Get Started with HAP
This article helps you quickly get started with HAP by building a simple recruitment management app.
1. Introduction to HAP
HAP (Hyper Application Platform) is a no code platform for building enterprise applications. It enables teams to create applications for scenarios such as sales, operations, HR, and procurement, while centralizing data across the organization.
HAP includes a built-in automation engine for handling complex and repetitive processes. With its integration center and API capabilities, it can connect with external systems. It also supports internationalization and cloud-native deployment, including multi-cloud environments.
Applications built in HAP are referred to as apps, ranging from simple ticketing systems to complex enterprise systems such as ERP.
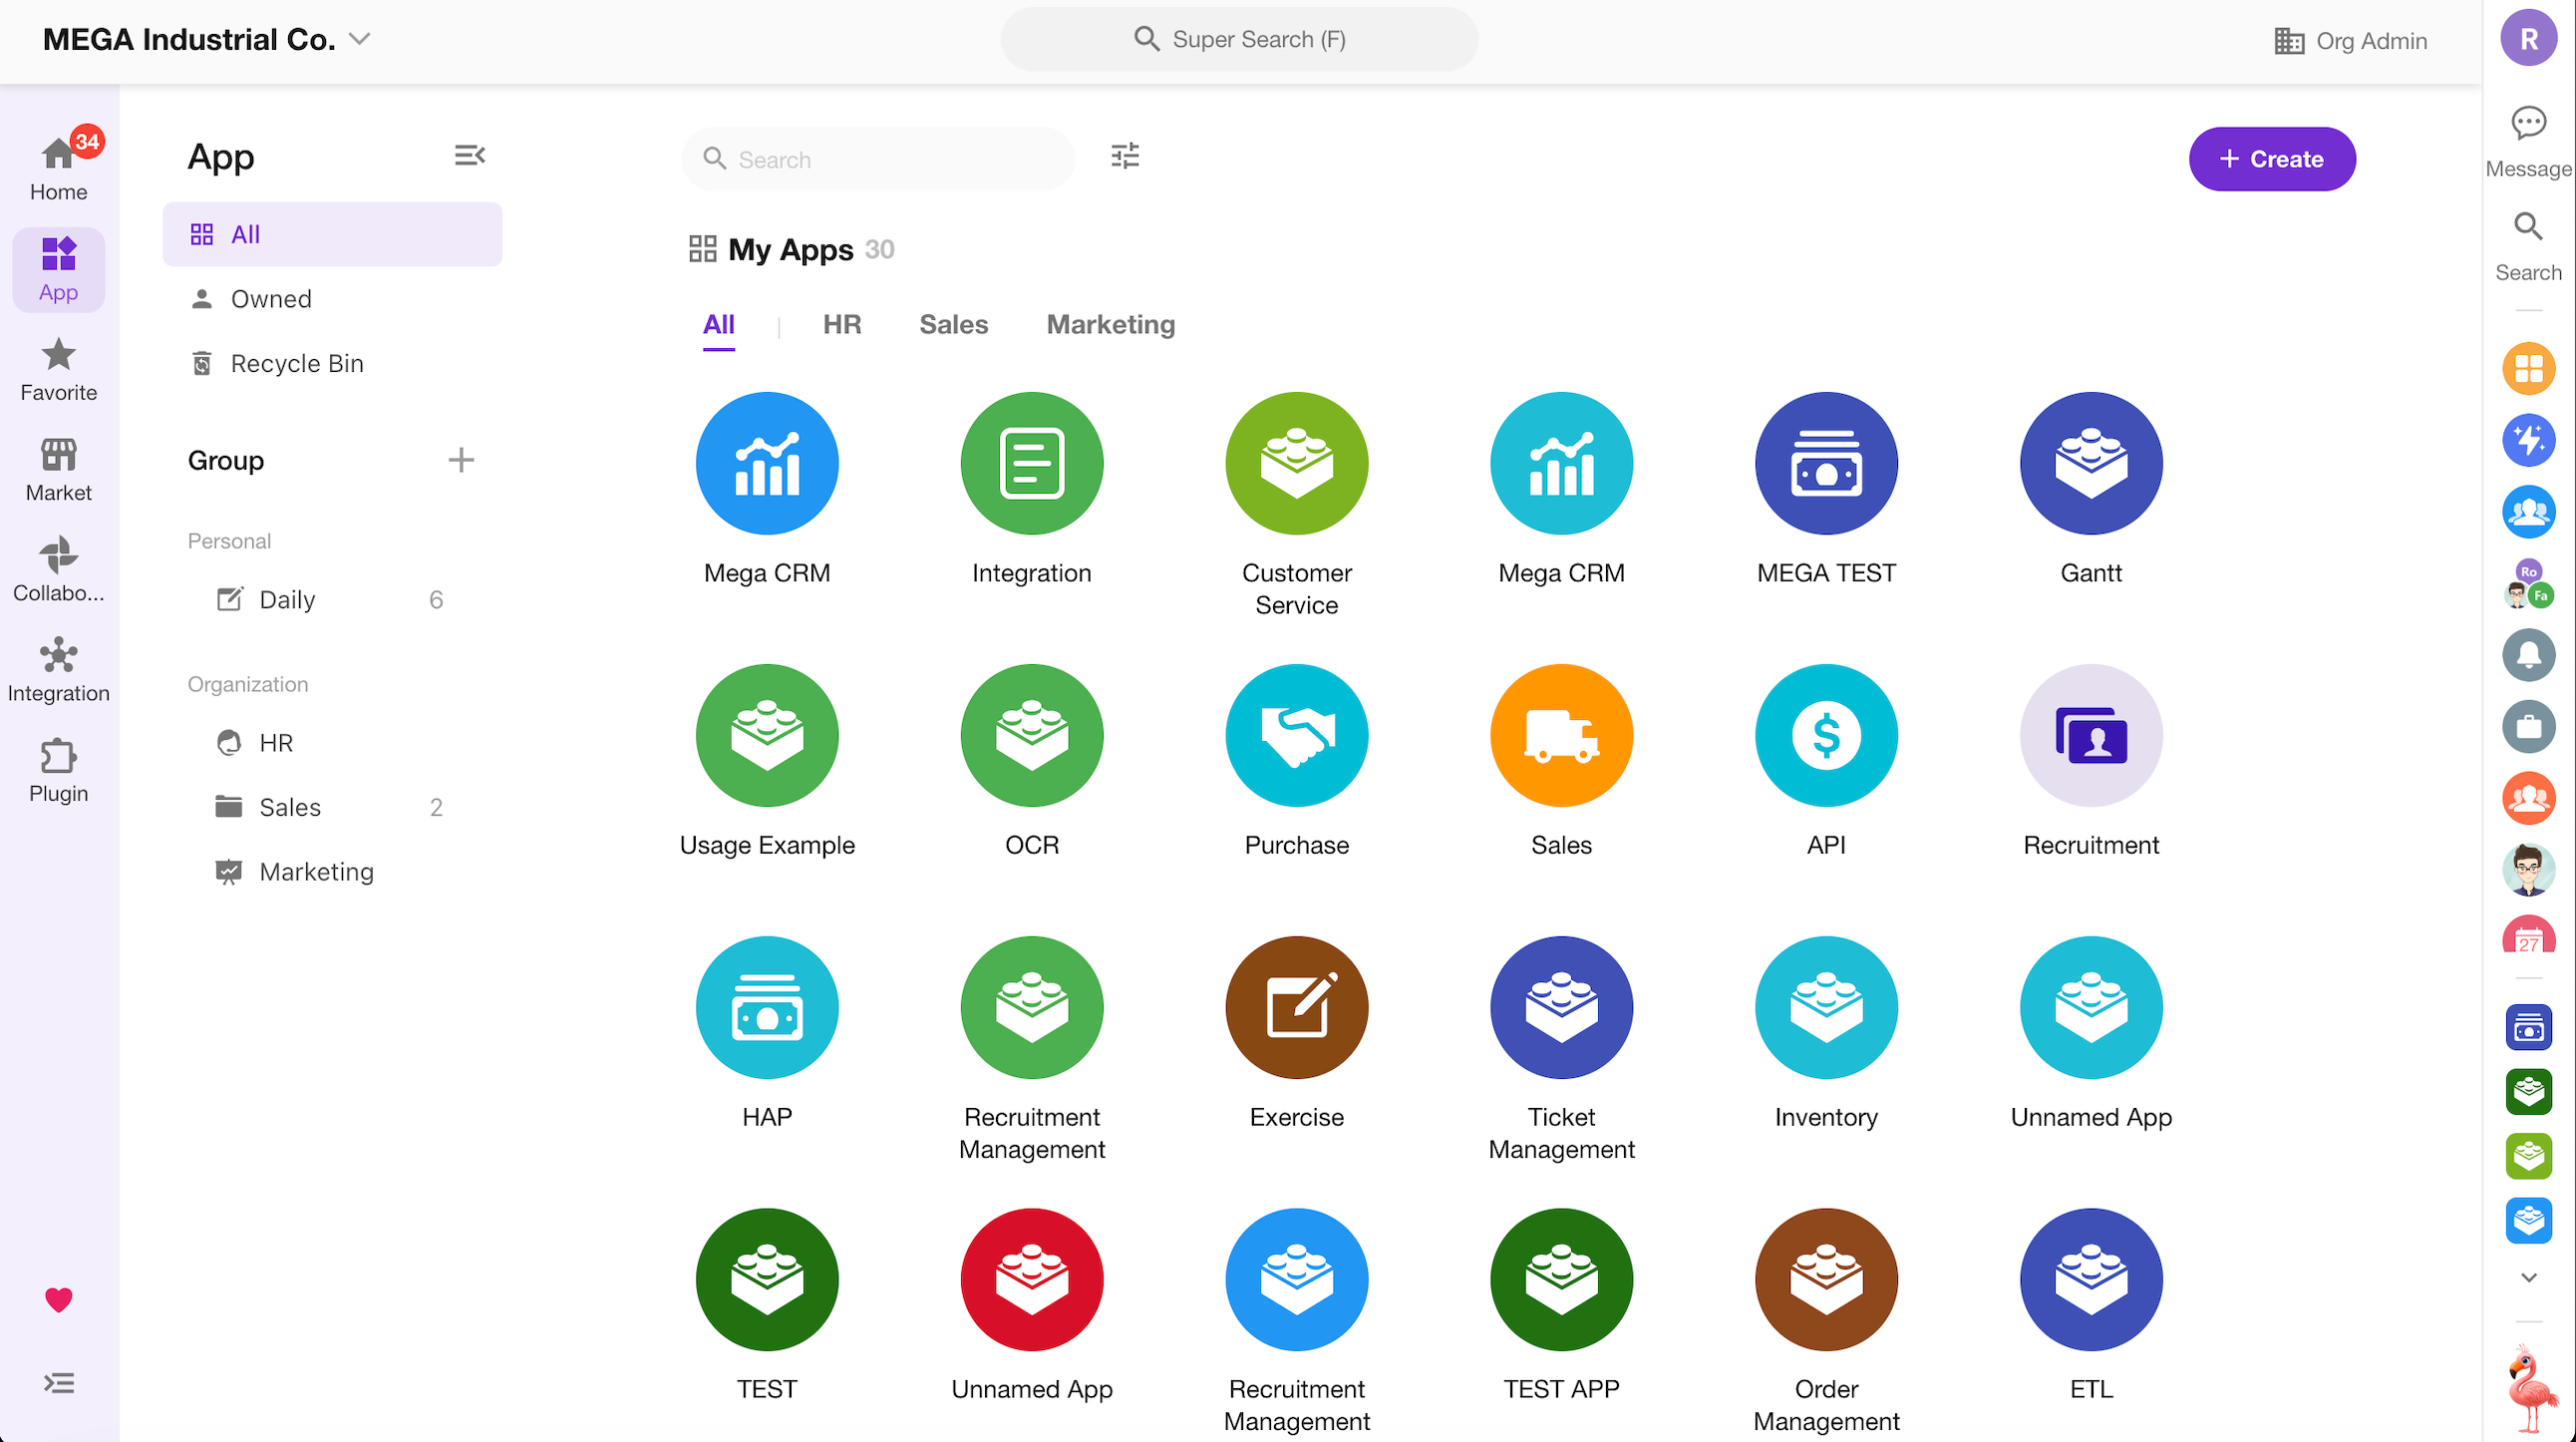
HAP applications are built using the following core modules:
- Worksheet – Stores business data such as customers, orders, or inventory.
- View – Displays data in different formats based on use cases.
- Roles and Permissions – Controls who can view or modify data.
- Workflow – Automates data processing and business processes.
- ChatBot – Enables users to interact with data, workflows, and external systems through conversations.
- Chart – Provides data analysis for reporting and decision-making.
- Custom Page – Builds dashboards or workspaces with charts and actions.
- External Portal – Allows external users to access and interact with the app.
The following example demonstrates how to build a simple app.
2. Application Planning
Before building your application, define the following:
- Business processes and automation requirements
- All related business data
- Roles involved and their permissions
In this example, we will build a recruitment management app.
1. Business Process
A typical recruitment process includes:
- Collect candidate resumes
- Manage candidate information
- Schedule interviews
- Notify interviewers before interviews (automated)
- Update interview results
- Sync hiring results to candidate records (automated)
- Monitor candidate status through a dashboard
2. Business Data
The main data in this app includes:
- Candidate information (resumes)
- Interview scheduling data
3. Roles
The app includes the following roles:
- Candidate
- HR
- Department Manager
4. How HAP Supports These Requirements
| Requirement | HAP Solution |
|---|---|
| Candidates submit resumes | Create a Candidate worksheet to store resume data |
| Manage candidate information | Create views for different statuses |
| Schedule interviews | Create an Interview Schedule worksheet |
| Notify interviewers before interviews | Create a workflow triggered by interview time |
| Update interview results | Create a role with edit permissions |
| Sync hiring results to candidate records | Use a workflow to update related records |
| Monitor candidate status | Create a custom page with charts |
3. Build the Application
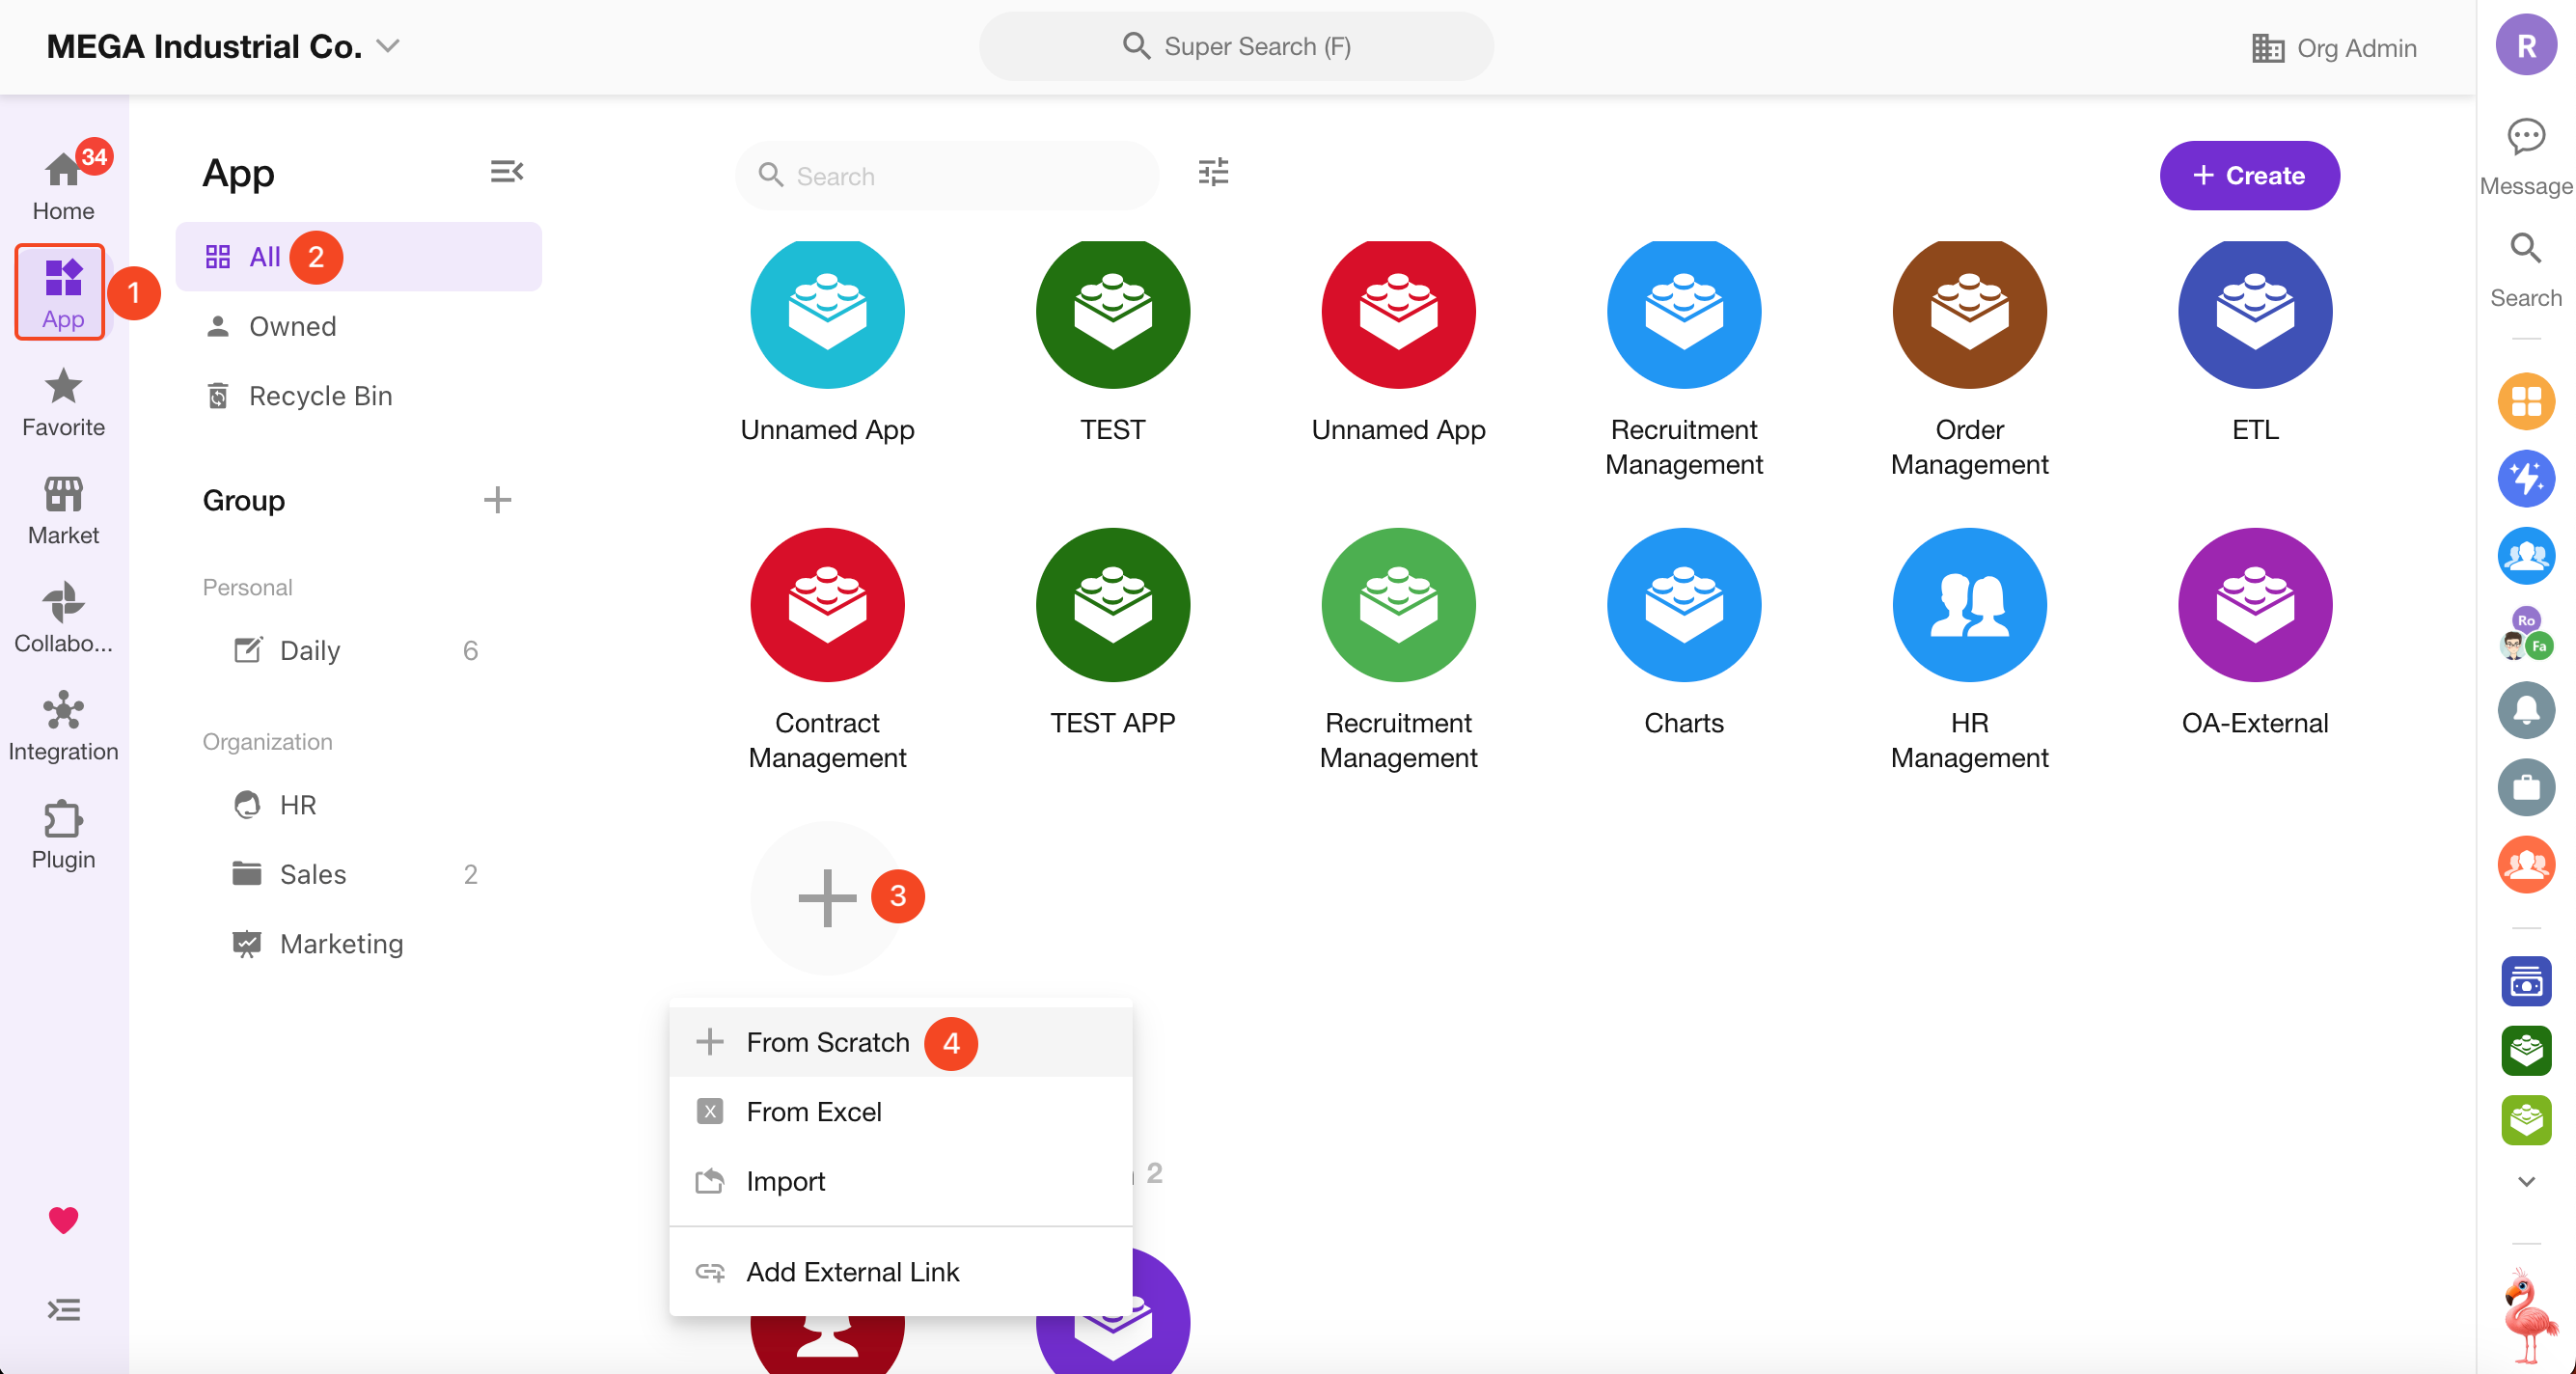
1. Create an App
Create a new app named Recruitment Management. All worksheets and data for this solution will be managed within this app.
You can now use worksheets, views, roles and permissions, charts, custom pages, and workflows to build your recruitment management app.
2. Create Worksheets
A worksheet is the core component of an app. It is used to store and manage business data.
Each worksheet represents a business object (such as candidates or interviews), while fields define the attributes of those objects (such as name, phone number, or position).
For this example, create the following worksheets:
- Candidate
- Interview Schedule
2.1 Create the Candidate Worksheet
Candidate data is typically managed with fields such as name, date of birth, phone number, email, and applied position.
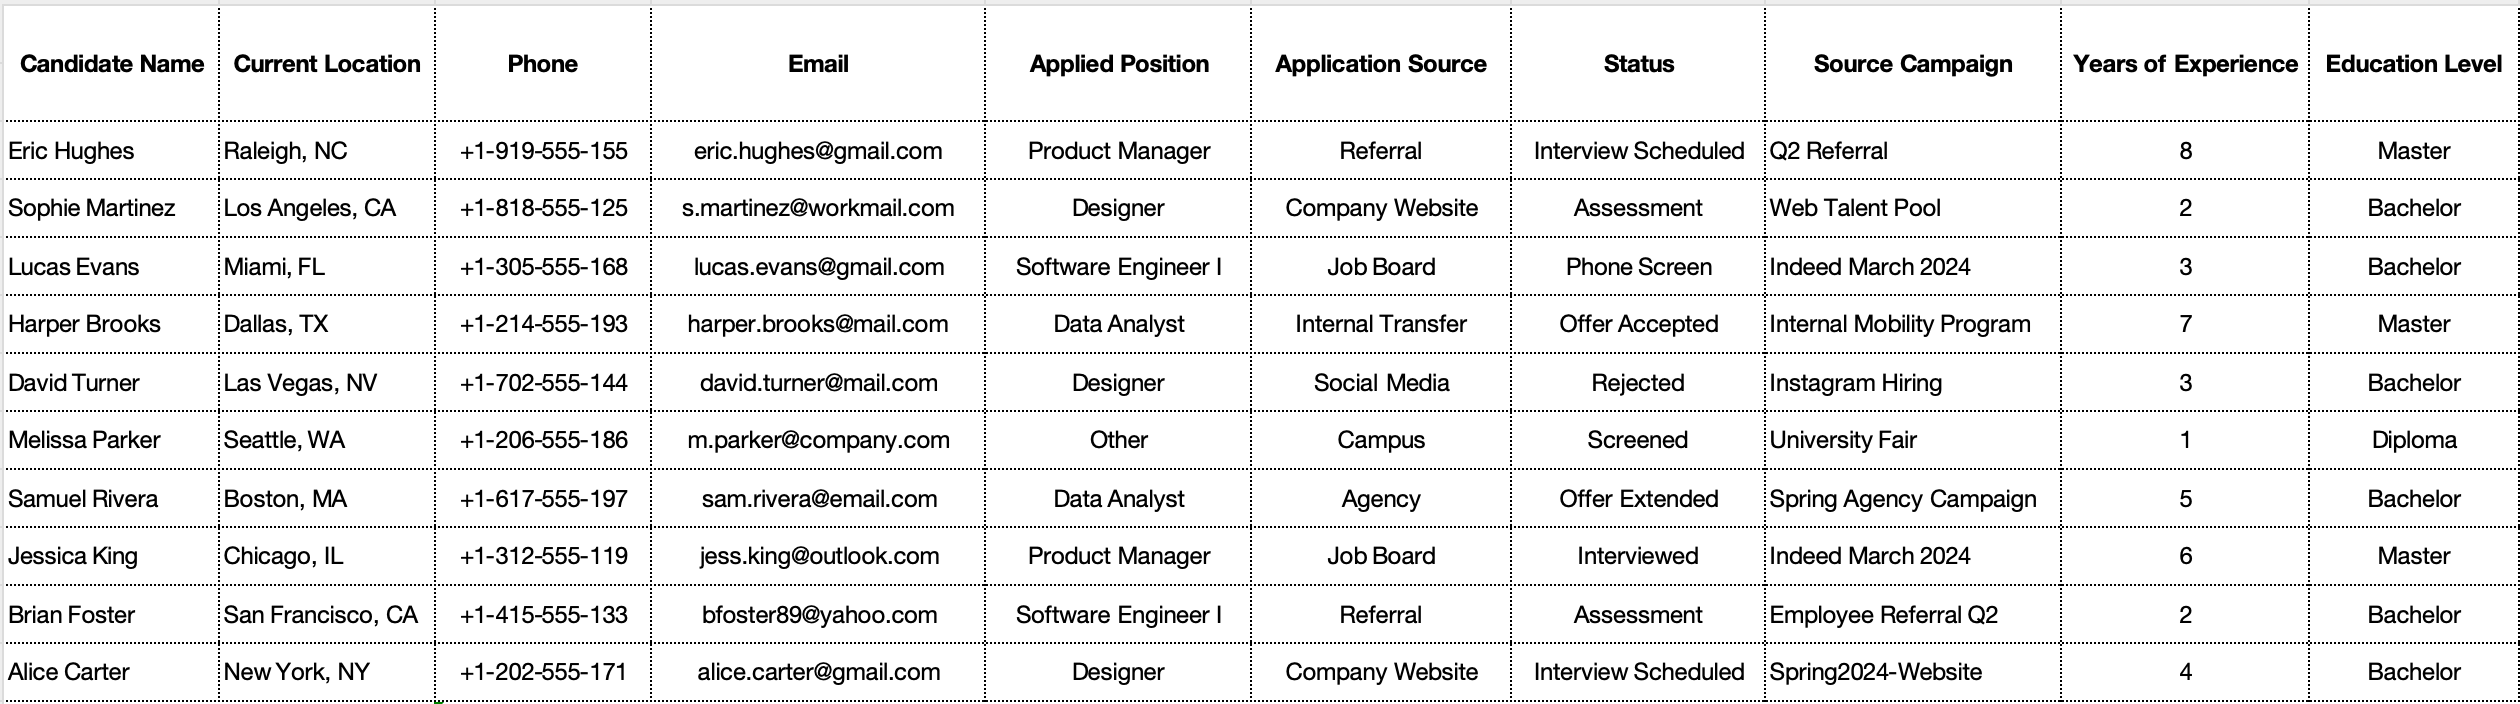
Create a worksheet to manage this data:
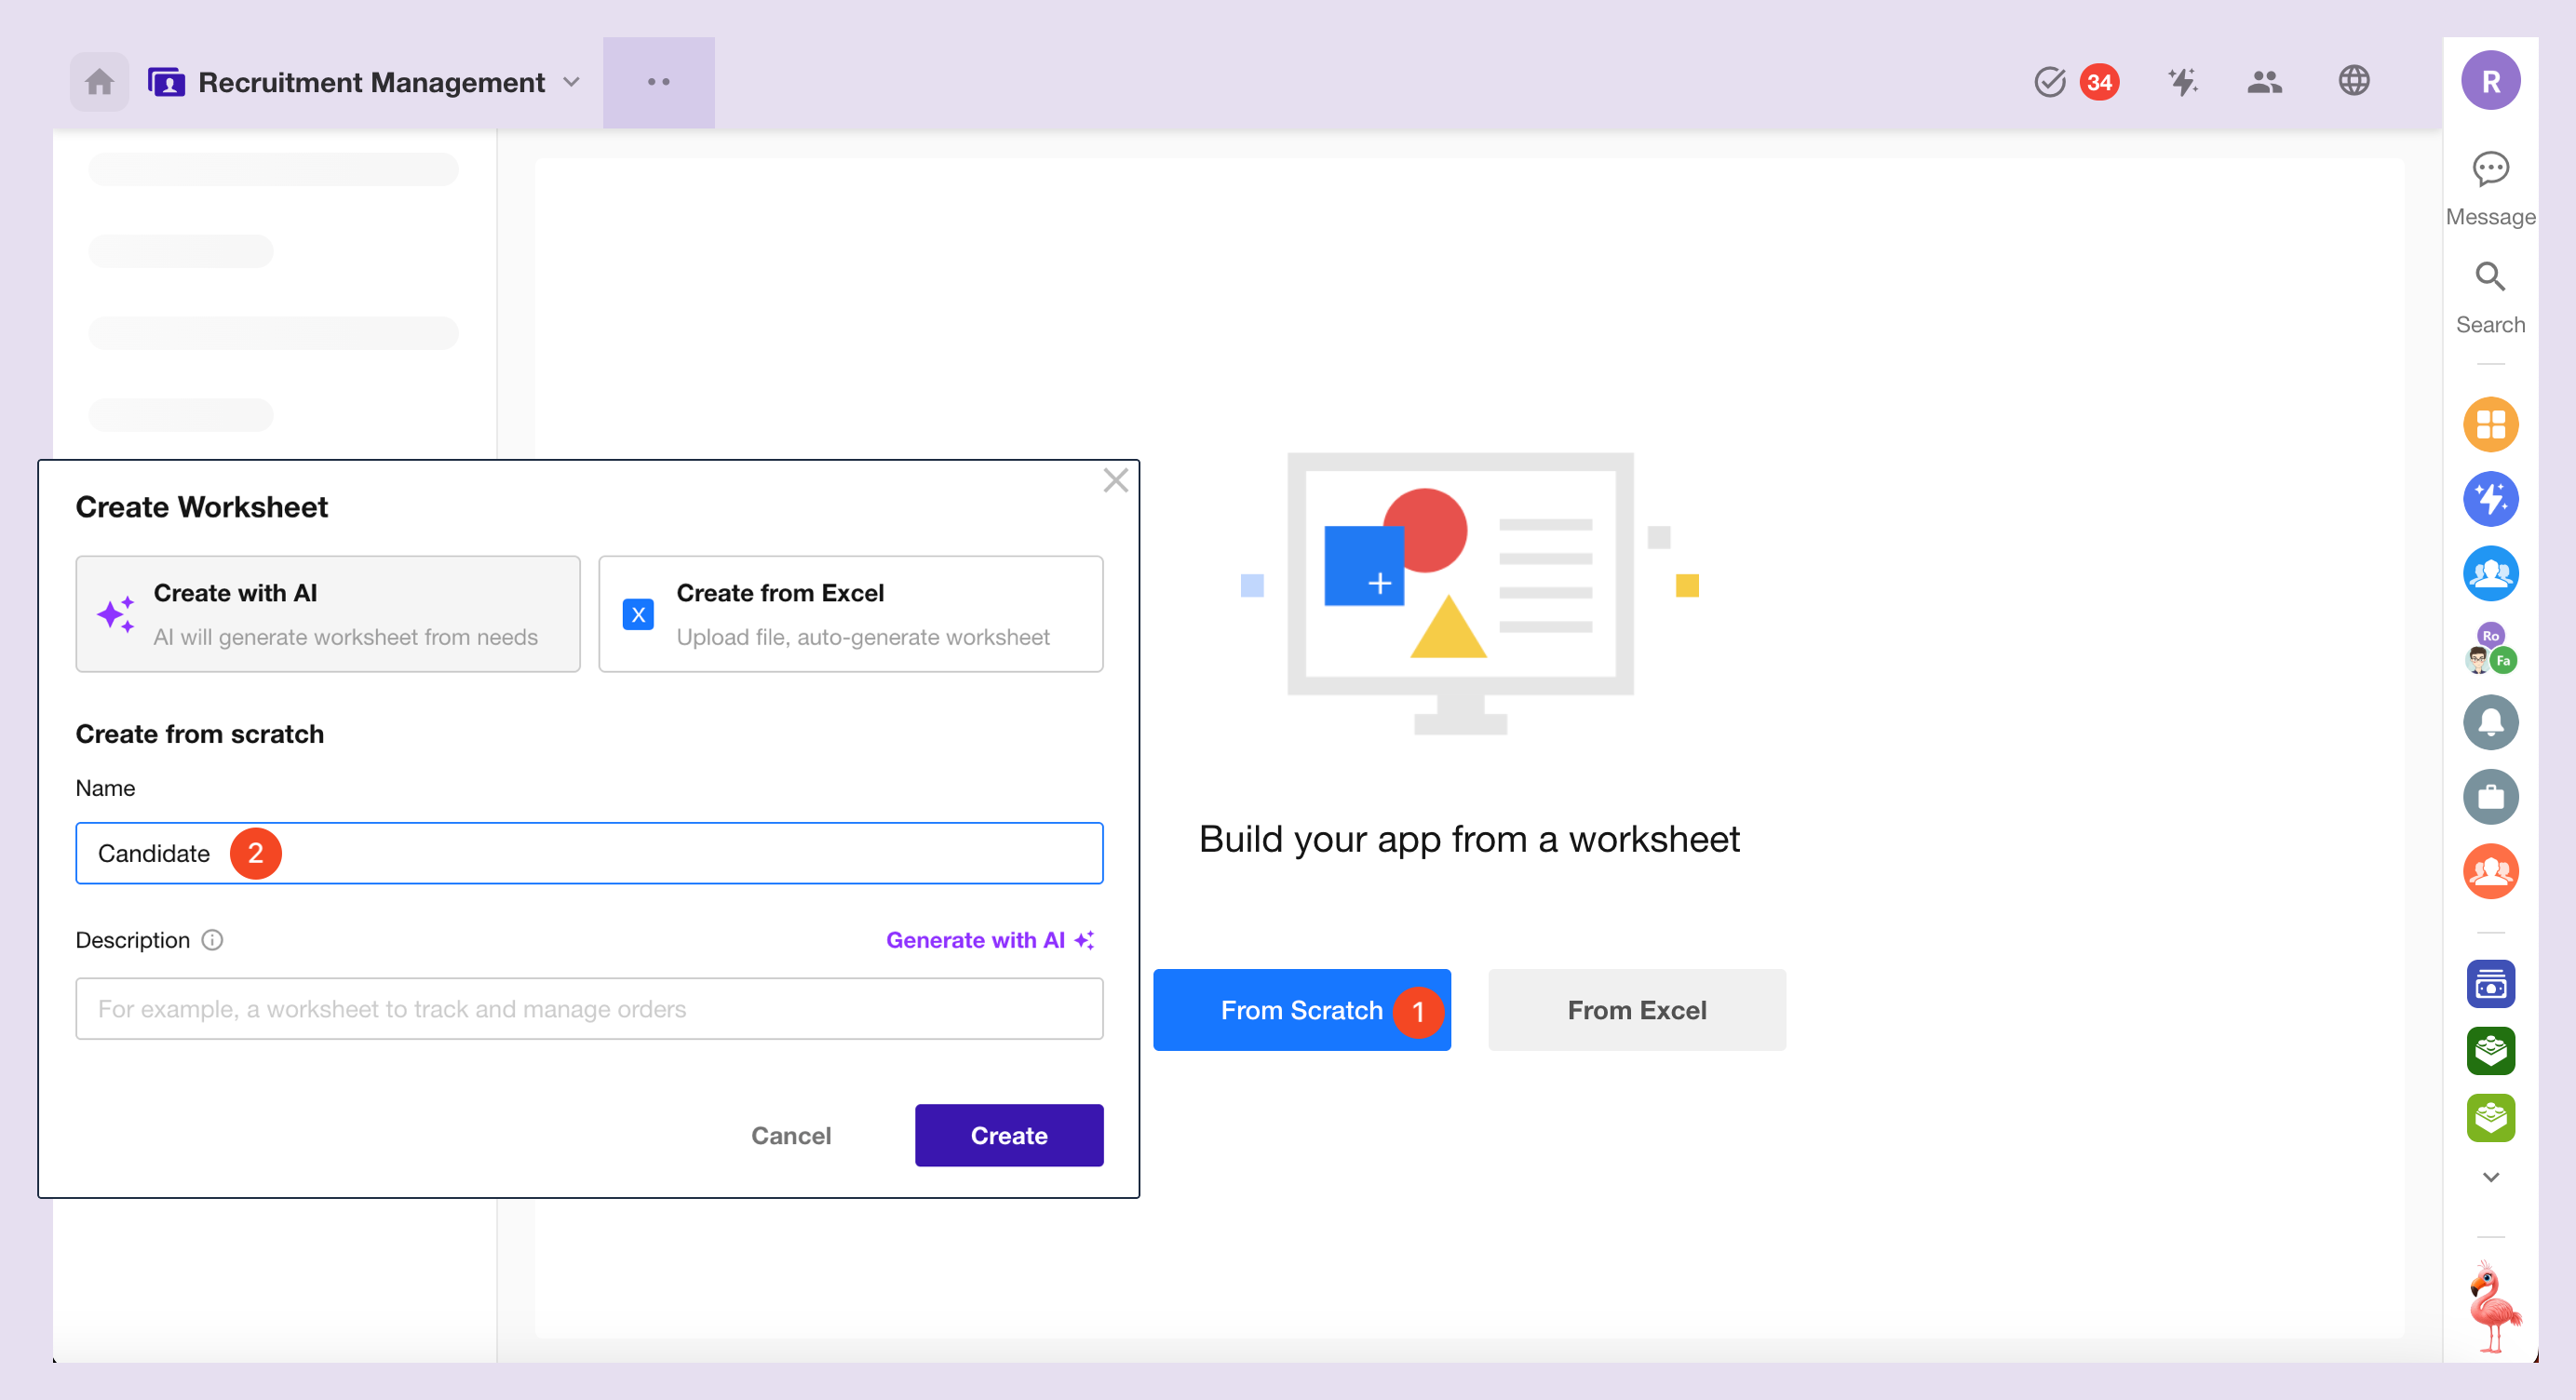
After clicking Create Worksheet, the system opens the worksheet design canvas.
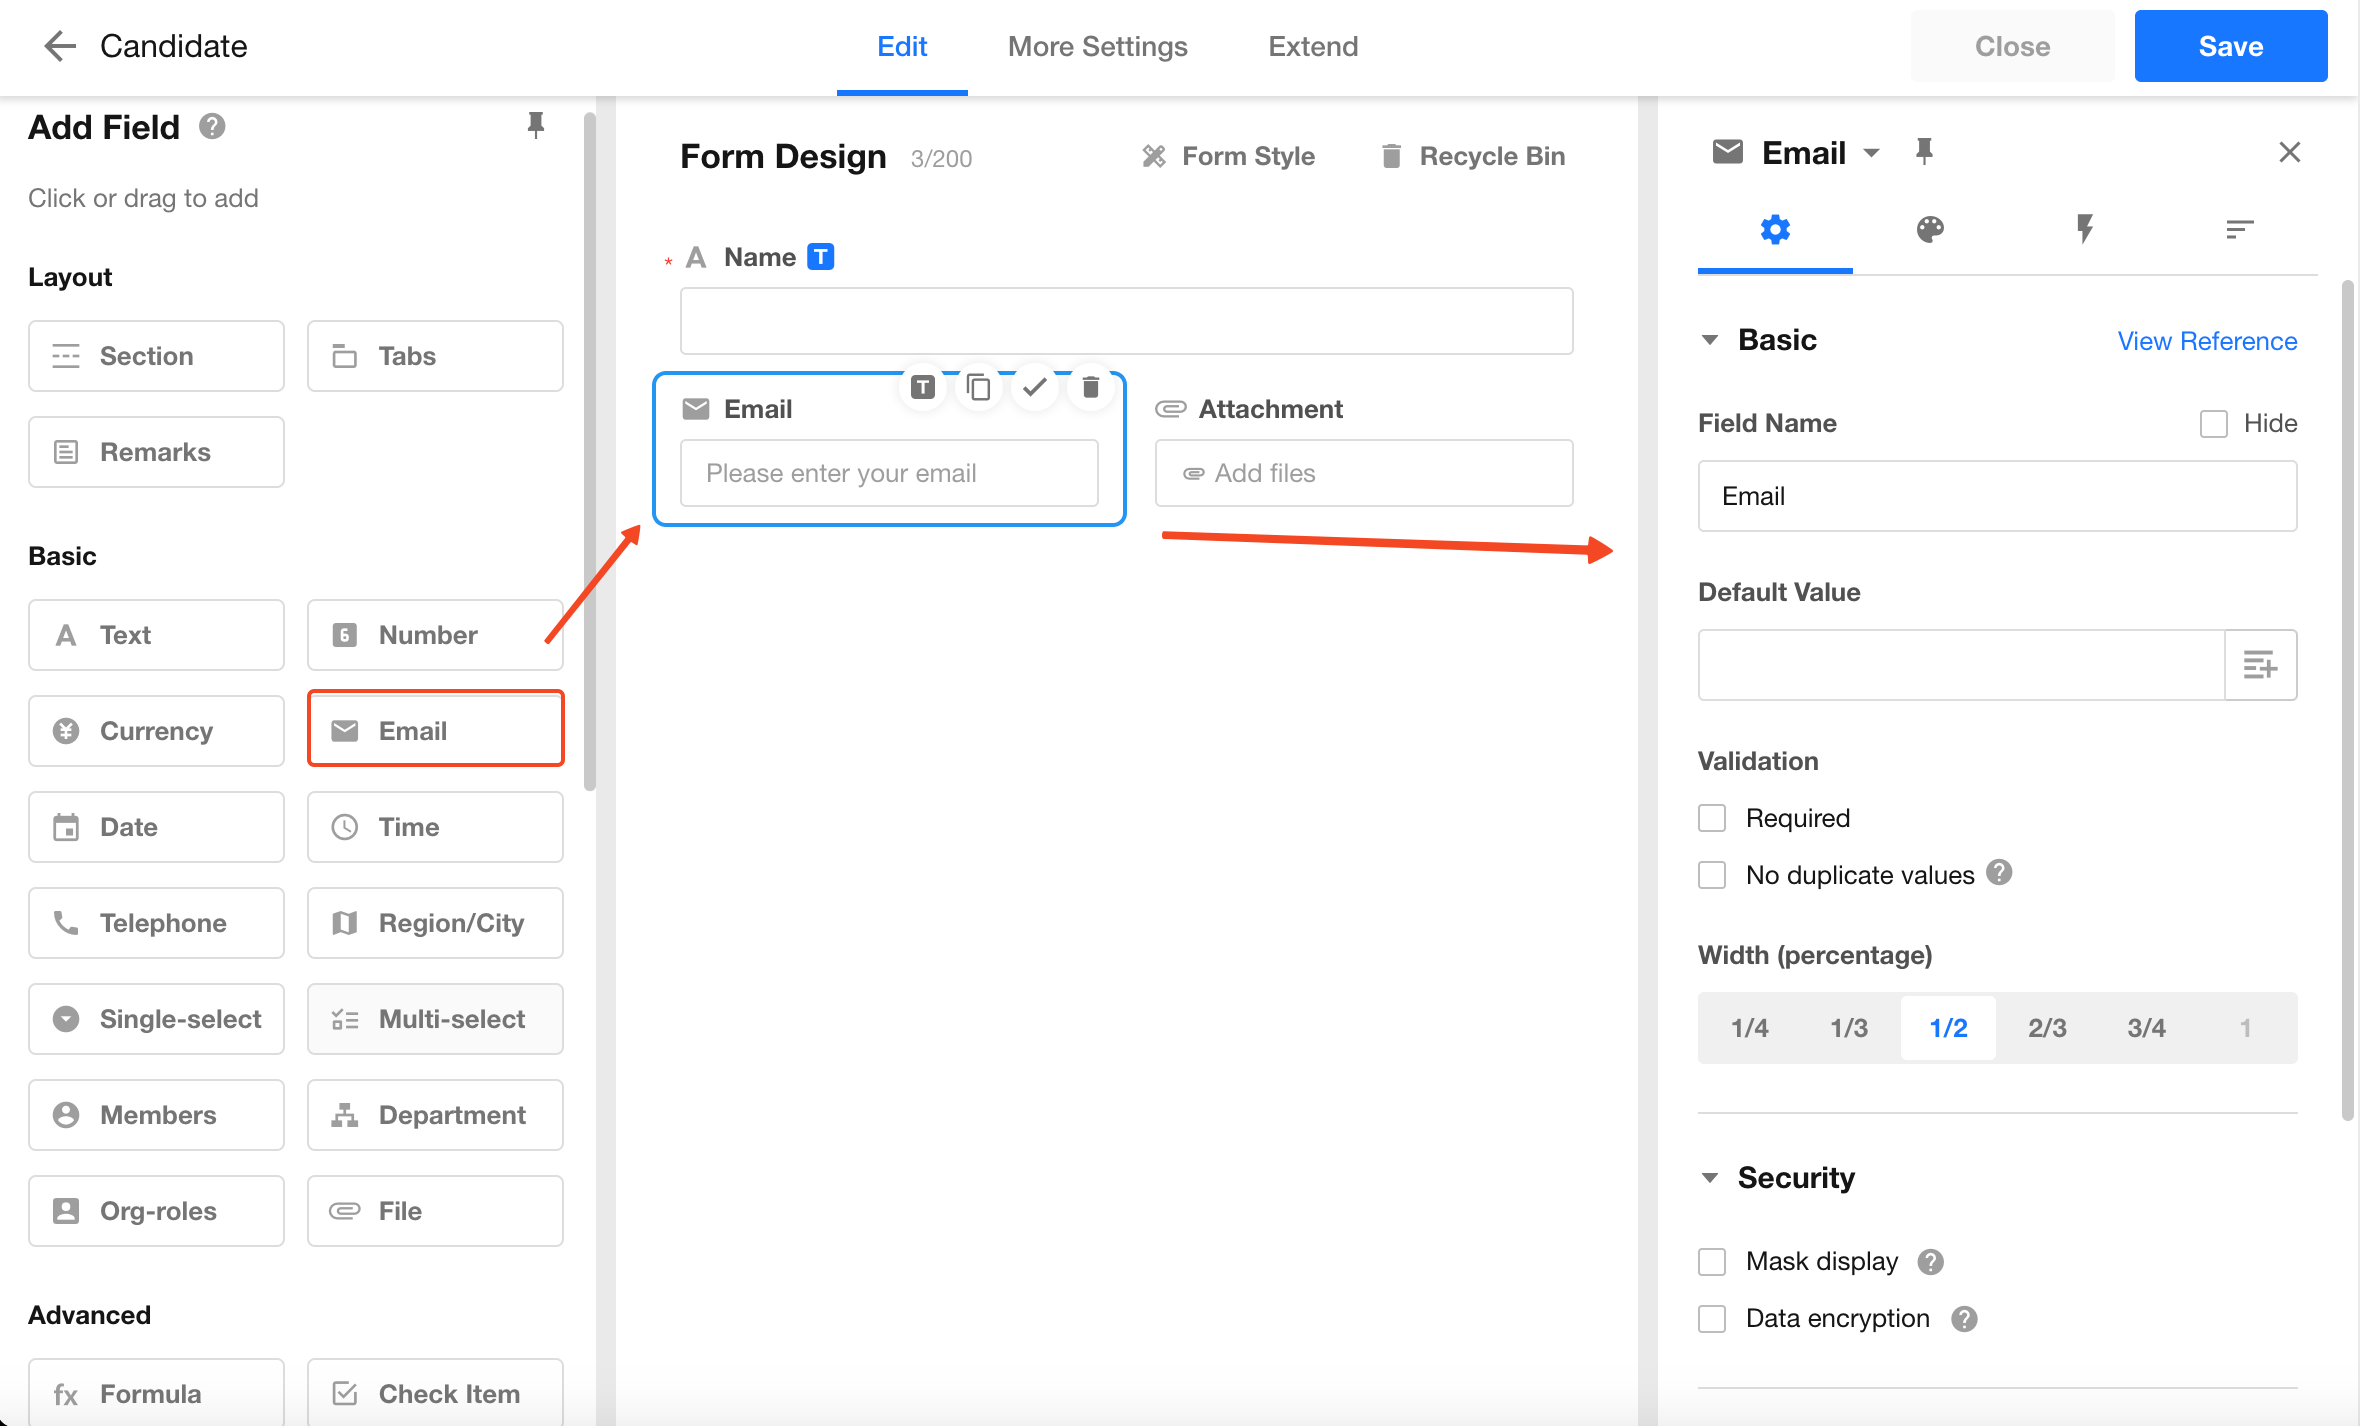
Drag fields from the left panel into the canvas and configure properties such as name, width, and required status.
| Field | Control Type |
|---|---|
| Name | Text |
| Phone | Phone |
| Date of Birth | Date |
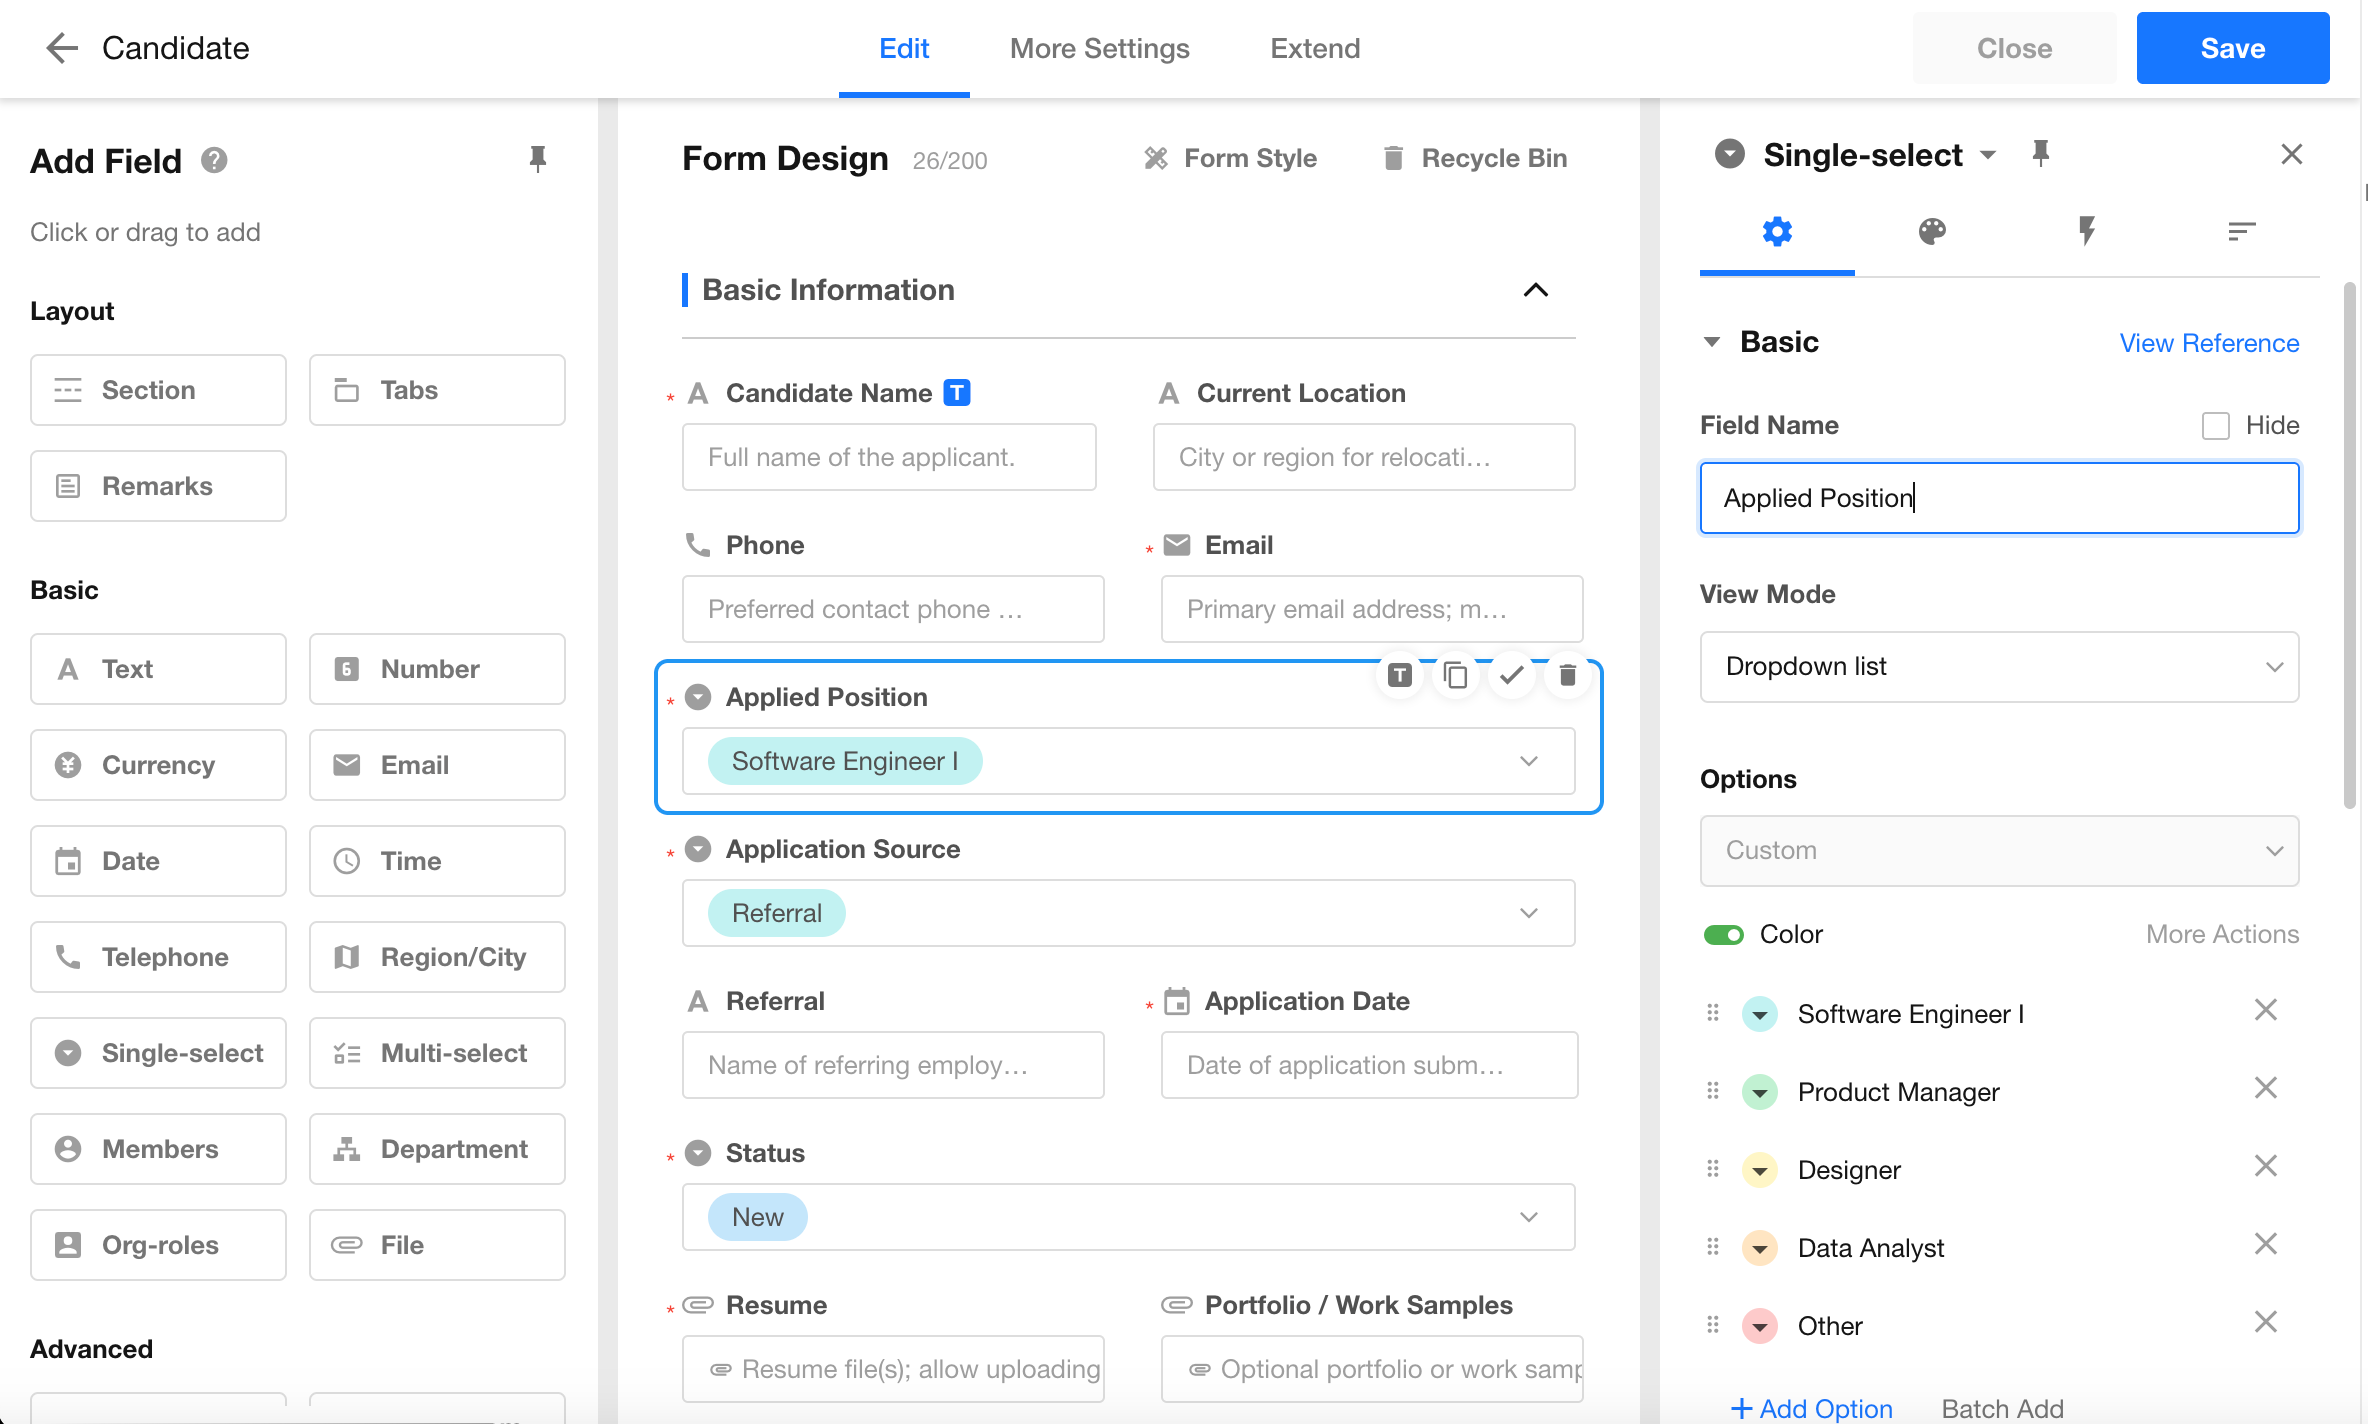
| Applied Position | Single Select |
| Applicaation Source | Single Select |
| Status | Single Select |
| Resume | File |
Completed worksheet:
1) Add Records
Records can be created manually or imported from Excel.
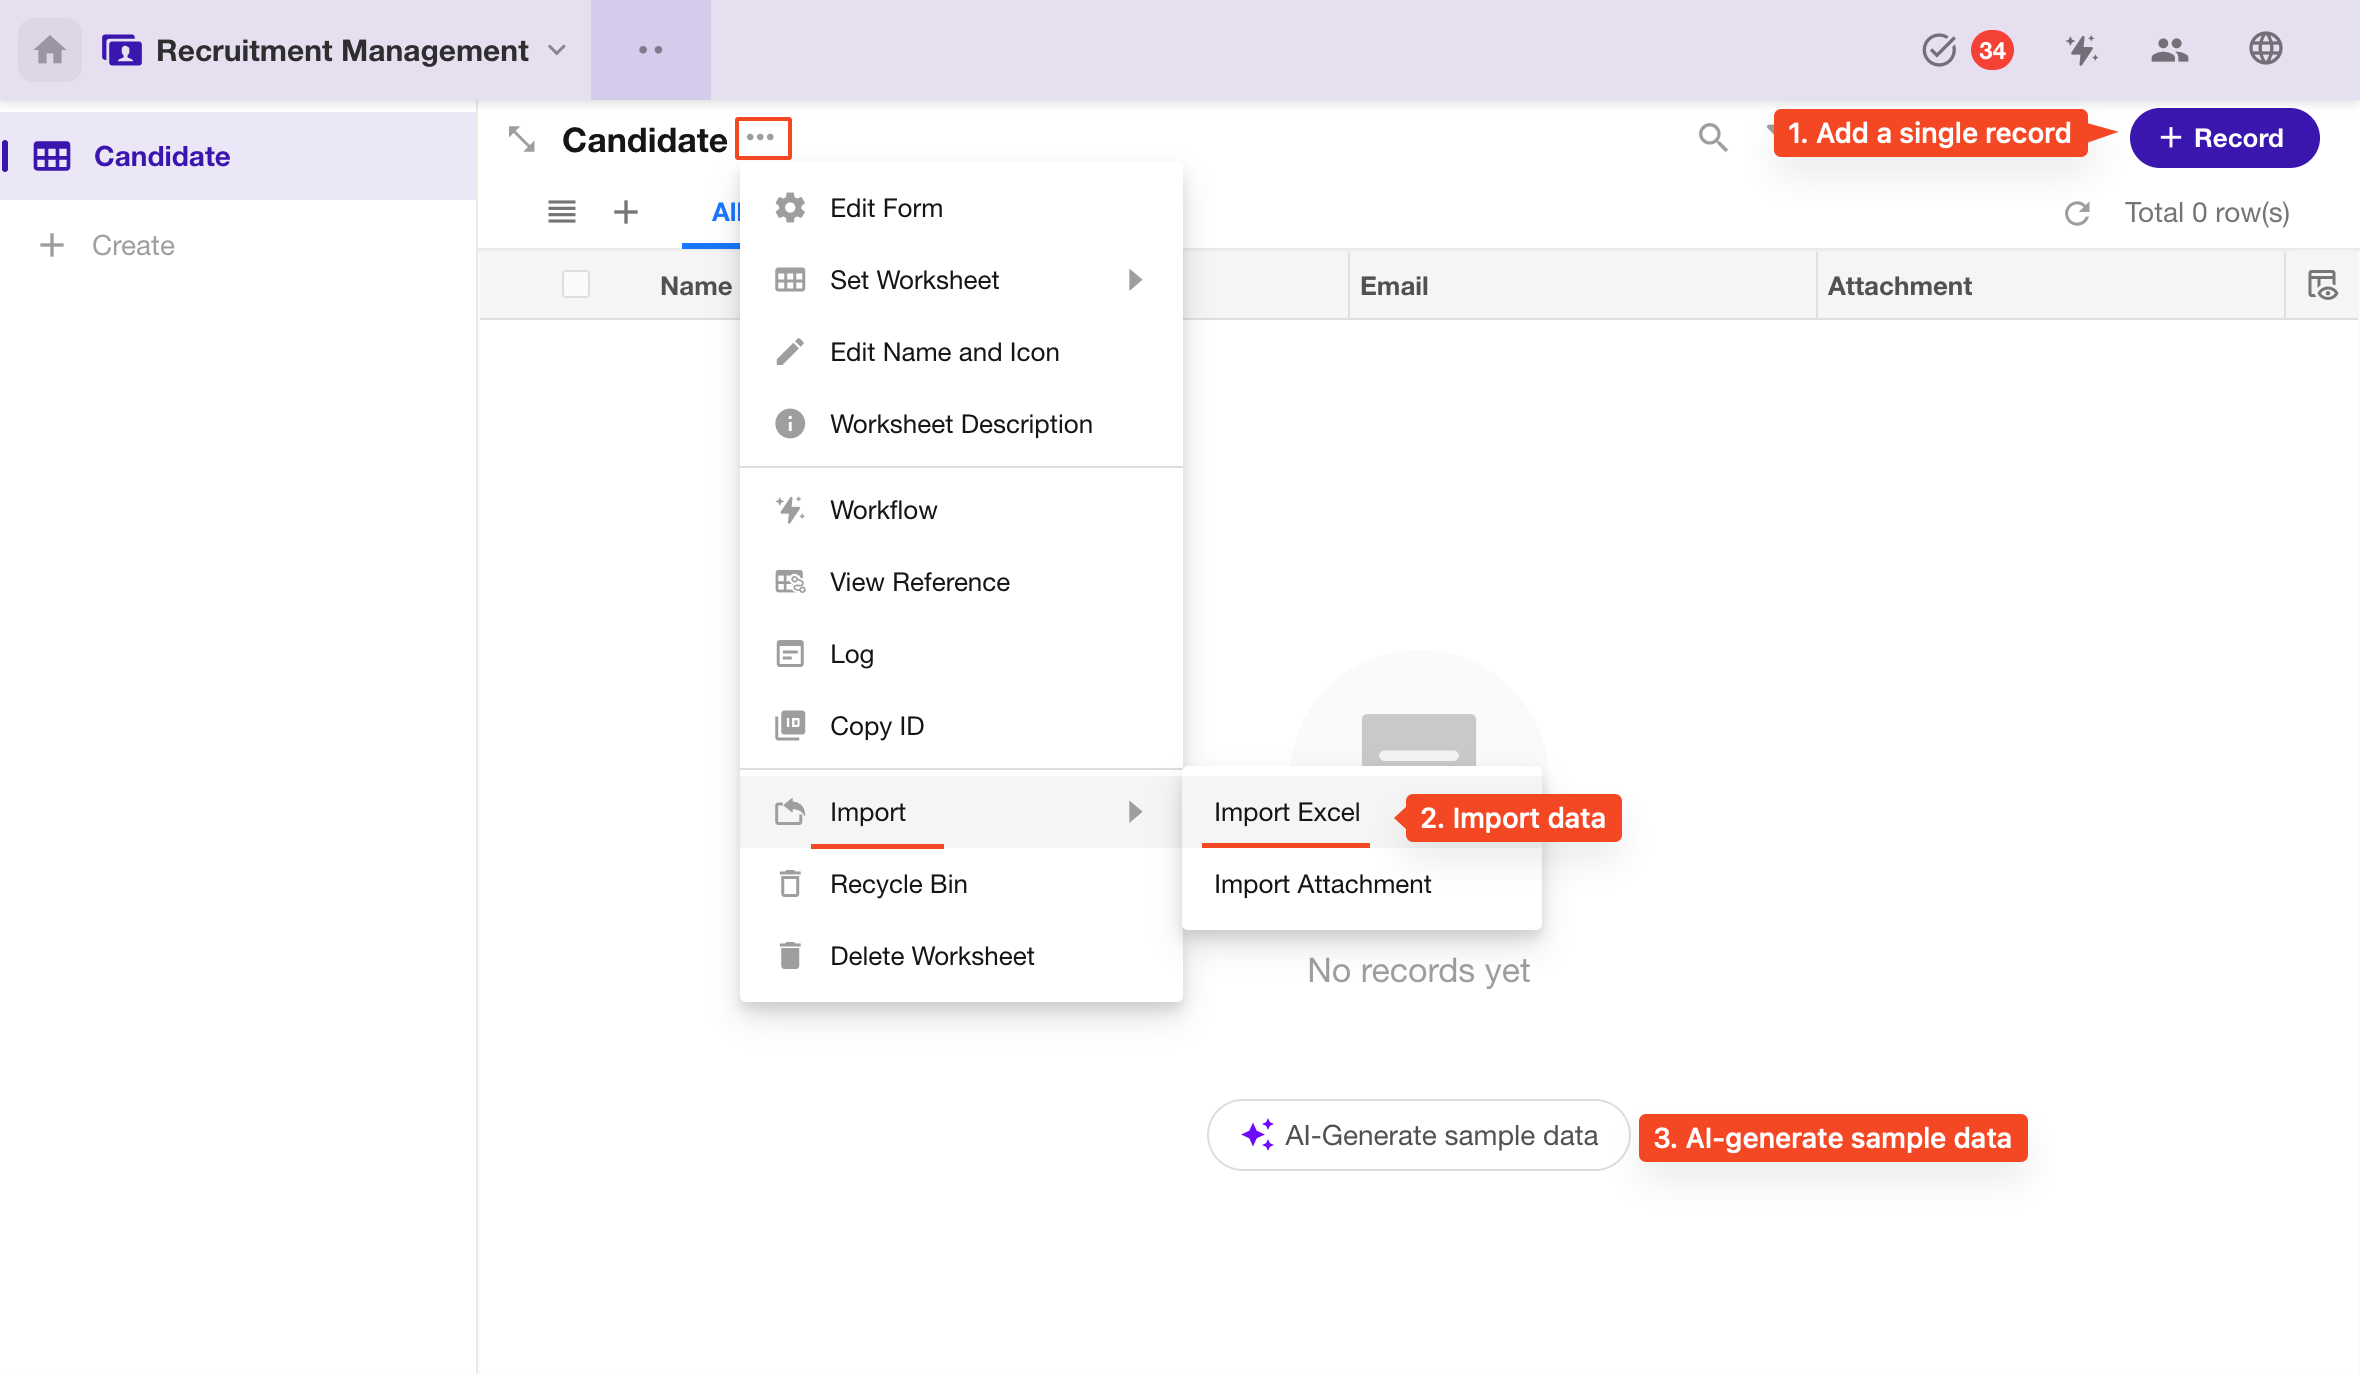
After importing data:
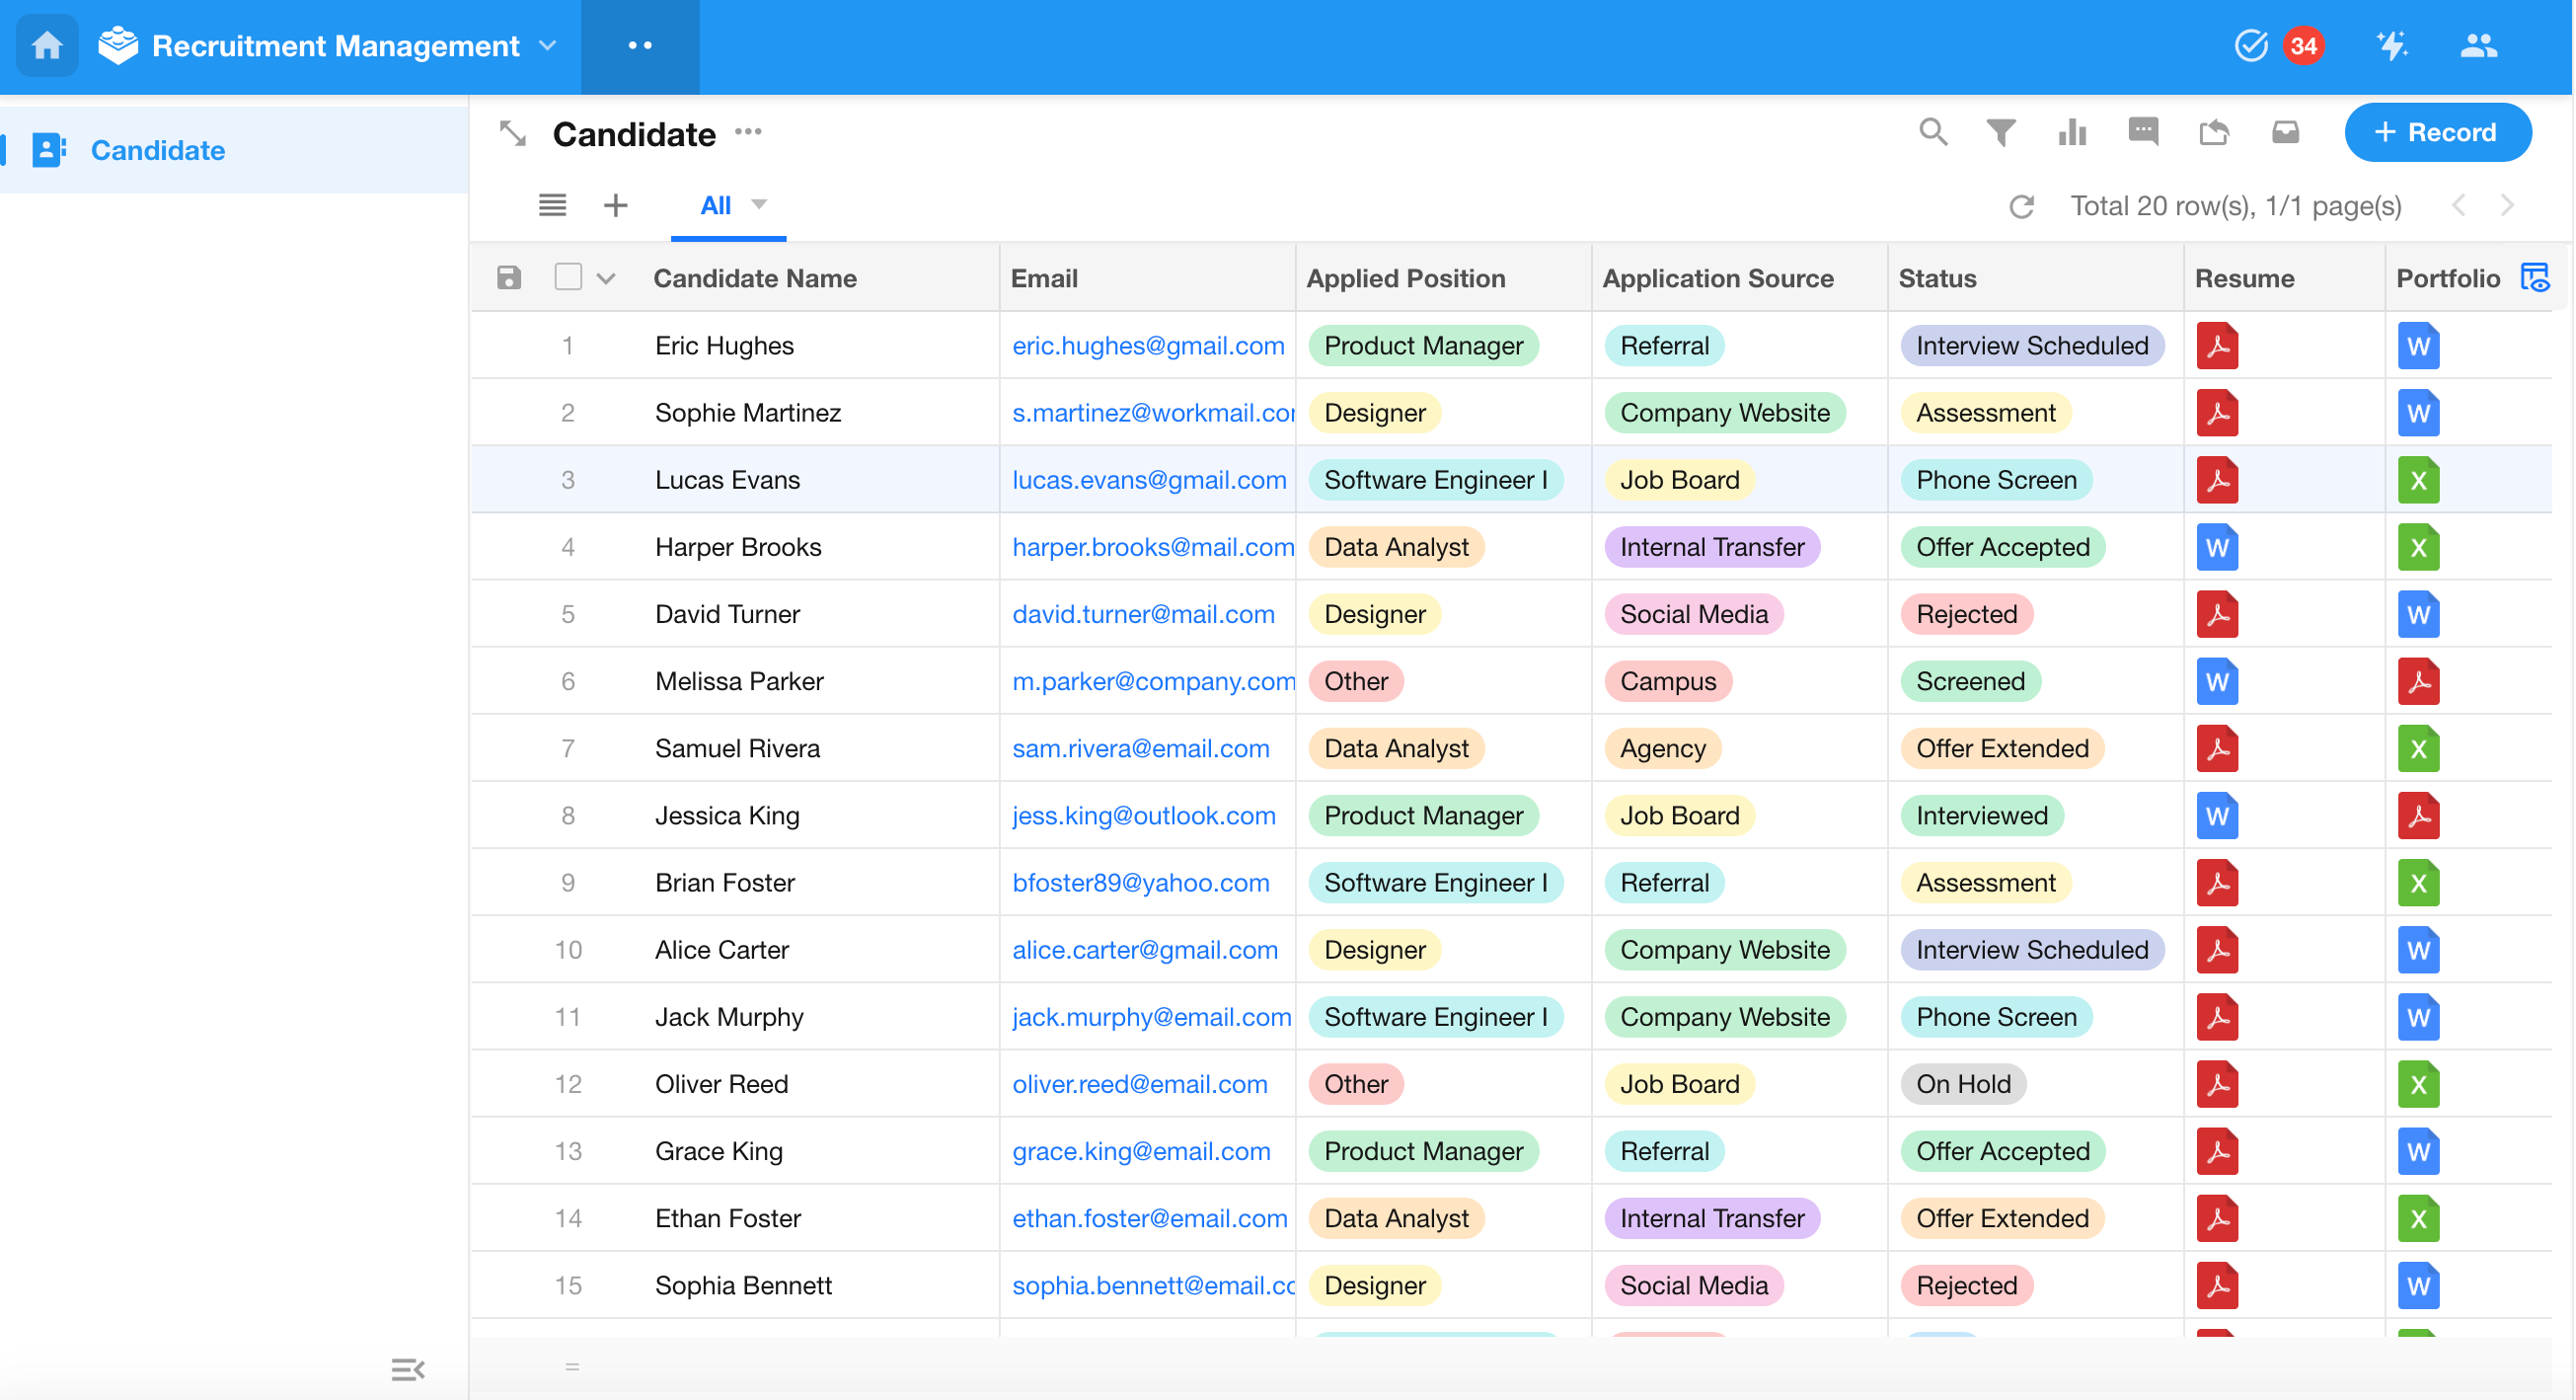
2) Manage Records
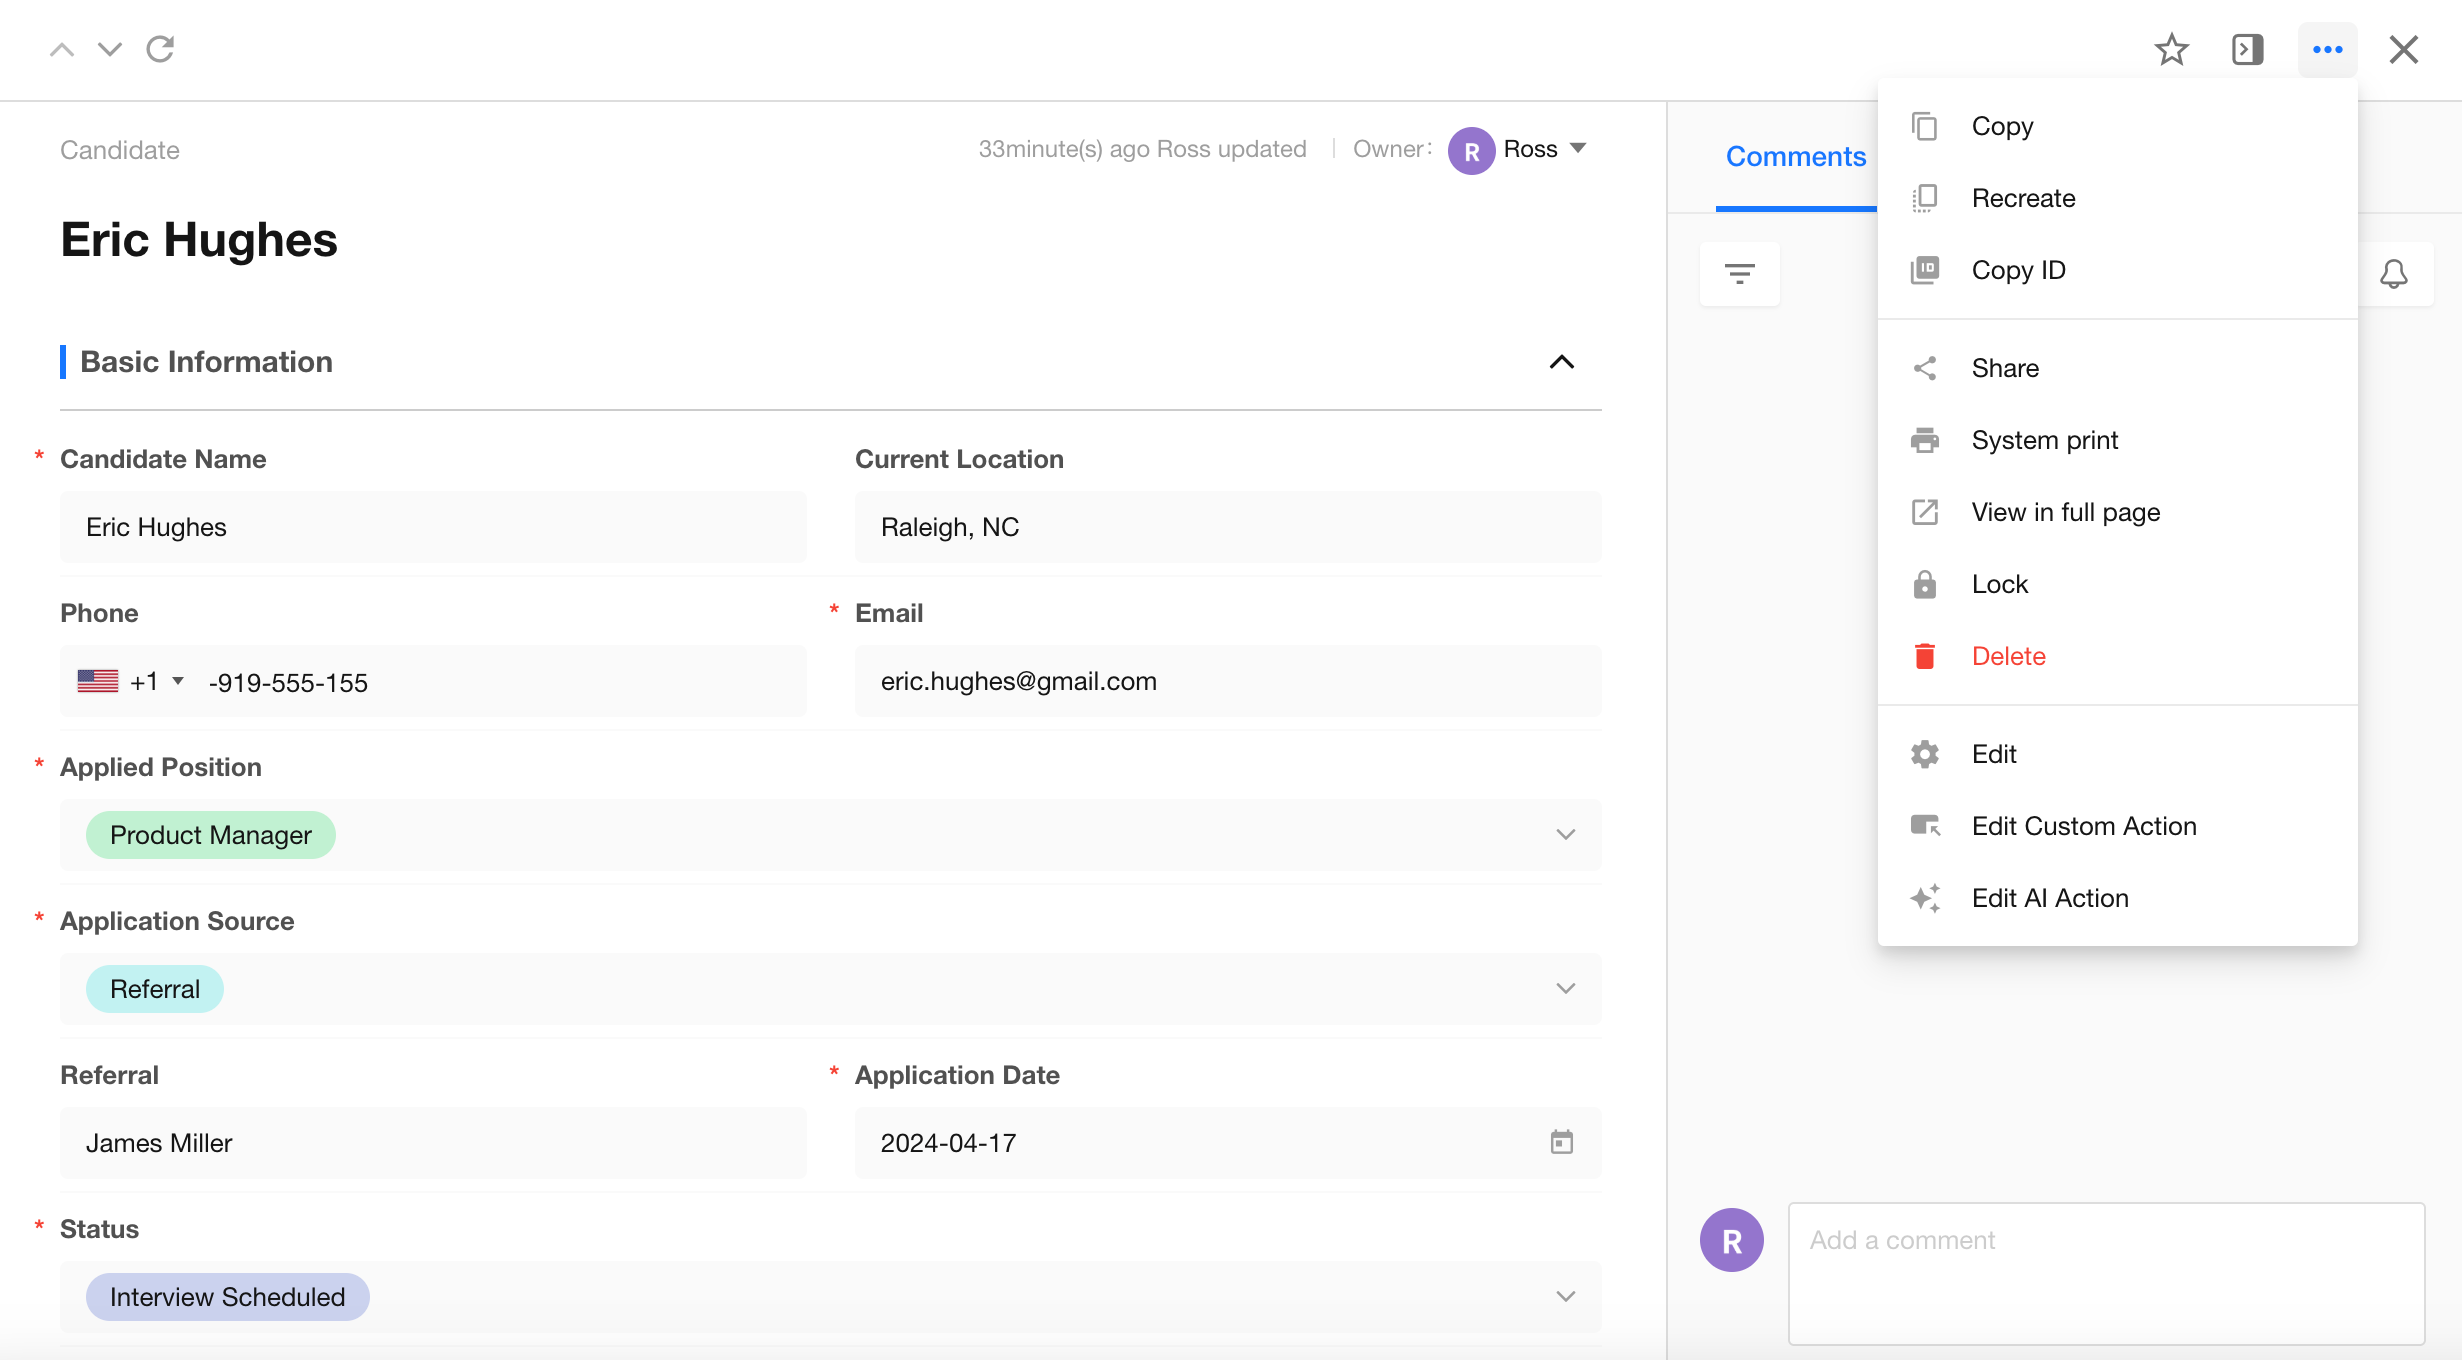
Click a record to open its detail page. From there, you can edit, share, comment, print, or delete the record.
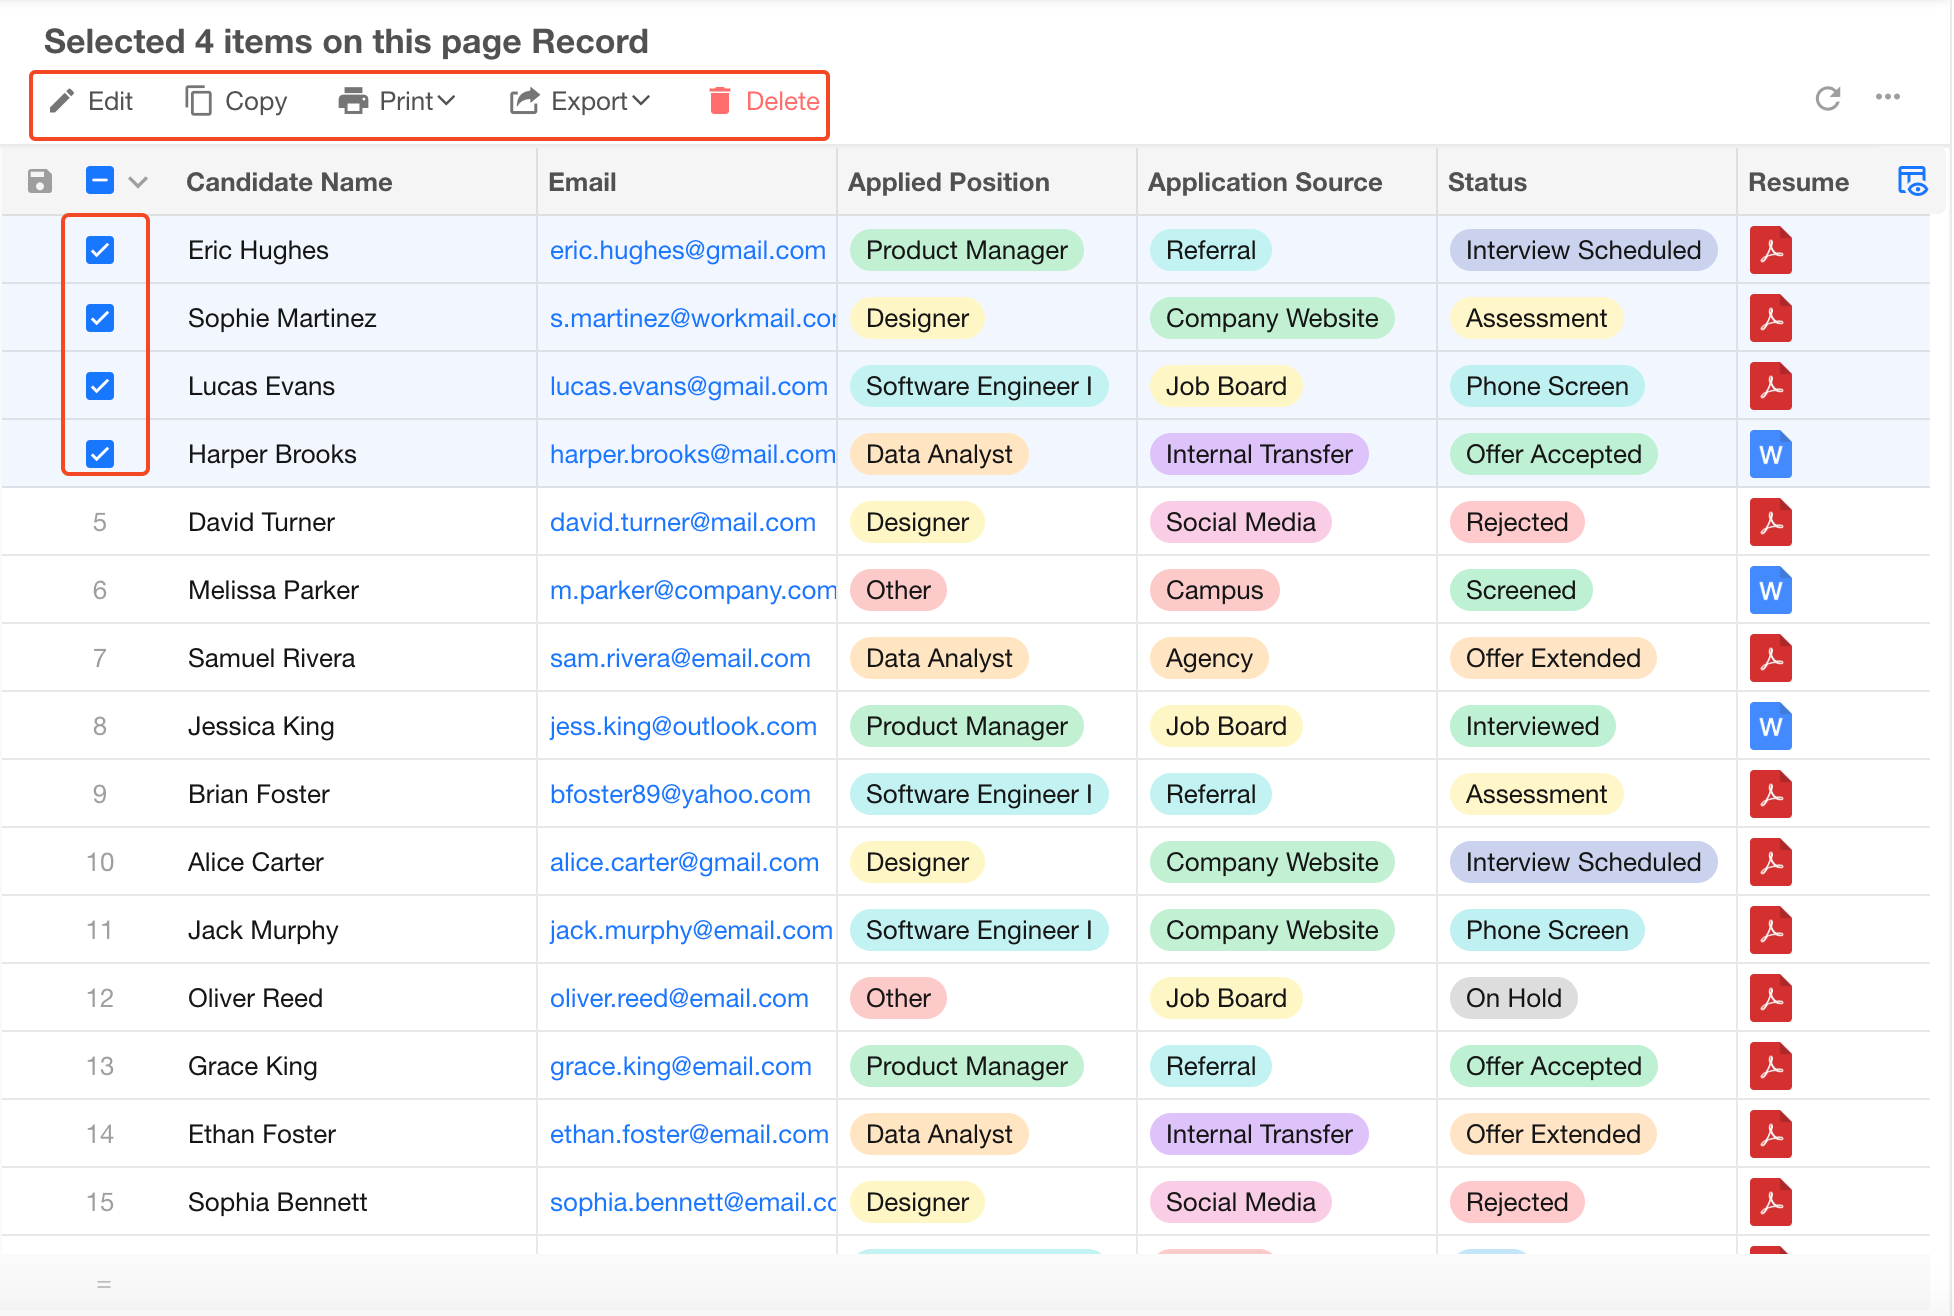
3) Bulk Actions
4) Publish as a Public Form
To collect candidate data externally, publish the worksheet as a public form:
Edit Form > Extend > Enable Public Form
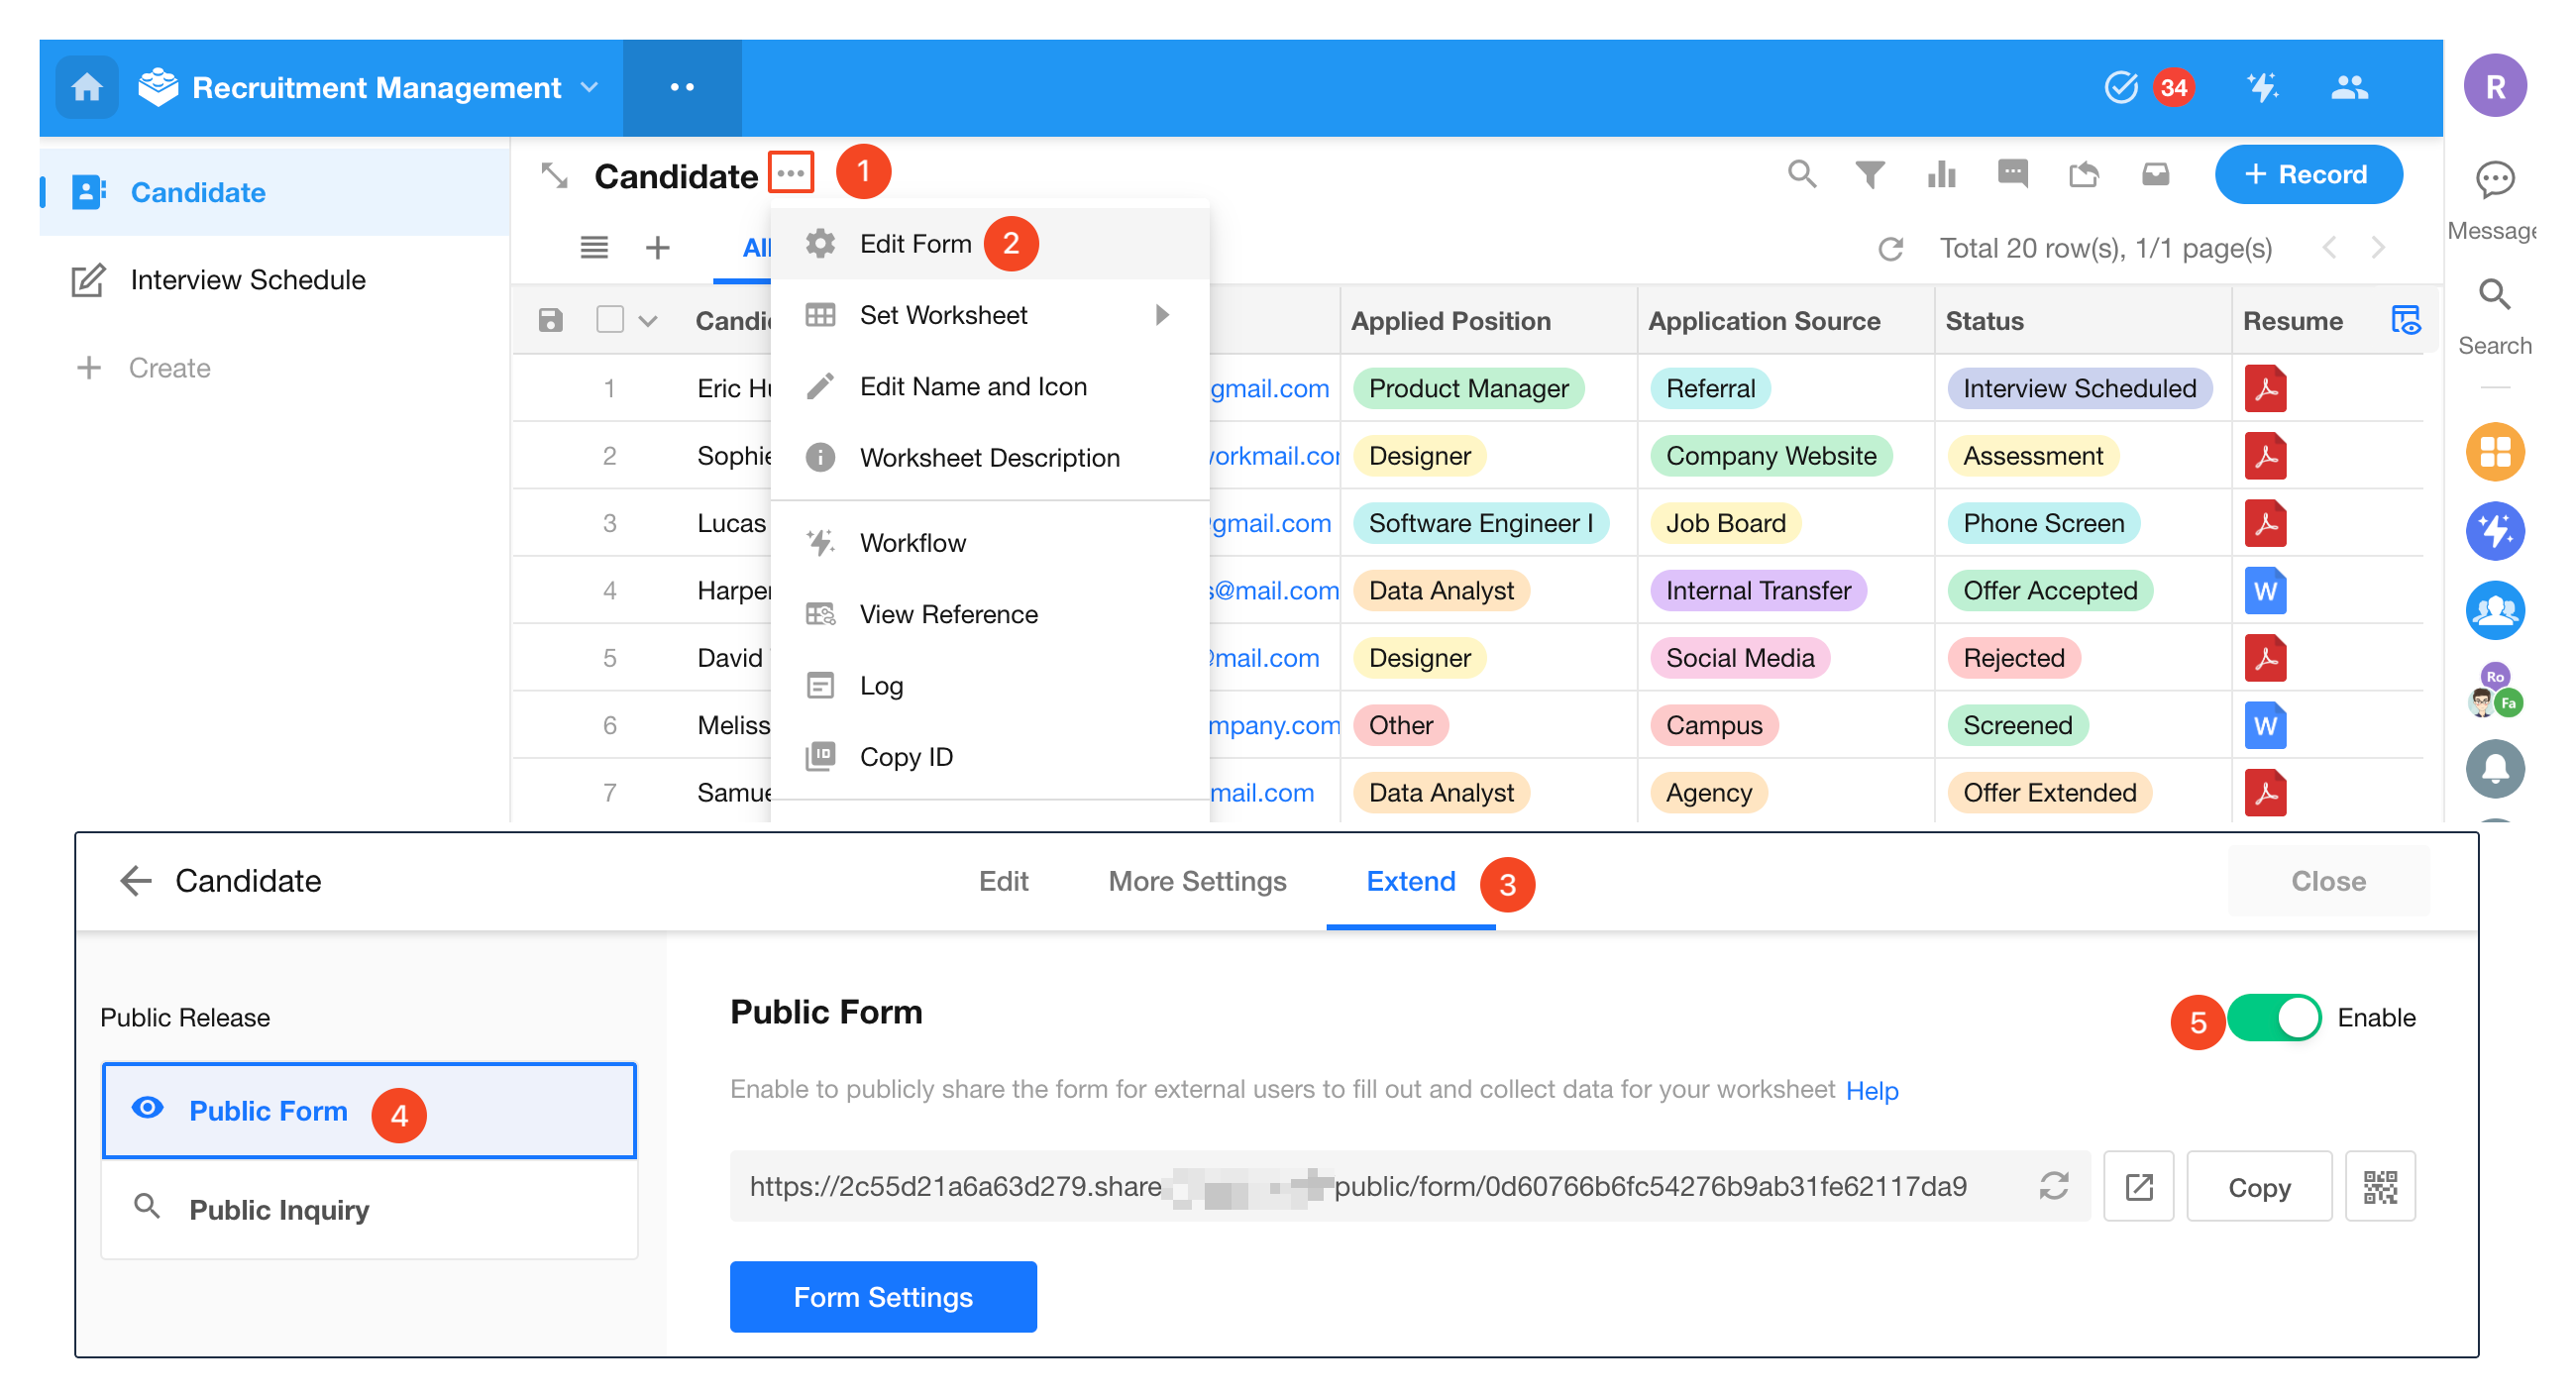
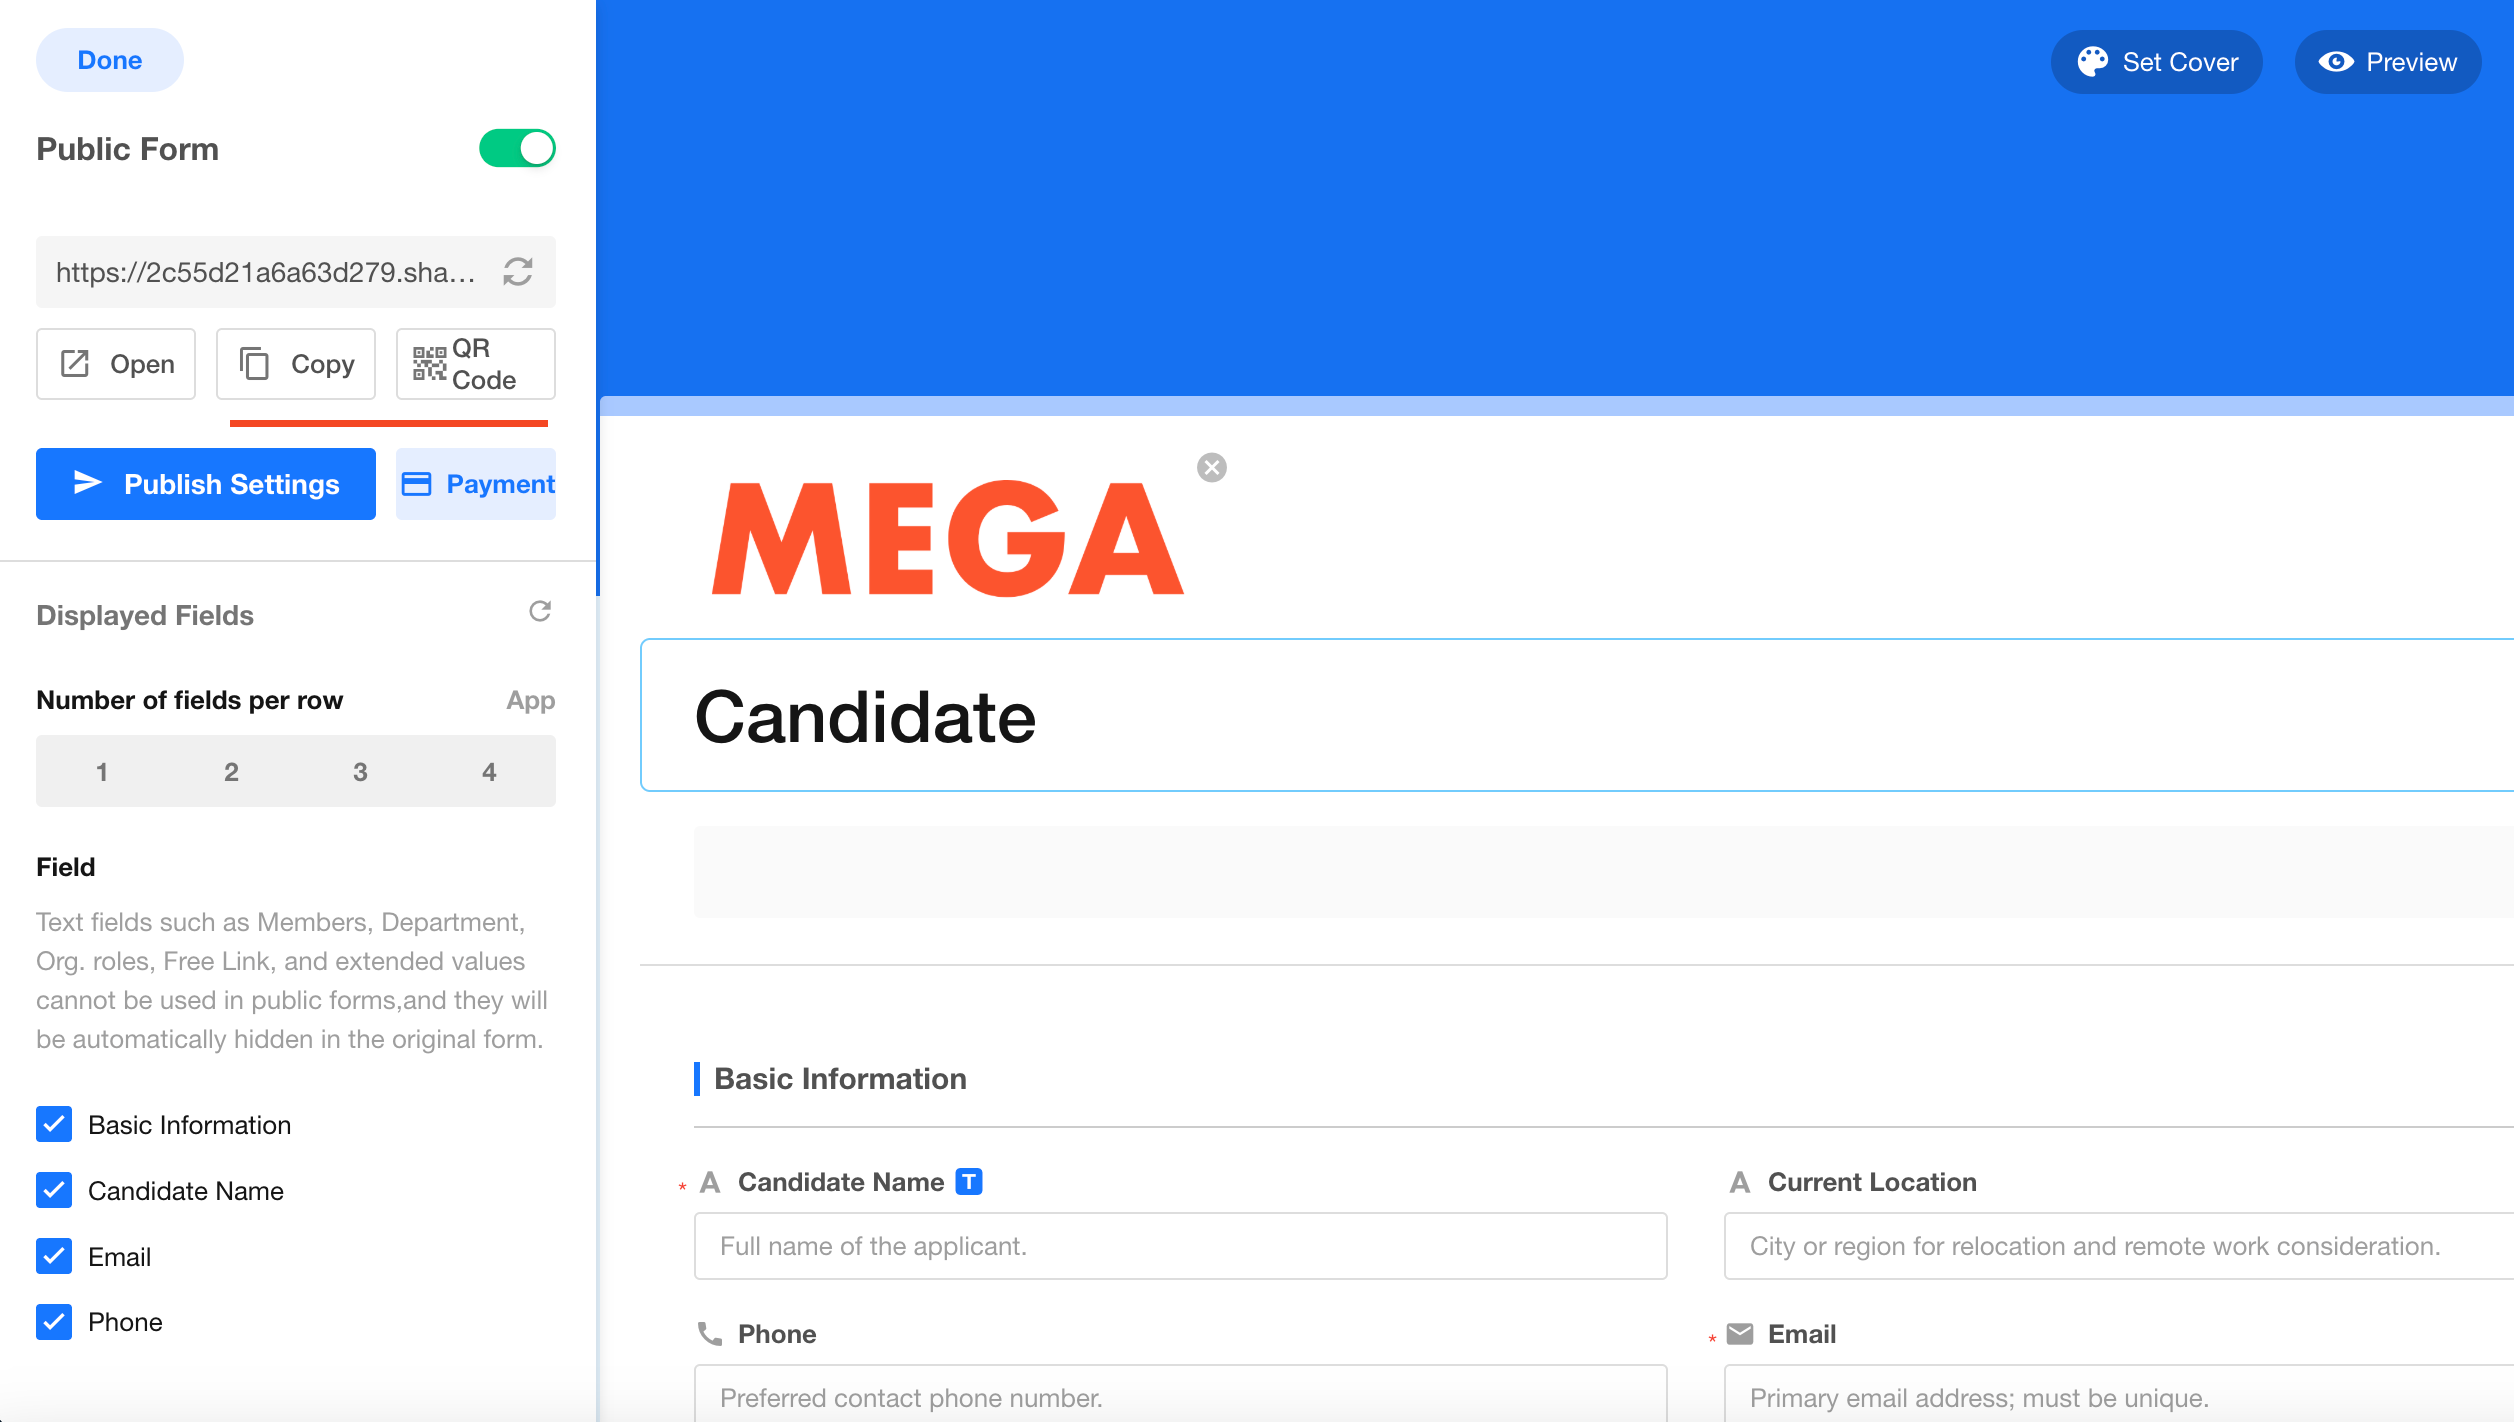
Customize the form (logo, background, description, and visible fields), then share it via link or QR code.
Users can submit data without logging in:

5) Additional Features
- Business Rules: Show, hide, or lock fields based on conditions
- Custom Actions: Add buttons to trigger contextual actions
- Print Templates: Design templates in Word and print records accordingly
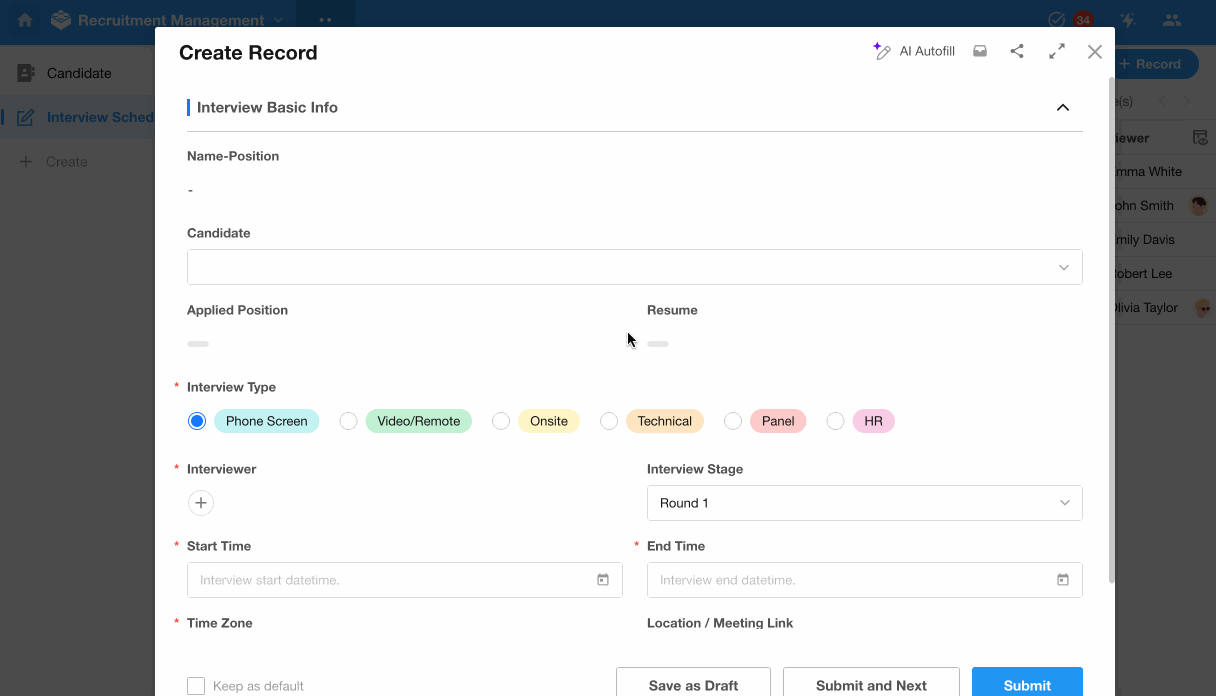
2.2 Create the Interview Schedule Worksheet
The interview schedule typically includes the following fields:
- Candidate
- Applied Position
- Resume
- Interviewer
- Start Time
- End Time
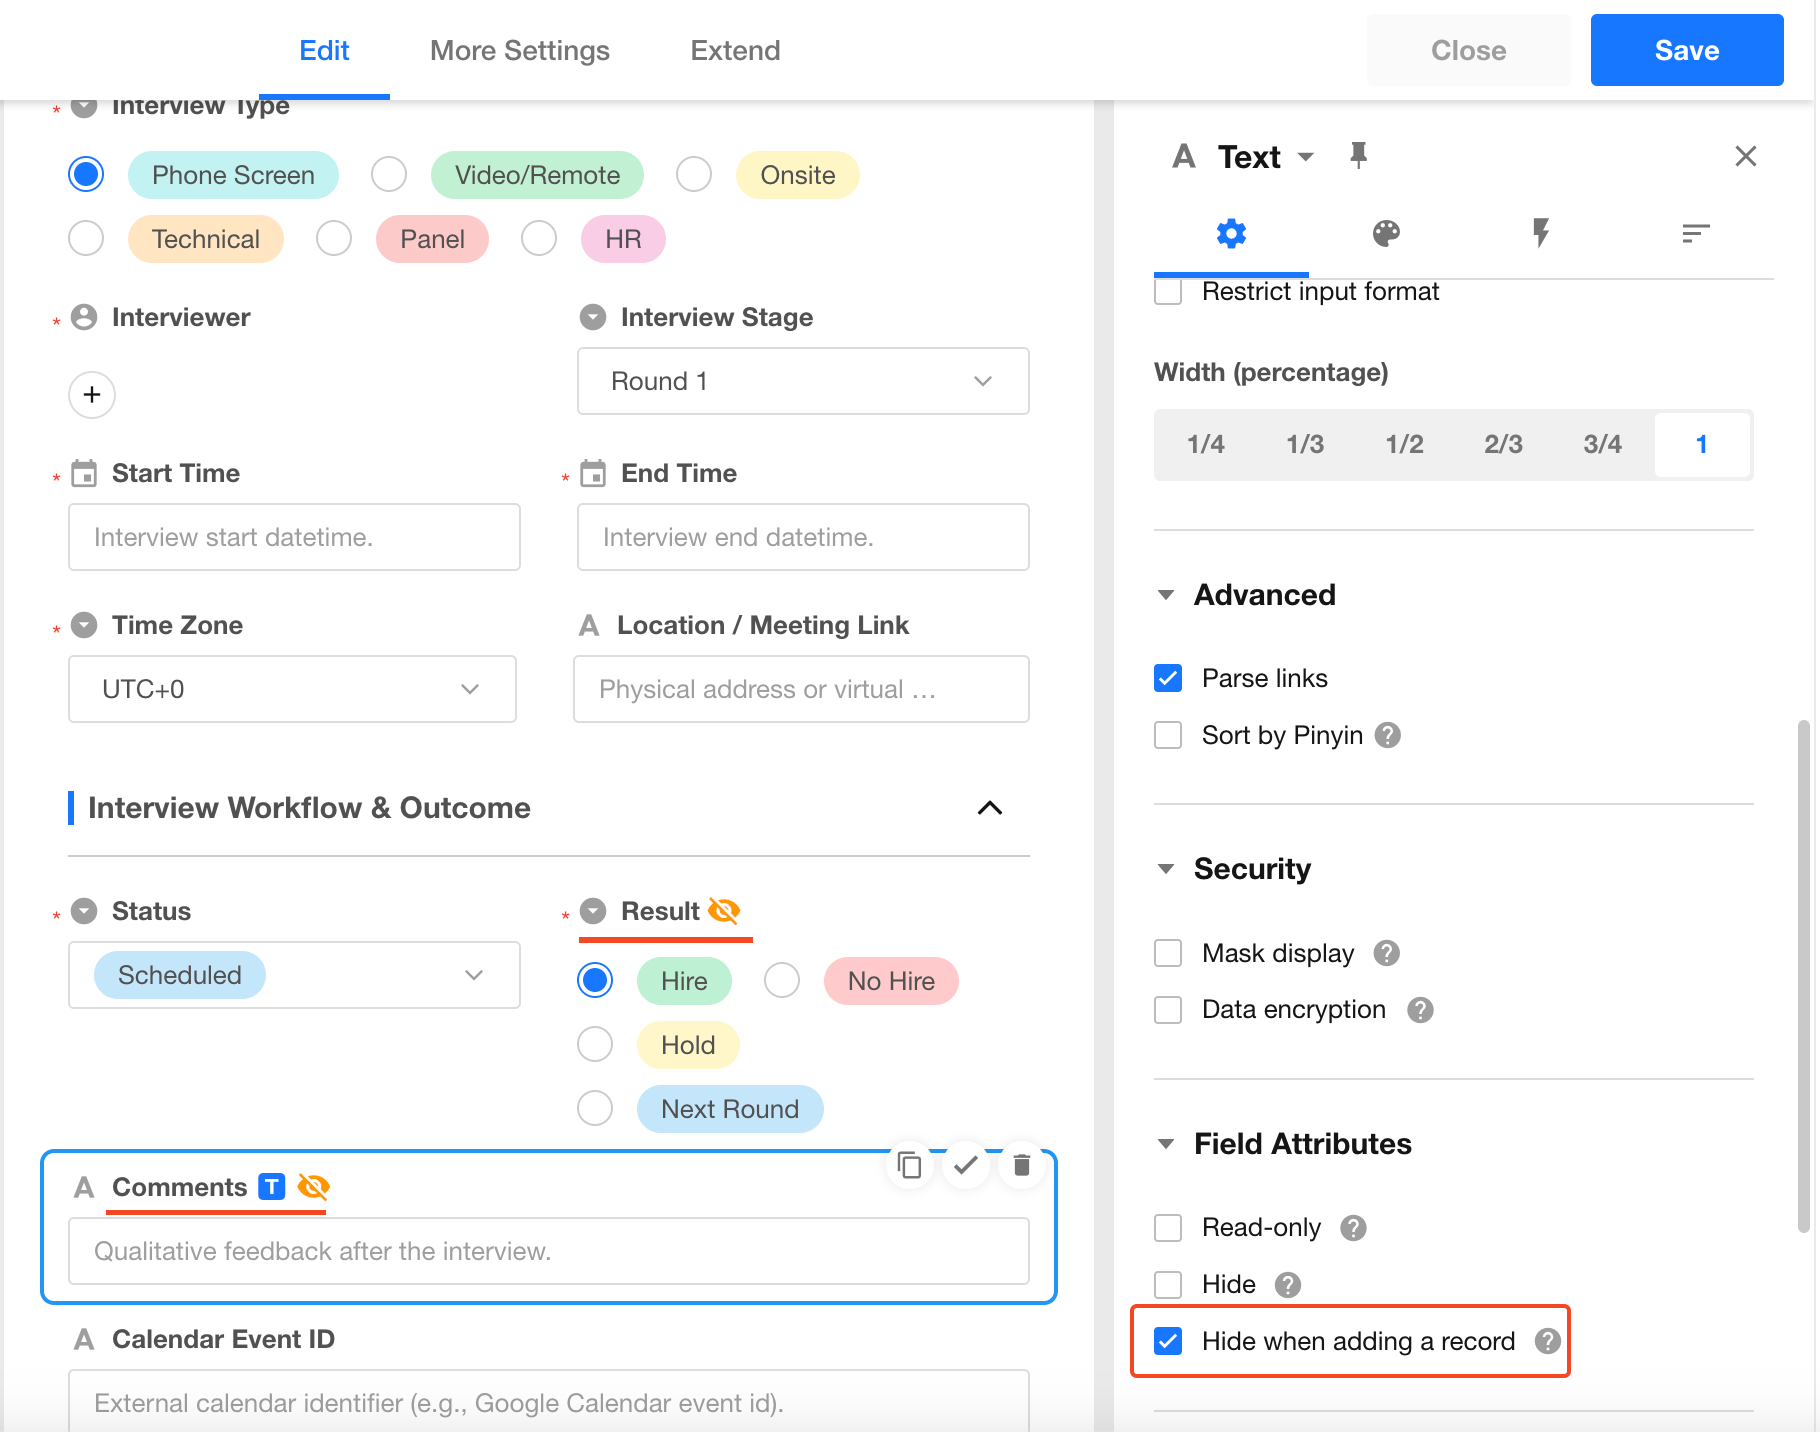
- Comments
- Result
Example design:
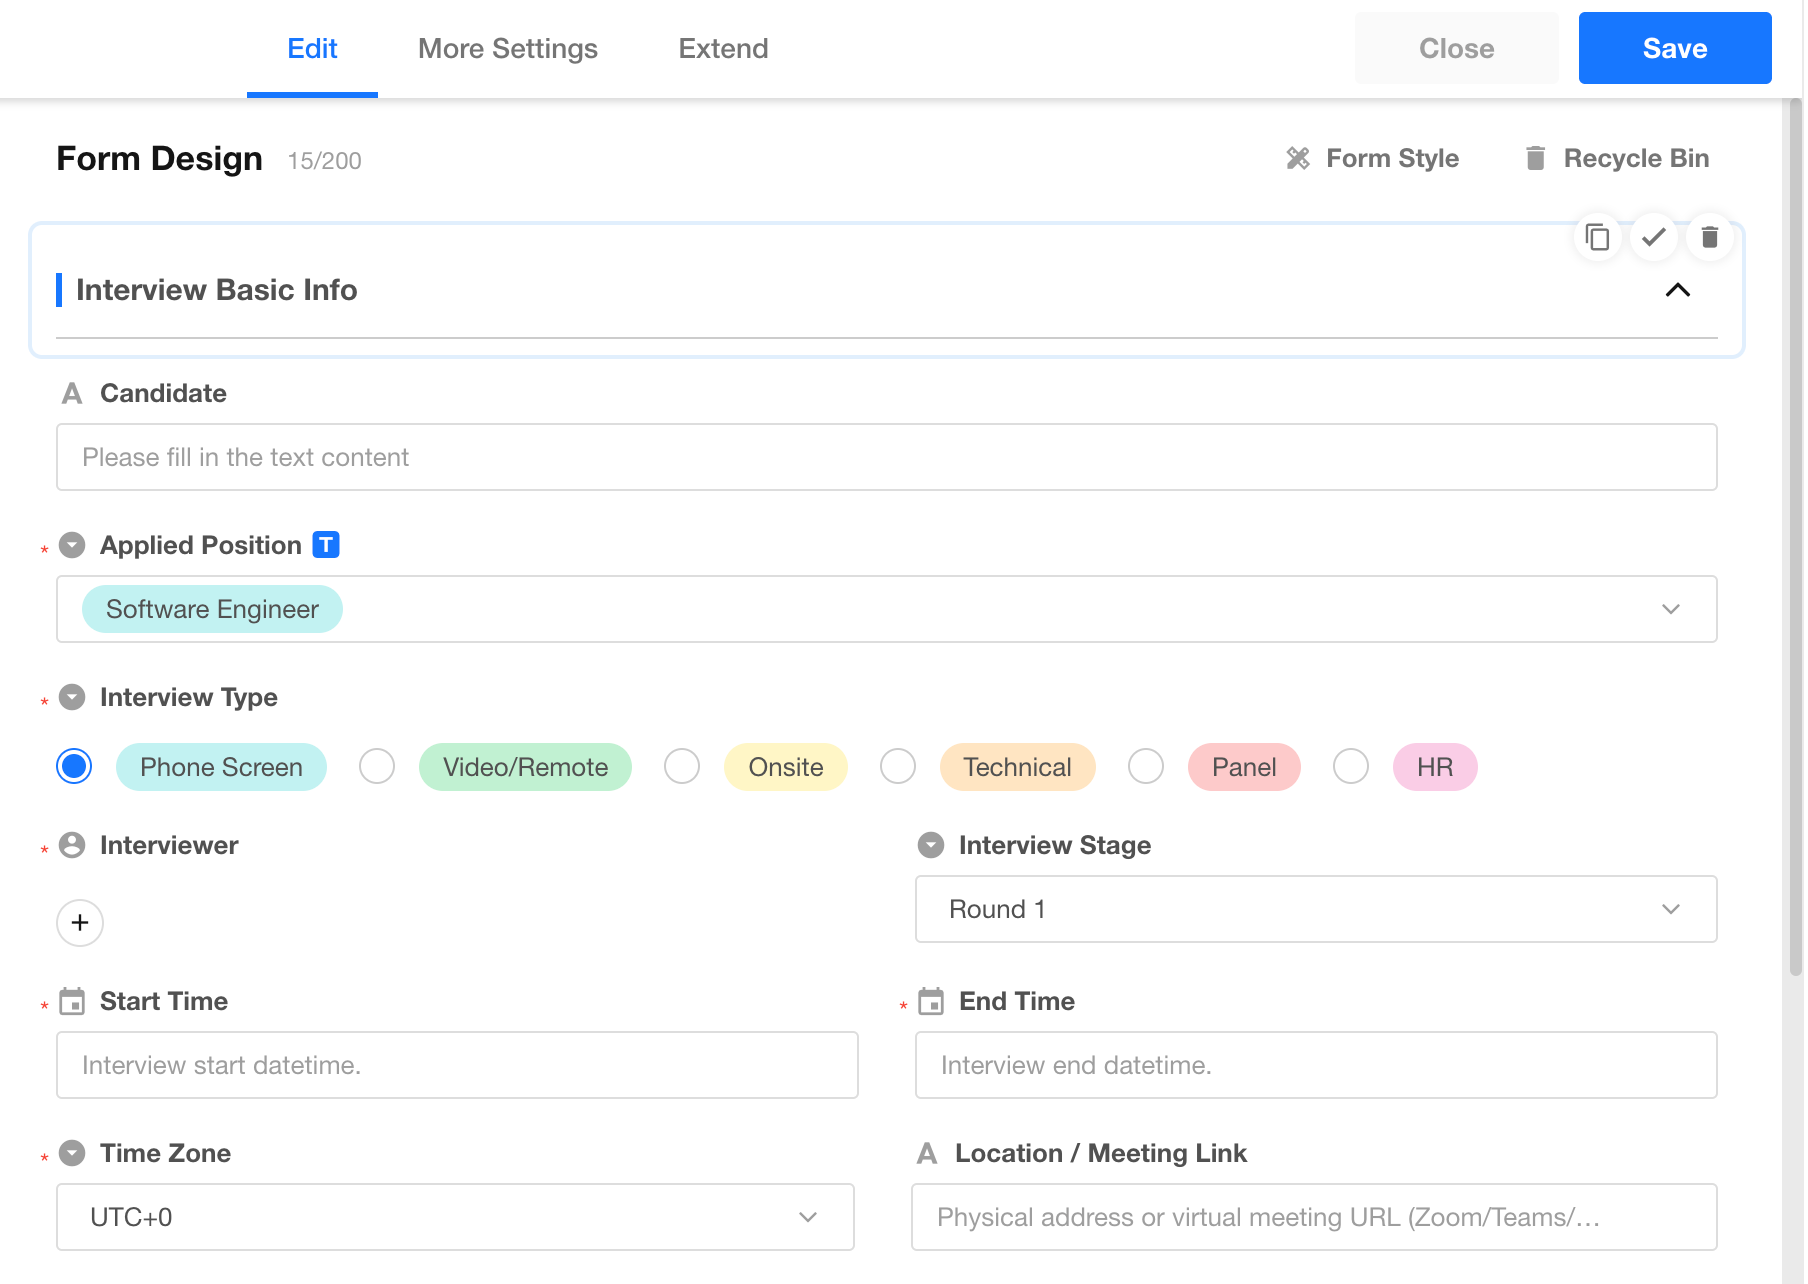
Fields like Comments and Result are not needed during creation, so set them to hidden on create.
2.3 Link Worksheets
Use a relationship field to link Candidate and Interview Schedule worksheets and avoid duplicate data entry.
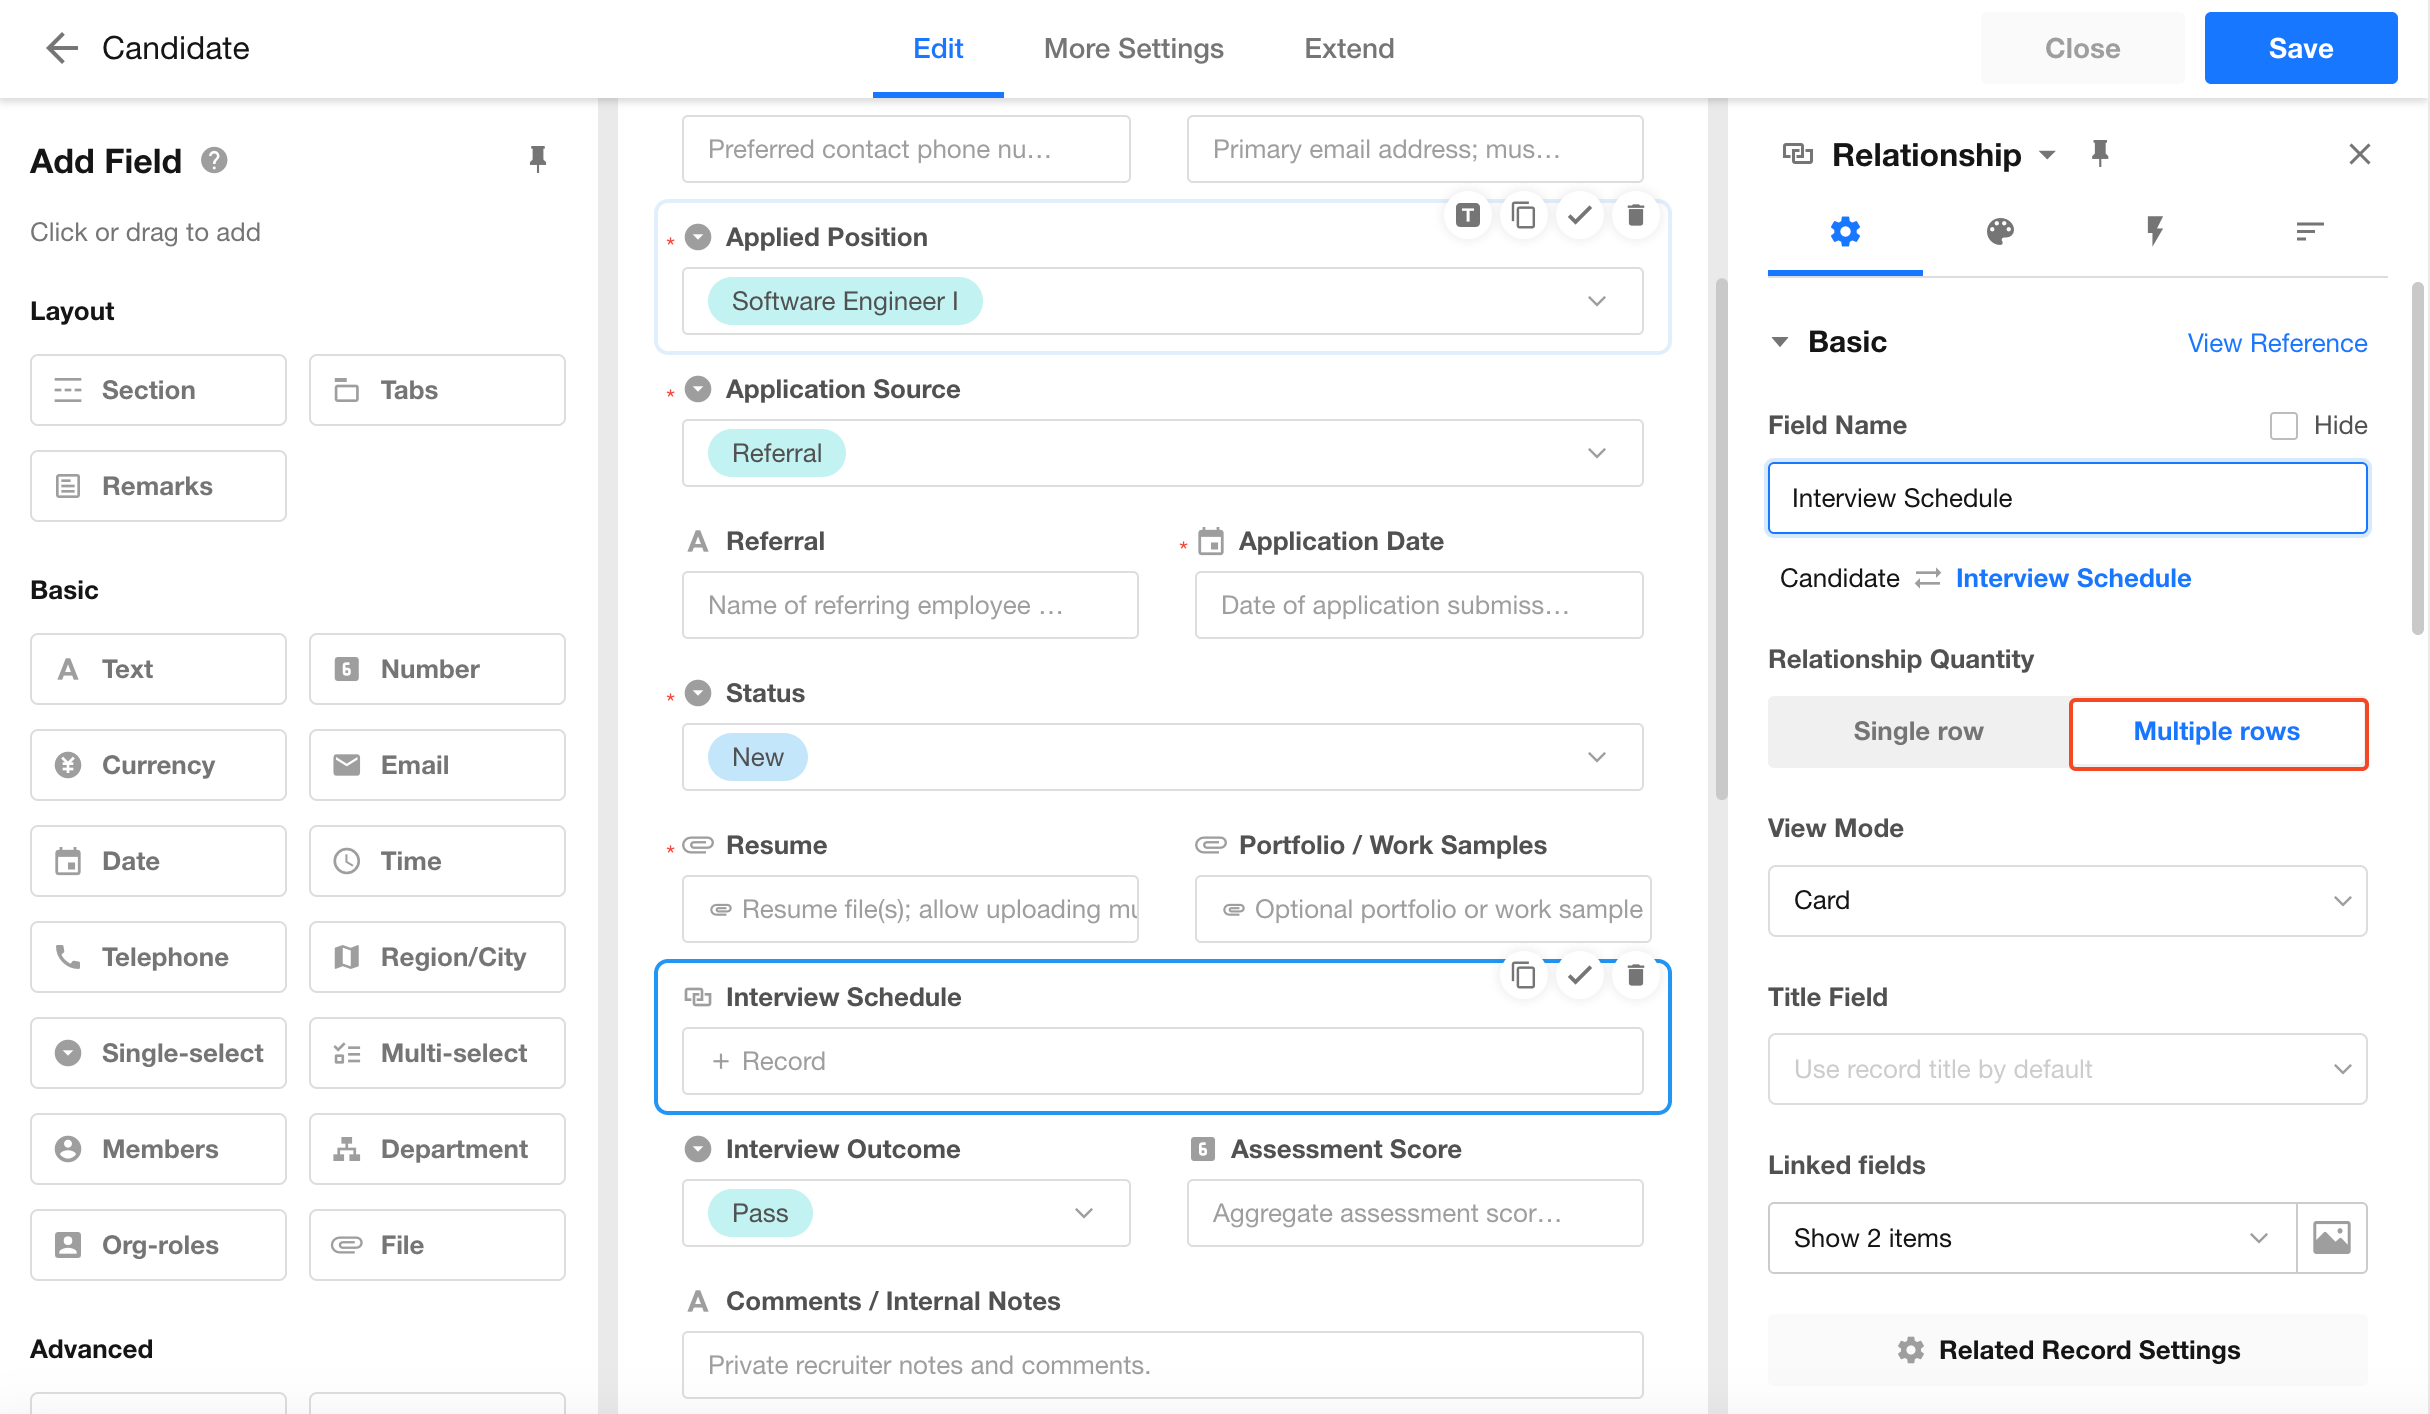
1) Add a Relationship Field
In the Interview Schedule worksheet, add a relationship field linked to the Candidate worksheet.
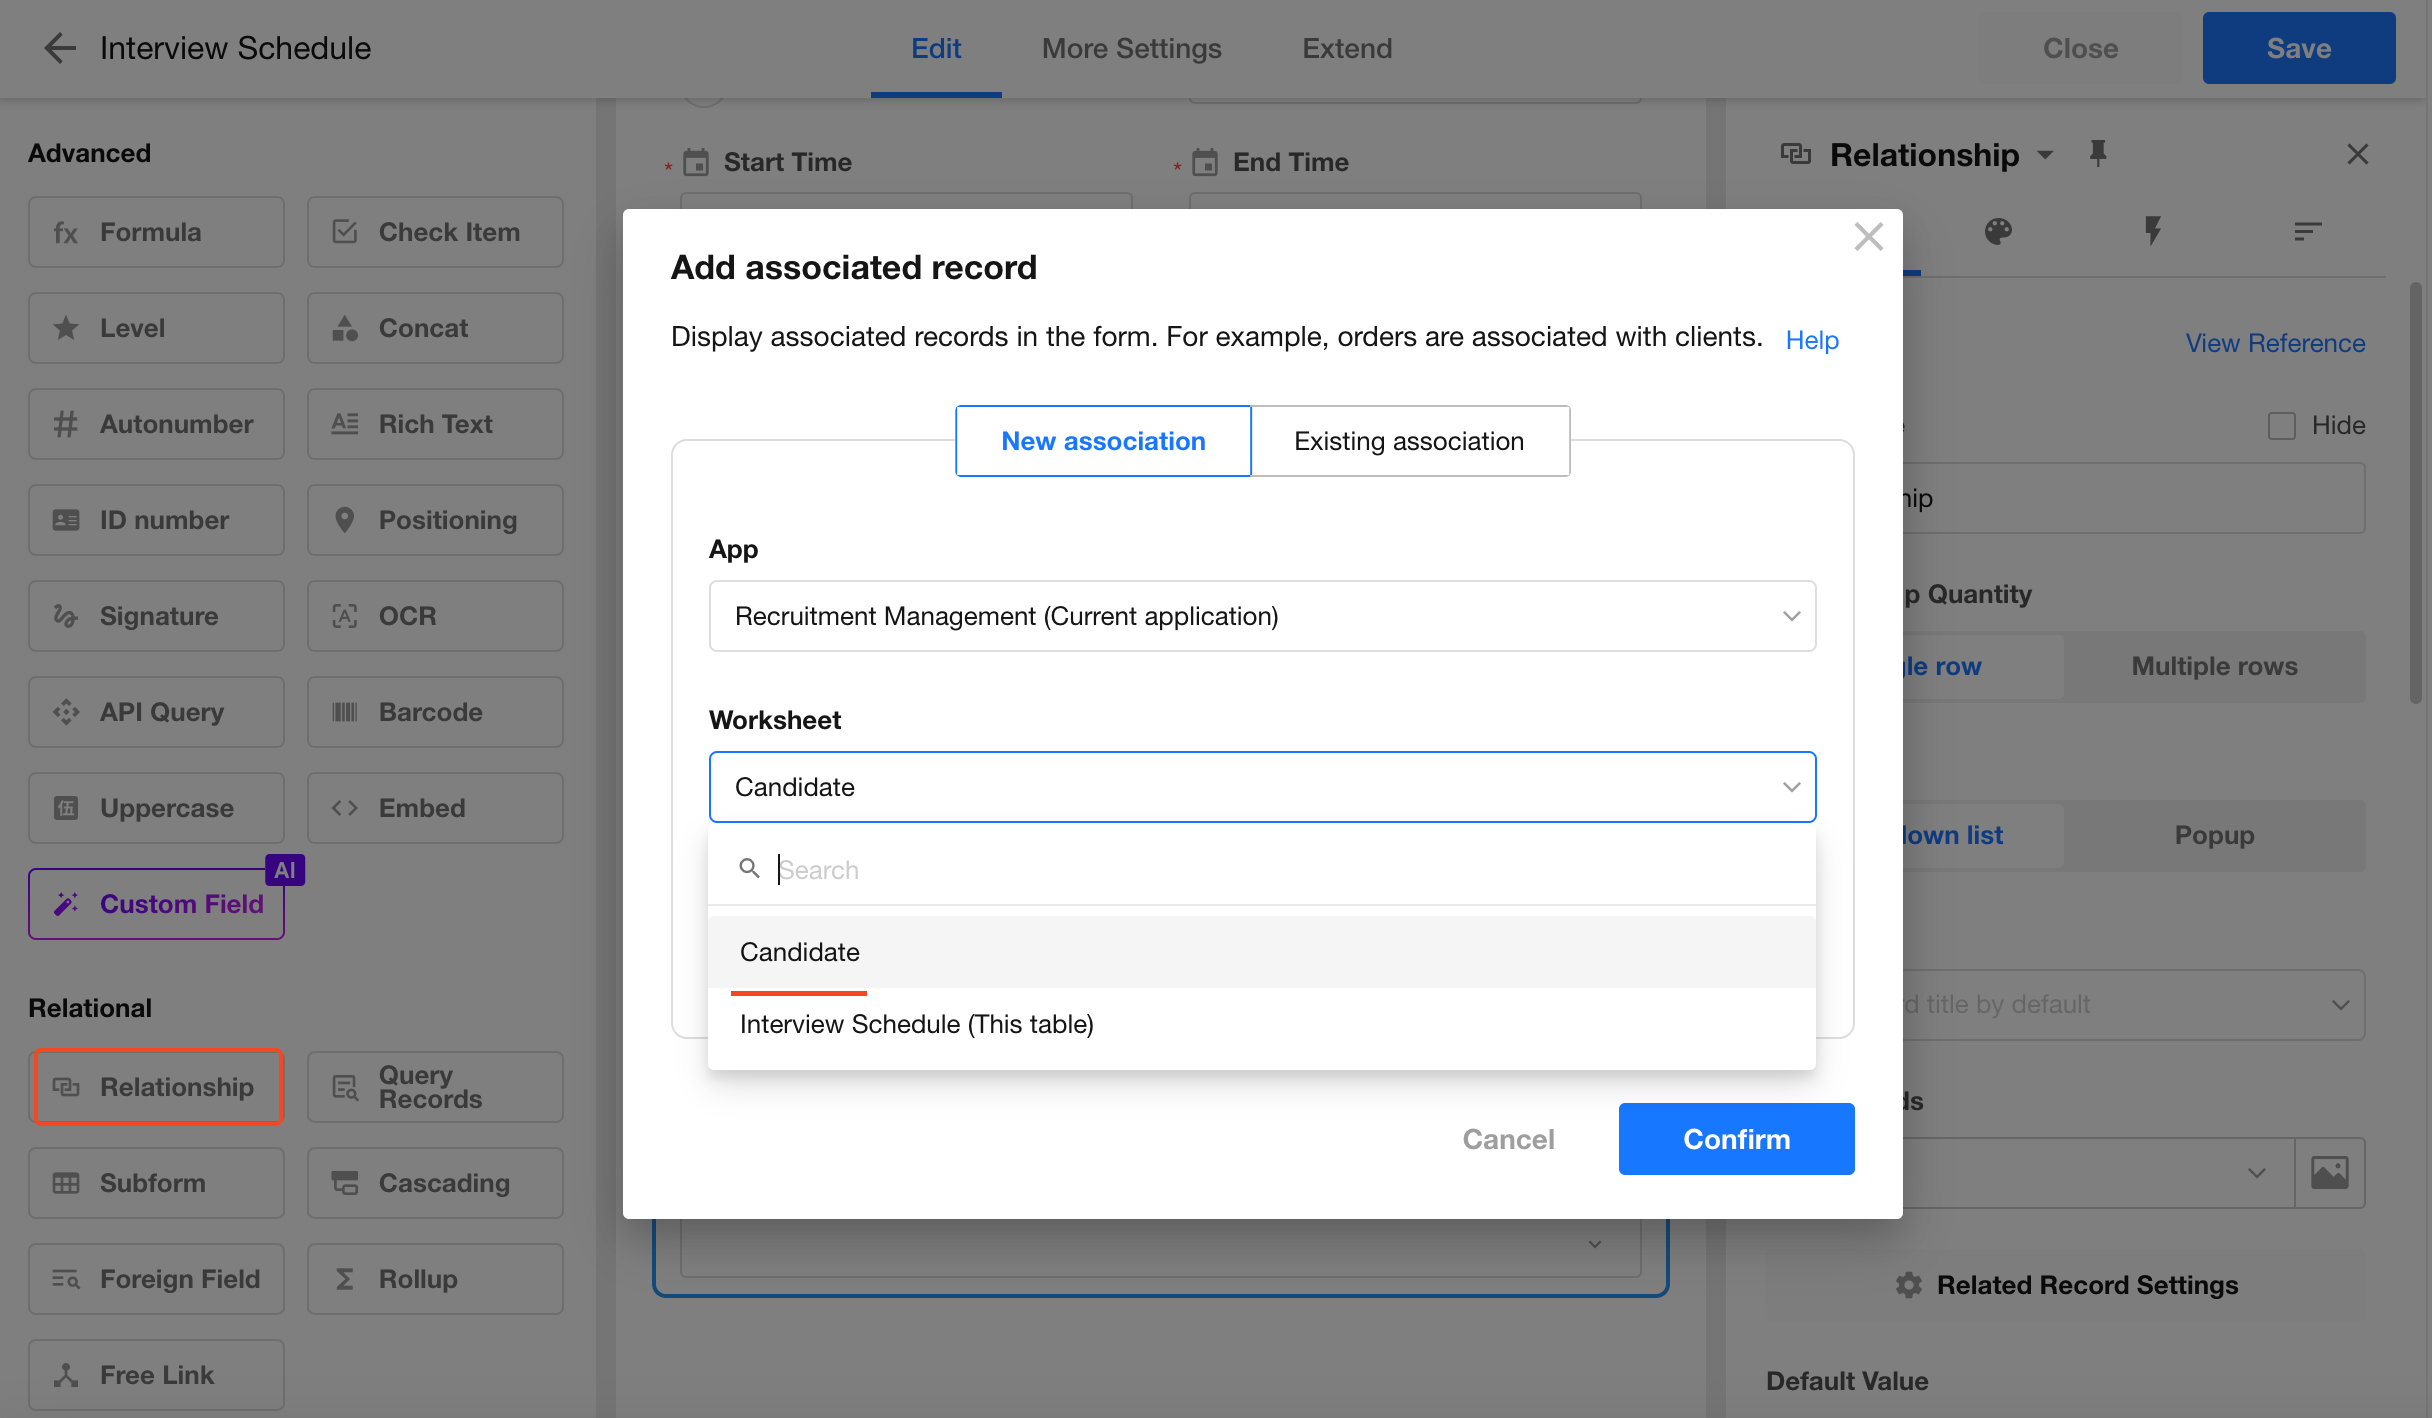
2) Configure the Relationship
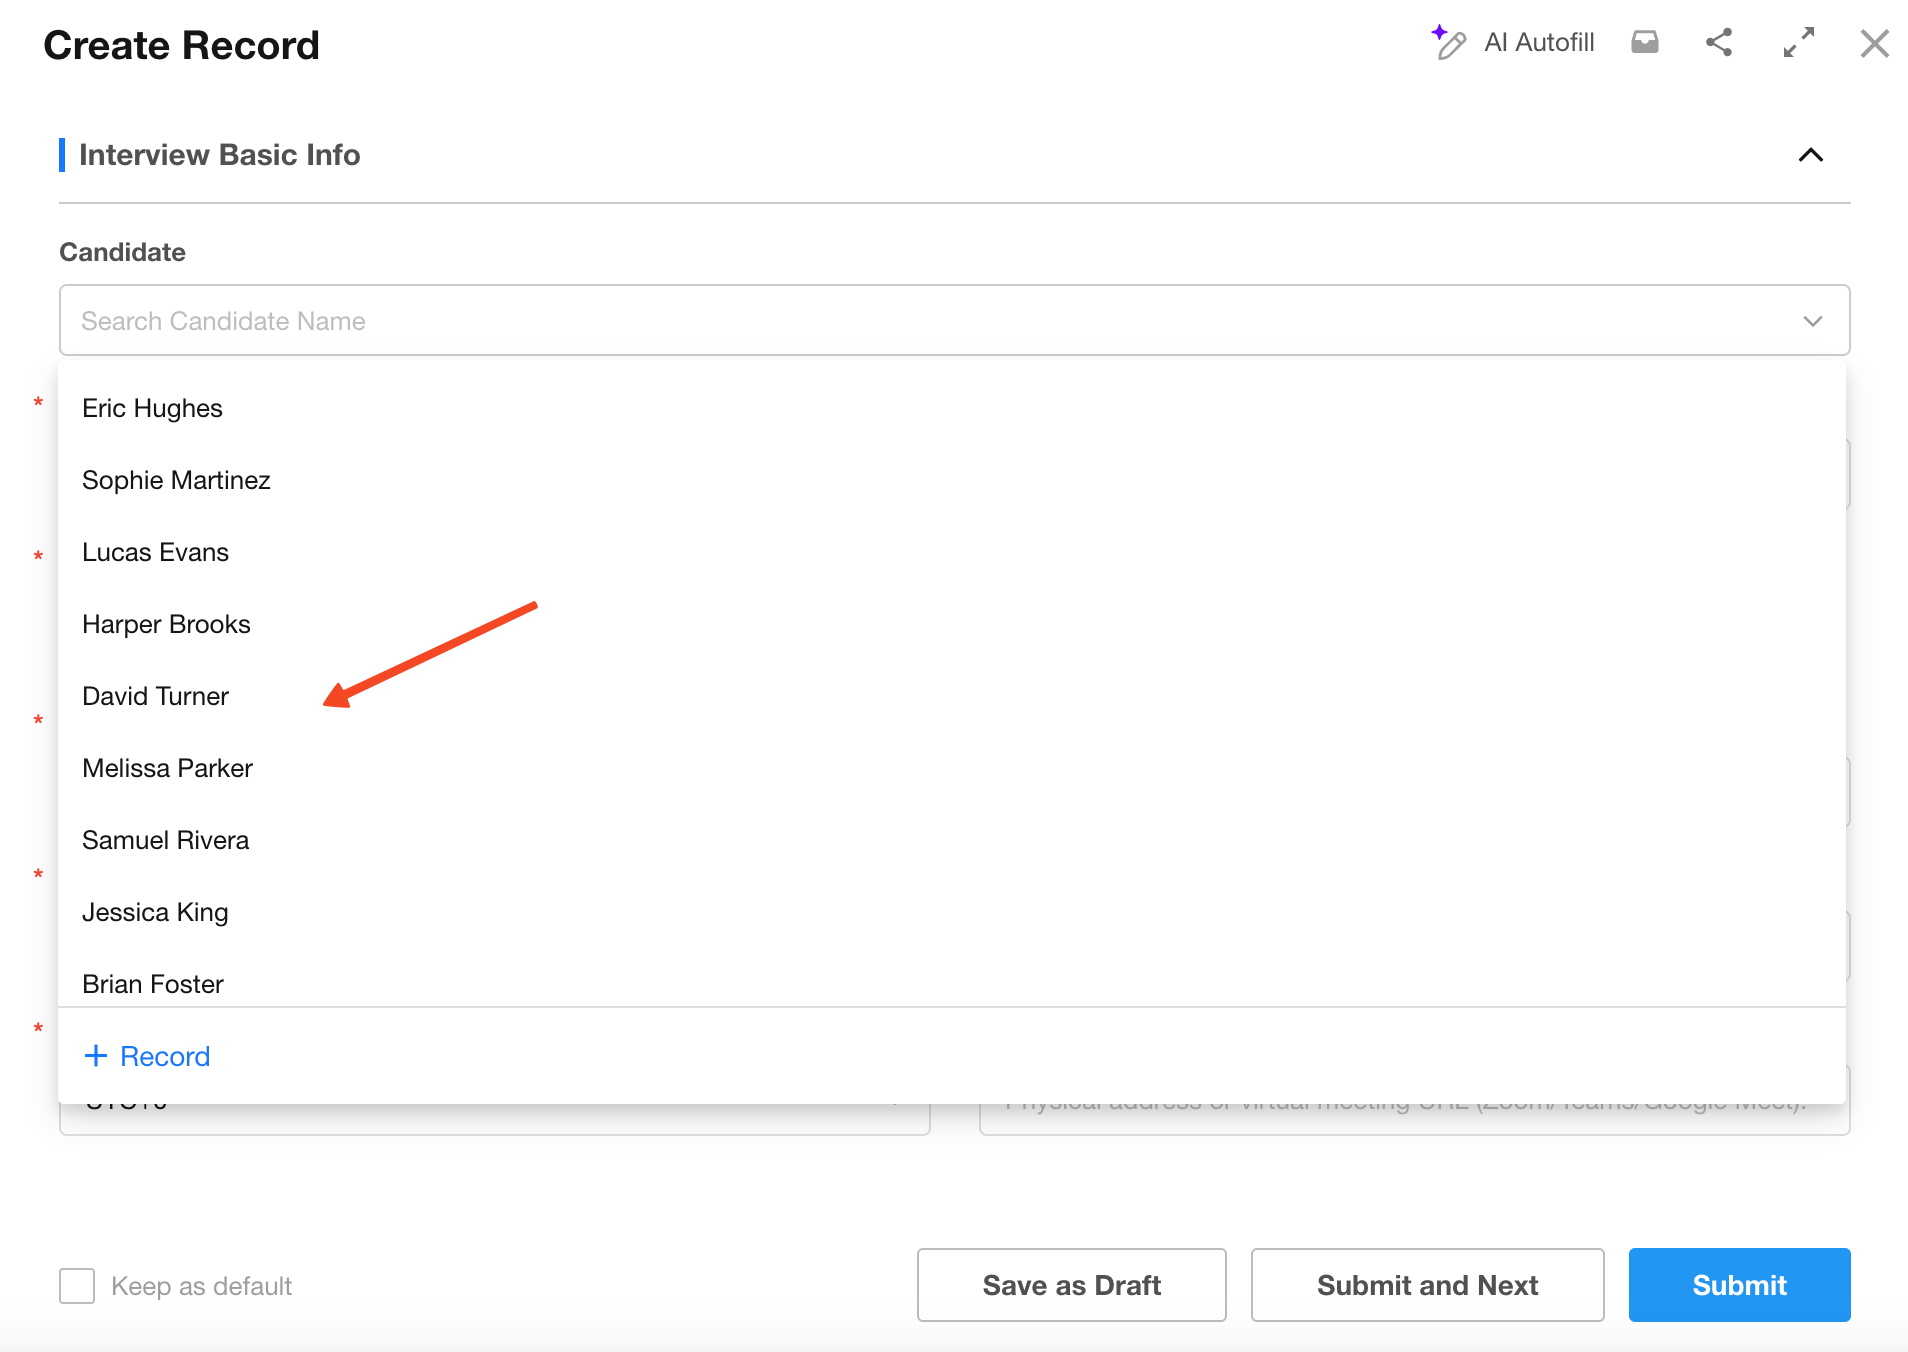
Each interview is associated with one candidate → select Single record.
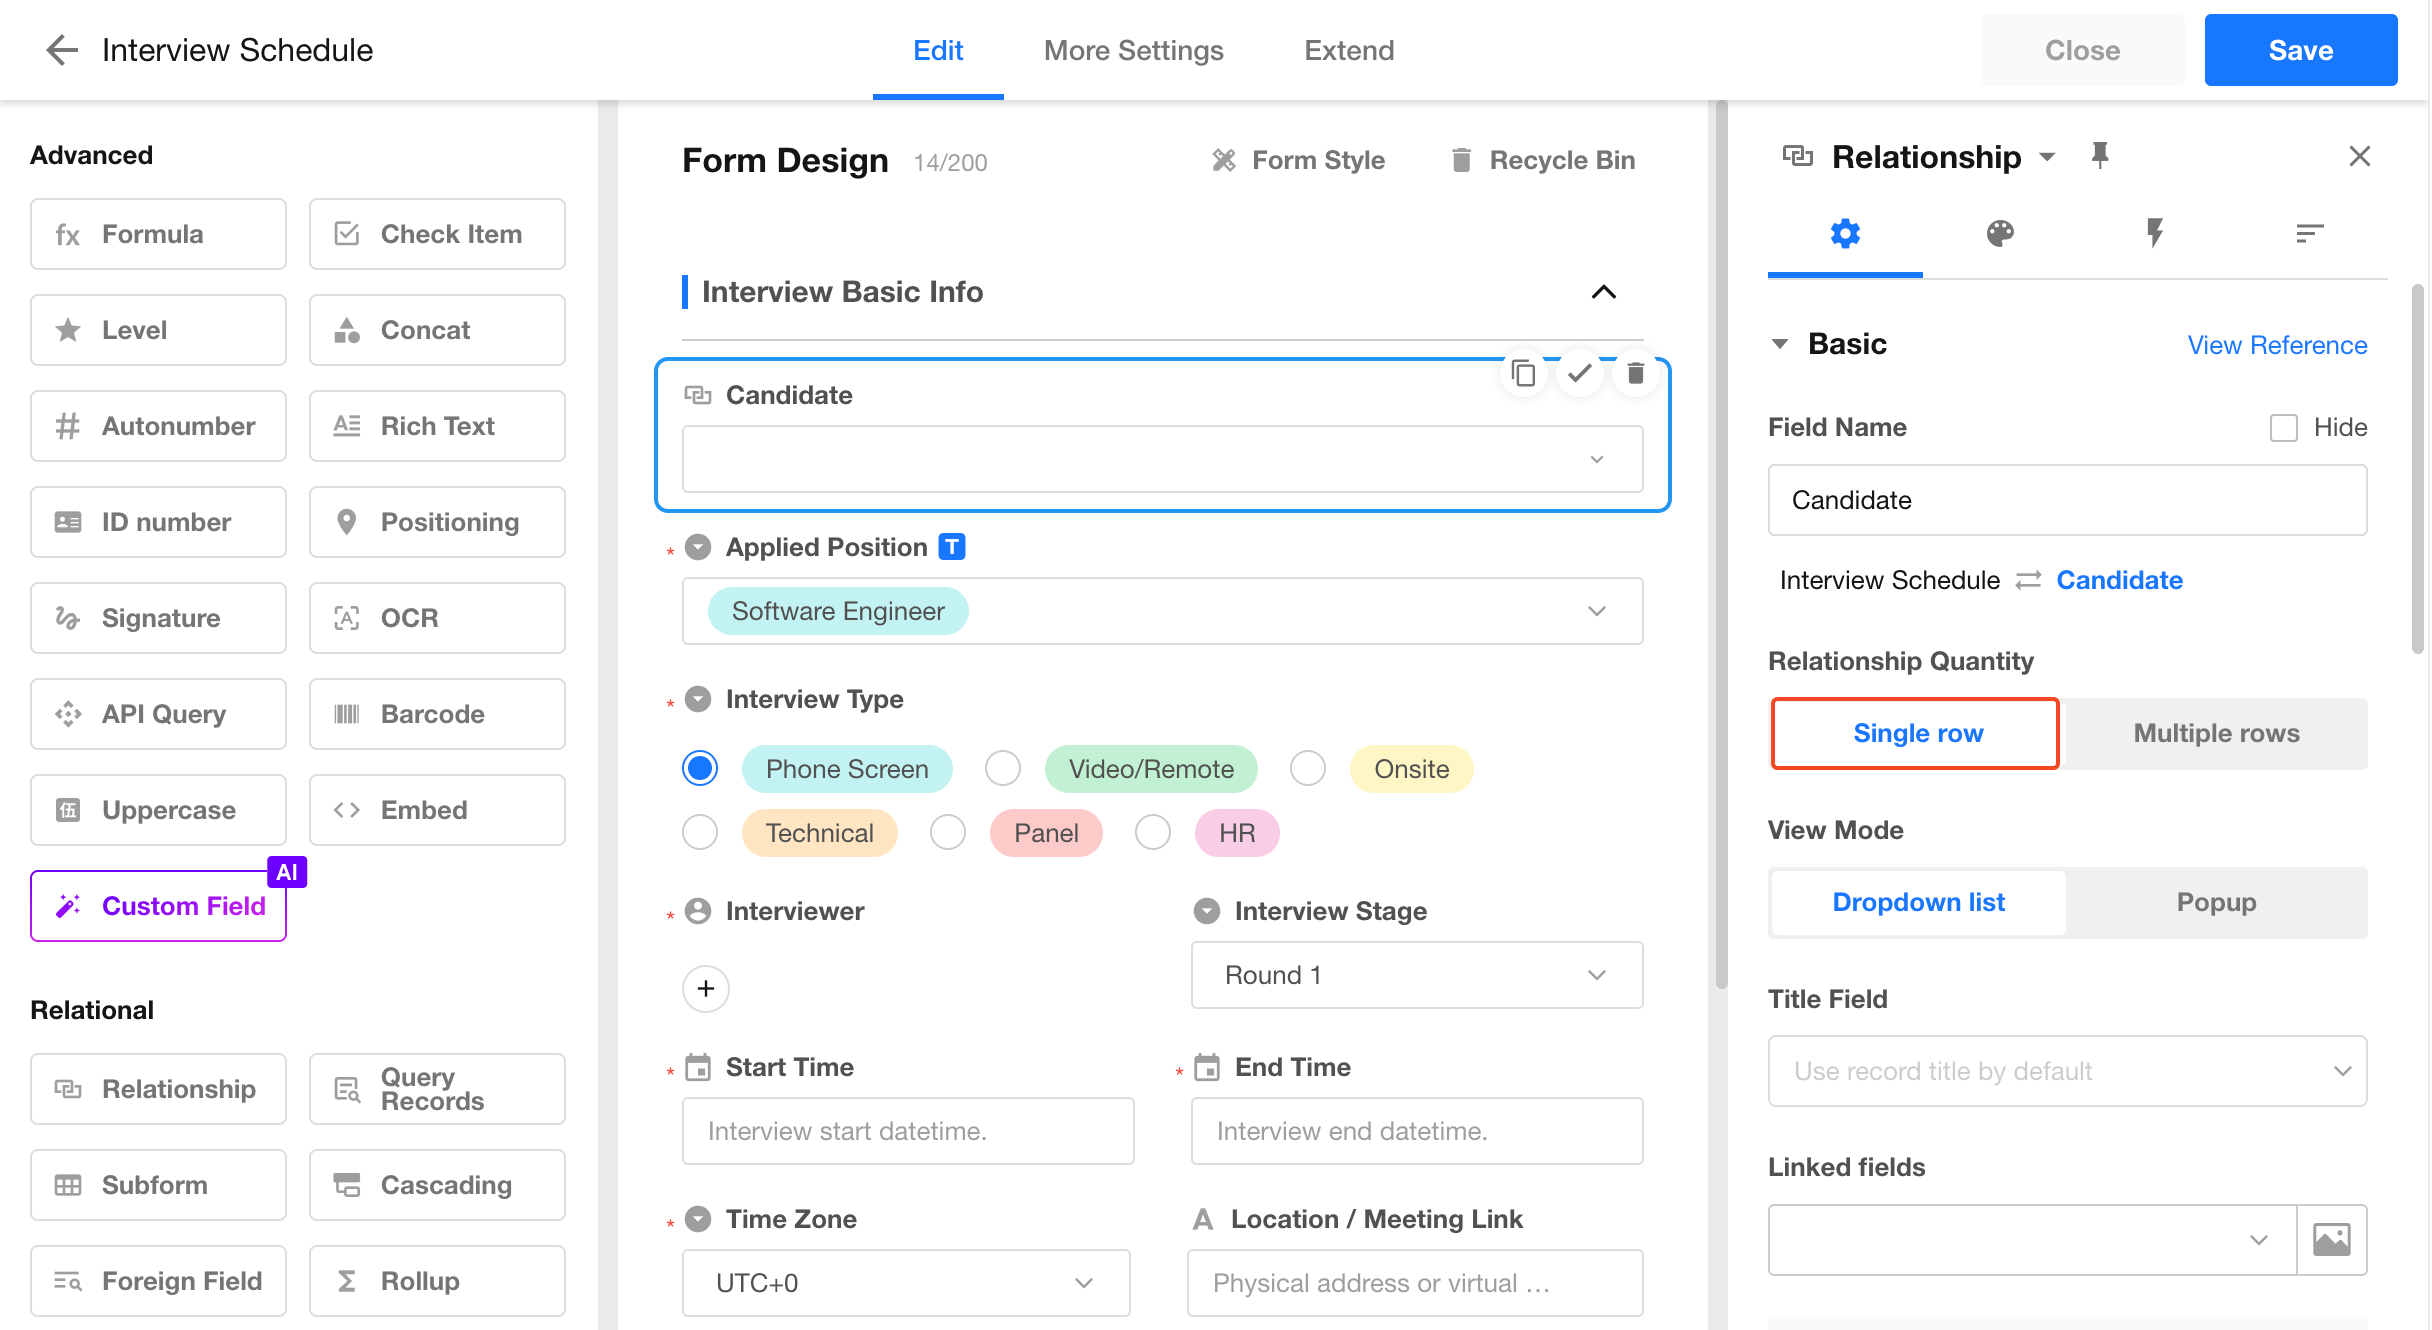
Each candidate can have multiple interviews → configure Multiple records on the Candidate side (enable bidirectional relationship).
Remove the original text field for candidate name. Now you can directly select candidates when creating interview records:
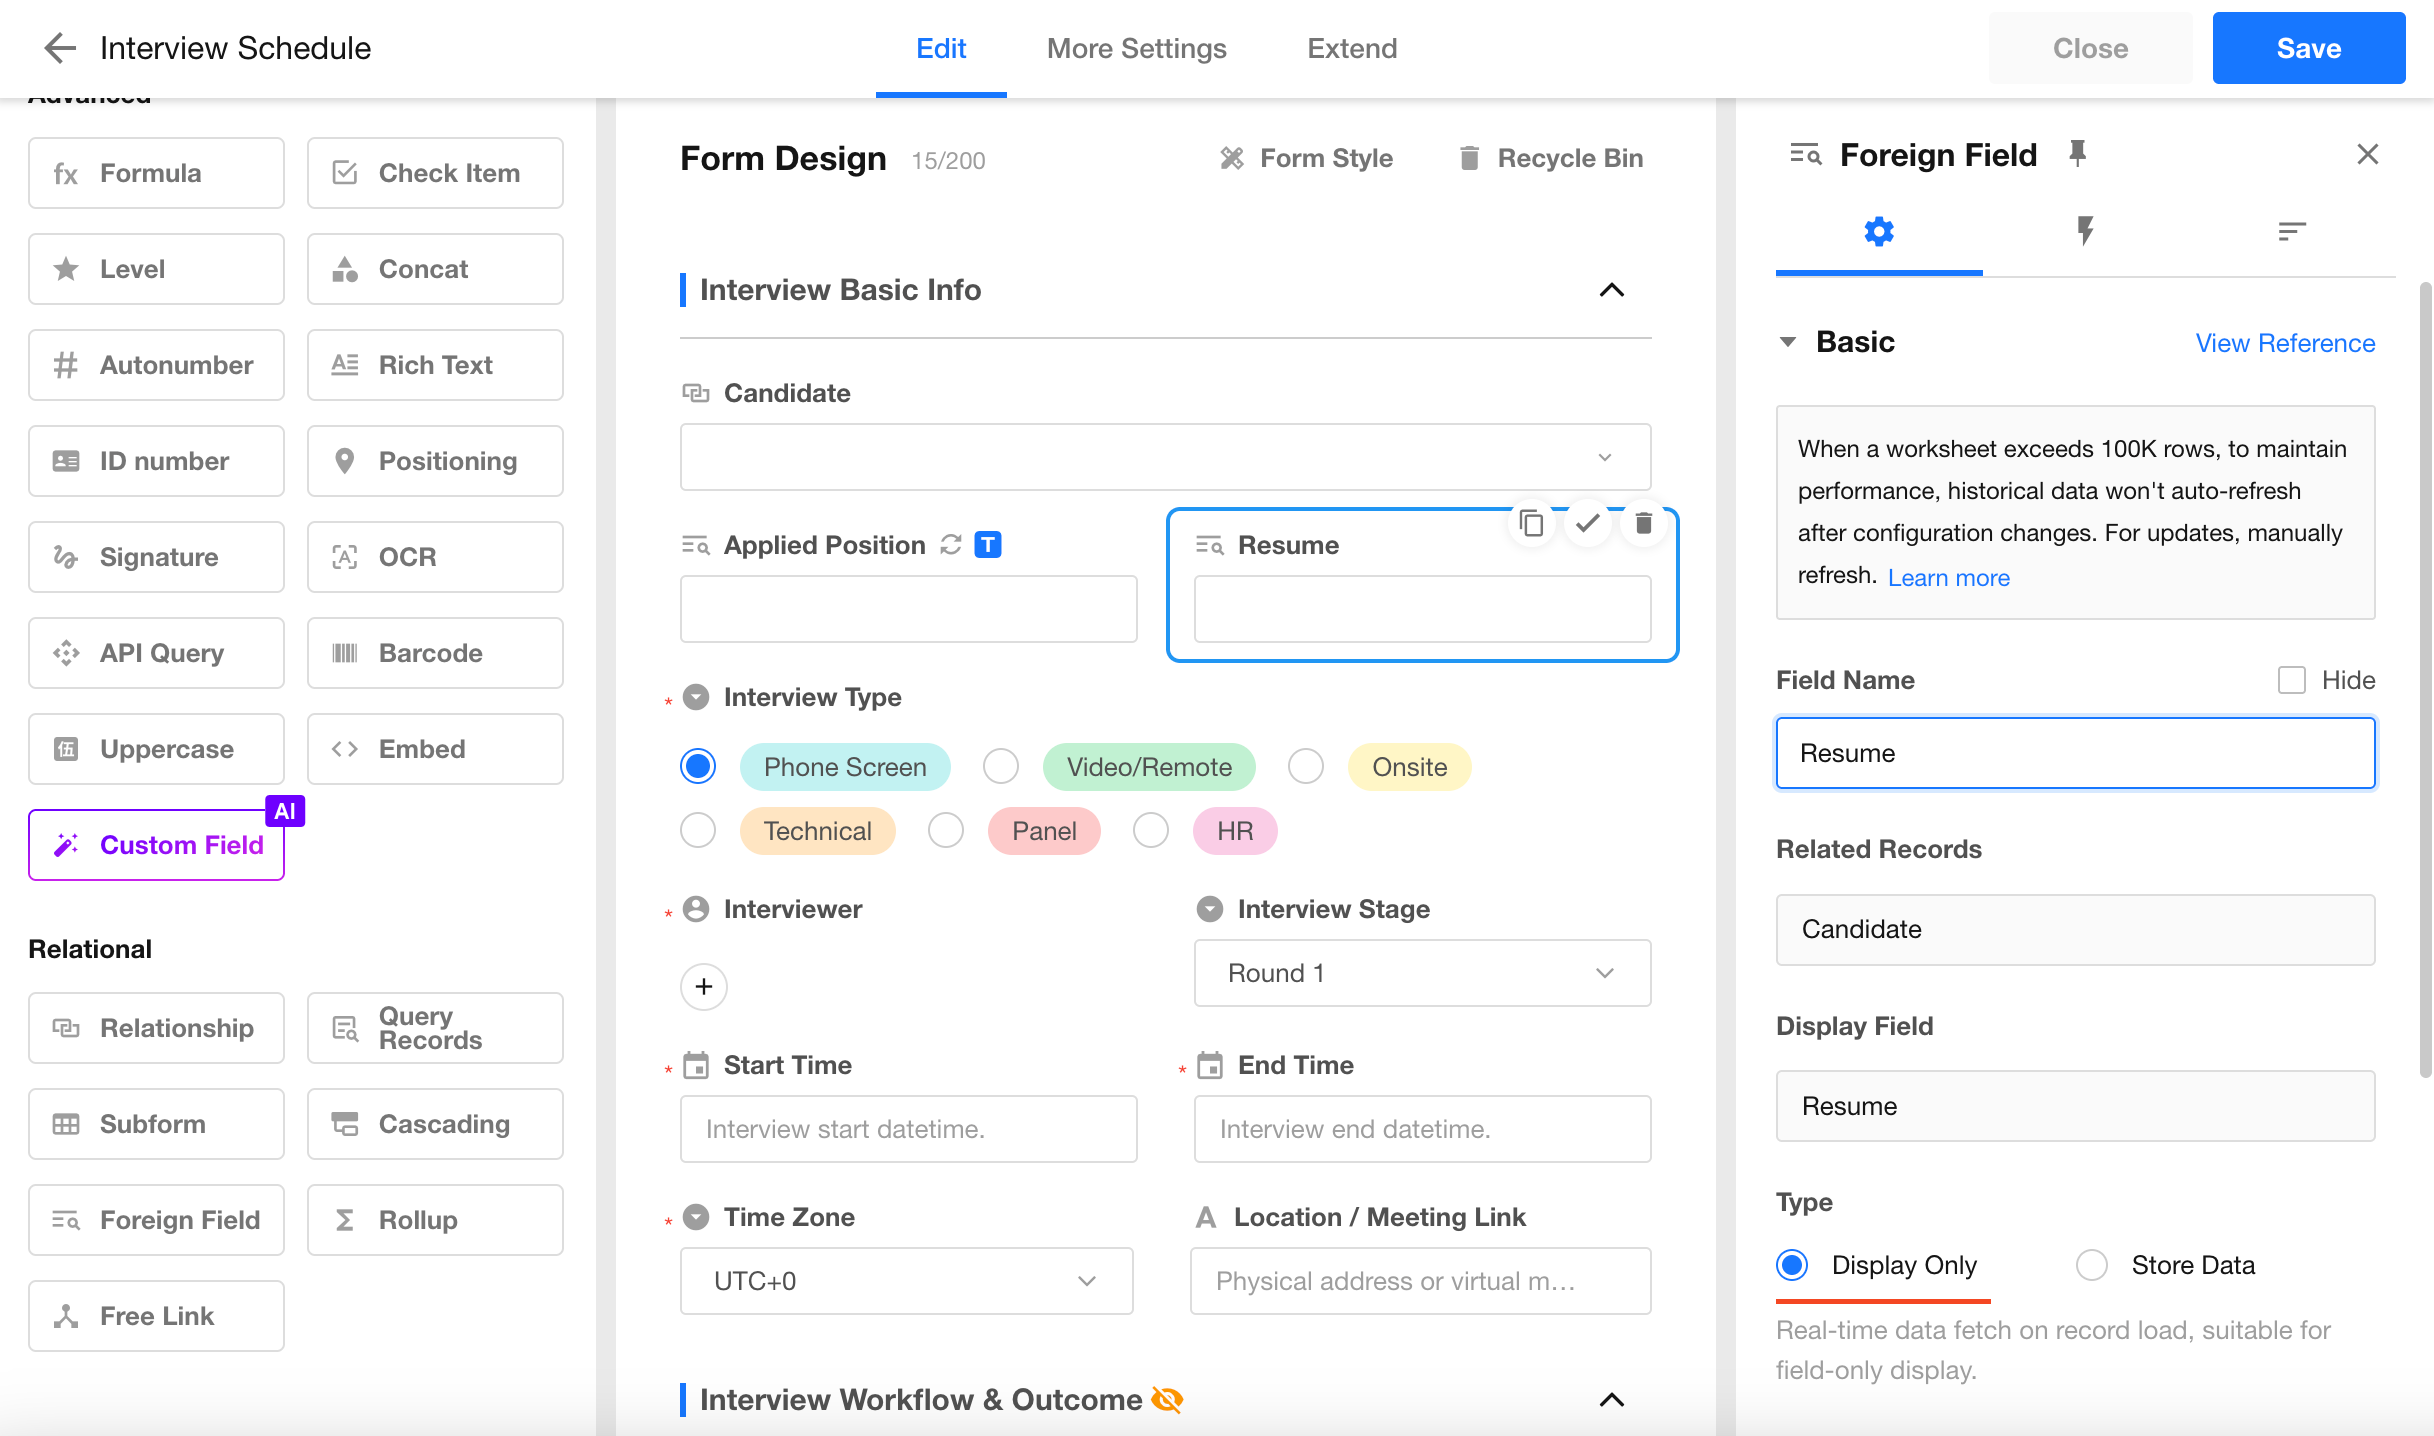
3) Use Foreign Fields
Use foreign fields to display related data such as gender, position, and resume.
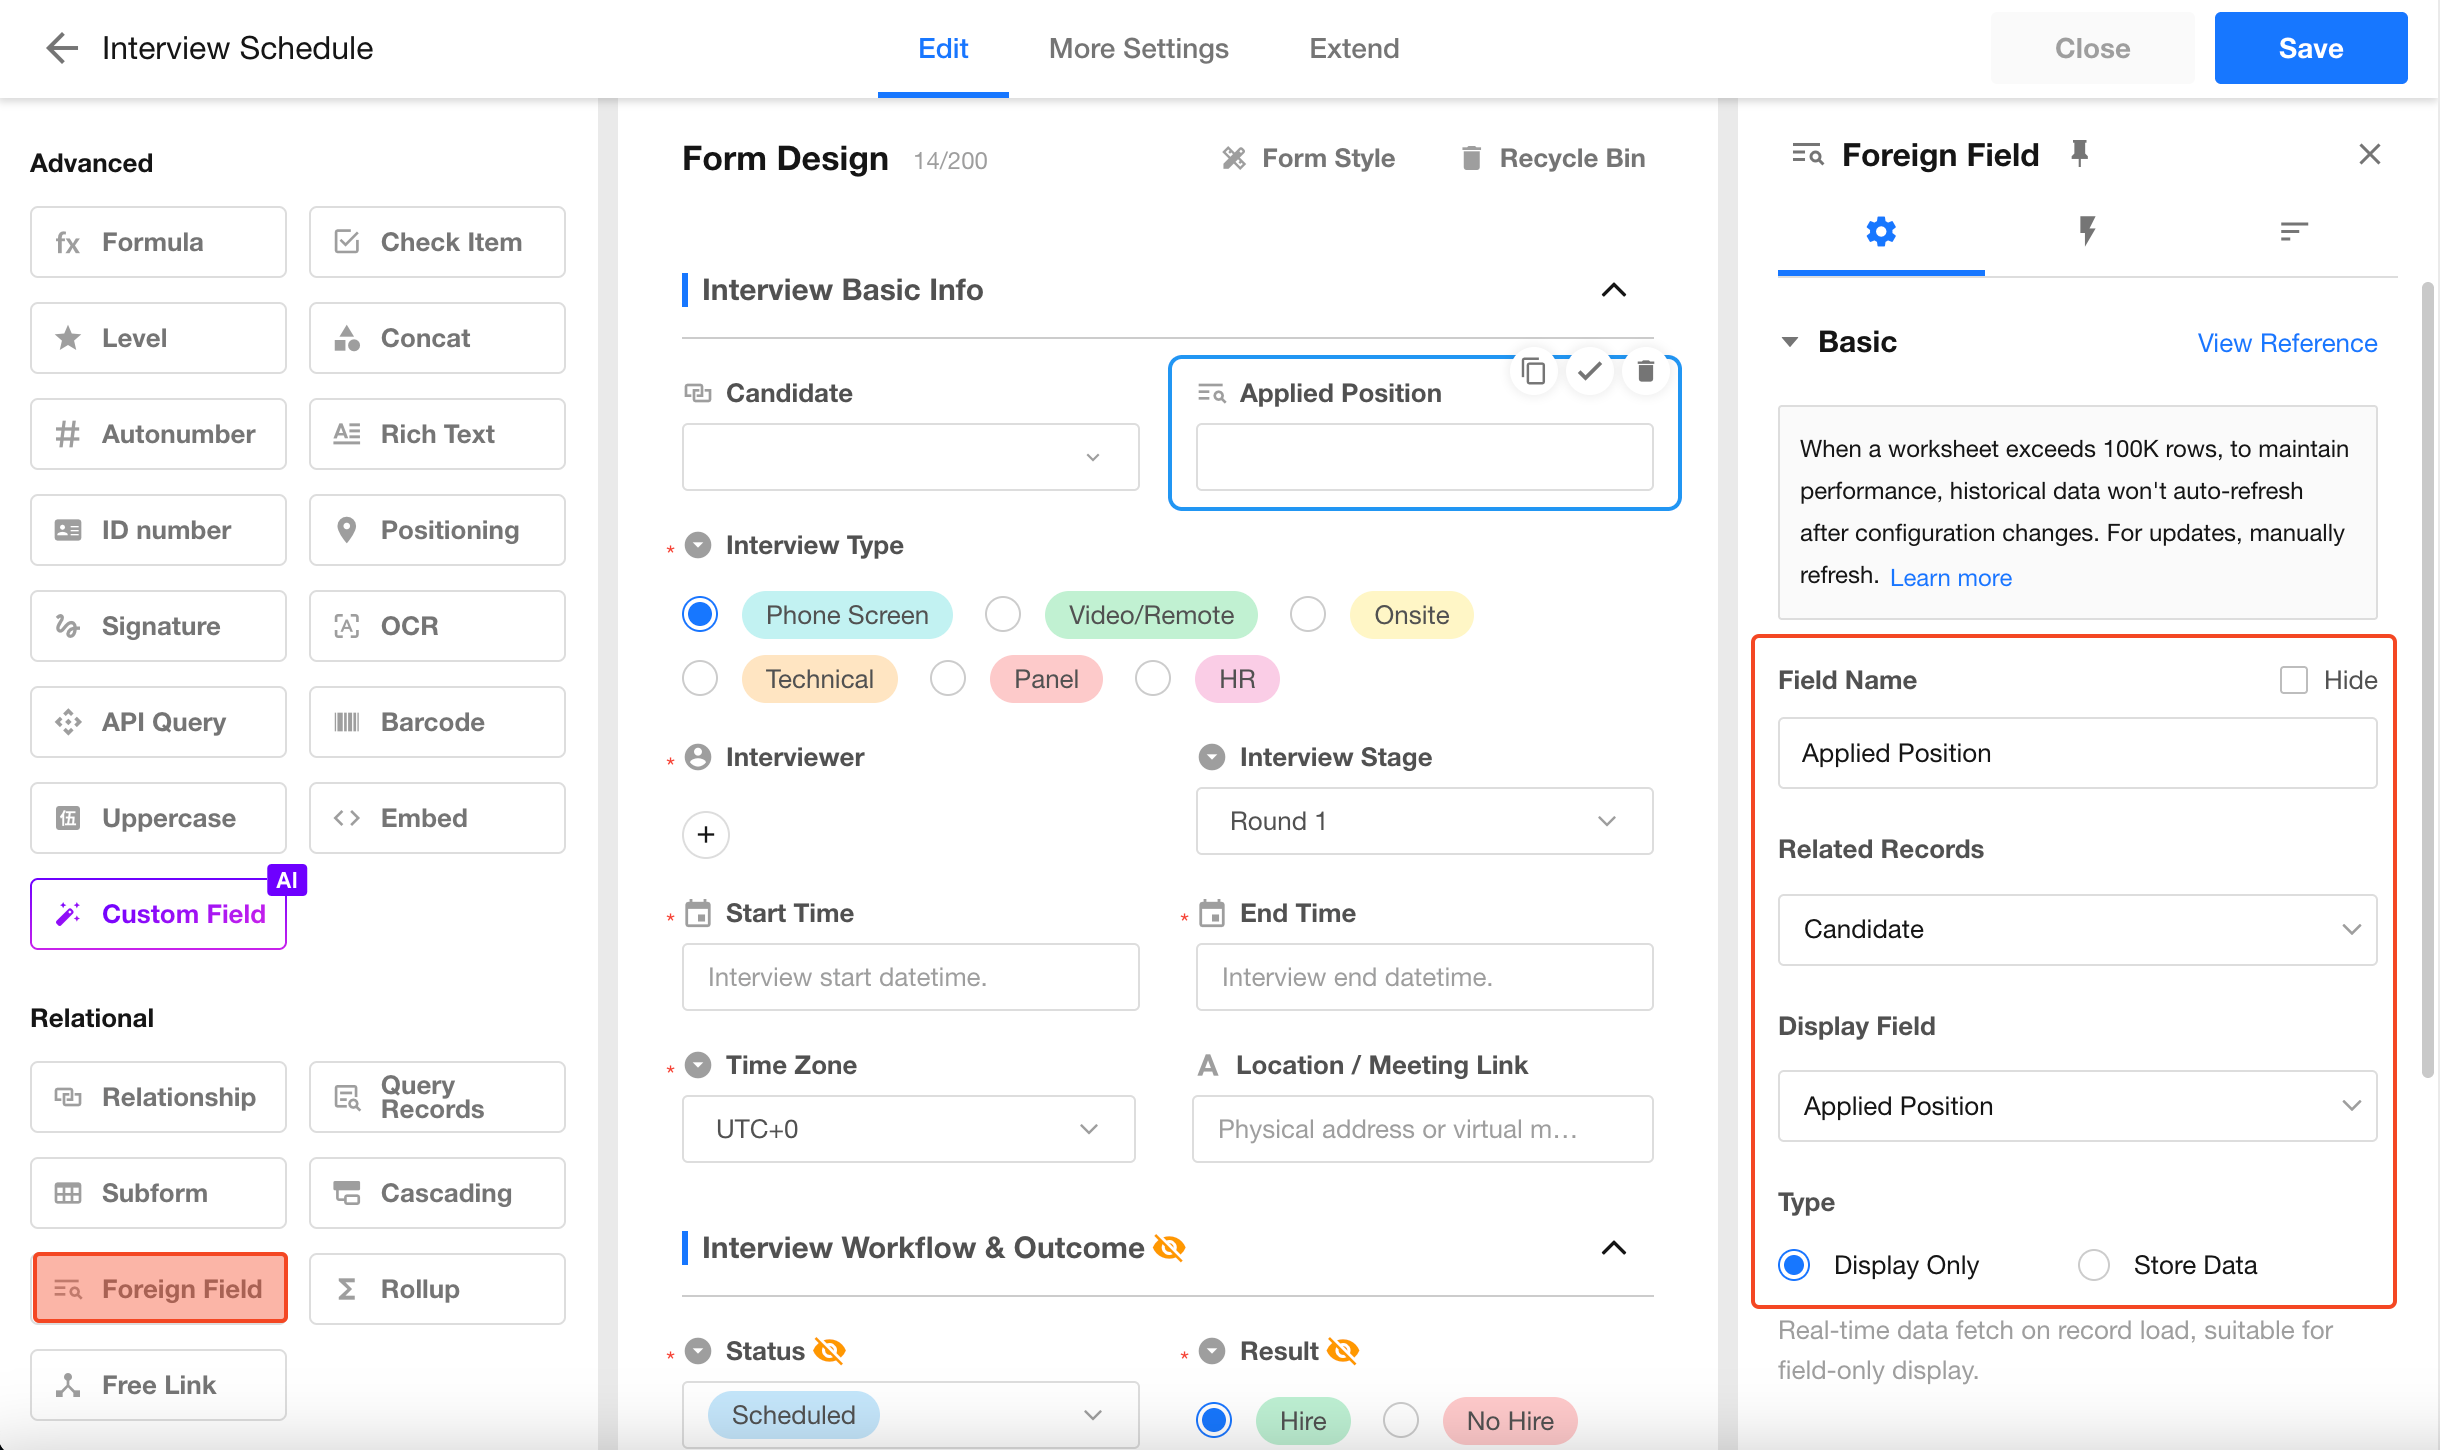
Configuration:
- Field name: Applied Position
- Relationship field: Candidate
- Display field: Applied Position
- Type:
- Display only (for real-time display)
- Data storage (for filtering, sorting, and calculations)
Repeat for Resume (Display only) field.
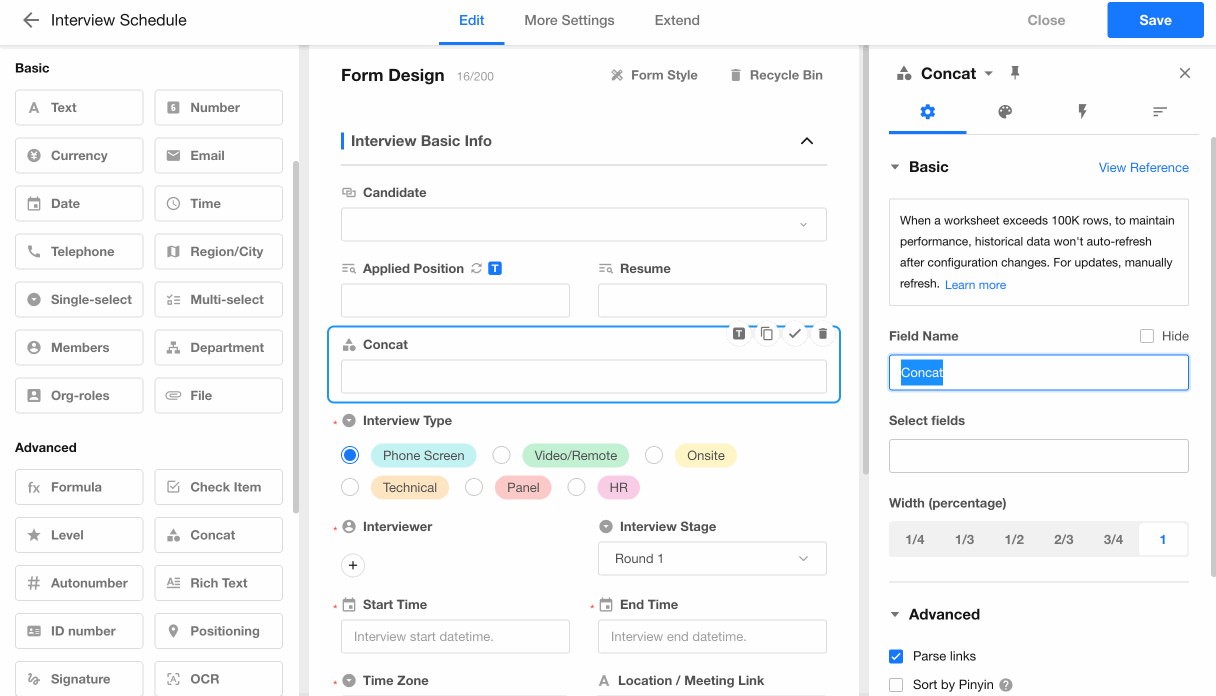
4) Set the Title Field
The title field uniquely identifies each record.
For better readability, use a concat field to combine key attributes (e.g., Name + Position), and set it as the title field.
Final structure:
| Field | Control Type | Notes |
|---|---|---|
| Title | Concat field | Name - Position |
| Candidate | Relationship field | Single record |
| Applied Position | Foreign field | Data storage |
| Interviewer | Member | |
| Start Time | Date | |
| End Time | Date | |
| Resume | Foreign field | Display only |
| Comments | Text | |
| Result | Single Select |
Final form:
3. Work with Views
A view defines how data is displayed and interacted with in a worksheet, including layout, visible fields, filters, and sorting.
Supported view types include:
- Table view
- Kanban view
- Org view
- Gallery view
- Calendar view
- Gantt view
- Map view
- Resources view
- Details view
- Custom view
Each worksheet includes a default Table view named “All”, which displays all records.
Views are commonly used to:
- Segment records by status or conditions
- Present data in different formats
- Limit visibility based on user roles
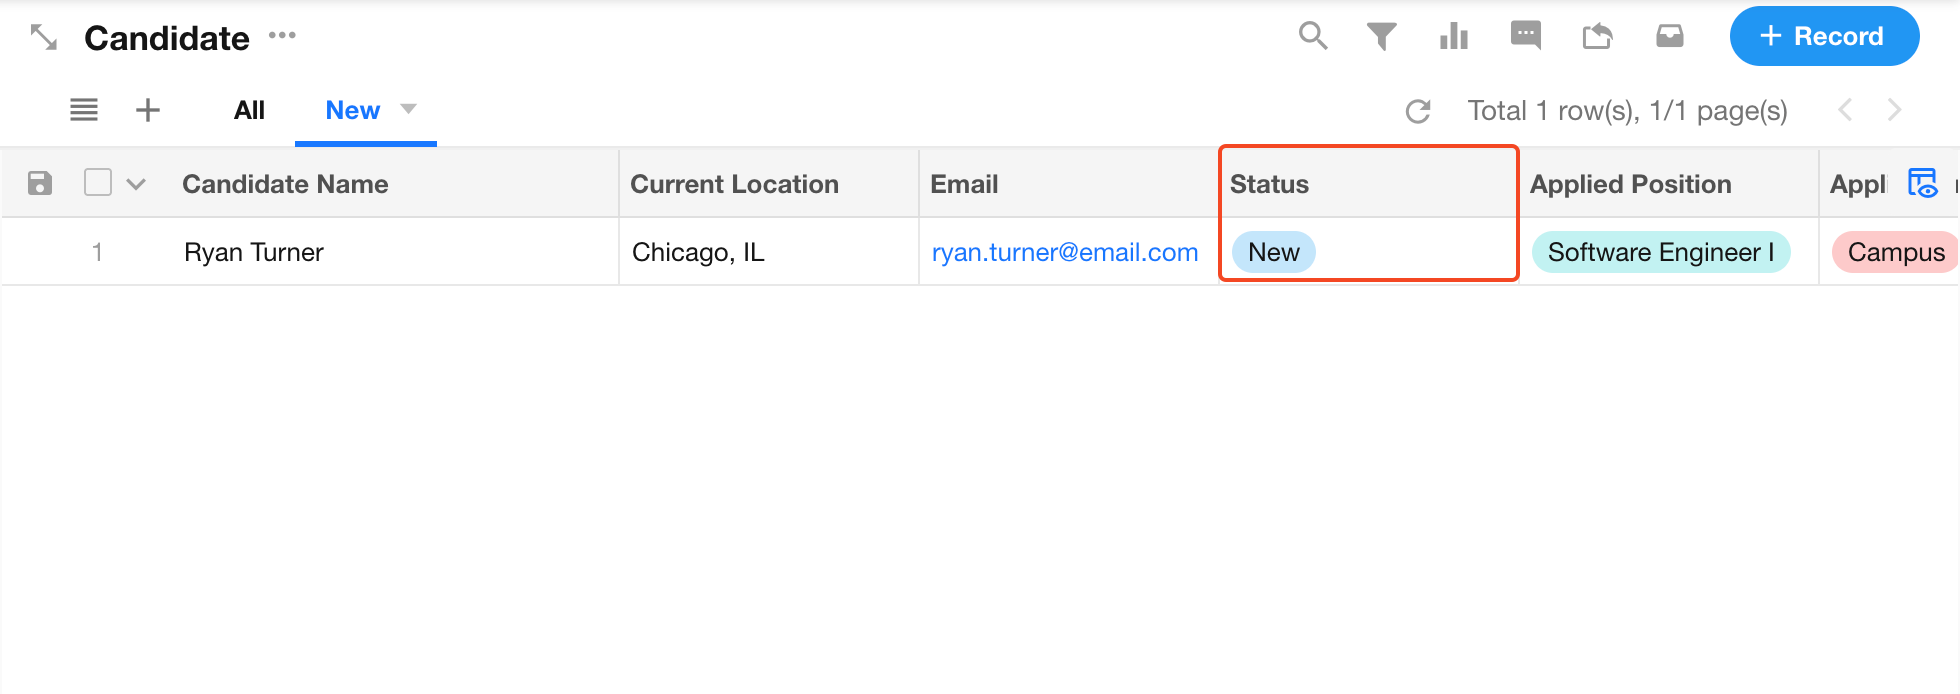
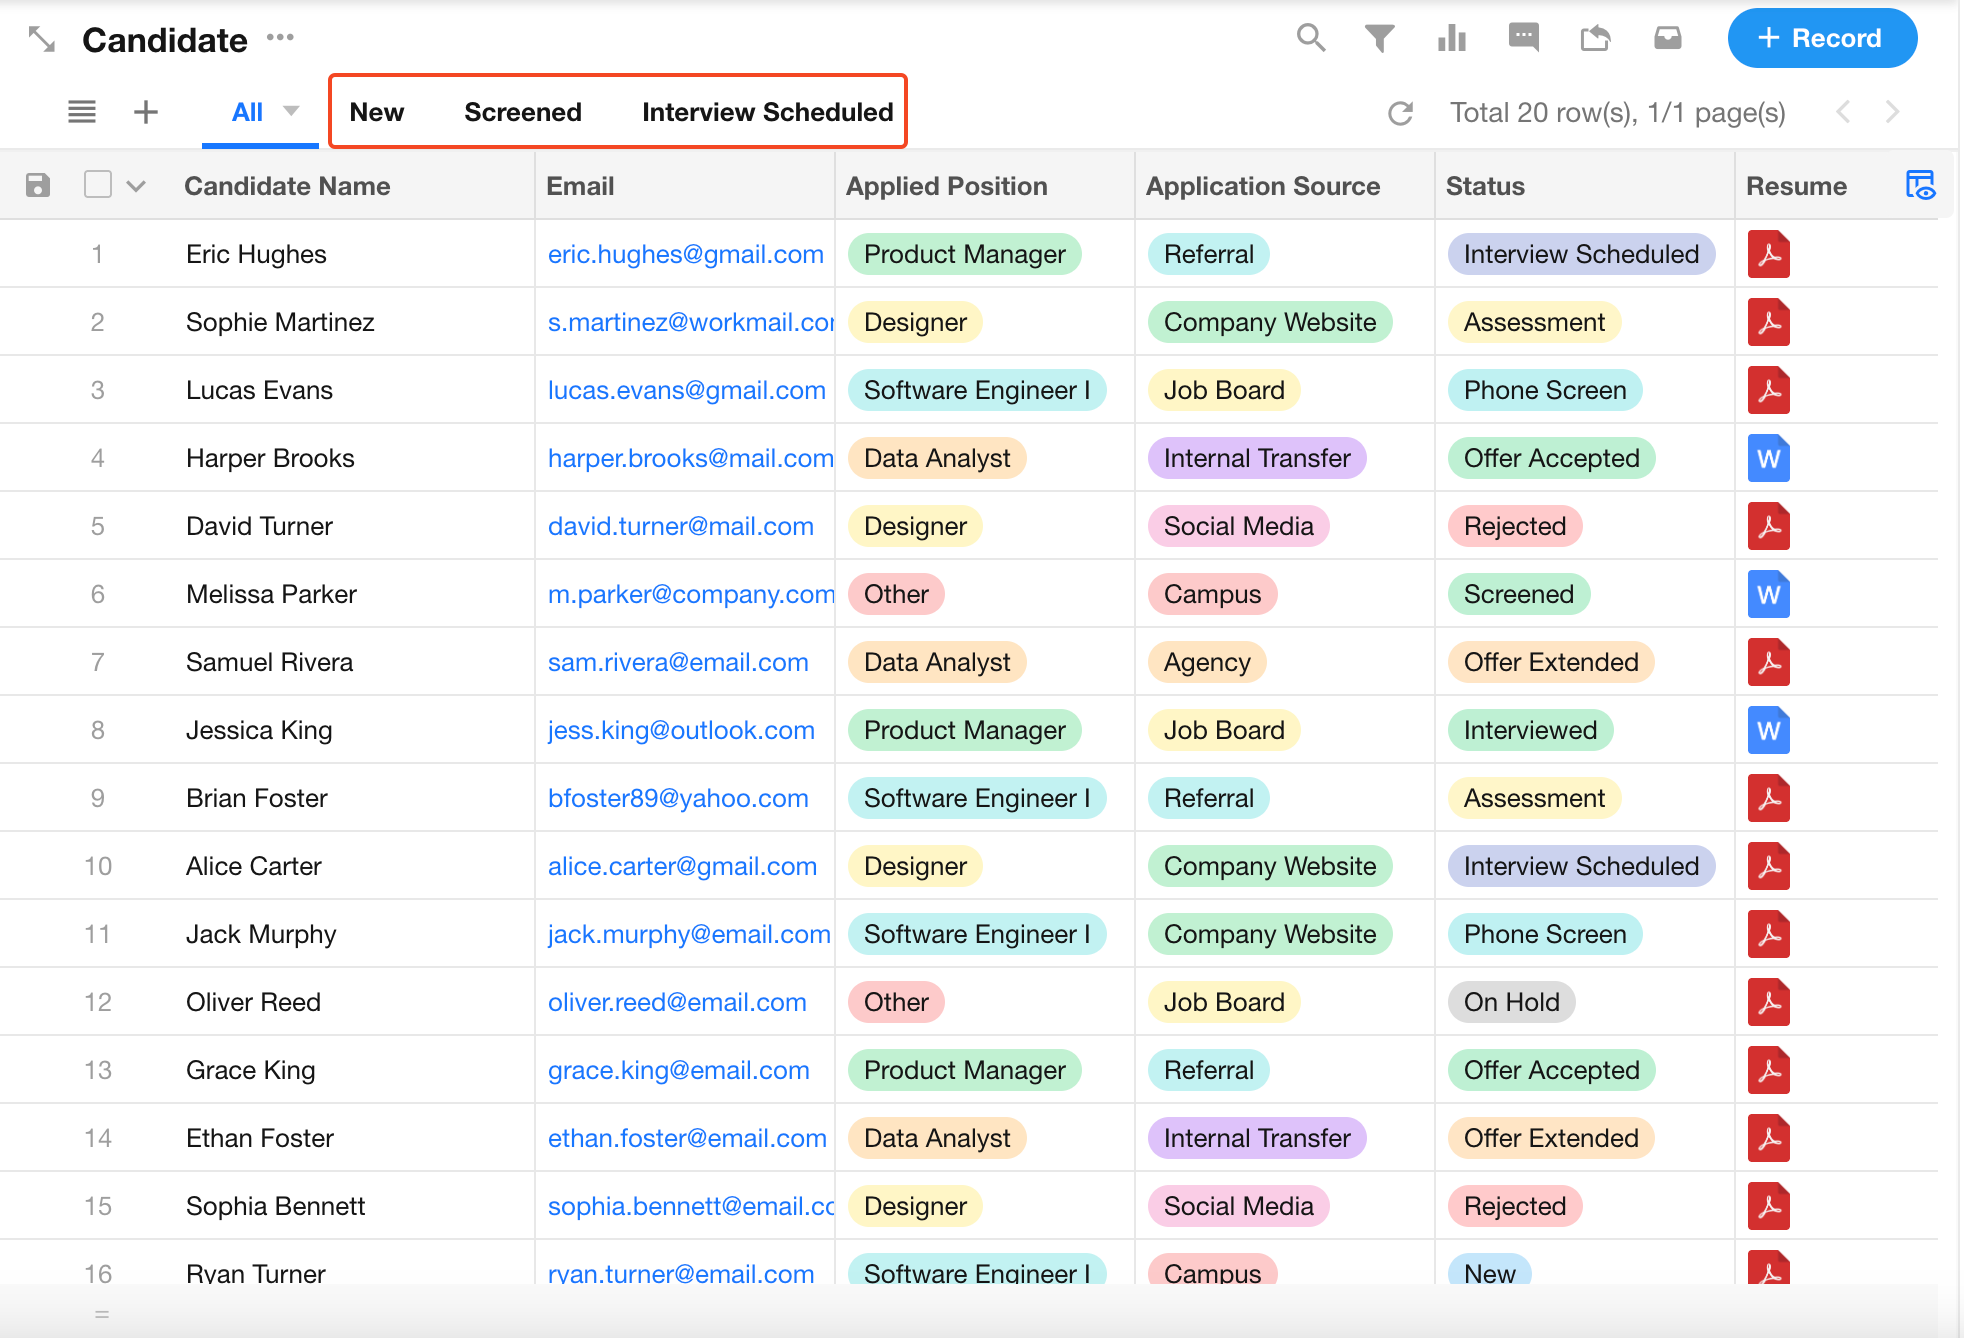
3.1 Manage Candidates by Status
1) Create Table Views by Status
Create multiple table view views to segment candidates by status.
Example: New Resumes view
- Filter: Status = New Resume
- Sort: Created Time
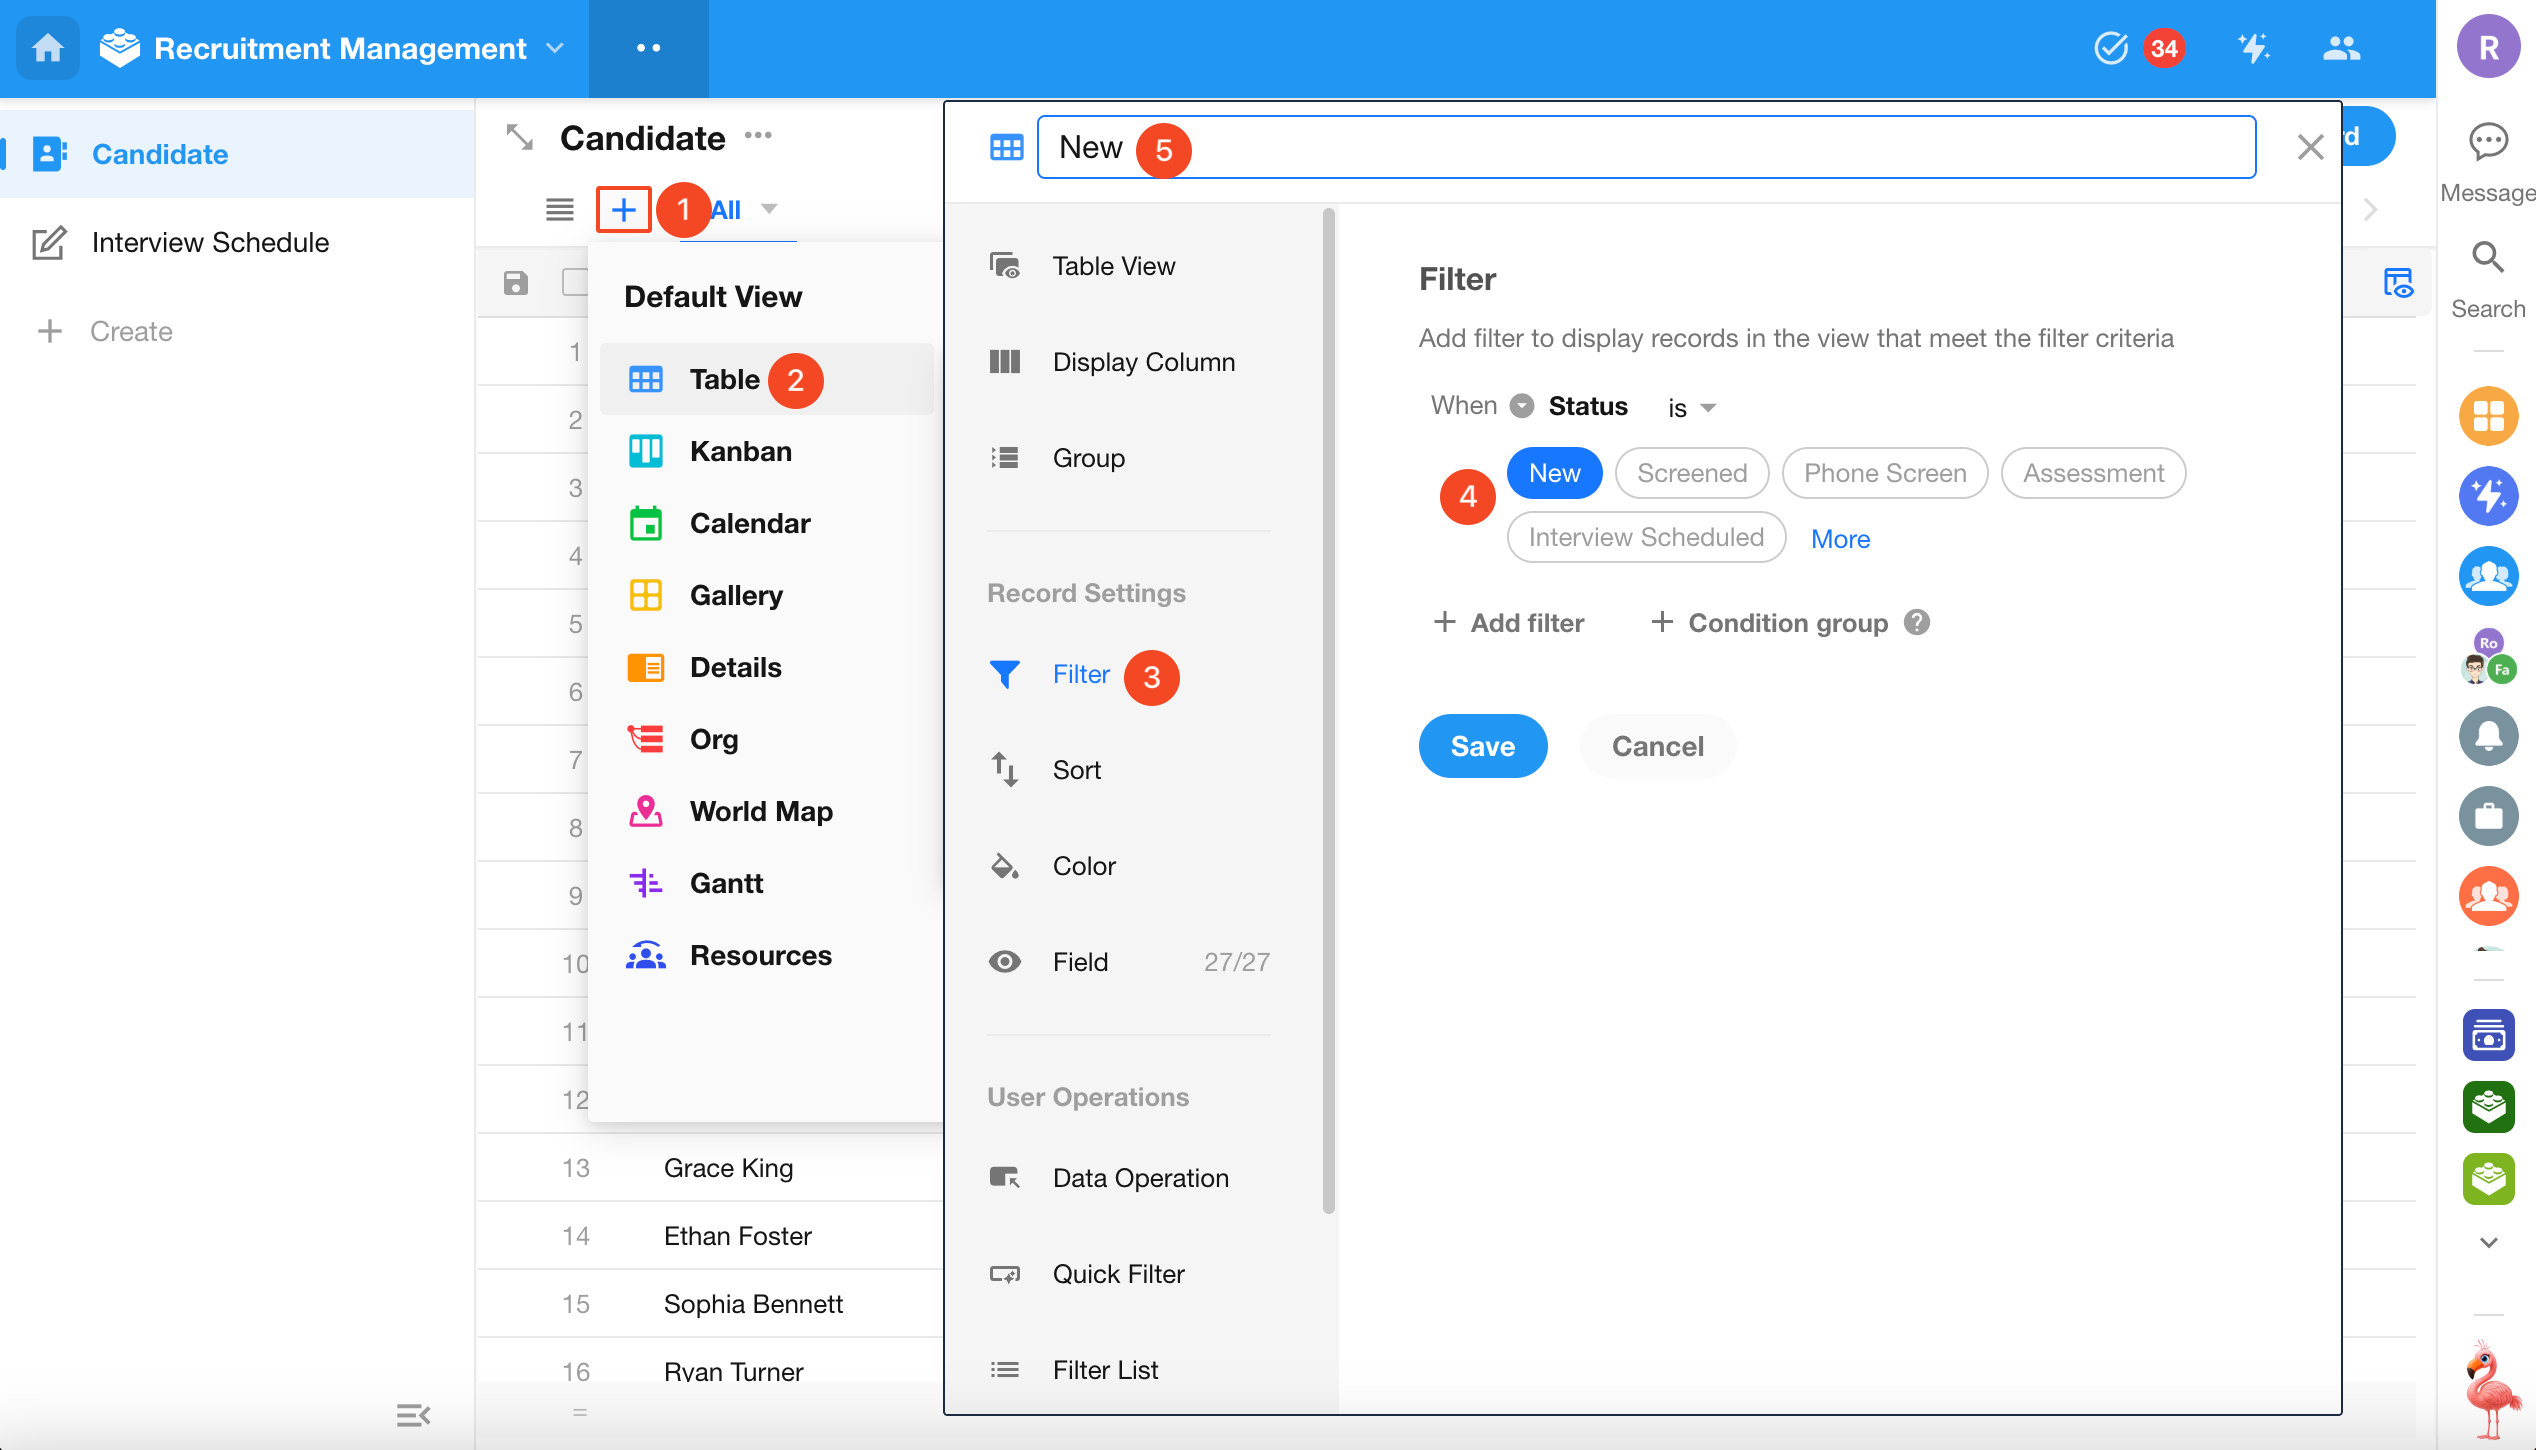
Result:
Repeat this configuration to create views for other statuses:
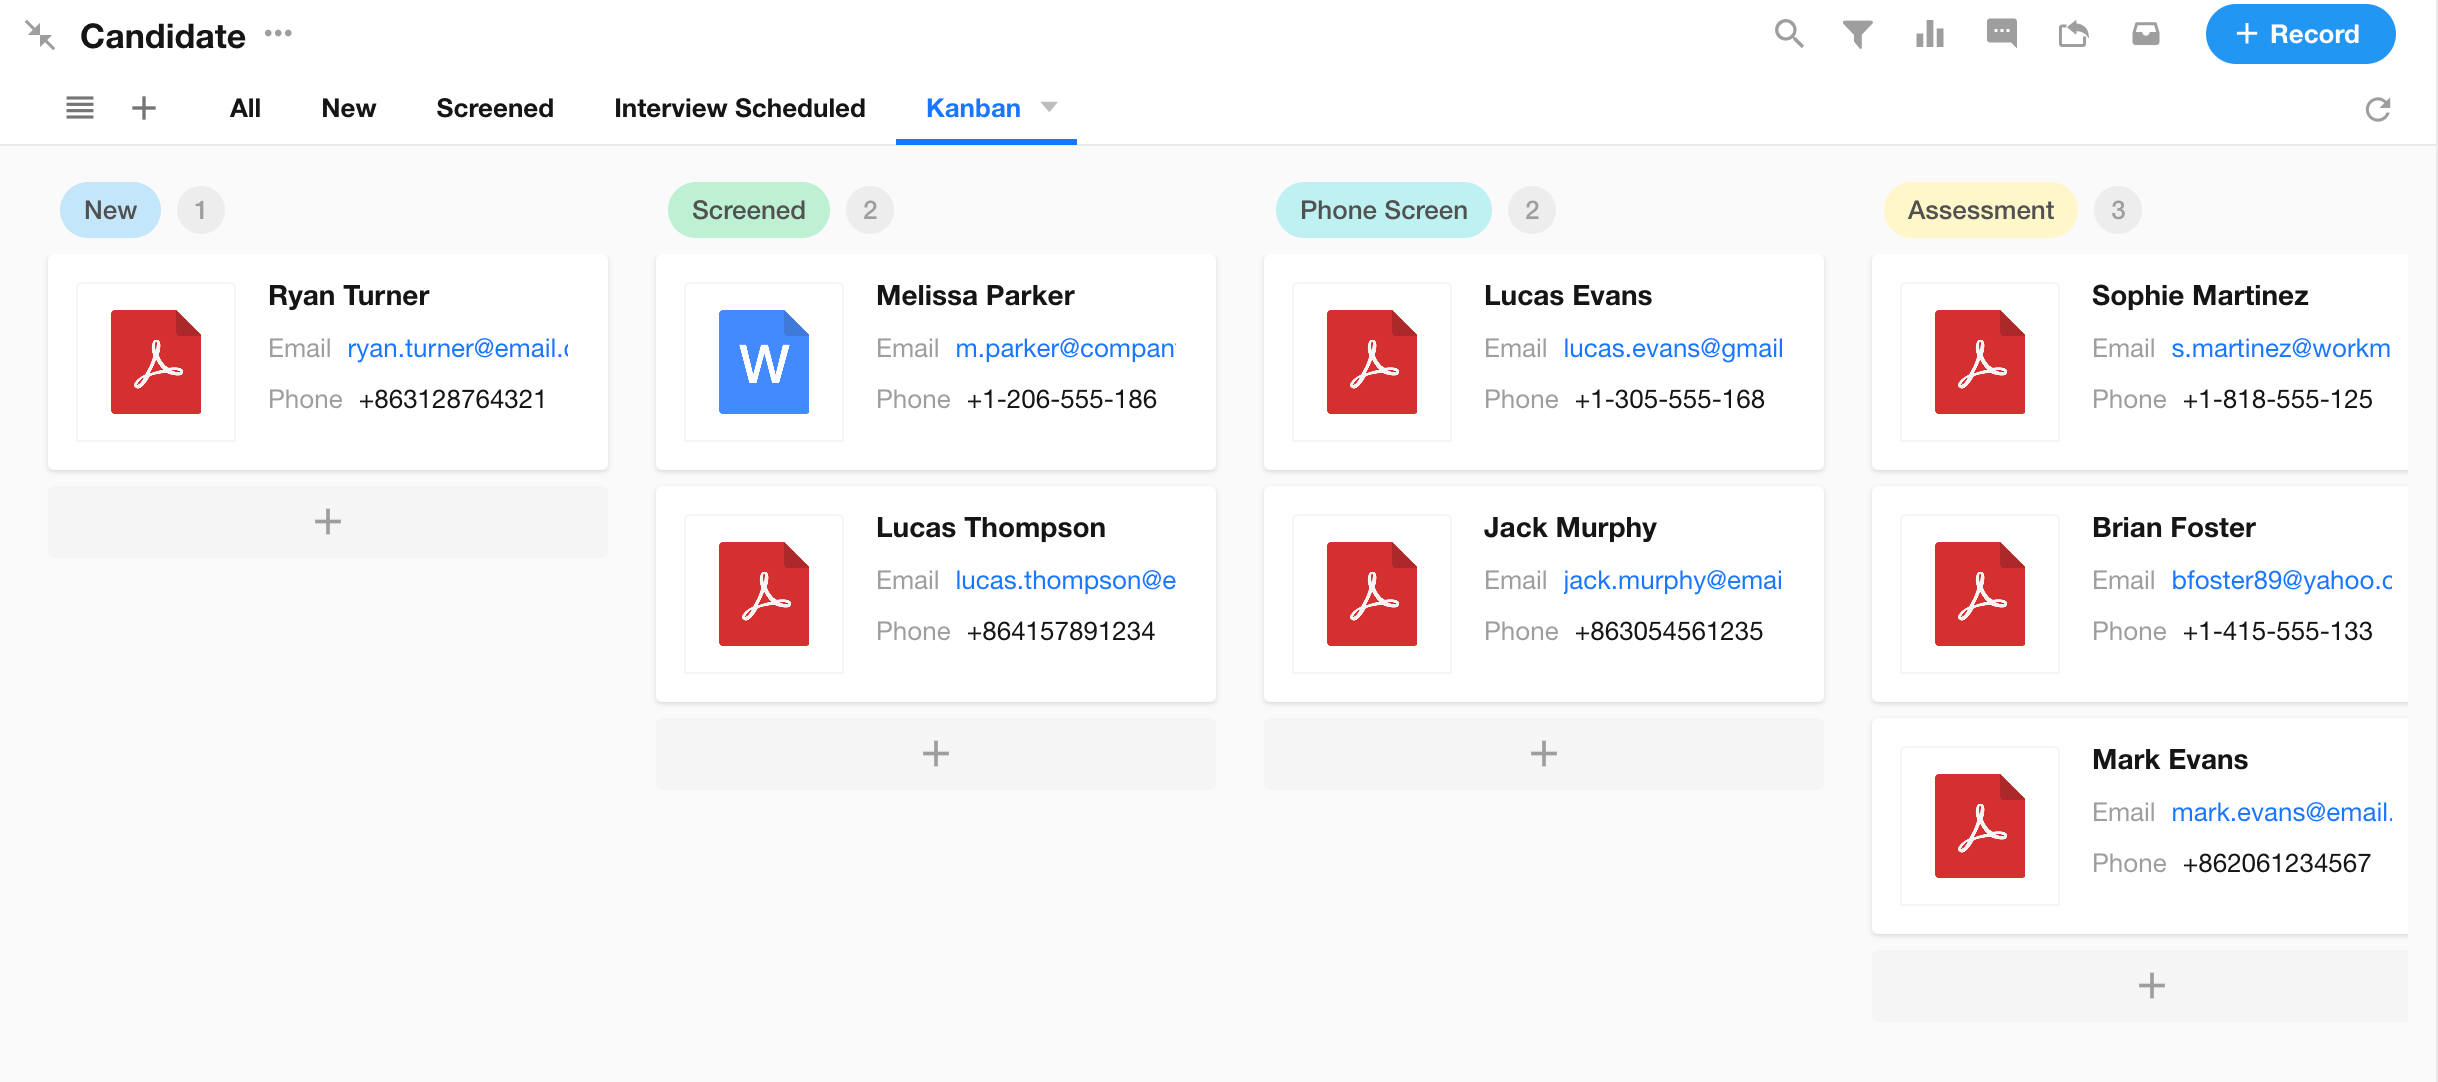
2) Use Kanban View
Use Kanban view to group records by status.

All records are displayed and grouped by status:
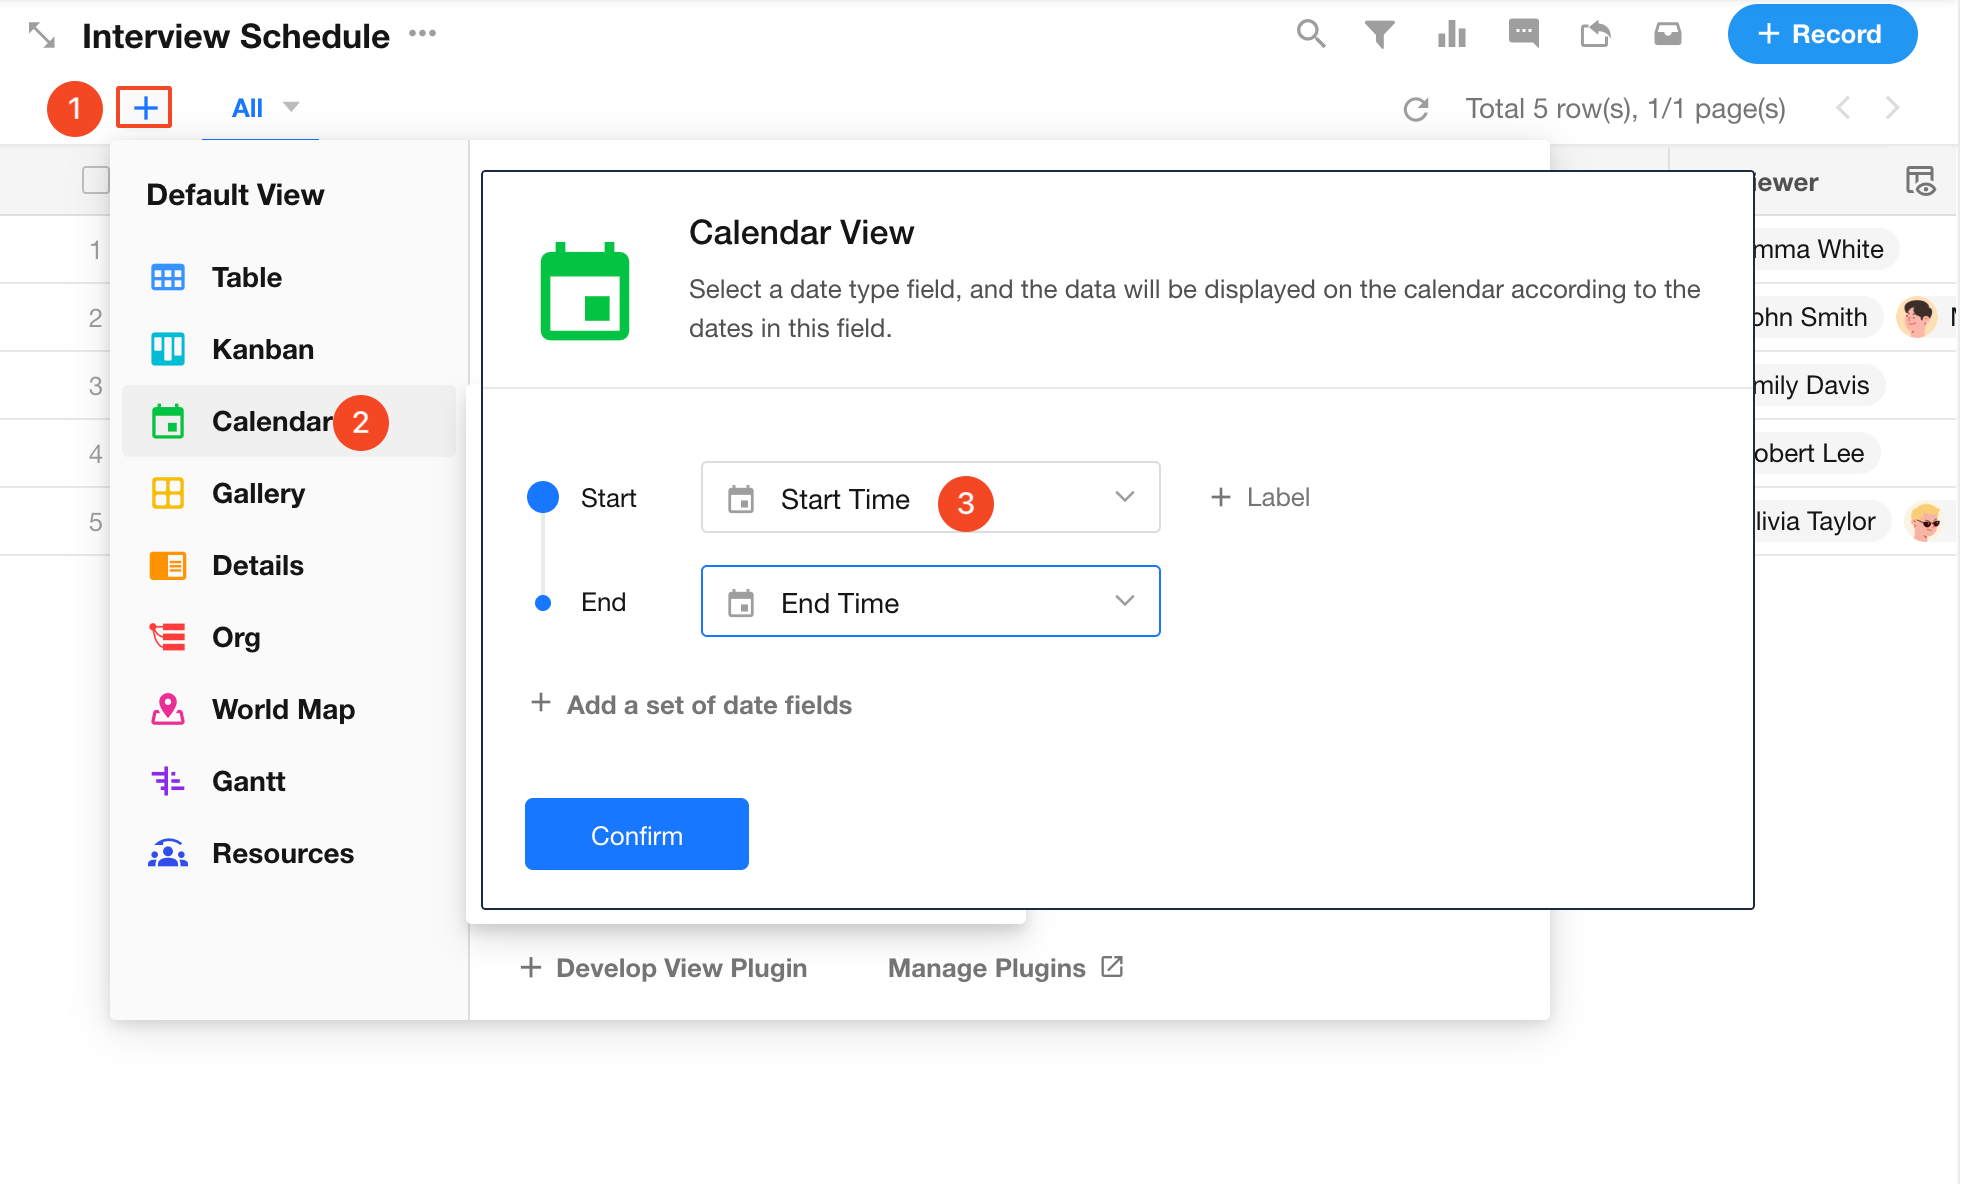
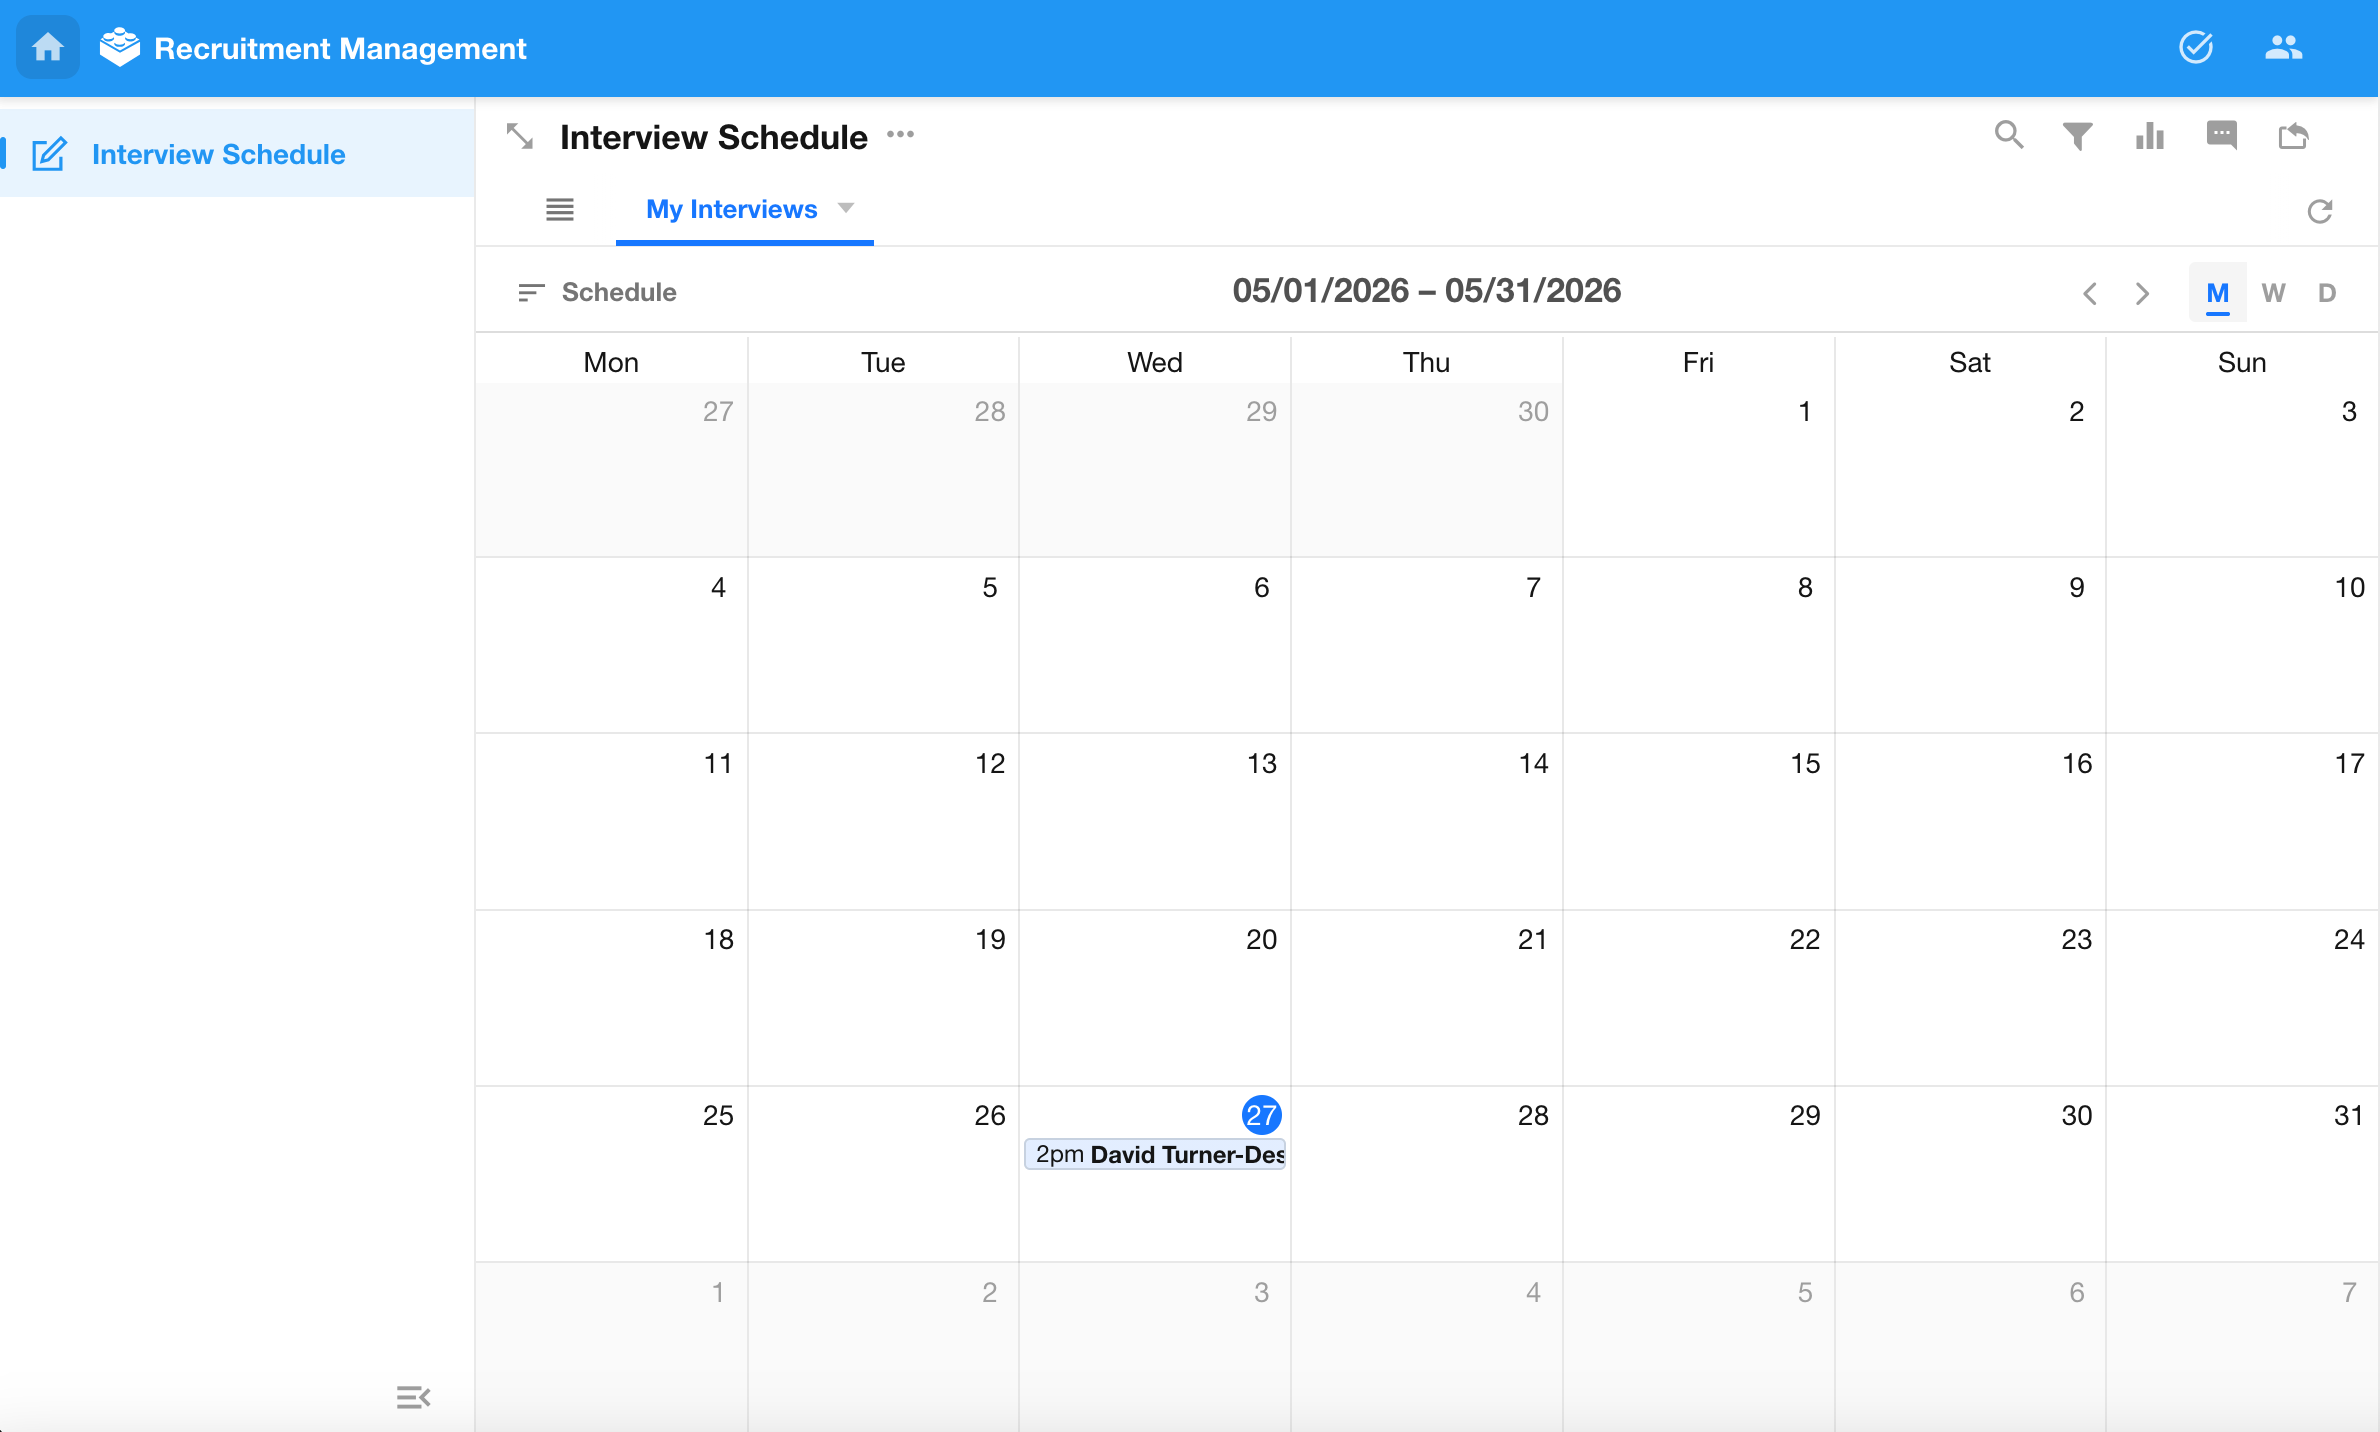
3.2 Use Calendar View for Interview Scheduling
Create a Calendar view in the Interview Schedule worksheet.
- Start time: Interview Start Time
- End time: Interview End Time
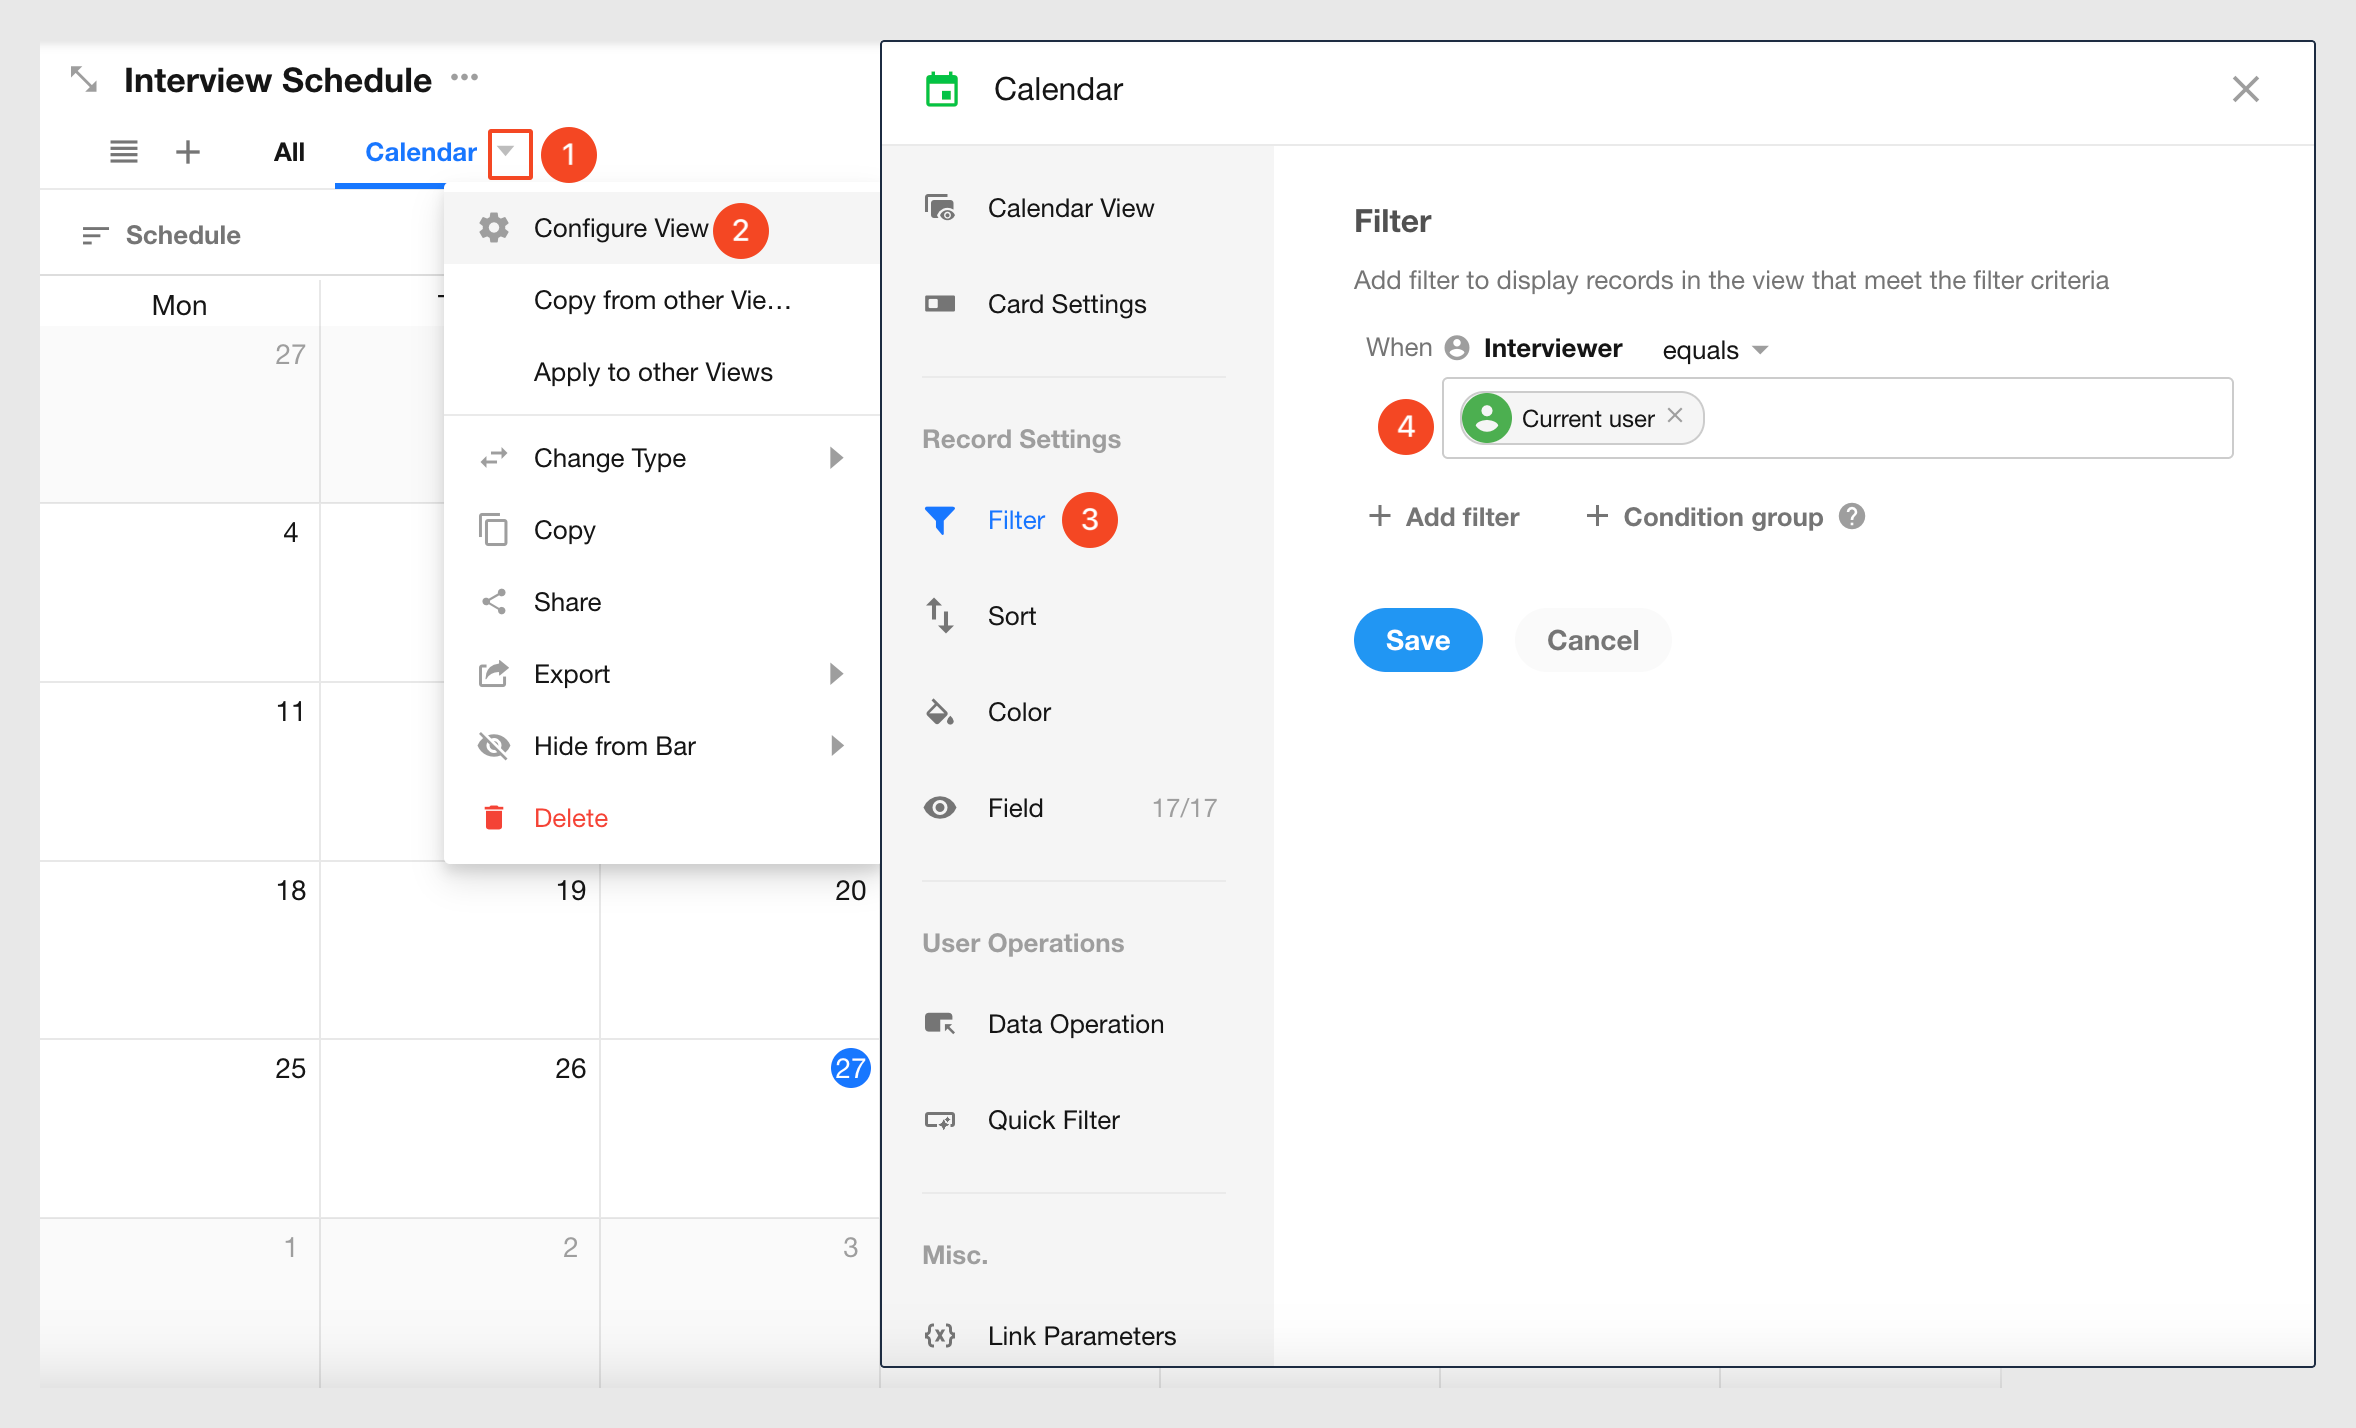
Apply a filter to show only relevant records:
- Interviewer = Current User
4. Roles and Permissions
Roles control how users access and interact with data in an app.
Role types:
-
App Admin
Full access to configure the app, including structure, features, and permissions. This role cannot be modified. -
Custom Roles
Used to define data access and actions for users.
In this example:
- Candidates submit data via a public form (no role required)
- HR acts as App Admin
- Department managers are assigned a custom role
4.1 Invite Users
Invite users via email or phone number.

4.2 Configure Roles and Permissions
1) Configure Role for Department Managers
Each app includes default roles such as Member and Read-only. These can be modified or duplicated.
Configure permissions as shown:
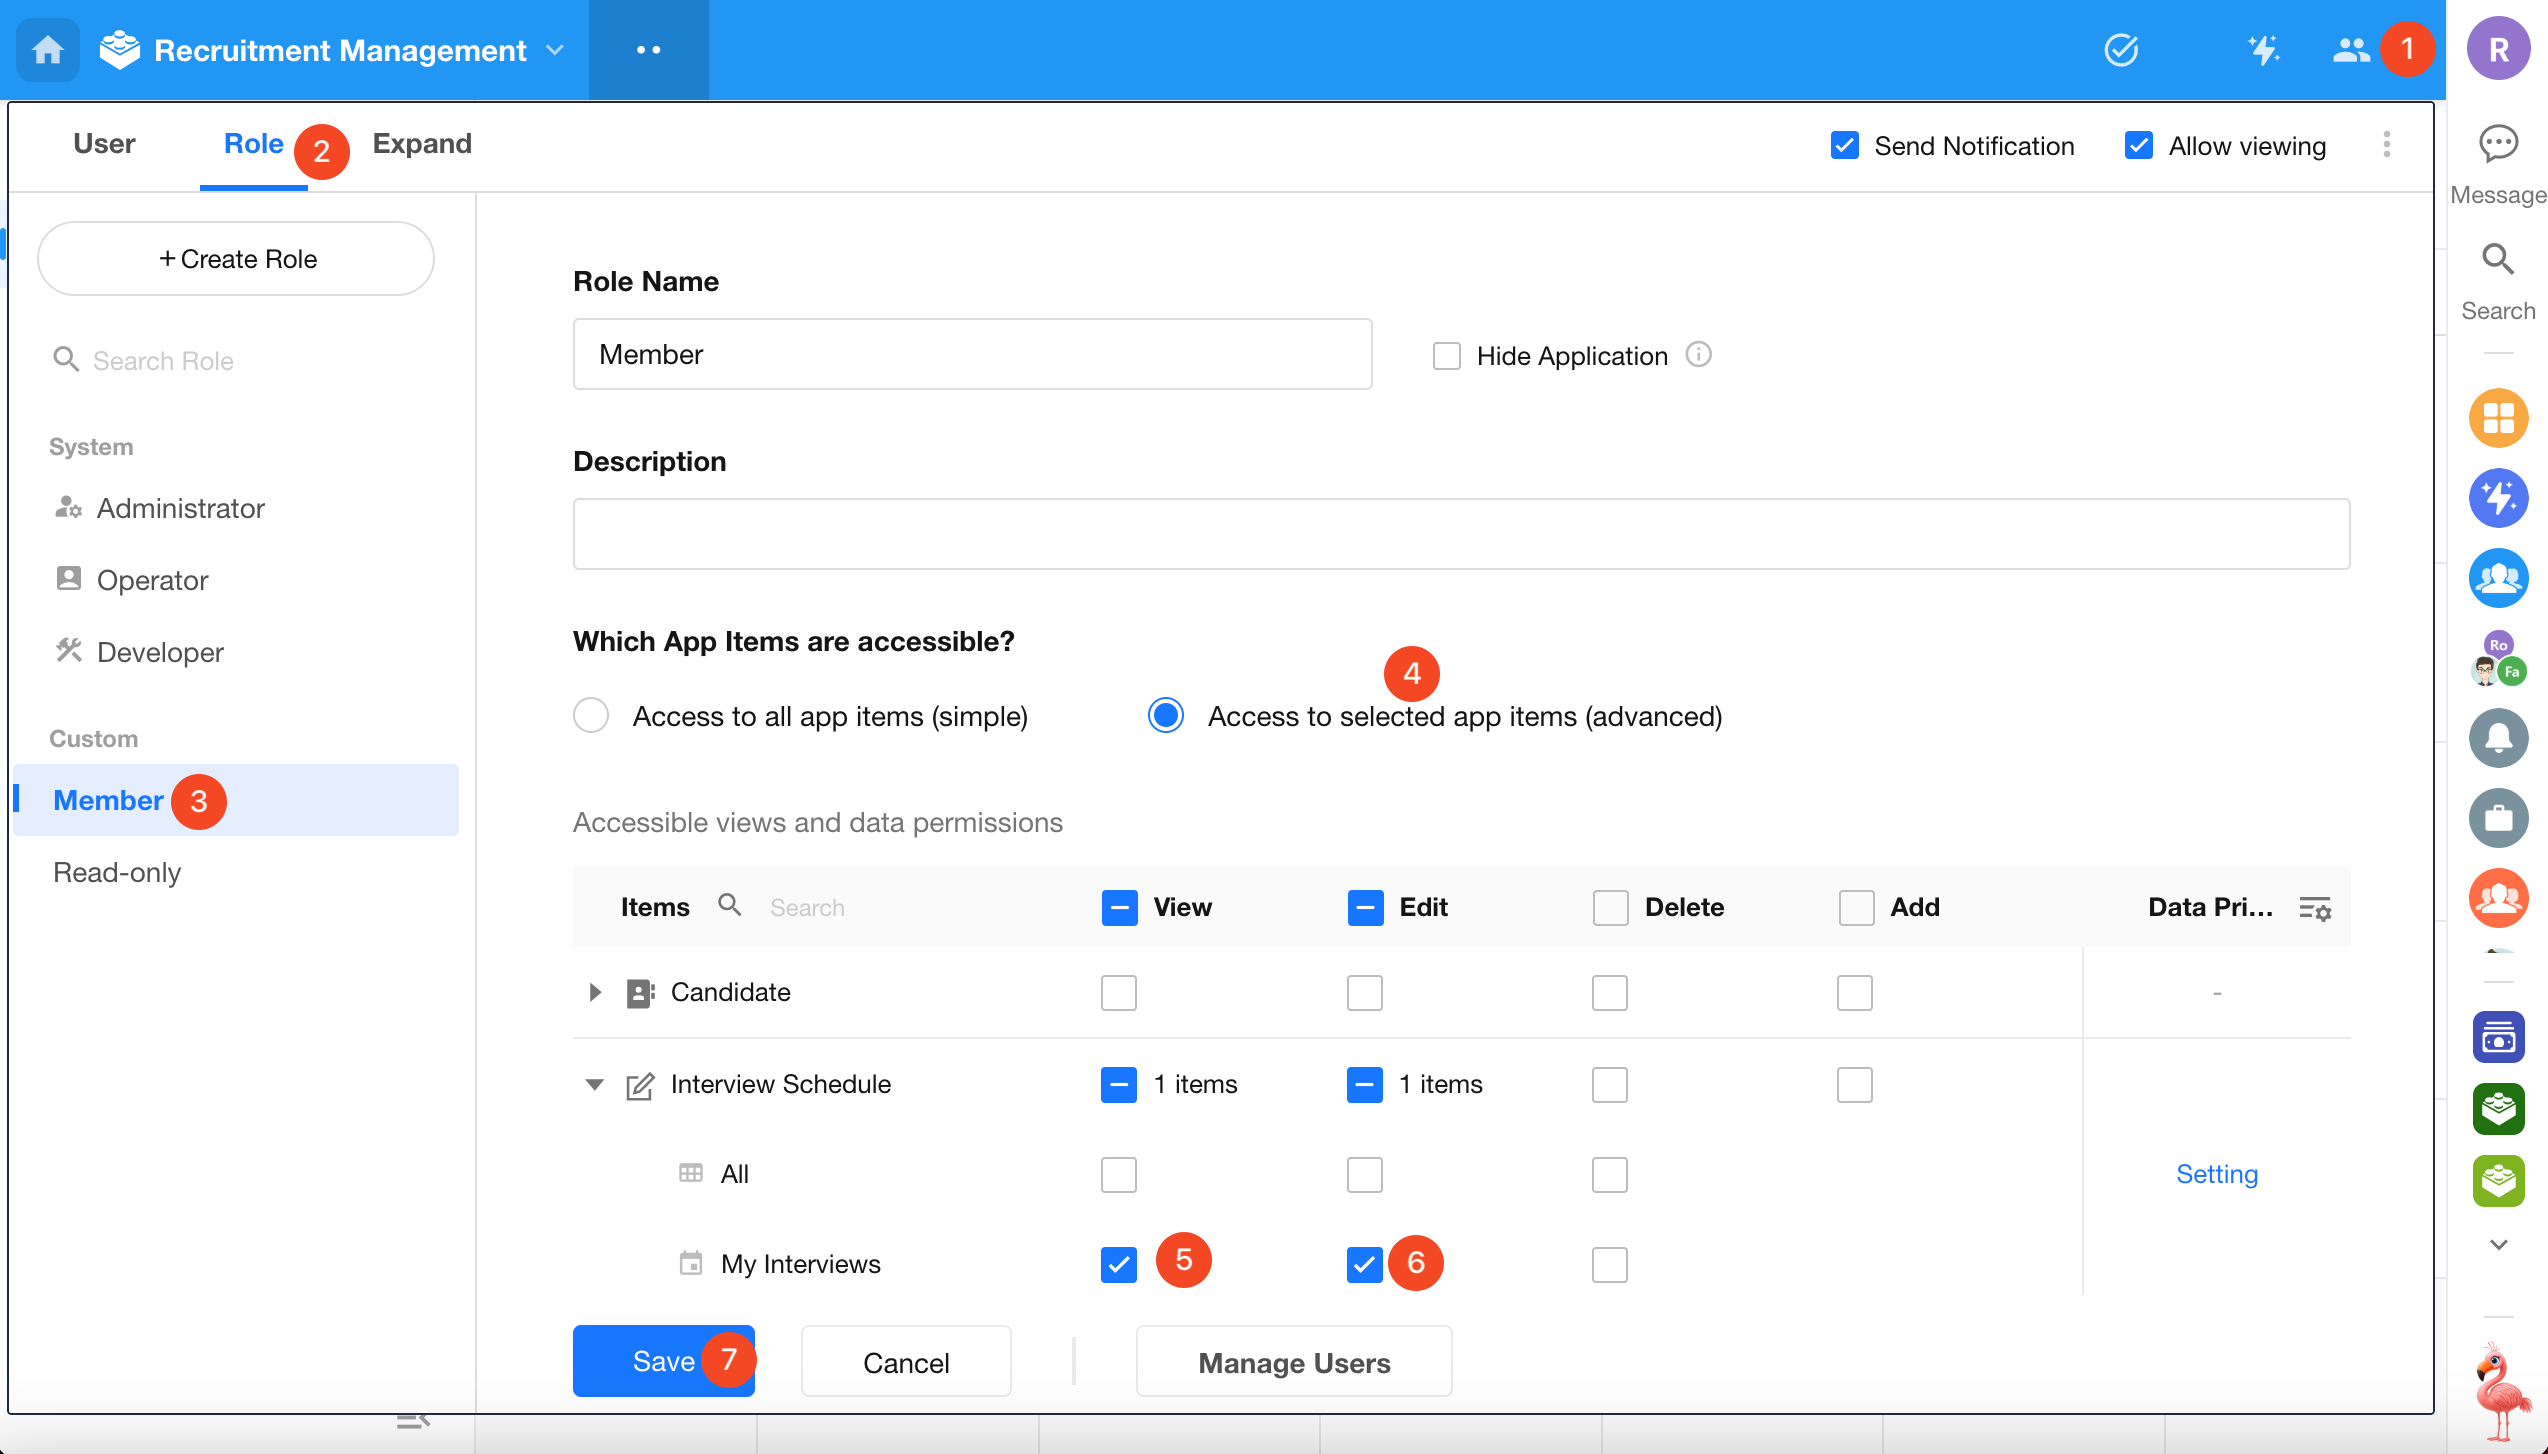
Key settings:
- Step 5: Grant access to the My Interviews view
- Step 6: Allow editing of records within that view
Users will not have access to:
- Views in the Candidate worksheet
- The “All” view in the Interview Schedule worksheet
2) Assign Users to Role
Add specific users (e.g., department managers) to the role.
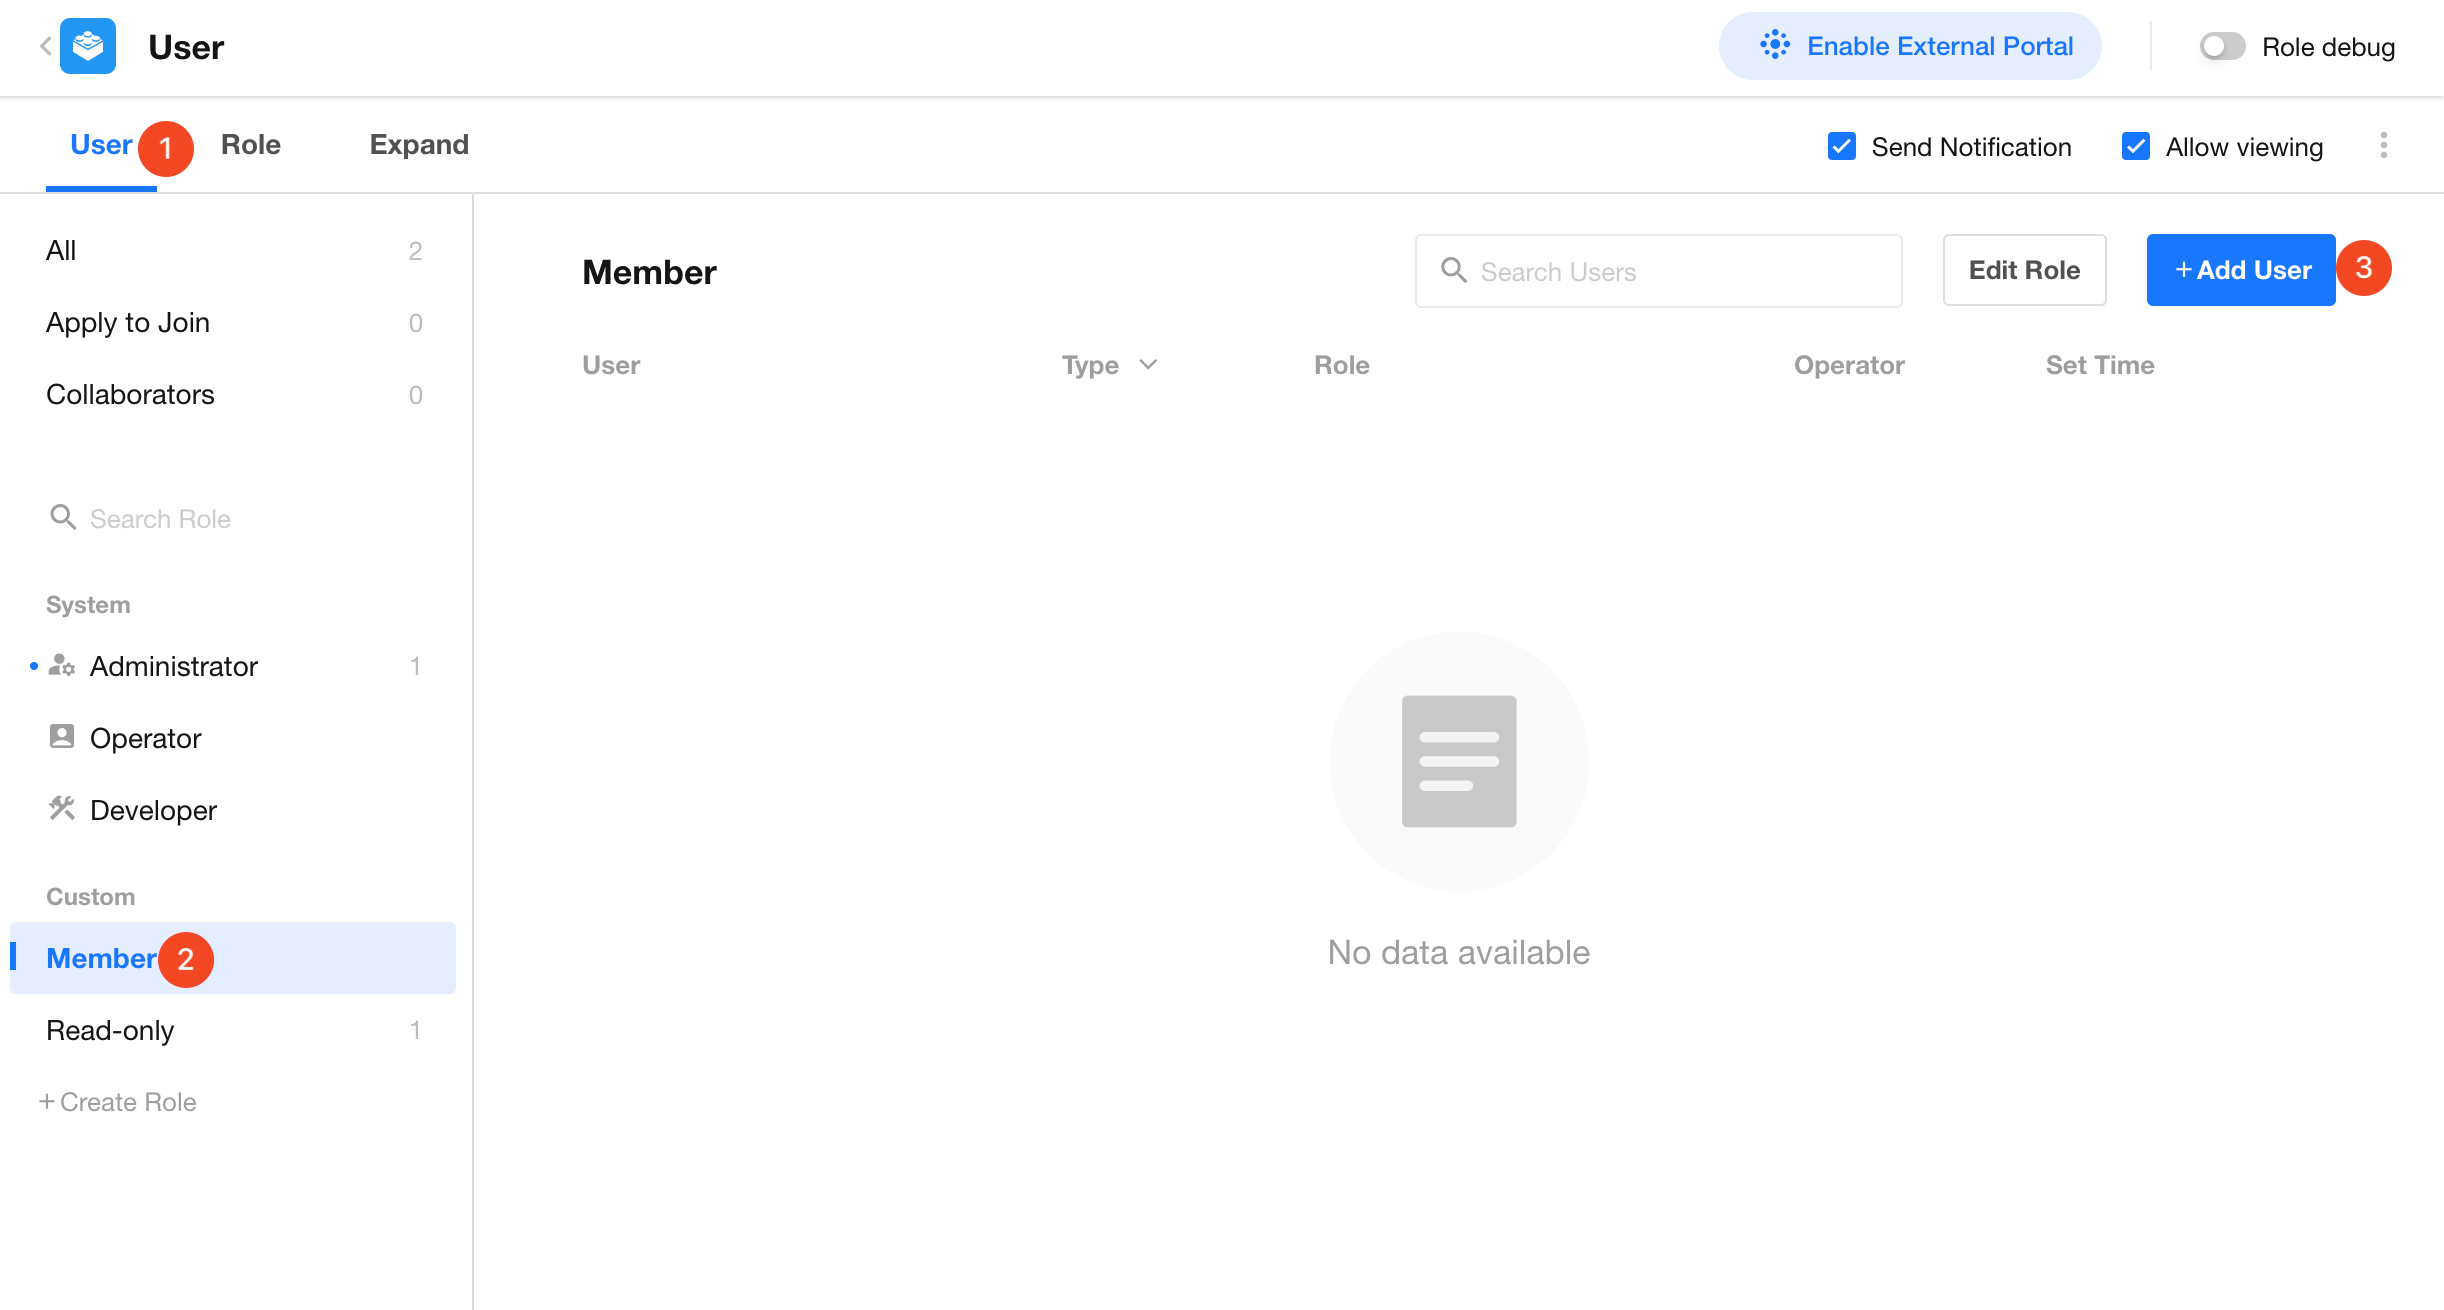
3) Role Access
Users can only access records in the My Interviews* view:
4) Update Interview Results
To update interview results:
- Open the interview record
- Edit the Comments and Result fields
- Save changes
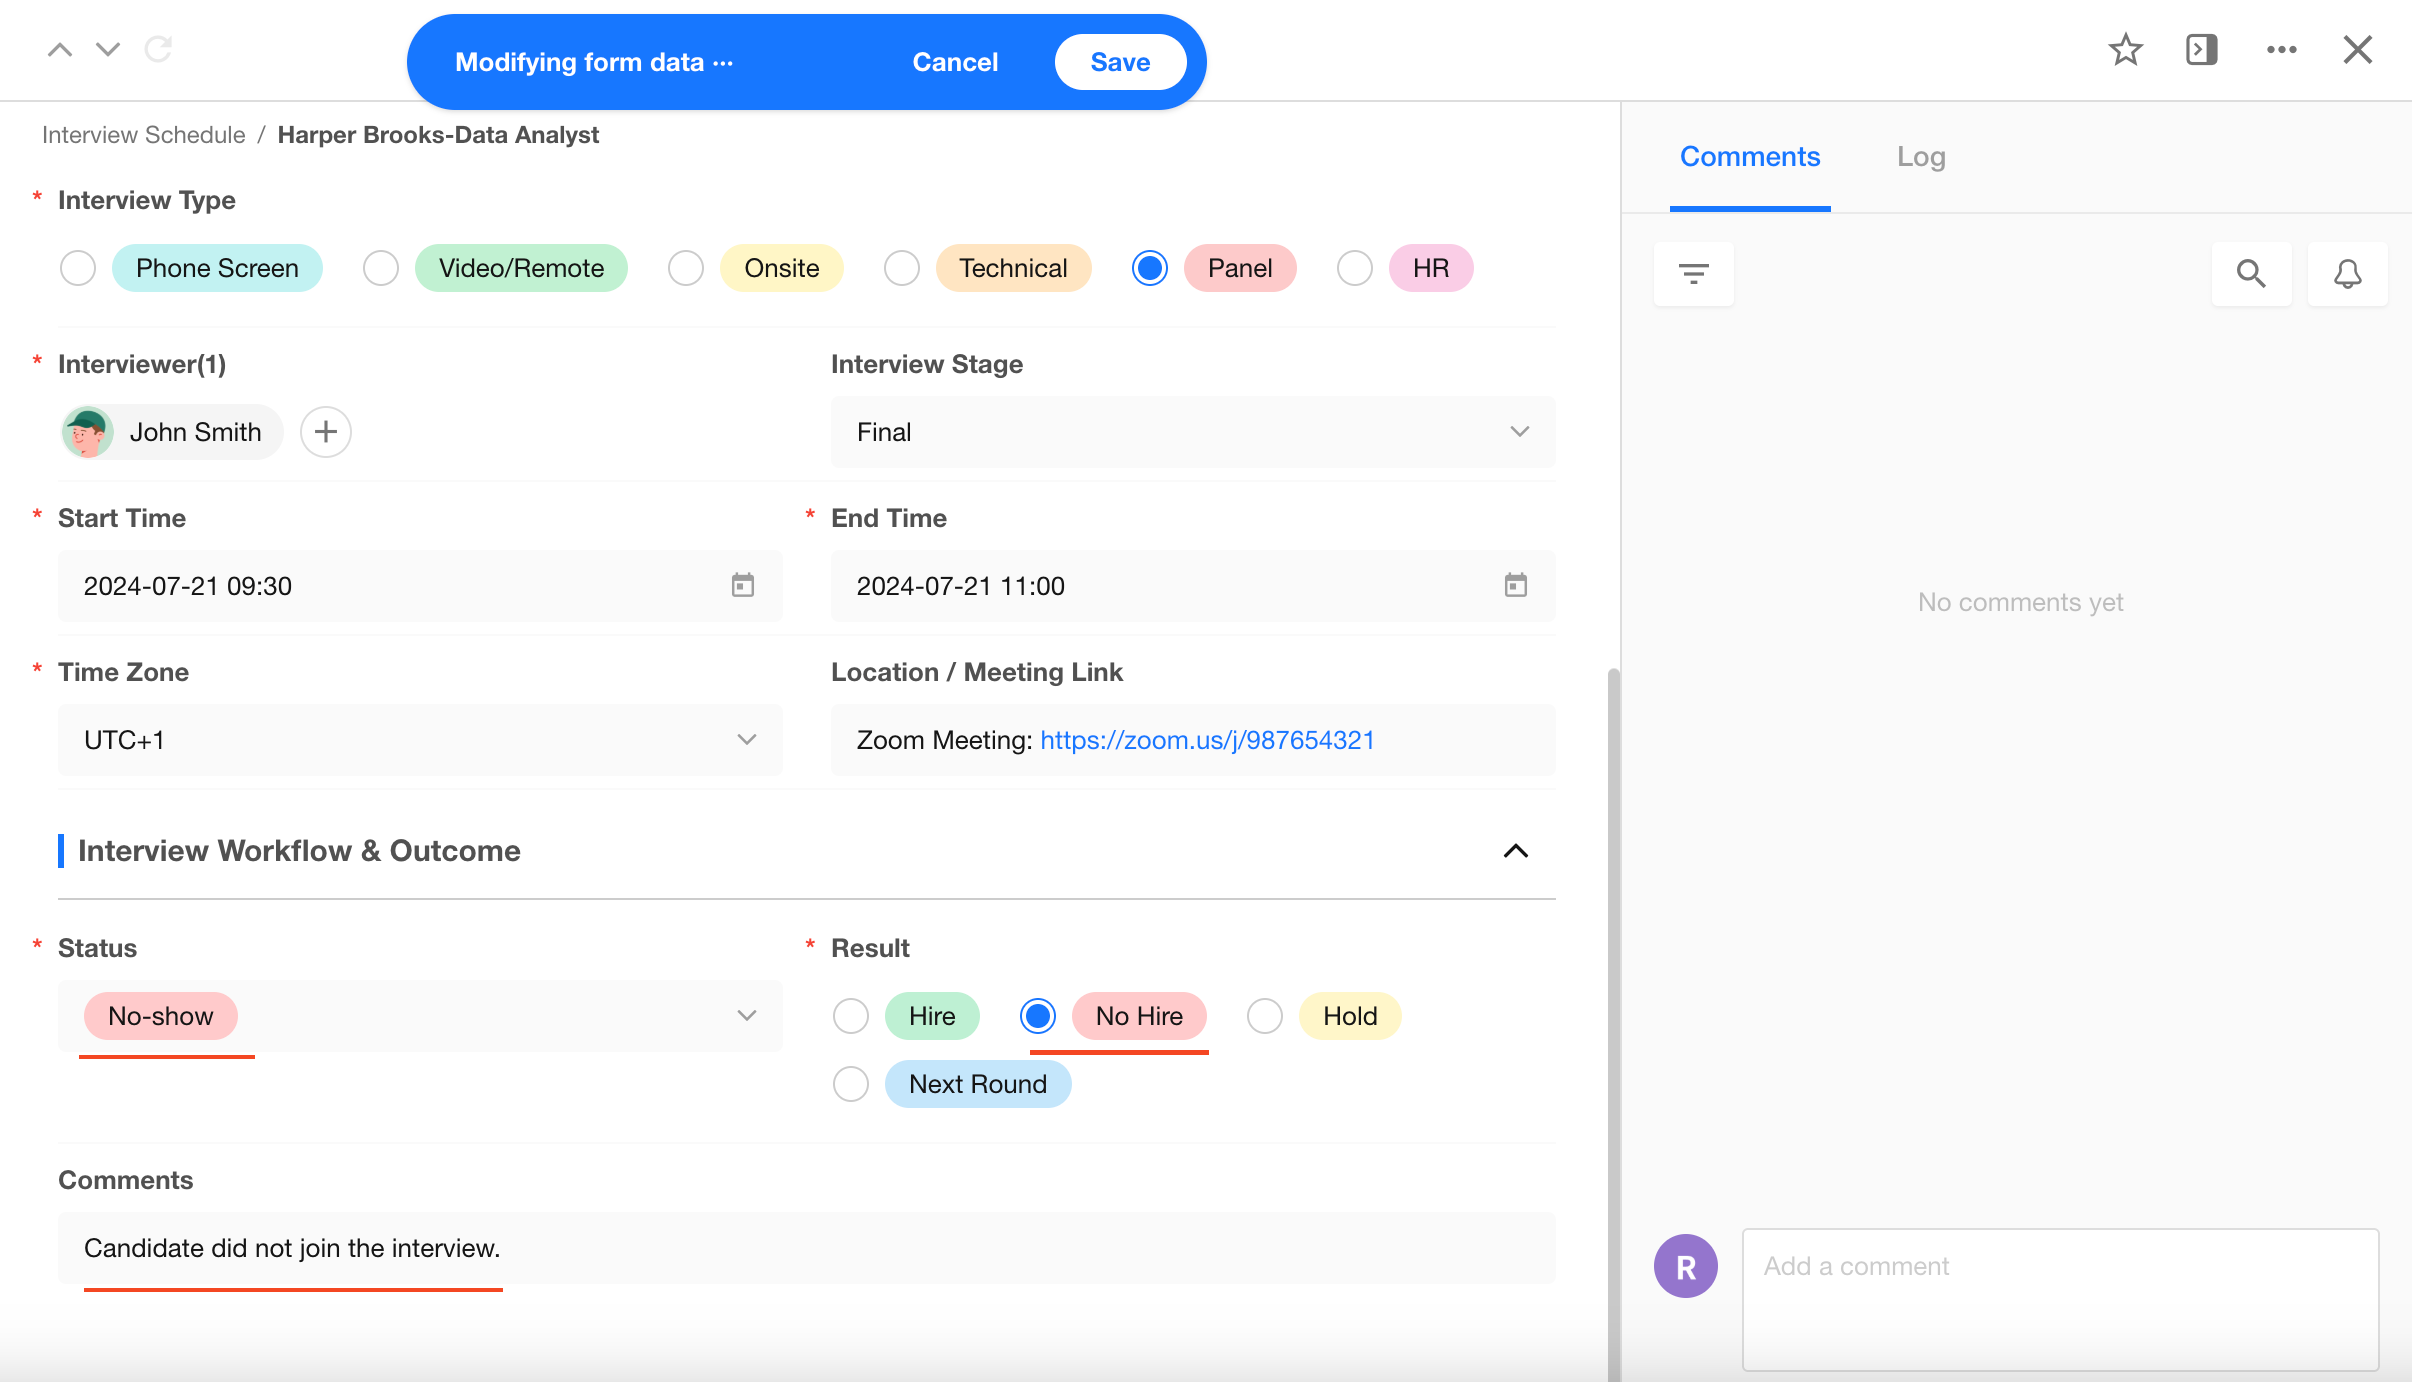
Permissions can be configured at both the record level and field level.
5. Use Workflows
A workflow consists of a trigger and one or more automation nodes.
When the trigger condition is met, the workflow executes the configured actions automatically.
Workflows are used to automate repetitive operations and streamline business processes.
The following automation scenarios are implemented:
- Notify interviewers 15 minutes before the interview starts
- Sync interview results to the Candidate worksheet
5.1 Notify Interviewers Before Interview Start
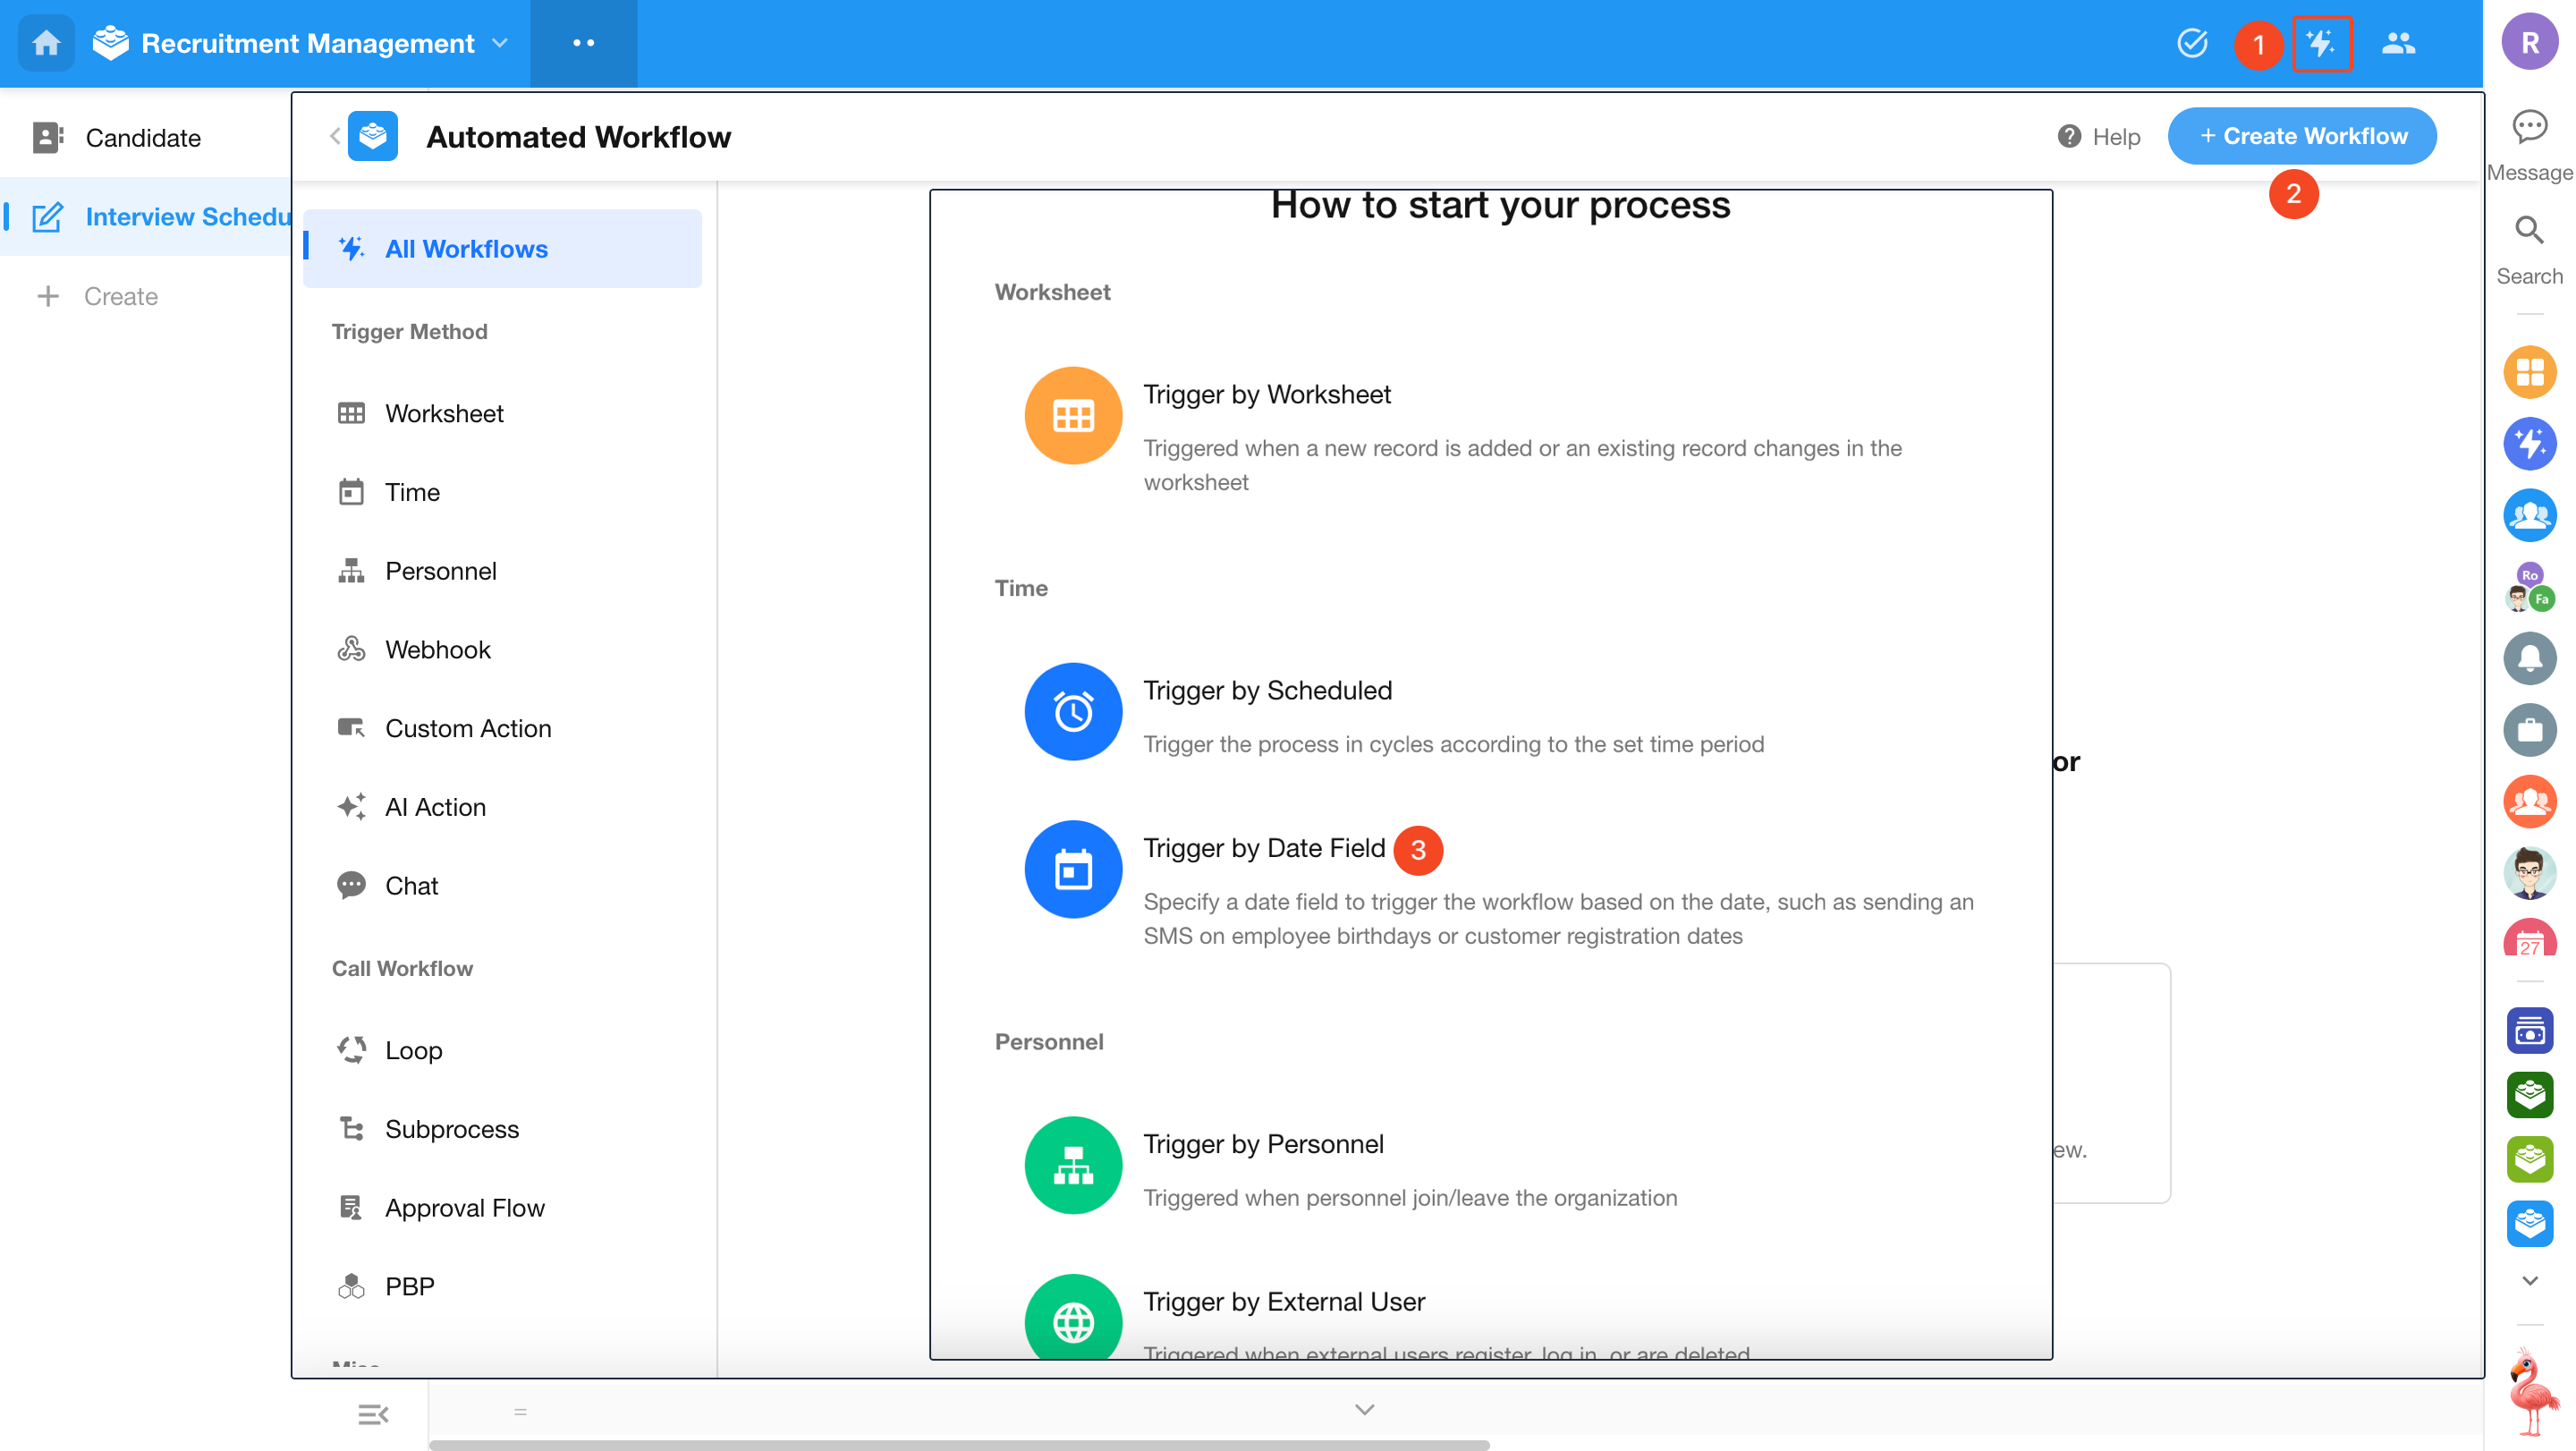
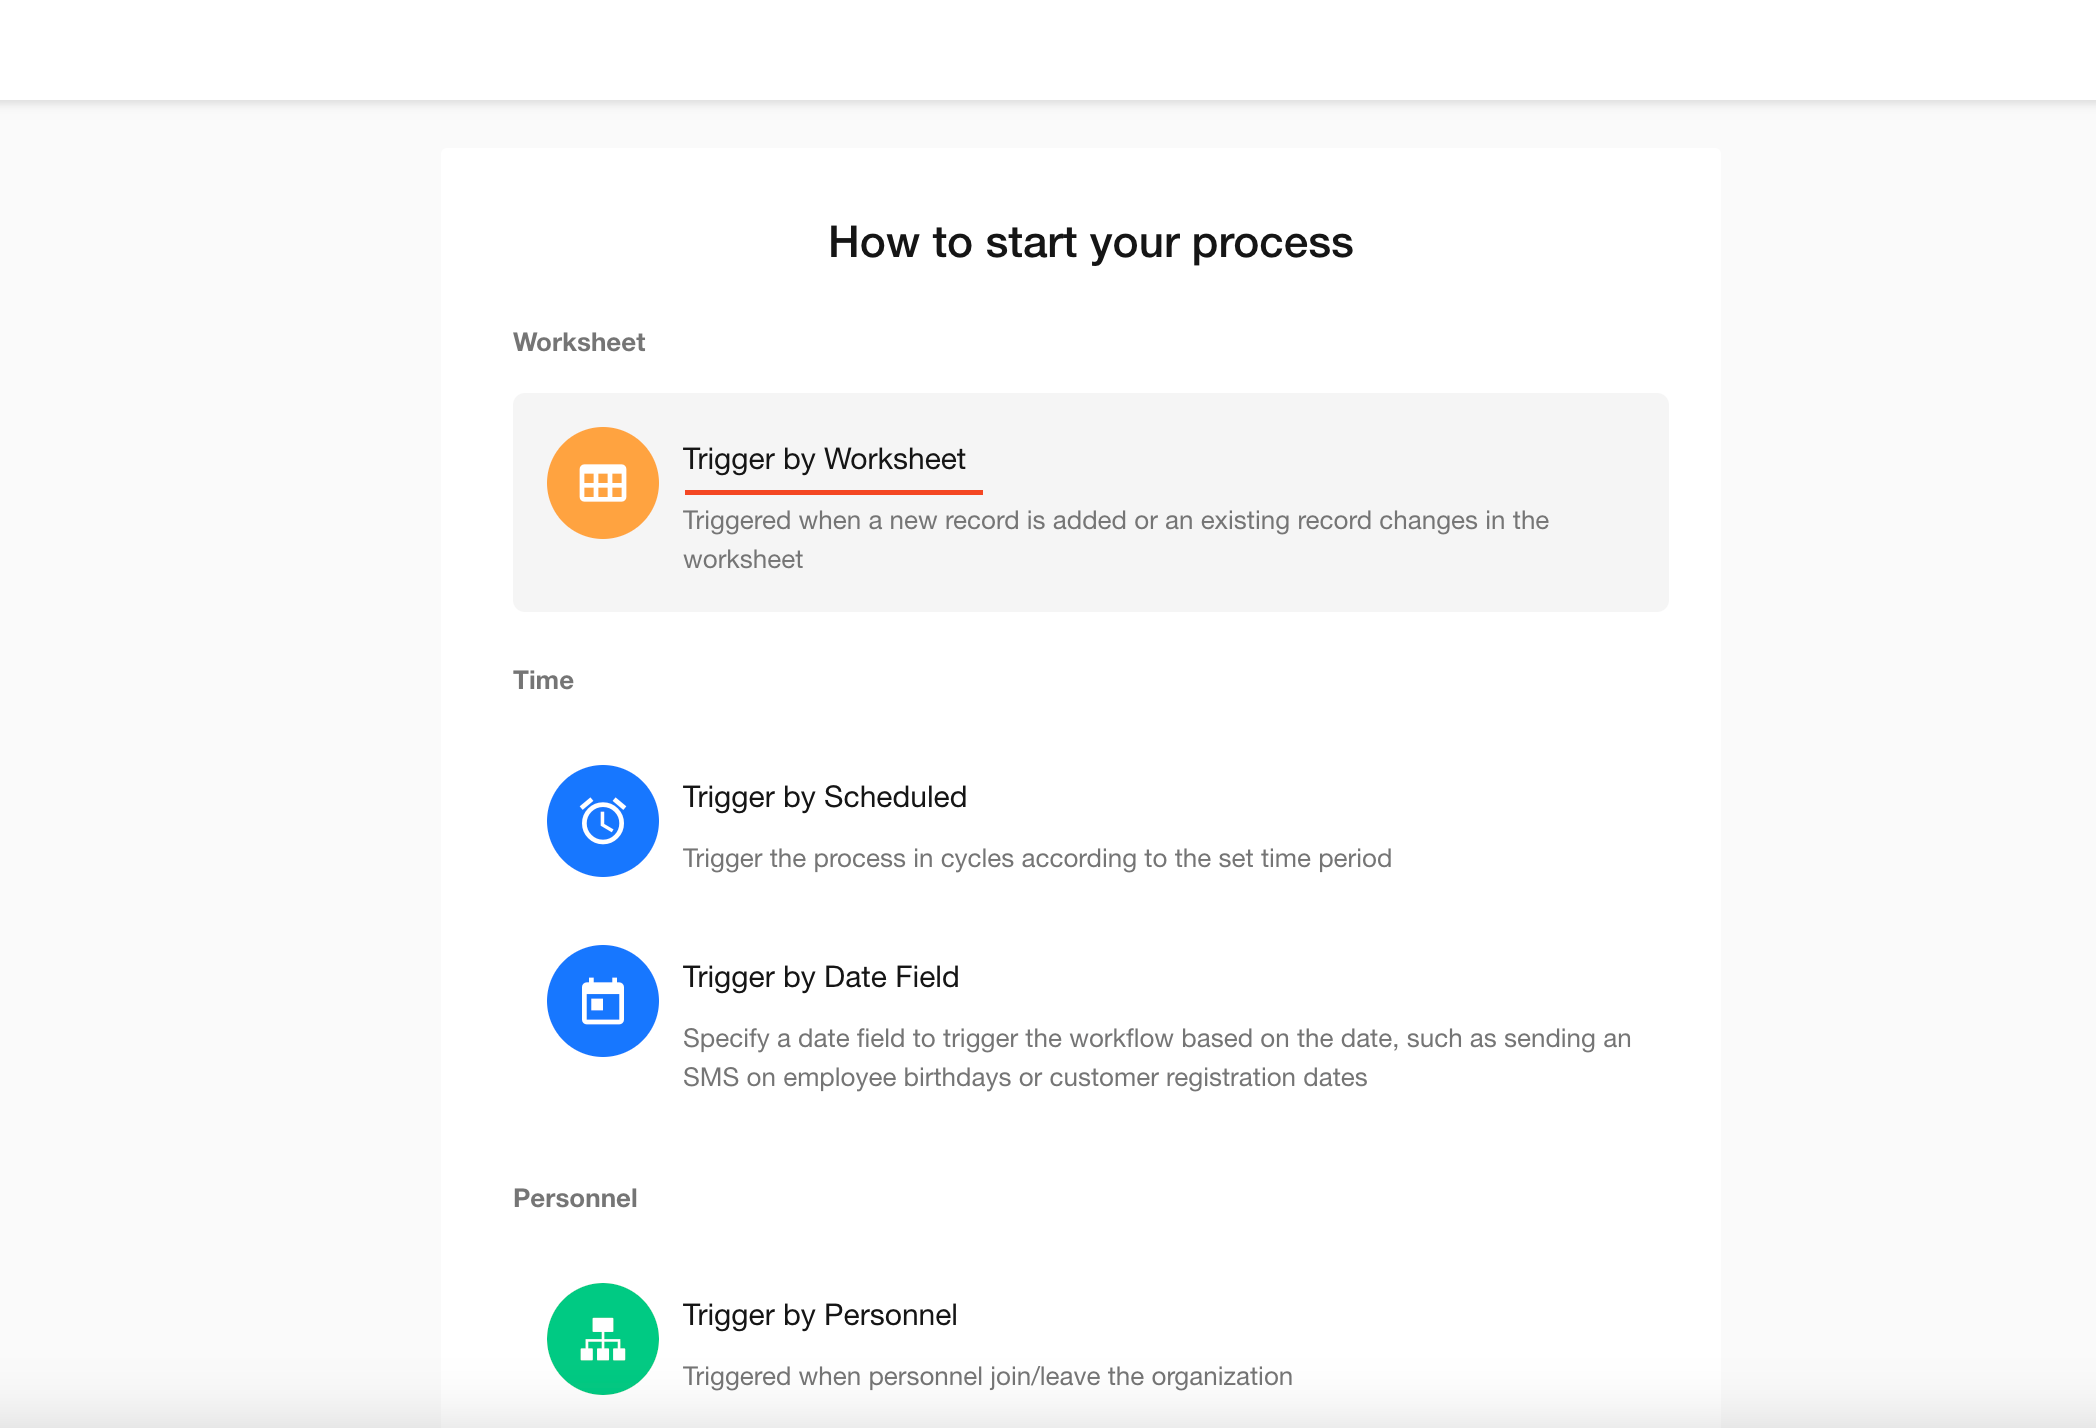
1) Select Trigger Type
Supported trigger types:
-
Worksheet event trigger
Triggered by record create, update, or delete events -
Scheduled trigger
Triggered at a specified time -
Date field trigger
Triggered based on a date field in a worksheet -
Webhook trigger
Triggered by external system requests -
Button trigger
Triggered manually by clicking a button
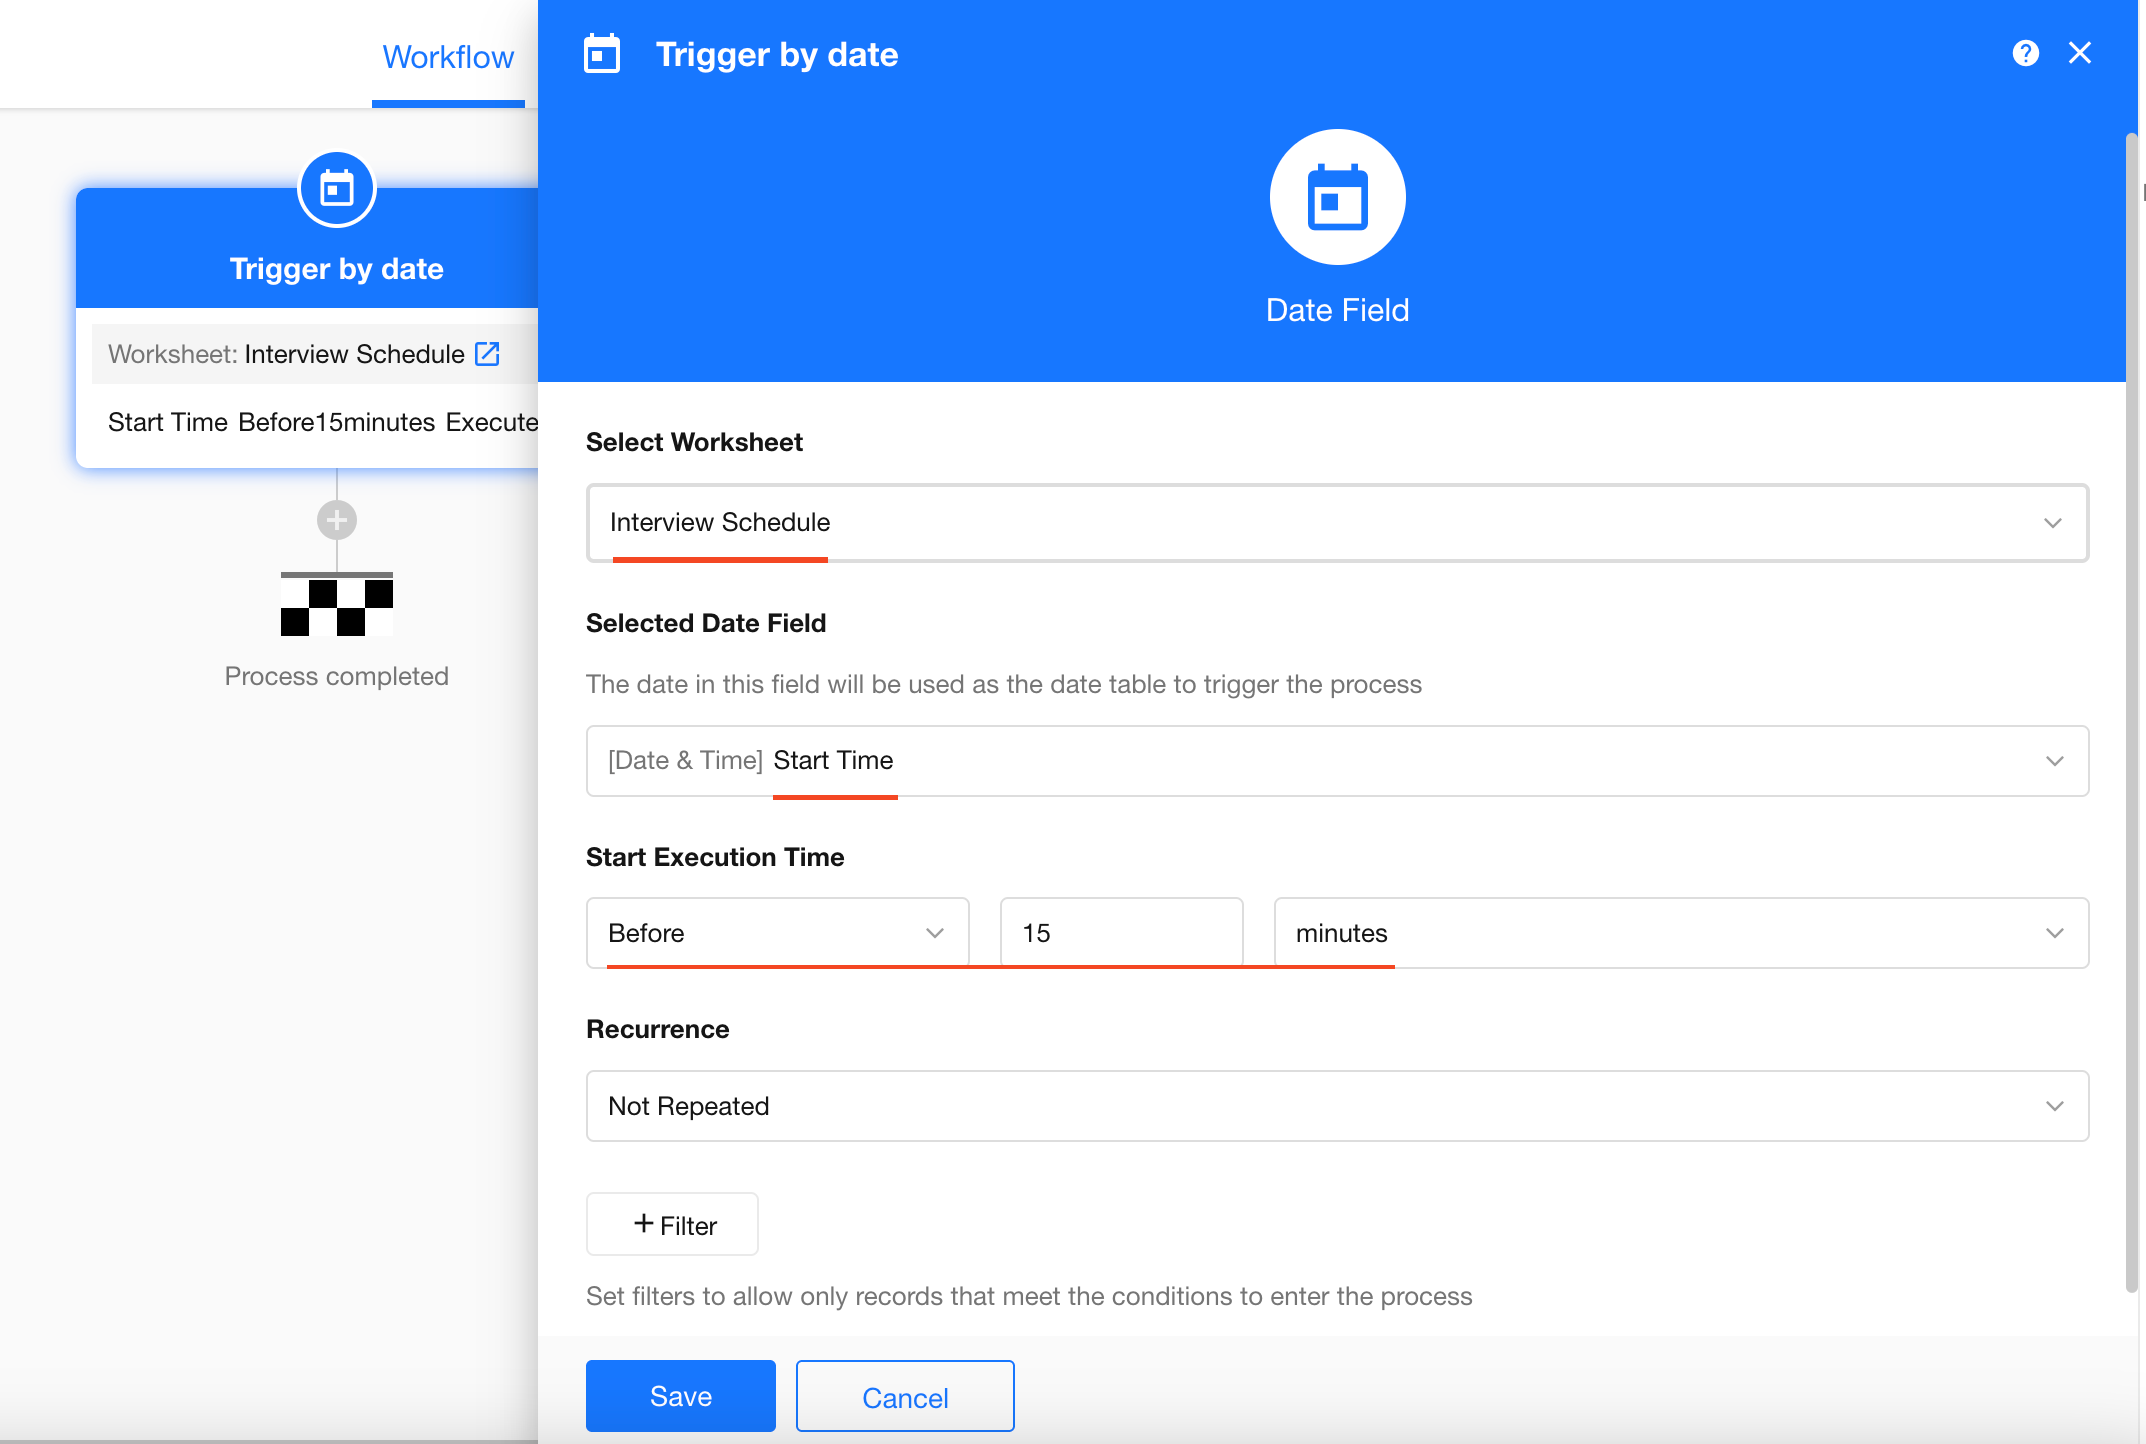
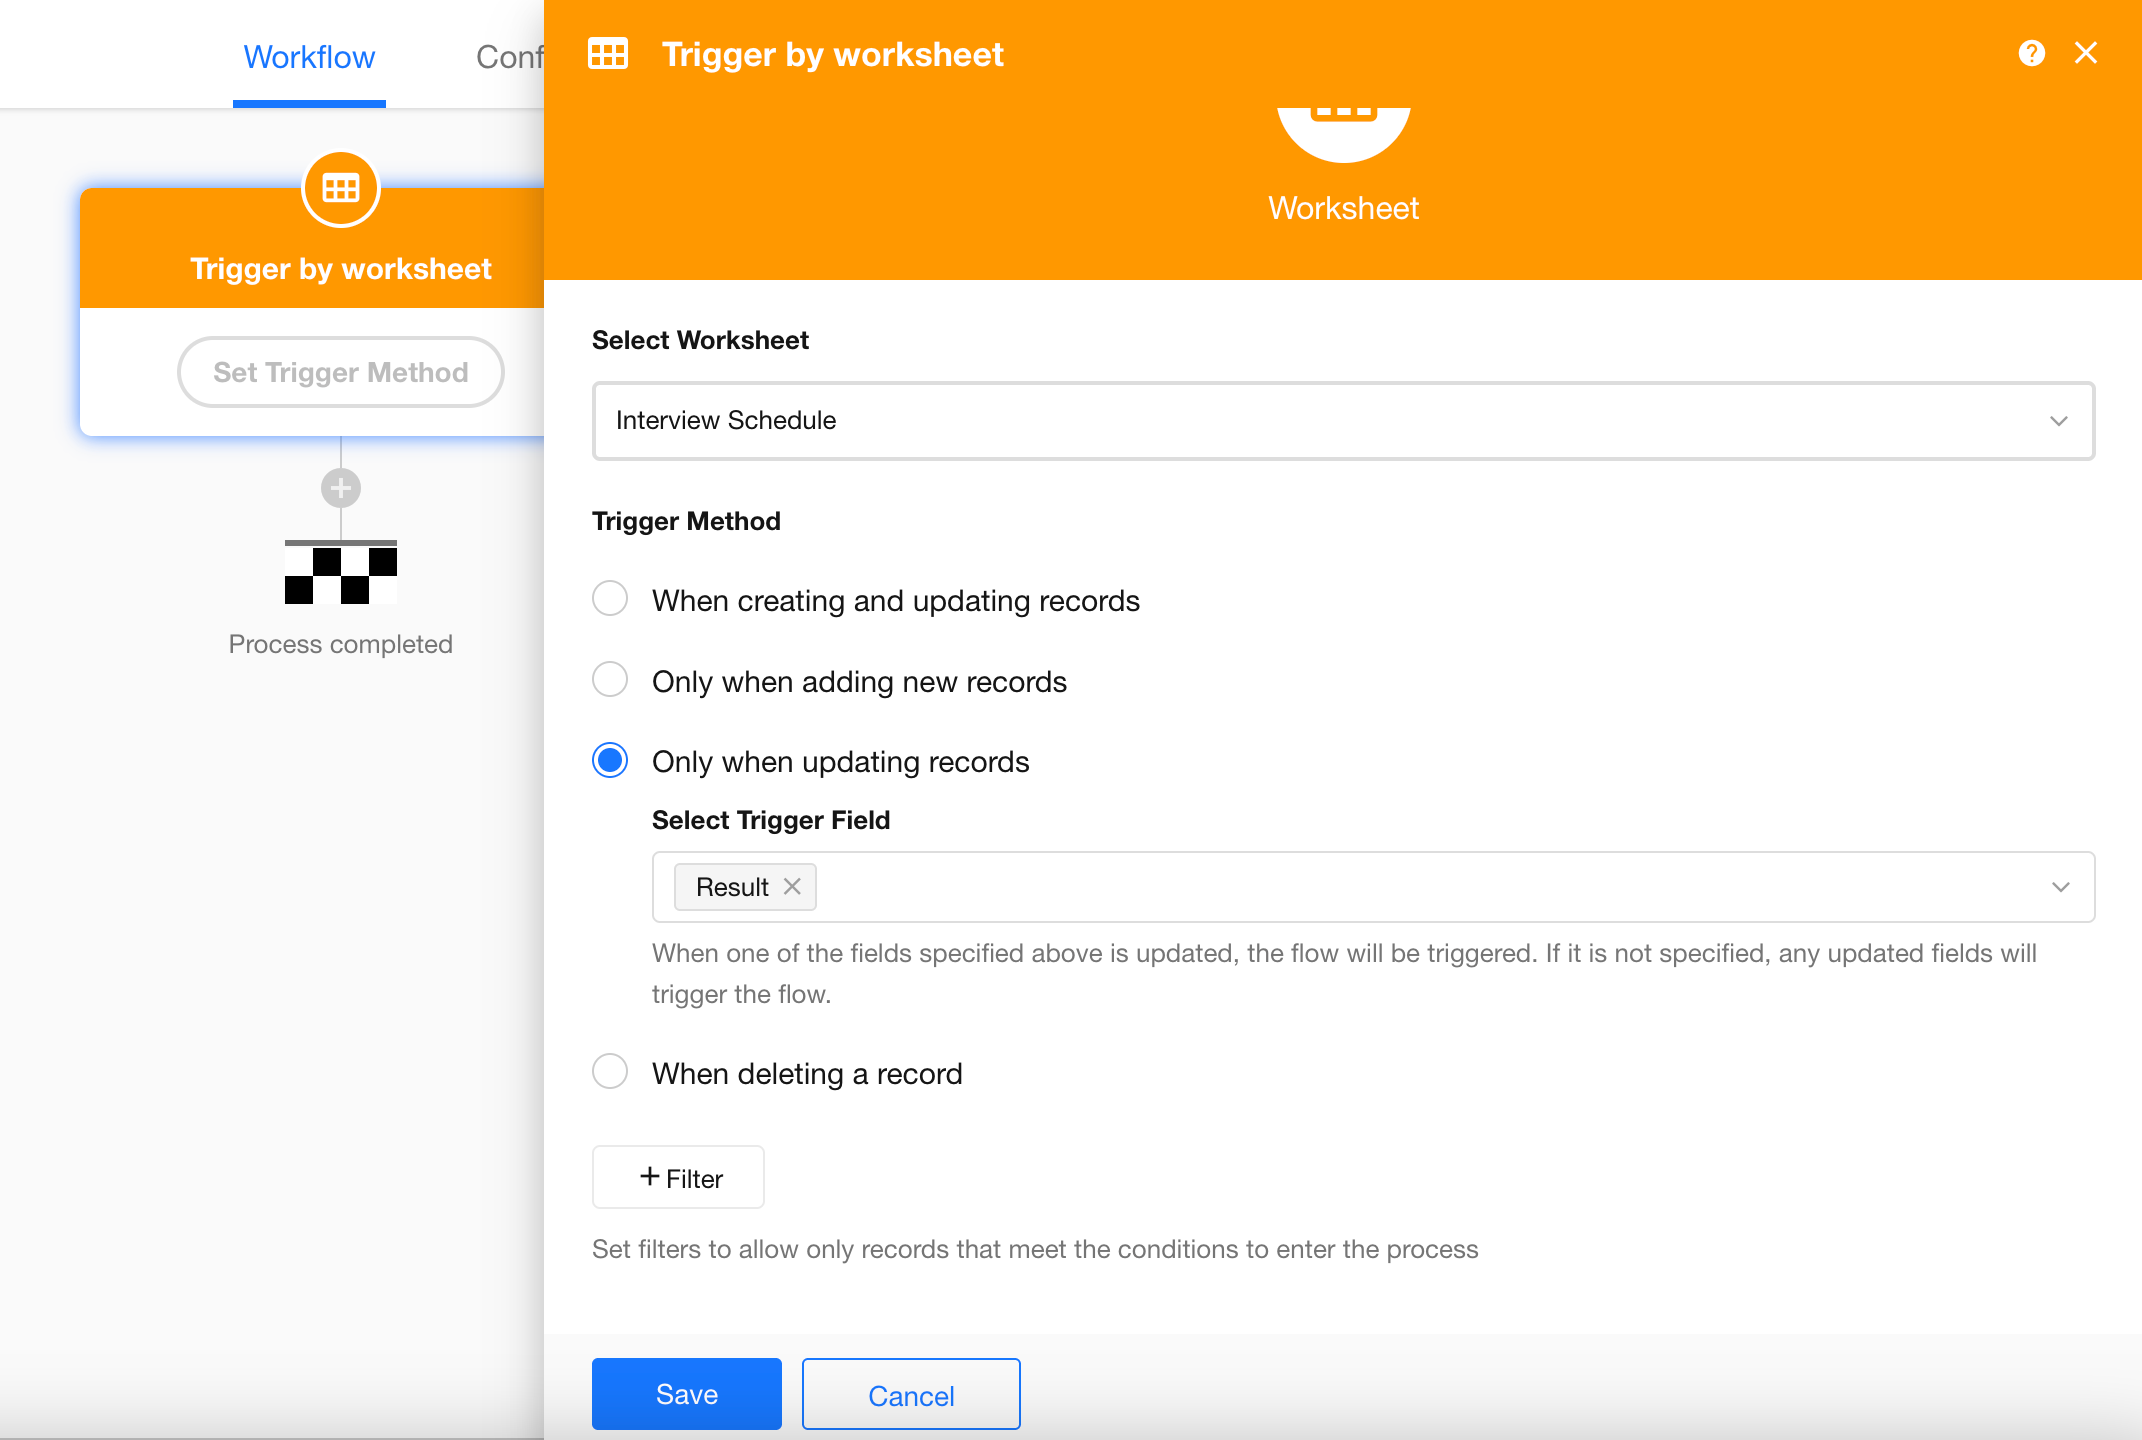
For this scenario, select a Date field trigger.
2) Configure Trigger
- Worksheet: Interview Schedule
- Date field: Interview Start Time
- Trigger time: 15 minutes before the start time
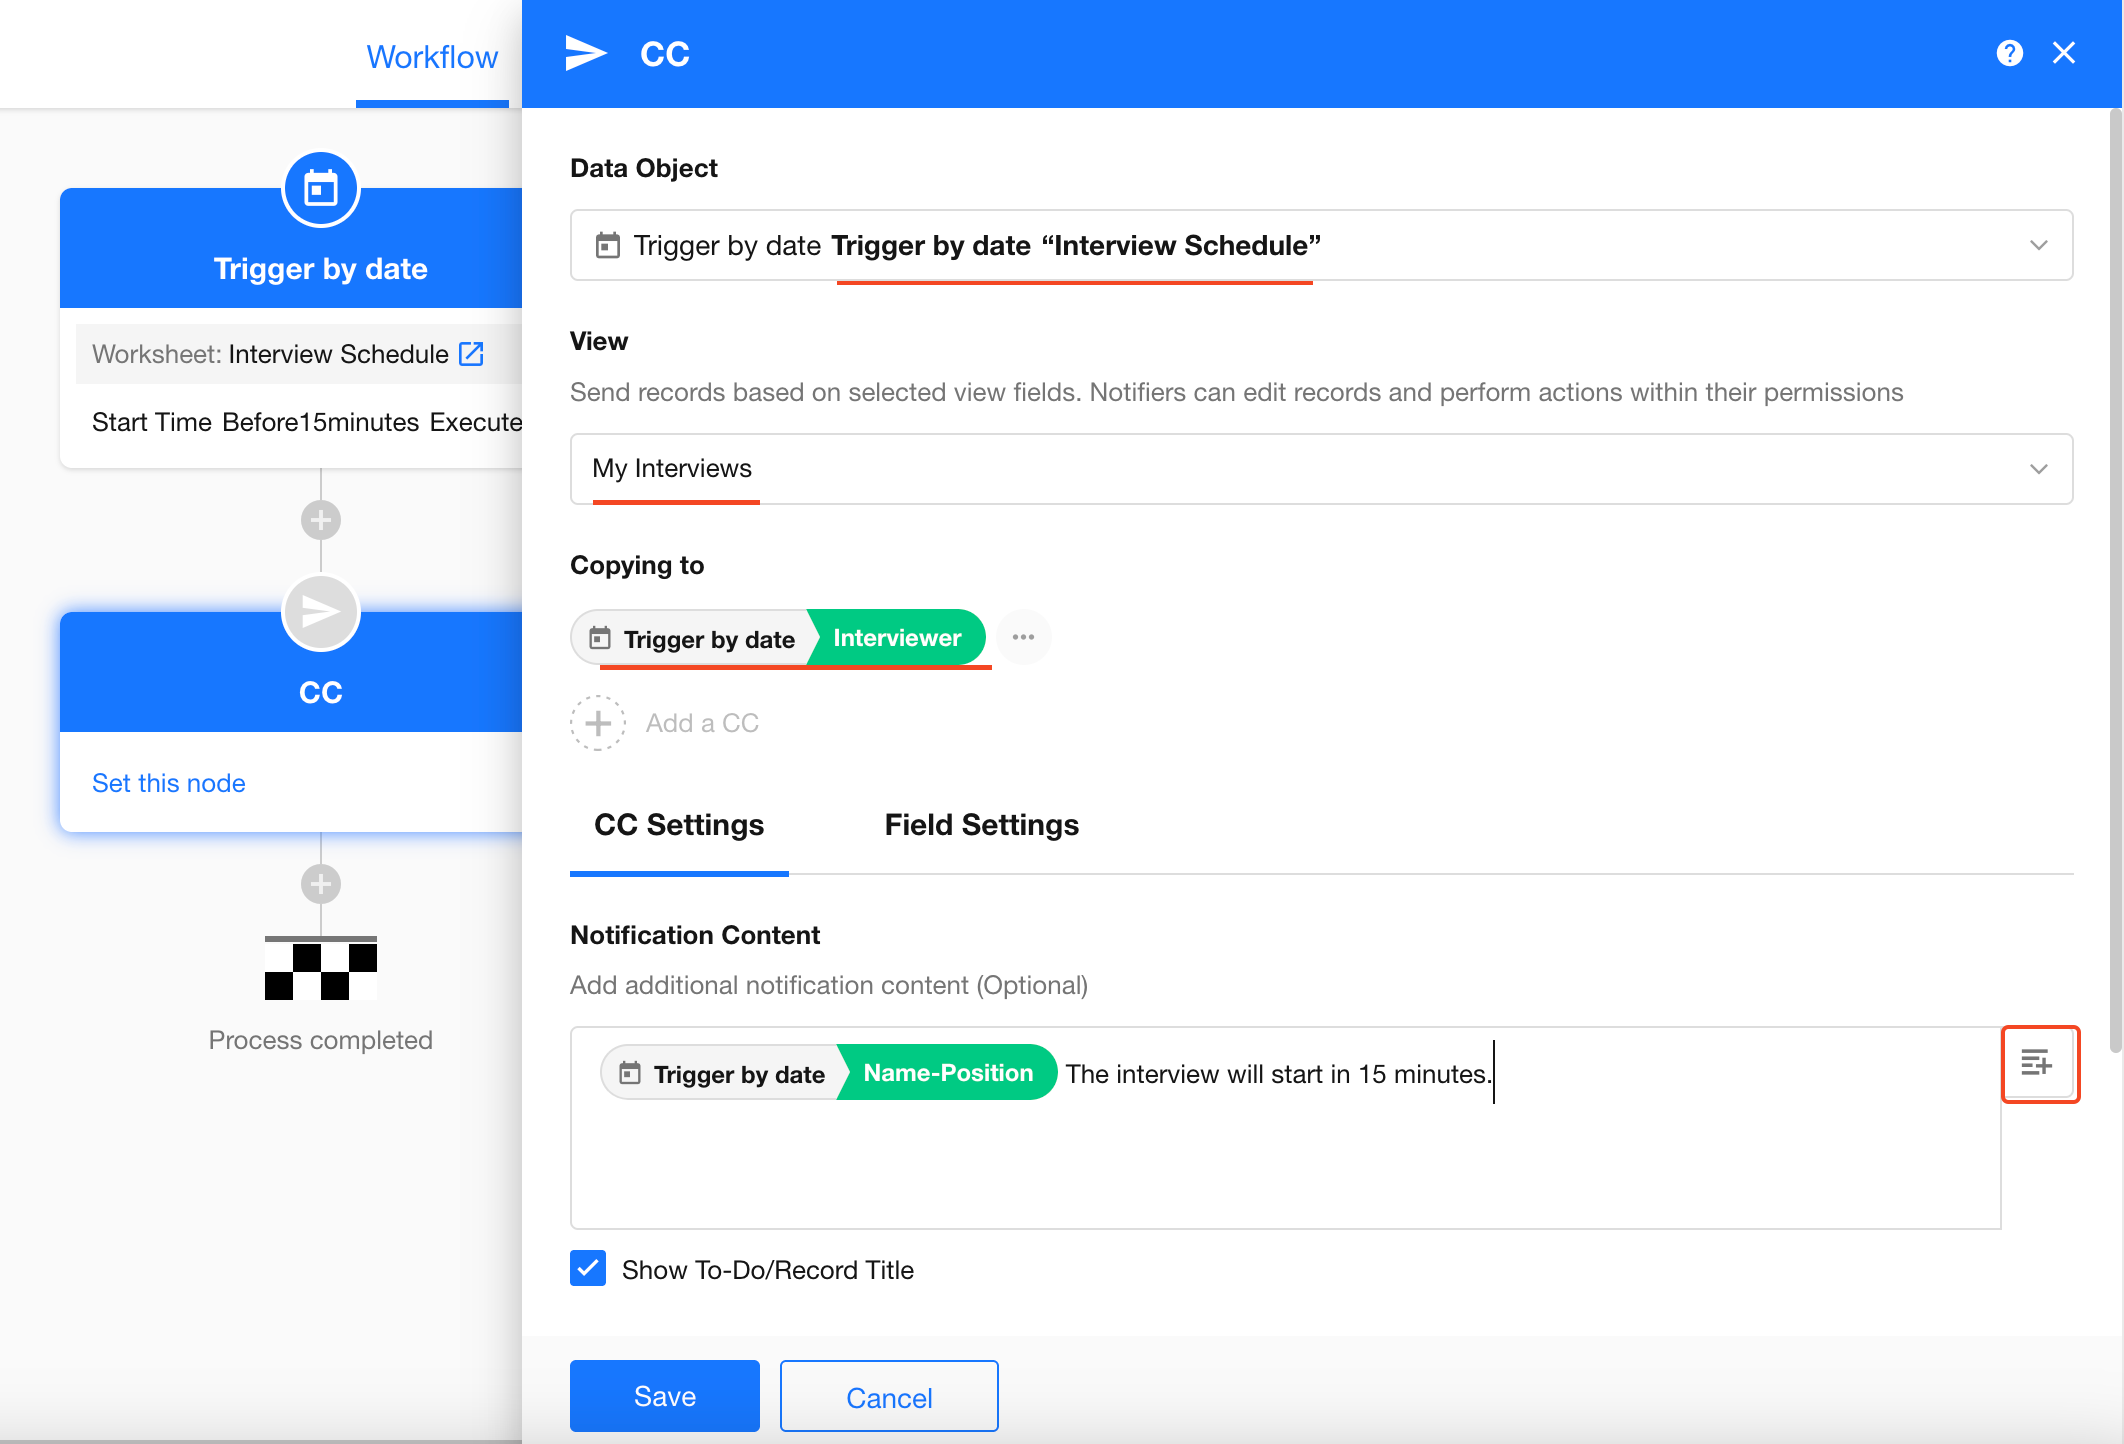
3) Add CC Node
Add a CC node to deliver reminders.
- Message content: Use field values or static text
- Recipients: Select the Interviewer field
4) Publish Workflow
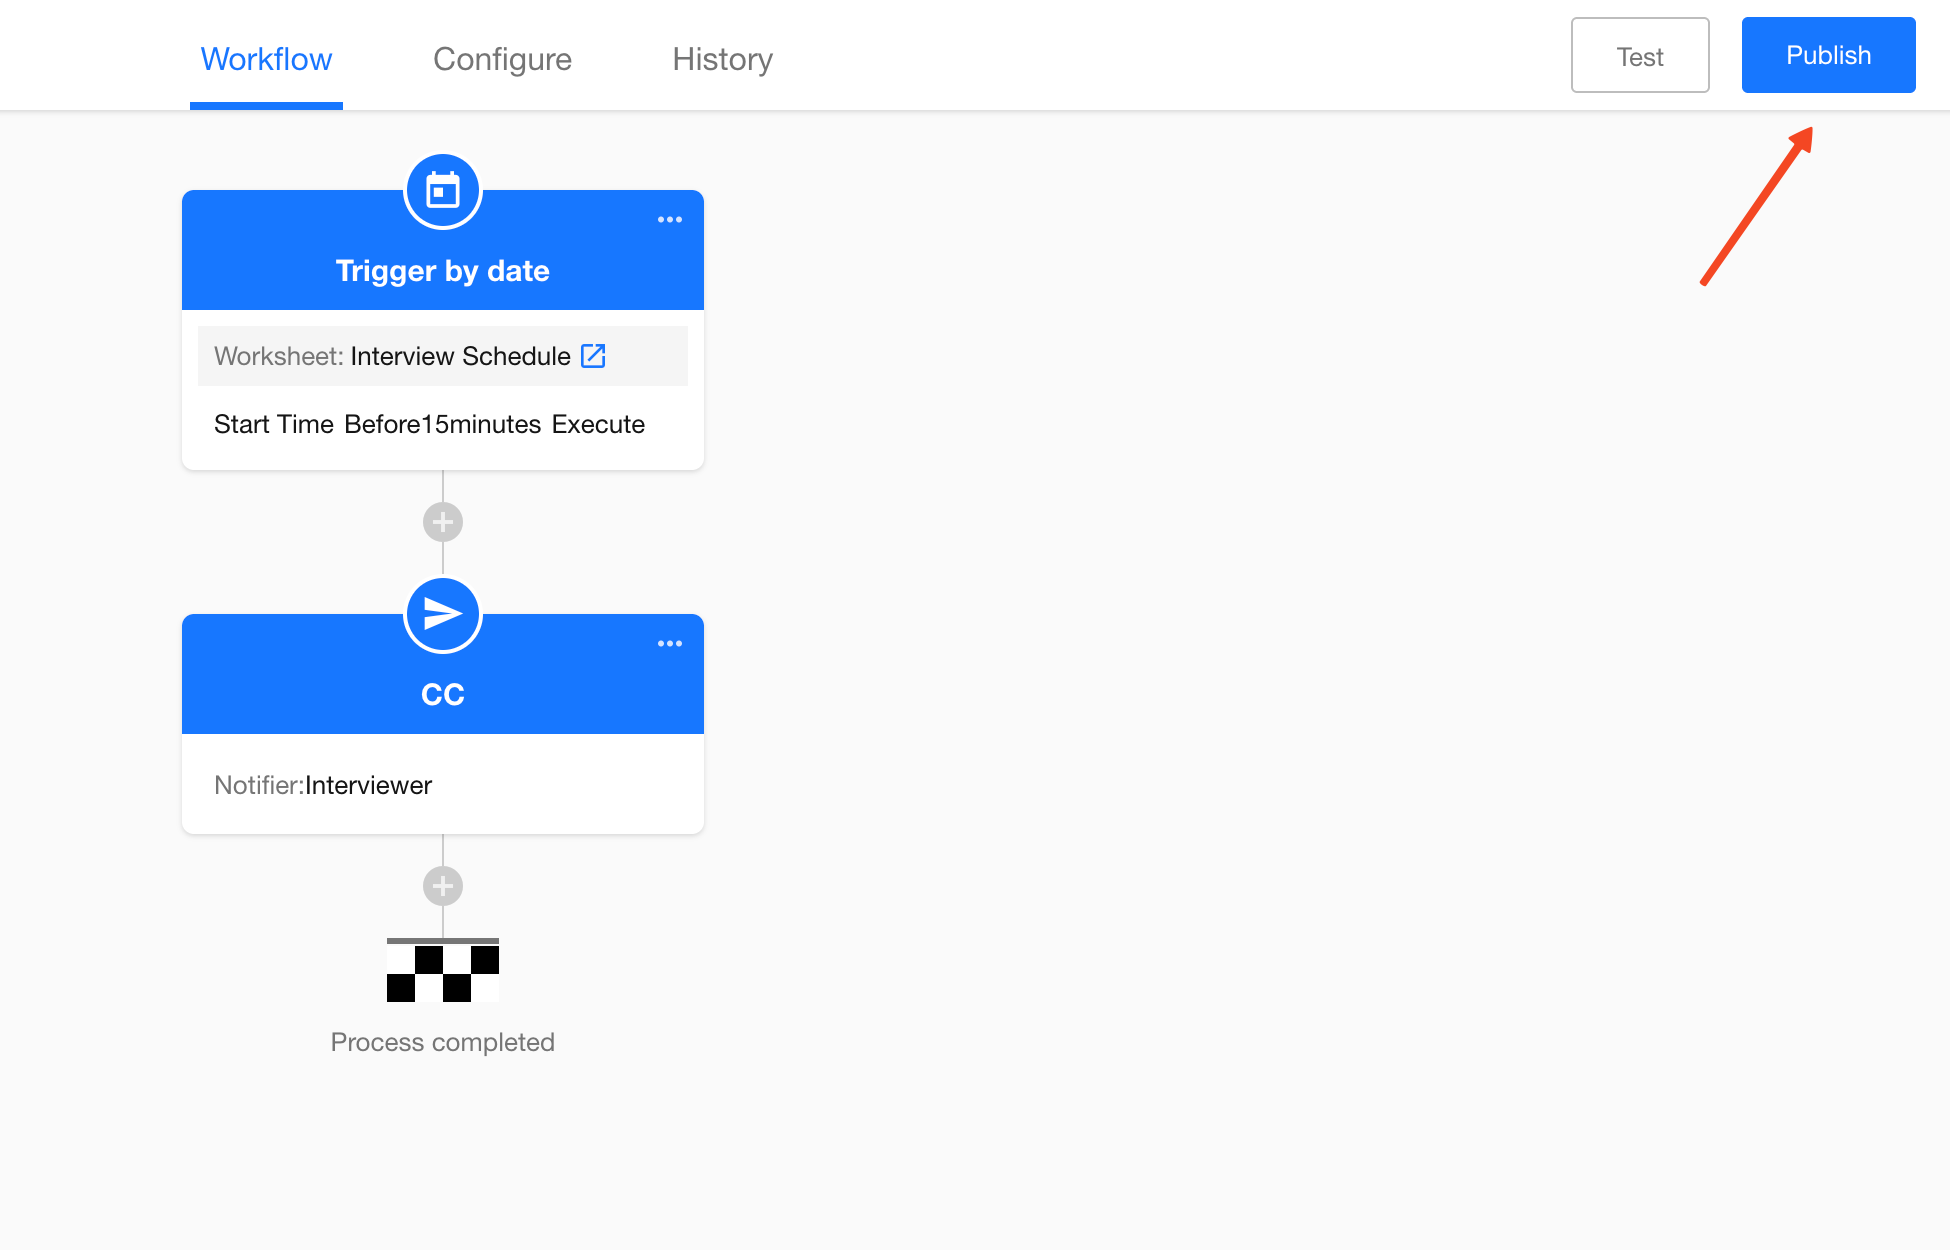
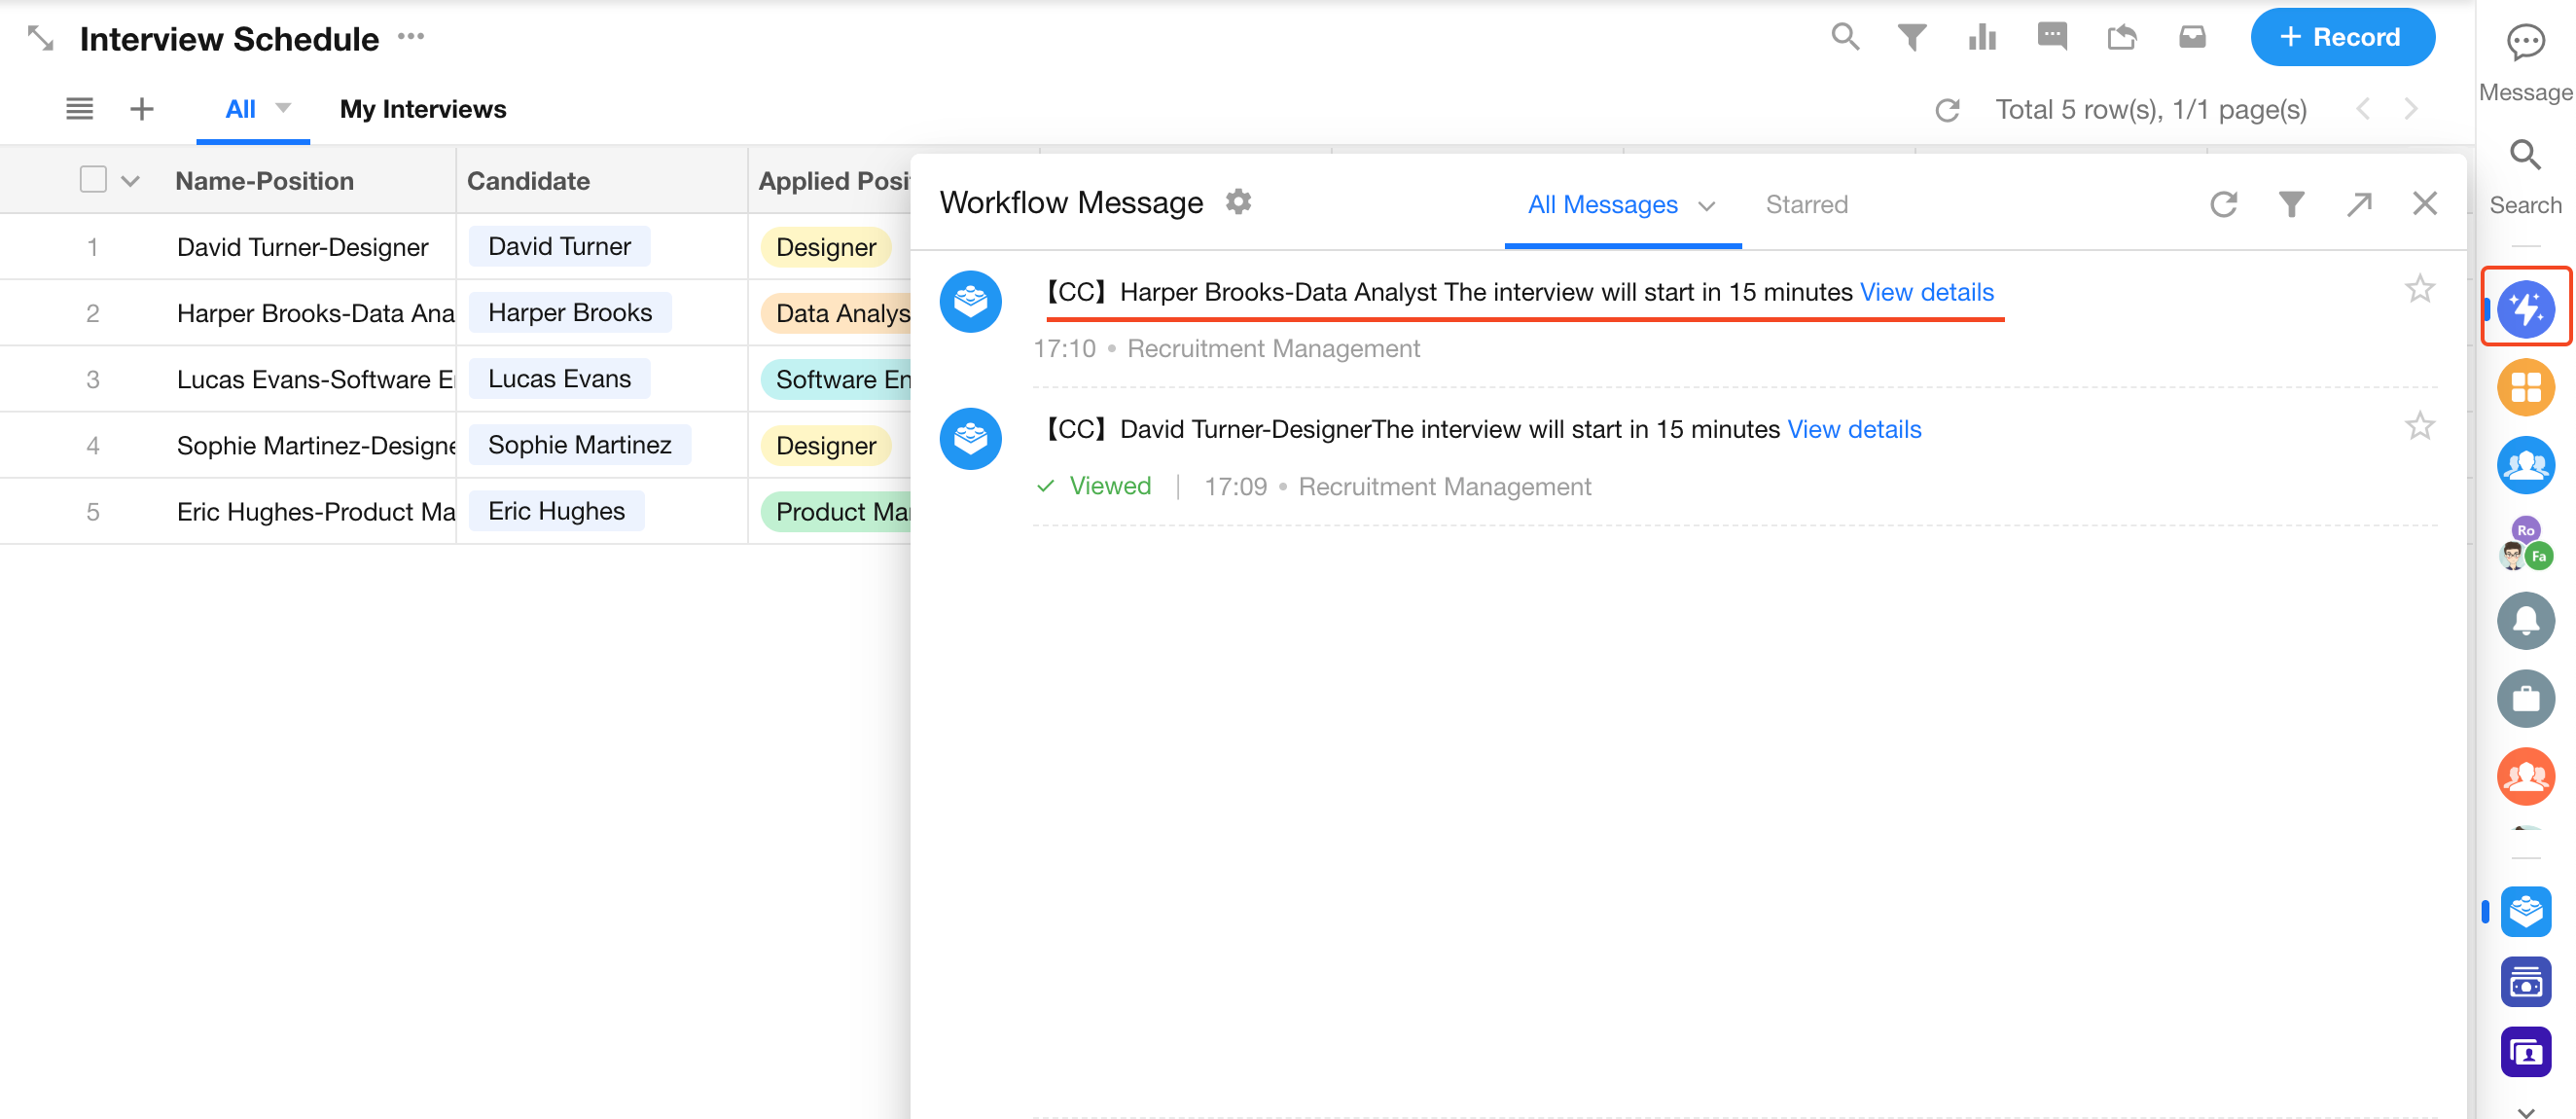
5) Notification Result
-
Mobile:

-
Desktop:
5.2 Sync Interview Results to Candidate Records�
The Interview Schedule worksheet includes a Result field (e.g., Passed, Rejected, Pending).
The Candidate worksheet includes a Status field.
When the interview result is updated, the candidate status should be updated automatically:
- Passed → Background Check
- Rejected → Rejected
- Pending → No update

1) Create Workflow
Select Worksheet event trigger.
2) Configure Trigger
- Worksheet: Interview Schedule
- Trigger condition: Result field is updated
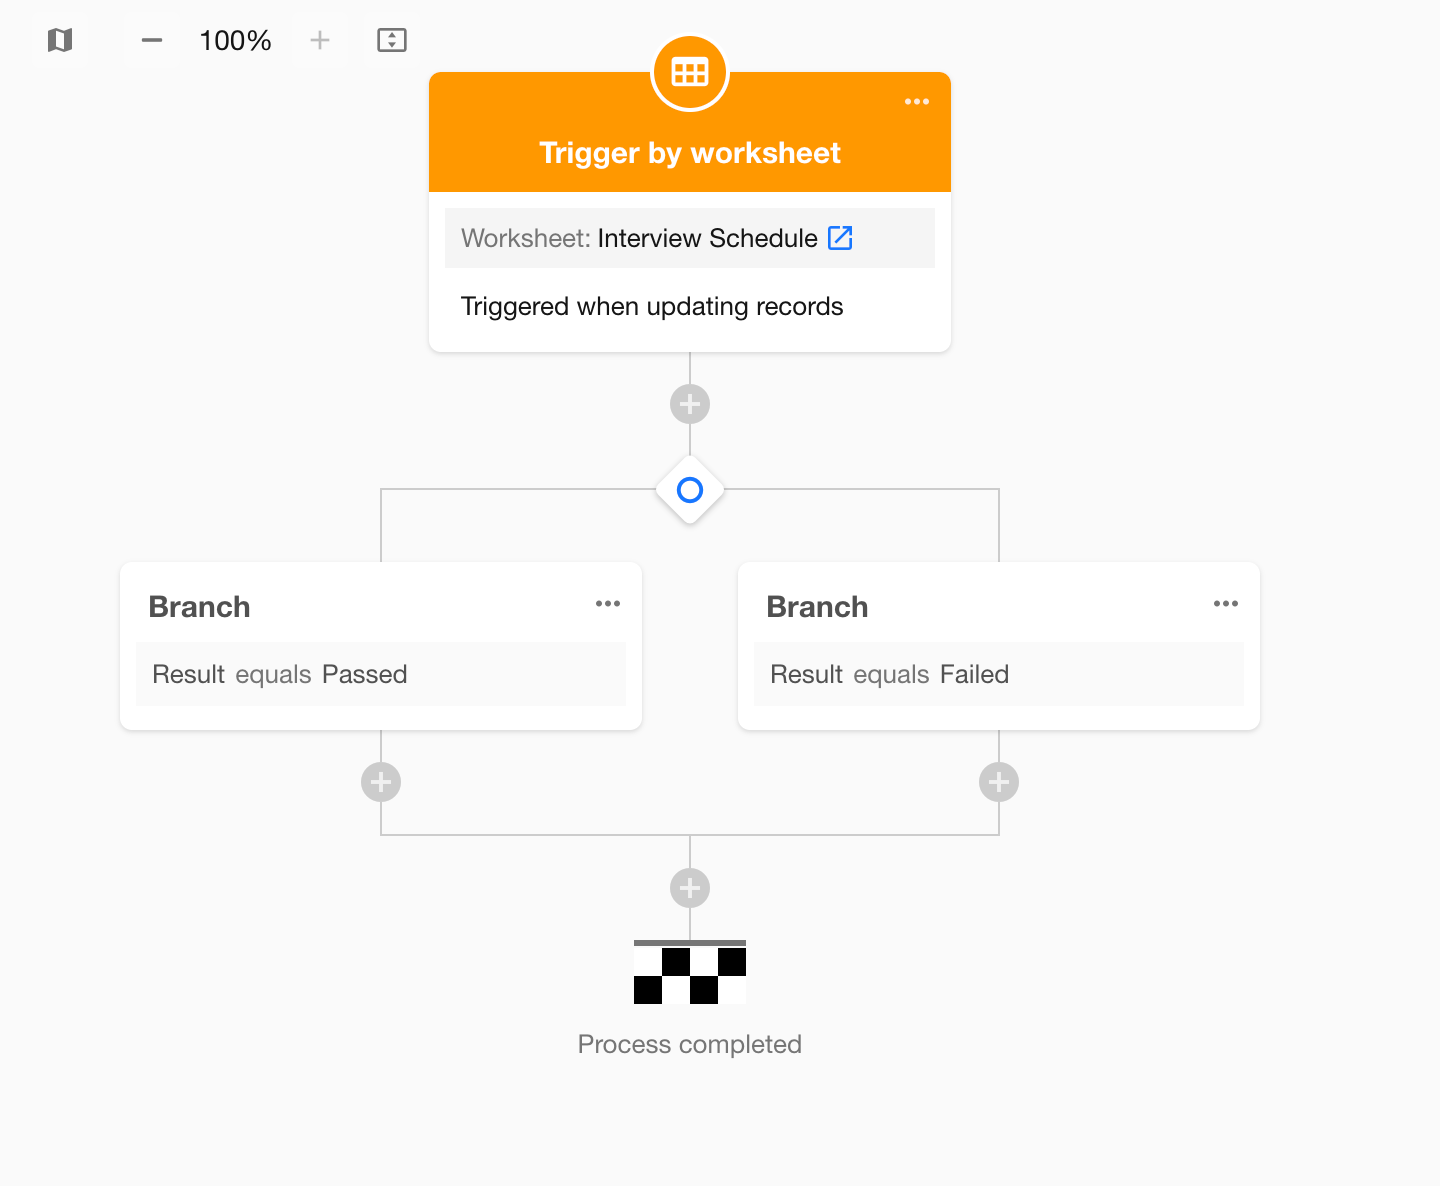
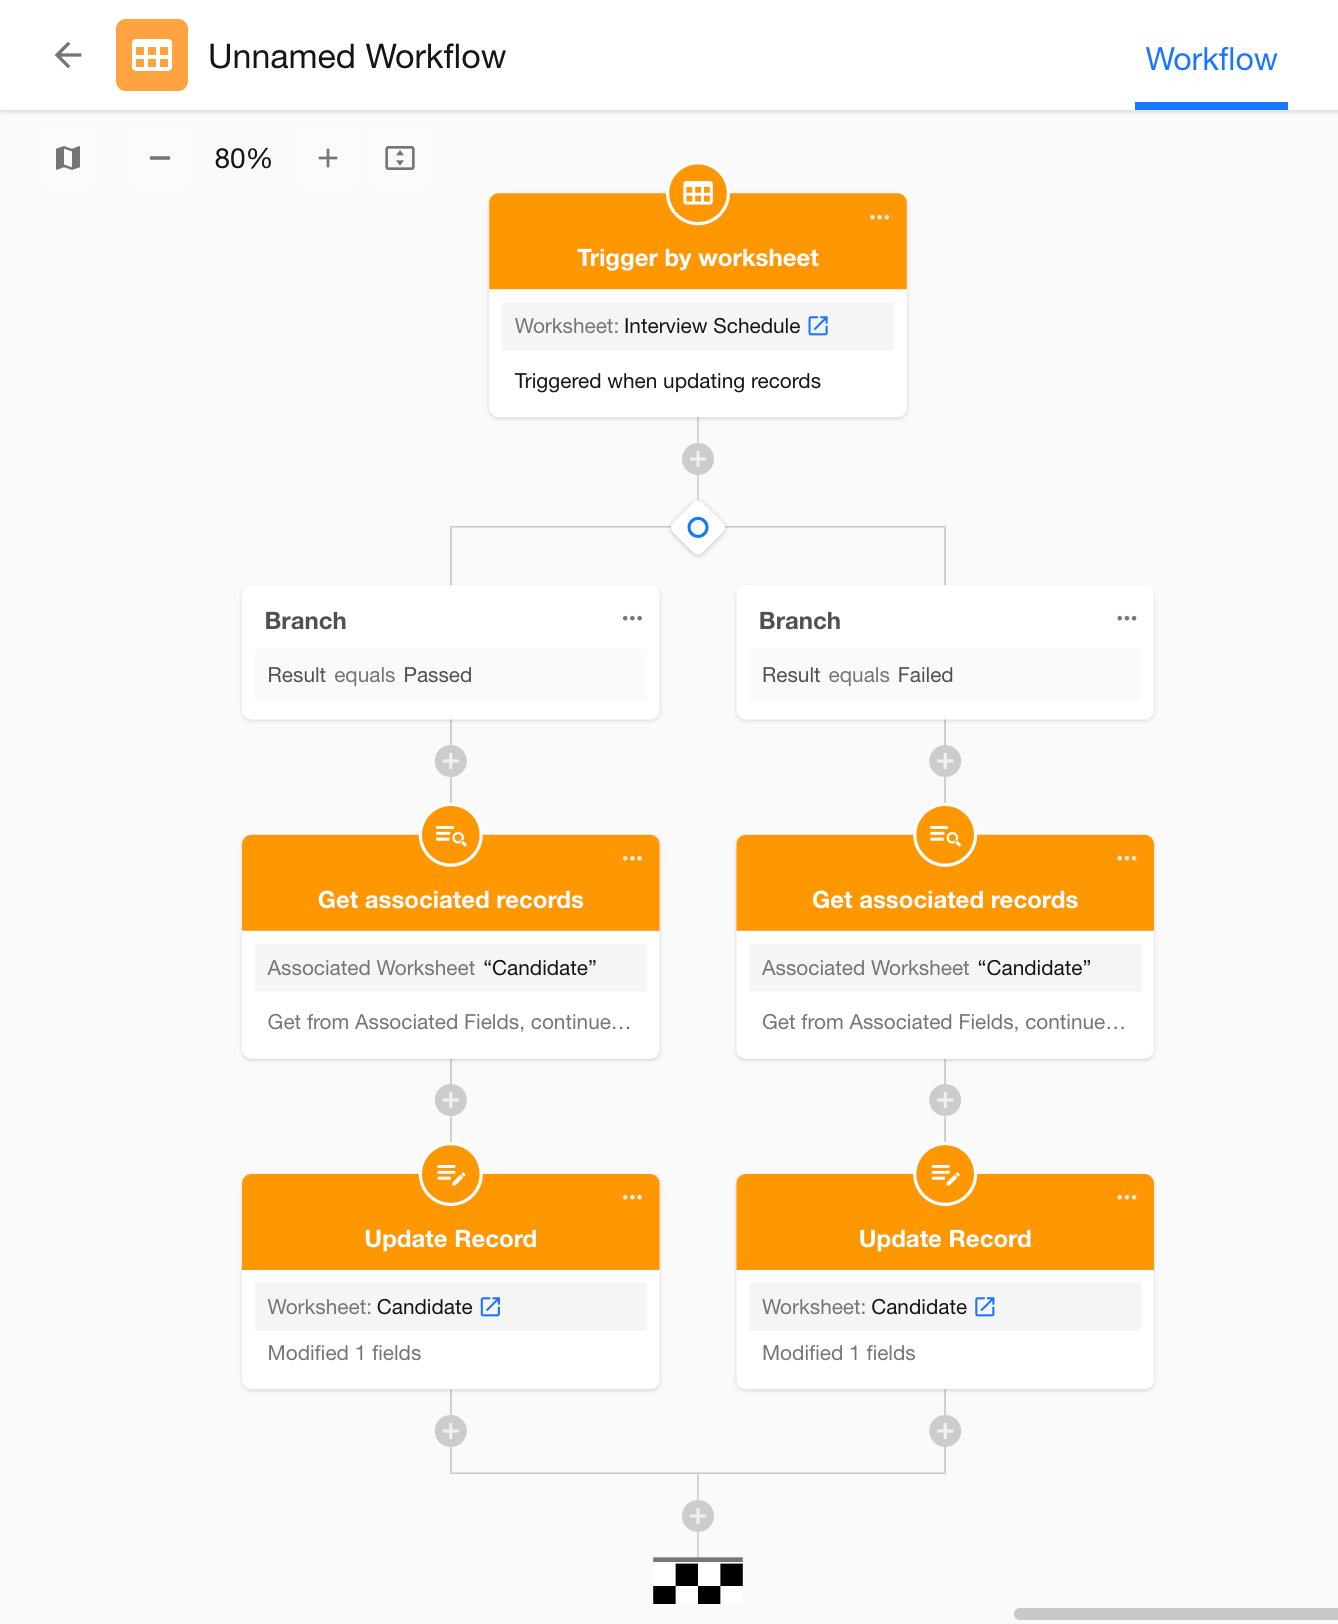
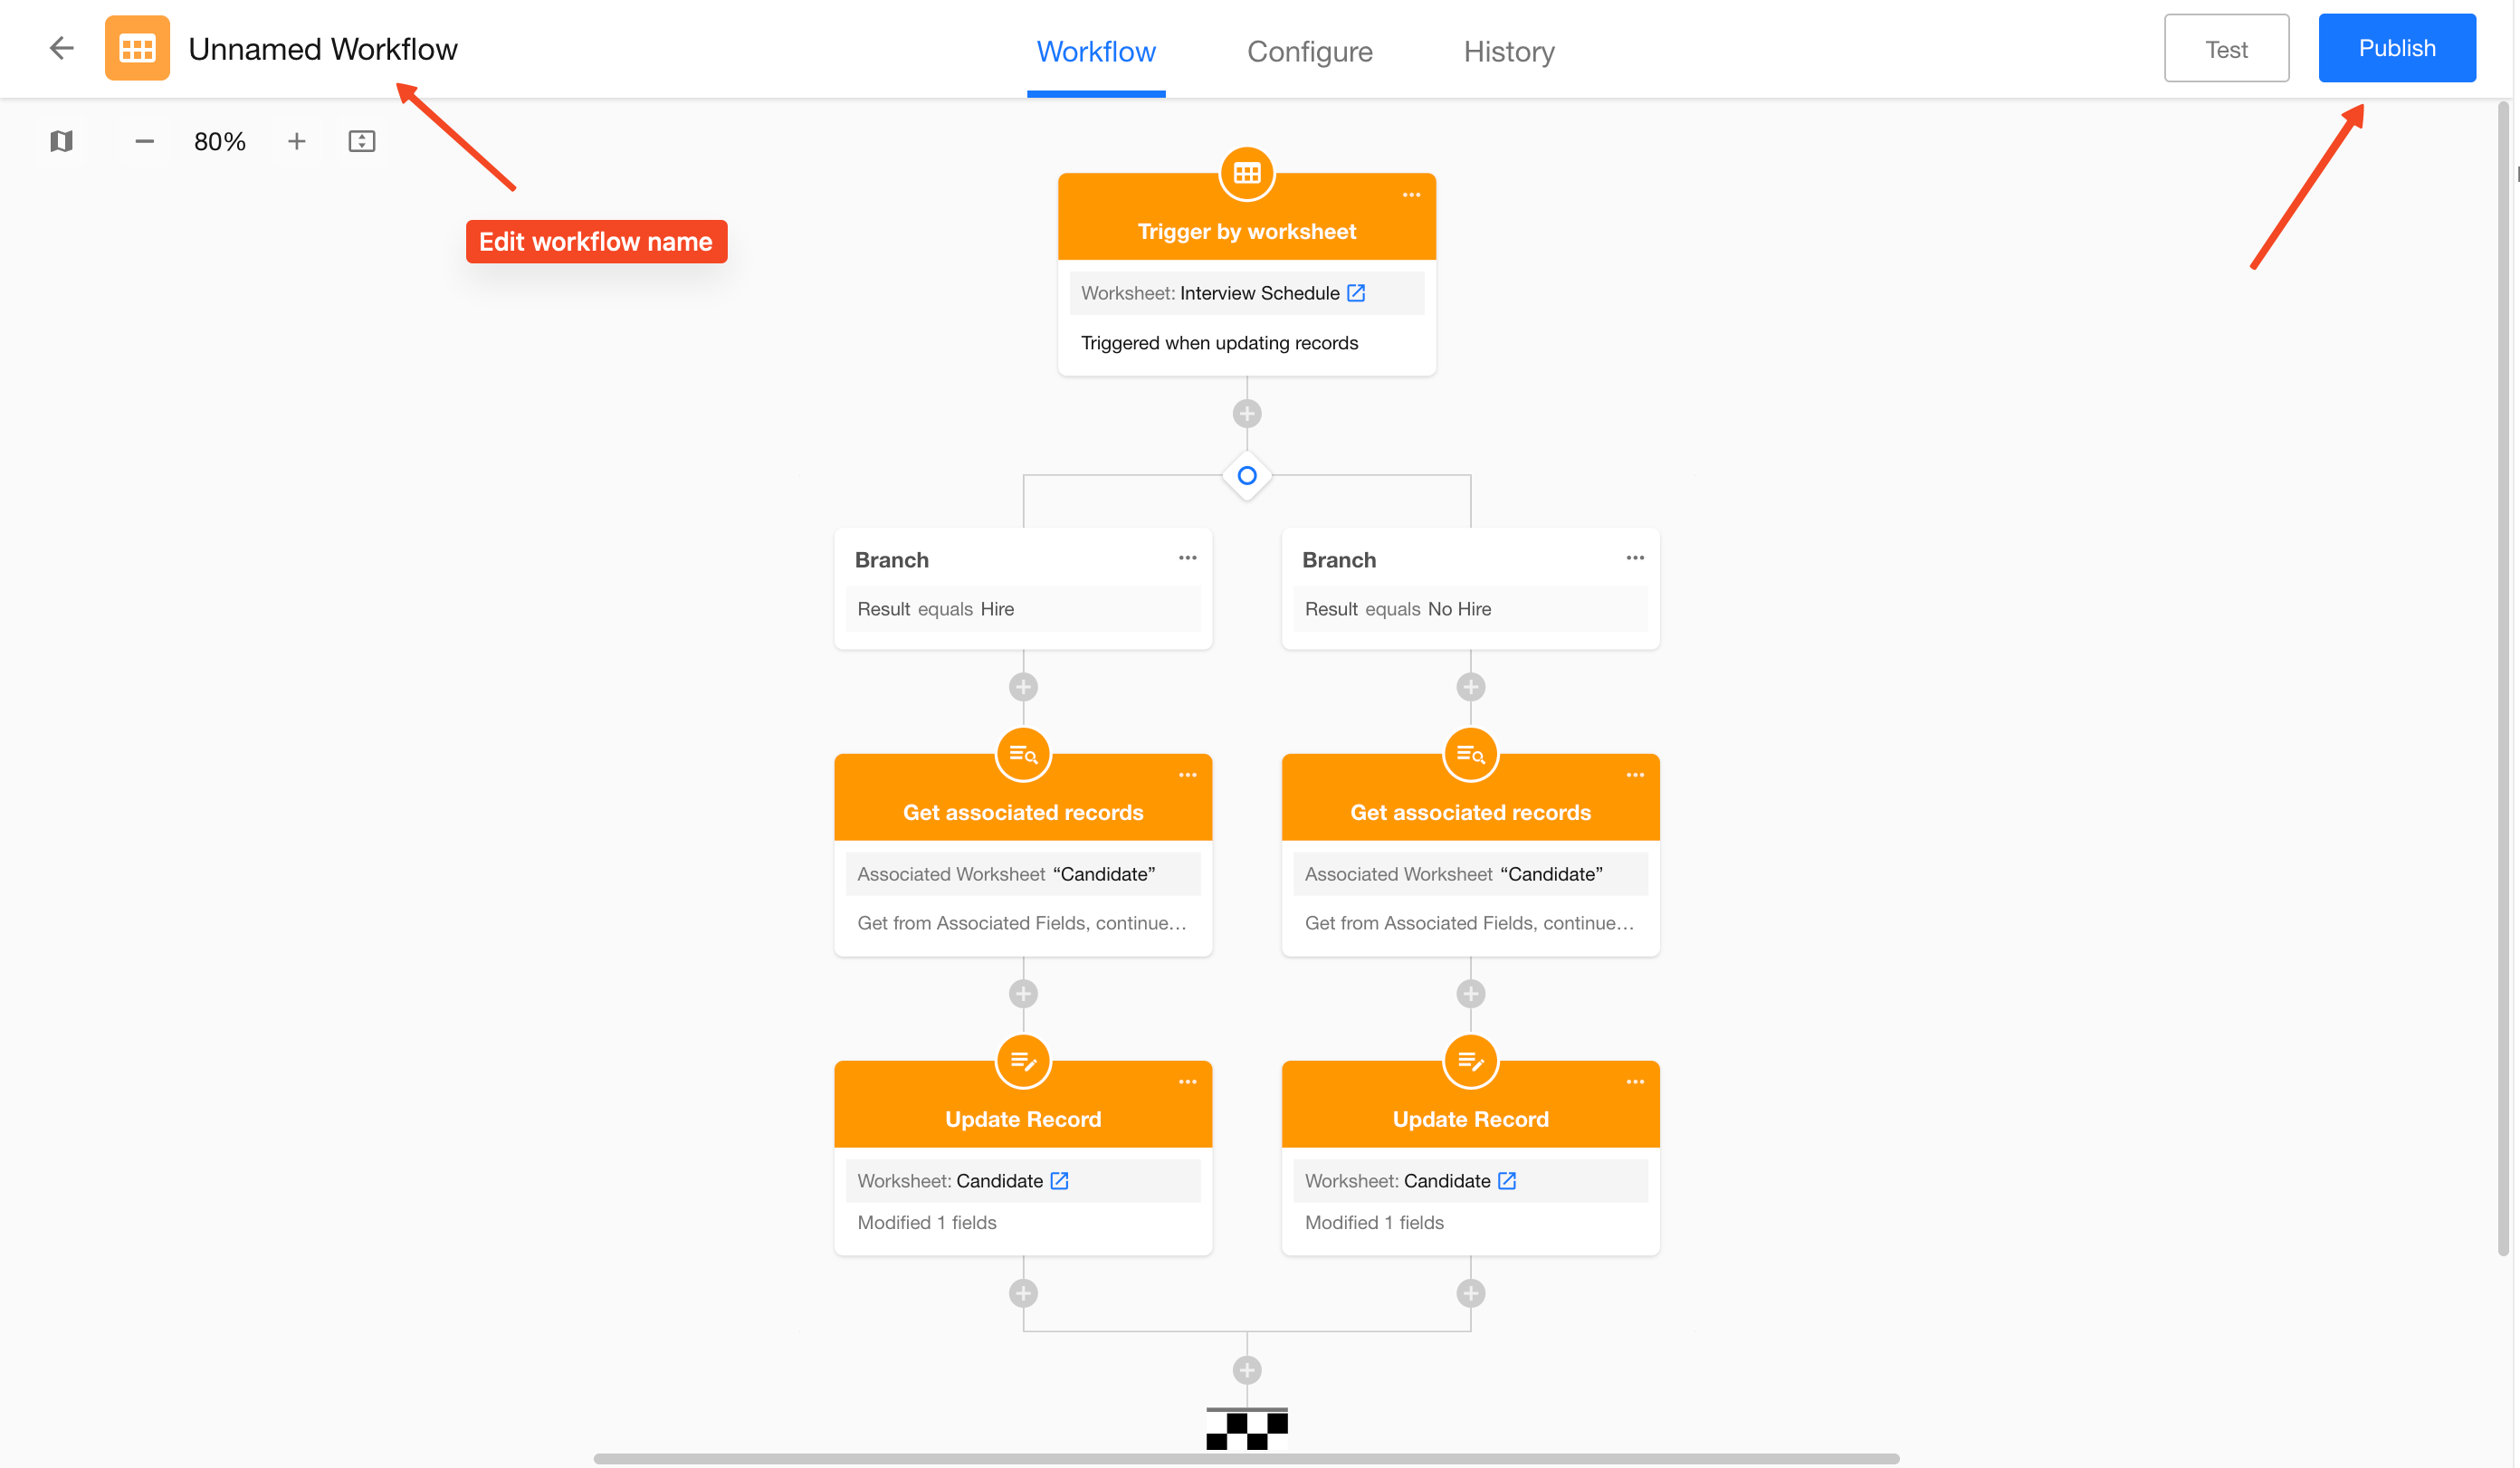
3) Add Branch Node
Add a branch node to handle different outcomes based on the interview result.
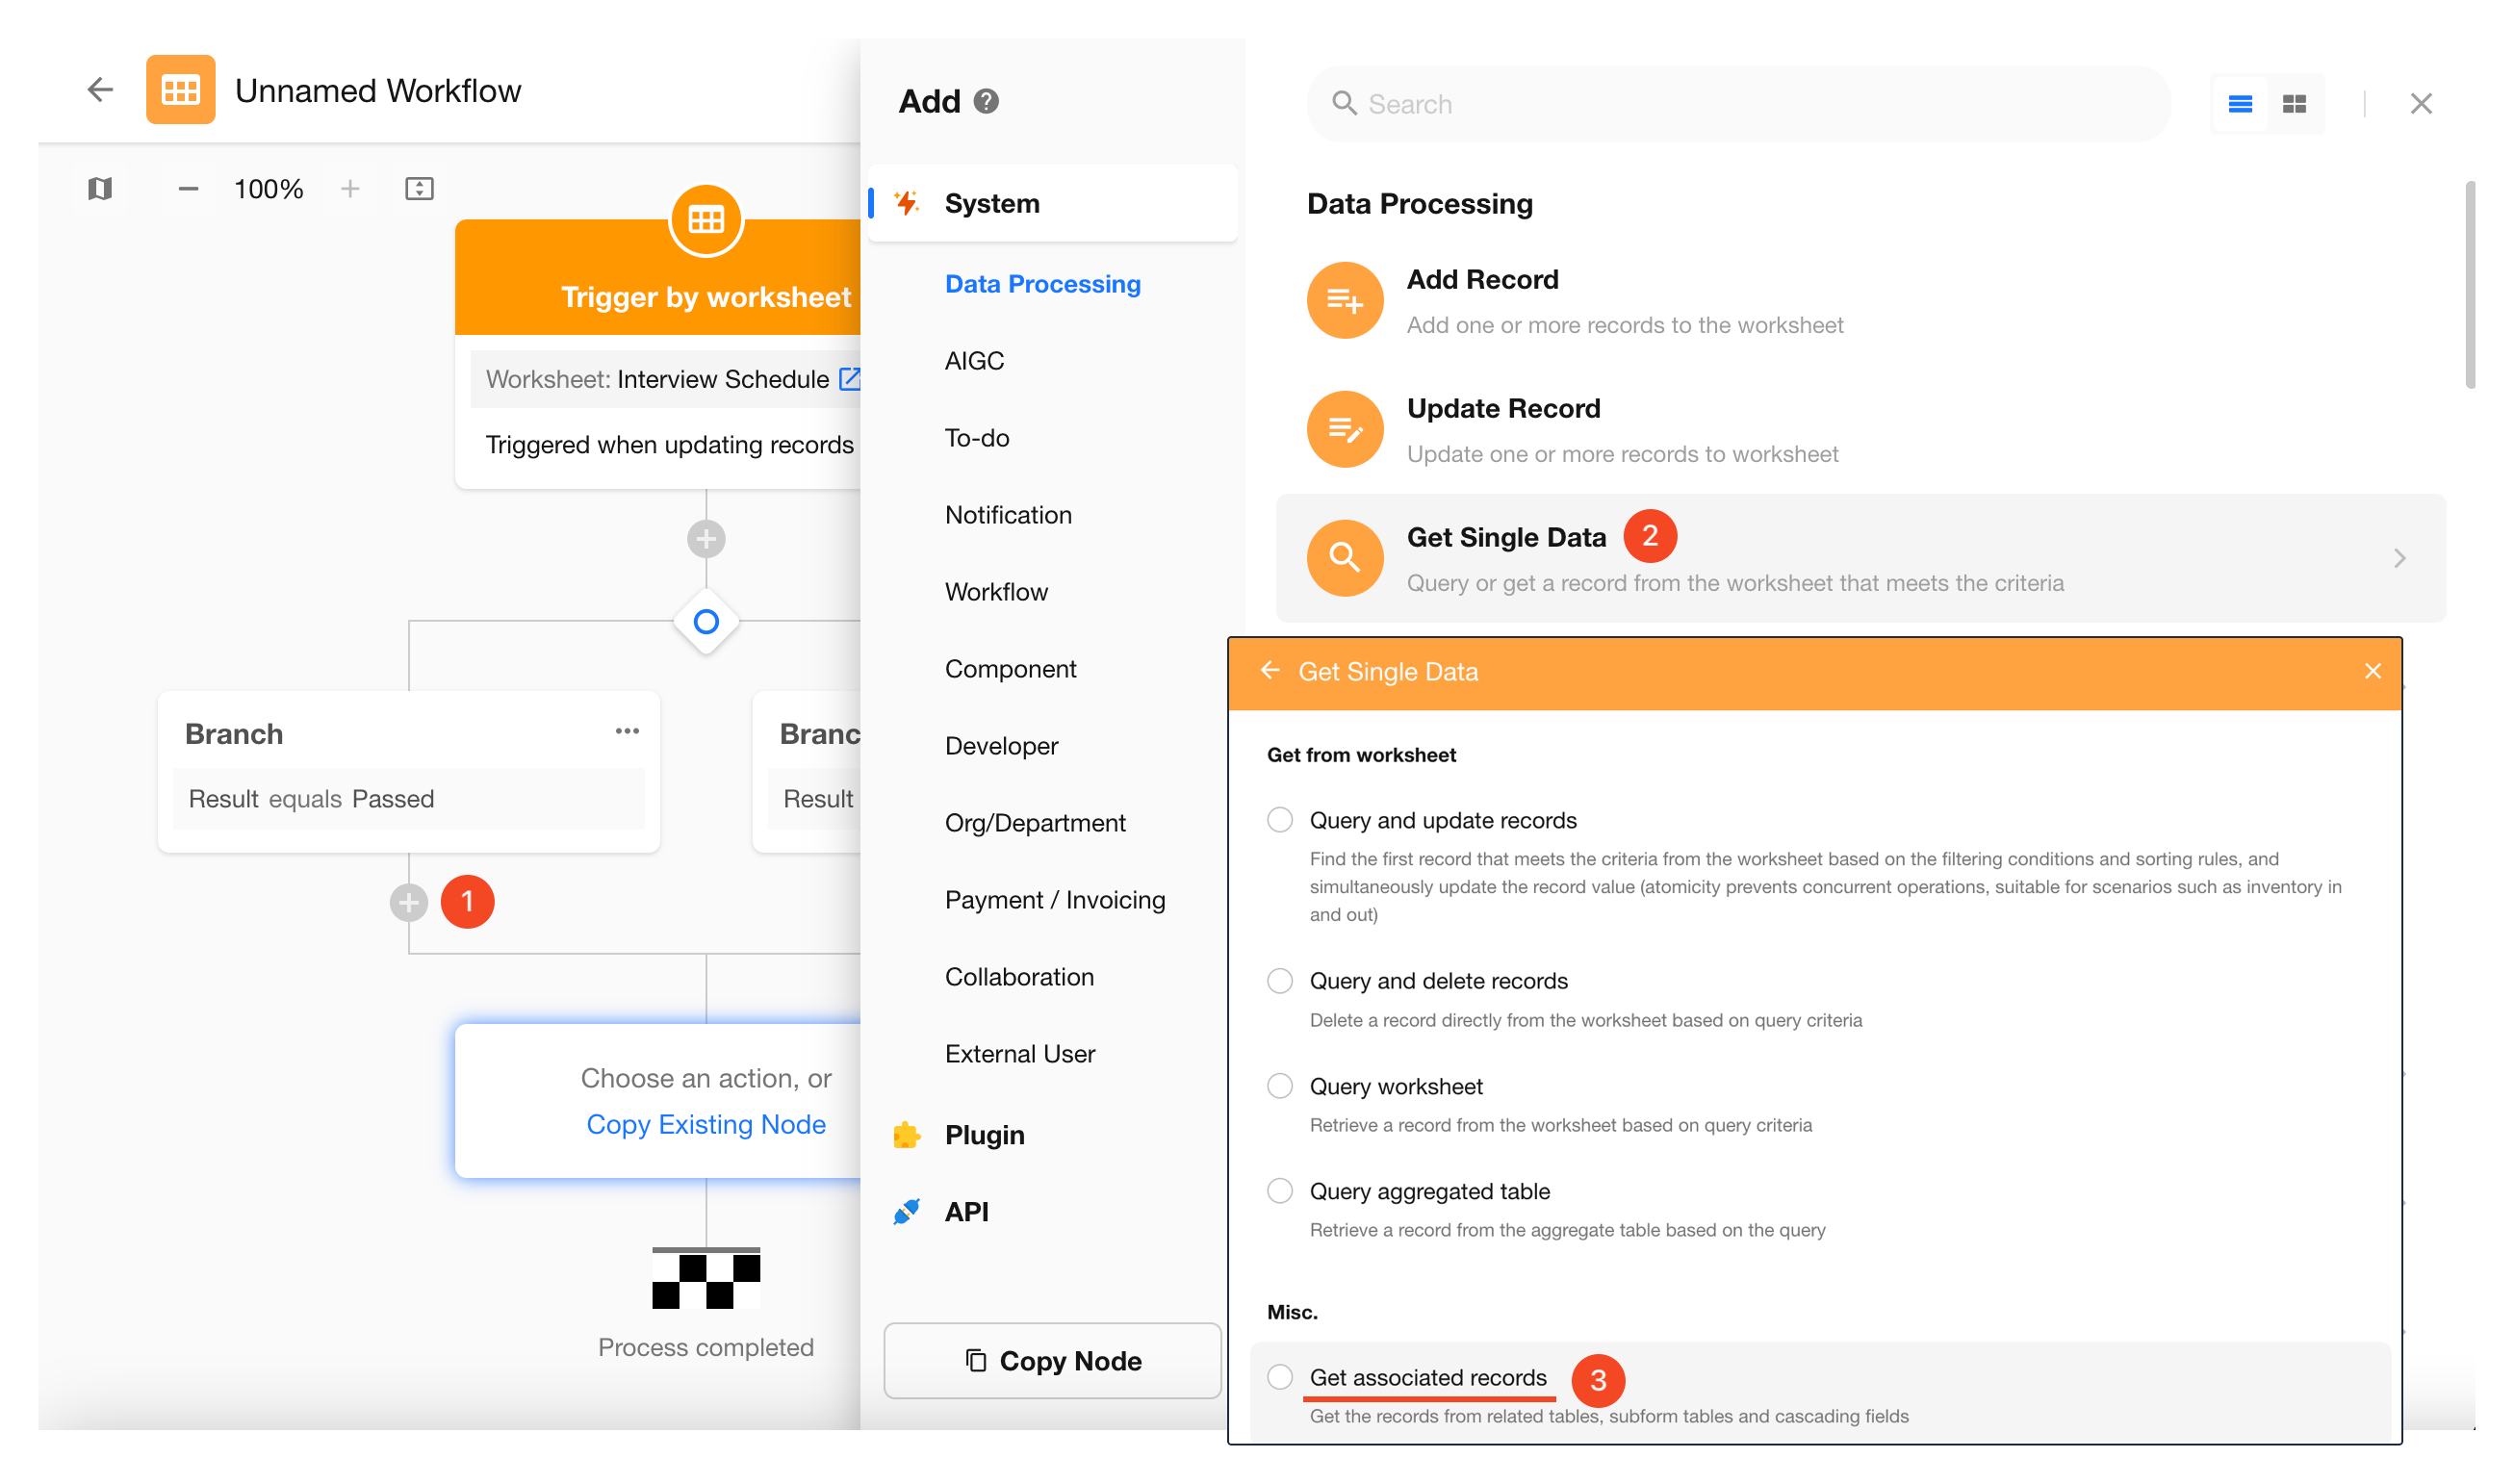
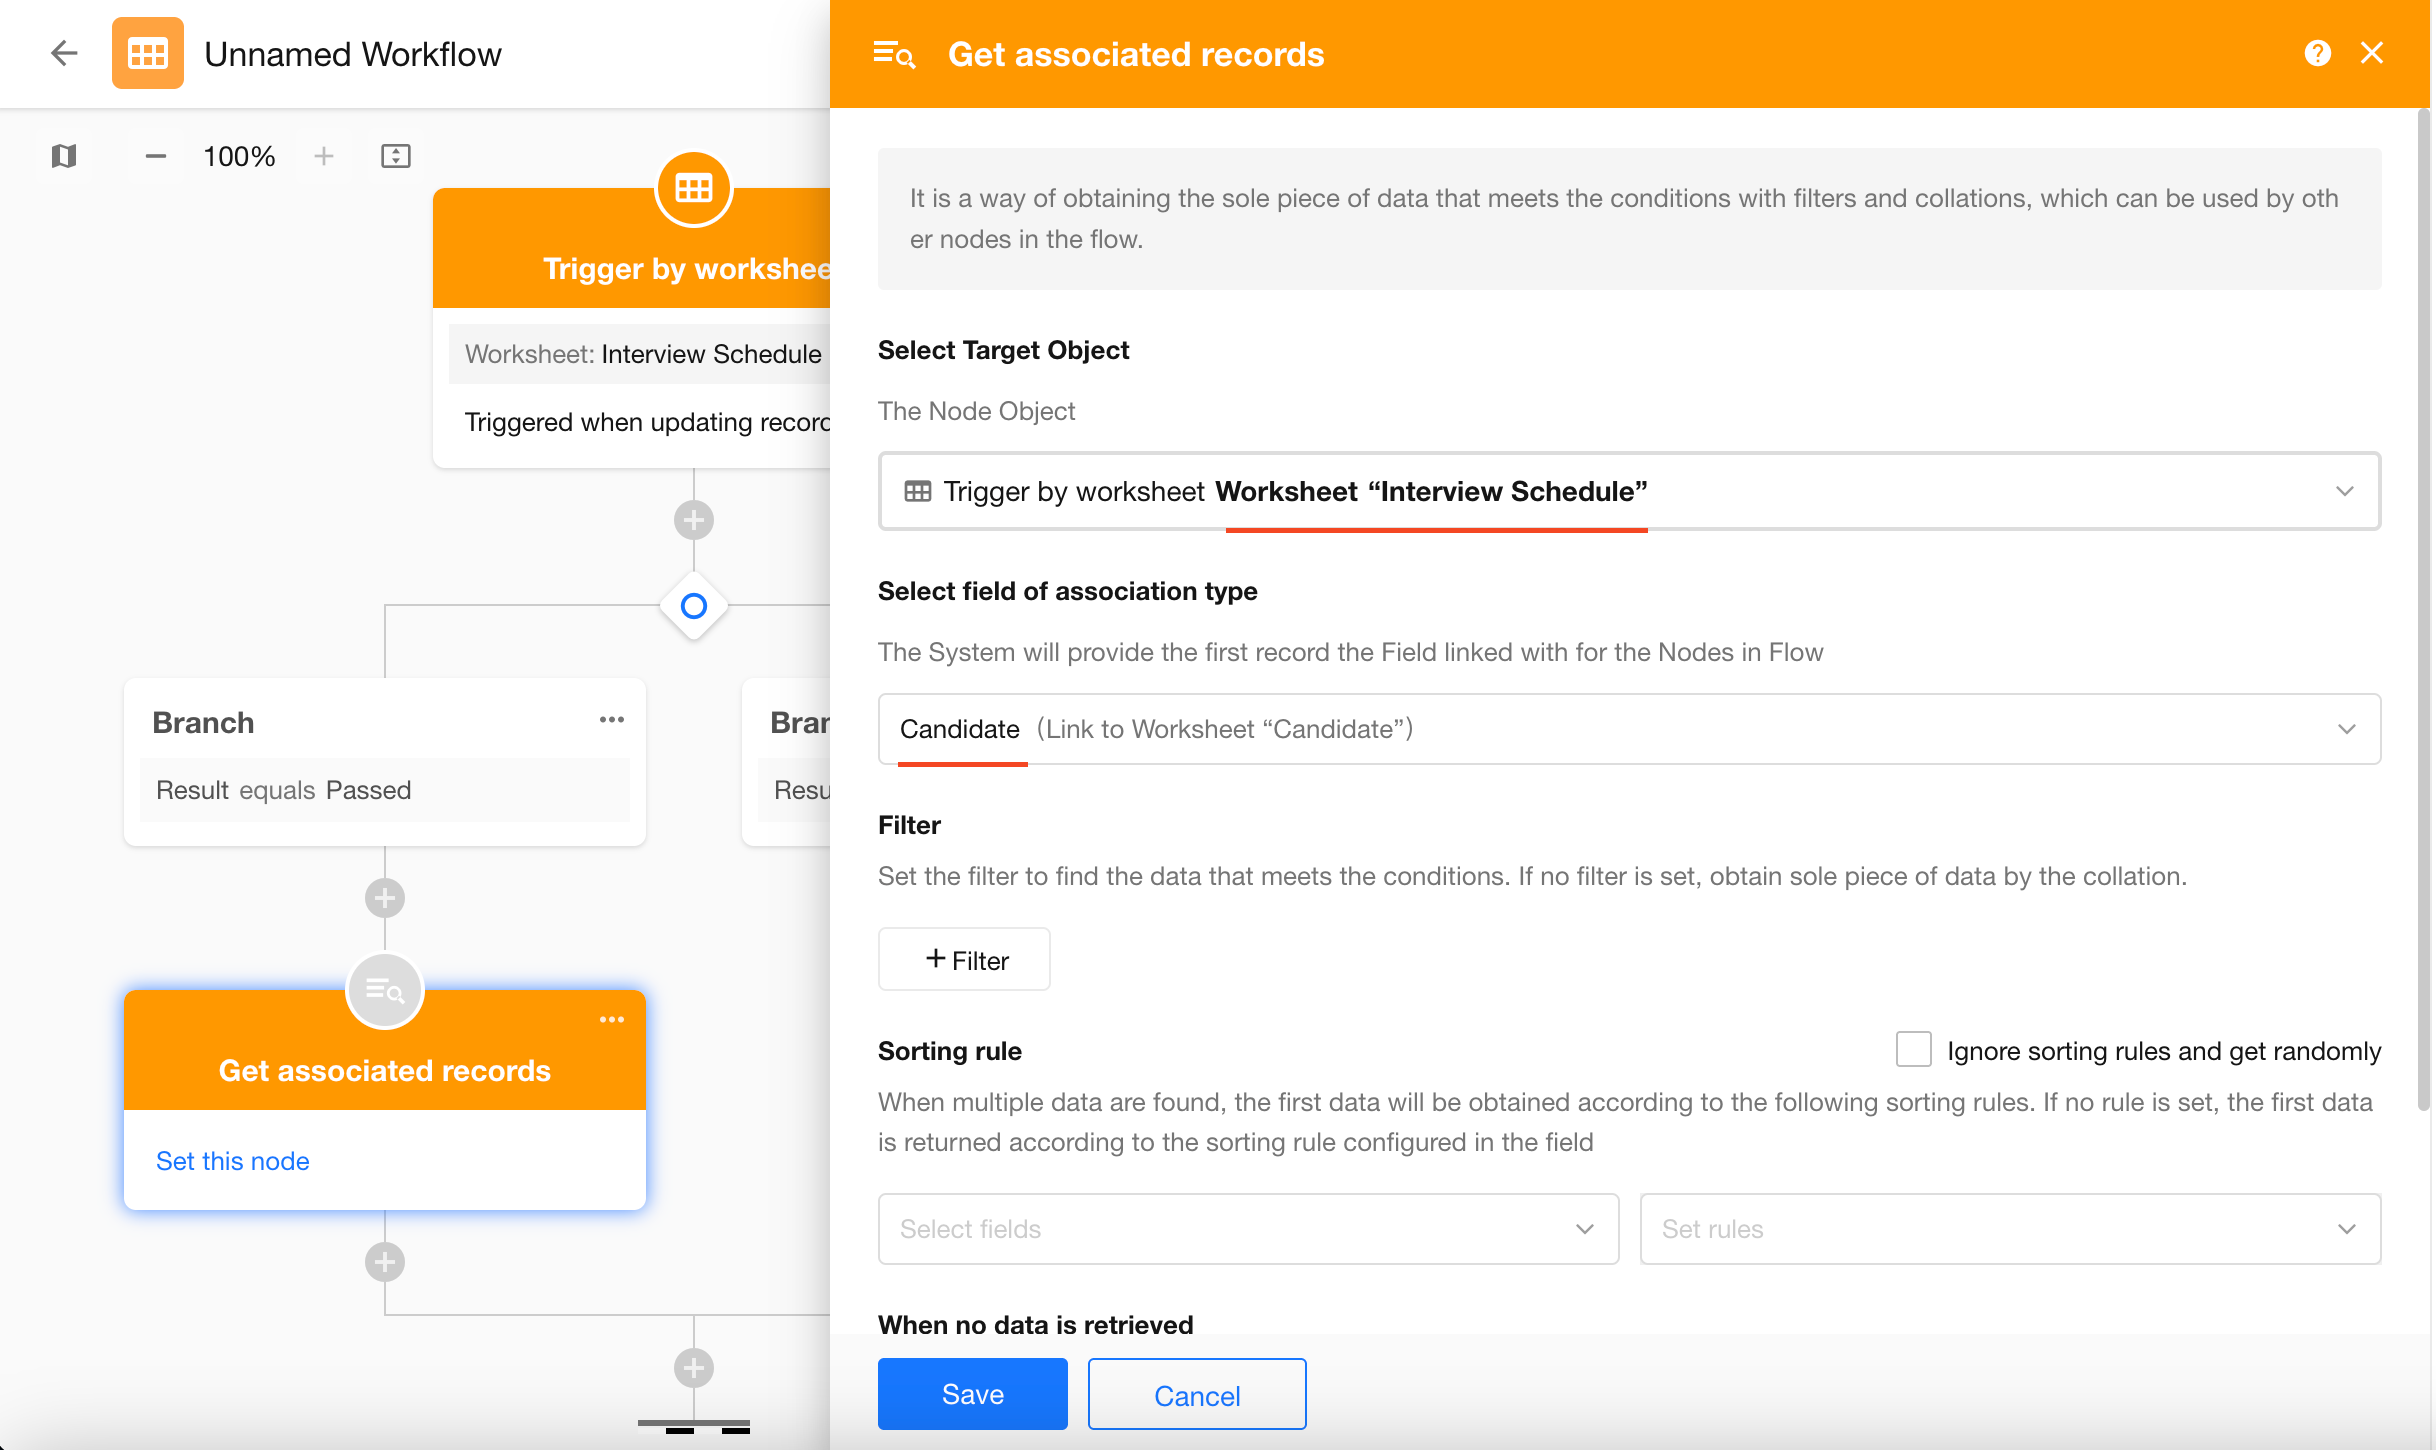
4) Add Get Single Data Node
Use the Get Single Data node to retrieve the related candidate record.
- Method: Get from relationship field
- Source: Candidate relationship field
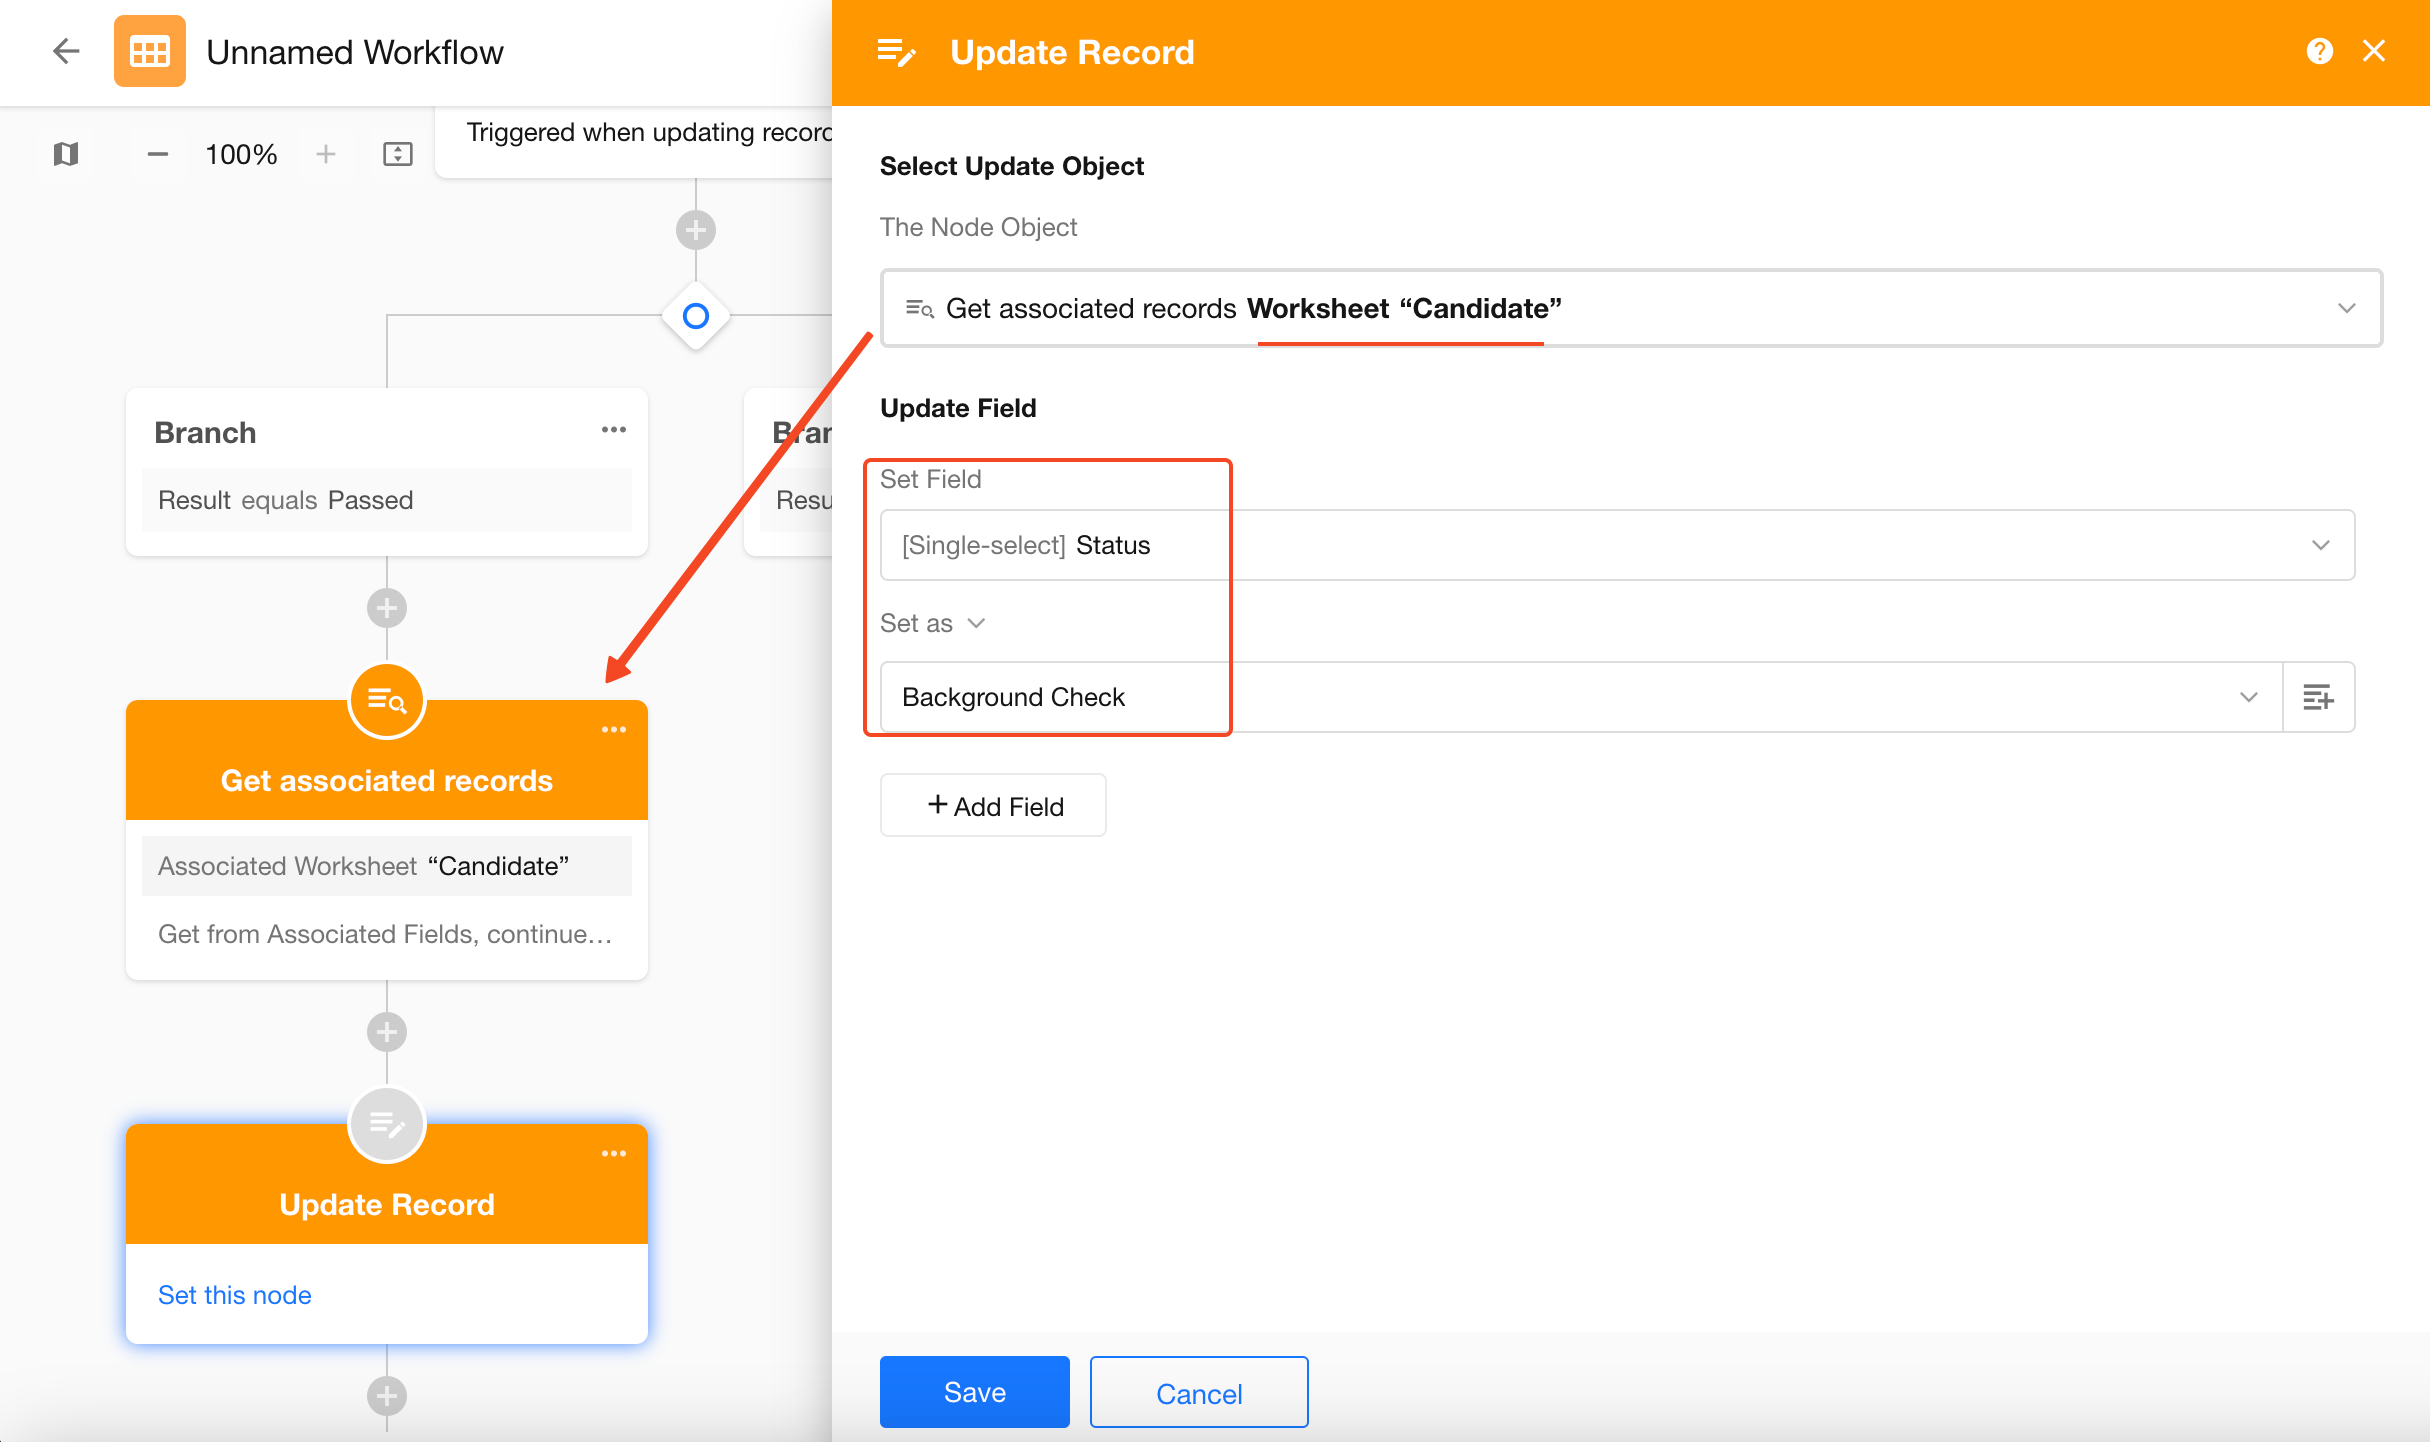
5) Add Update Record Node
Update the candidate’s status:
- Target record: Retrieved candidate record
- Field: Status → Background Check
6) Complete Branch Logic
Configure additional branches for other outcomes (e.g., Rejected).
7) Publish Workflow
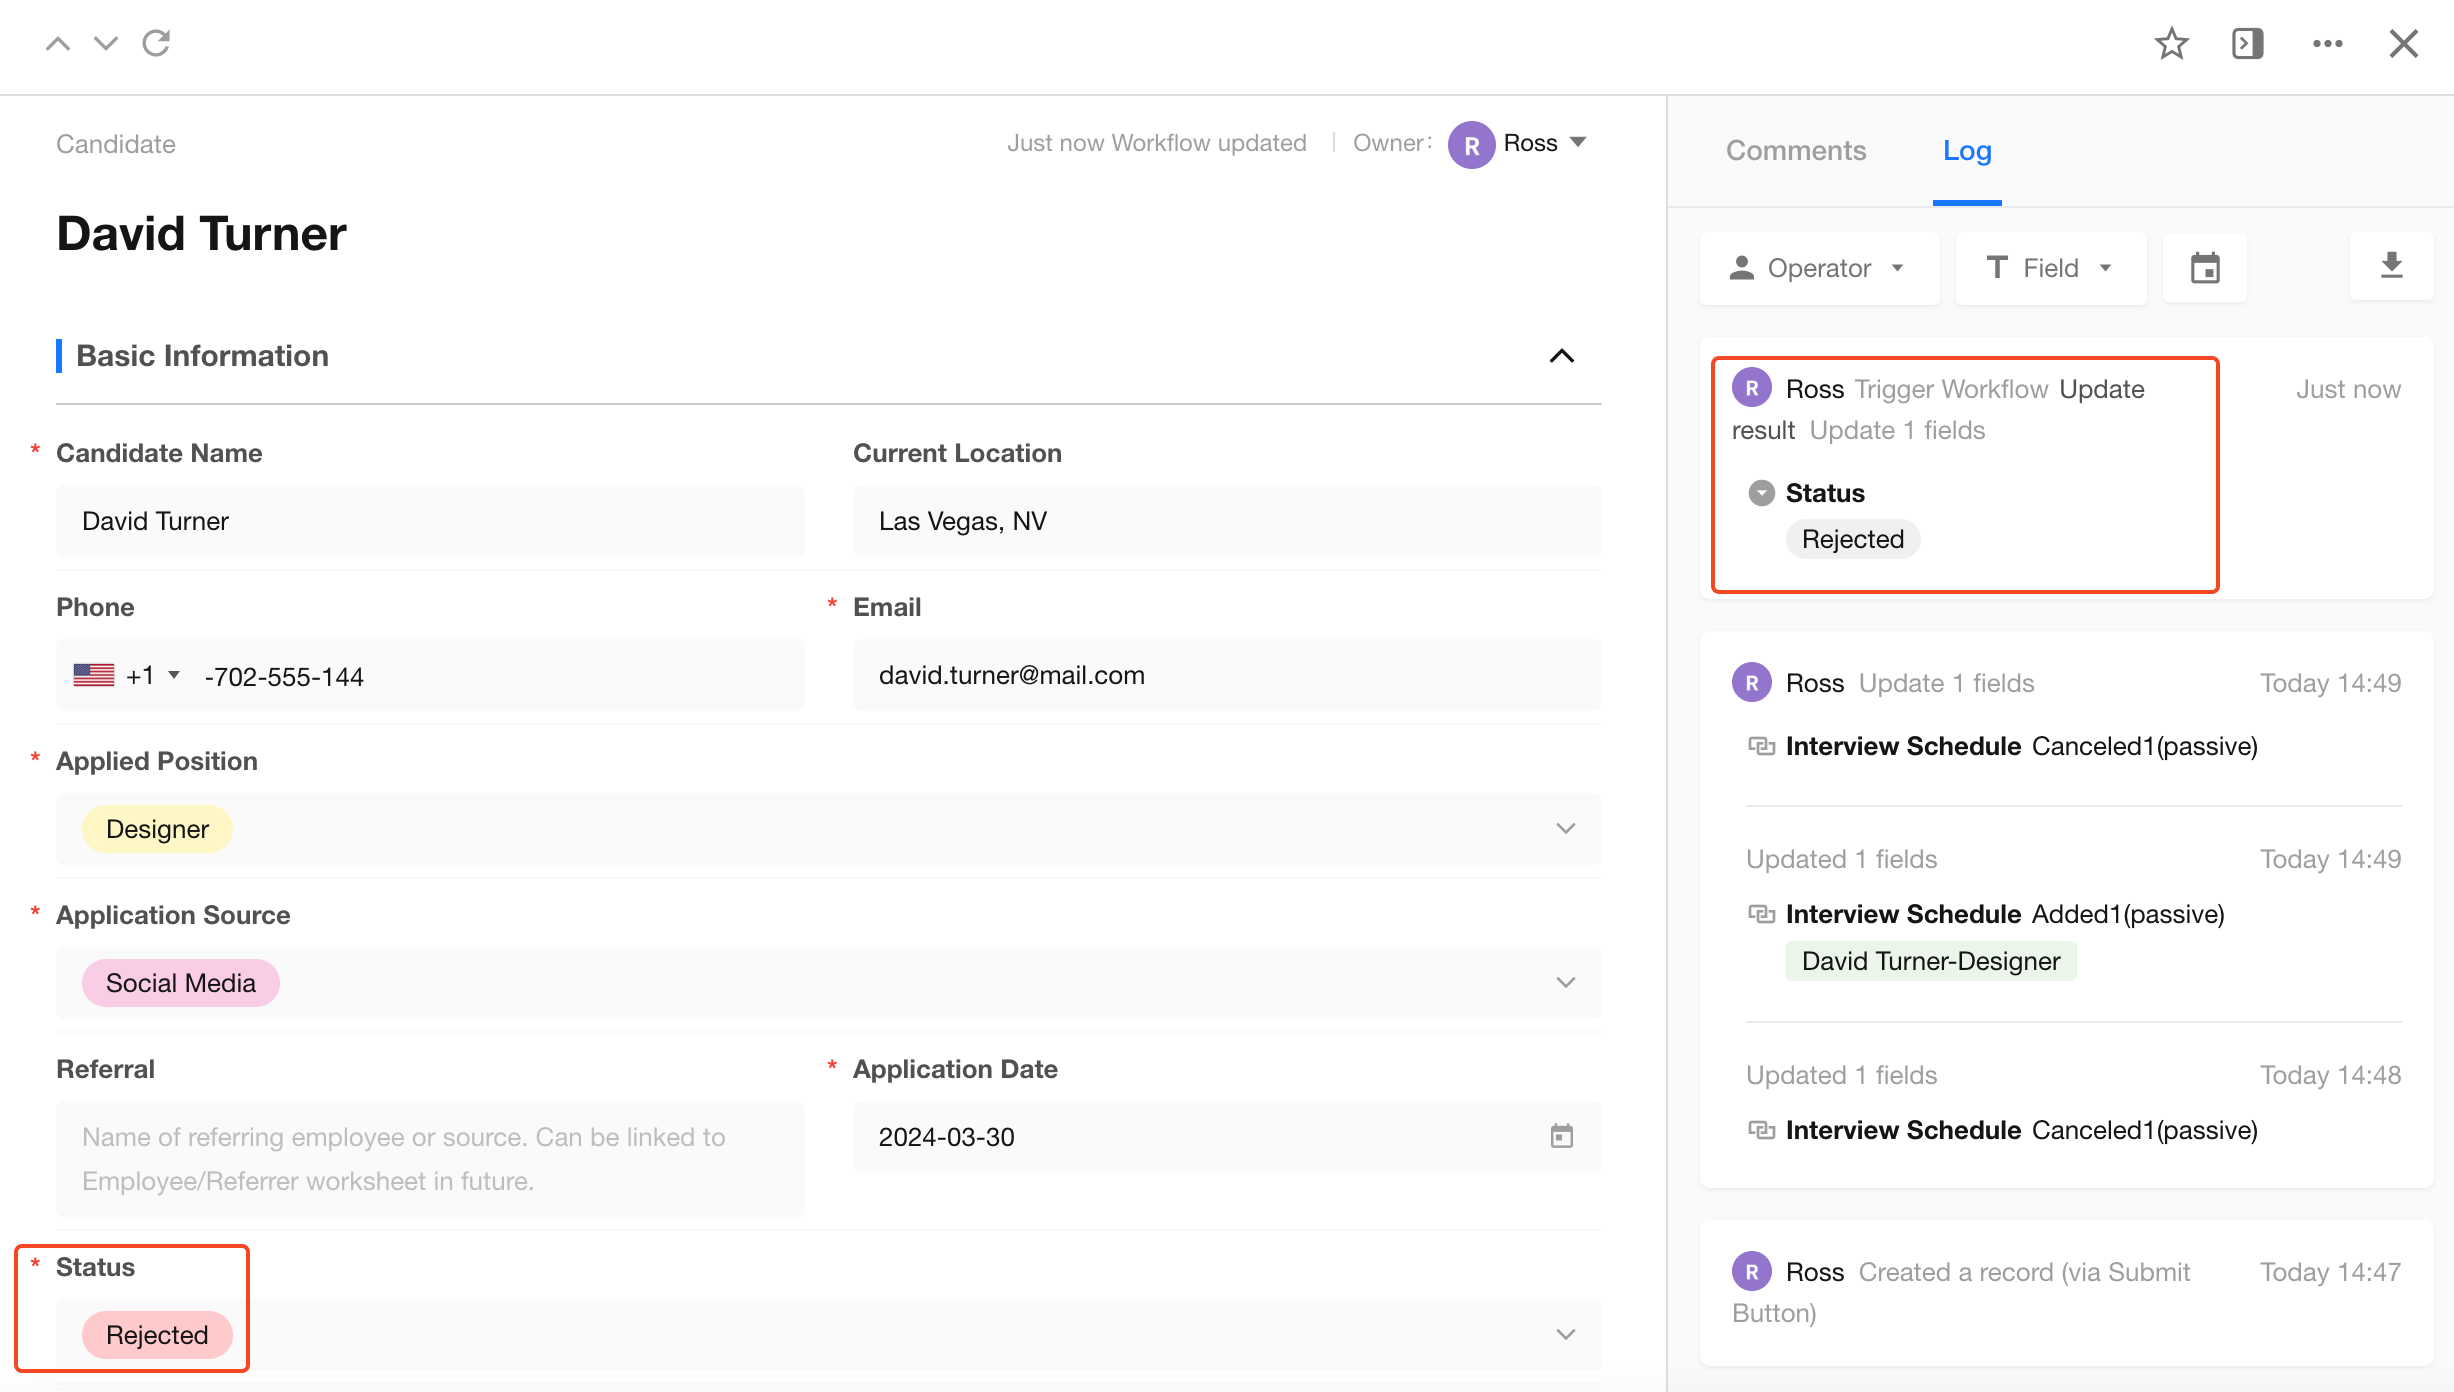
8) Test Workflow
- Open an interview record
- Update the Result field
- Save the record
The related candidate record is updated automatically.
Workflows can be extended to support more complex automation scenarios. Refer to the Help Center for additional nodes and use cases.
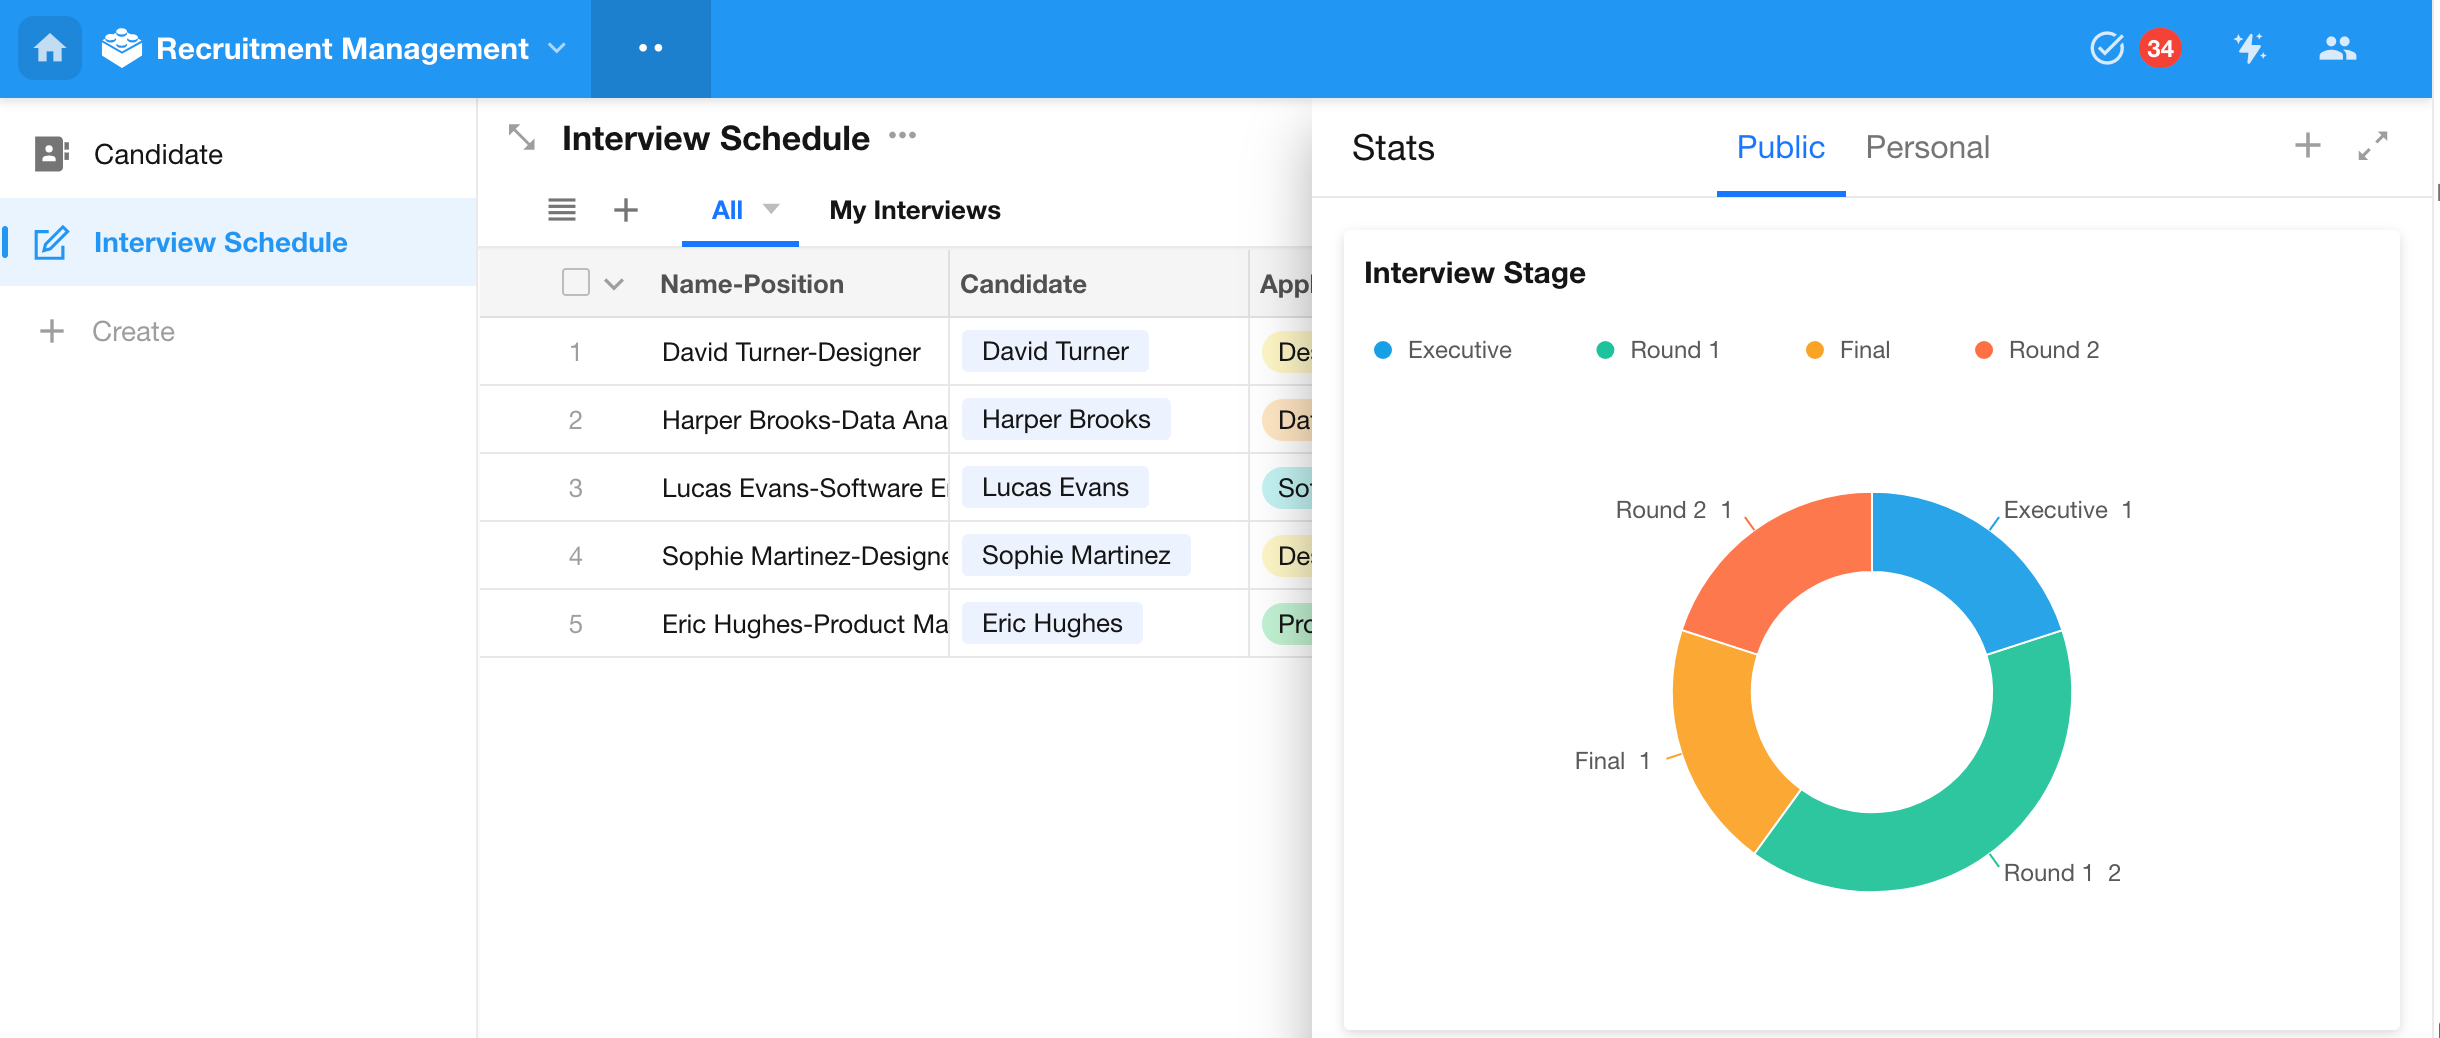
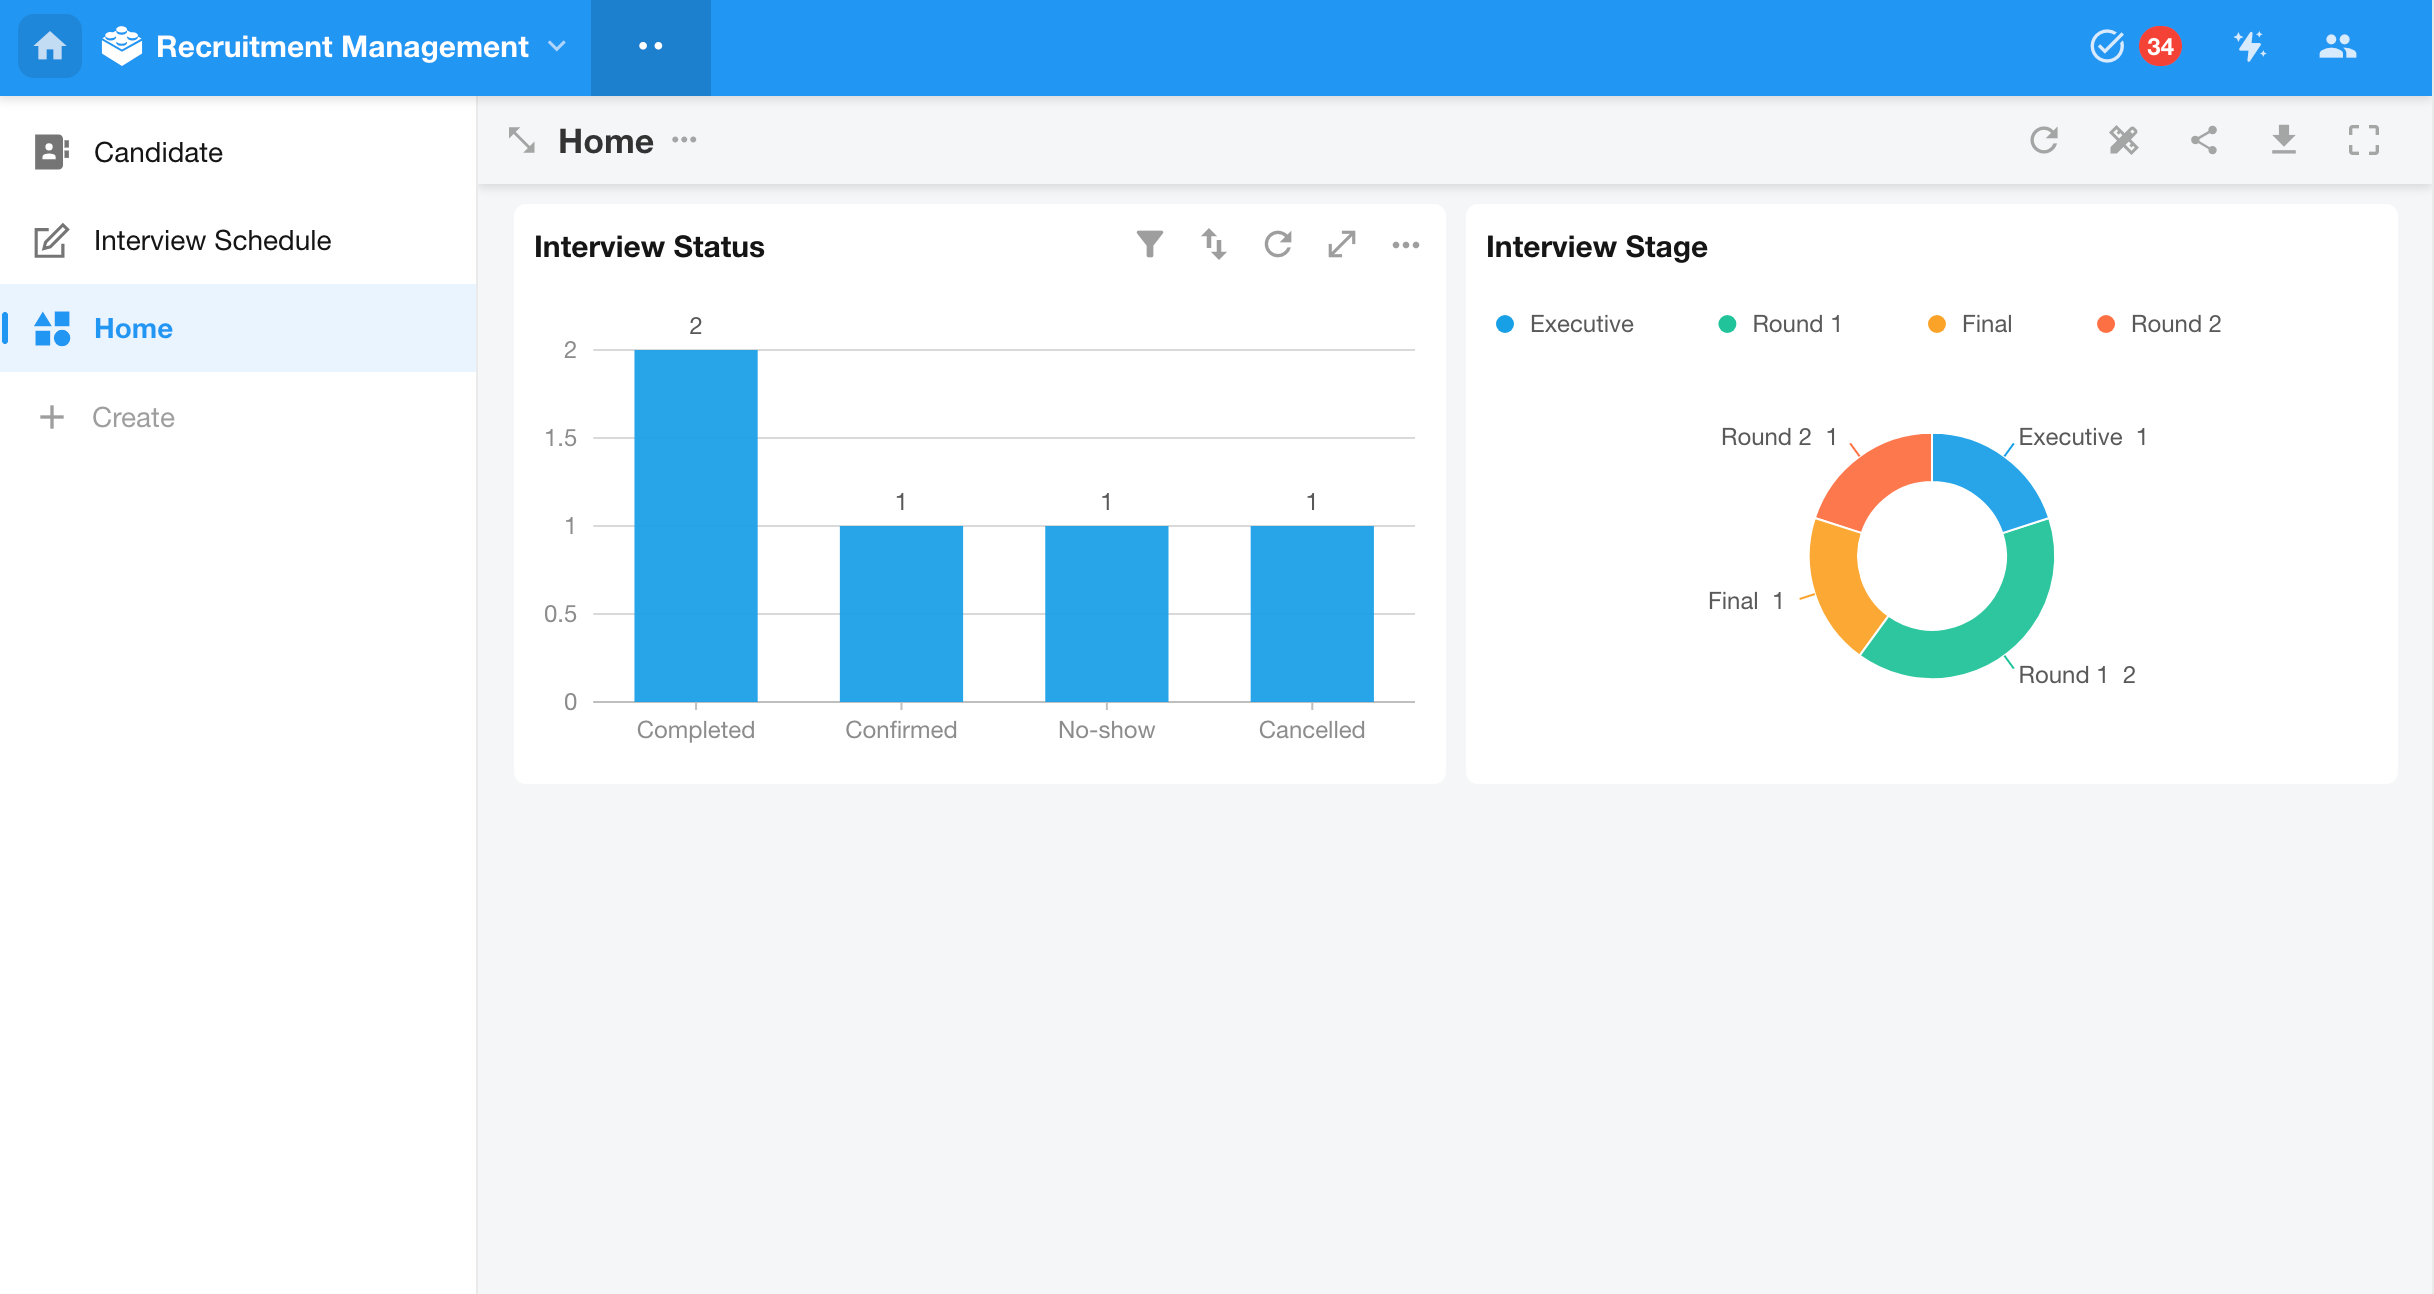
6. Charts
Charts help you analyze business data by visualizing metrics, identifying trends, and supporting decision-making.
In this recruitment management app, common scenarios include:
- Tracking candidates awaiting interviews this week
- Monitoring hired candidates
- Analyzing candidate status distribution
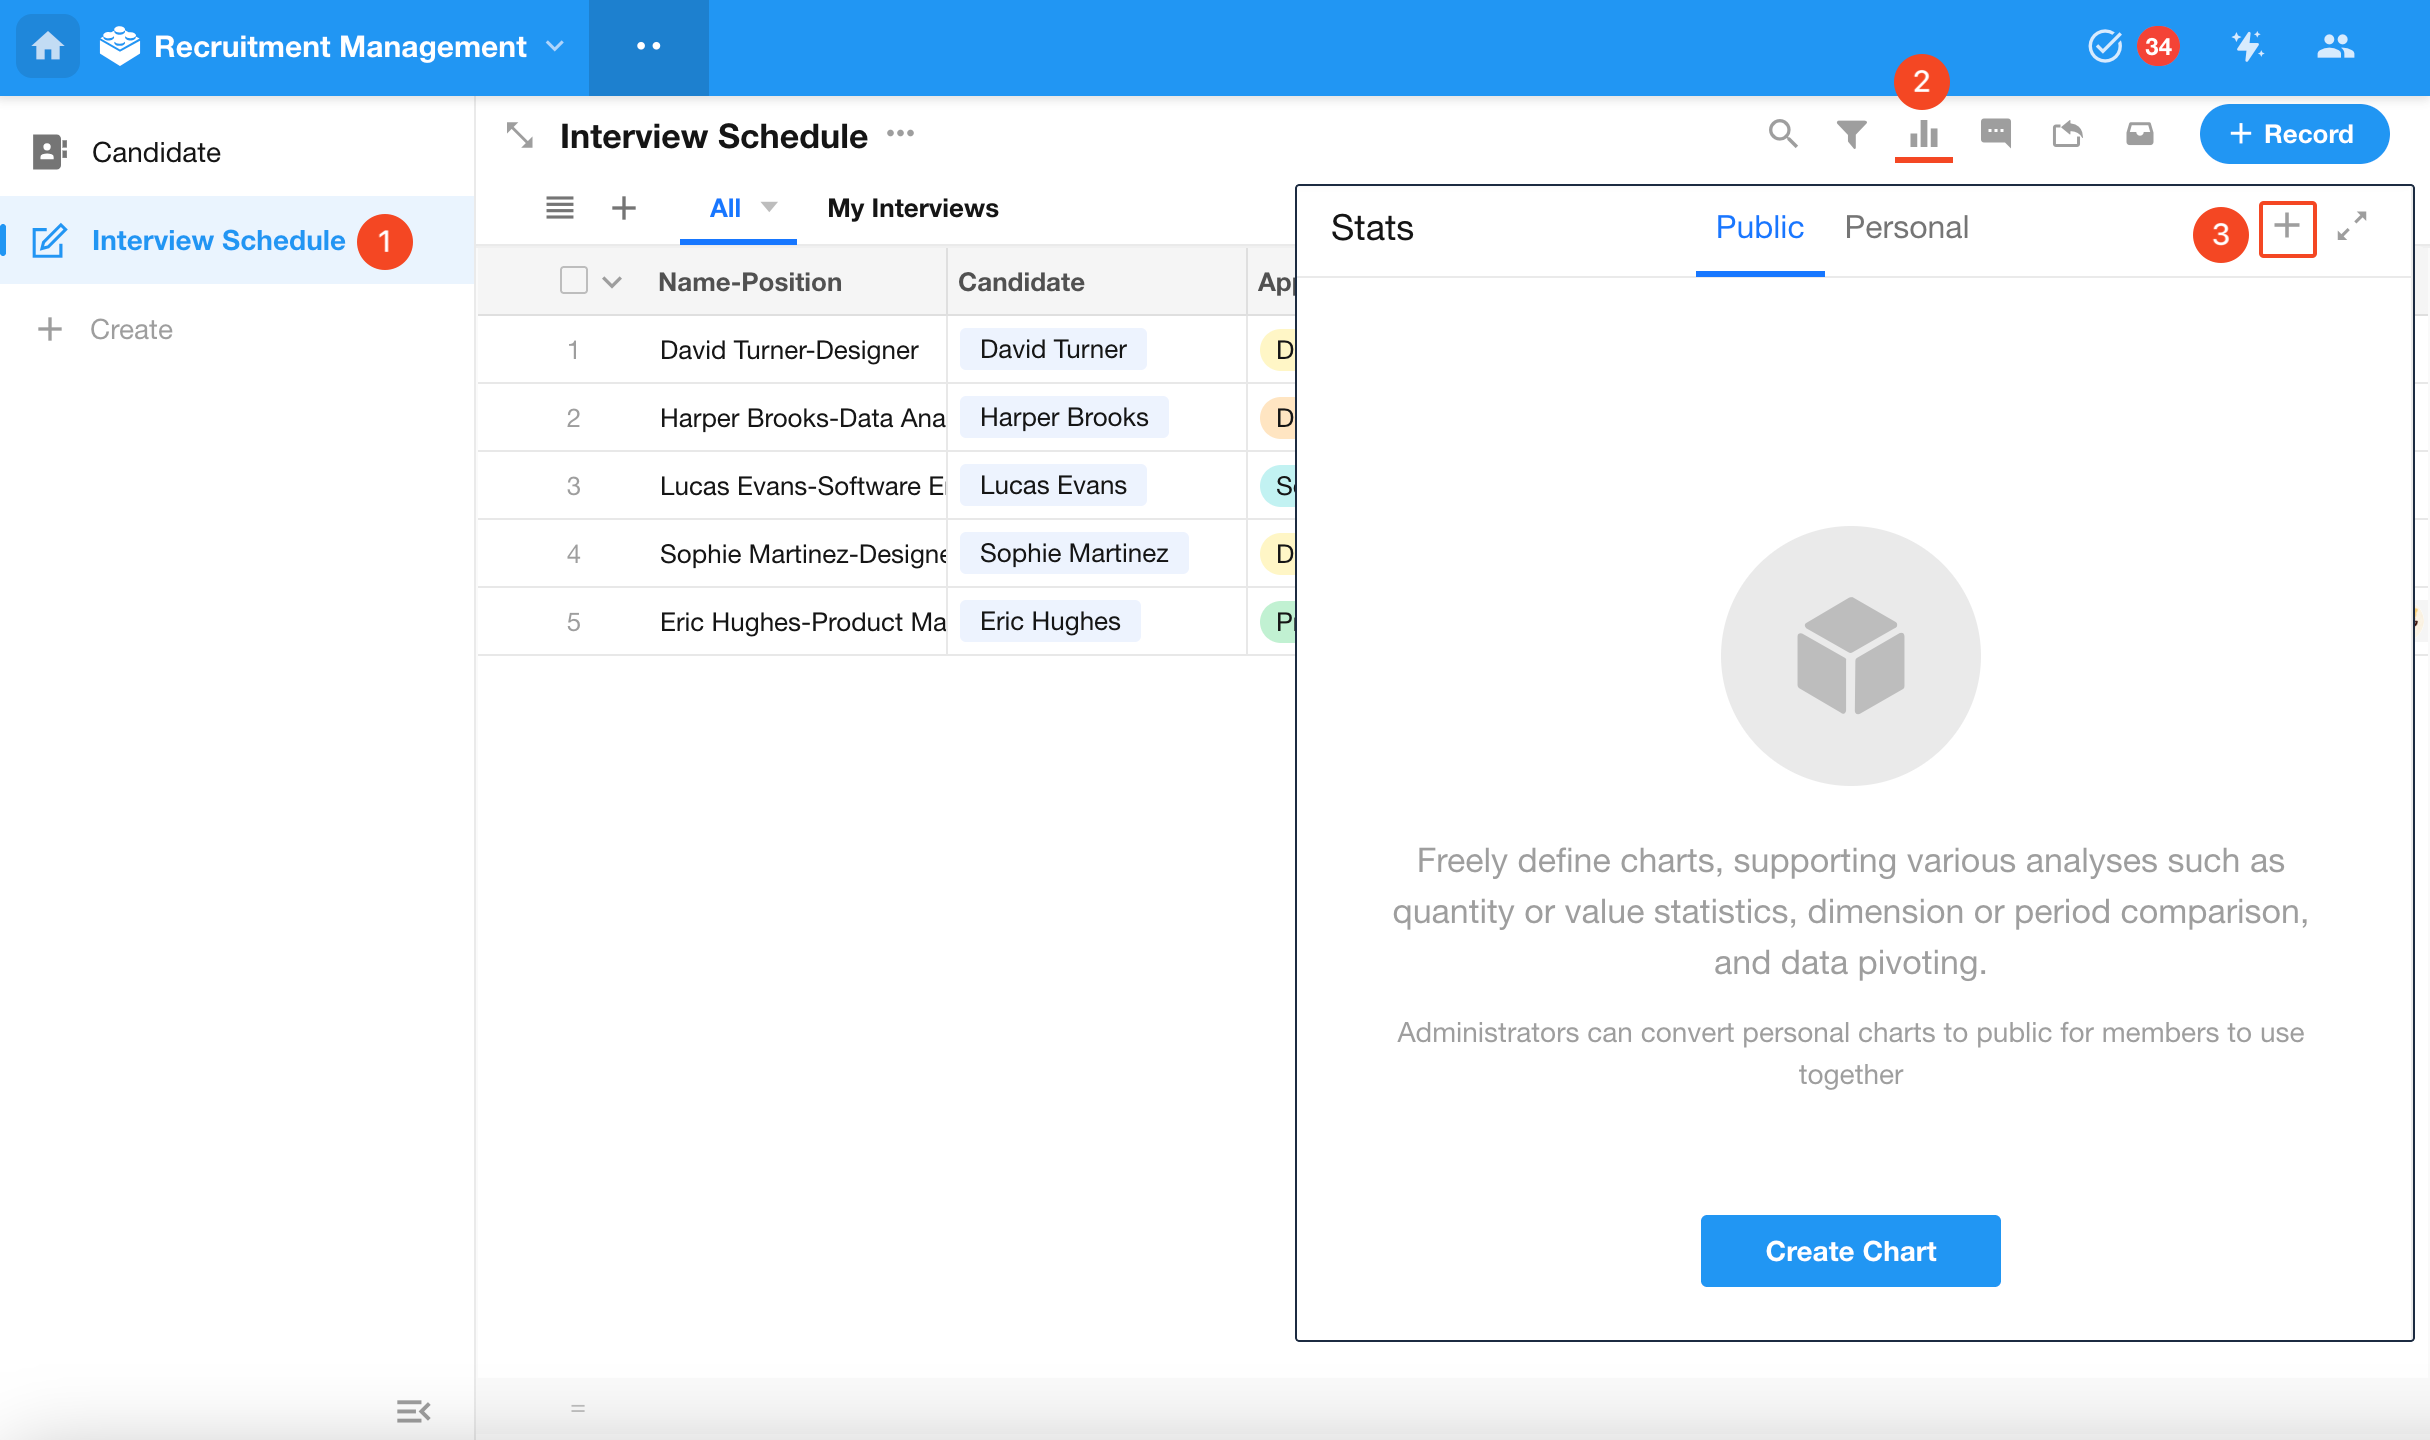
1) Create a Chart
To analyze interview-related data, create charts under the Interview Schedule worksheet.
2) Configure the Chart
Chart configuration typically includes:
- Define the data scope
- Select a chart type
- Choose dimensions and metrics
- Set the chart name
- Save the chart
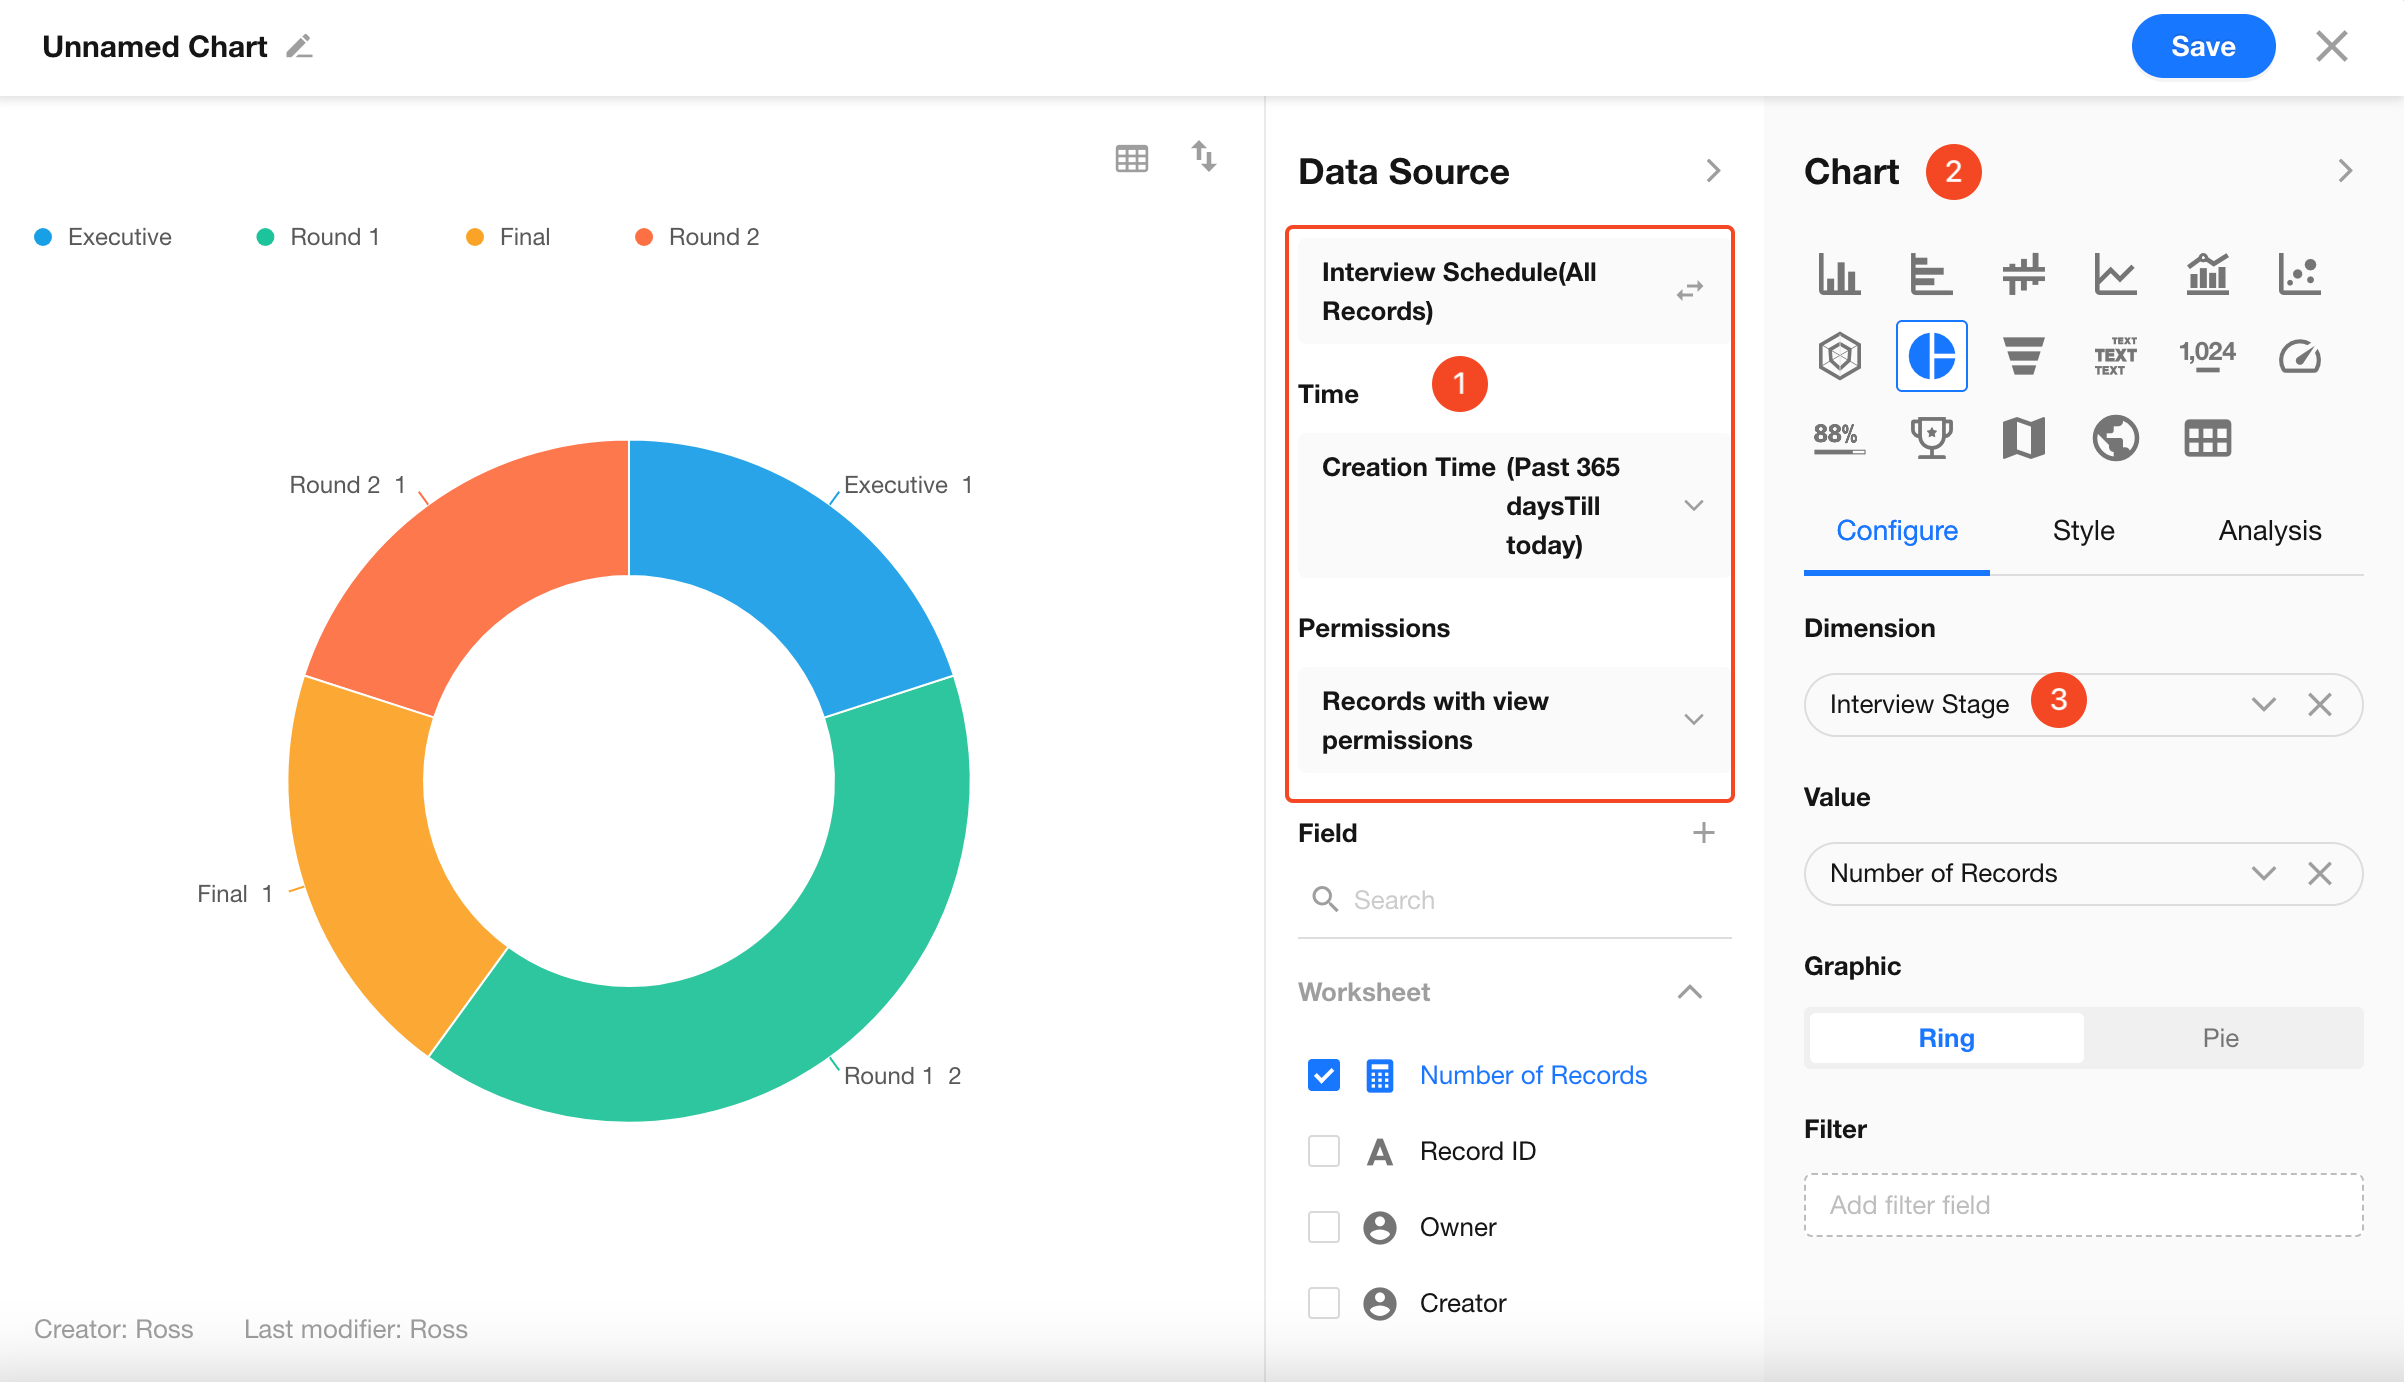
Example:
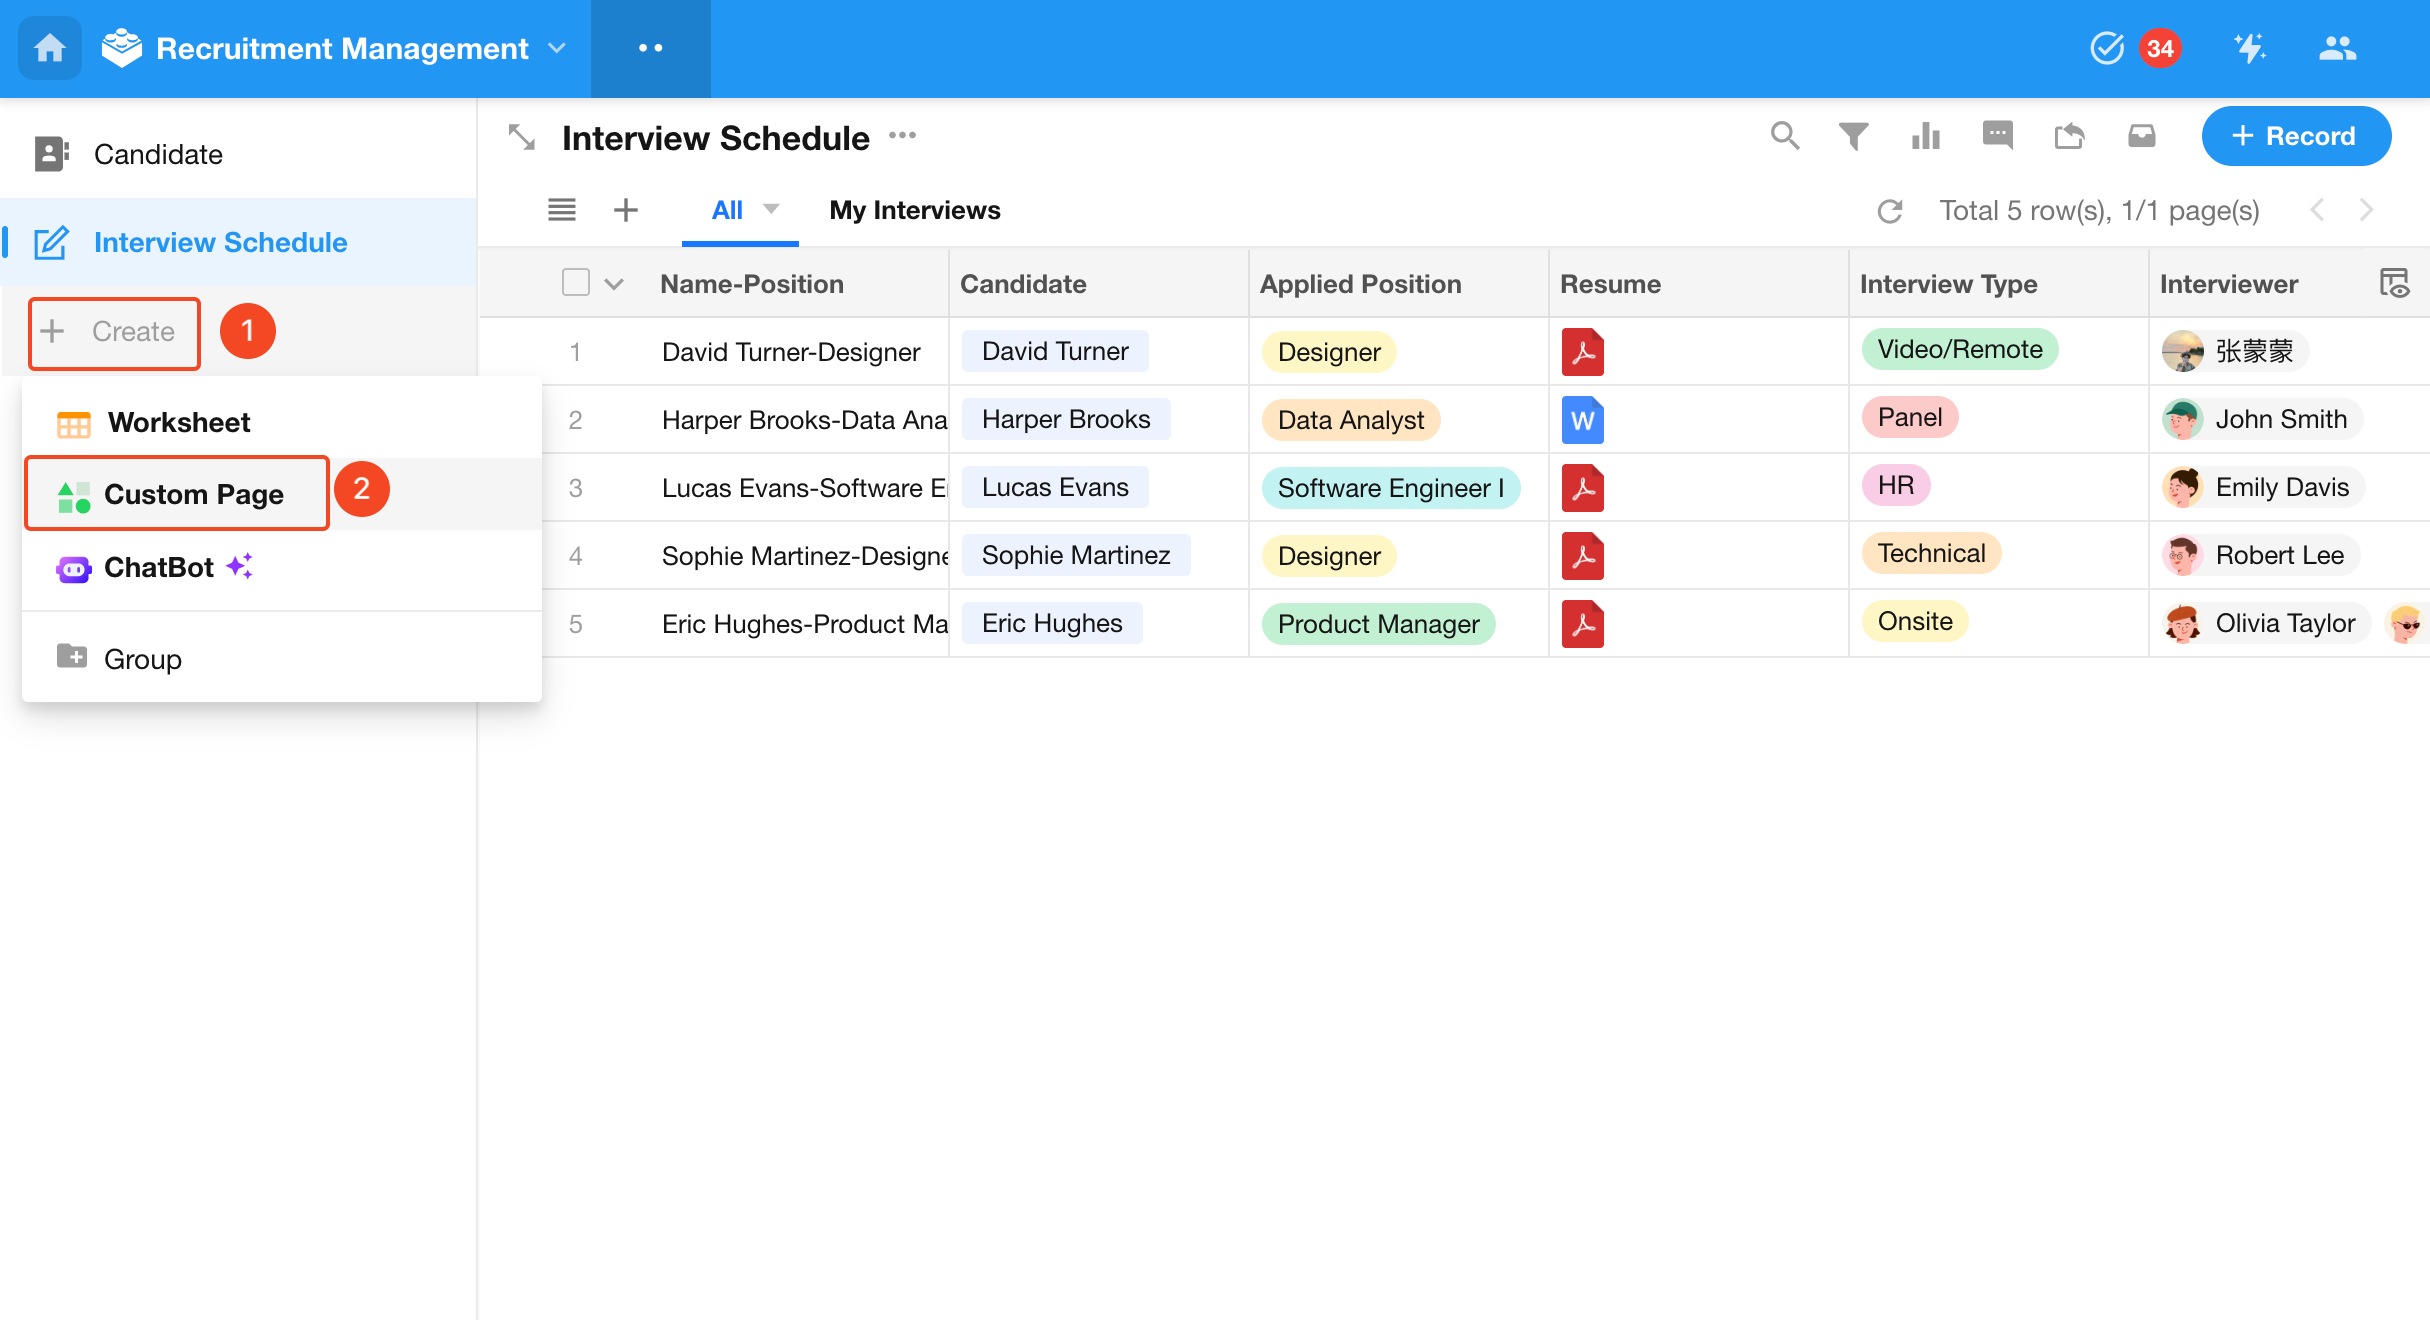
7. Custom Pages
Custom pages provide a centralized workspace for key data, actions, and visualizations. They are commonly used as dashboards.
Supported components include:
- Button
- Chart
- Filter
- View
- Carousel
- Text
- Image
- Embedded URL
Supported containers include:
- Tabs
- Card
In a recruitment app, you can use a custom page to display multiple charts for monitoring candidate progress.
1) Create a Custom Page
Create a new custom page and name it Home.
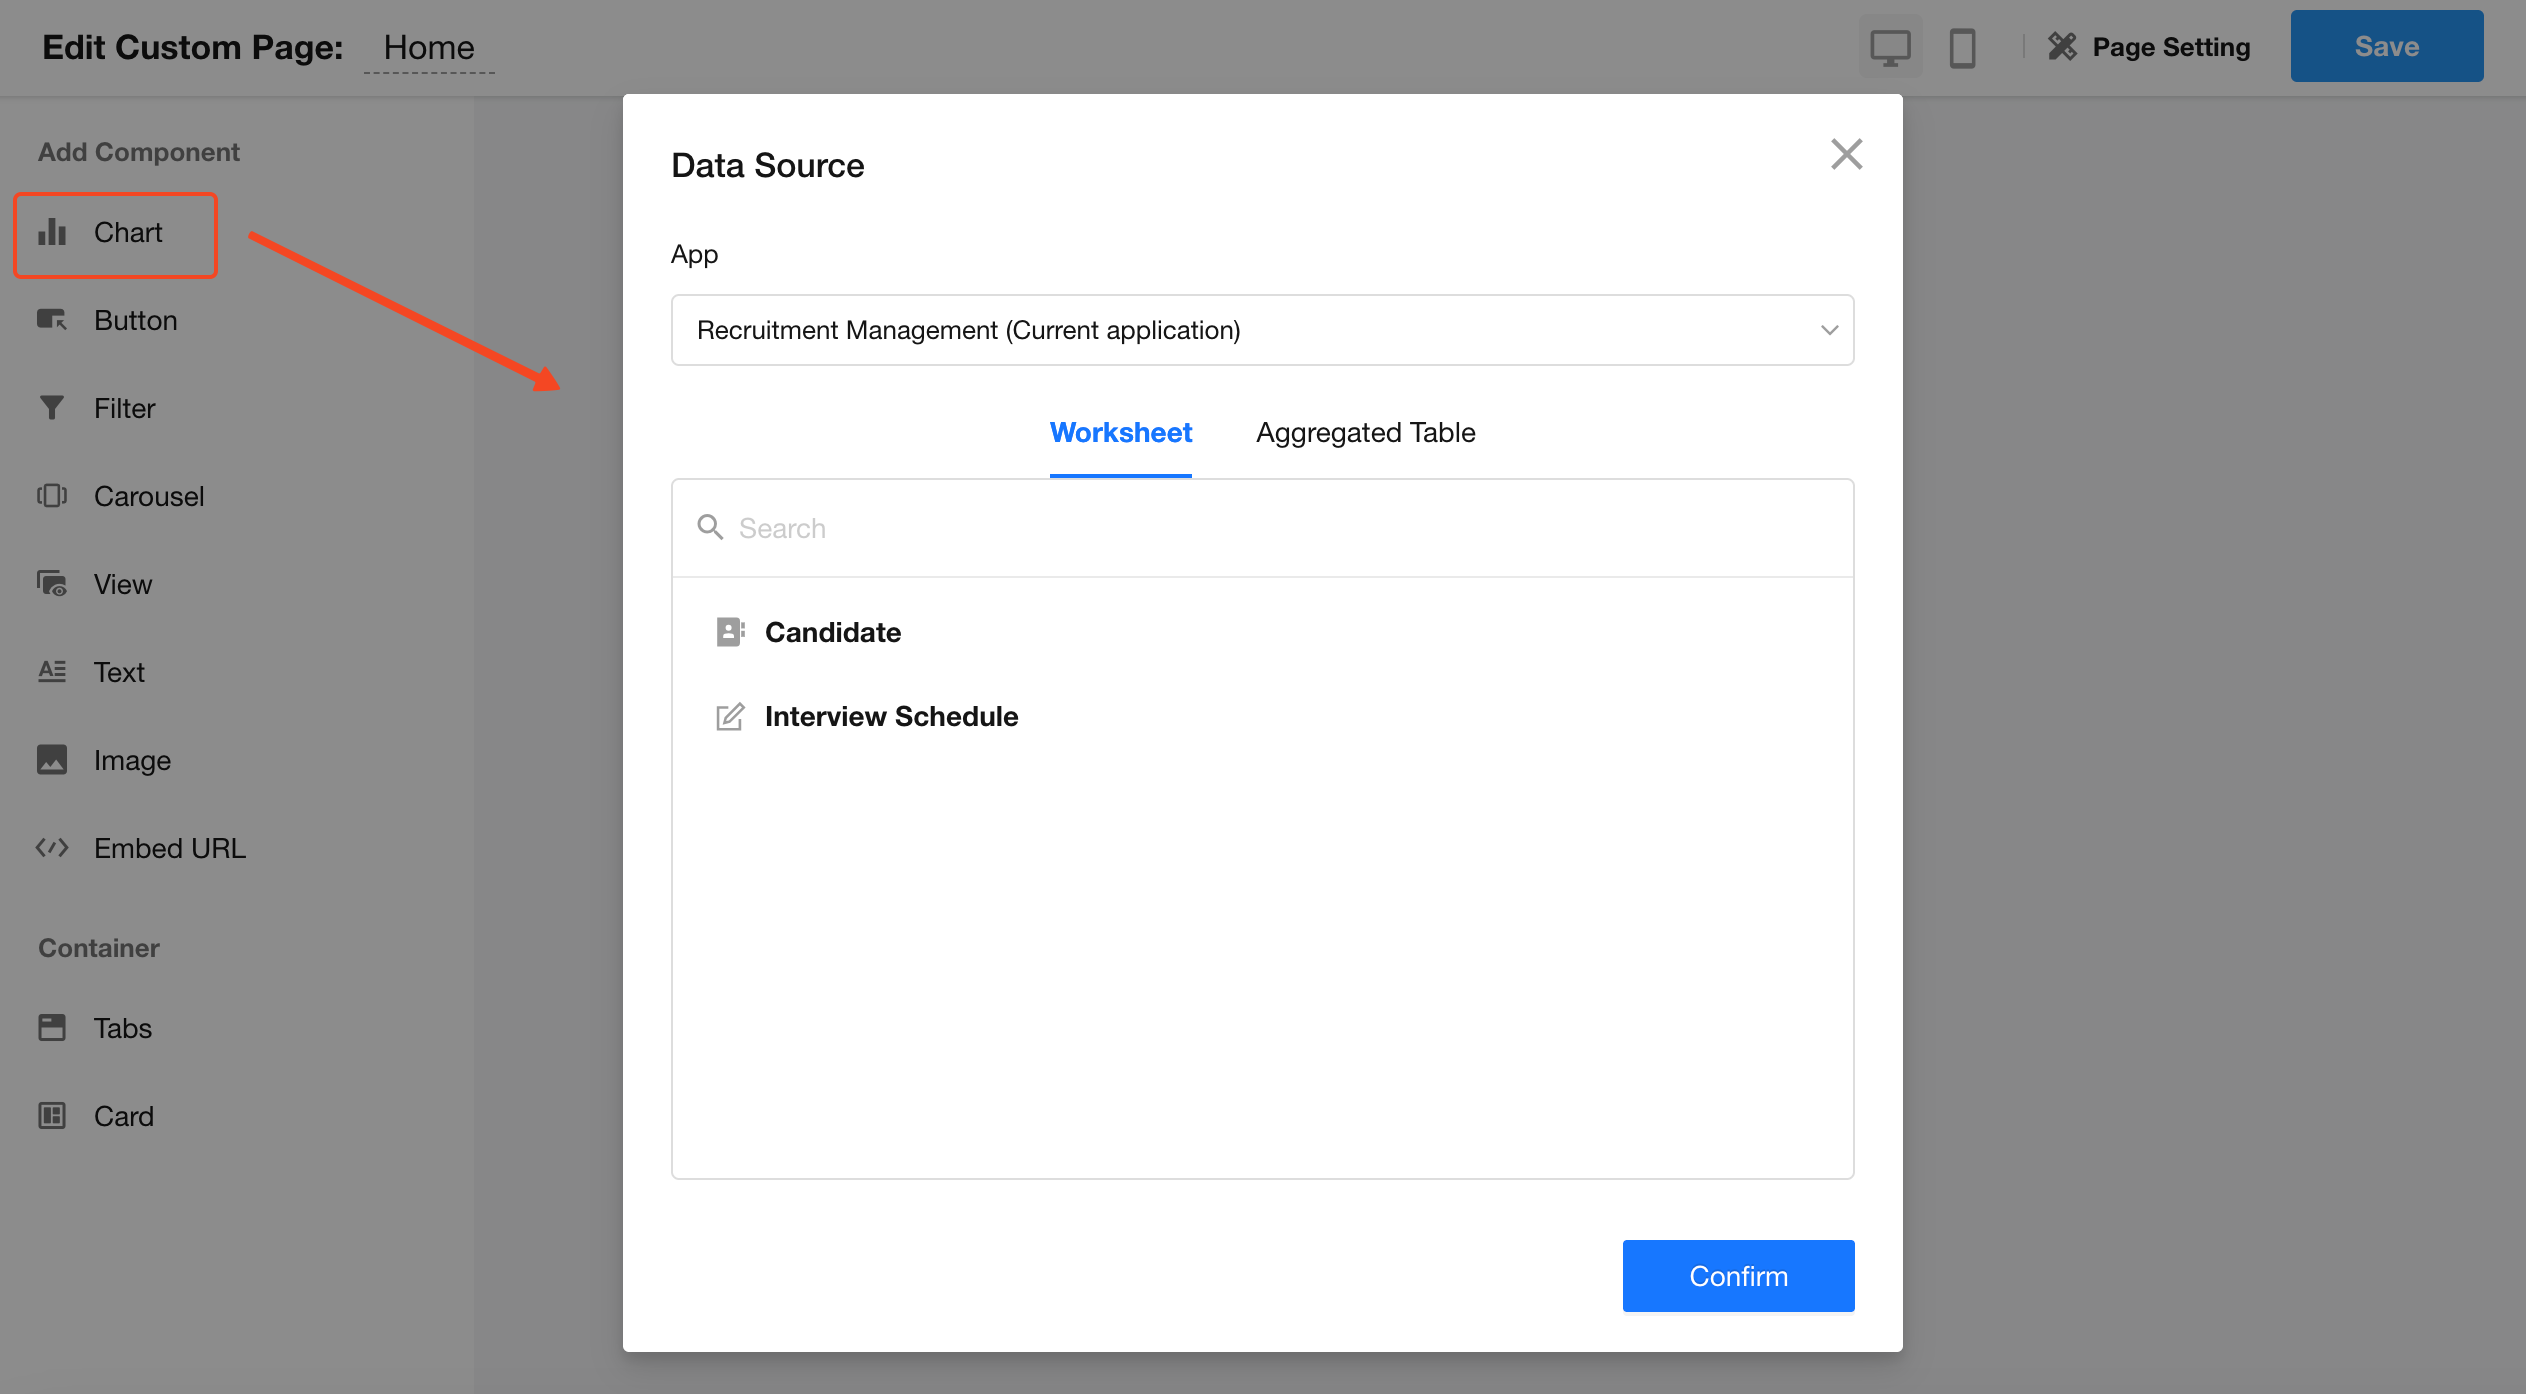
2) Add Chart Components
Add chart components and configure each chart as needed.
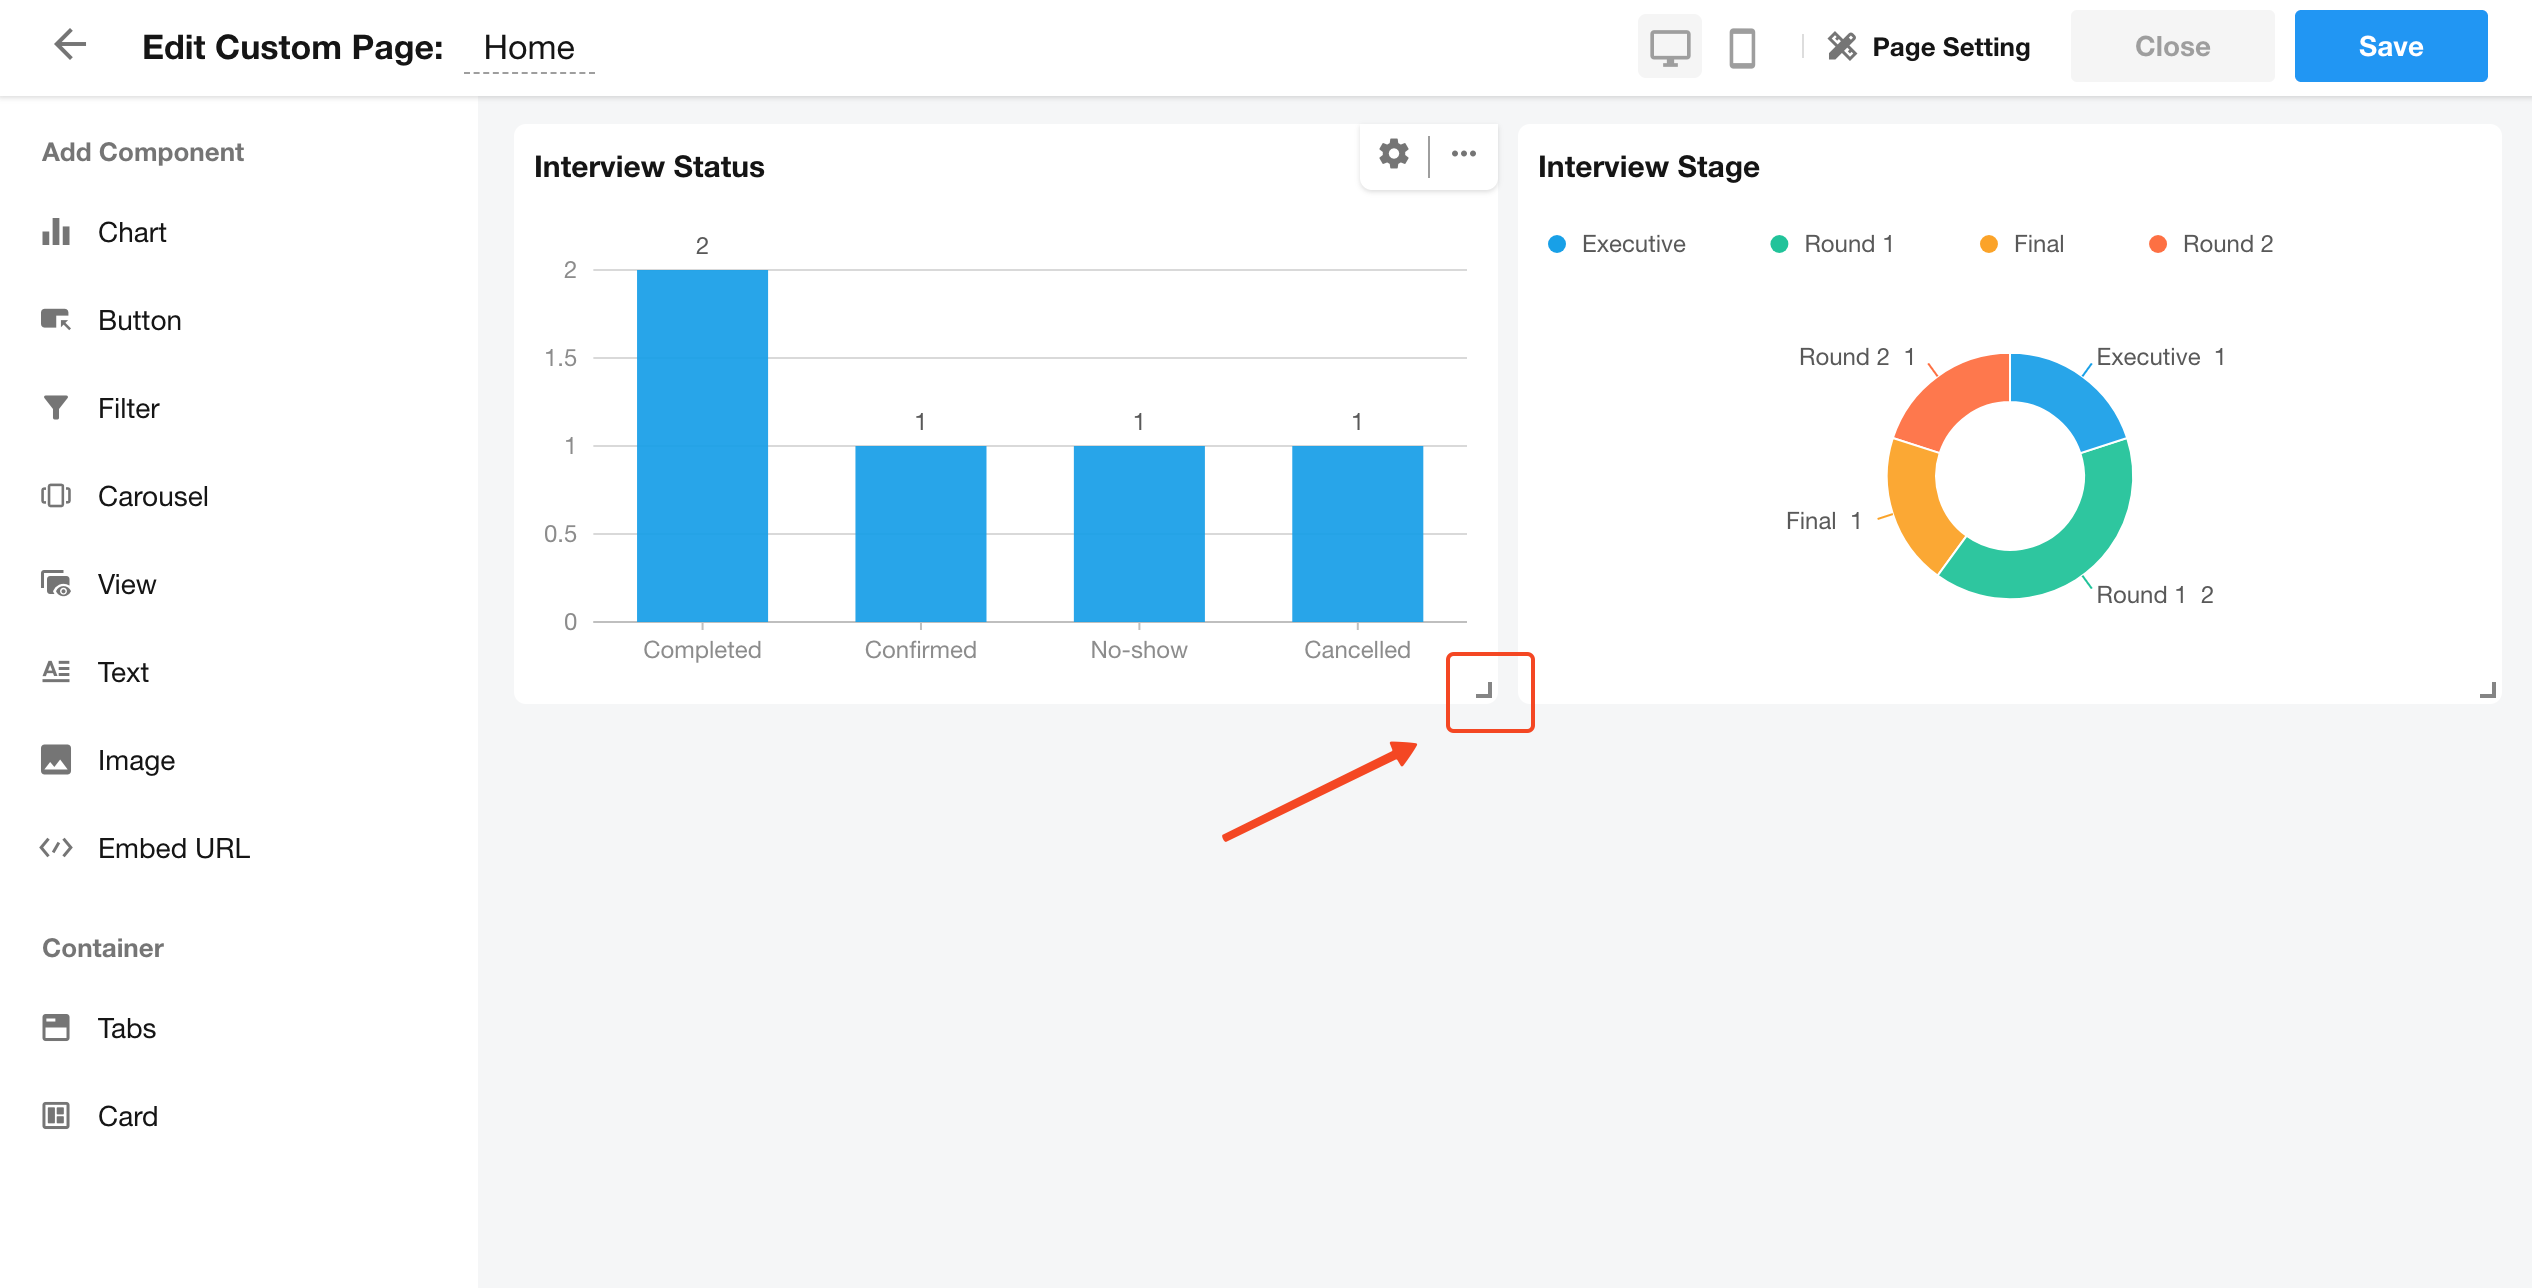
3) Adjust Layout
Resize and reposition components using drag-and-drop.
4) Save the Page
8. Summary
Using these core modules, you can build a recruitment app with:
- Structured data management
- Role-based access control
- Automated workflows
- Data analysis through charts
More complex applications can be built using the same modular approach with no code.
4. Additional Capabilities
In addition to core app-building features, HAP provides capabilities for enterprise-scale management and integration.
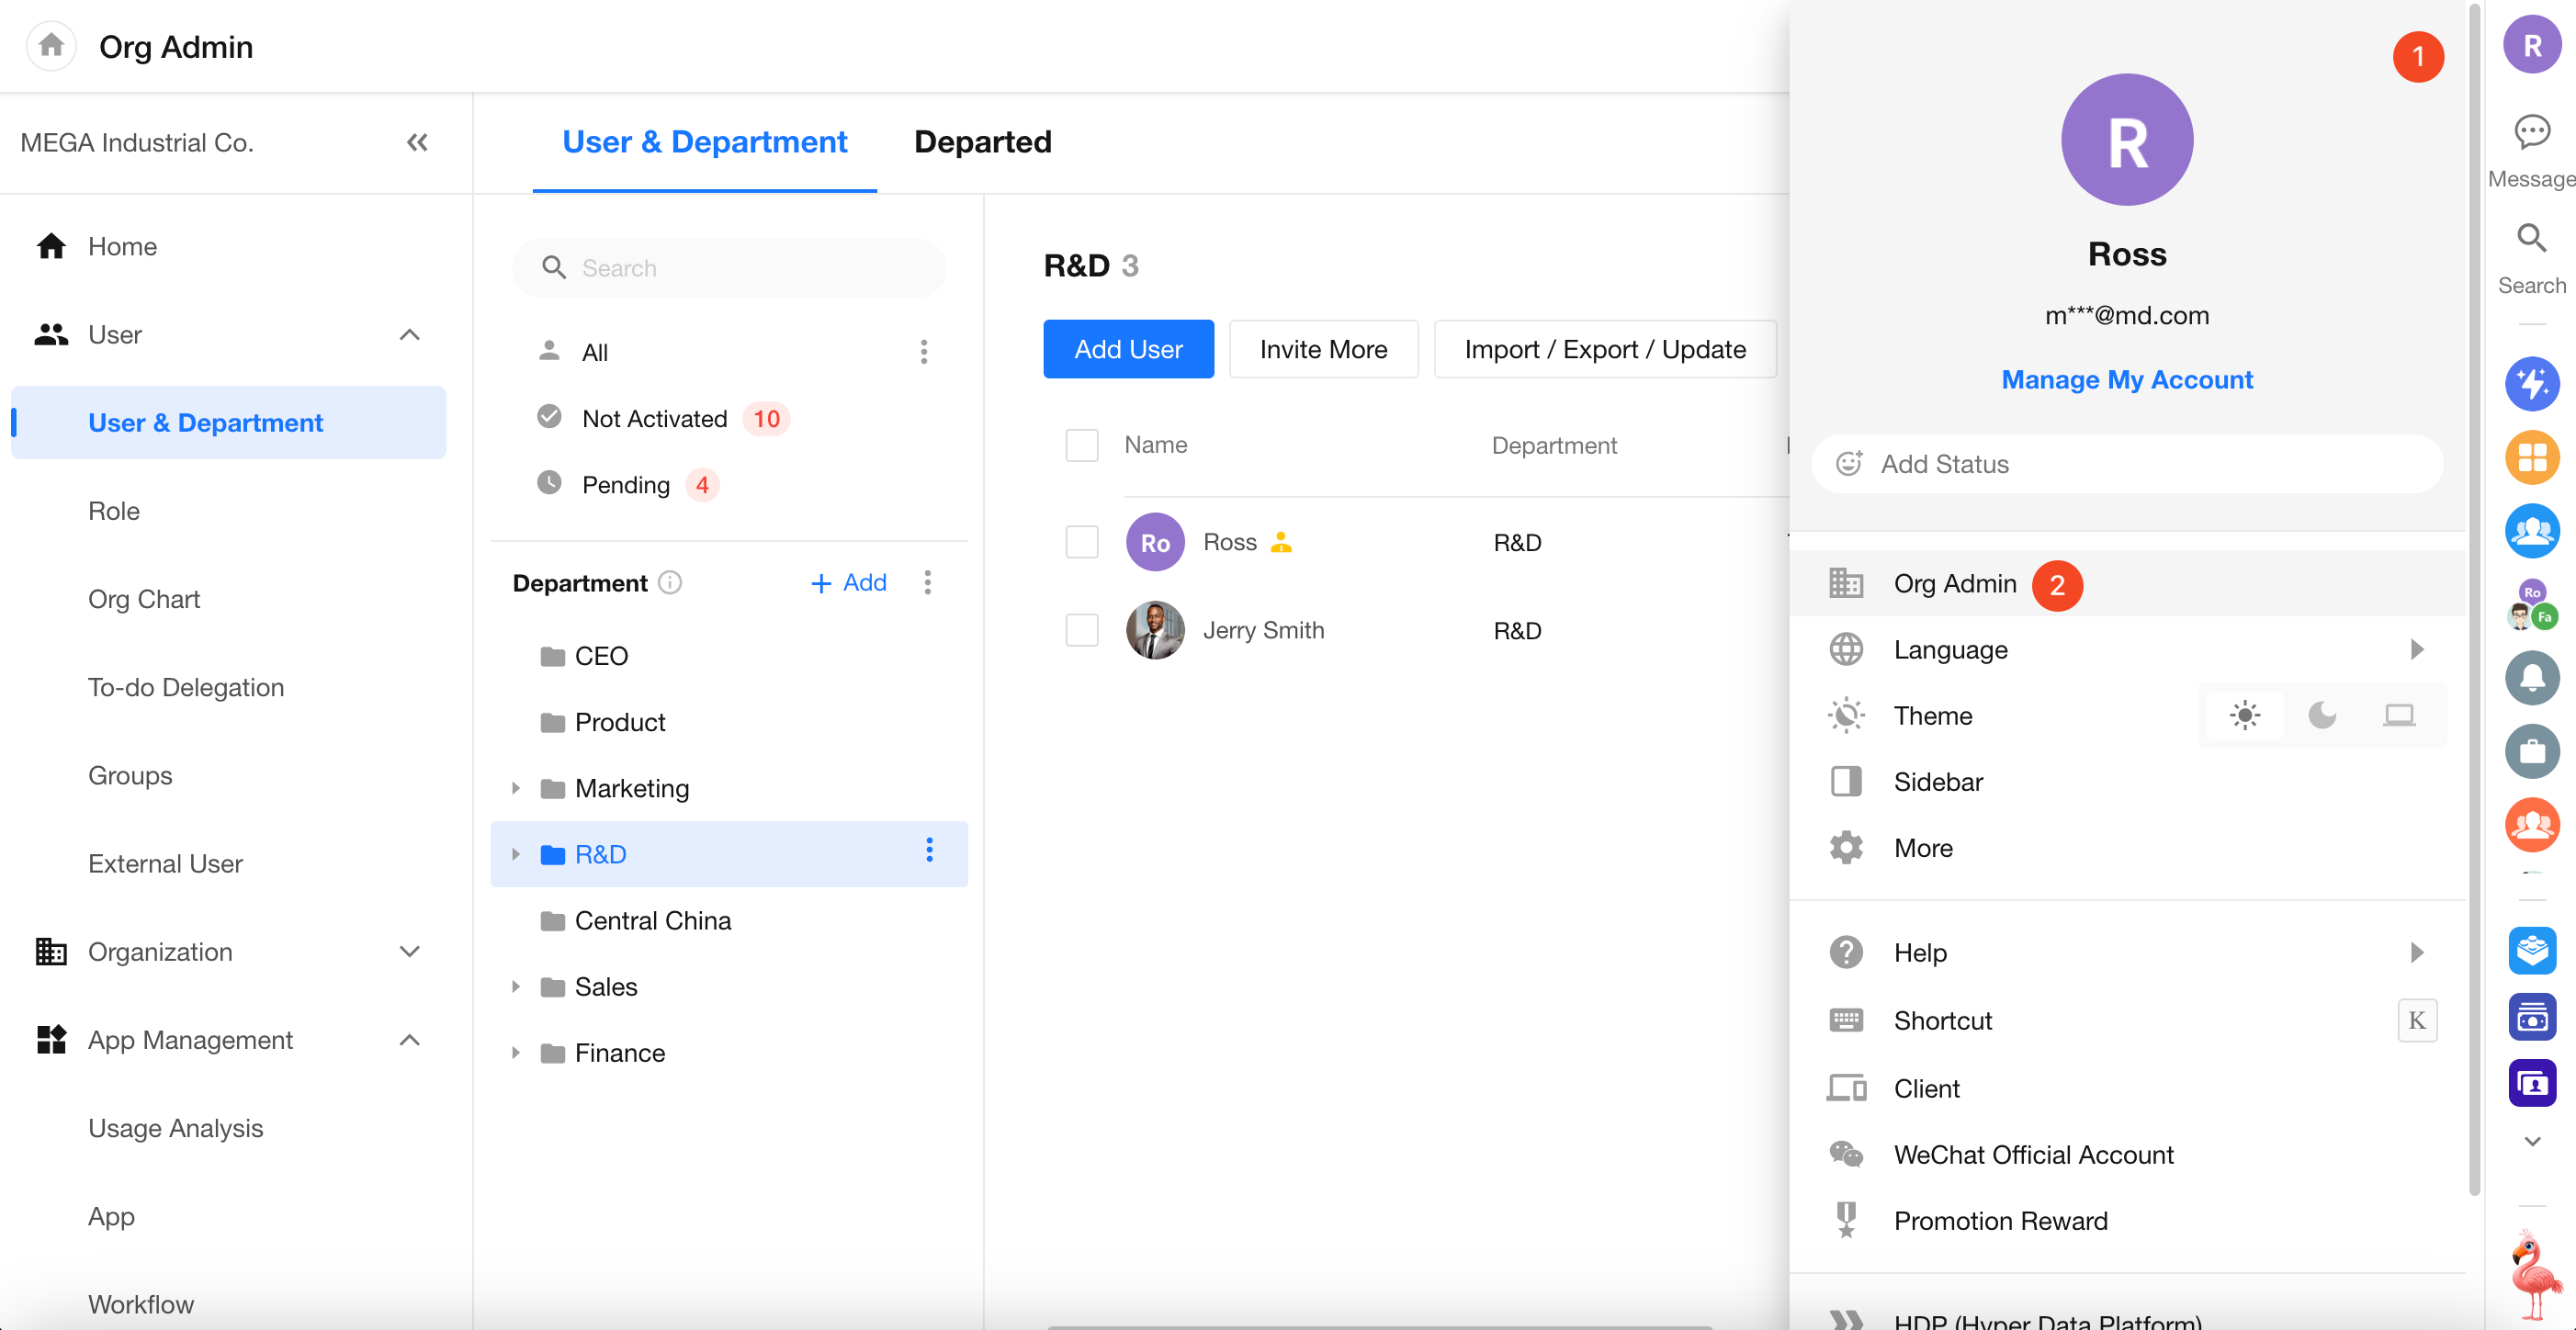
1. Organization Management
The Organization Management Console enables administrators to manage users, configure organization settings, and control system-level features.
2. Integrations
Modern business systems require seamless data exchange across platforms. HAP supports multiple integration approaches:
API Integration
- Configure API connections and authorization in the Integration Center
- Reuse APIs in worksheets and workflows
- Use the Send API Request node in workflows to connect external systems
Data Integration
The Data Integration module provides a visual interface for:
- Connecting to external databases
- Synchronizing data between HAP and databases
- Performing ETL operations
It can also act as a middleware layer to sync data between multiple databases.
Third-Party Platform Integration
HAP integrates with enterprise platforms such as:
- DingTalk
- WeCom
- Feishu
Supported capabilities include:
- Single sign-on (SSO)
- Unified Contacts management
- Message synchronization
Was this document helpful?