External Portal
Overview
The External Portal is designed to manage external users who need to participate in specific business collaboration scenarios, such as suppliers, customers, and partners. It supports self-service registration, login, and data operations.
Common use cases include:
- Customer ticket management
- Member information management
- Factory site and delivery driver management
Compared with regular accounts, External Portal provides the following benefits:
- Easy registration and login: Supports quick registration with mobile number or email verification. Users can log in using verification codes, passwords, or WeChat QR code scanning.
- Simplified interface: External users can only access the current application. Internal modules such as collaboration, messages, and Contacts are completely hidden.
- Cost-effective: One external user costs as low as RMB 0.5 per year.
Configure and Use External Portal
Example Scenario
This article uses a Customer Service application as an example to demonstrate how to configure and use External Portal.
The expected results are:
- External users can quickly register and log in.
- Users can submit and update tickets.
- Users are automatically notified when ticket information changes.
Enable External Portal
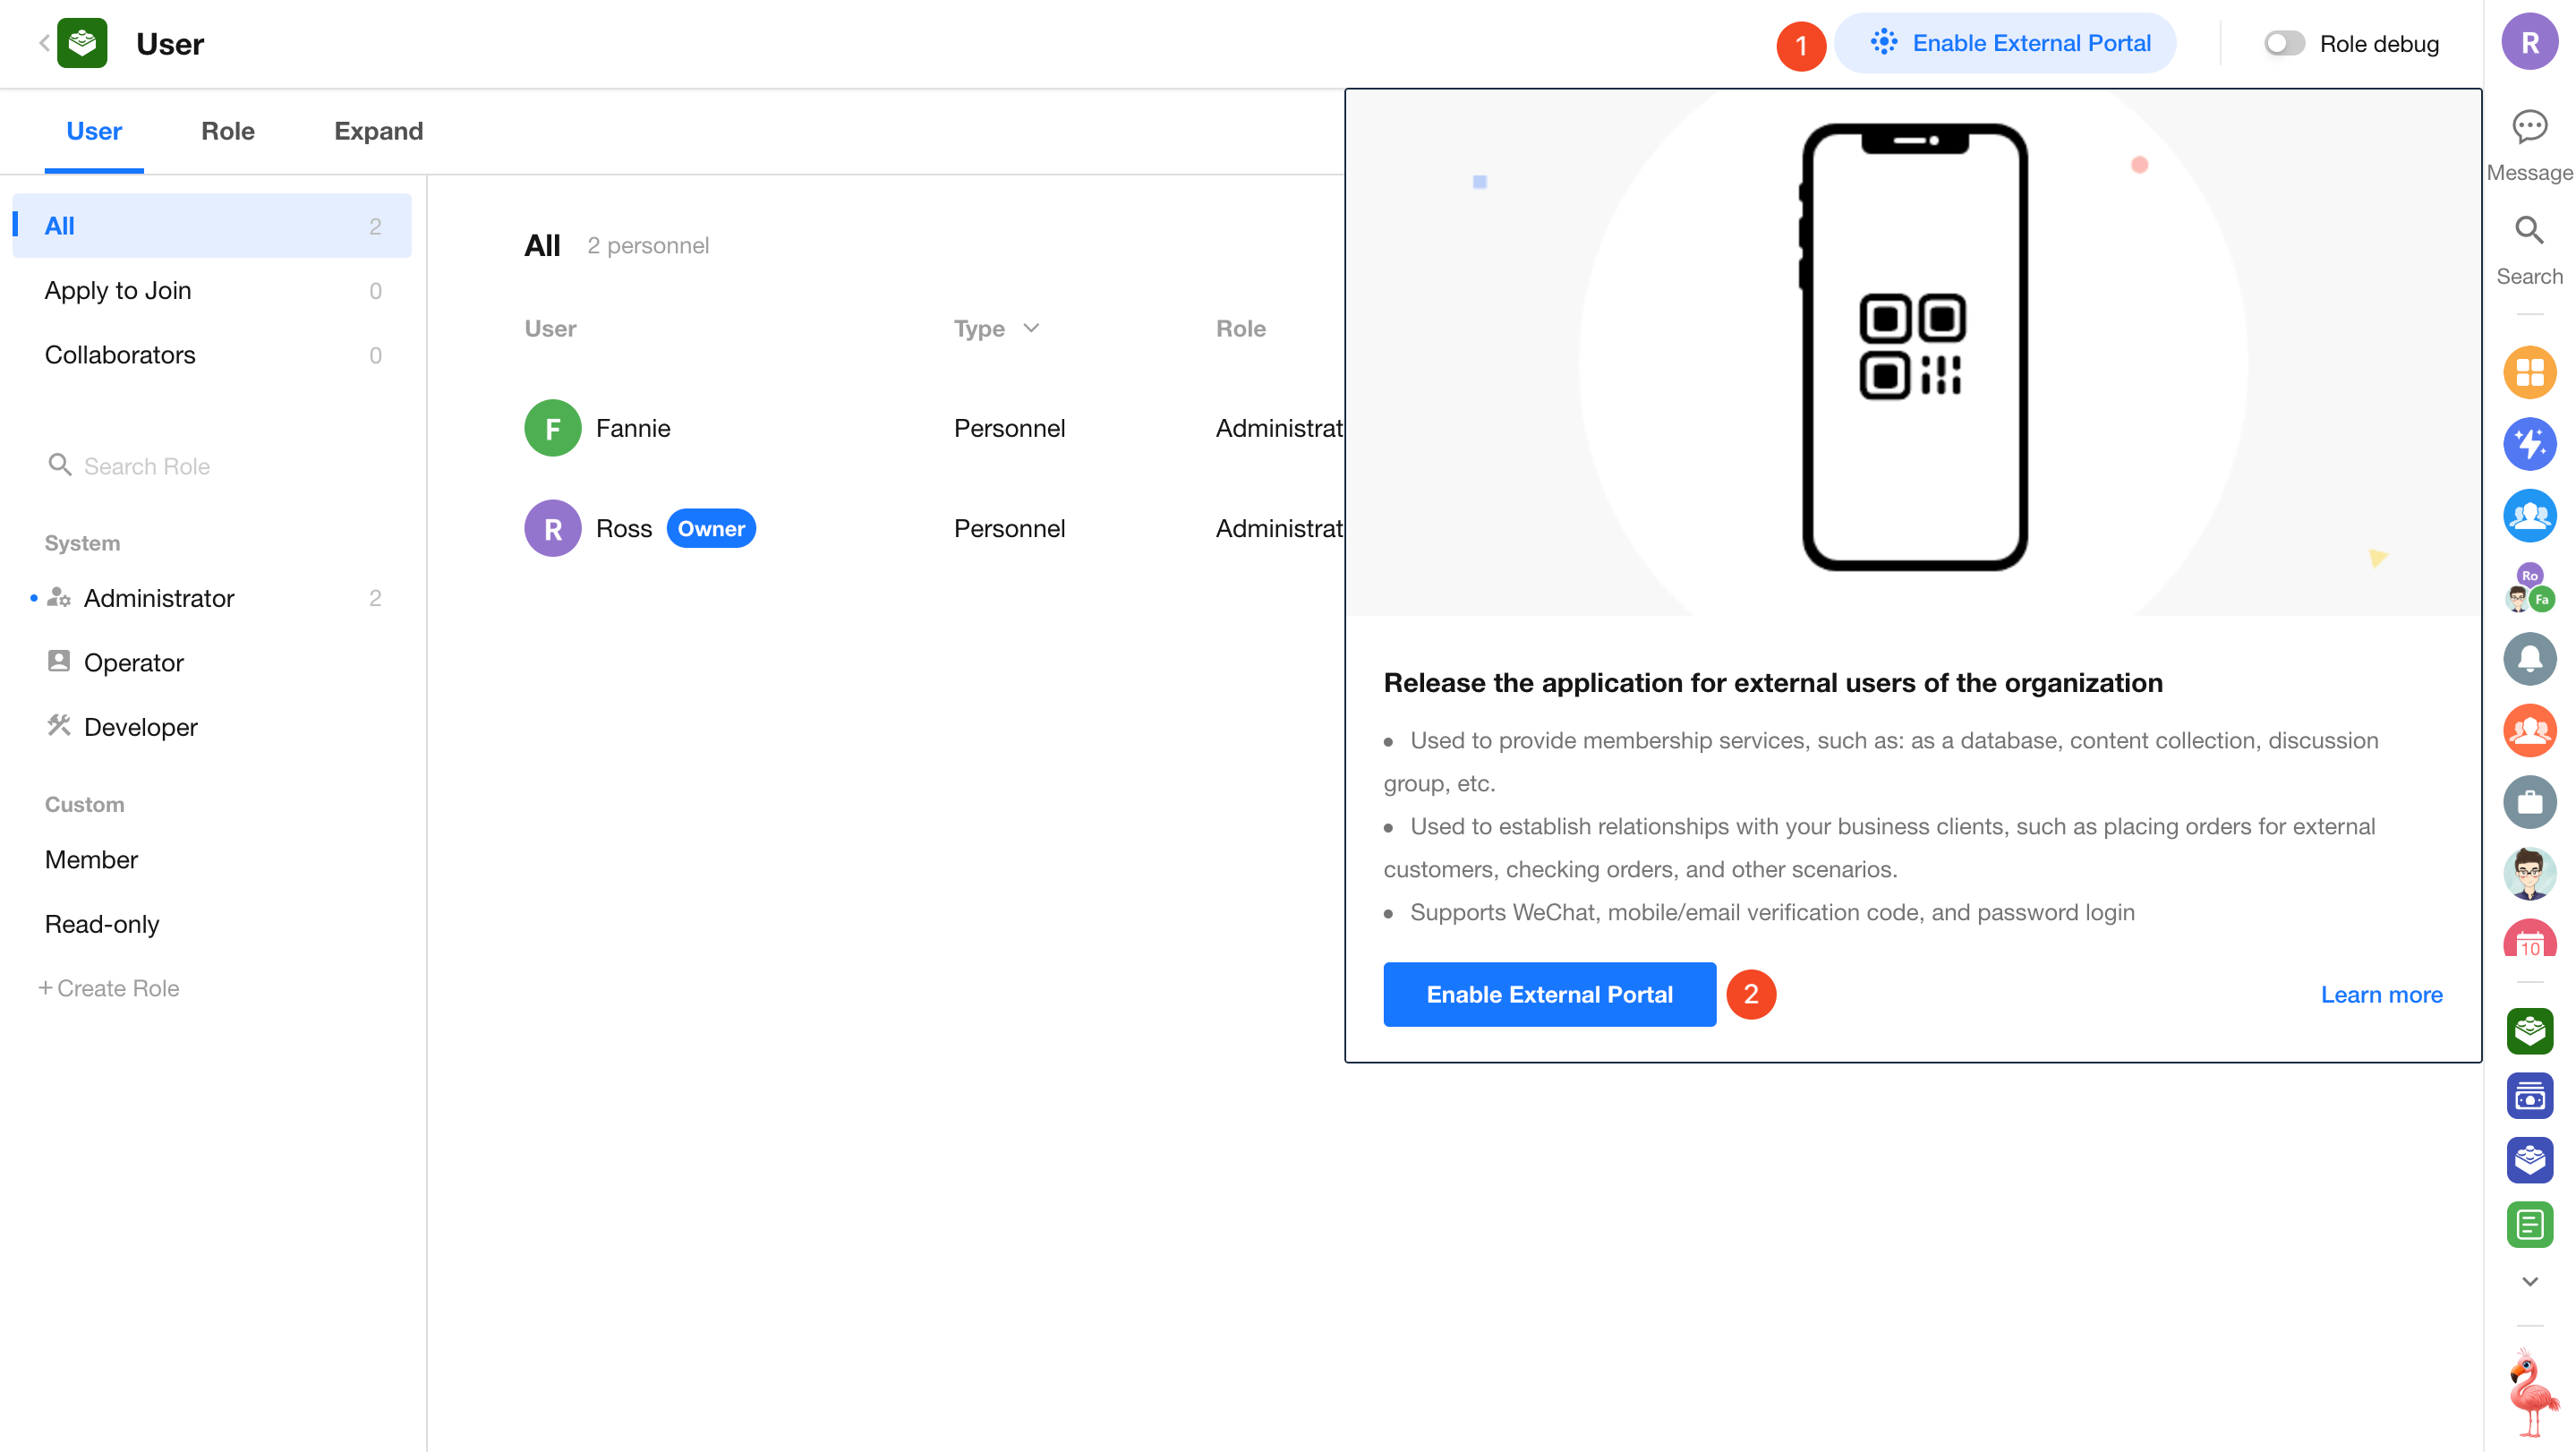
Go to the User module in the application, then click Enable External Portal.
Disable External Portal
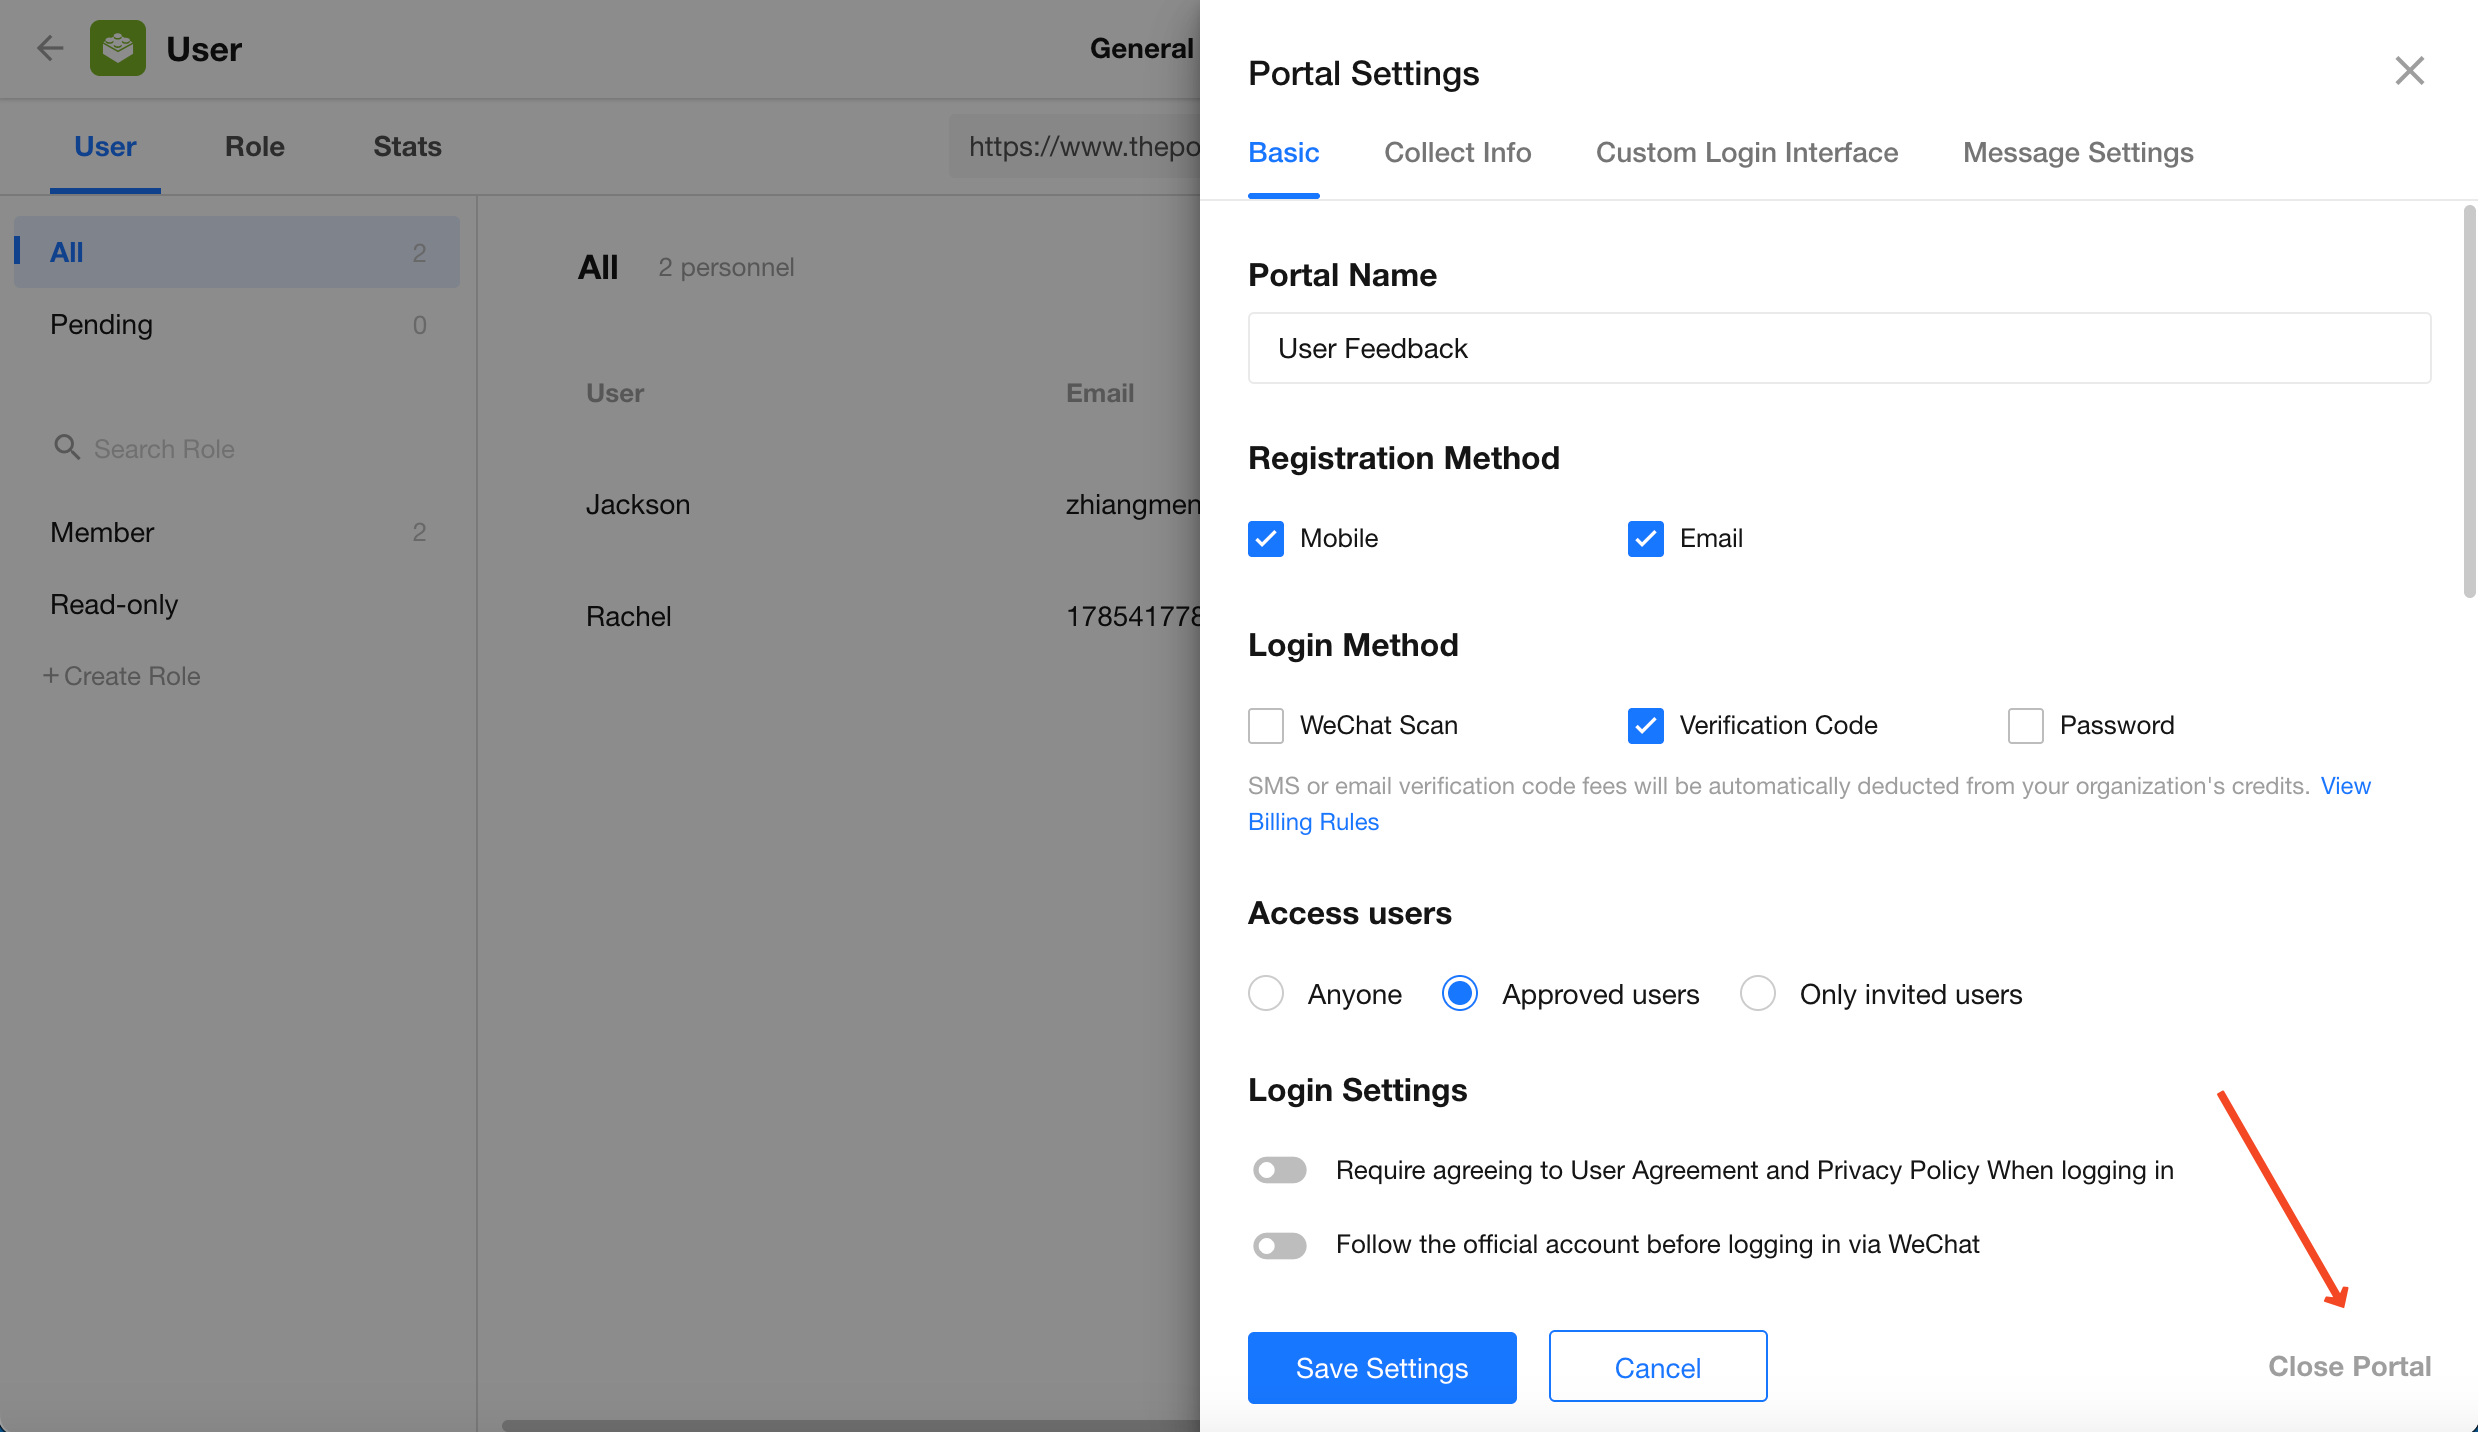
Go to Portal Settings > Basic, then click Close Portal. After the portal is disabled, external users can no longer access it.
Customize the External Portal URL
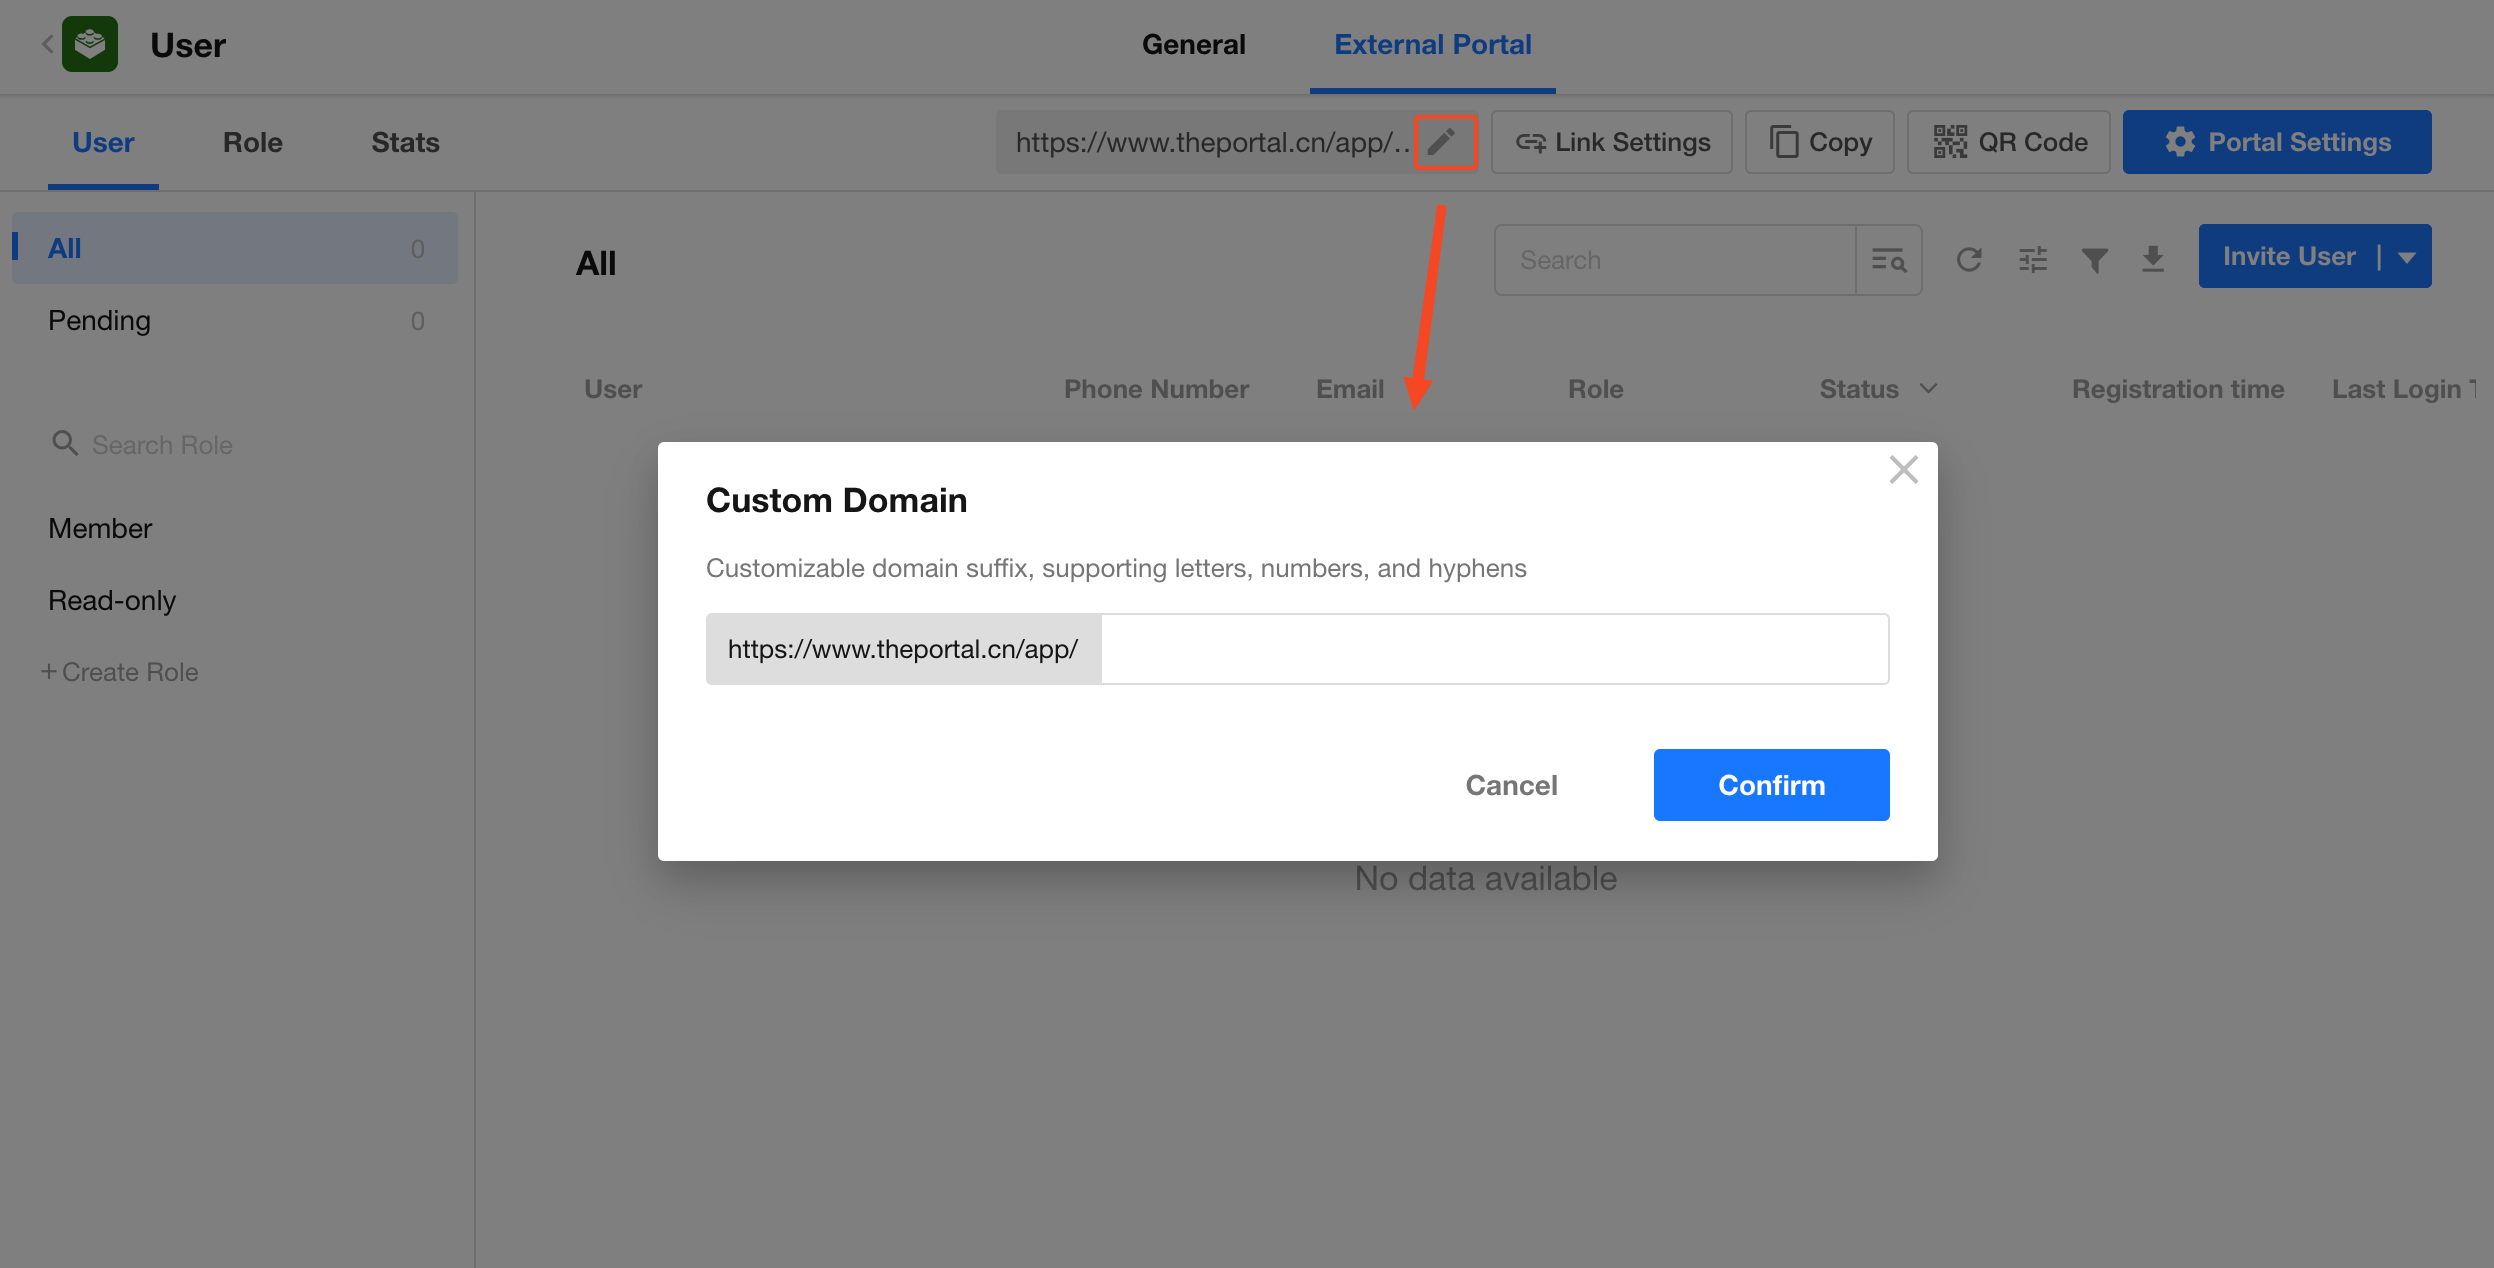
The default External Portal URL format is:
Domain/Application ID
You can replace the application ID with a custom suffix.
Custom URL rules:
- Only the URL suffix can be customized. The domain name cannot be modified.
- Only numbers, letters, and hyphens are supported.
- The suffix cannot start or end with a hyphen.
- Must contain at least 4 characters.
- Must be unique.
- After setting a custom URL, the default URL remains available.
Get Registration and Login Entry Points
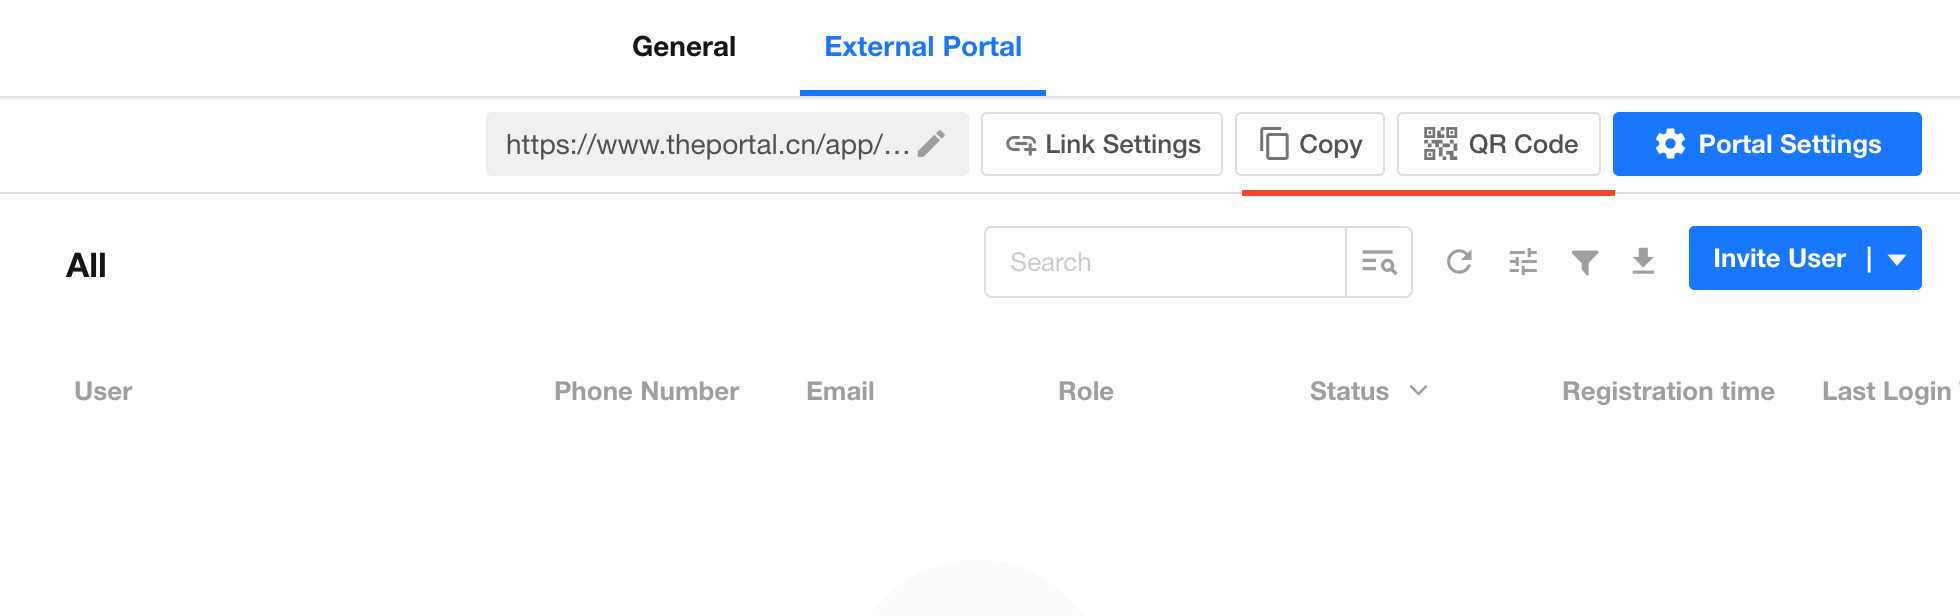
After enabling External Portal, you can obtain the registration and login links and QR codes from Portal Settings.
Registration and login use the same entry point. The first login automatically creates an account.
Customize the Login Page
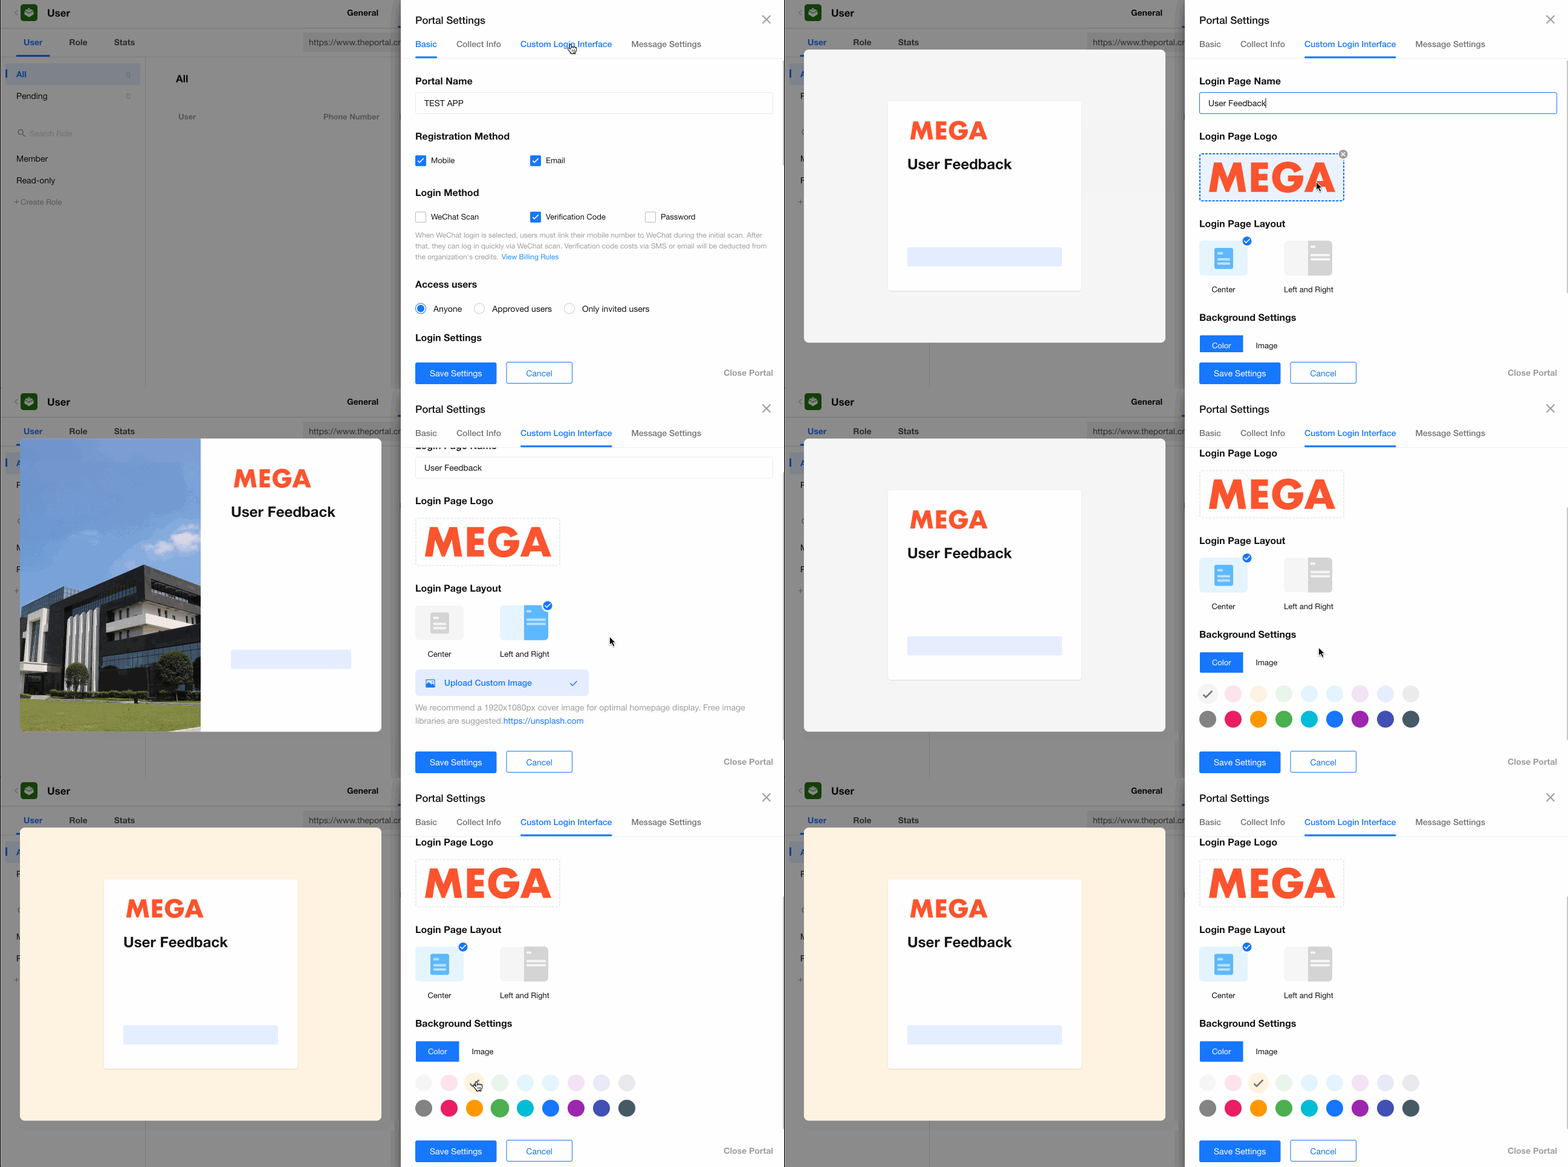
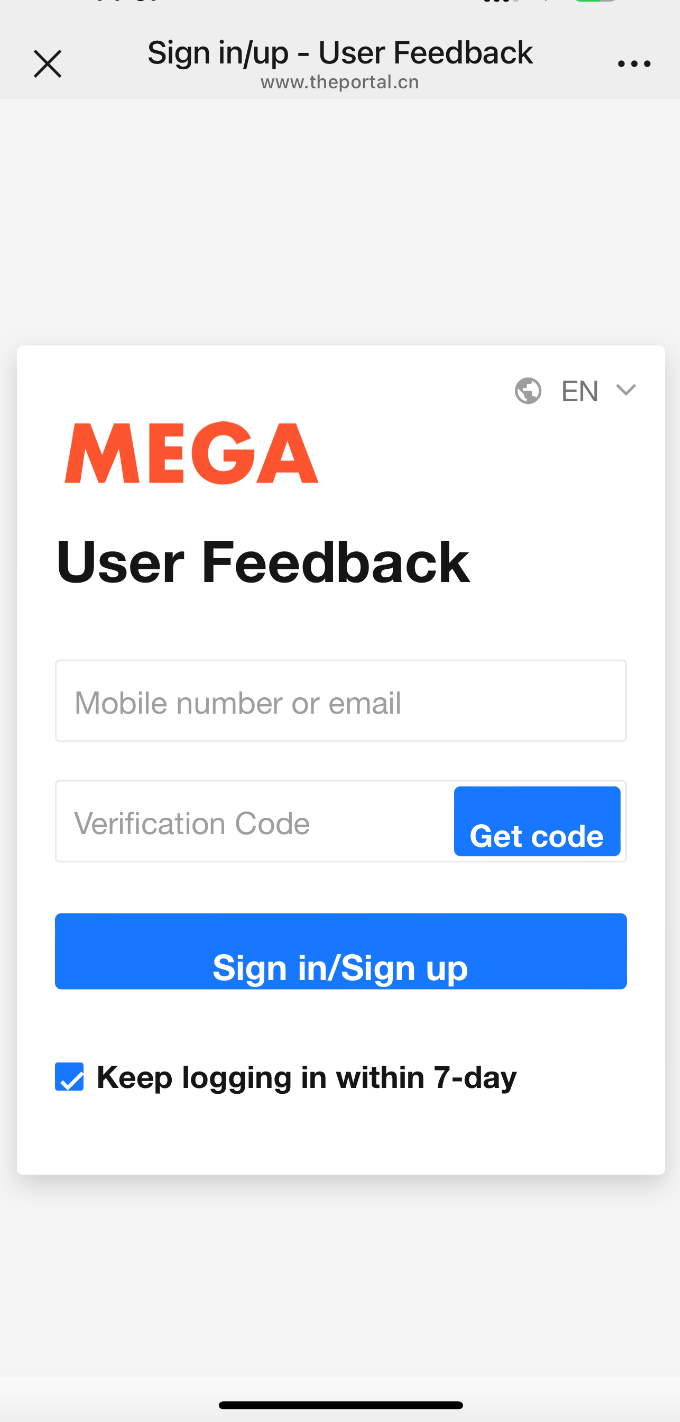
Go to Portal Settings > Customize Login Interface to configure the login page name, logo, layout, background image, and background color.
-
Mobile:
-
PC Browser:
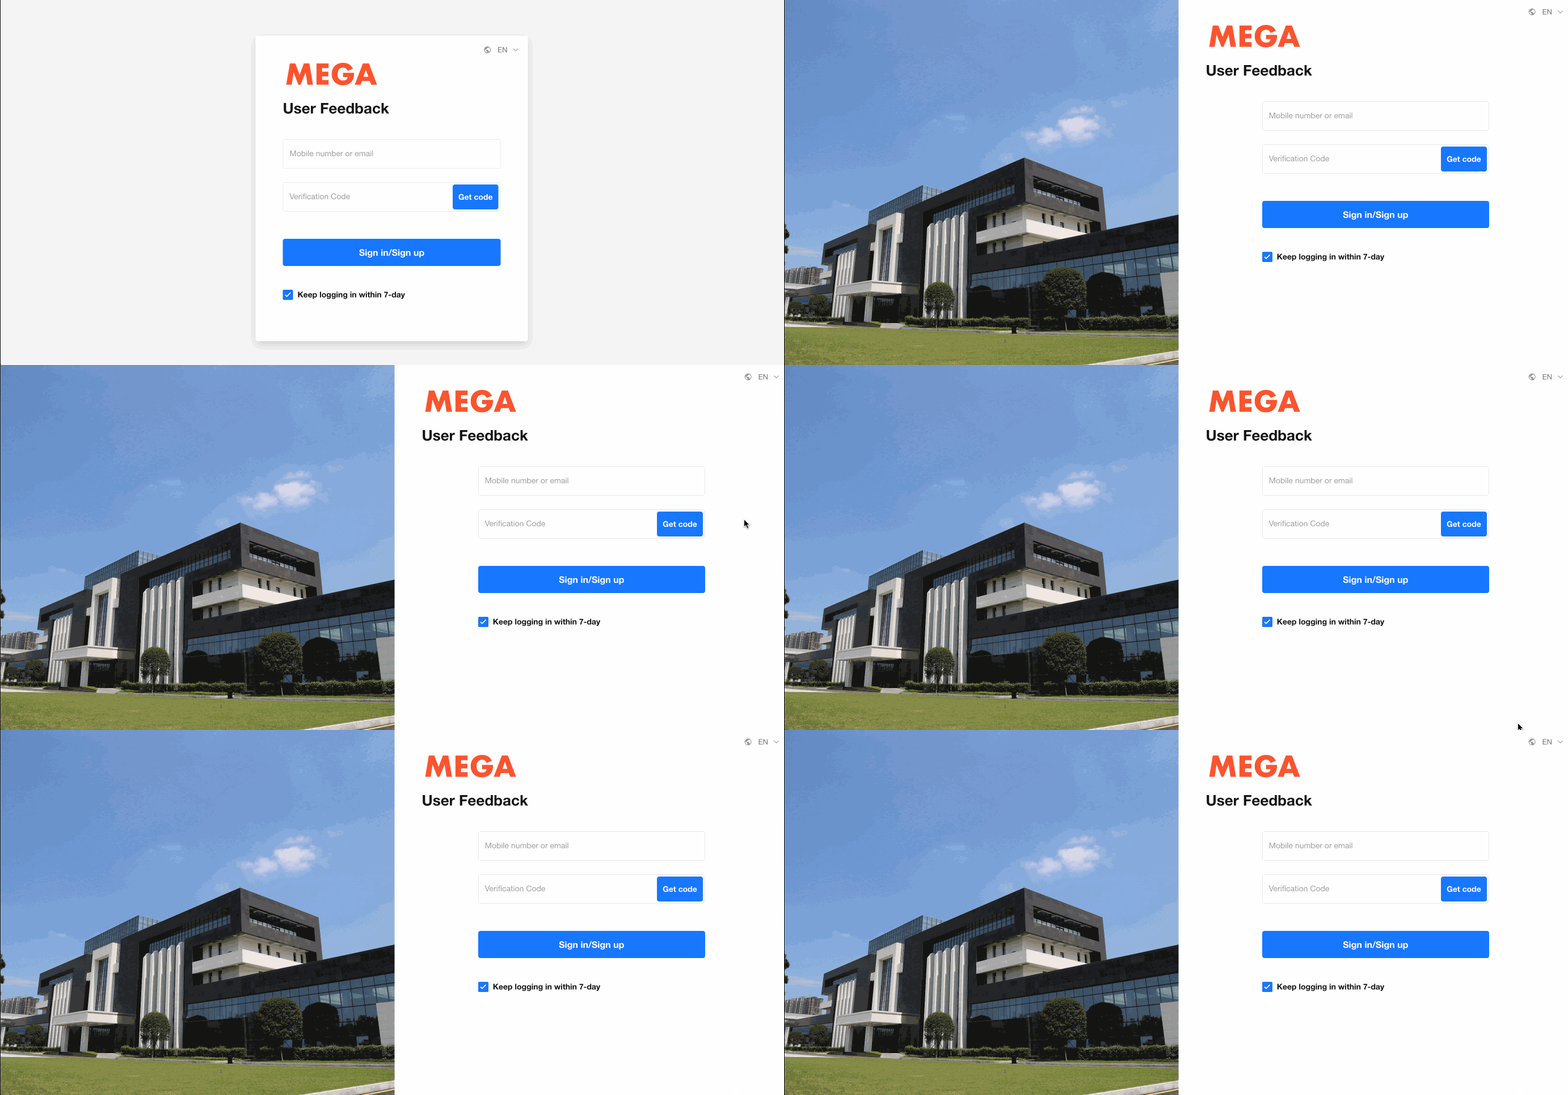
The left-right layout is only available on PC browsers. On mobile devices, the login page always uses a centered layout.
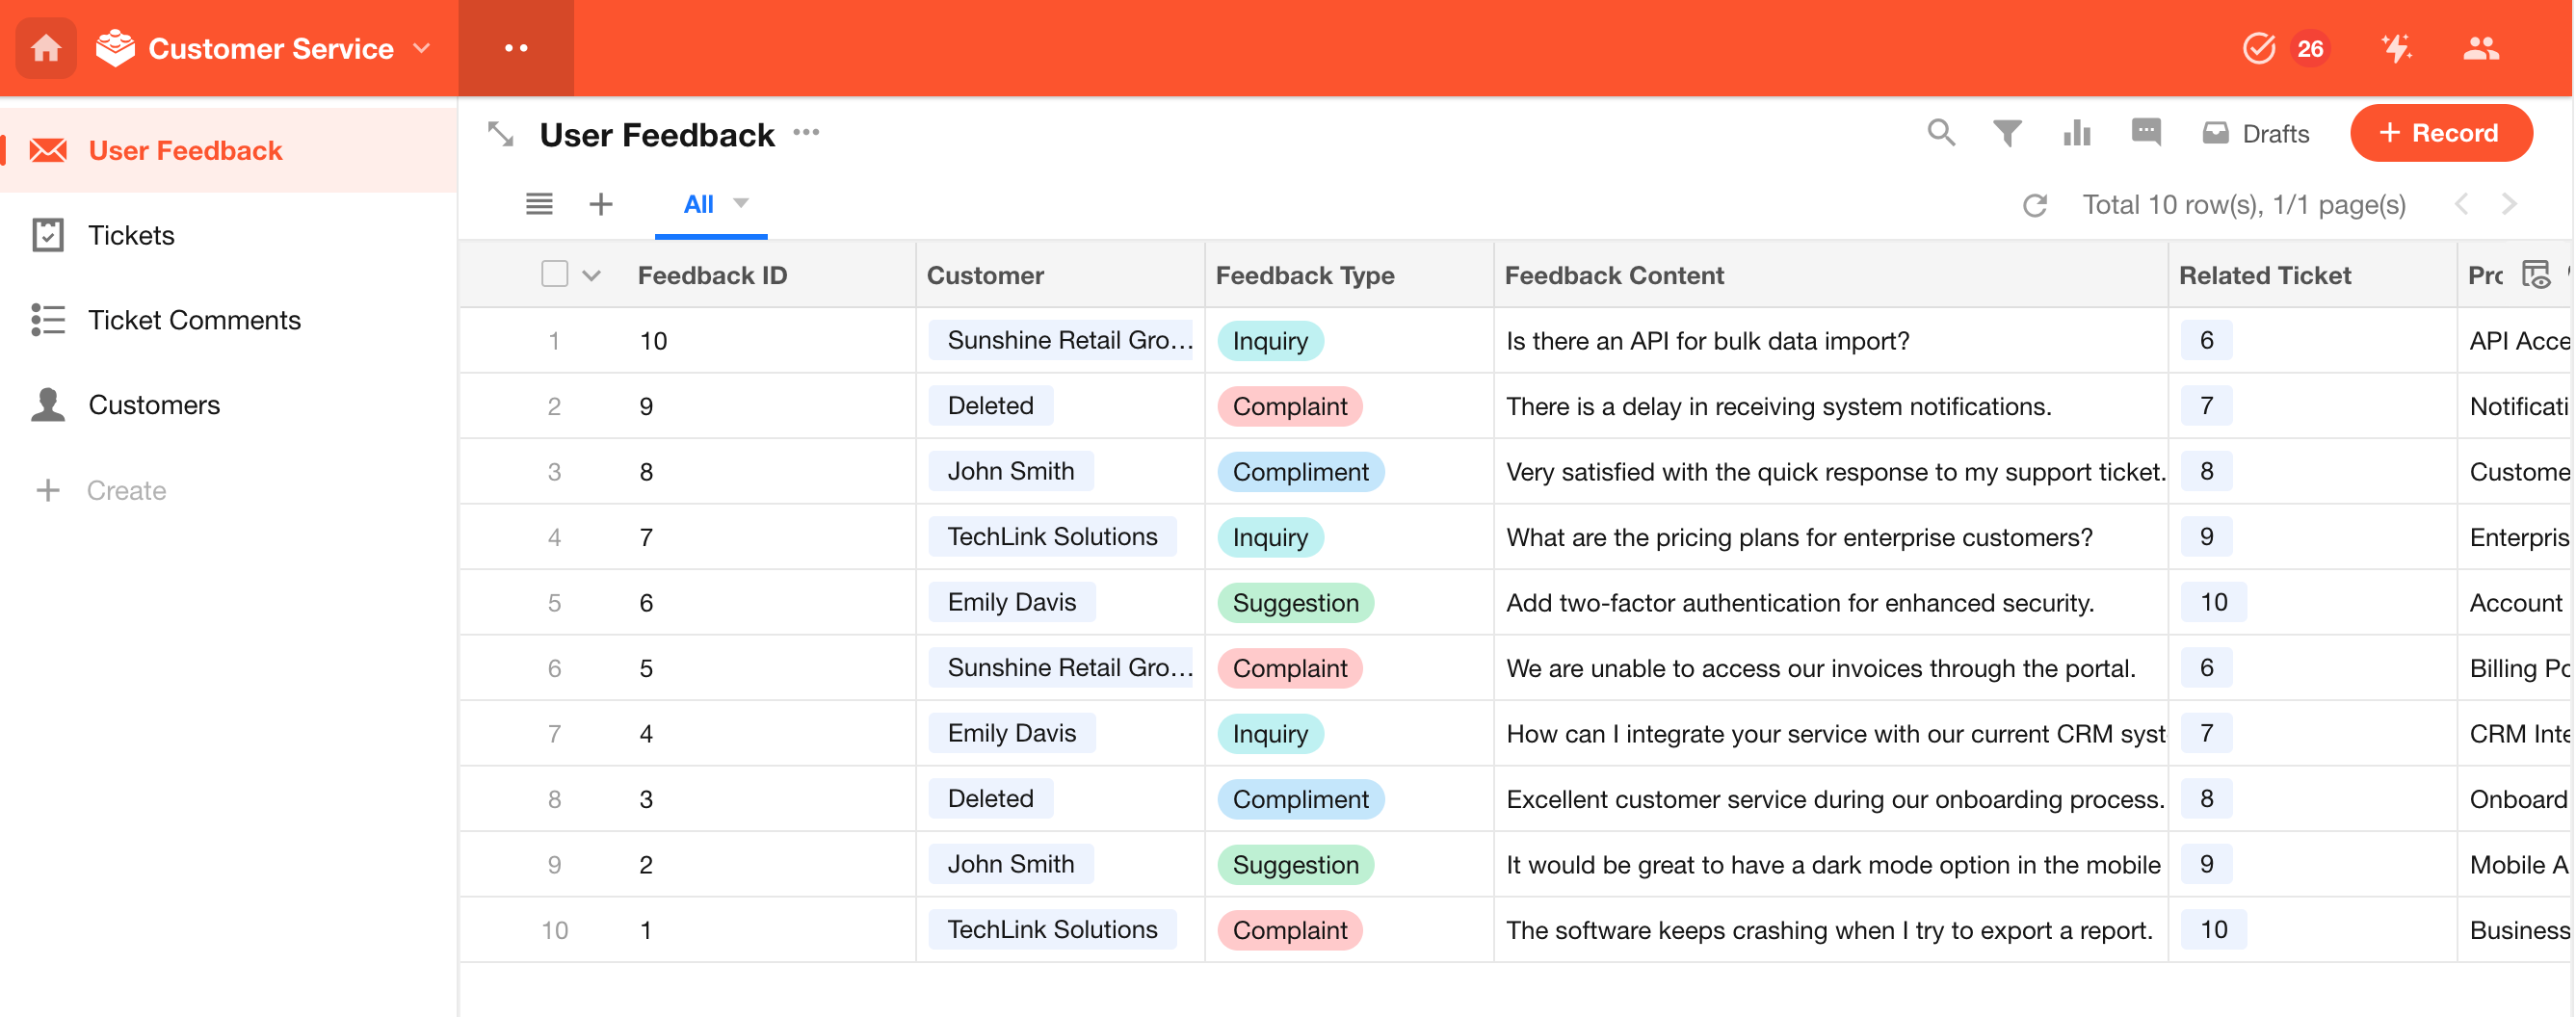
Set the Portal Display Name
The application name is mainly used by internal members and may not always be suitable for external users.
For example, if a Customer Service application only exposes the User Feedback worksheet to external users, you can set the portal display name separately as User Feedback.
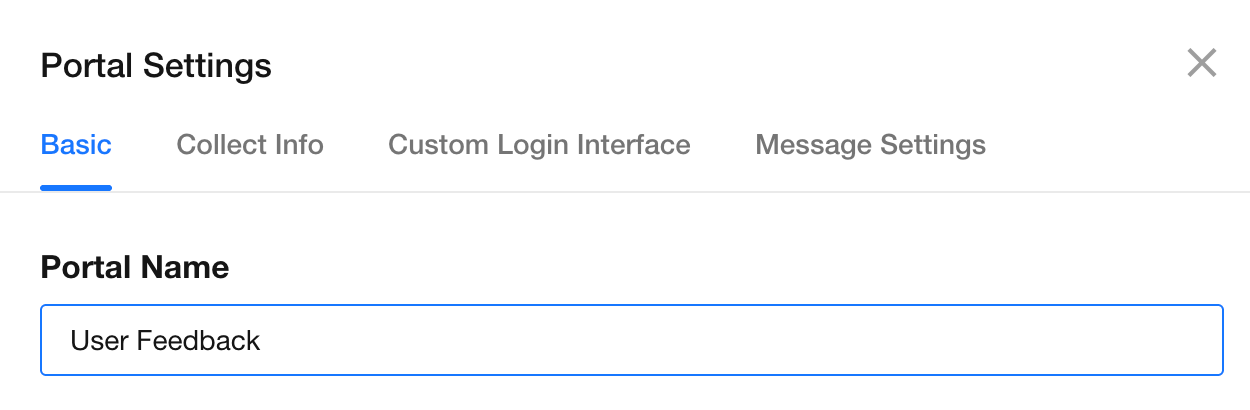
Views from internal members and external users:
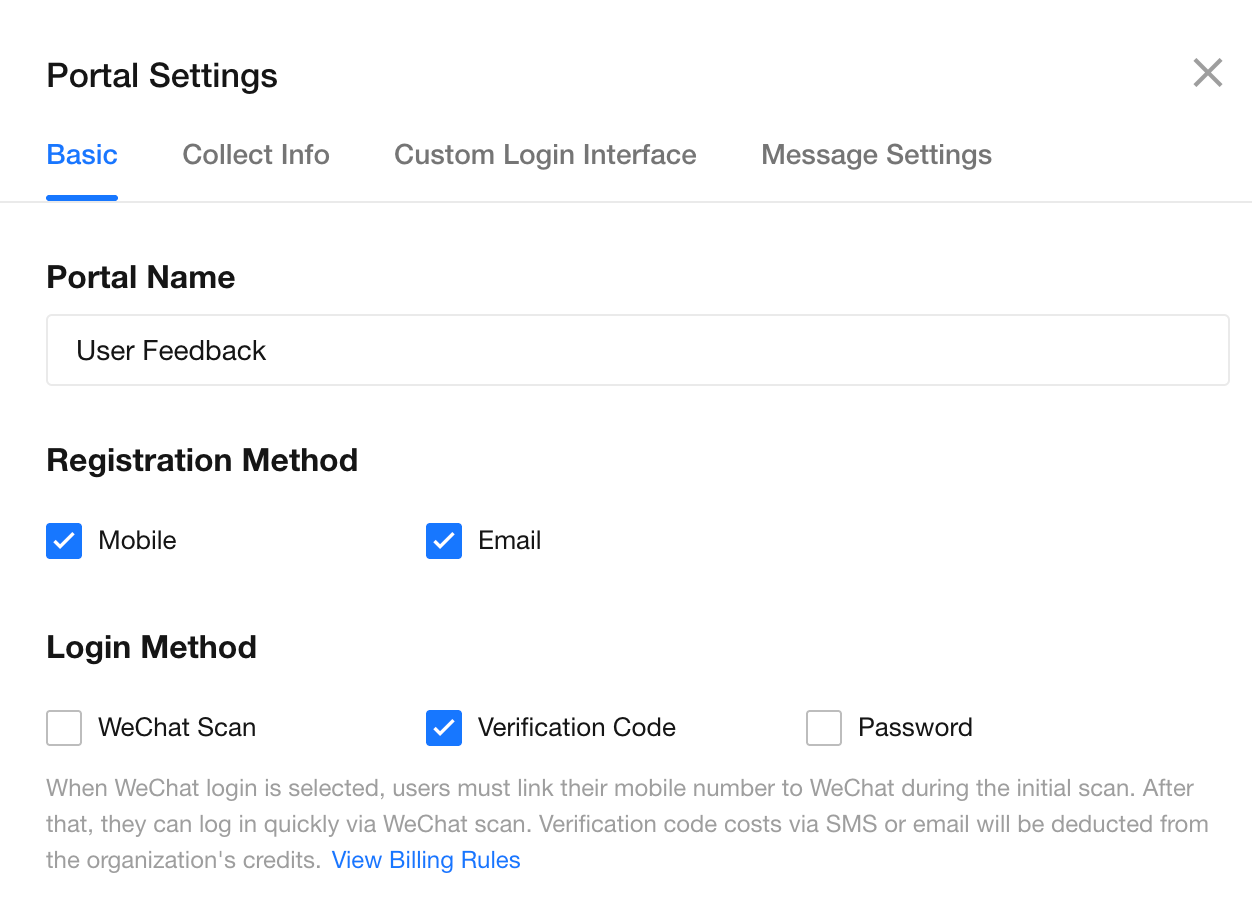
Configure Registration and Login Methods
- Registration account: Supports mobile numbers and email addresses as account names.
- Login methods: Supports verification code login, password login, and WeChat QR code login.
Verification Code Login
Users verify their identity through a verification code each time they log in.
If a user has not registered when logging in for the first time, the system automatically creates an account using the mobile number or email address and completes the login.
Prerequisite: Complete SMS Signature Settings.
Password Login
After registration, users can set a login password from the Personal Center.
Log in with WeChat QR Code
After binding a WeChat service account) in the Organization Admin console, users can scan a QR code with WeChat to authorize login.
PC users can also scan the QR code to log in.
Require users to follow the service account first
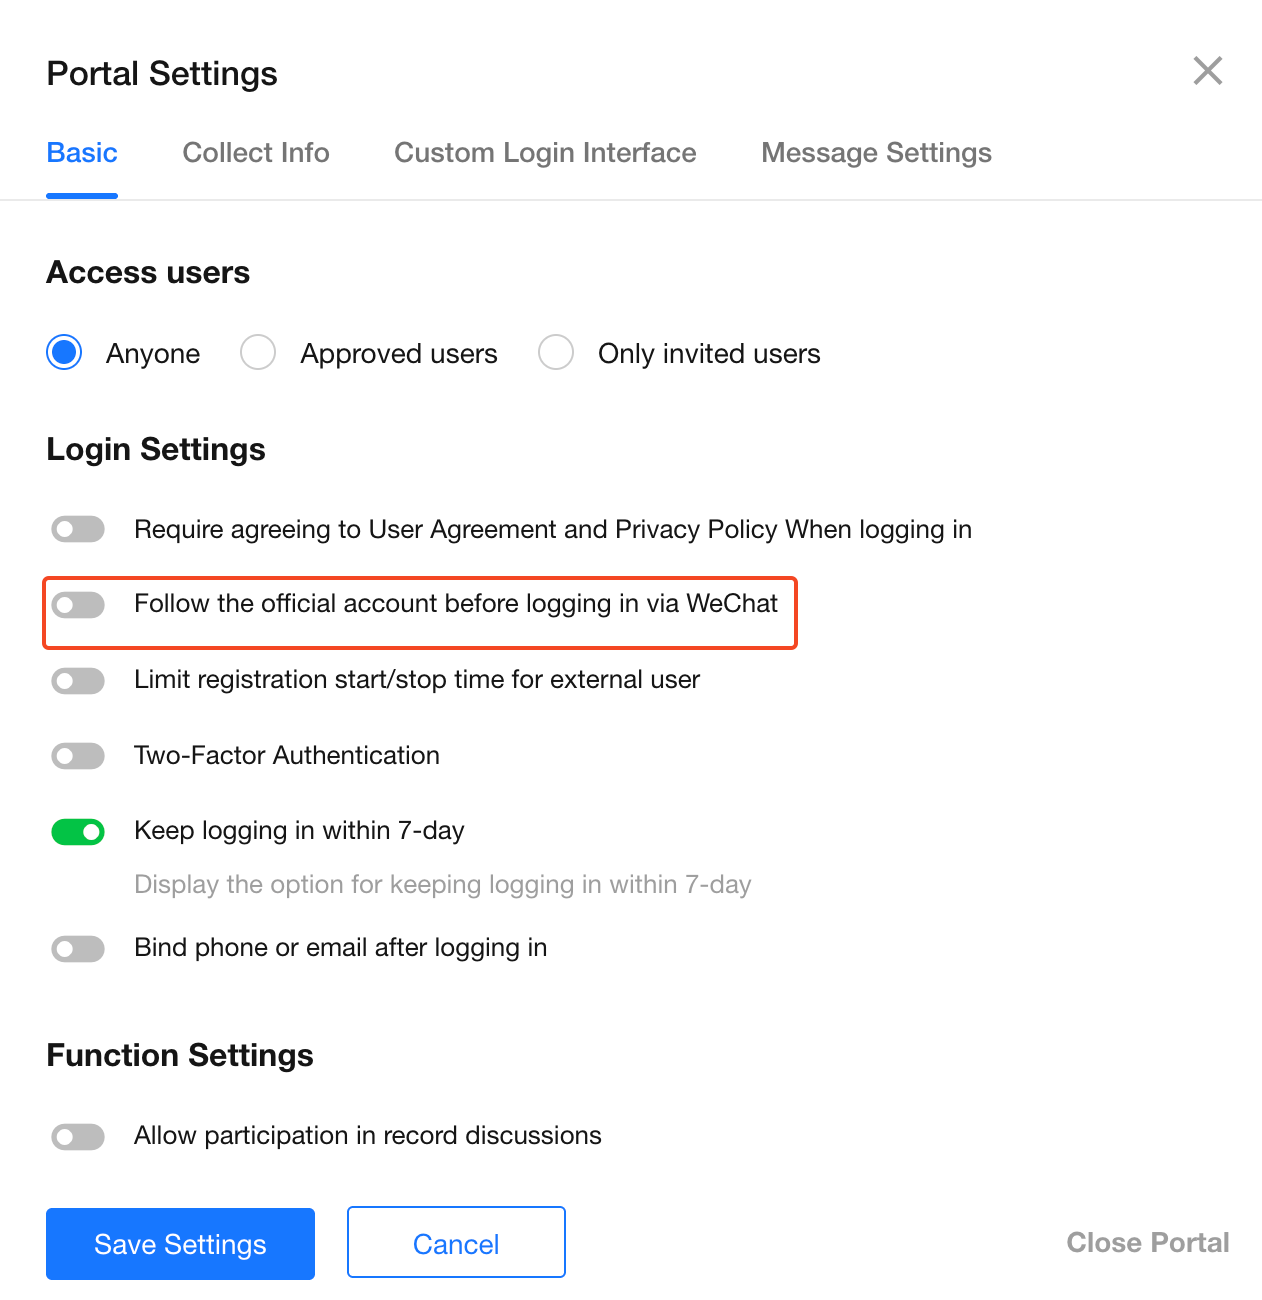
When enabled, users are guided to follow the service account before completing authorization and login for the first time.
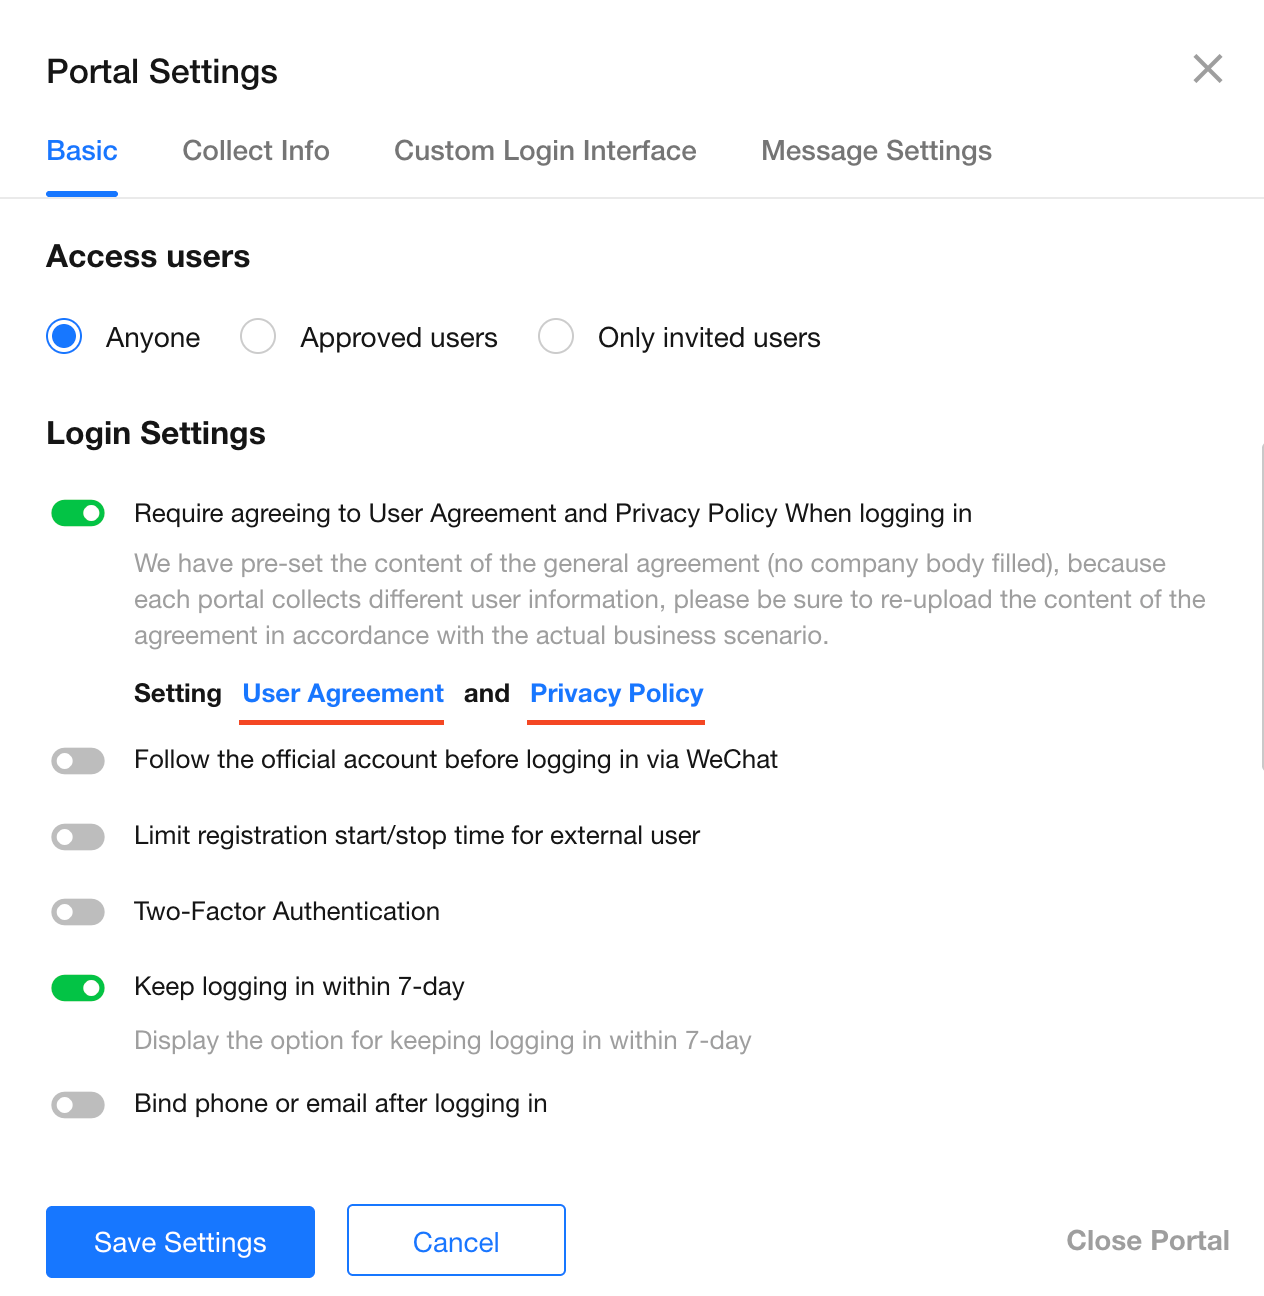
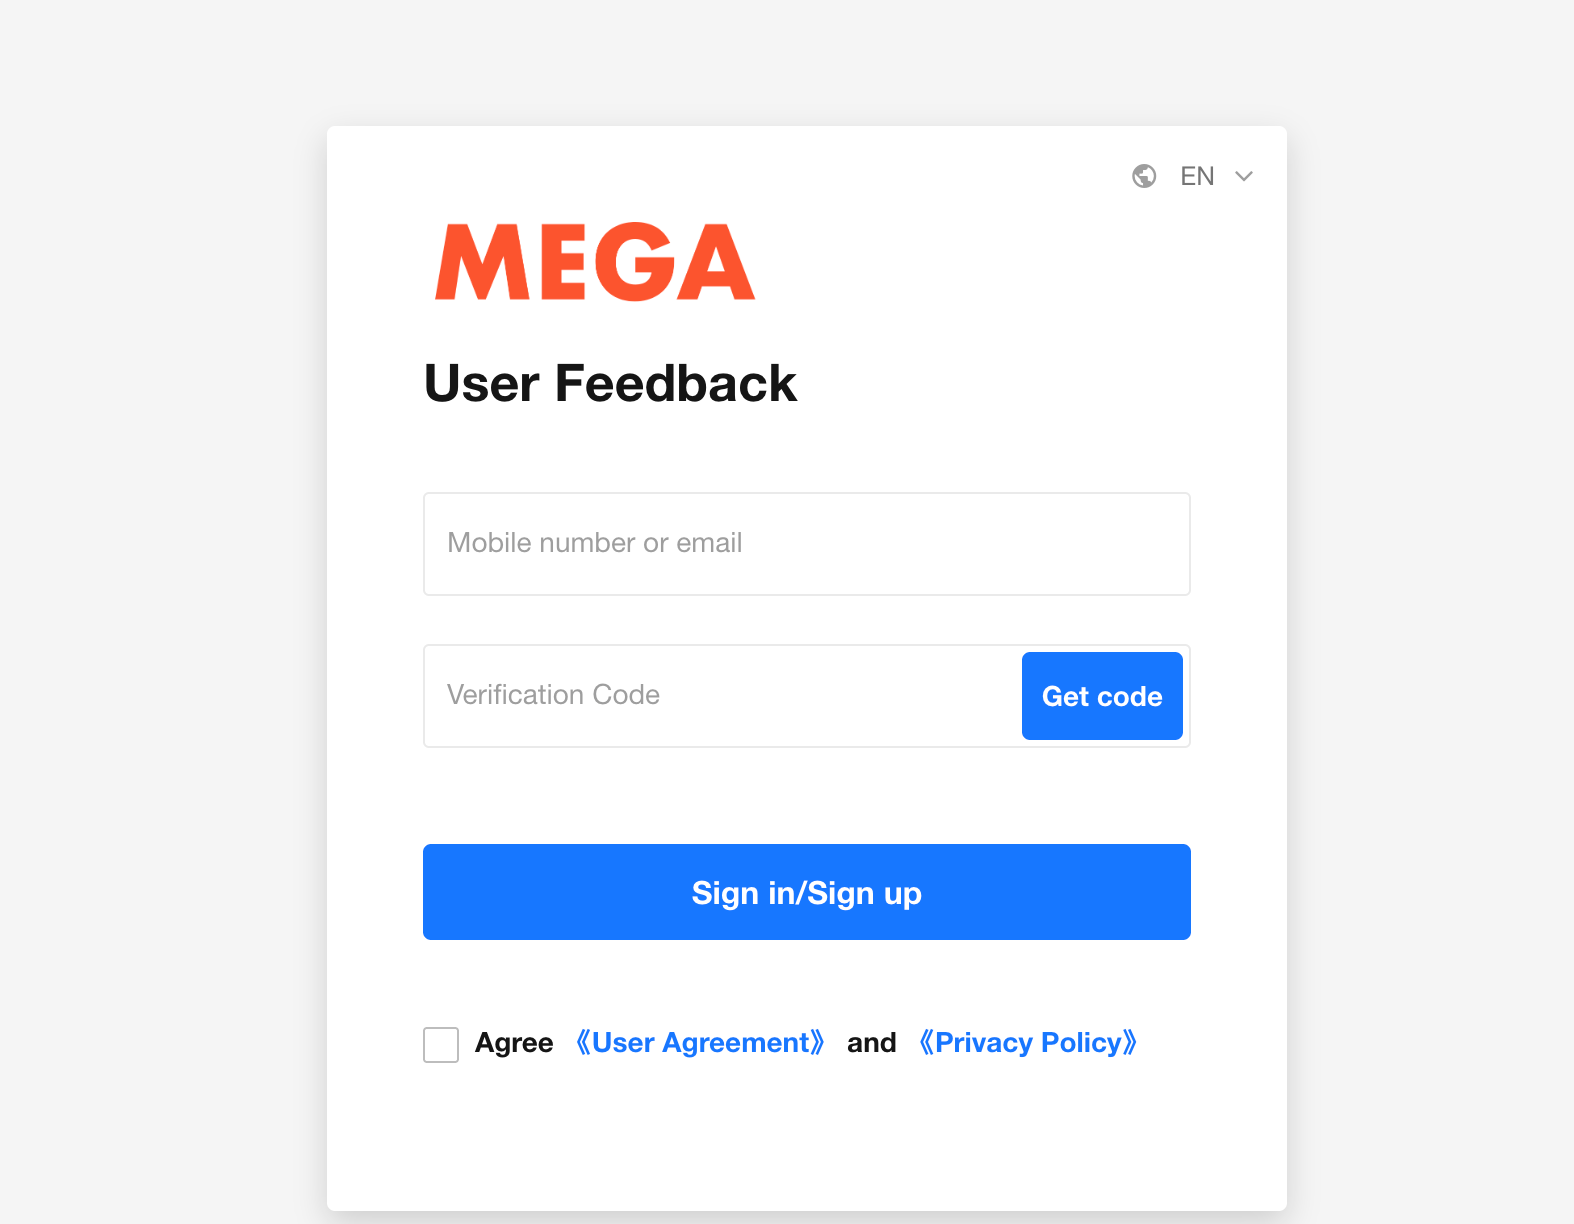
Enable User Agreement and Privacy Policy
Configure agreement and privacy policy content based on your business requirements. After uploading, users must agree to the terms before registration or login.
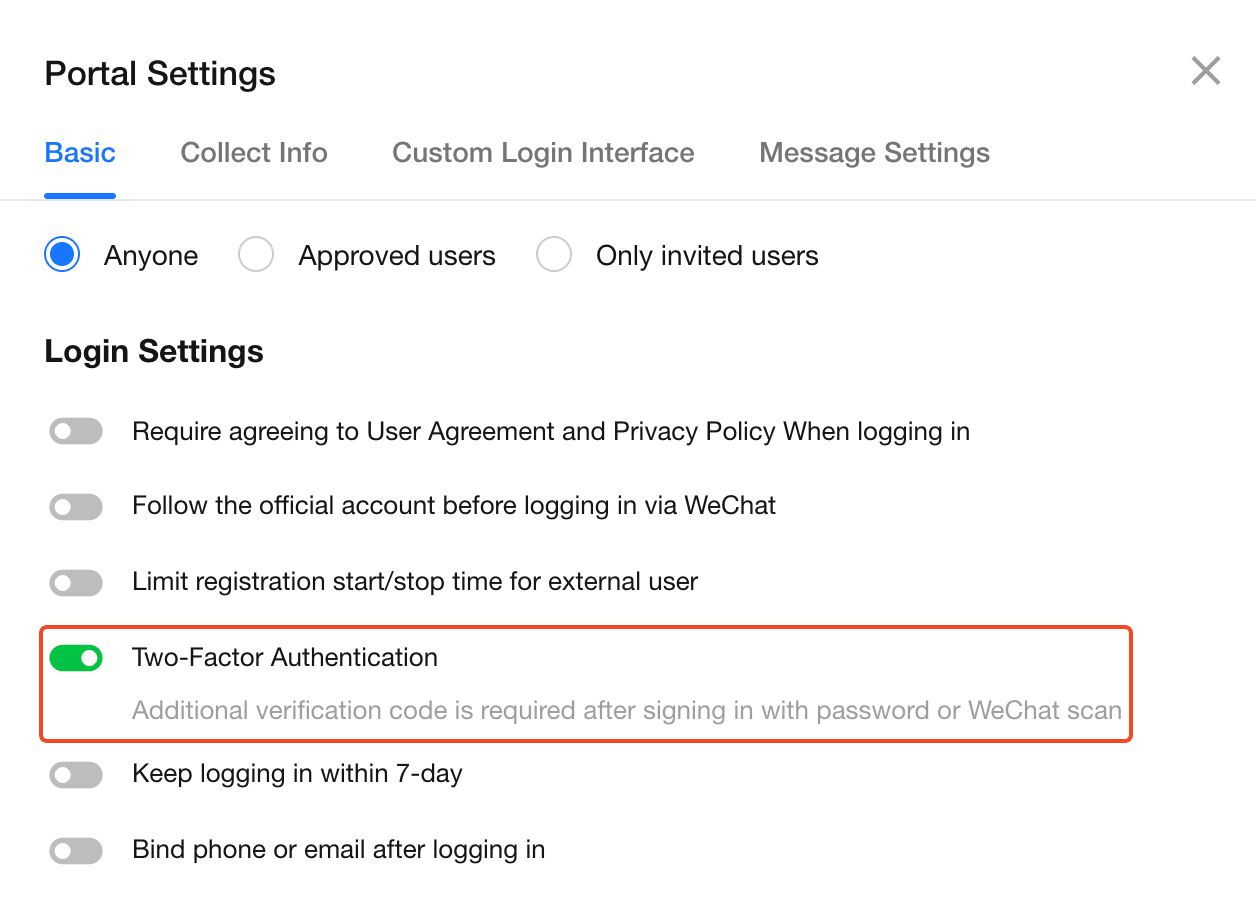
Enable Two-Factor Authentication for Login
After enabling this option, users who log in with an account password or WeChat QR code must complete an additional verification code verification before accessing the portal.
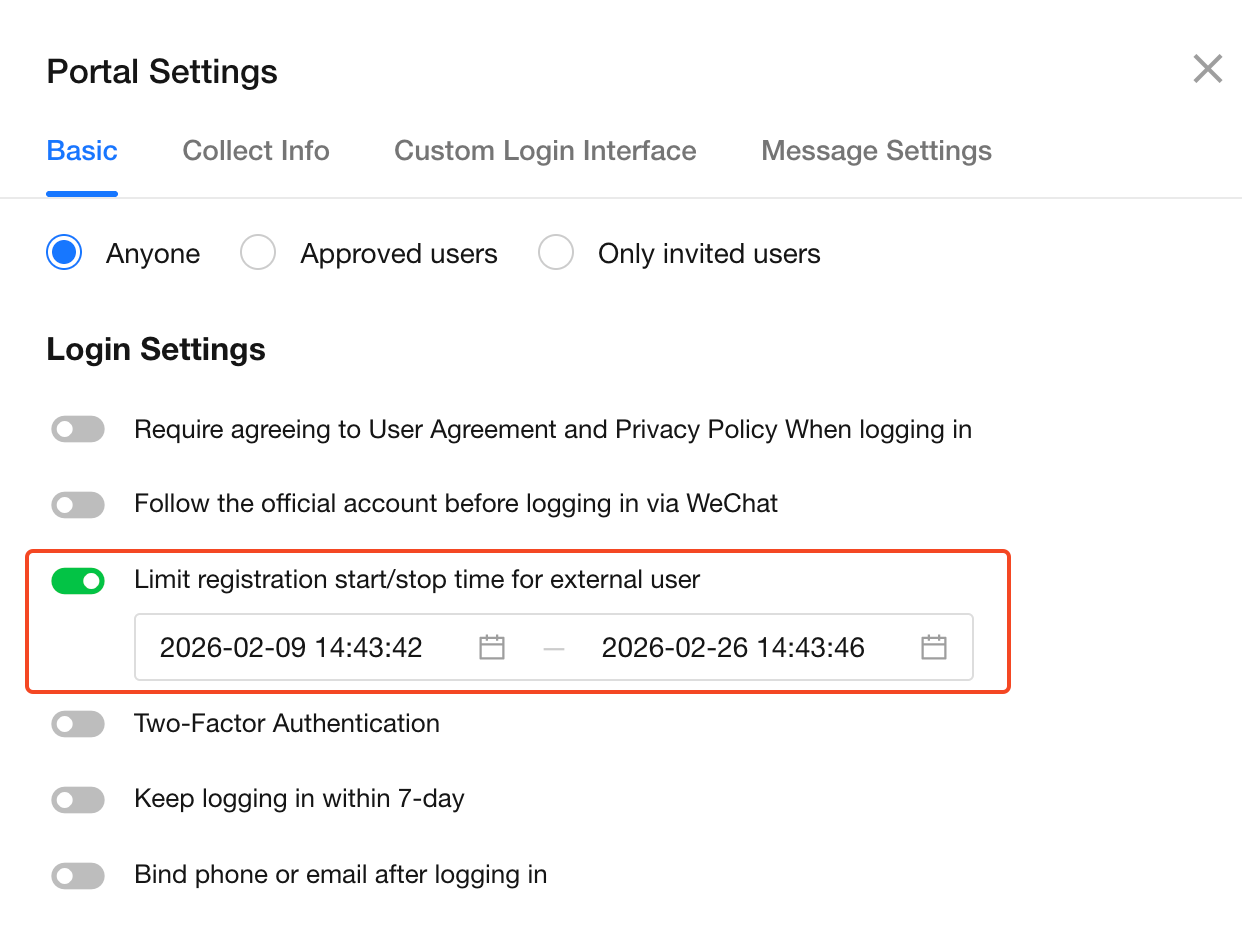
Restrict Registration Time
You can configure a registration time range and allow external users to register only during this period.
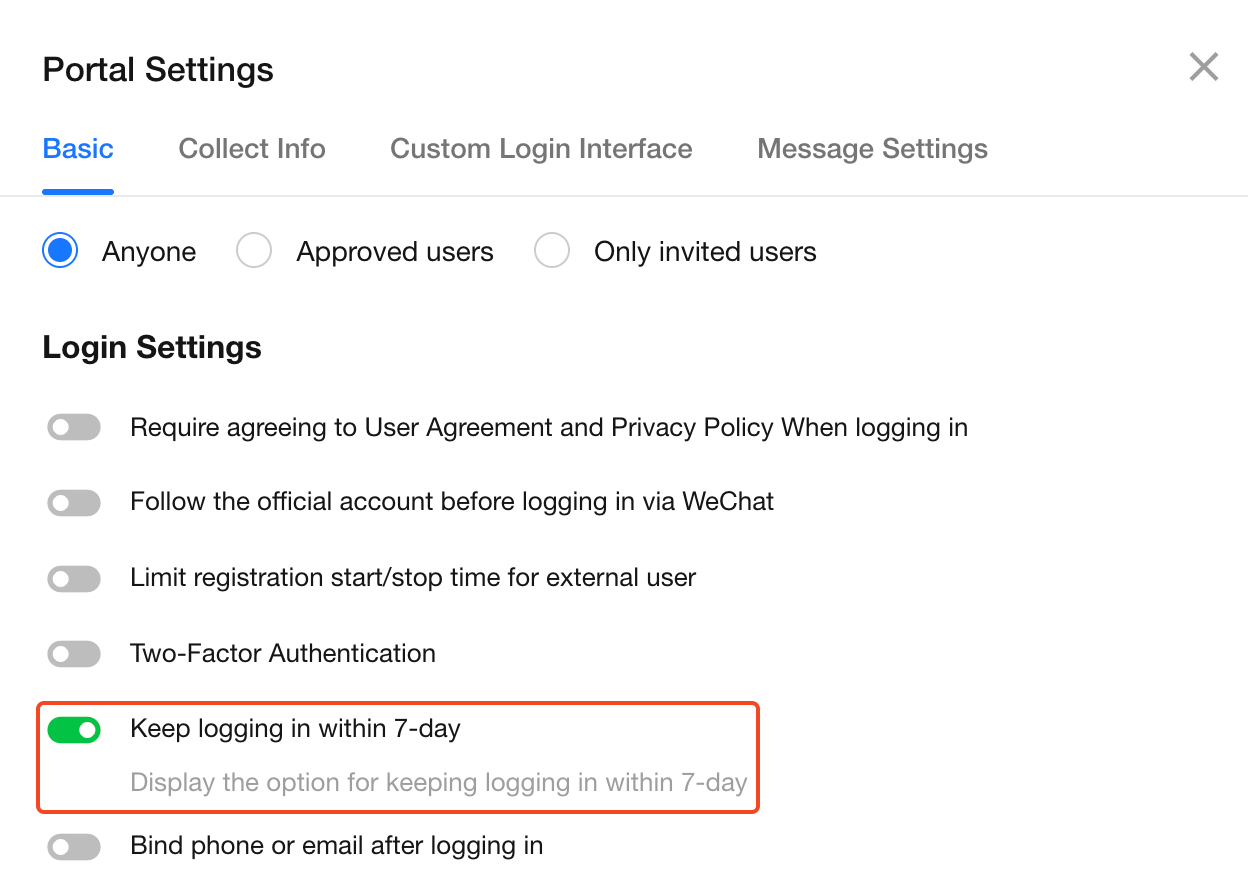
Enable 7-Day Passwordless Login
When enabled (default), users do not need to enter their account and password again within 7 days after logging in.
When disabled, external users must verify their identity again each time they log in.
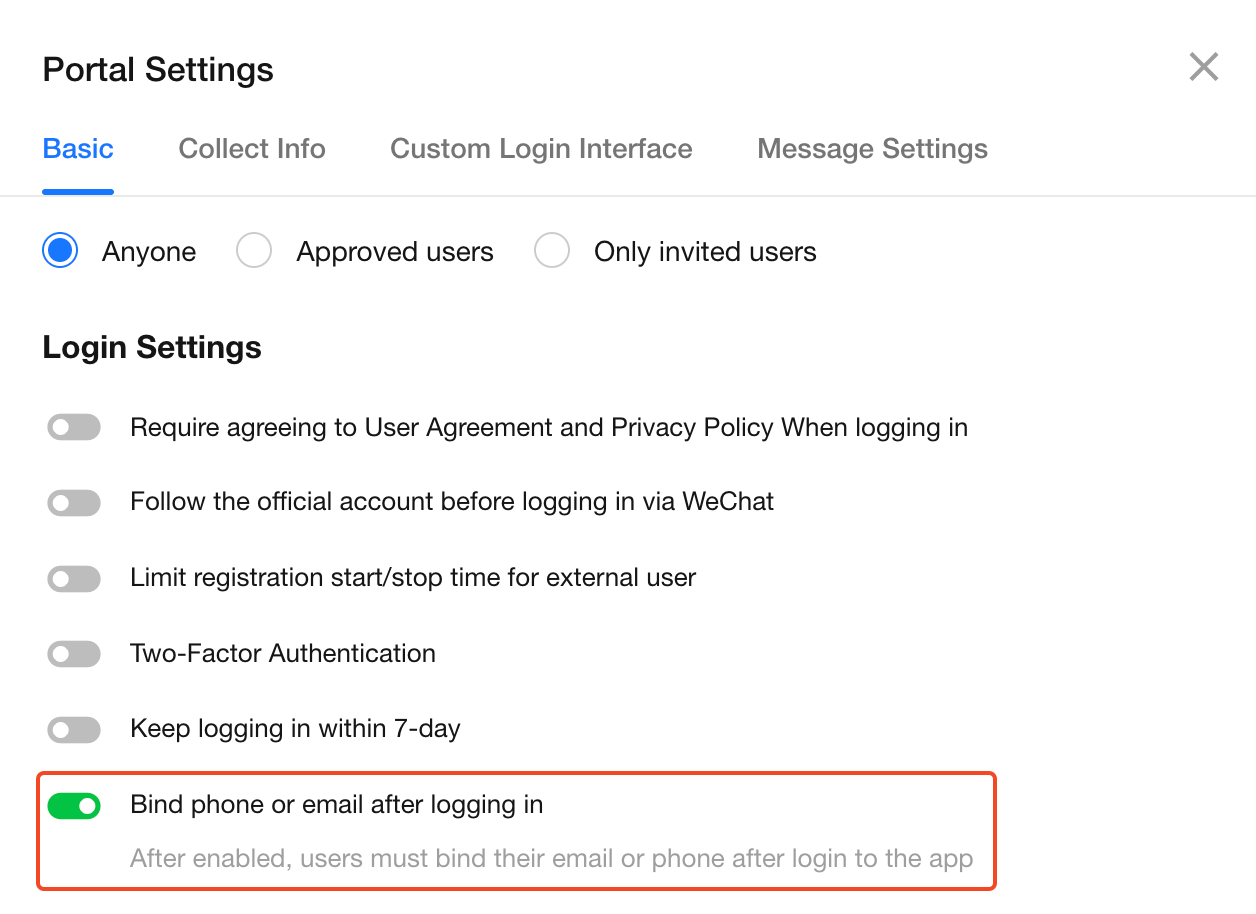
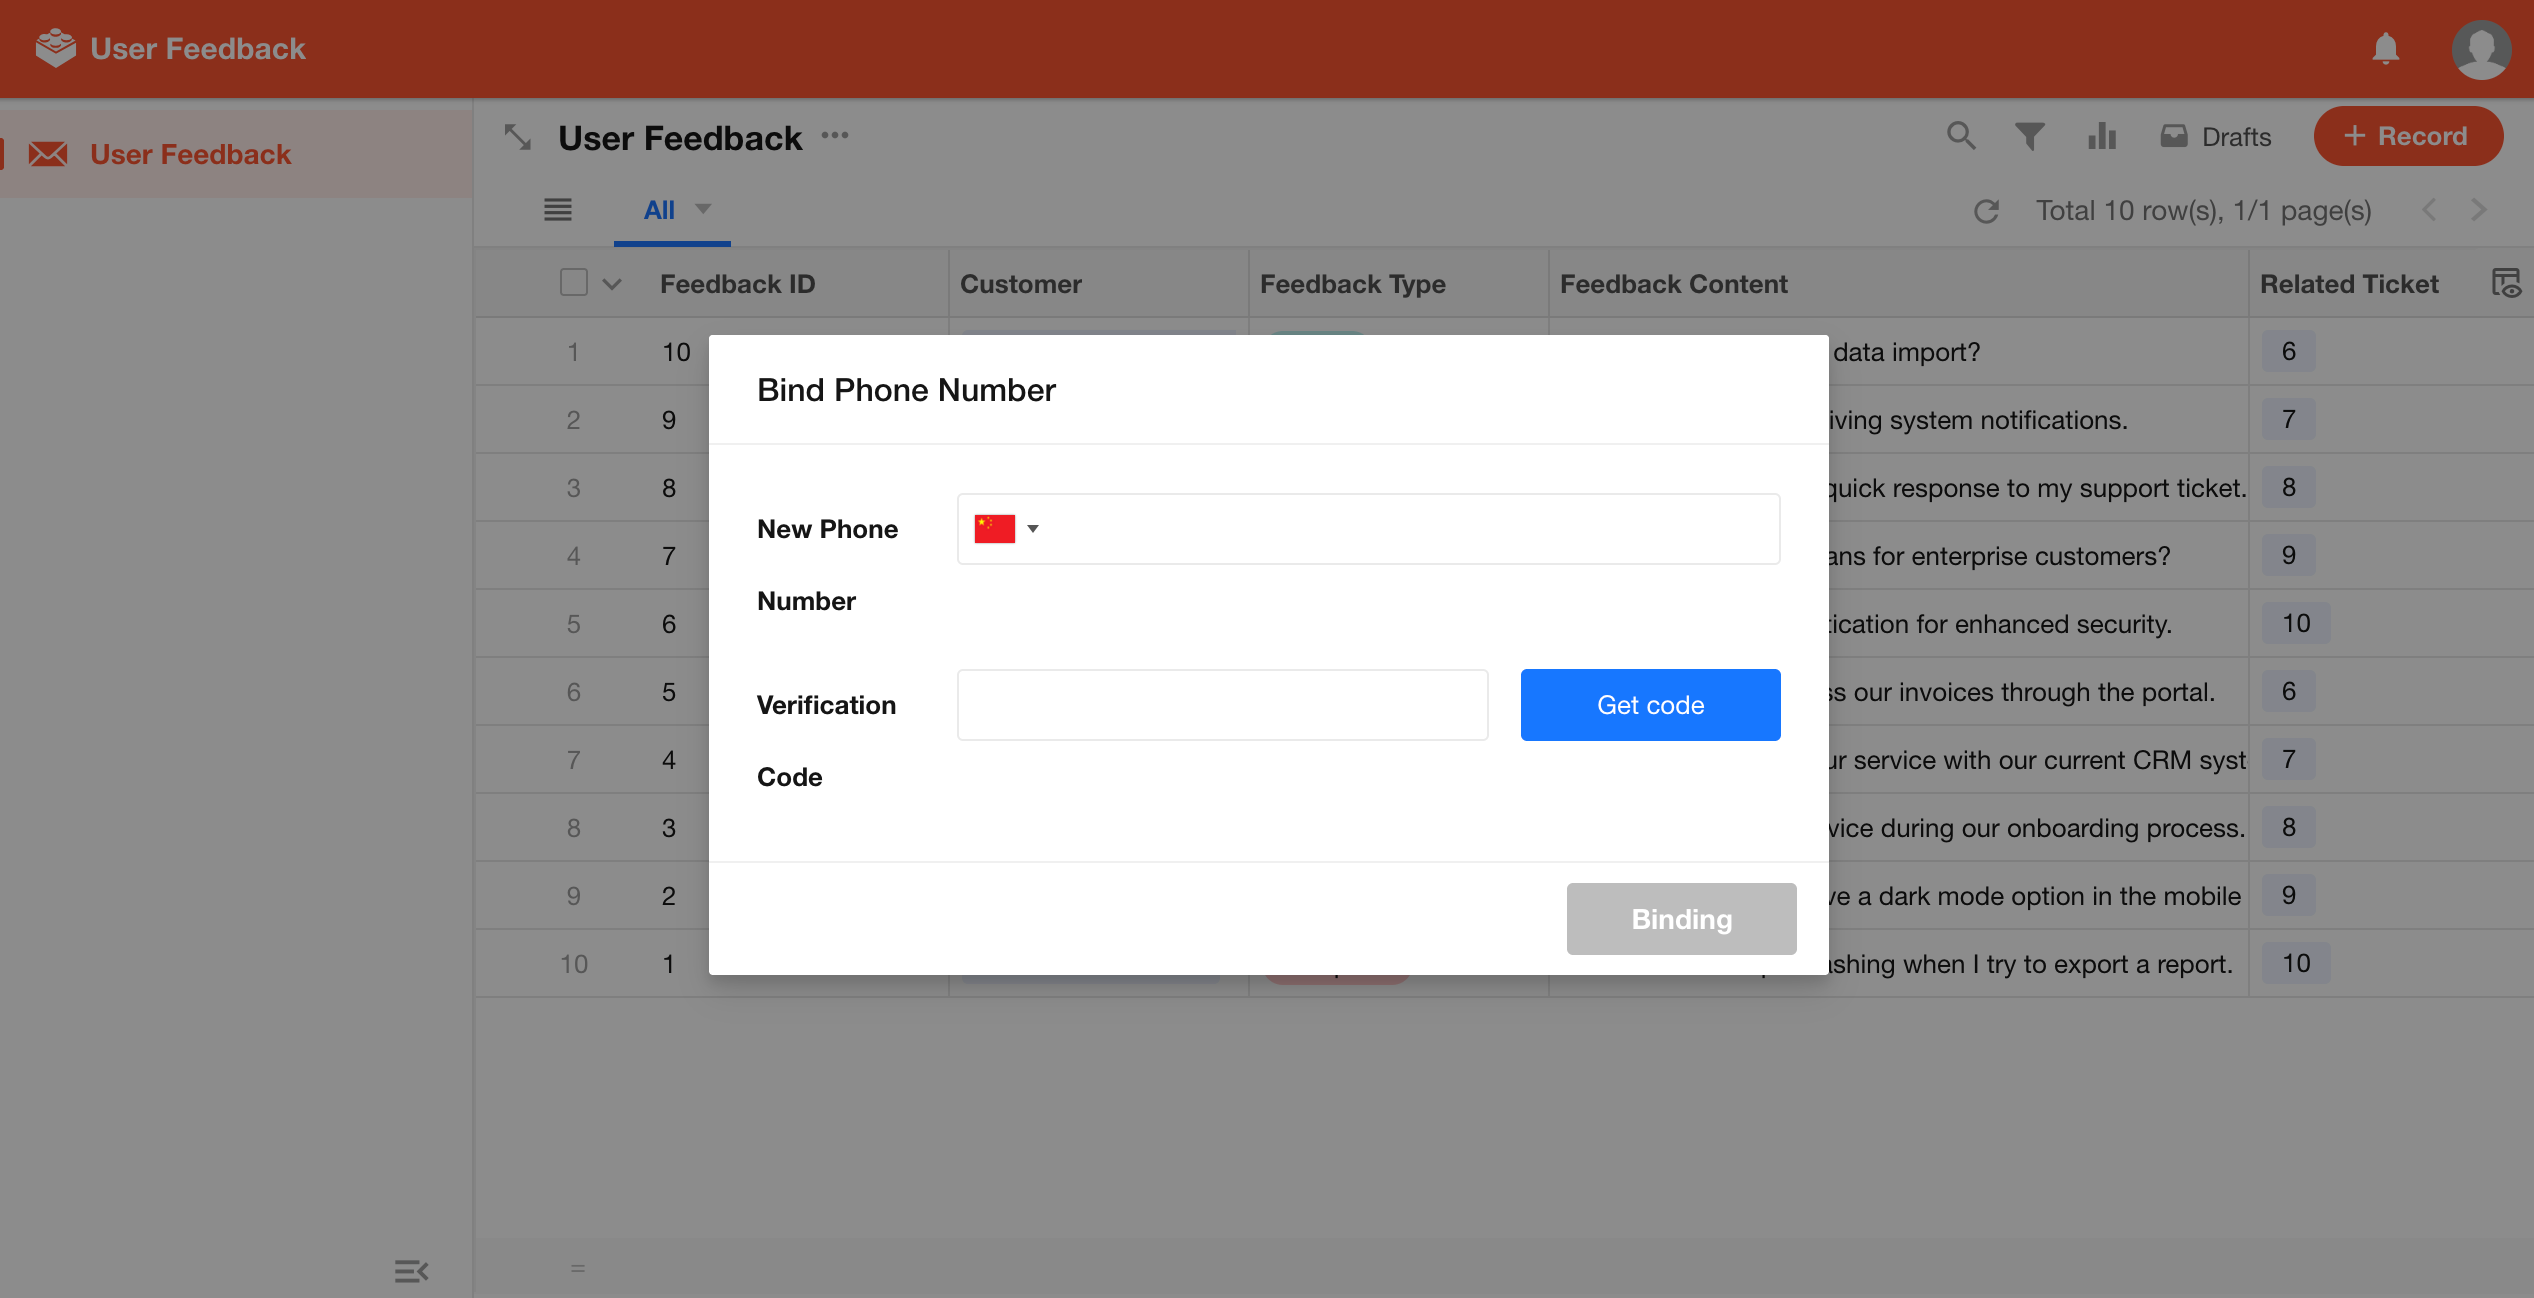
Require Mobile Number and Email Binding
When enabled, users must bind both a mobile number and email address before accessing the application.
For example, if a user registers with a mobile number, they must still bind an email address after logging in.
Create Personalized Login Links
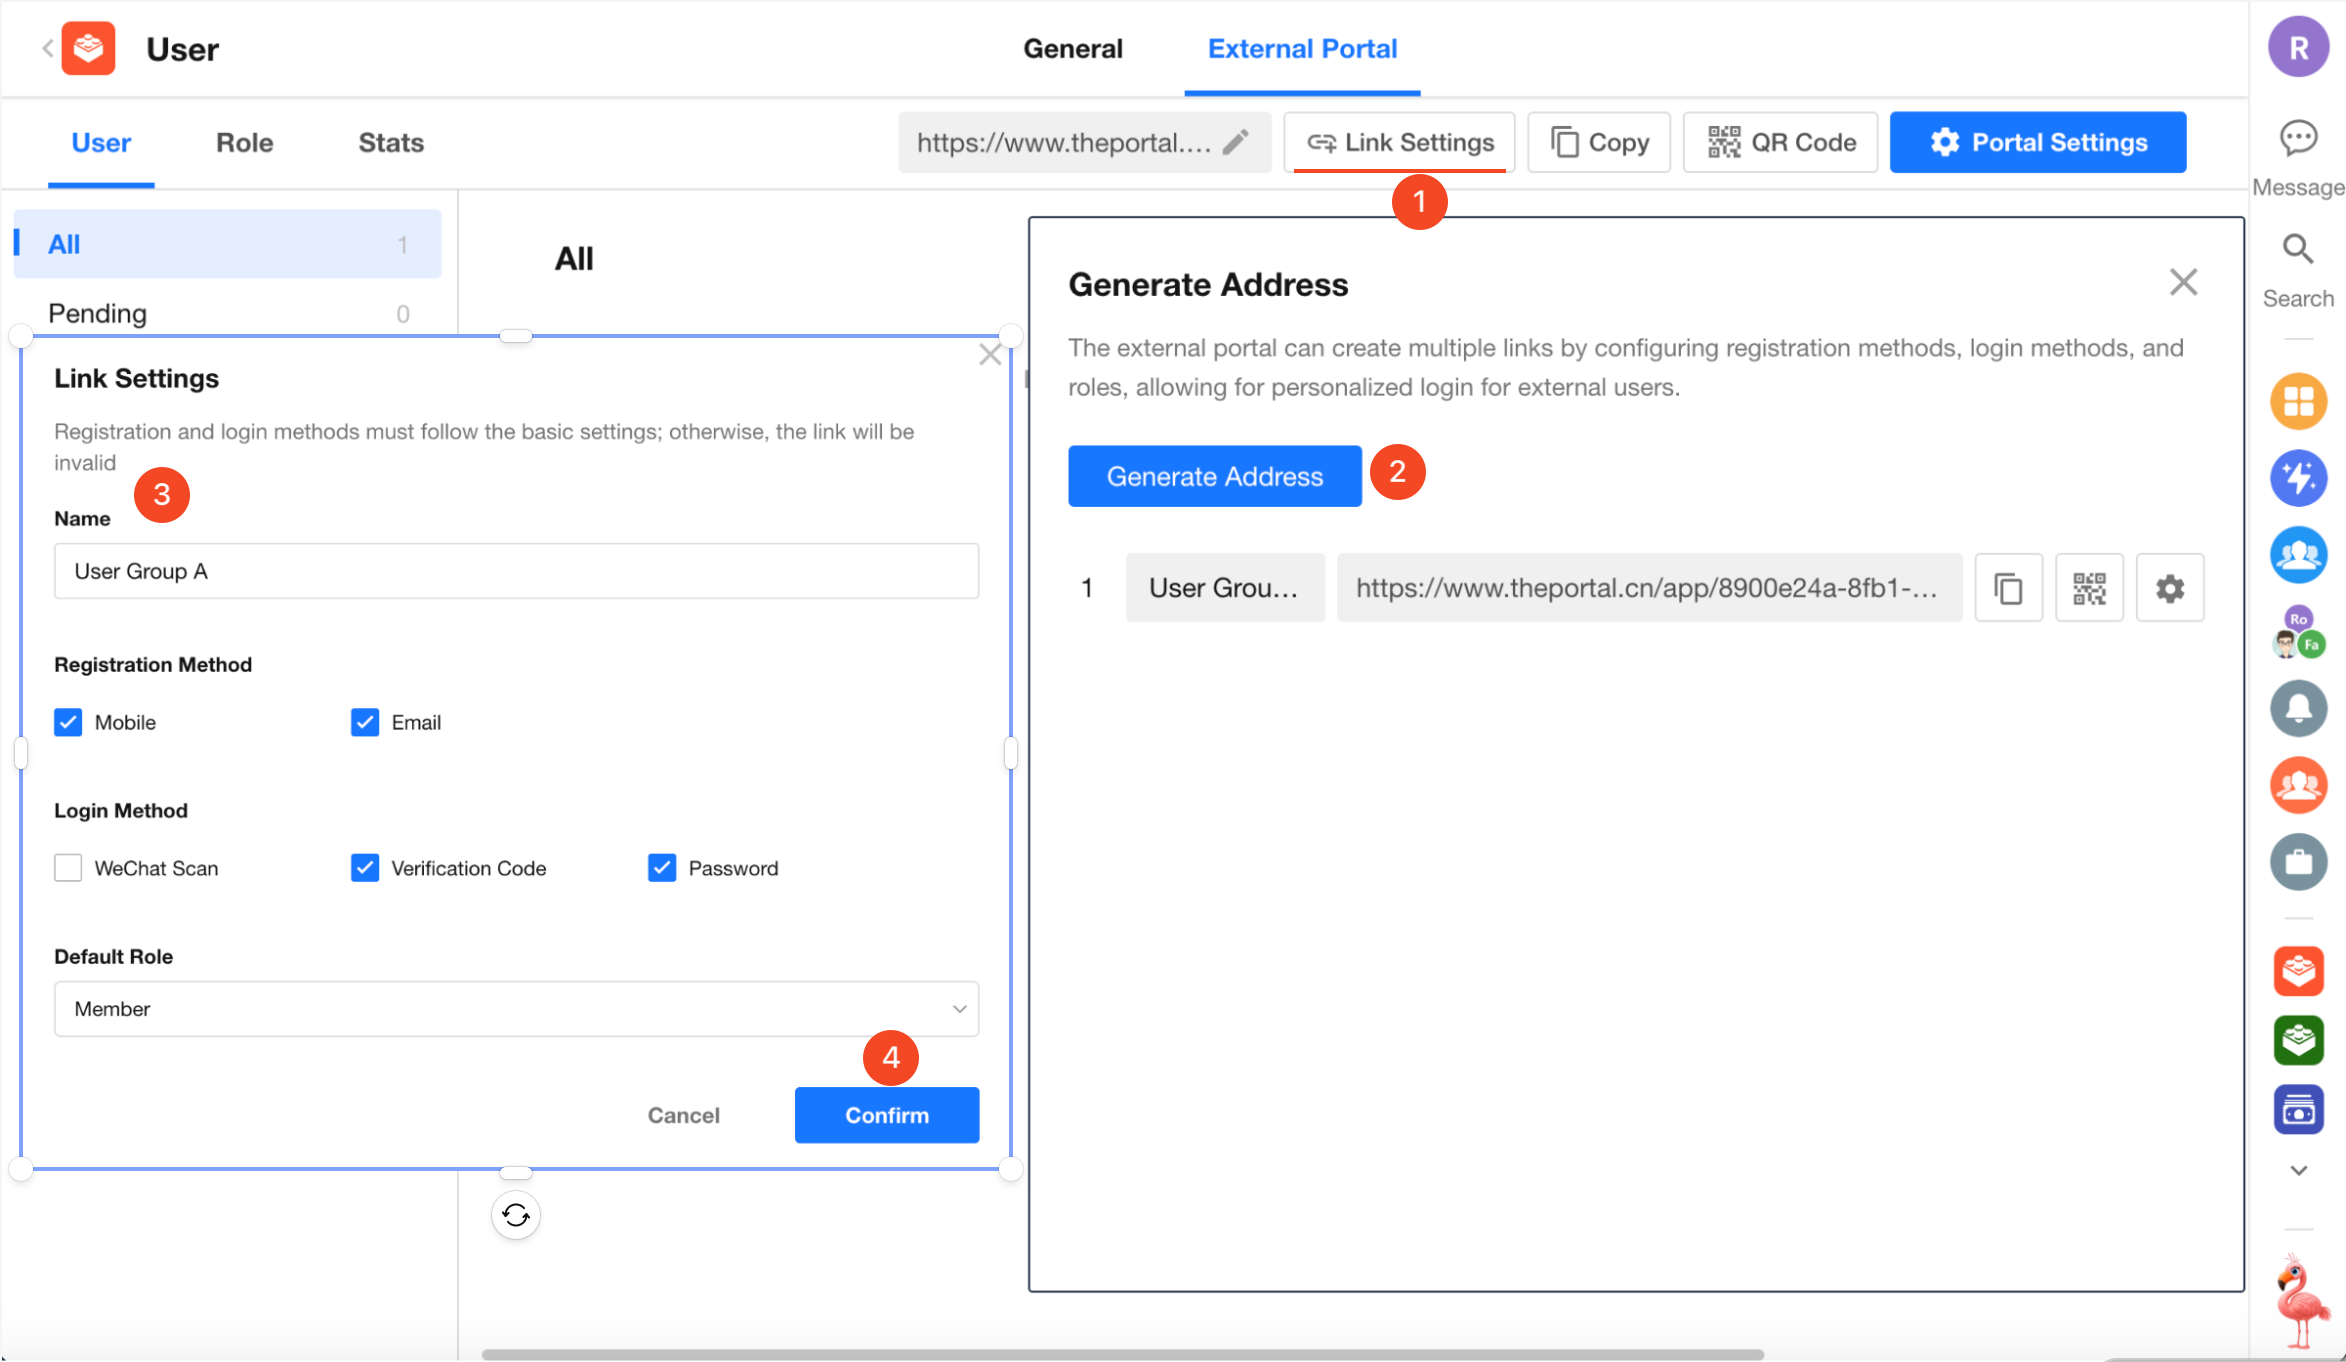
By configuring different registration methods, login methods, and default roles, you can create multiple personalized login links for different user groups.
For example, overseas users may prefer email + password login, while users in China may prefer mobile number + password or WeChat login. Separate login links can be created for these two user groups.
The registration and login methods configured for a link must already be enabled in Portal Settings > Basic.
Set Access Permission Type
Because registration links and QR codes can be easily shared, configure access permissions based on your business requirements.
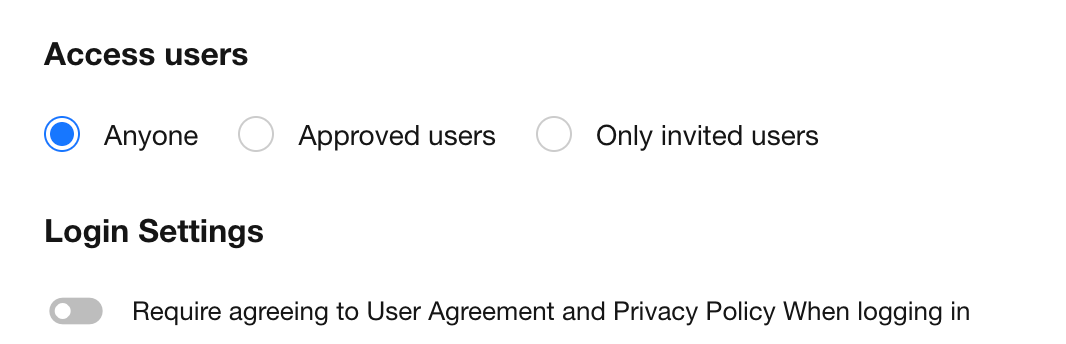
External Portal supports three access permission types:
- Anyone: Any user with the link can register and access the portal without approval.
- Approved users: Newly registered users must be reviewed by an administrator. After approval, users receive an SMS notification.
- Invited users only: Only invited users can register and access the portal. Users can be invited individually or in batches.
Configure Record Discussion Visibility
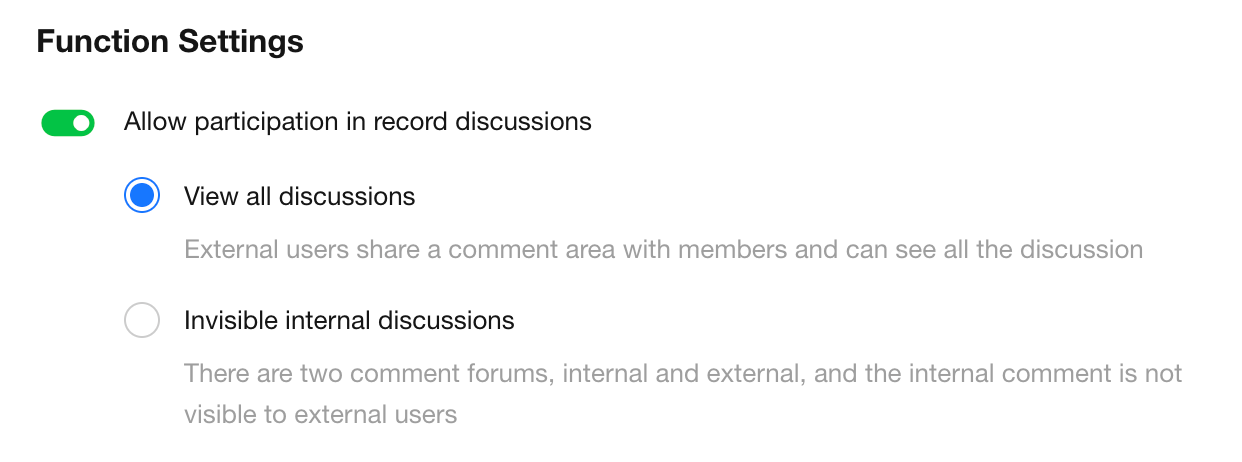
- Disable discussions: External users cannot comment when viewing records.
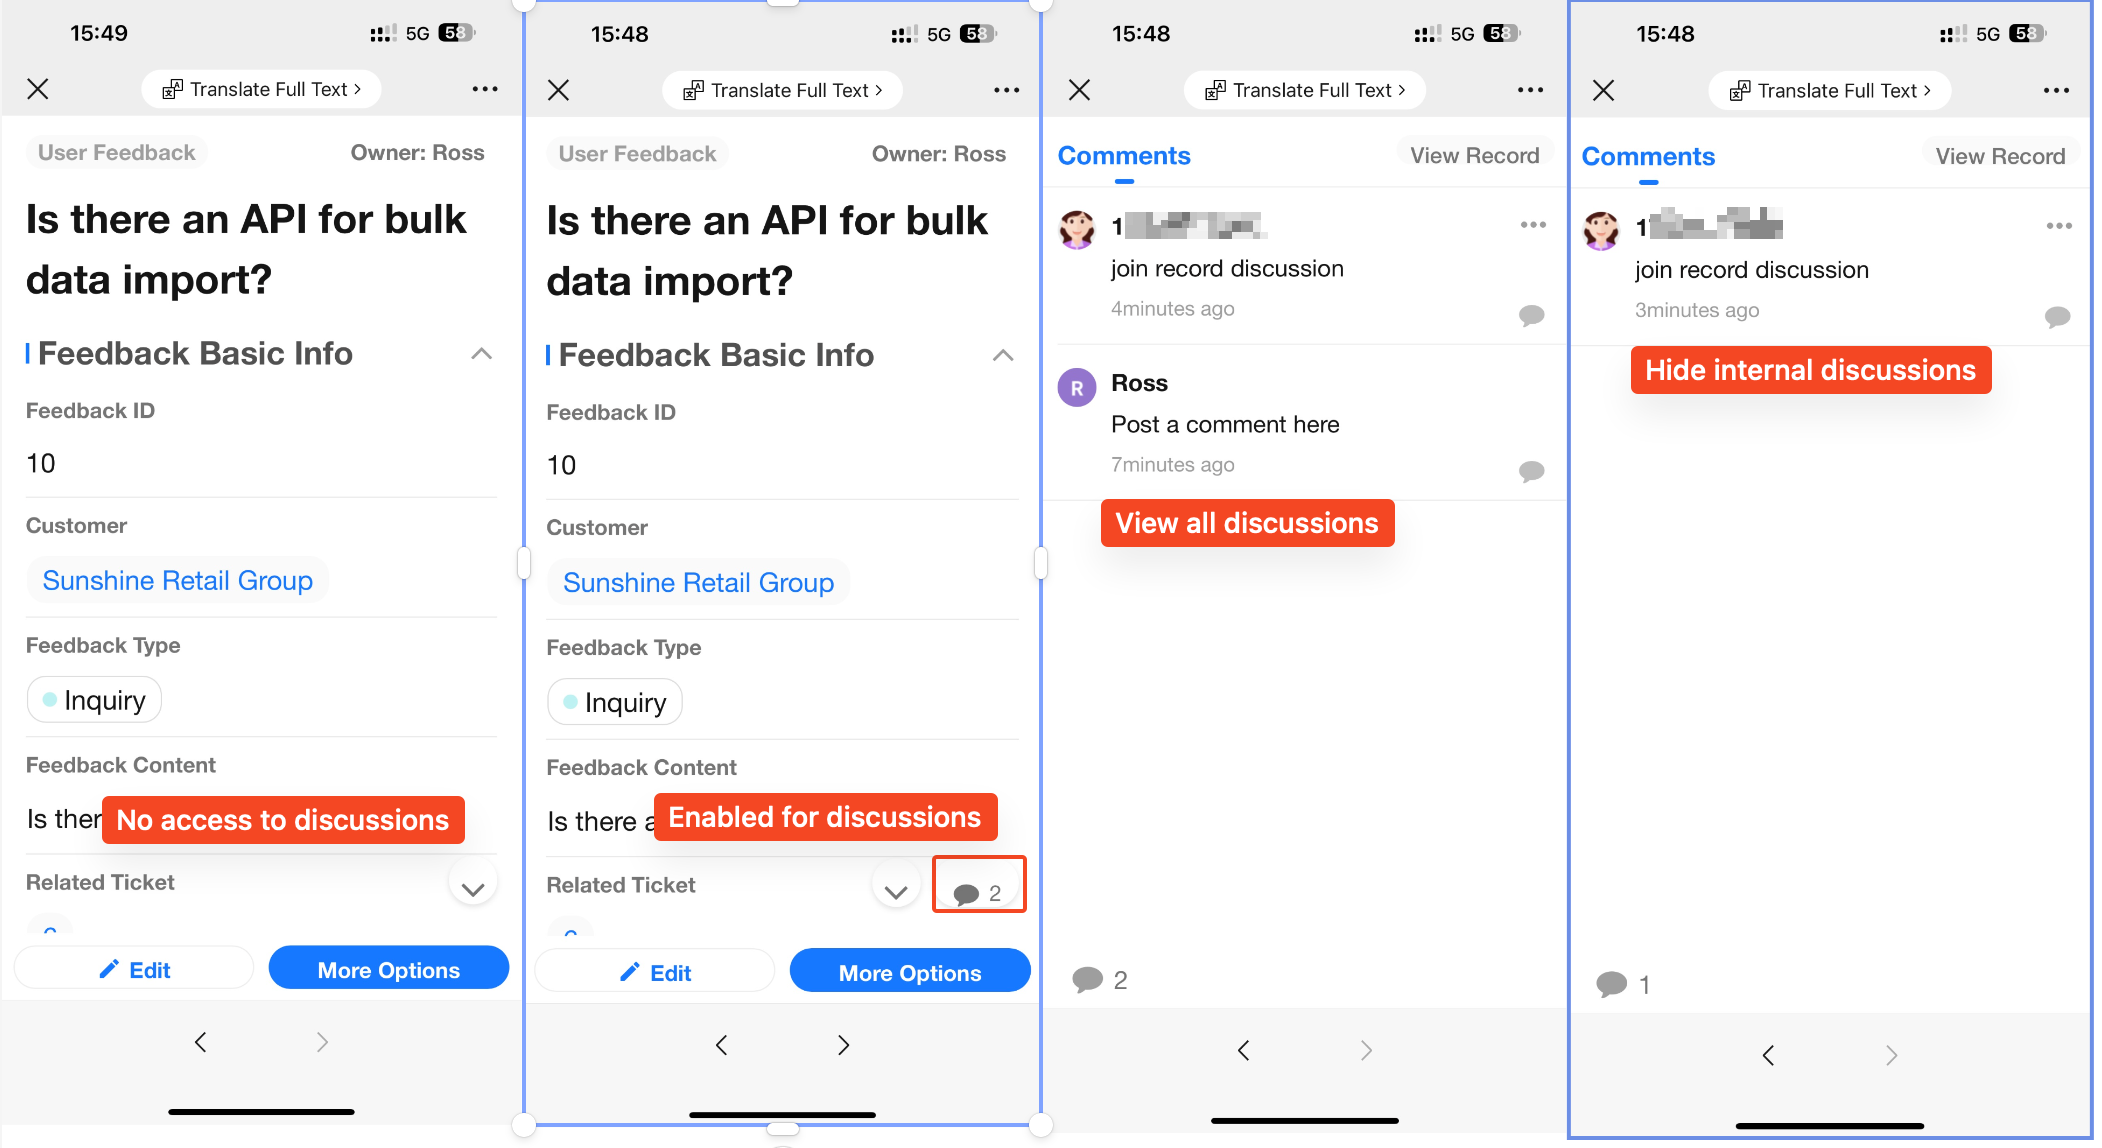
- Allow discussions - View all discussions: Internal members and external users share the same record discussion area.
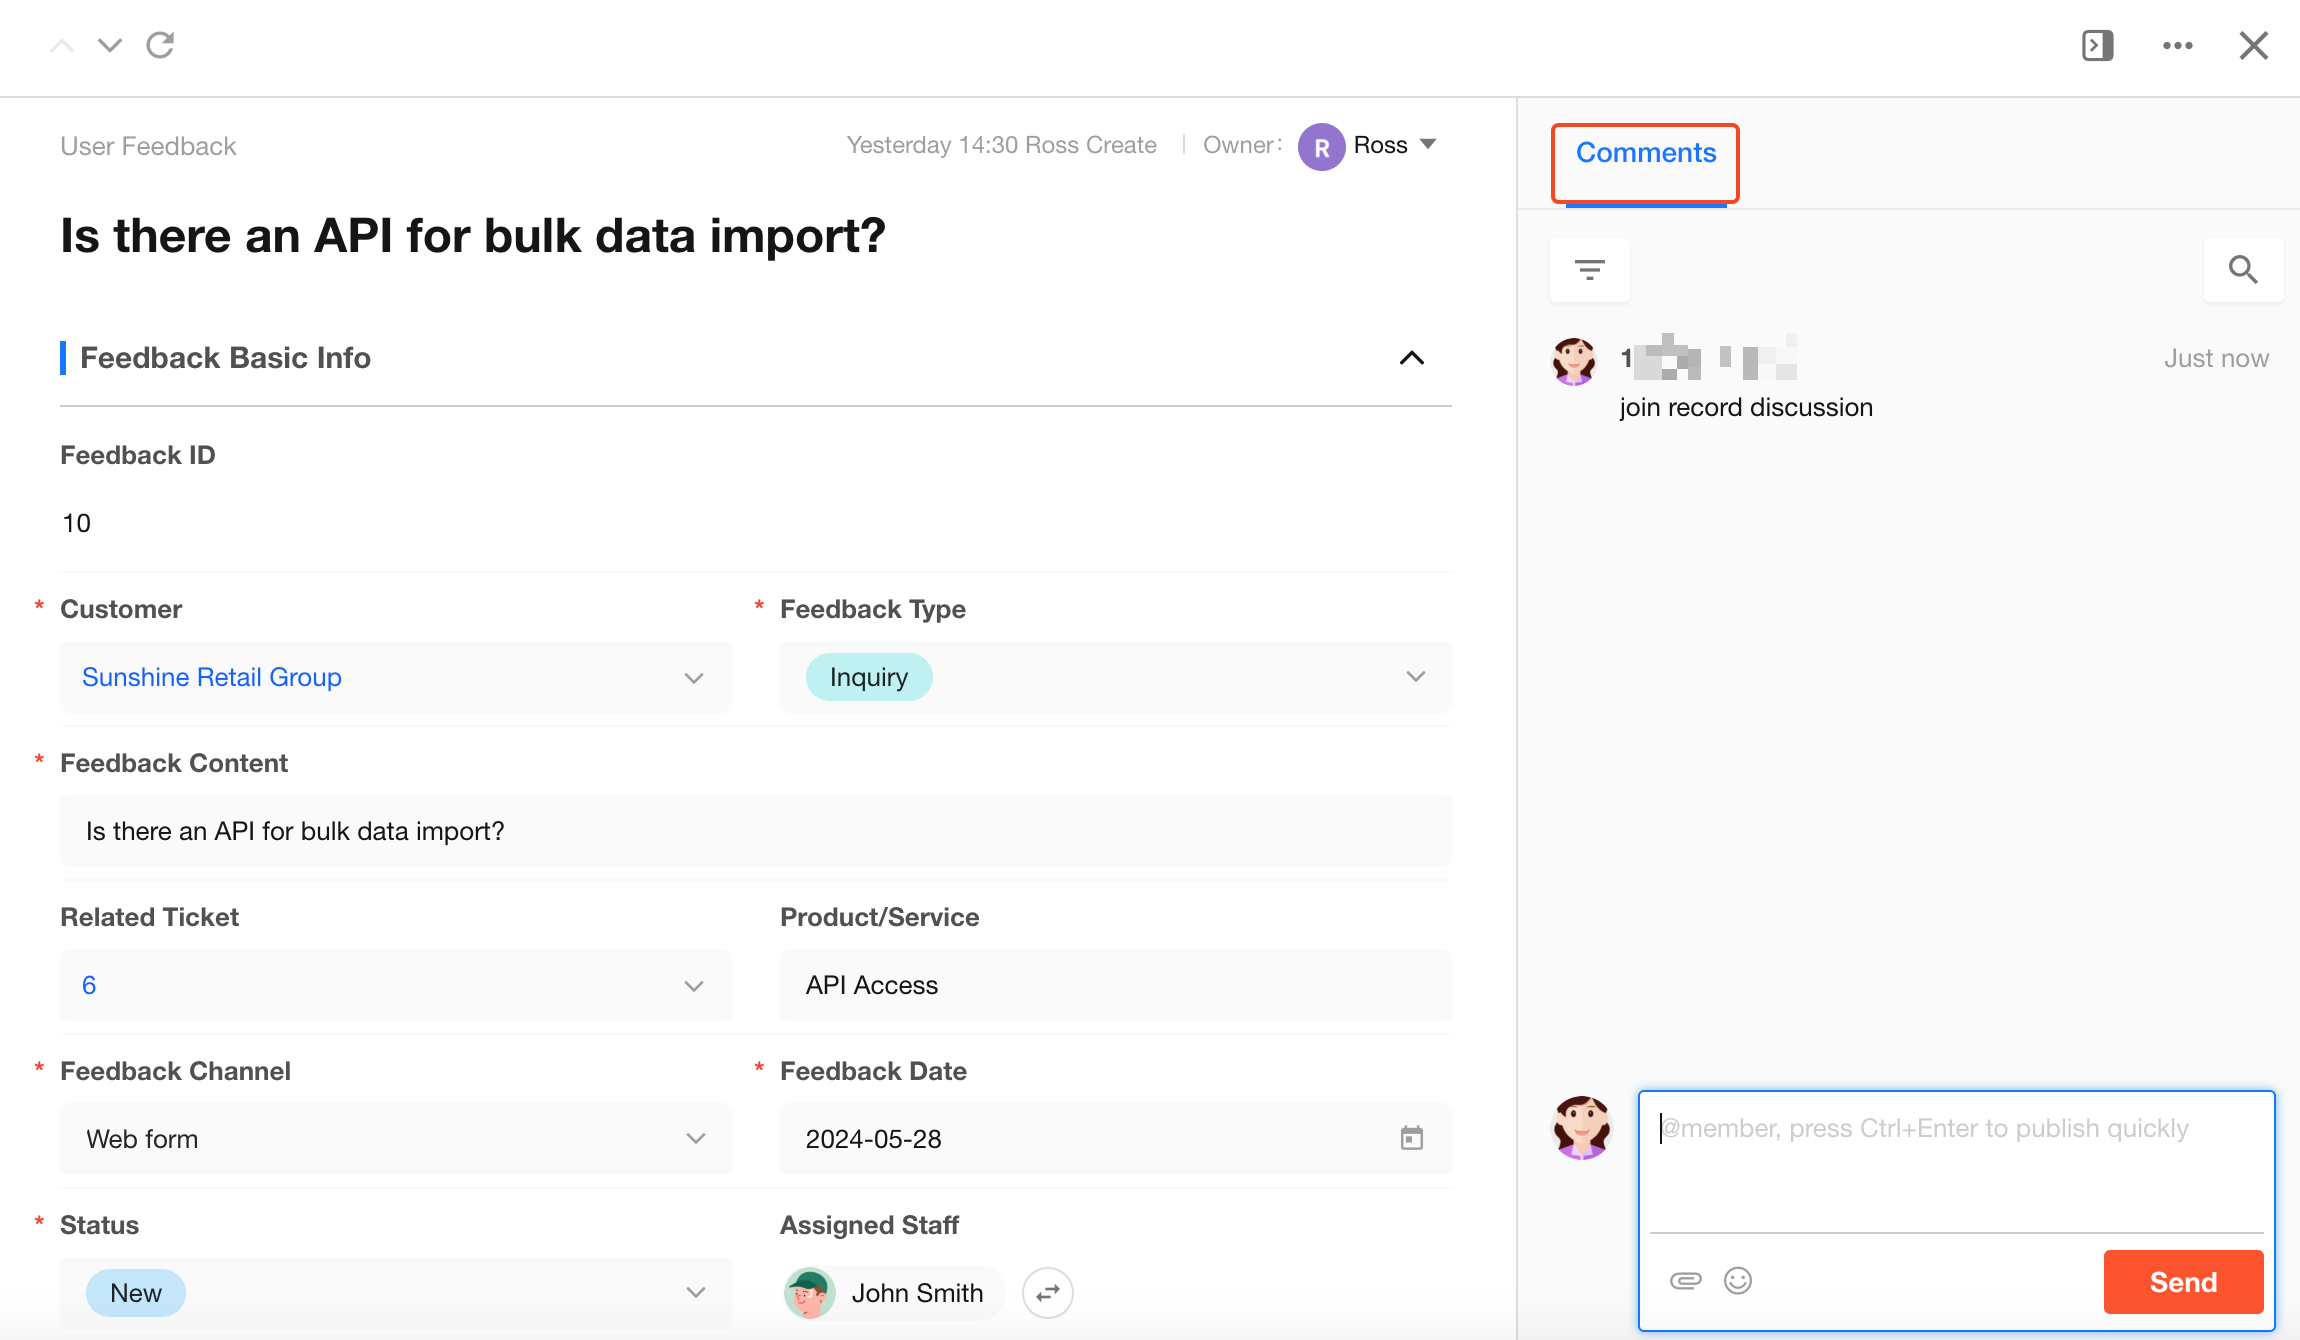
- Allow discussions - Invisible internal discussions: Separate discussion areas are available for internal members and external users. External users can only view their own discussions.
External user view:
Mobile:
Notes:
-
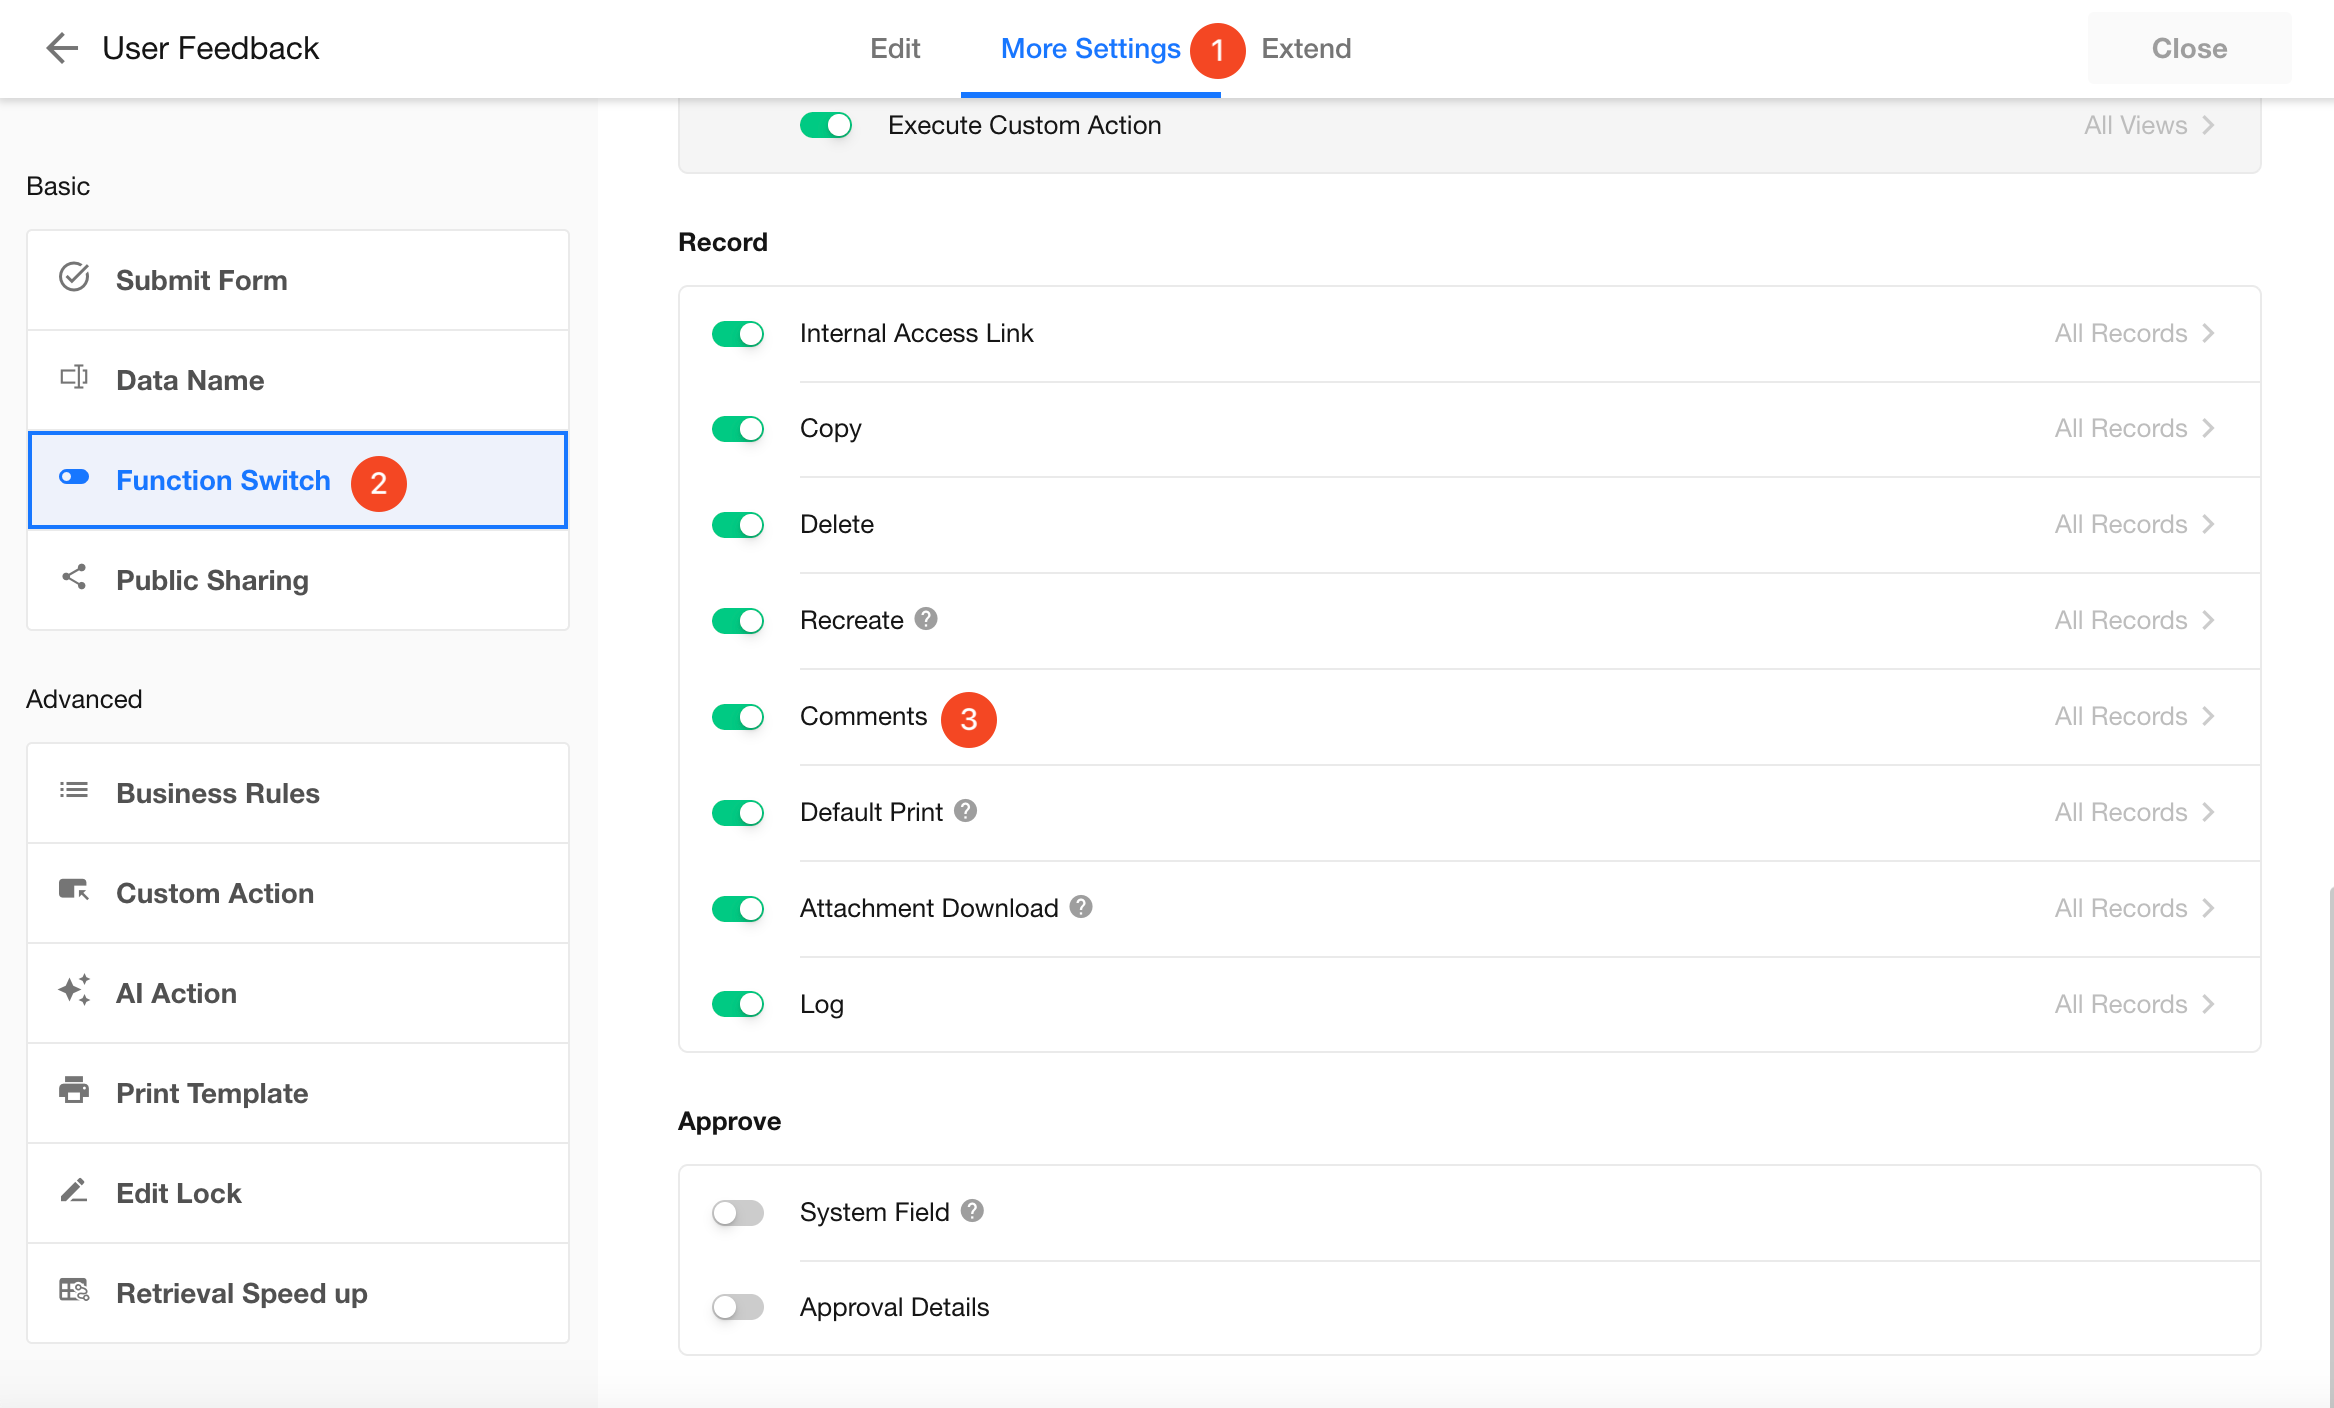
If record discussions are disabled or the discussion visibility scope is configured in Edit Form > More Settings > Function Switch, External Portal follows the same configuration.
-
When switching from Show all discussions to Hide internal discussions for the first time, the system automatically moves historical discussions to the internal discussion area. External users can no longer view them.
Notification Settings for New Discussions
When external users are mentioned with @ or receive replies, they cannot receive notifications through the APP. Configure automatic notifications through WeChat, SMS, or email instead.
-
Enable new discussion notifications
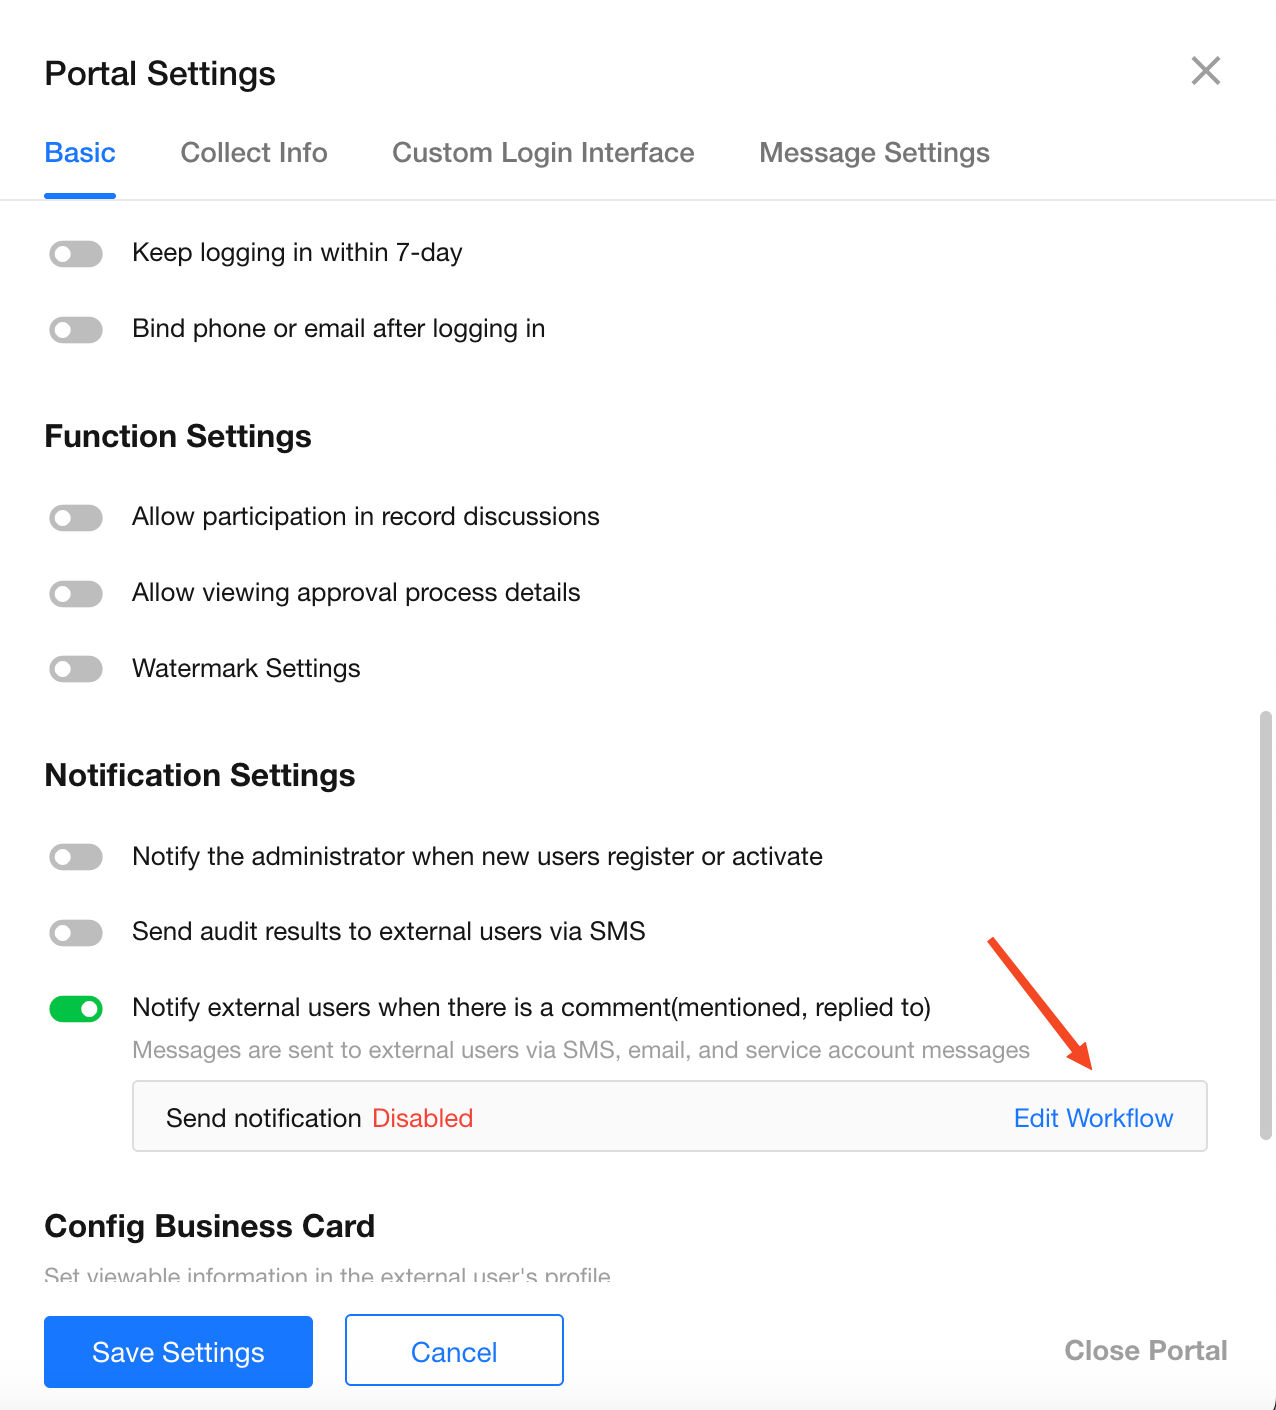
Go to Basic Settings > Notification Settings, then enable Notify external users when there are discussions (mentions and replies).
After enabling this option, the system automatically creates a workflow. Click Edit Workflow to configure it.
-
Configure the notification workflow
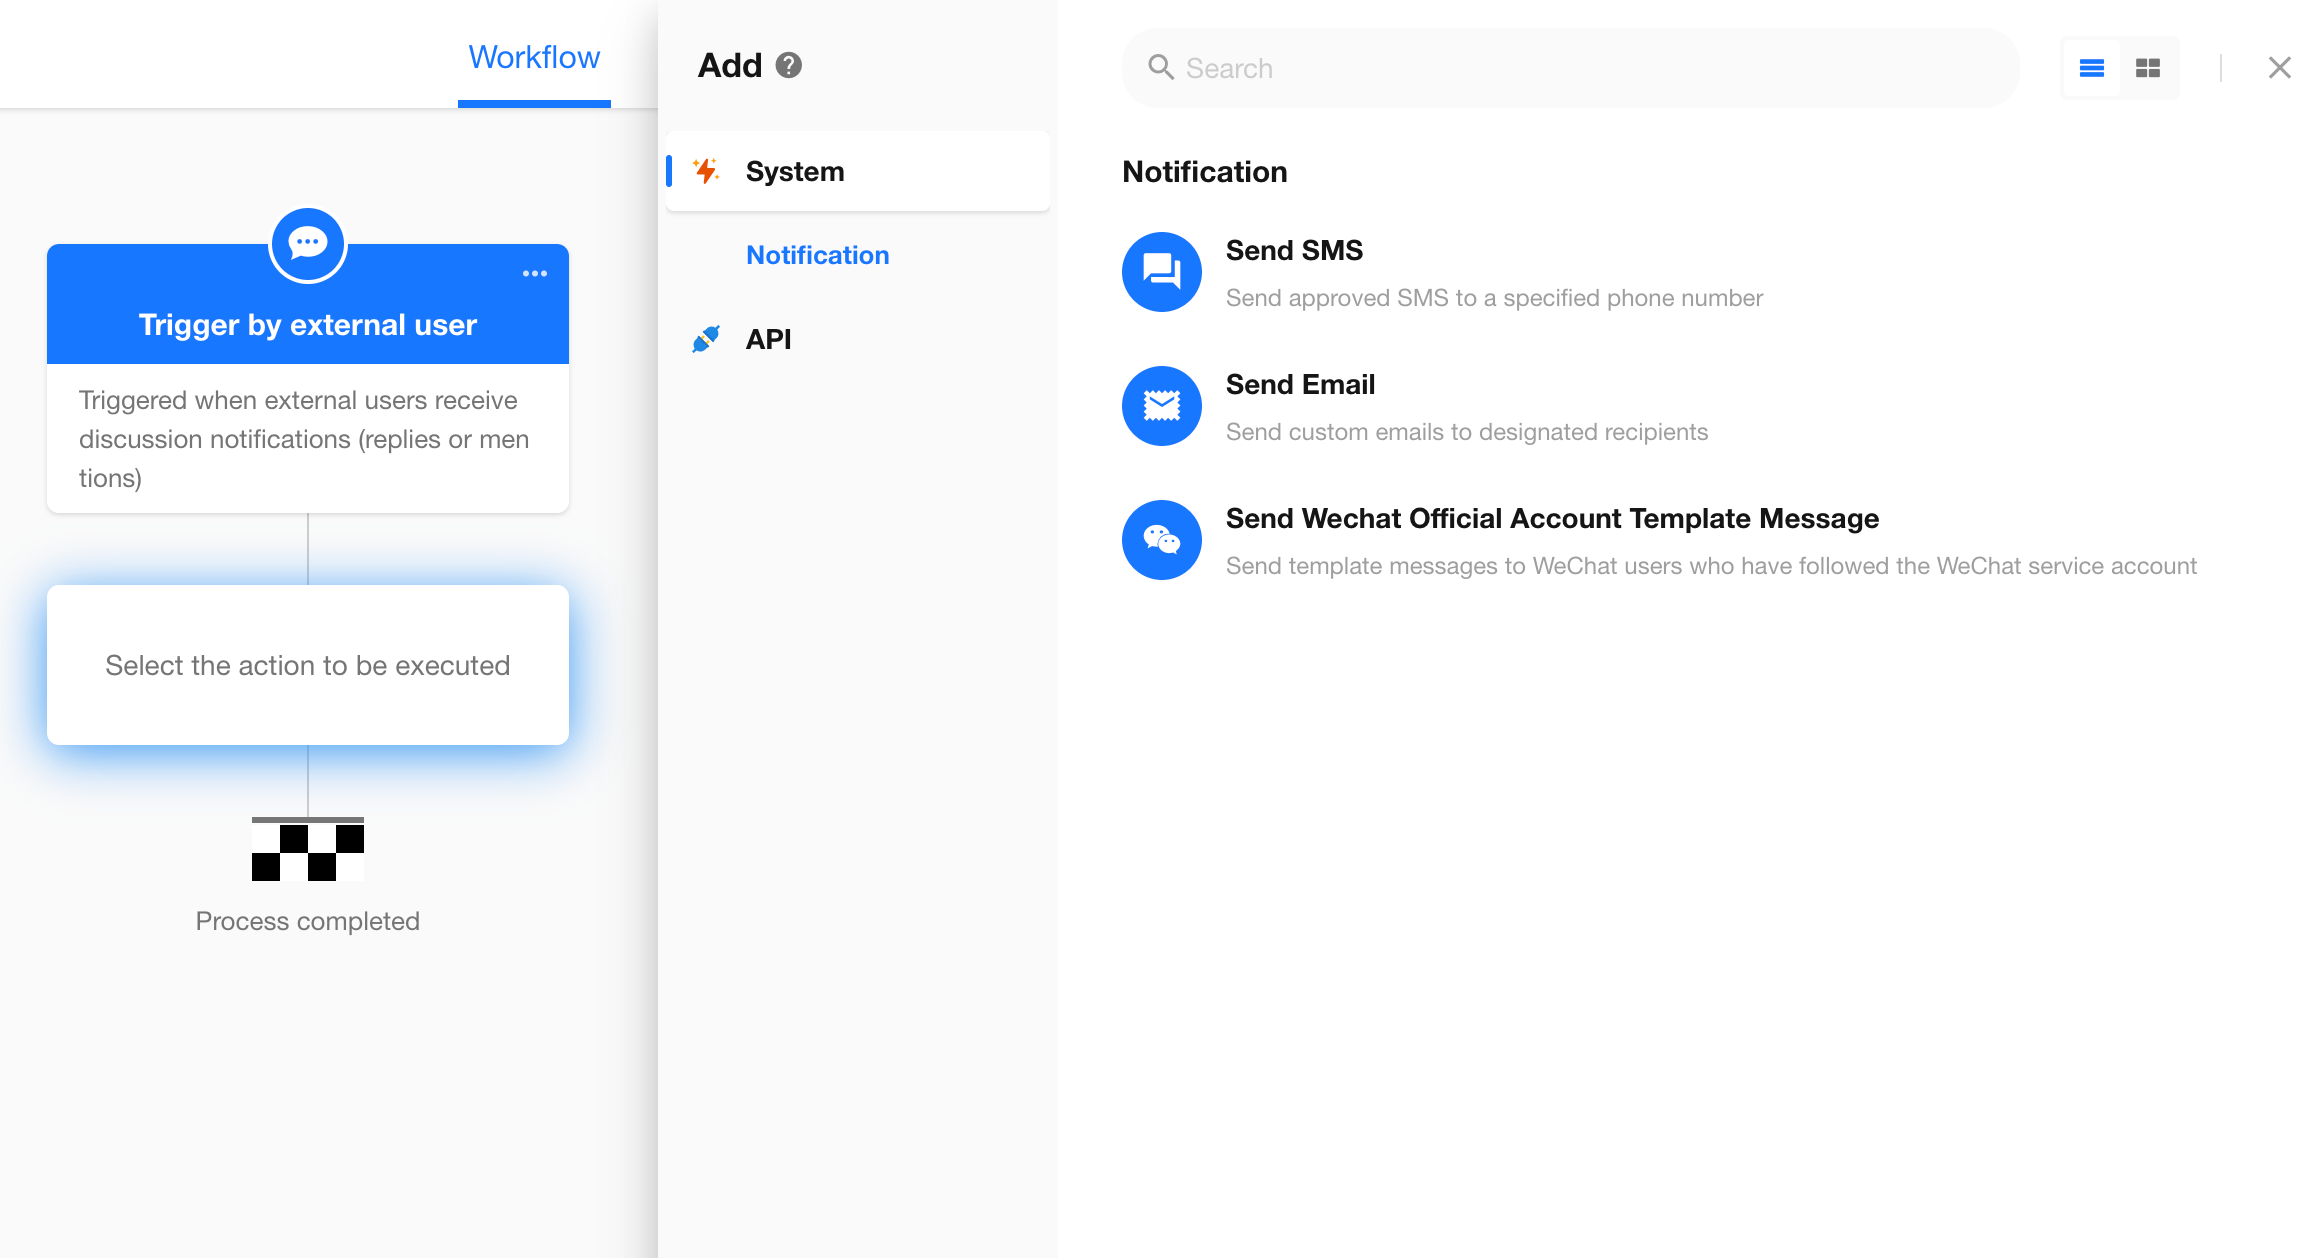
The trigger node does not require configuration. The workflow is automatically triggered when an external user is mentioned or receives a reply in a discussion.
Add the required notification nodes based on the notification method. You can also send notifications through integrated APIs.
-
Publish the workflow
After completing the configuration, click Publish to enable the workflow.
Then open a record discussion in the application and mention an external user to test the notification.
Notifications for New External User Registration
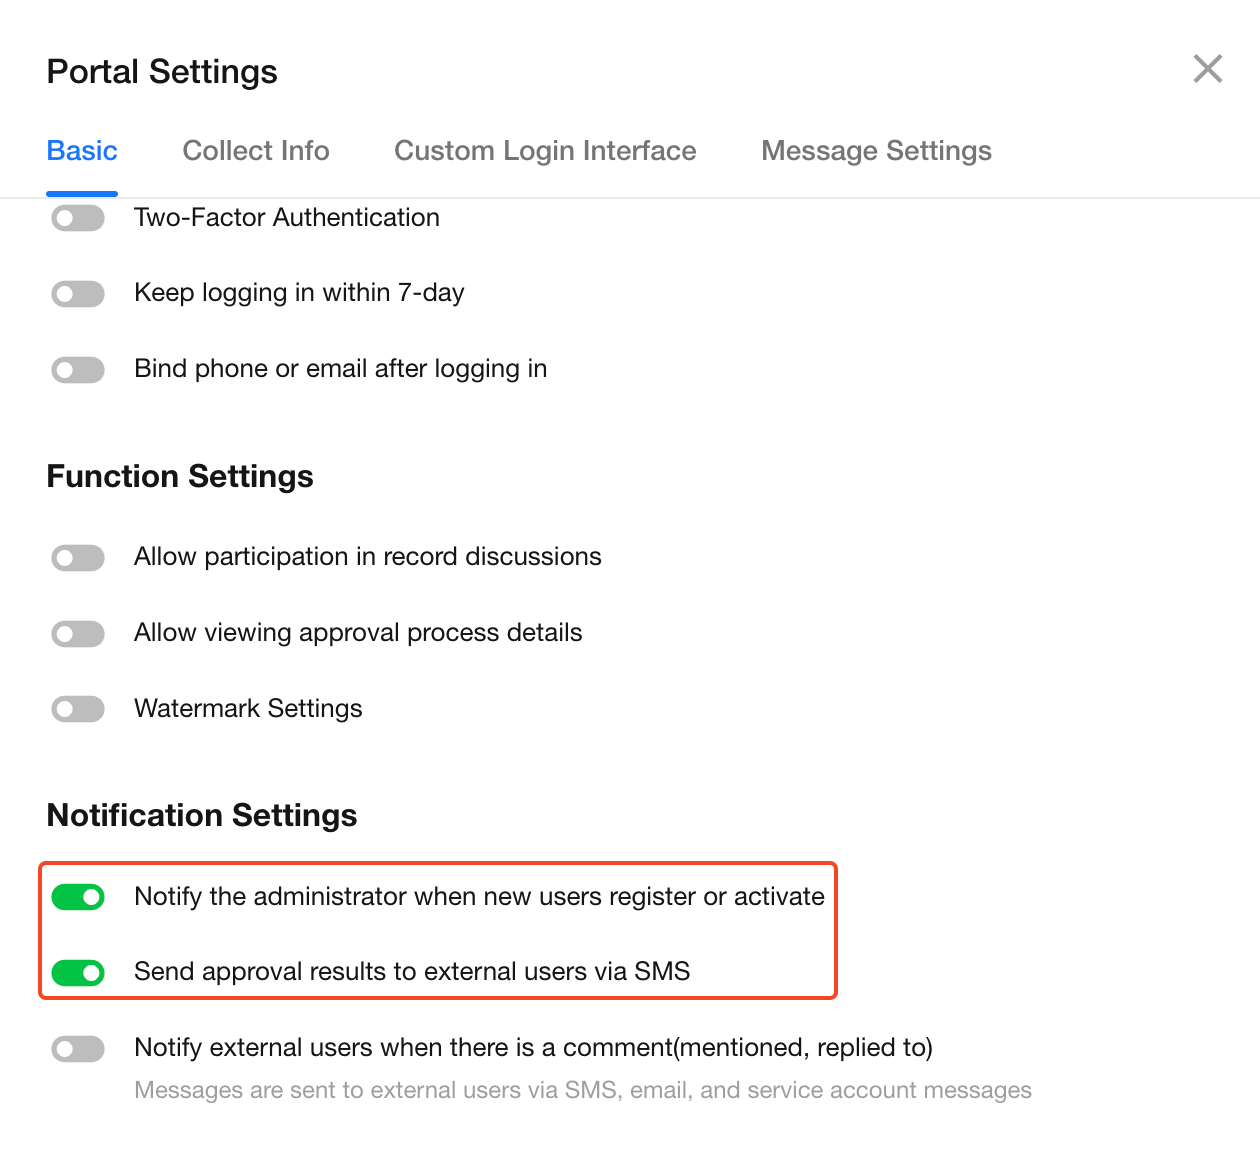
- Notify administrators when a new user registers or activates an account: Administrators receive an in-system notification.
- Notify external users of approval results by SMS: When registration is approved or rejected, an SMS notification is sent to the registered user.
Collect User Information
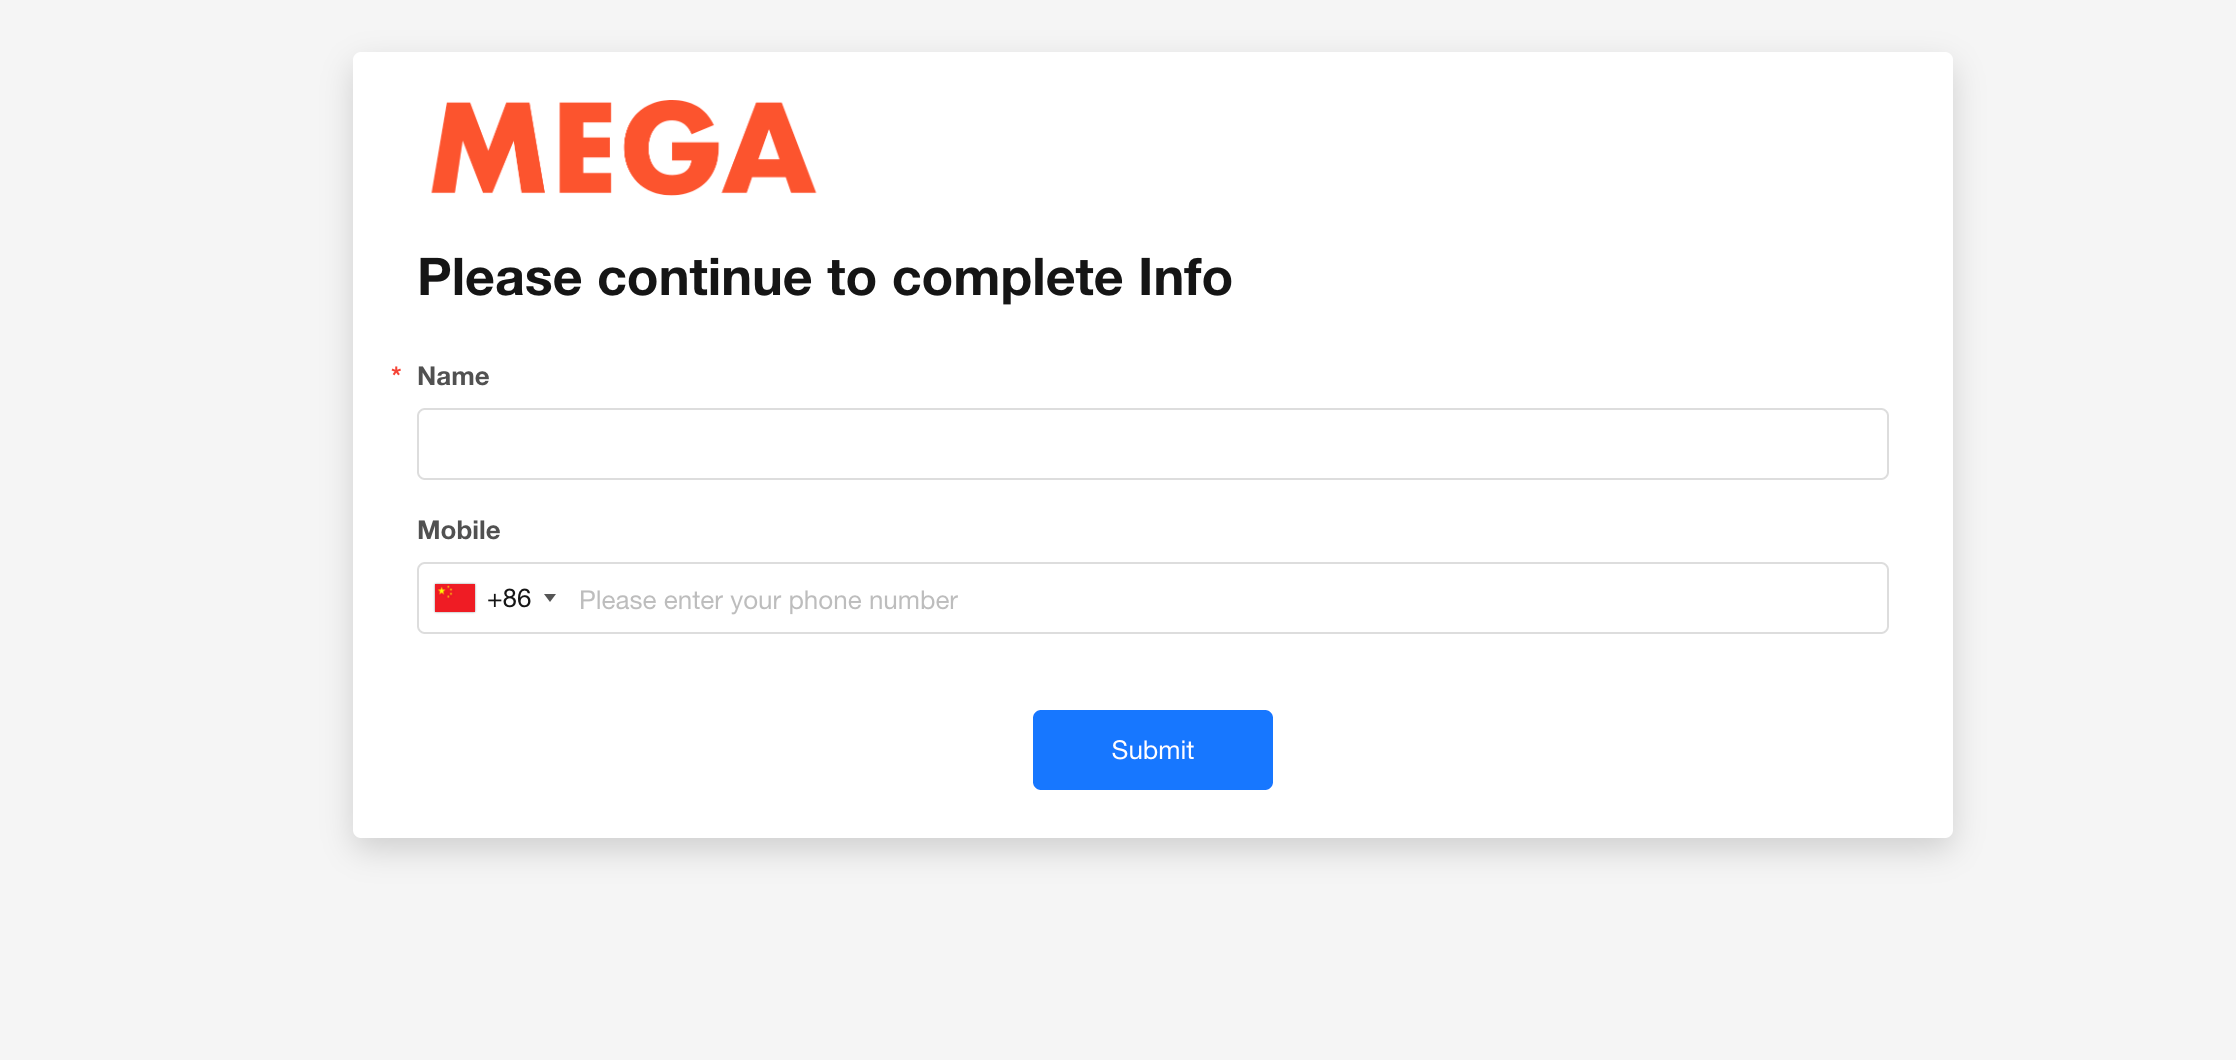
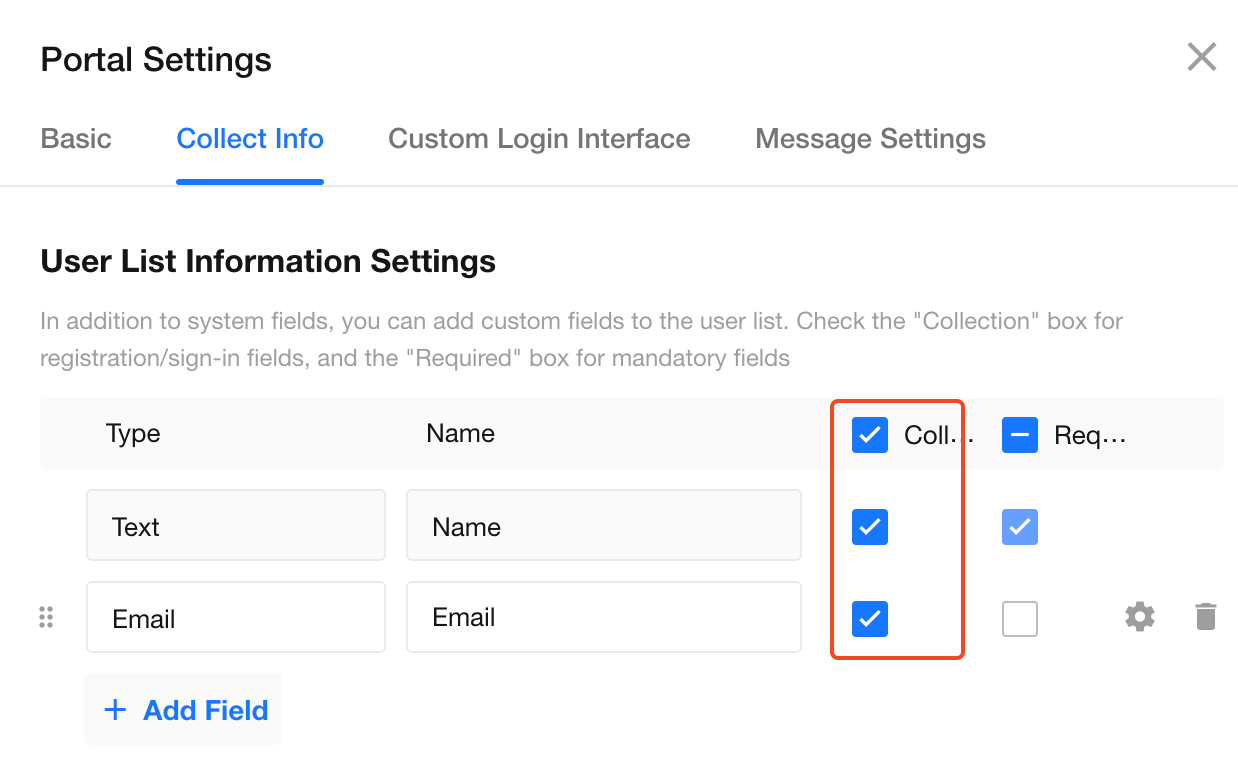
If you need to collect user information such as name, company, or position during registration, users must complete these fields after their first login before their account is fully activated.
Configure information collection fields:
Go to Portal Settings > Collect Info, then select the fields to collect.
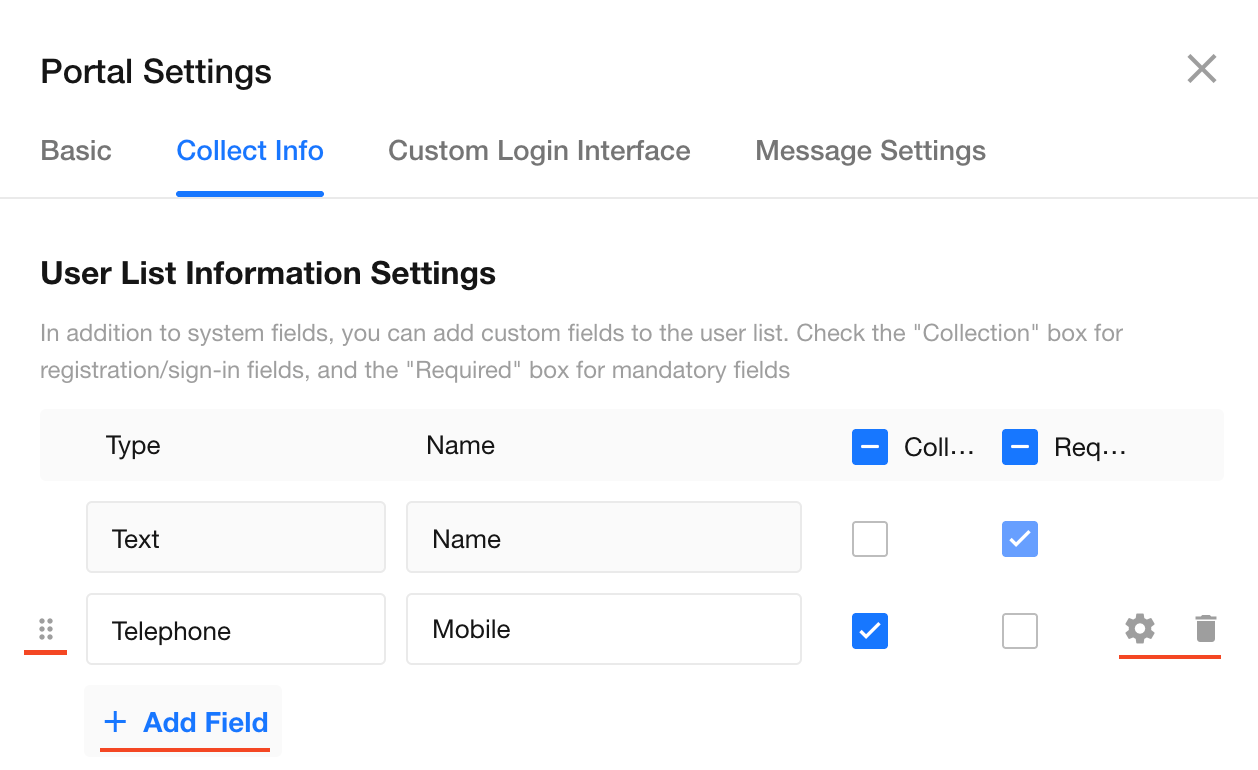
- The Name field (text type) is not collected by default. Set it as required if needed.
- Additional field types can be added, sorted, and removed.
- These fields only apply to the current application. Different applications can configure different information collection fields.
- If users close the page before completing the information, their account remains inactive. If approval is enabled, users must log in again and complete the required fields before entering the approval process.
Fields displayed after the user's first login:
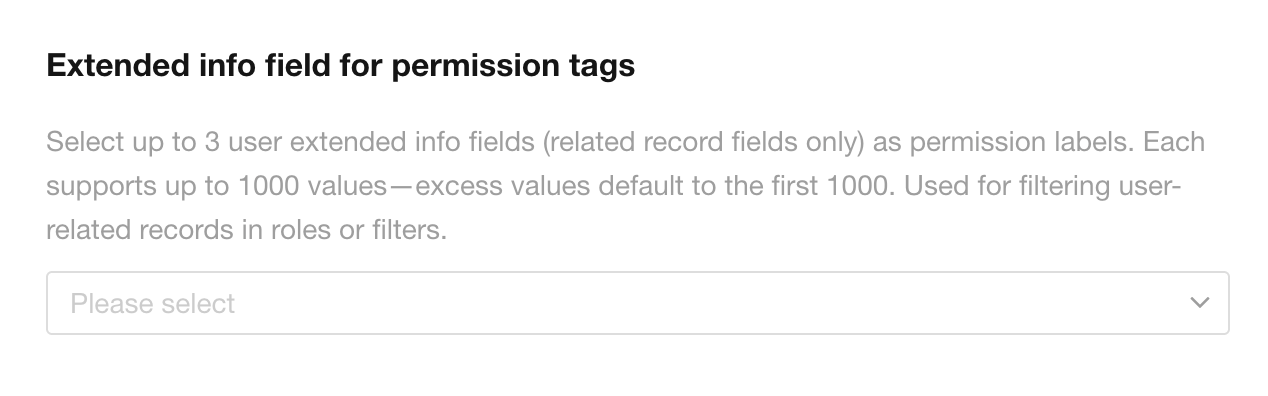
Use Extended Information as Permission Tags
Configure a relationship field in the user list as a permission tag to dynamically extend user permissions.
For details, see Extended Permission Tags.
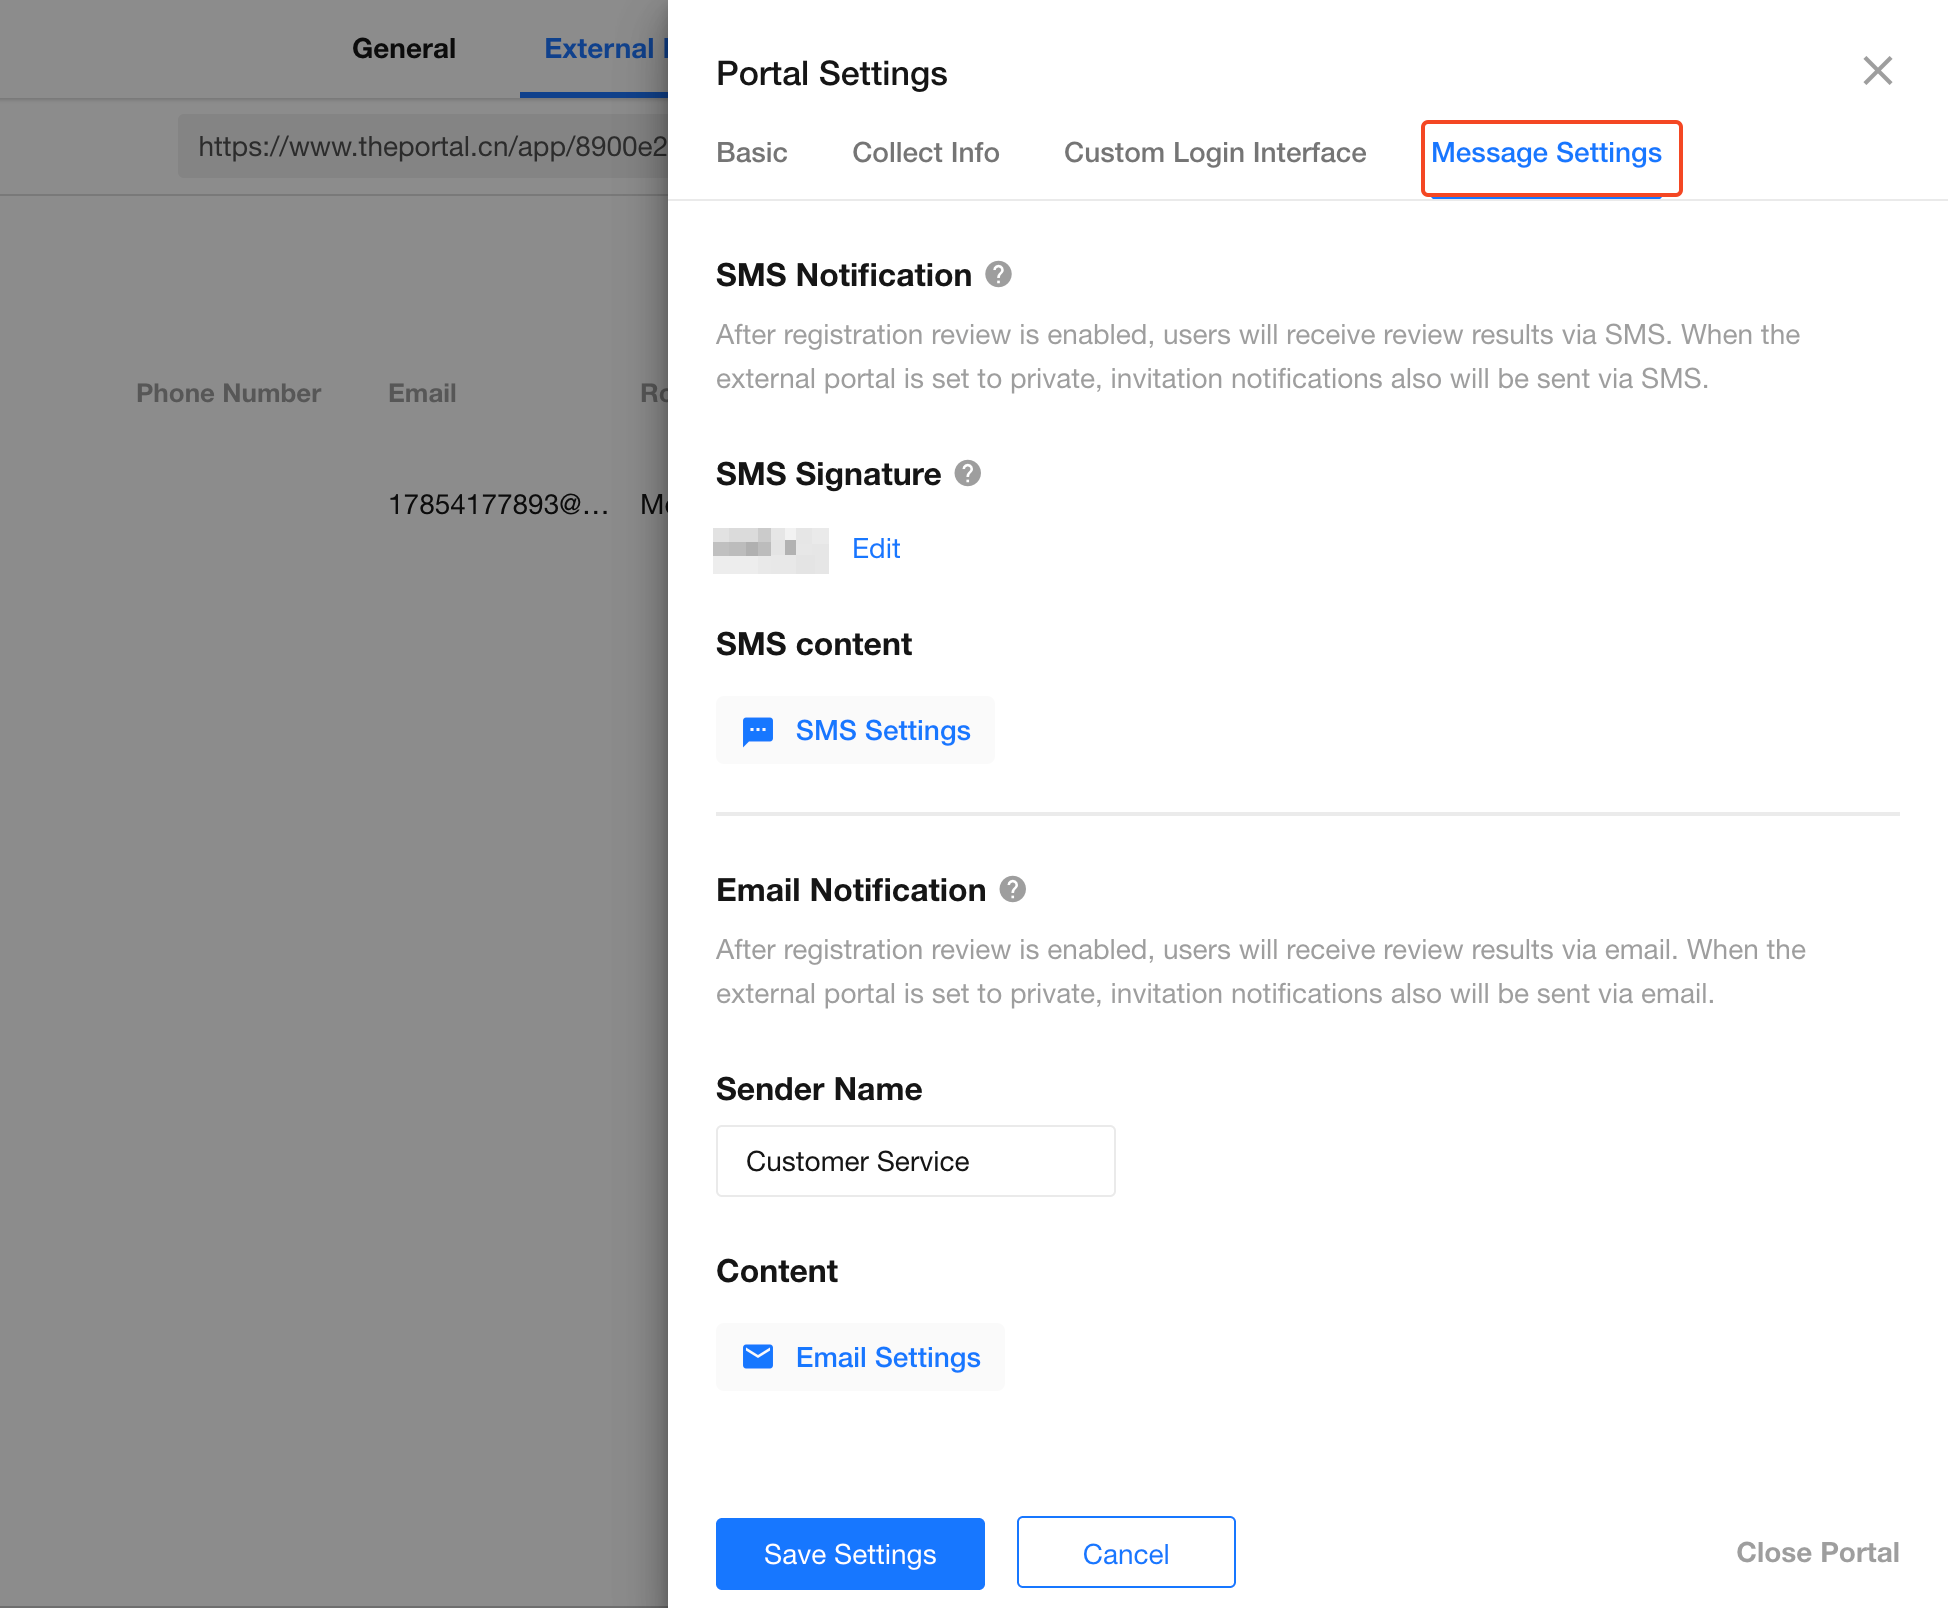
Message and Notification Settings
Notifications for External Portal, such as verification codes, invitations, and approval results, are sent to users through SMS or email.
Go to Portal Settings > Message Settings to configure SMS signatures, notification content, and other settings.
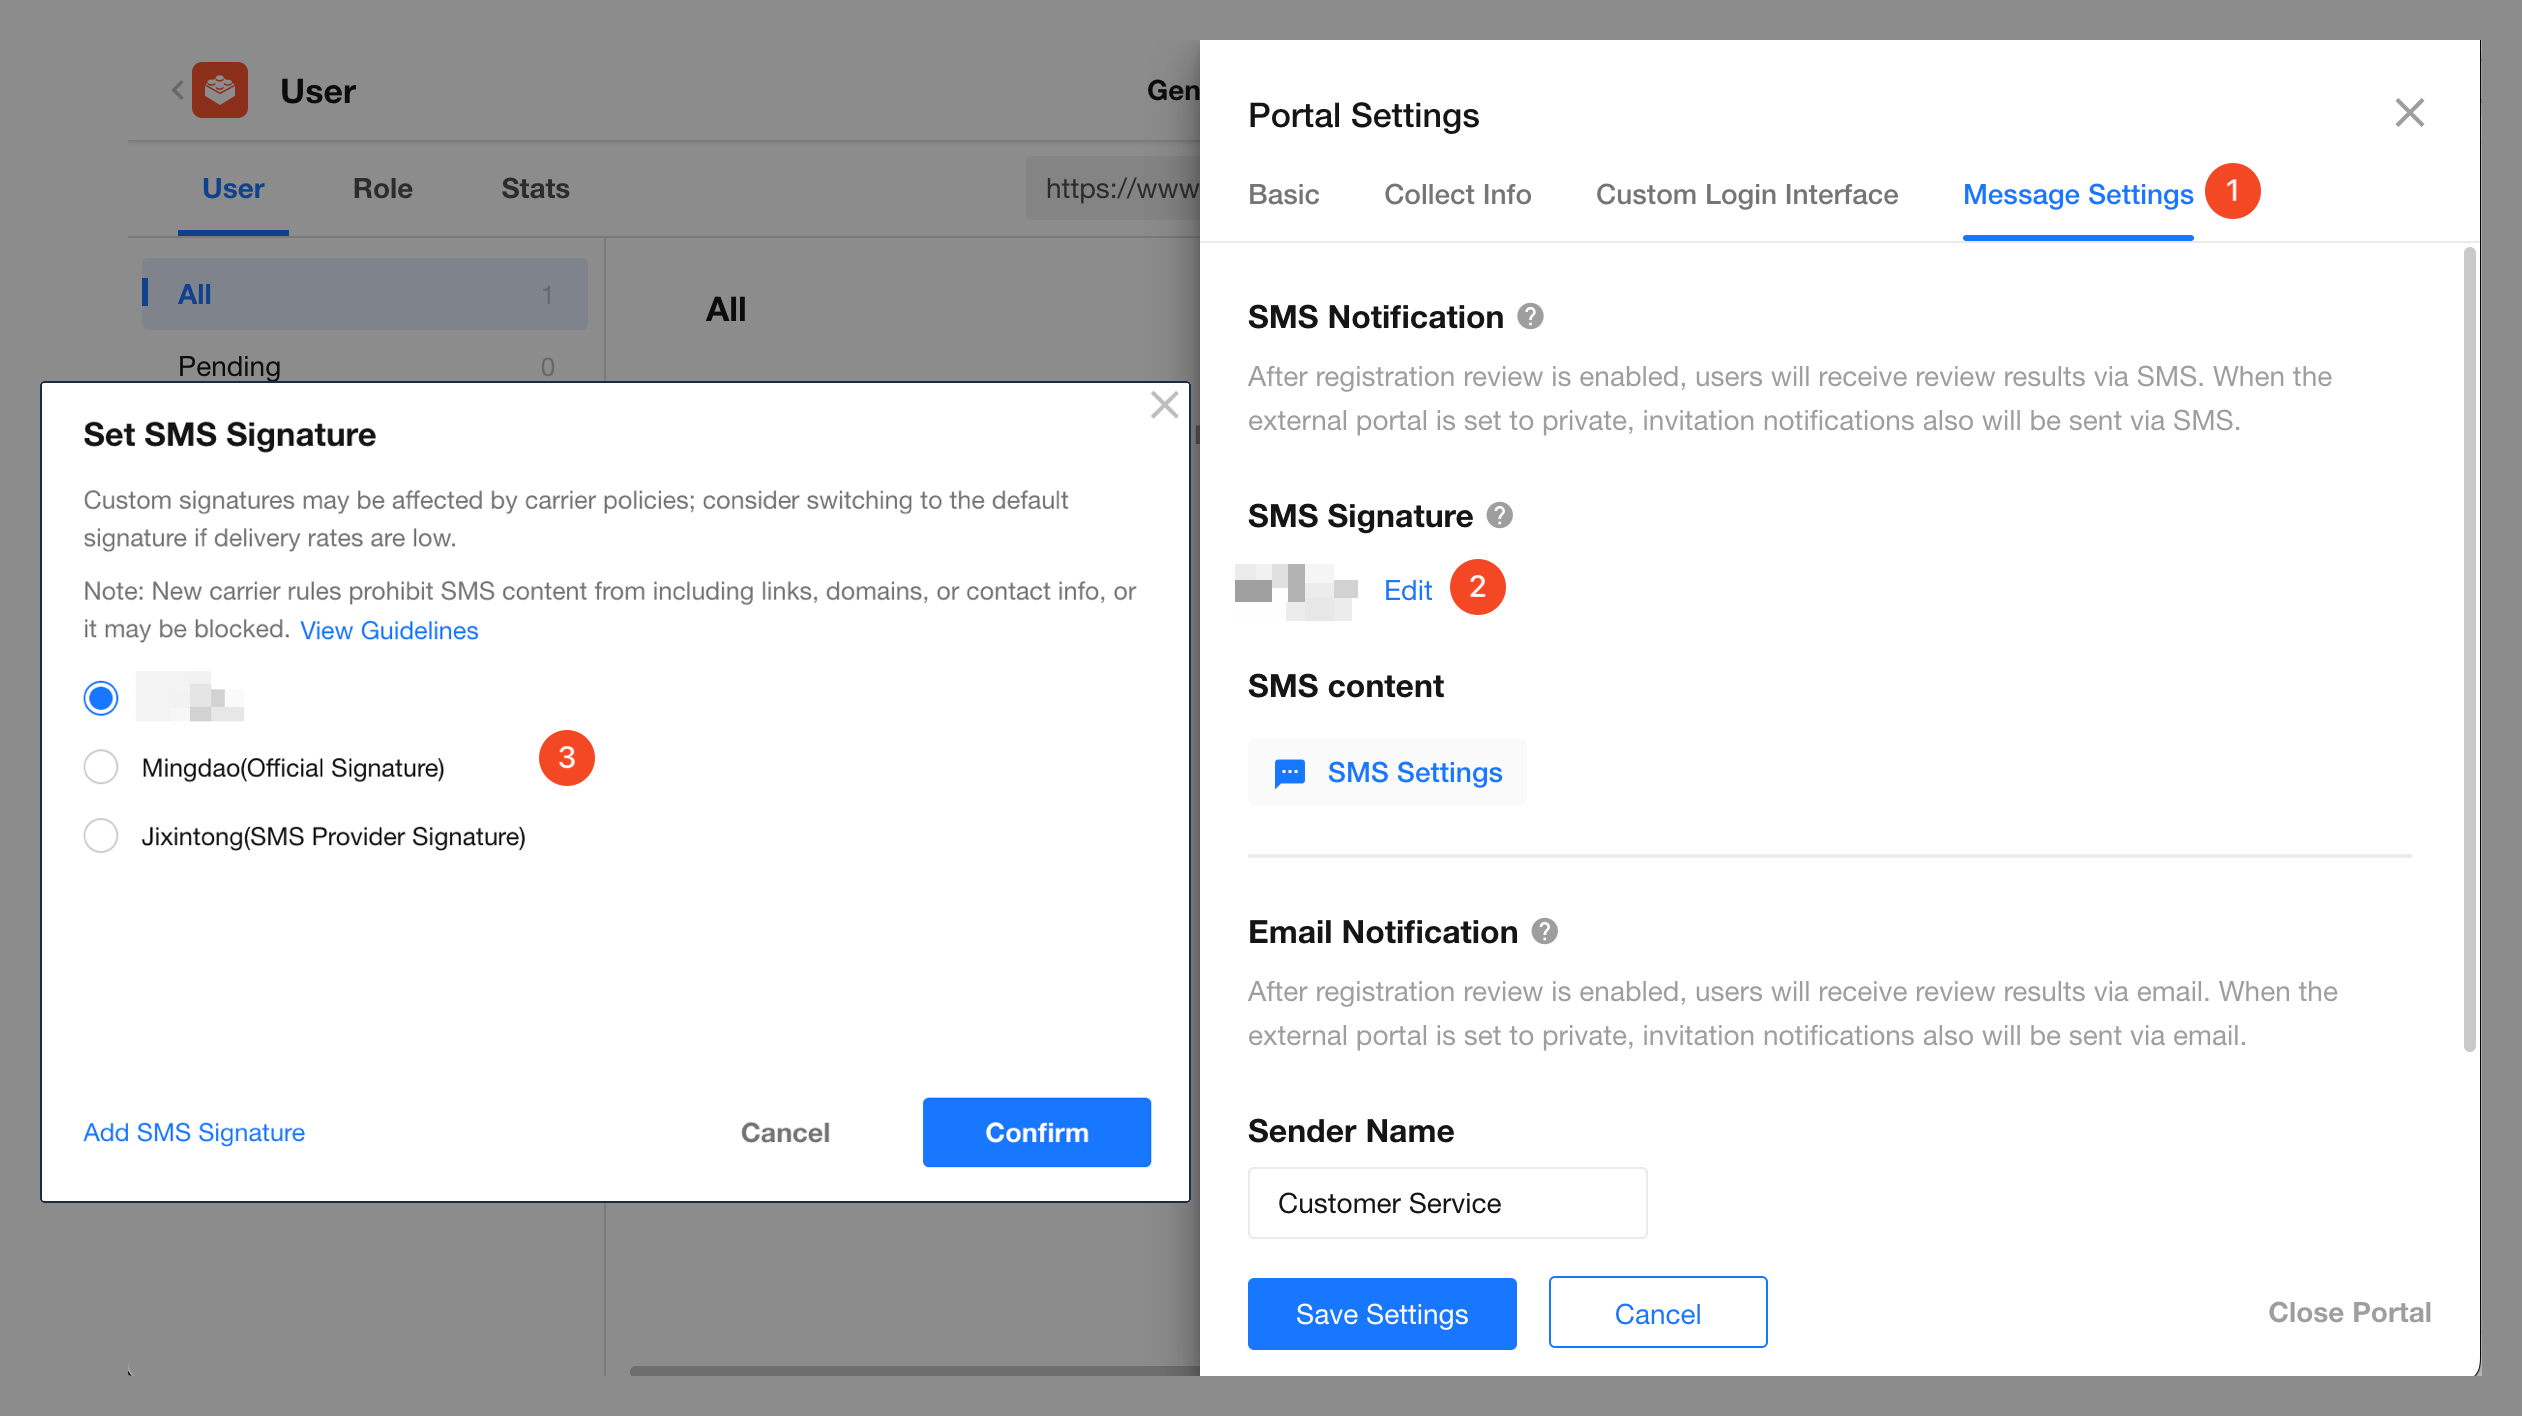
SMS Notifications
-
Signature Settings:
The SMS signature is displayed at the beginning of the message and is automatically added to each SMS. The signature must contain no more than 20 characters.- Custom Signature: Can be selected only after the organization administrator adds the signature in the Organization Admin console and completes real-name verification.
- Platform Signature: Used when no available custom signature exists.
Different signatures apply to different notification scenarios. View the signature usage list.
-
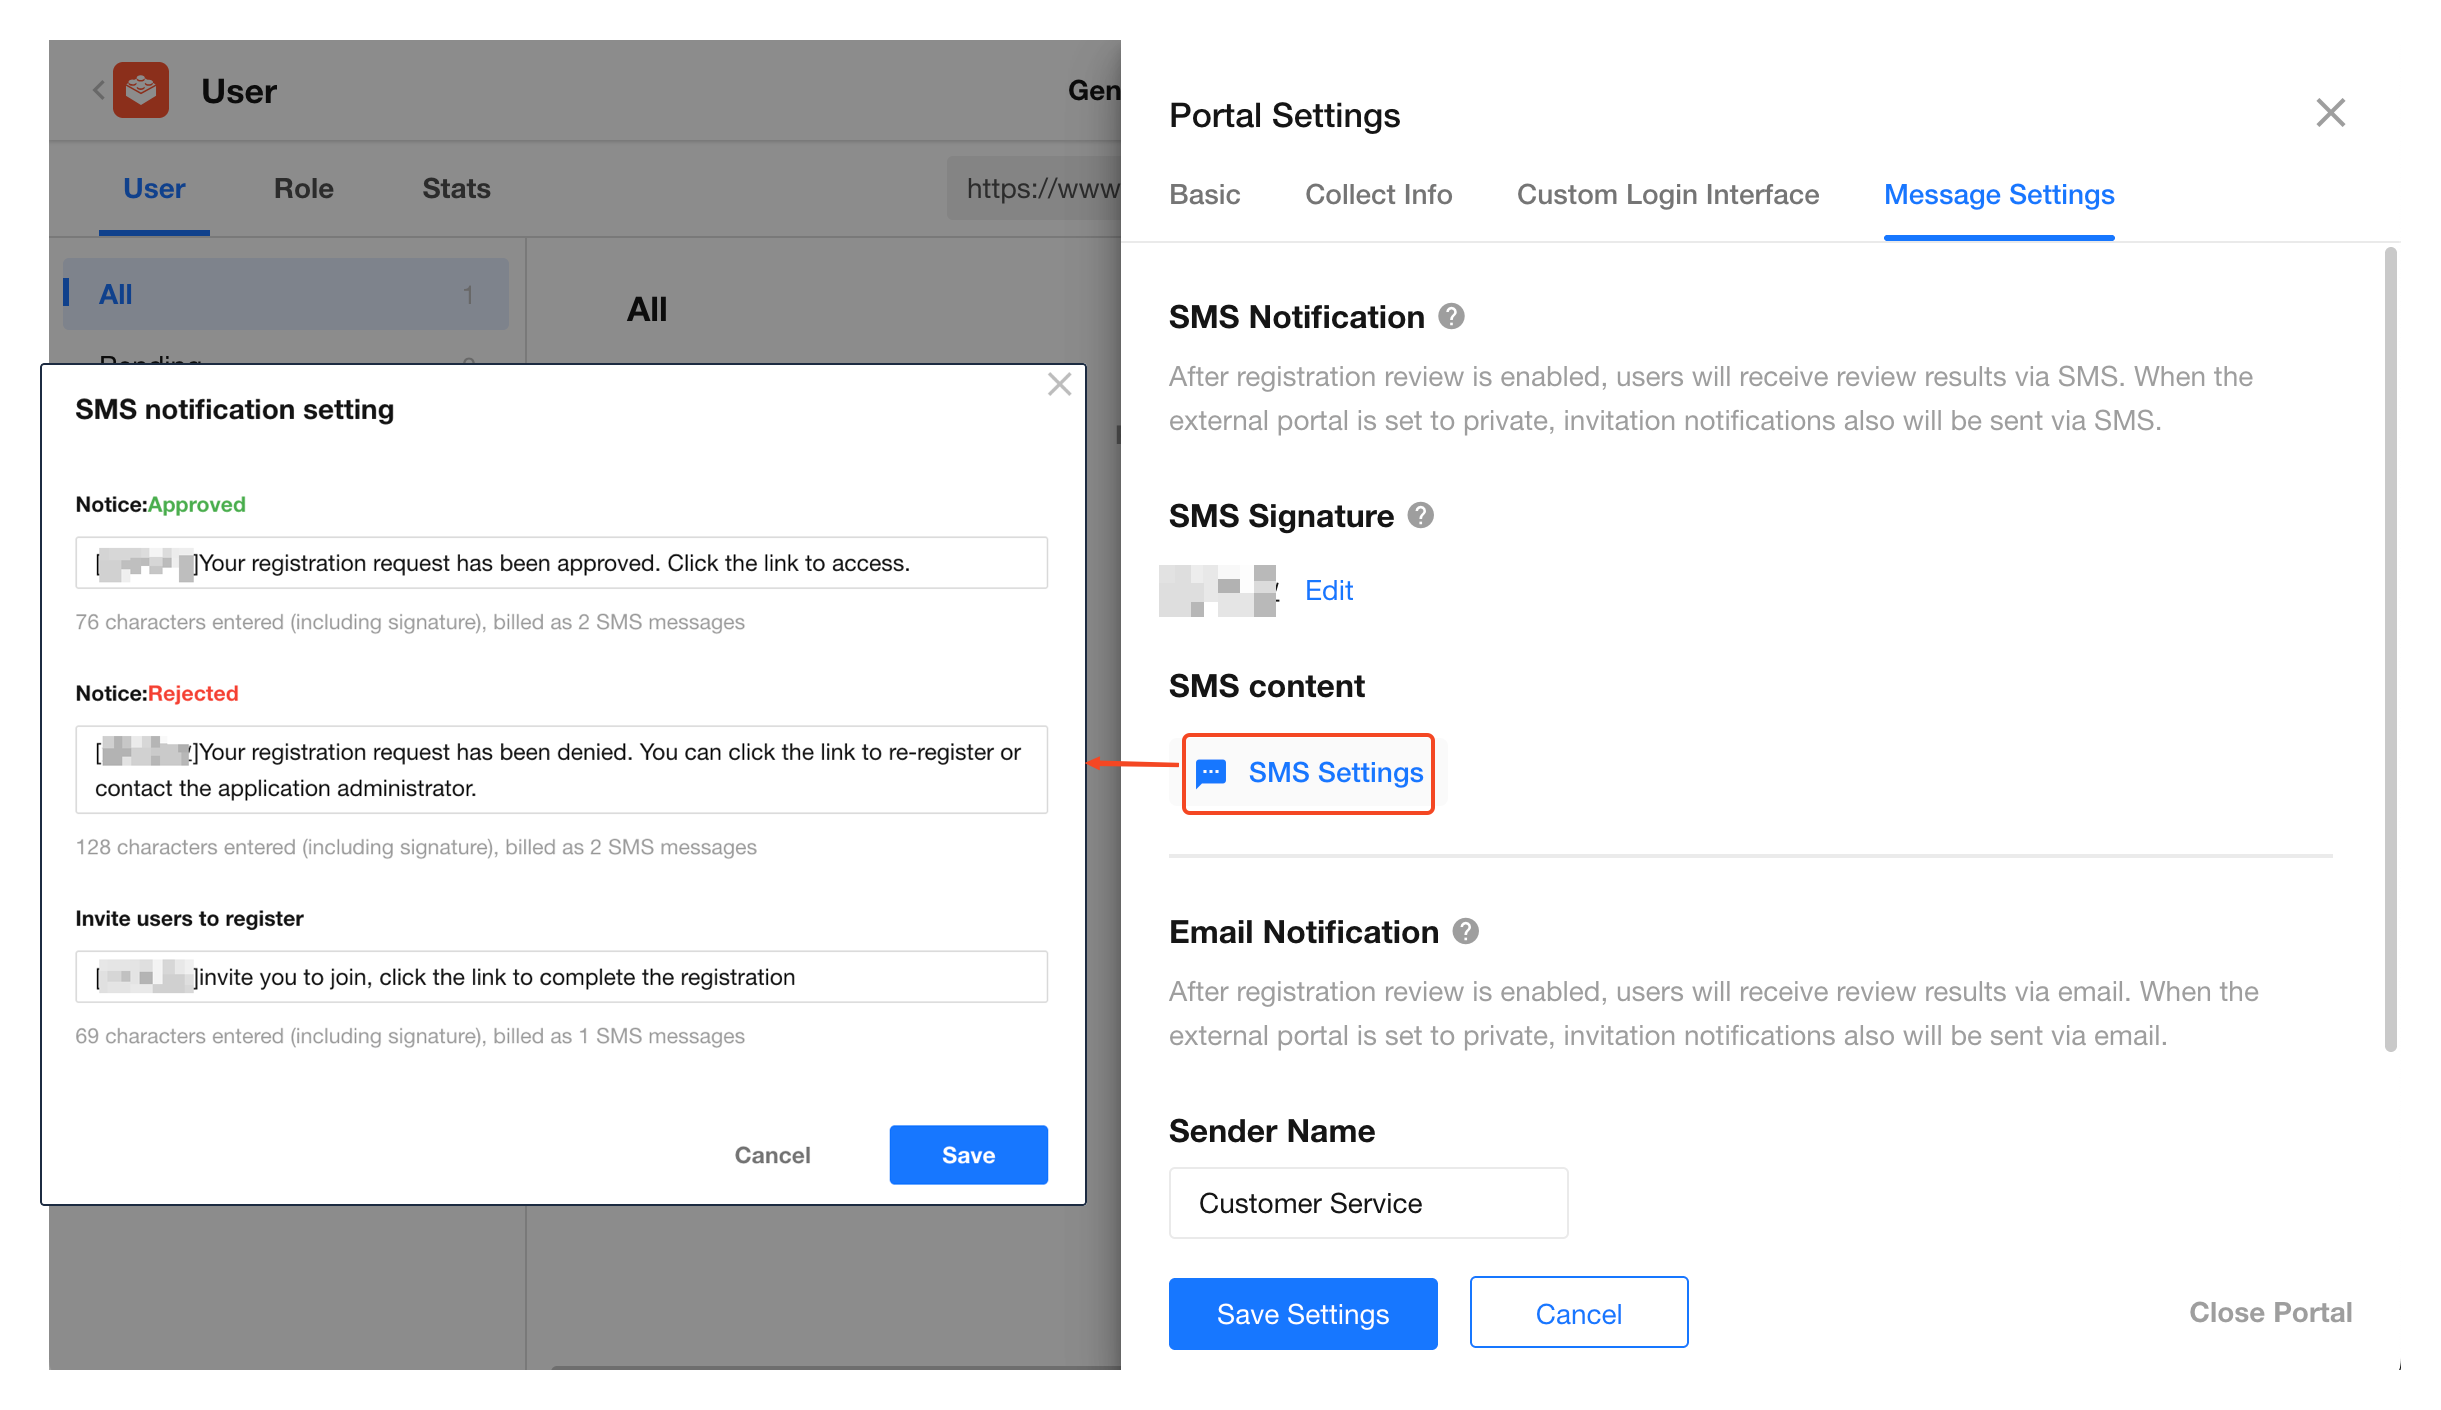
SMS Content Settings
- Login verification code SMS: The content format is fixed as
【Signature】Your login verification code is: XXXX. Do not share or forward it.This content cannot be modified. - Registration invitation SMS: The content can be customized.
- Approval result notification SMS: The content can be customized.
- Note: Due to carrier policies, if the SMS content contains a portal link (when Include Link is enabled), the signature is automatically switched to the platform signature.
- Login verification code SMS: The content format is fixed as
If a portal link needs to be included in SMS notifications, you can customize the URL suffix, then copy the customized URL into the notification content to reduce the number of billable characters.
Email Notifications
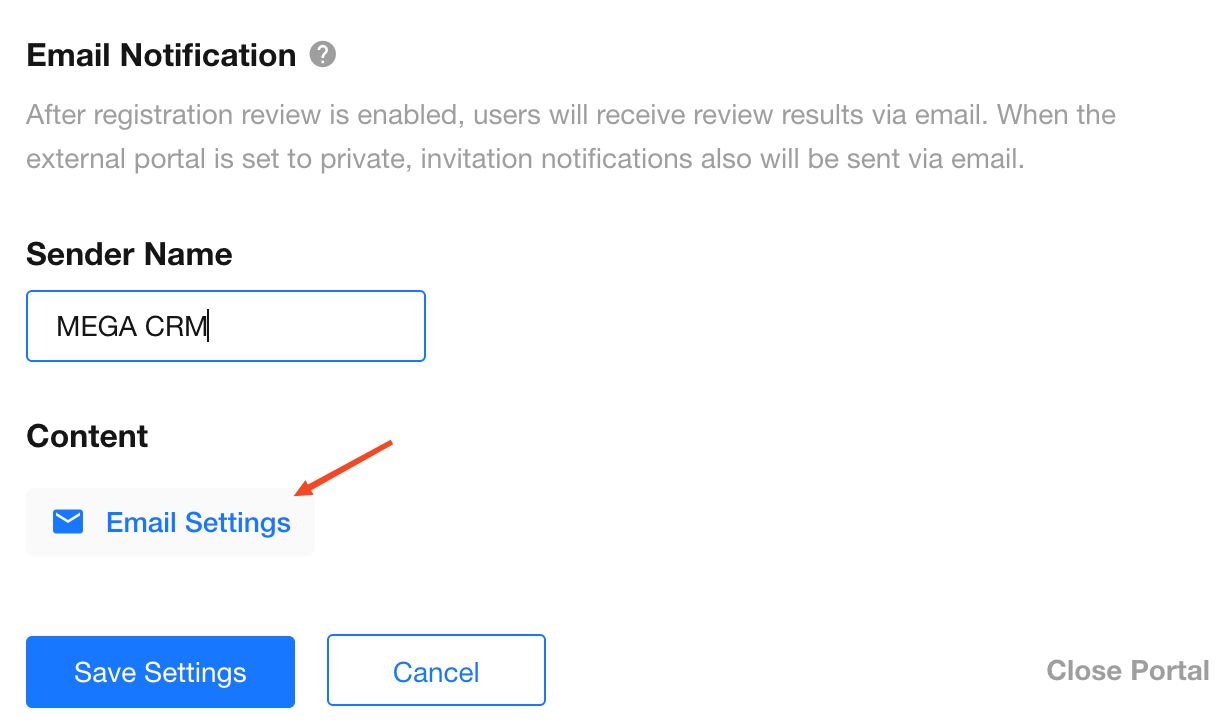
- Supported scenarios: Login verification codes, password setup verification codes, registration invitations, and approval result notifications.
- Sender address: Fixed as
sender@register.mingdao.com. - Content editing: Click Email Settings to customize the email subject and body template.
Display Approval Flowchart Details
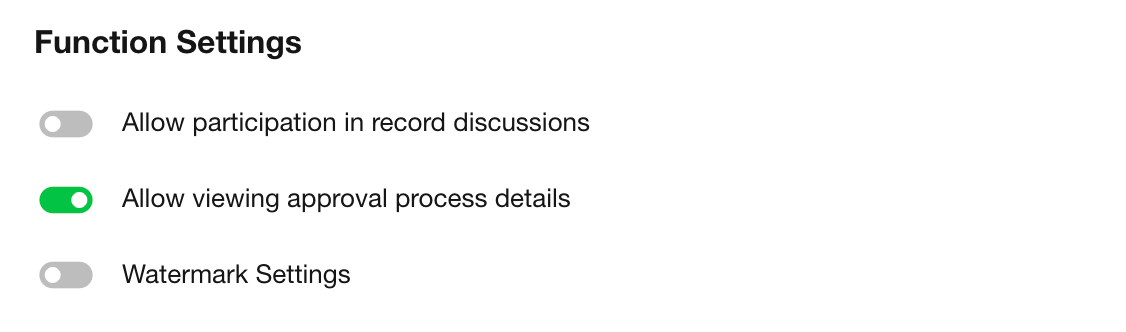
After enabling Allow Viewing Approval Flowchart Details, external users can view approval progress in records.
This feature only supports approval processes initiated through the Initiate Approval Flow node.
Screen Watermark
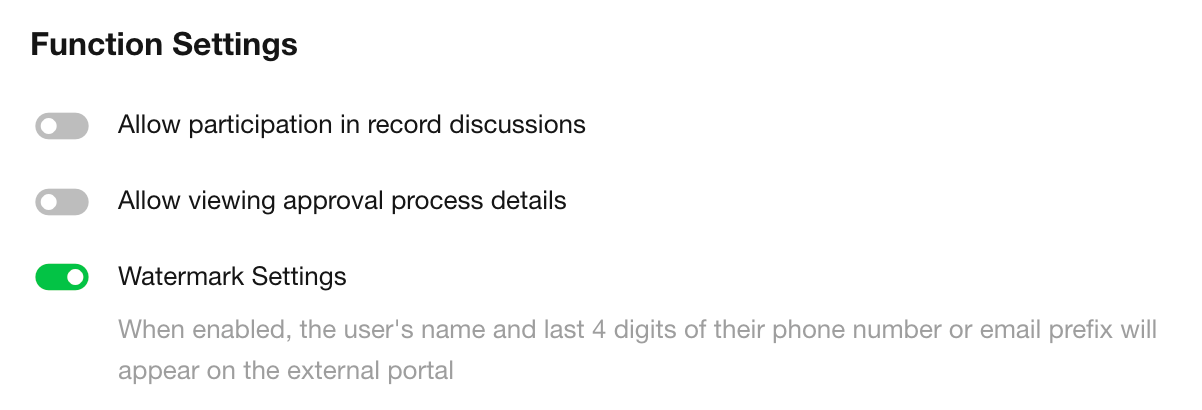
After enabling this option, configured watermark information is displayed on the External Portal interface.
Supported watermark content includes names, mobile numbers, email addresses, and custom text.
Allow External Users to Modify Account Information
After disabling Allow External Users to Modify Account Information, external users cannot modify their bound mobile numbers or email addresses.
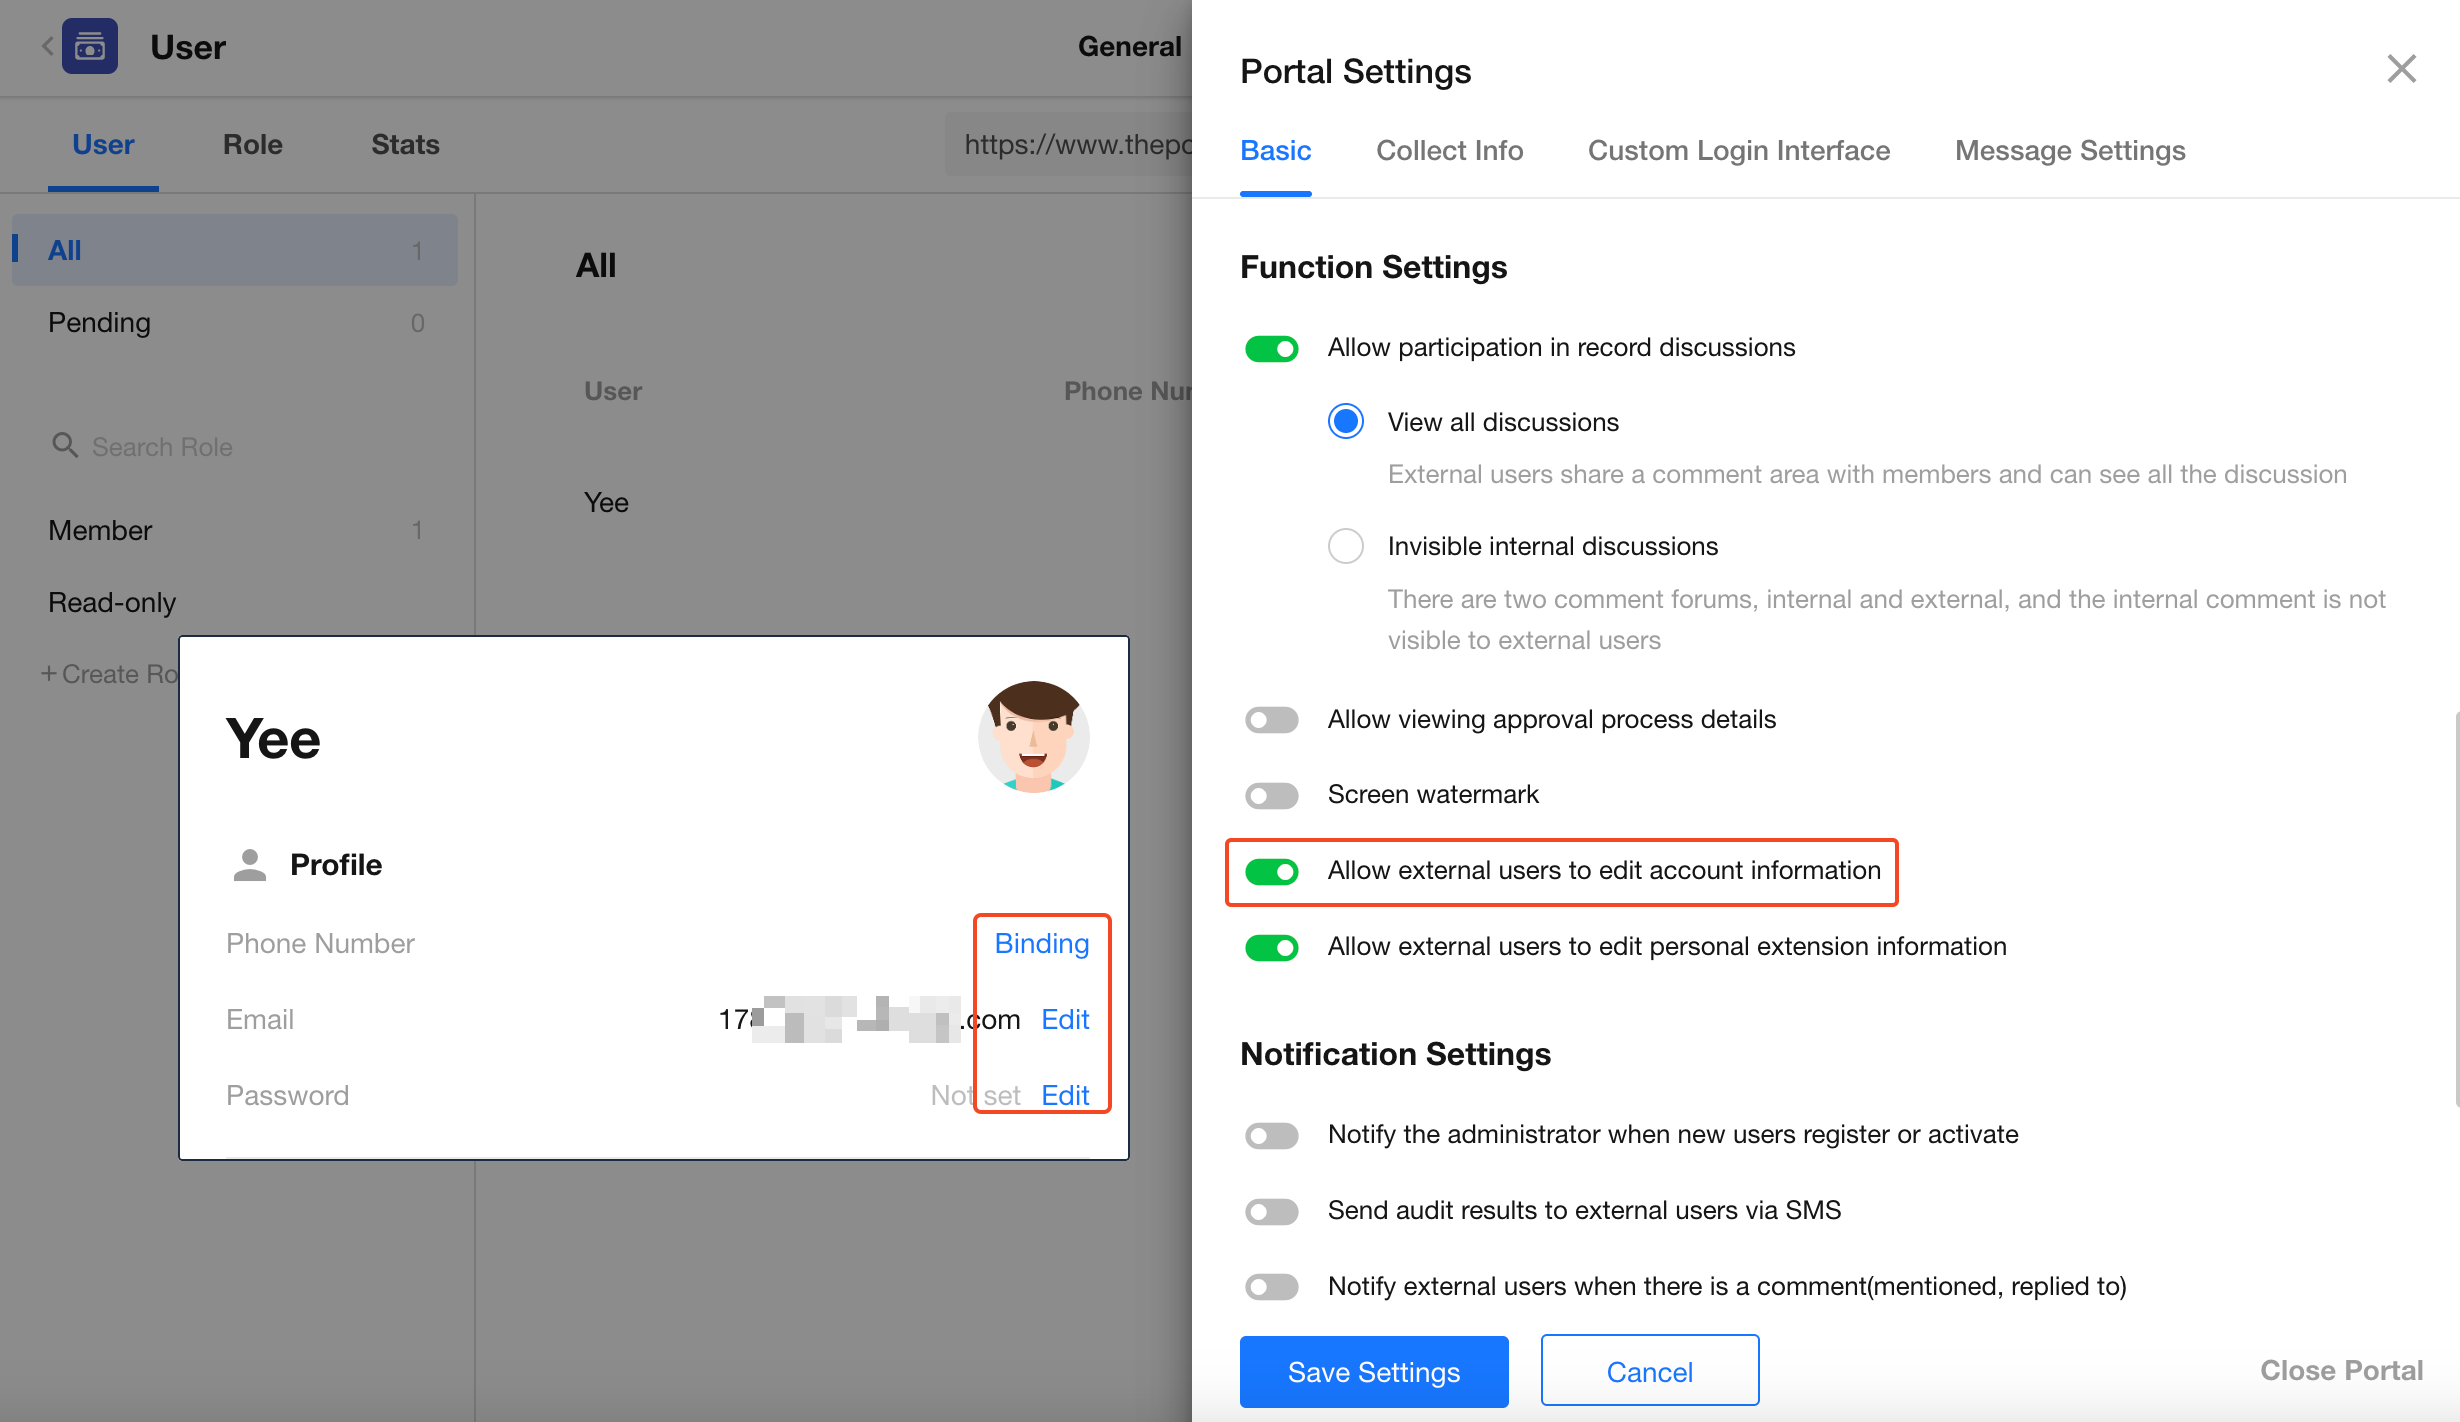
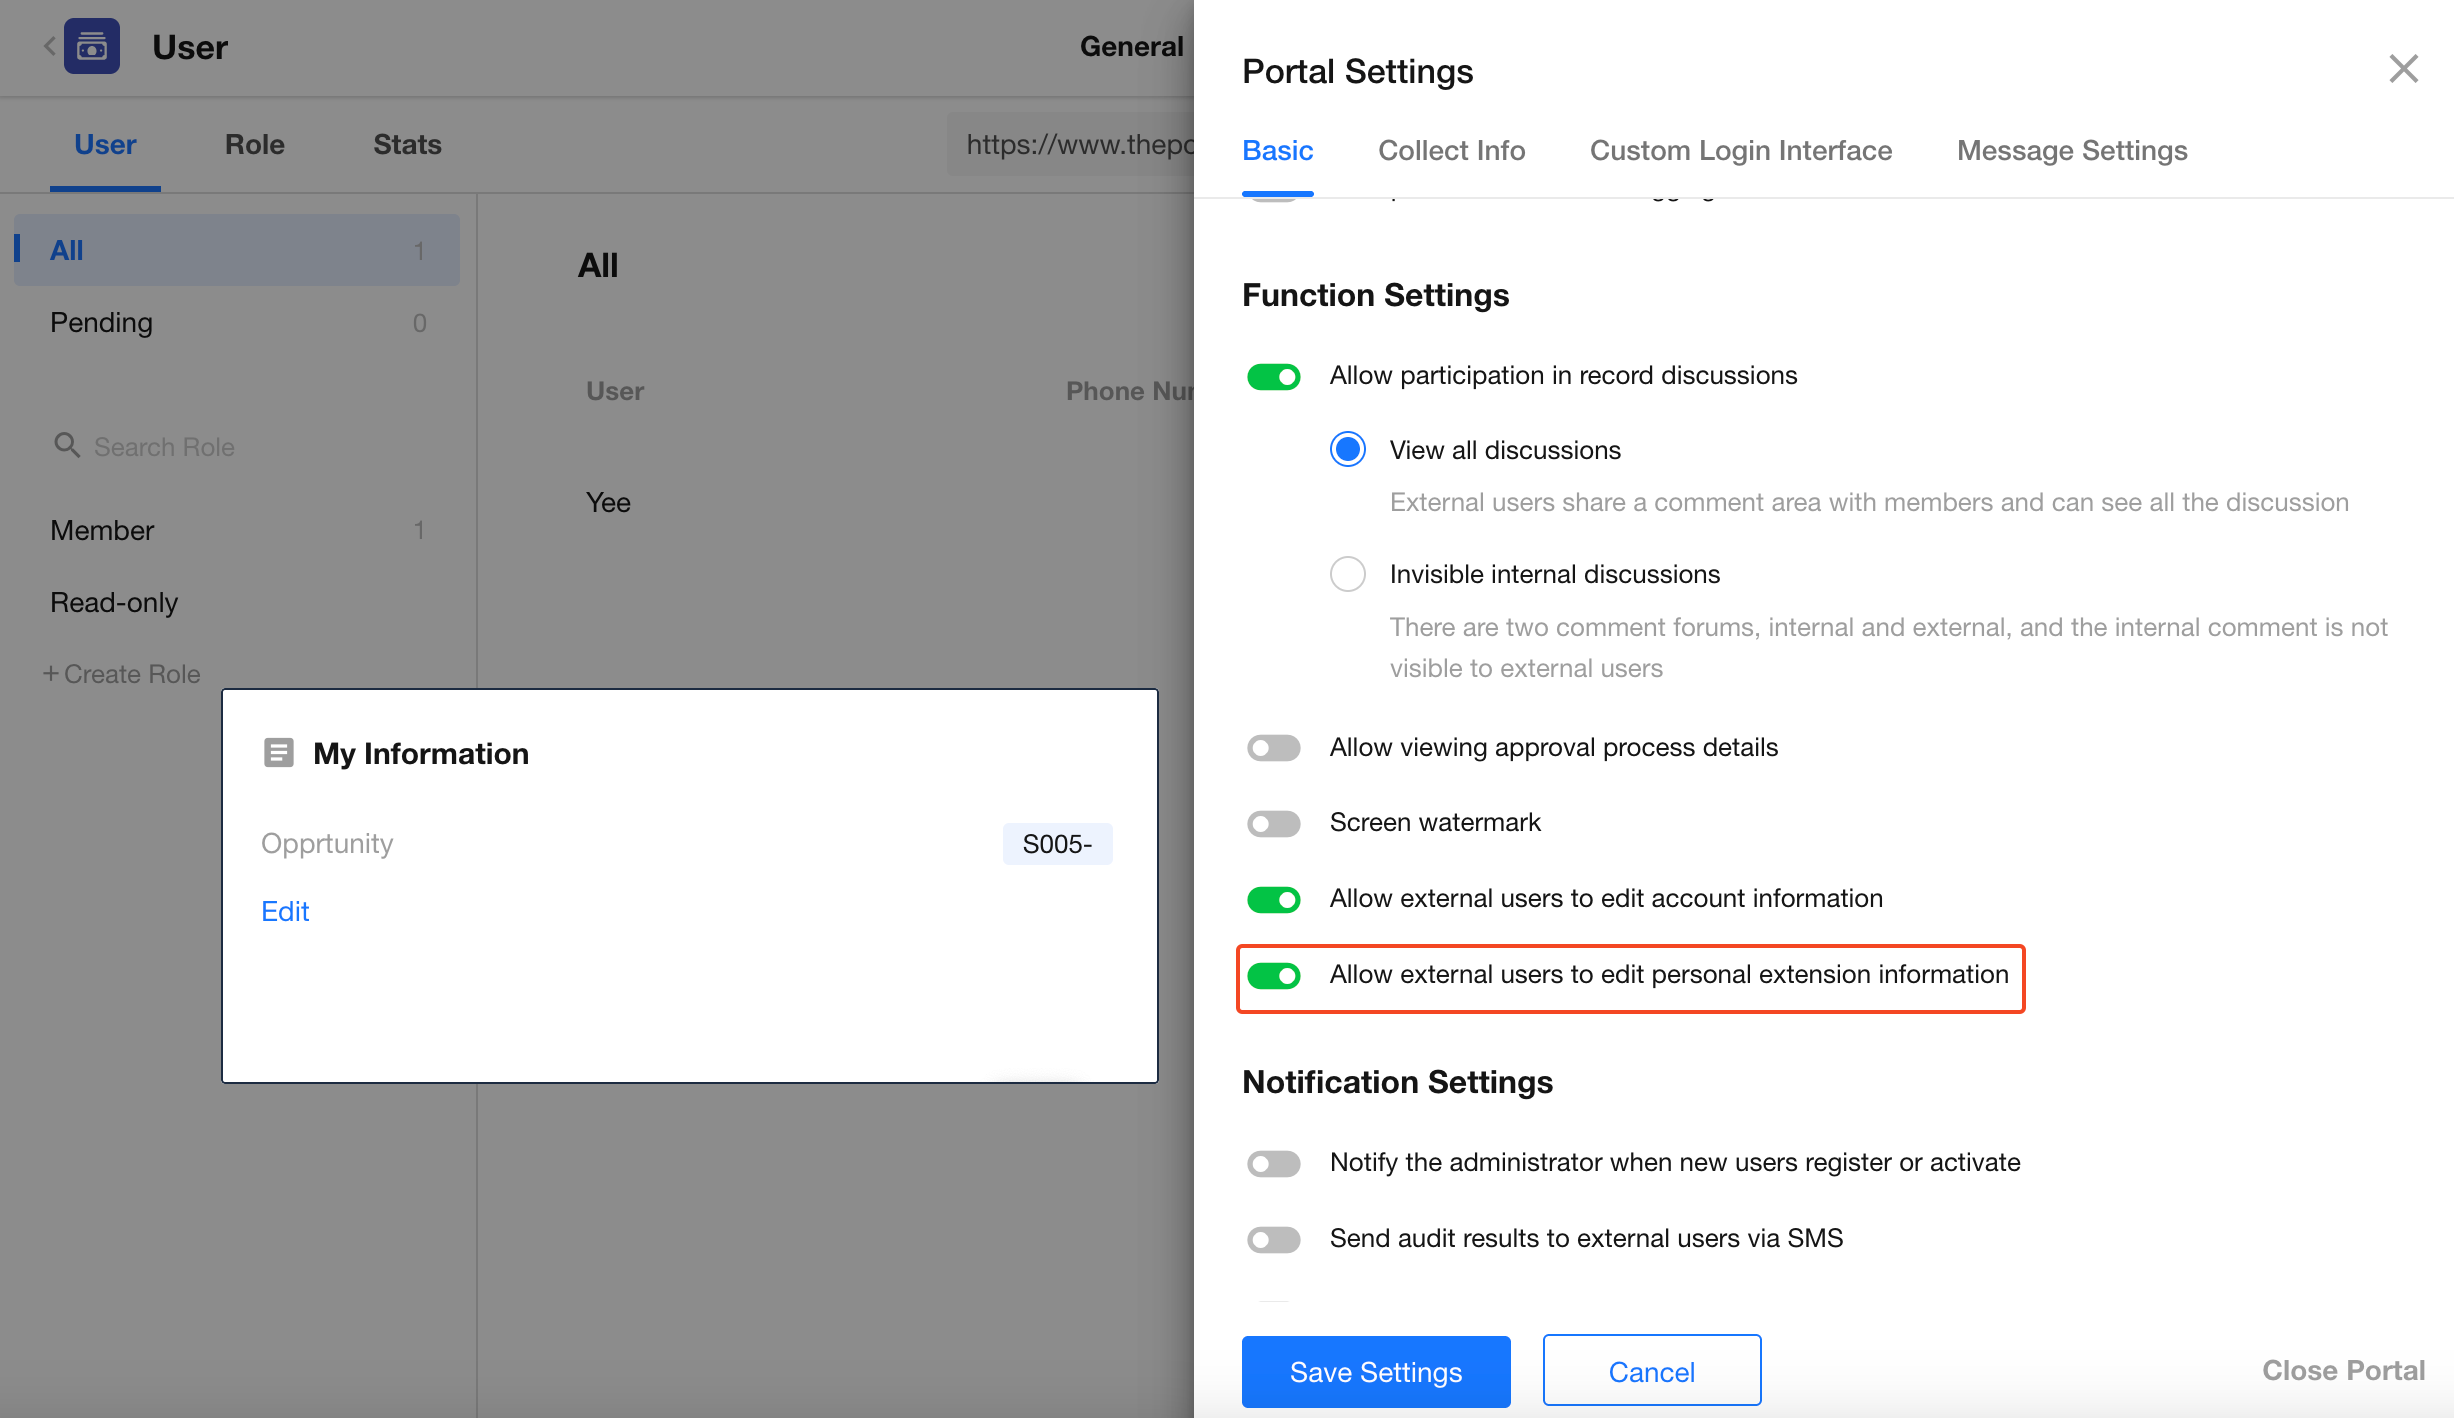
Allow External Users to Modify Extended Information
After disabling Allow External Users to Modify Personal Extended Information, external users cannot modify their personal extended information.
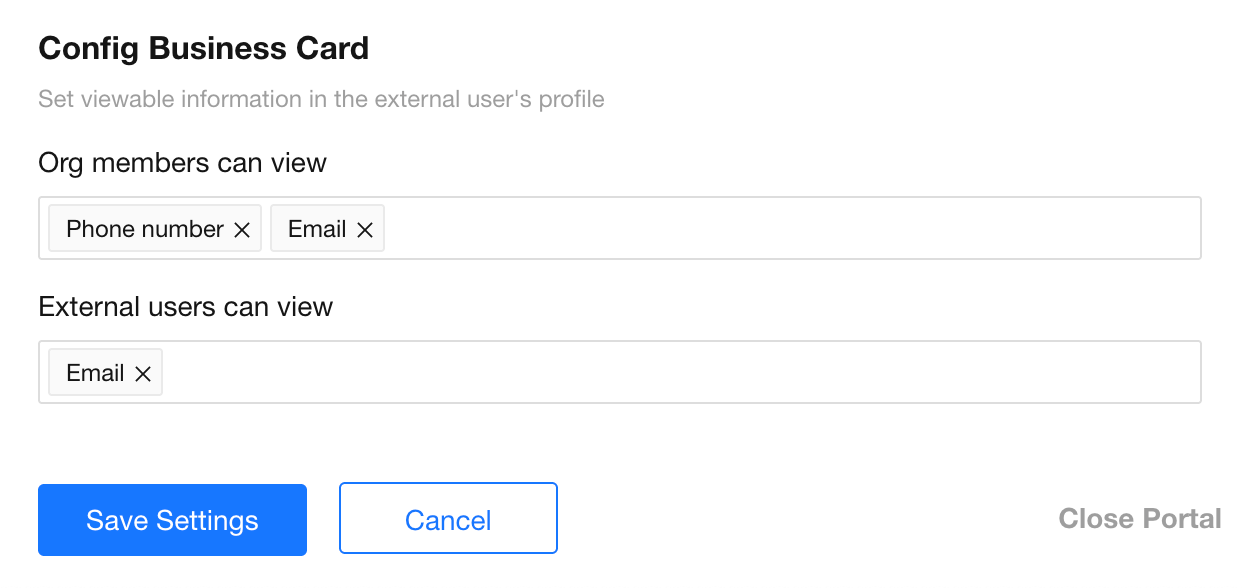
Configure Business Card Display Information
When internal users view external user information, displaying user roles helps them quickly identify users.
To prevent information leakage, external users are usually restricted from viewing sensitive information such as mobile numbers and email addresses of other external users.
Go to Portal Settings > Congigure Business Card to configure visible information separately for internal users and external users.
Manage External Users
Configure Roles and Permissions for External Users
External user roles and permissions are managed separately from the roles of internal members.
Features of external roles:
- Each external user can only belong to one role.
- External roles do not support directly adding users. Users must be managed by assigning roles.
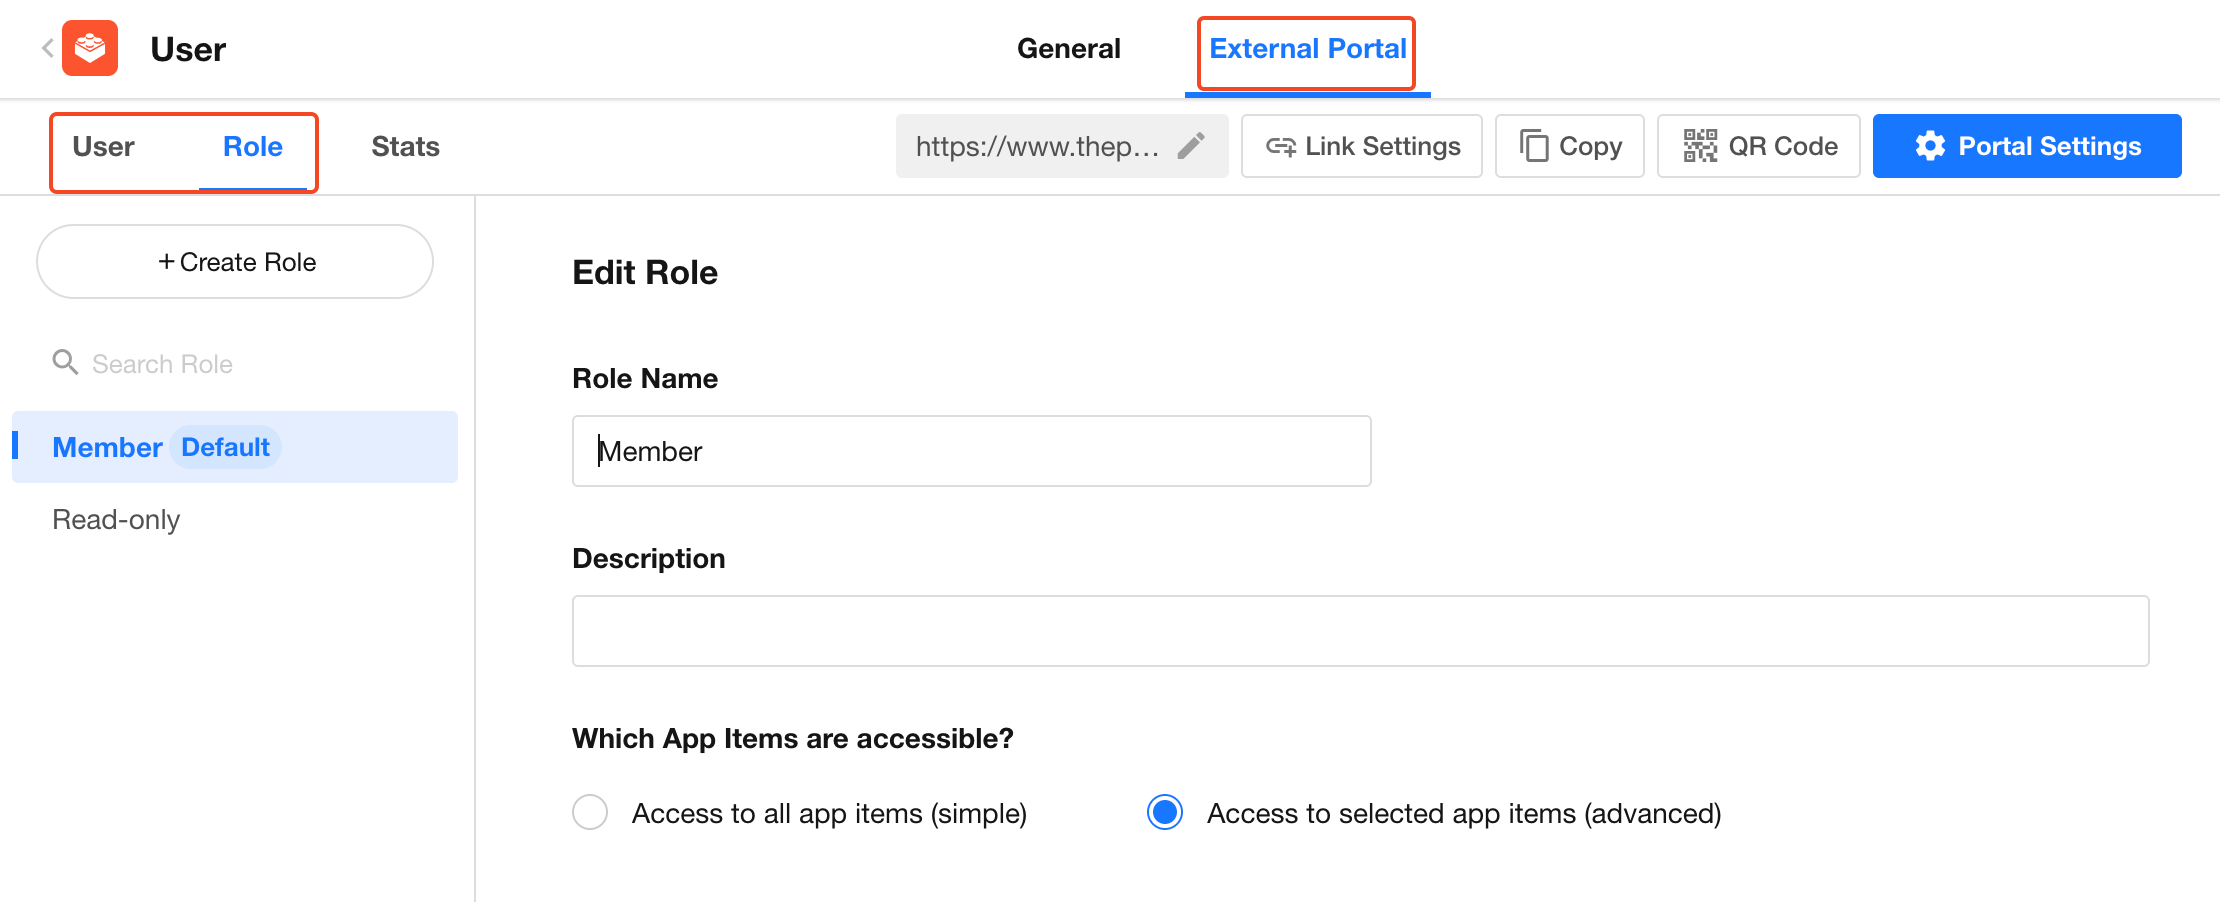
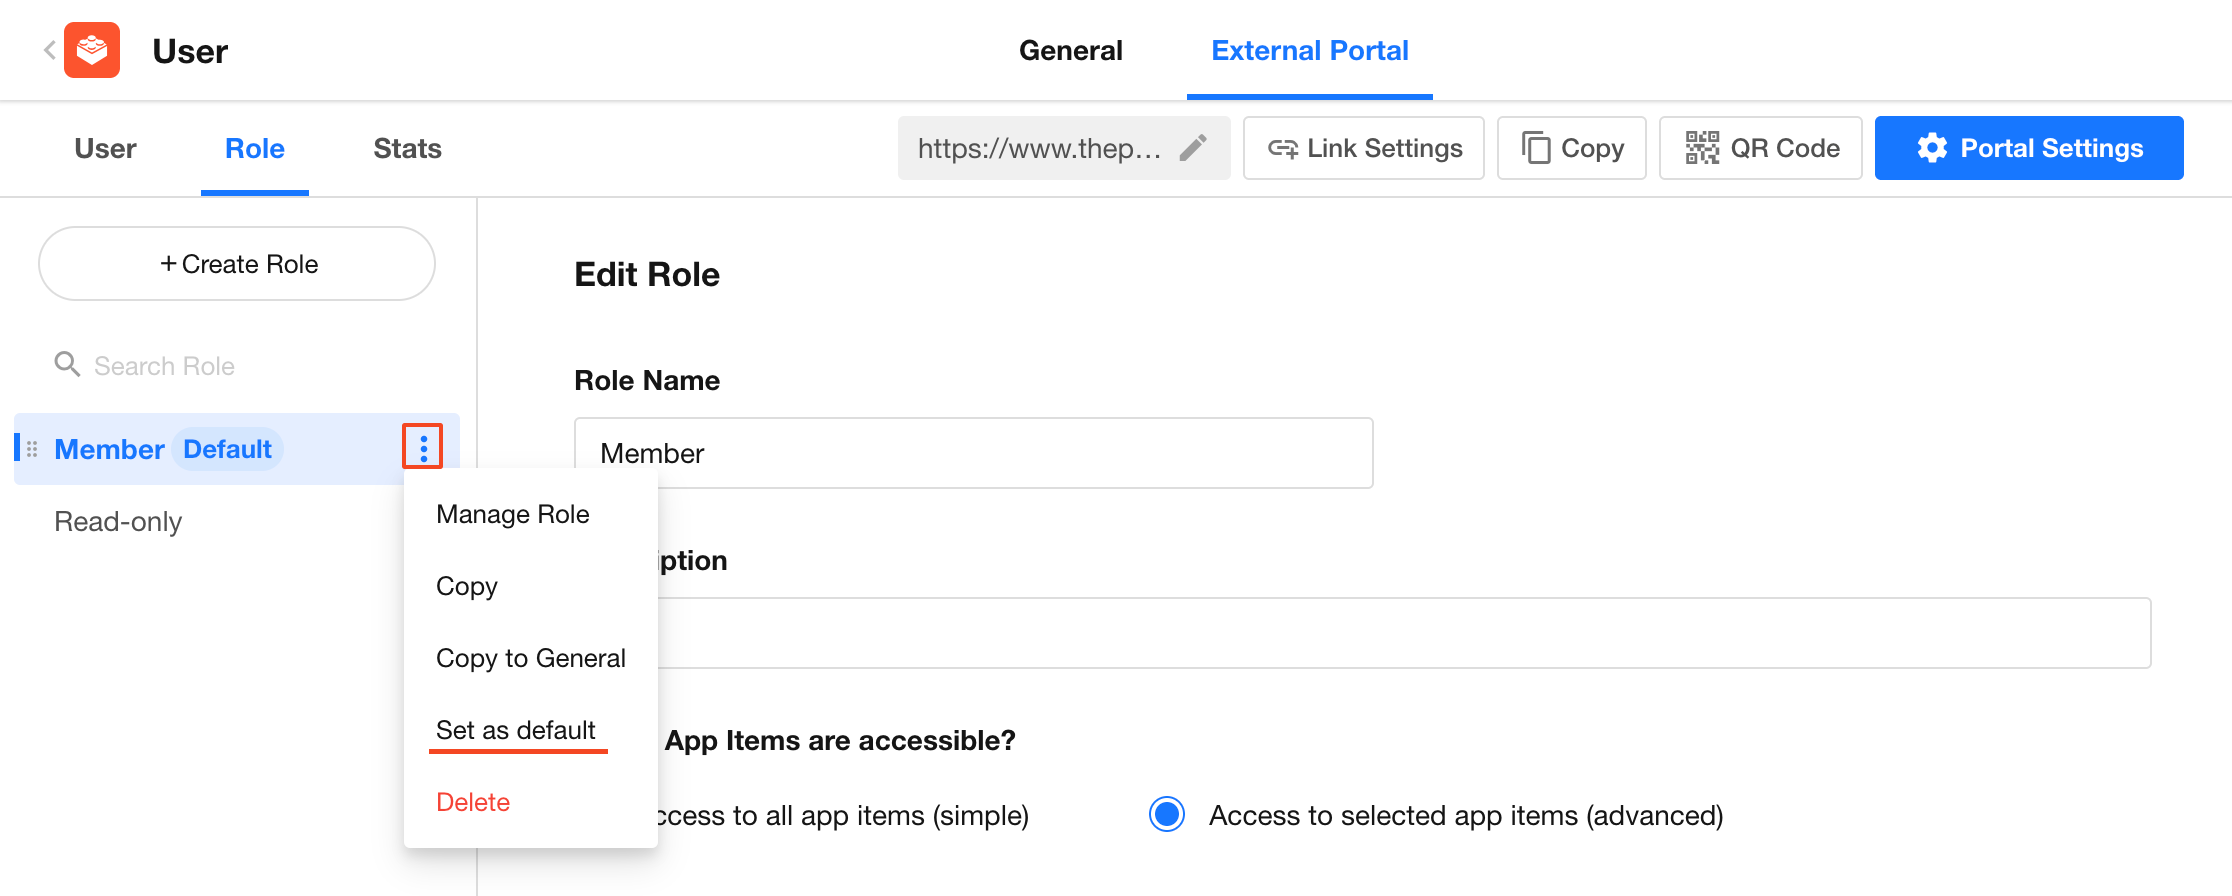
External role operations:
-
Set Default Role: After a role is set as the default role, newly registered external users are automatically assigned to this role. The role can be changed later from the user list.
-
Copy with regular roles: External roles and regular roles use the same permission configuration structure, so role configurations can be copied between them.
Invite External Users
If public registration is disabled, you can invite specific users or import external users in batches.

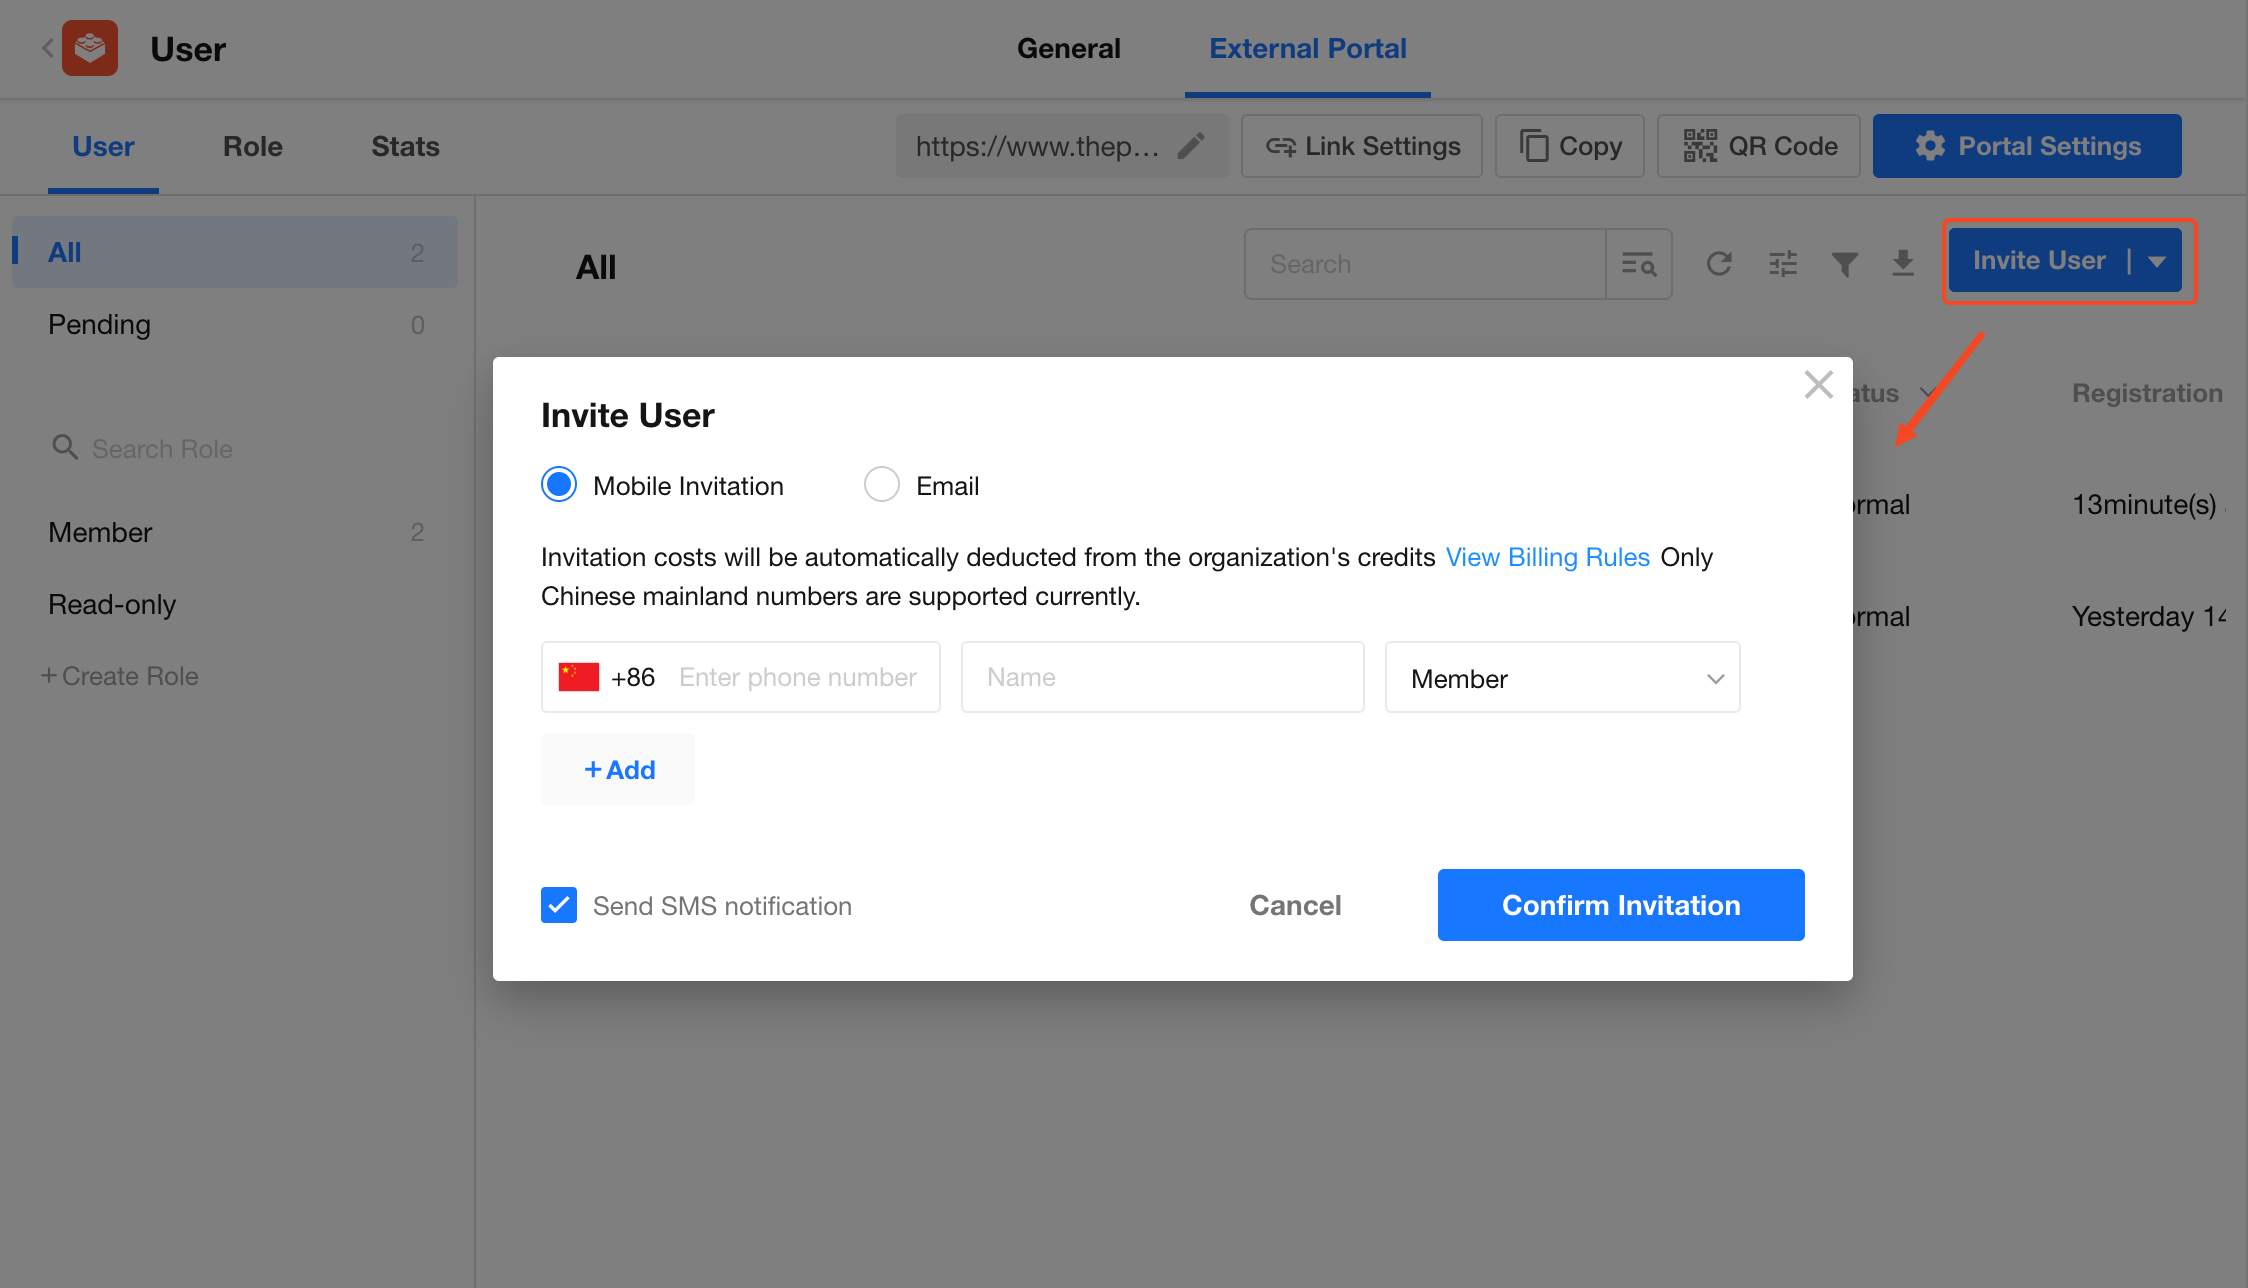
Invitation methods
-
Individual or small-scale invitations: Click Invite User to send invitations directly. If Send Notification is not selected, no SMS or email notification will be sent.
-
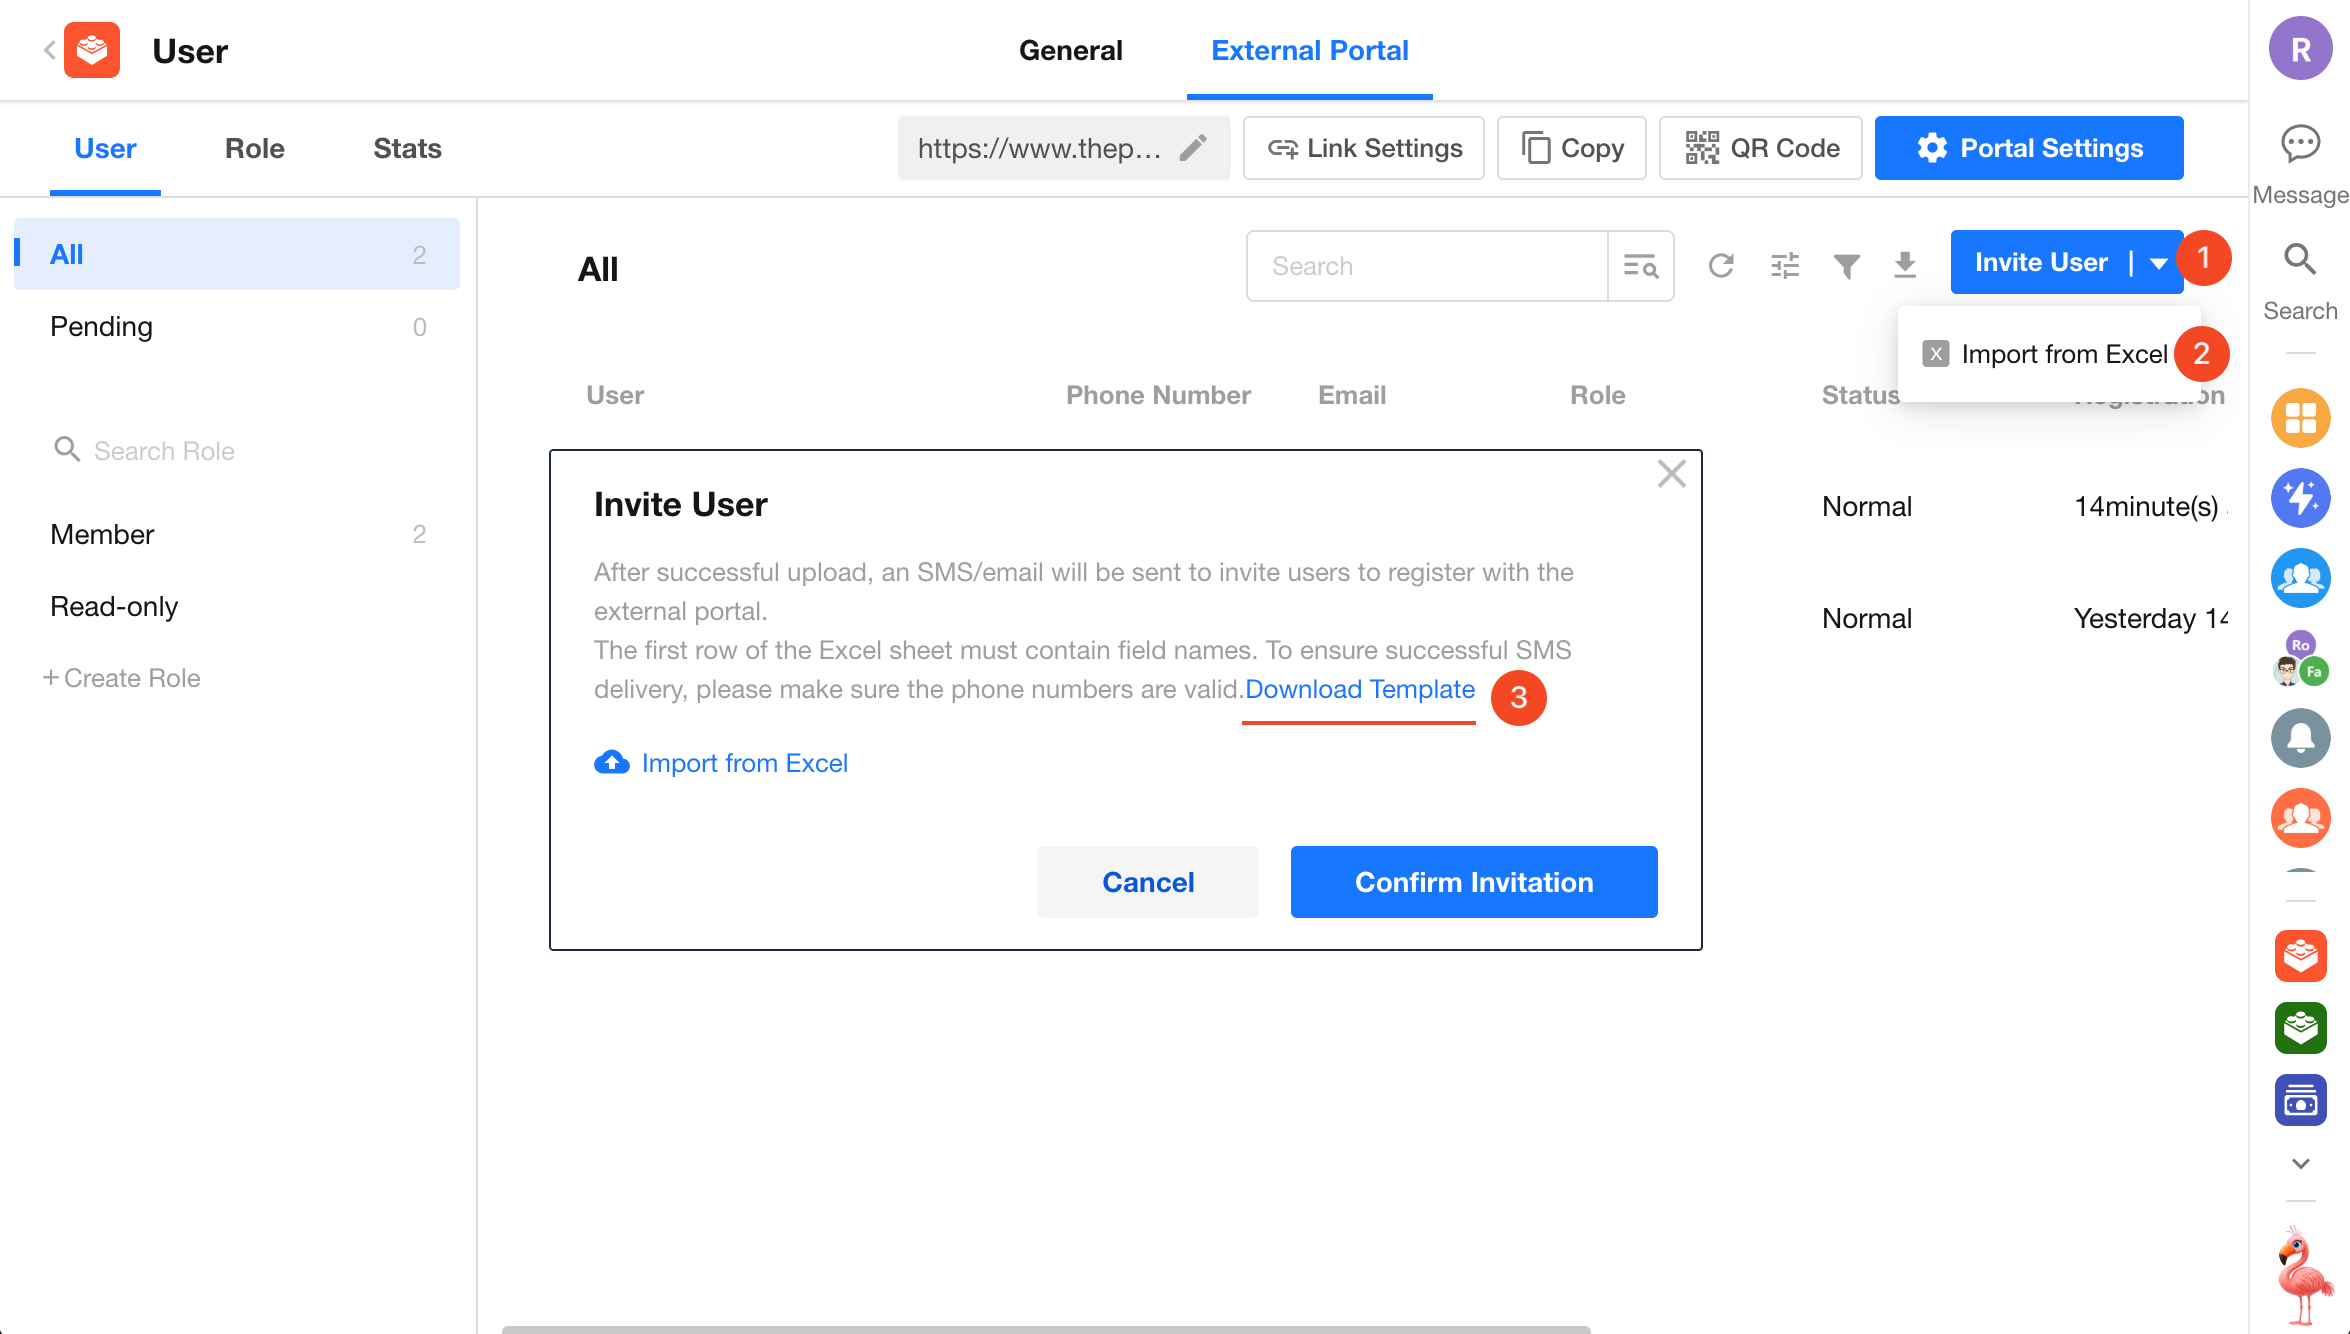
Large-scale or batch invitations: Download the template, enter user information, then upload and import the file.
Quota and Billing
Both Free and paid editions include 100 external user quotas. If the quota is exceeded, an external user expansion package is required. Disabled and deactivated external users do not consume quotas.
SMS charges for messages sent to mainland China mobile numbers are deducted directly from the organization's credits balance. To send SMS messages to Hong Kong, Macao, Taiwan, or other international regions, the organization must first integrate the international SMS service Twilio.
External User Information Management
View External User Information
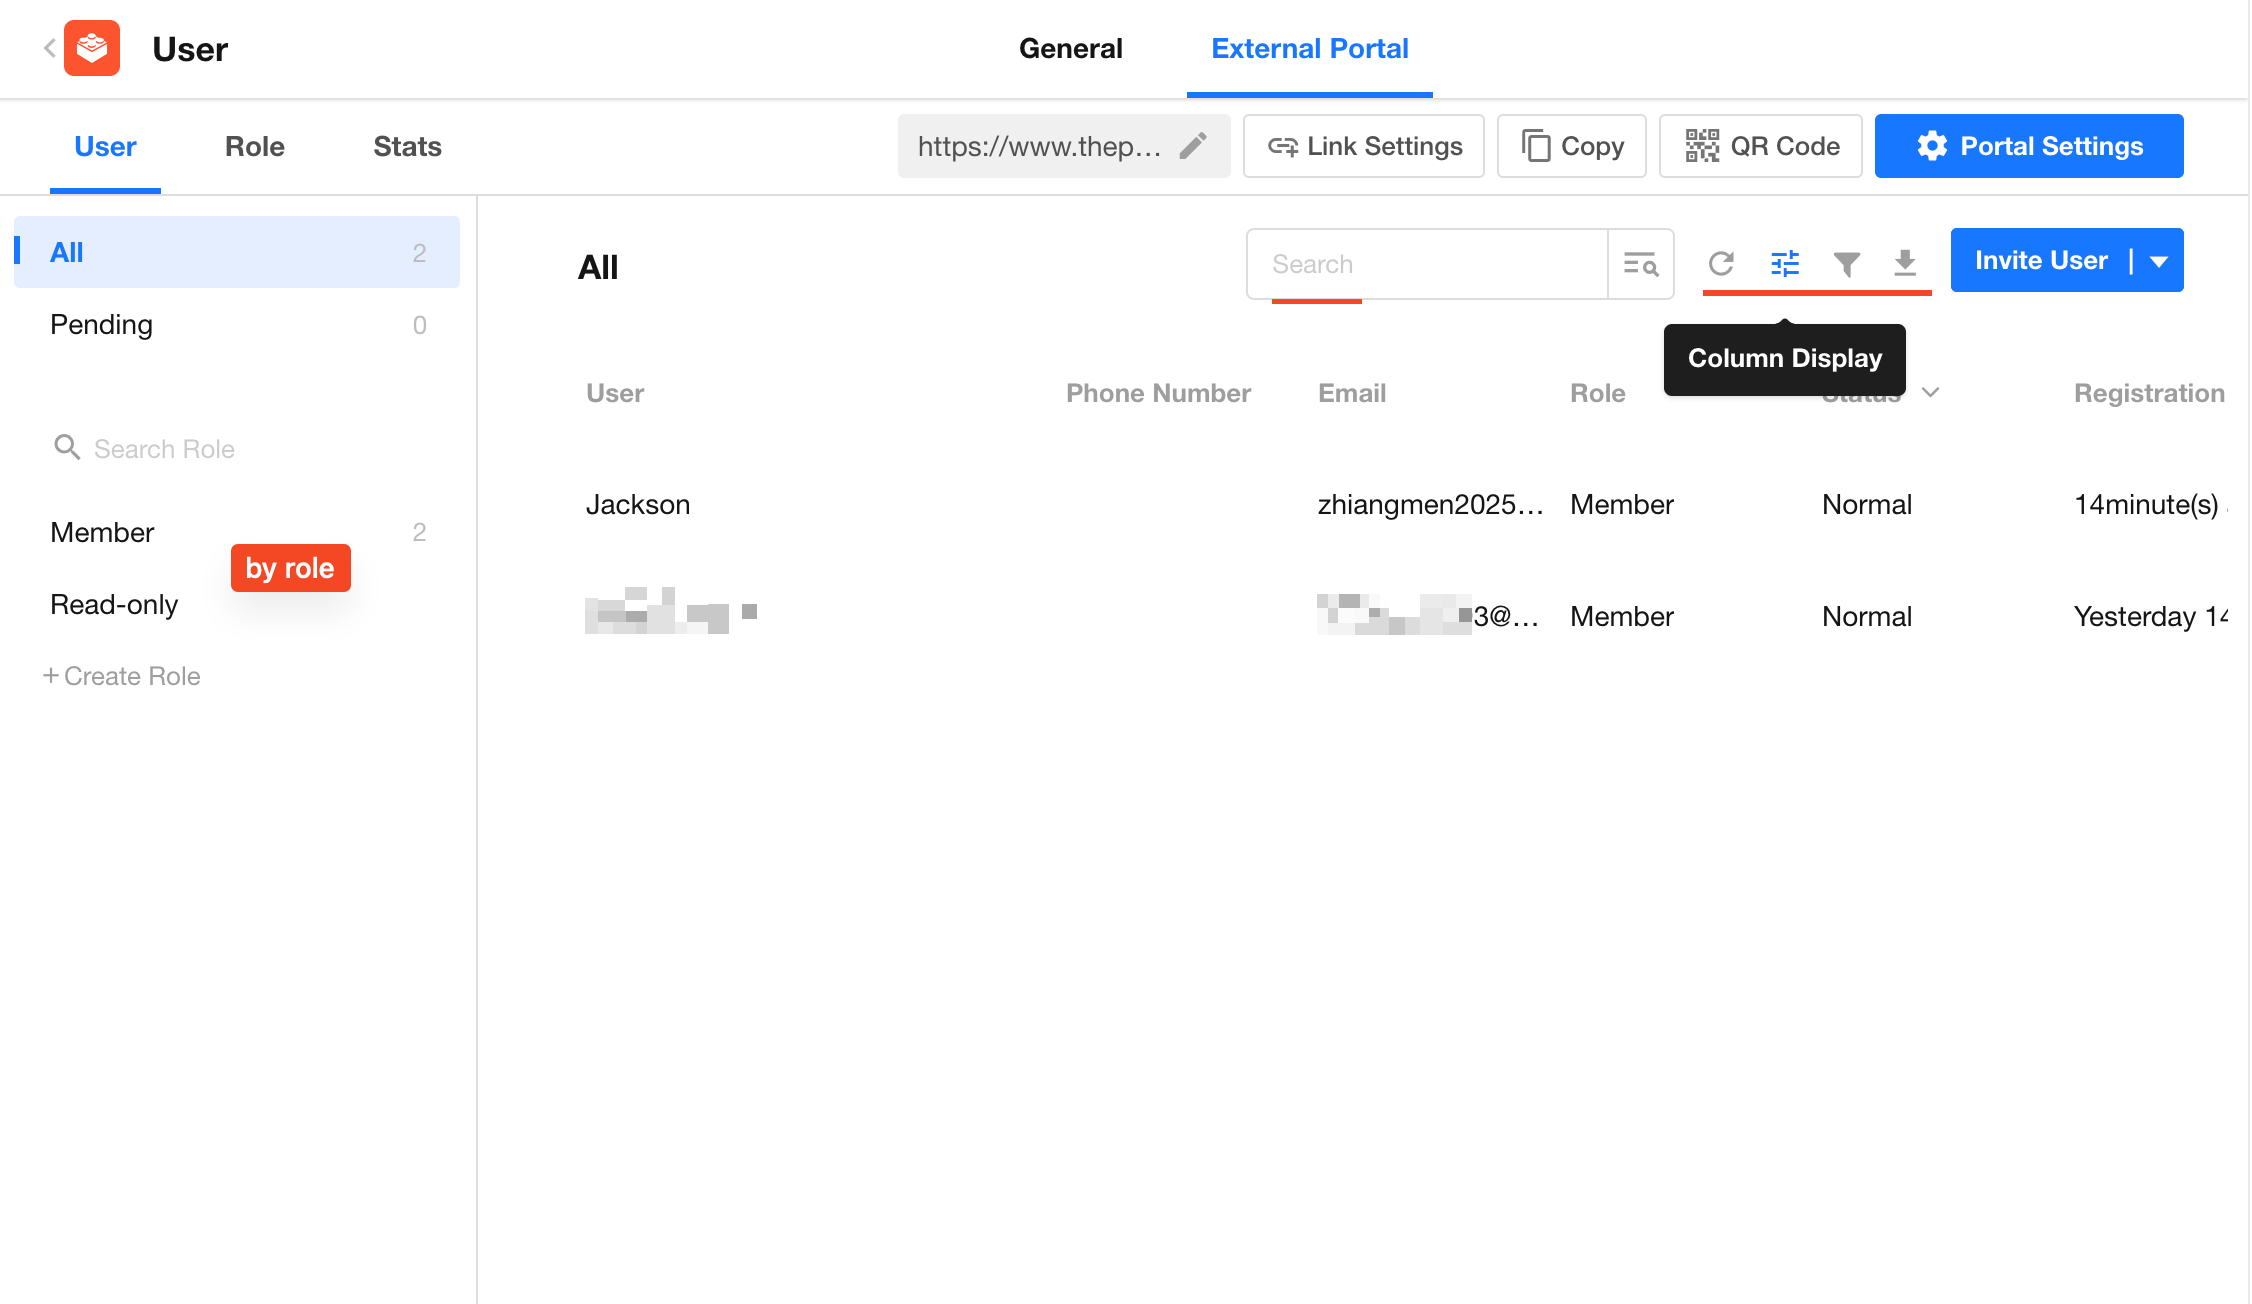
You can quickly locate external users in the user list using multiple filters:
- Role Filter: Filter users by their assigned external roles.
- Status Filter: Filter users by status: Active, Disabled, or Deactivated.
- Field Search/Filter: Search and filter users by system fields and custom information collection fields.
- Column Display Settings: Customize the system fields or information collection fields displayed in the user list.
Edit External User Information
Quick Edit:
Click the Actions button on the right side of a user row to quickly update the following information:
- Change user roles
- Update user status (Active / Disabled / Deactivated)
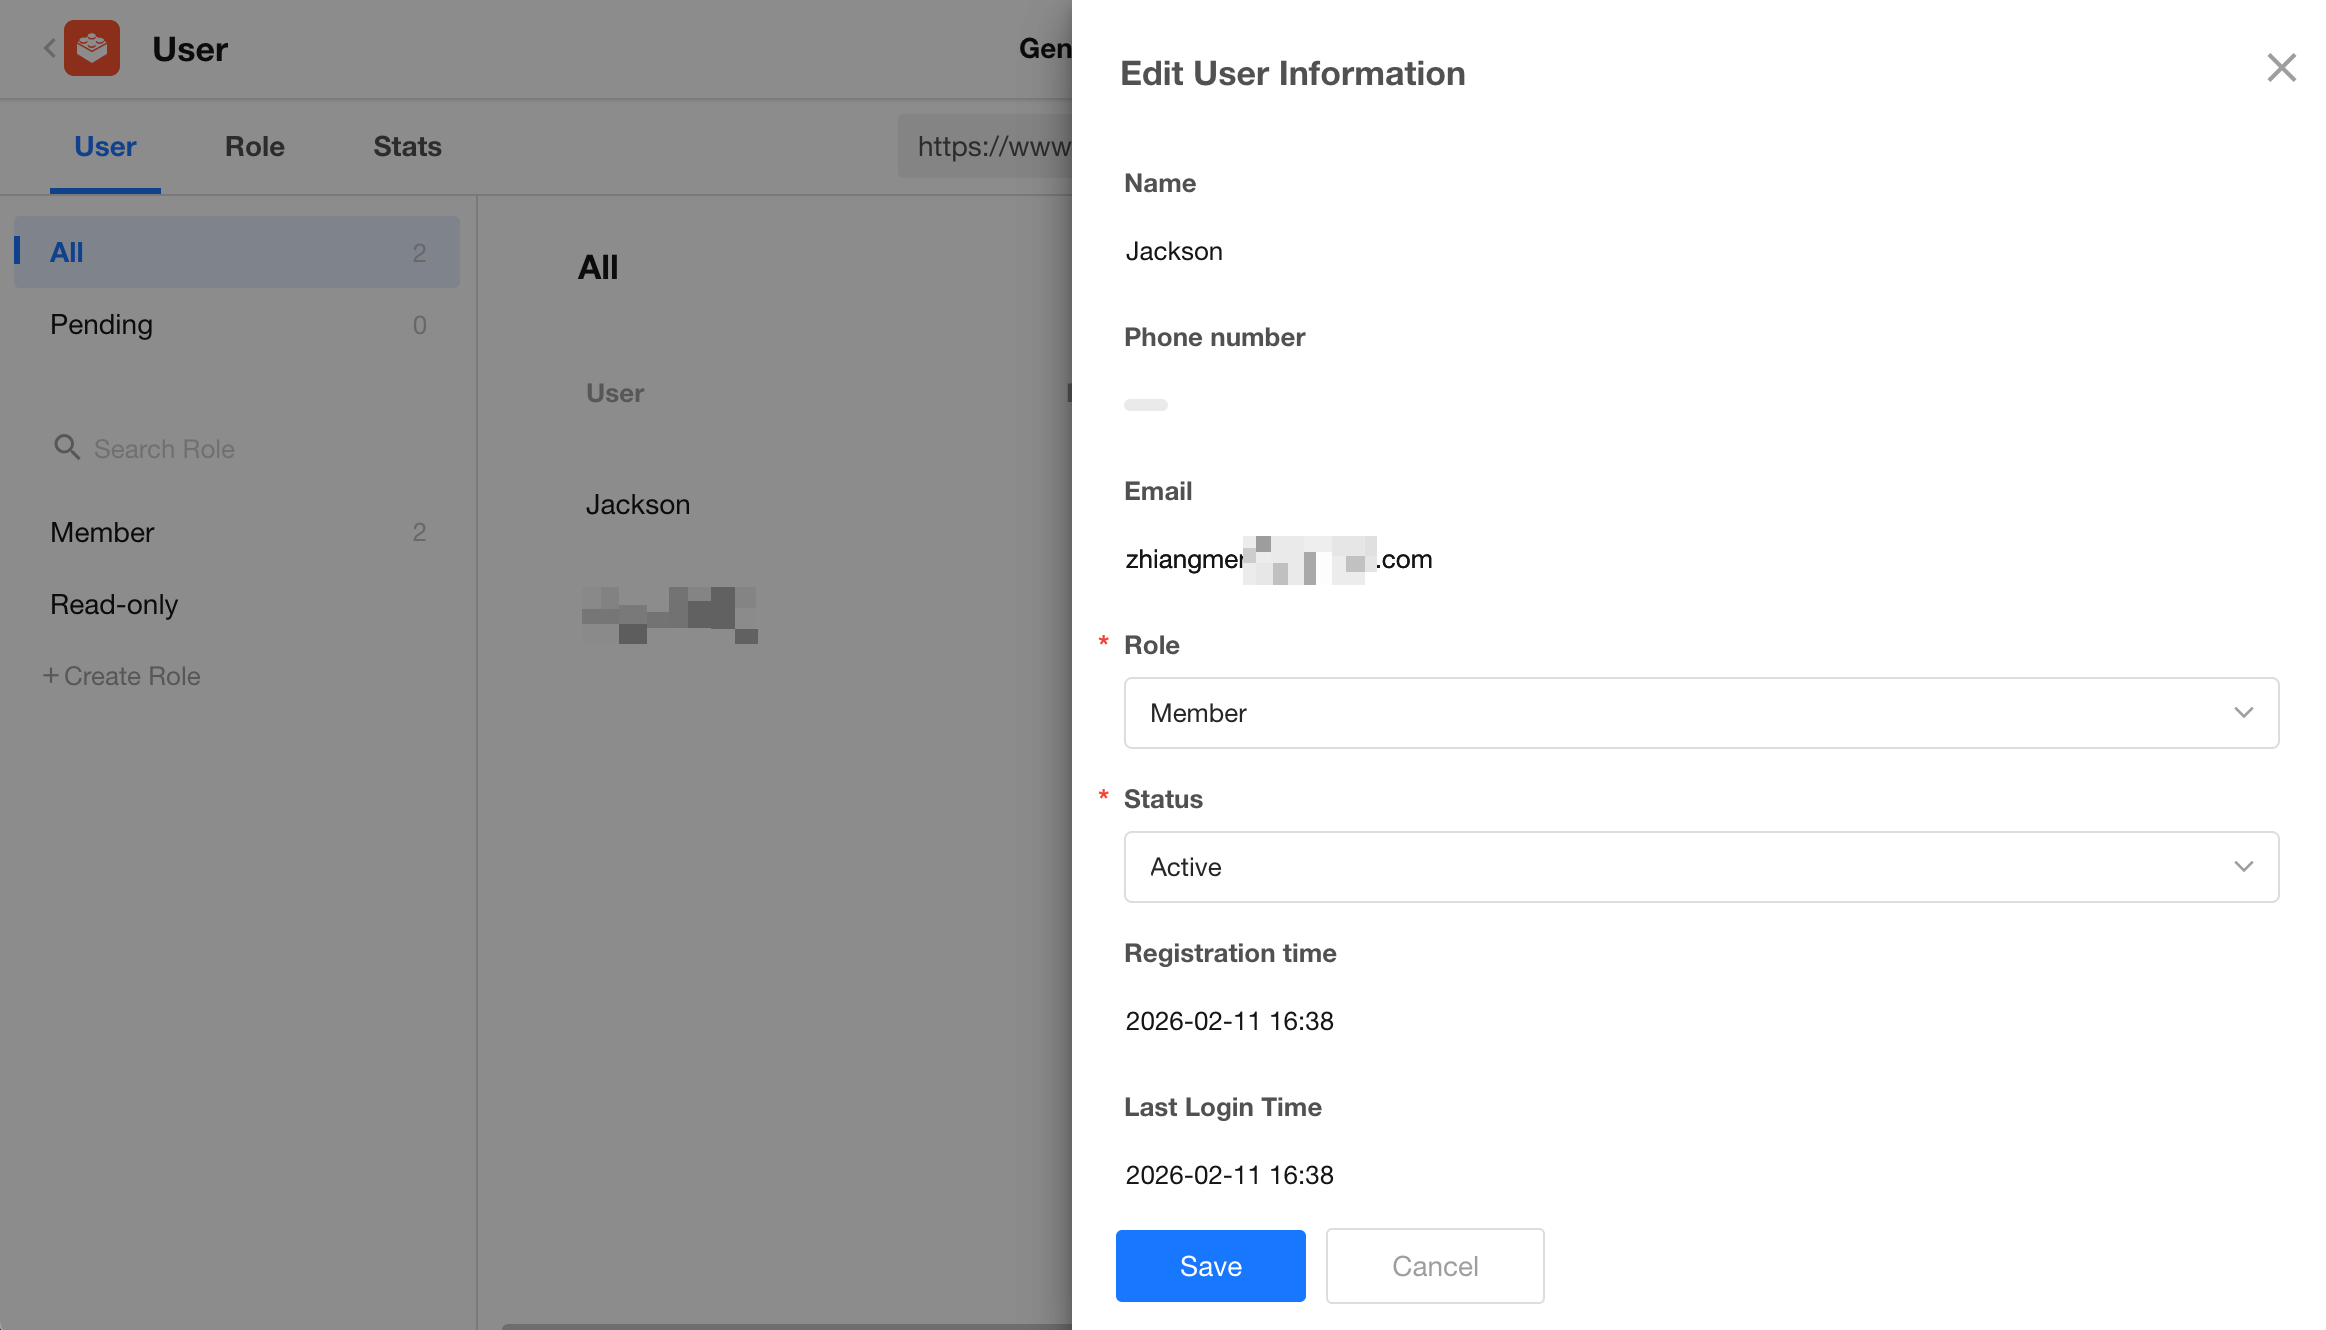
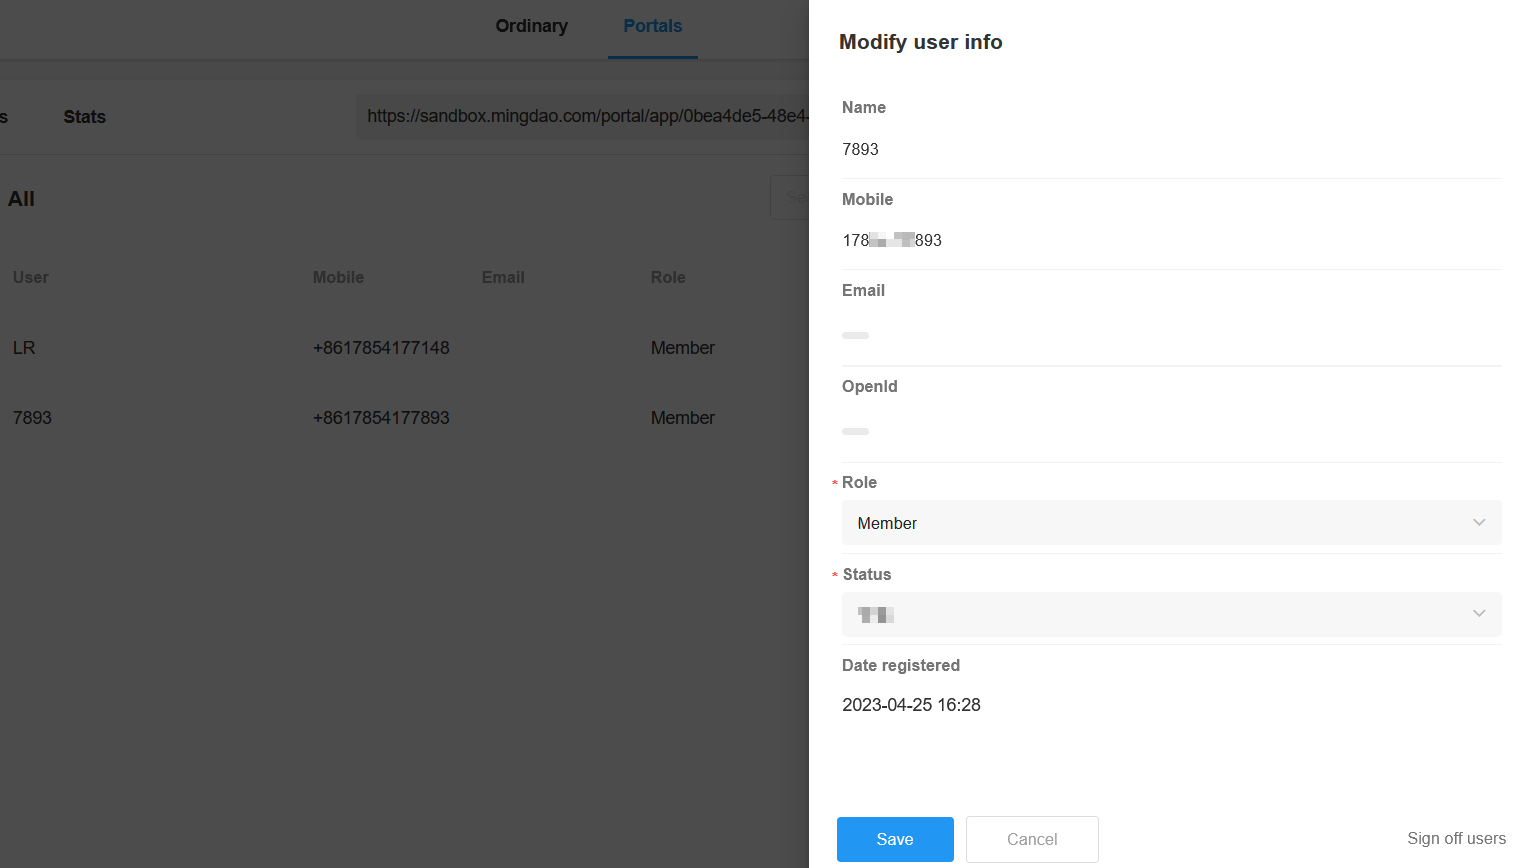
Sidebar Edit:
Click any area of a user row to open the details panel. You can edit custom information collection fields and update the user's status and role.
View User WeChat OpenID
The user list can display the WeChat OpenID associated with each user.
If the field is empty, the user has not authorized WeChat login and can only sign in using a mobile number or email address.
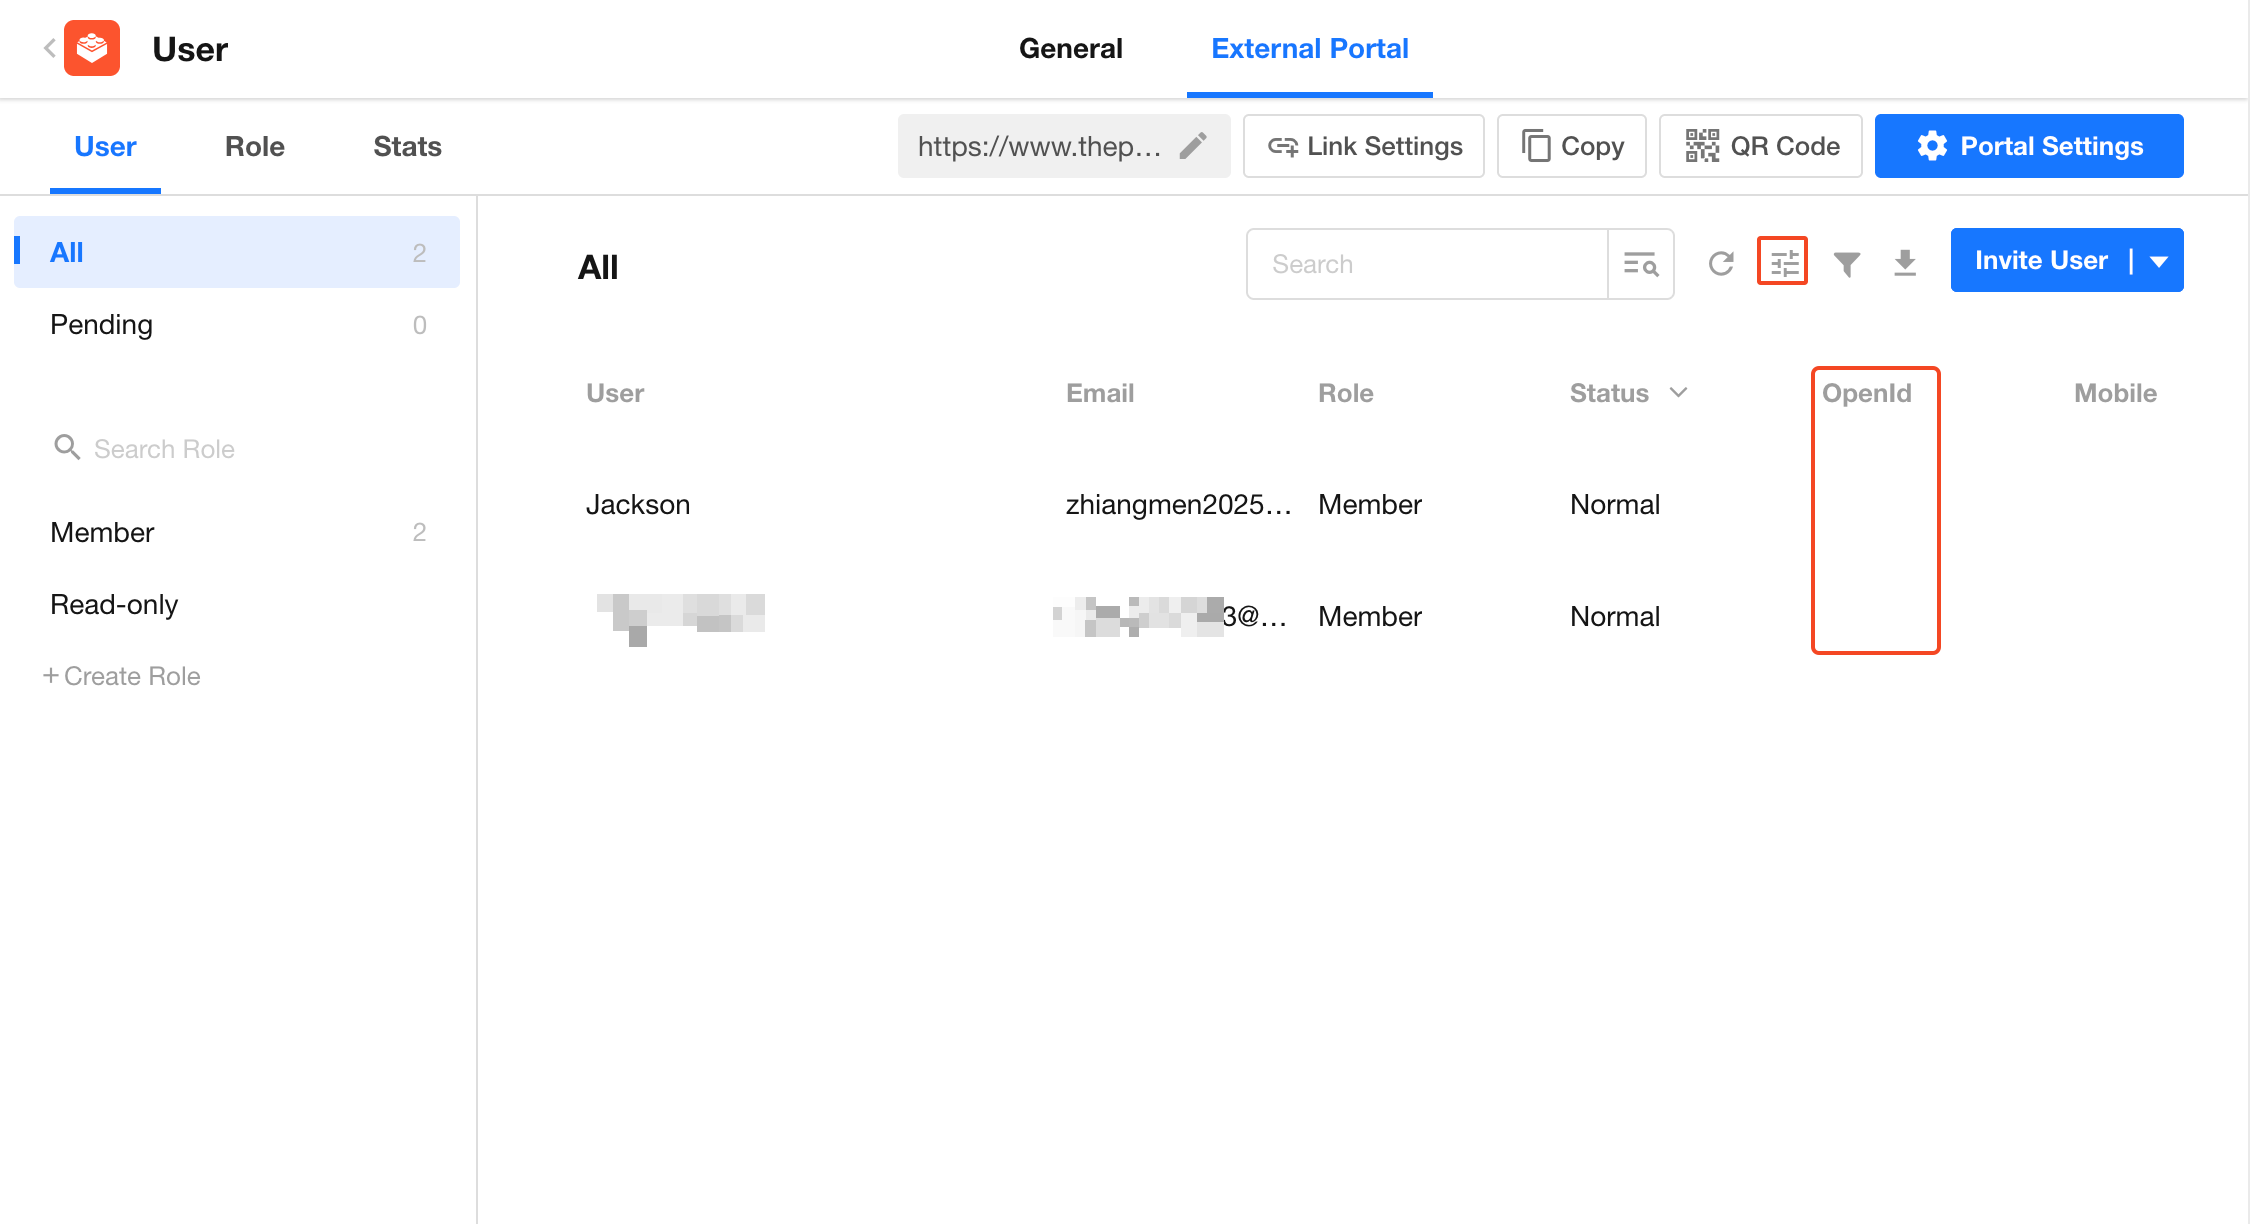
If the OpenID column is not displayed, enable it through Column Display Settings.
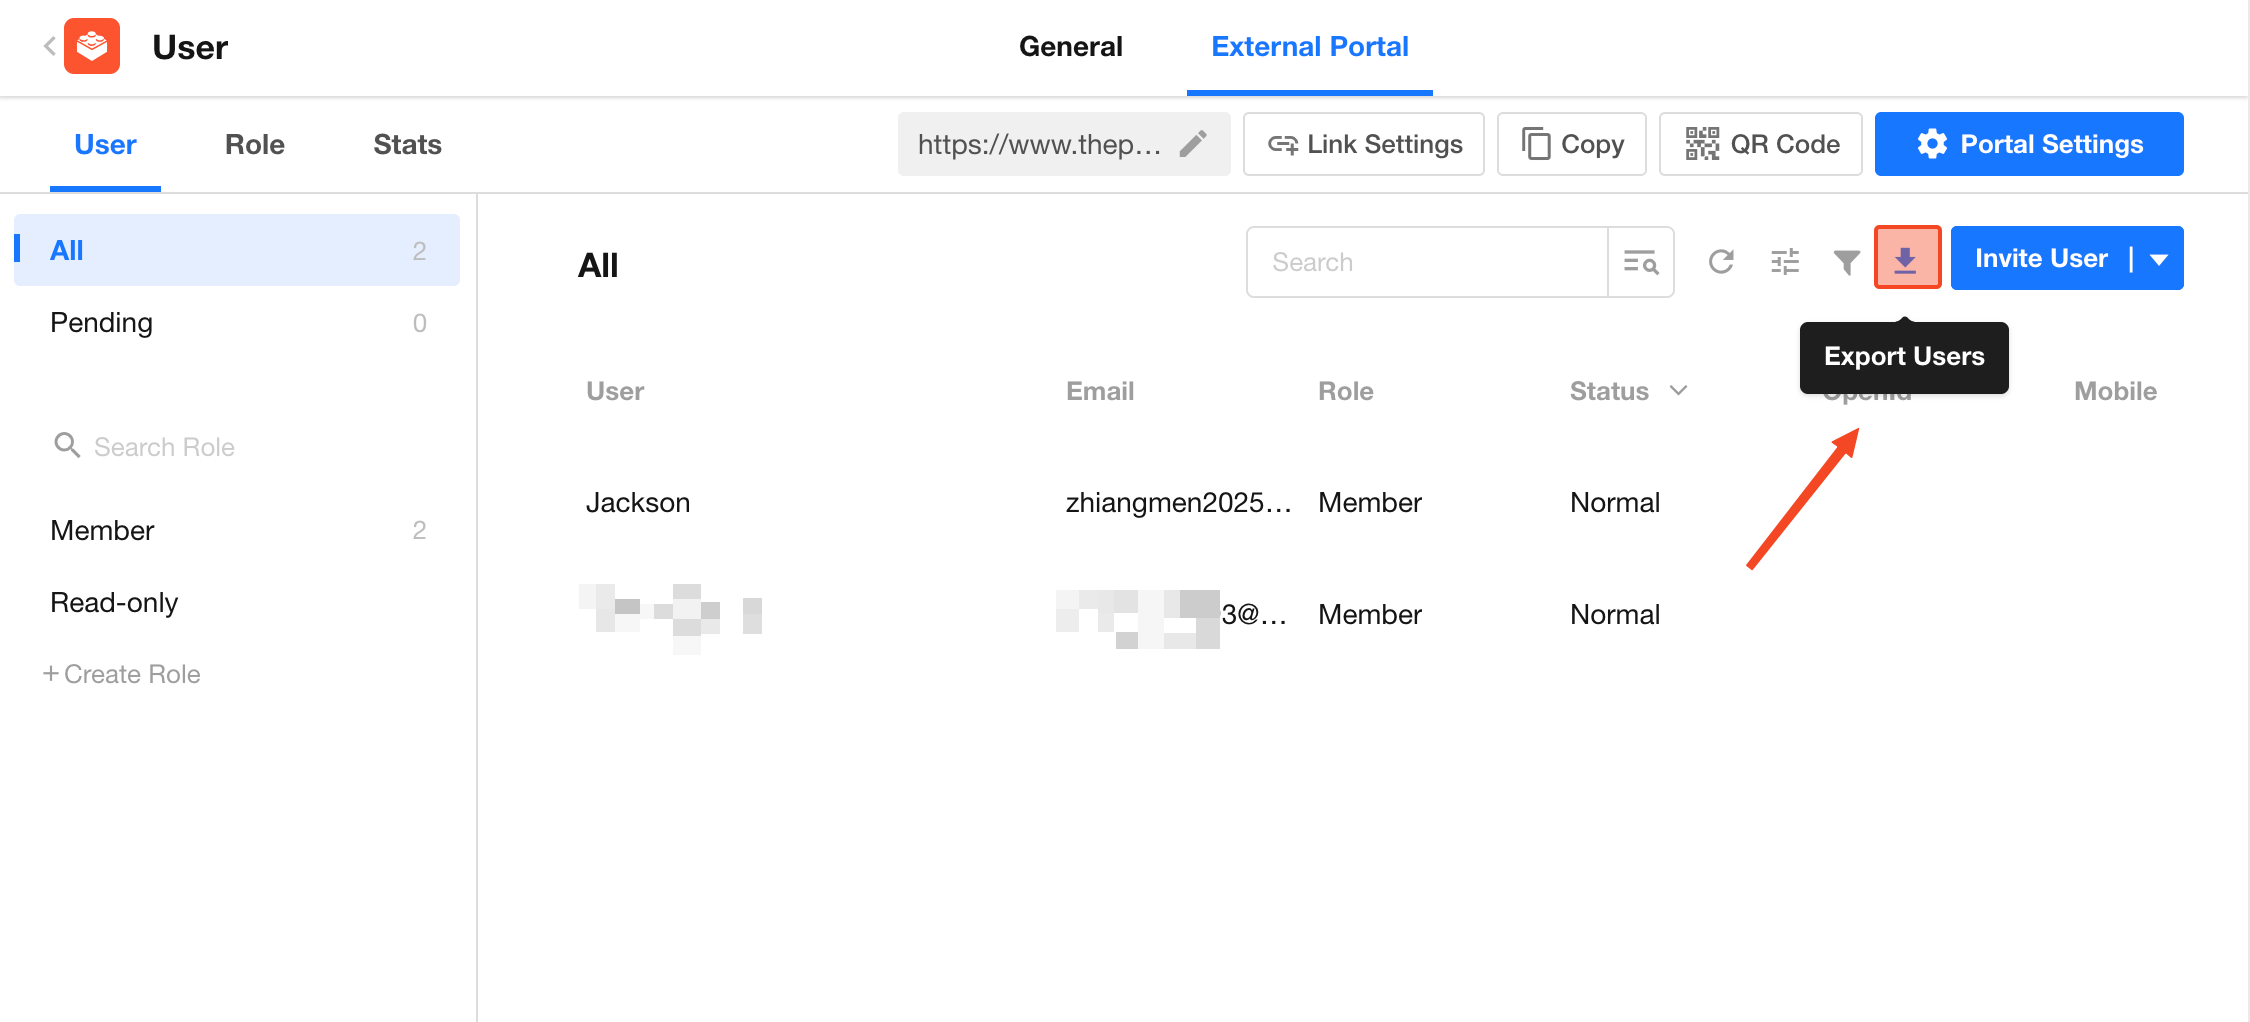
Export External Users
- Export by Role: Select a role, then click the Export icon above the user list to export all users under that role.
- Export Selected Users: Select specific users, then click Export to export the selected users.
Batch Update User Status or Delete Users
You can perform batch operations on external users, including activating, disabling, deactivating (deleting), canceling invitations, removing users, and sending invitations again.
Select users and perform the required operation. You can also filter users directly by the Status column.
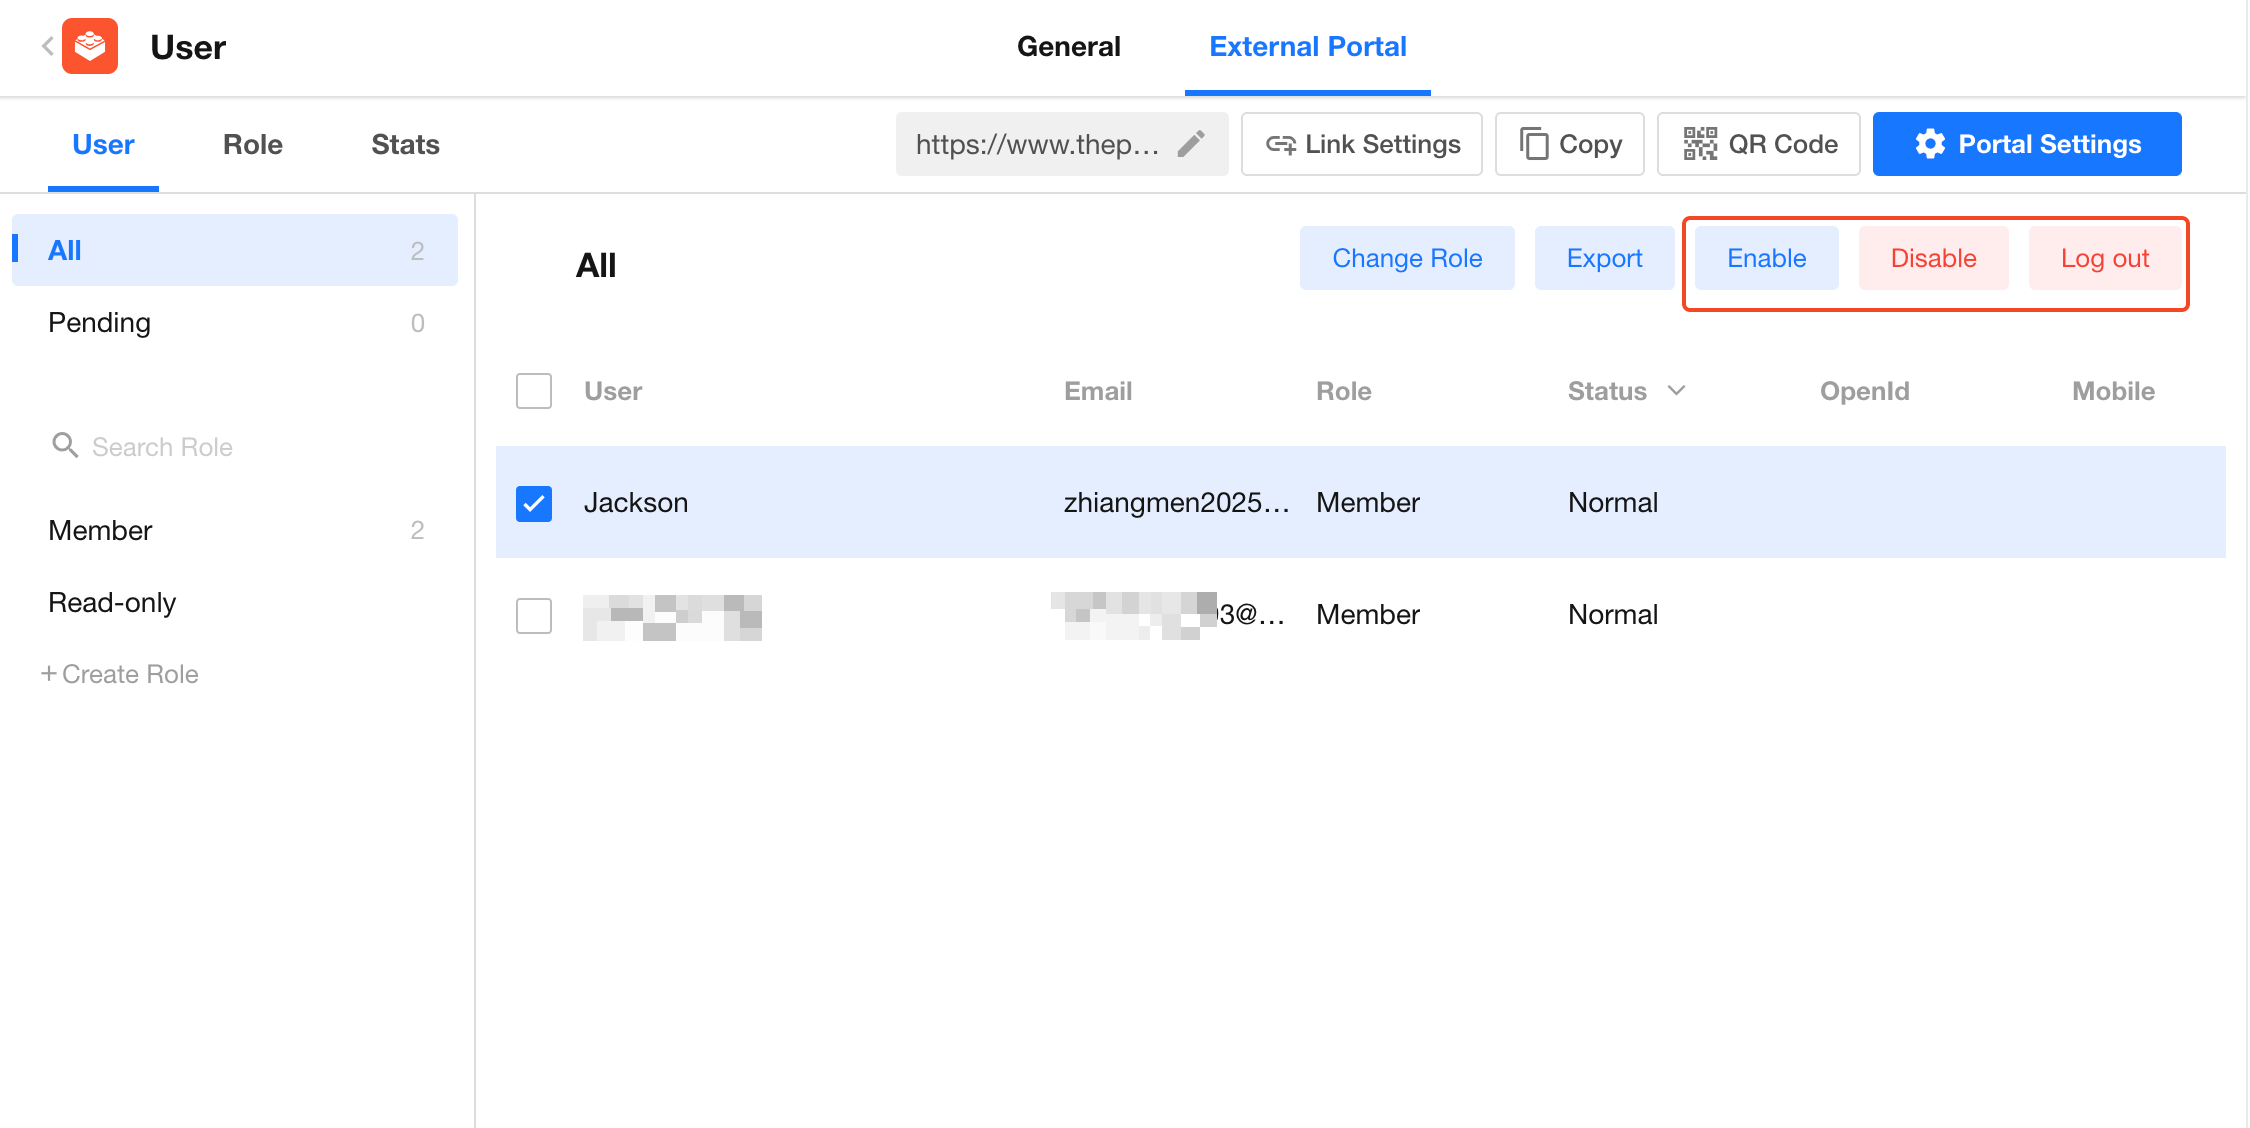
External users can also deactivate their own accounts.
User Approval and Approval-Exempt User List
When access permission is set to Approved Users, newly registered users must be reviewed by an administrator before they can access the portal.
You can also configure an approval-exempt user list. Users who match the configured rules will be automatically approved after registration.
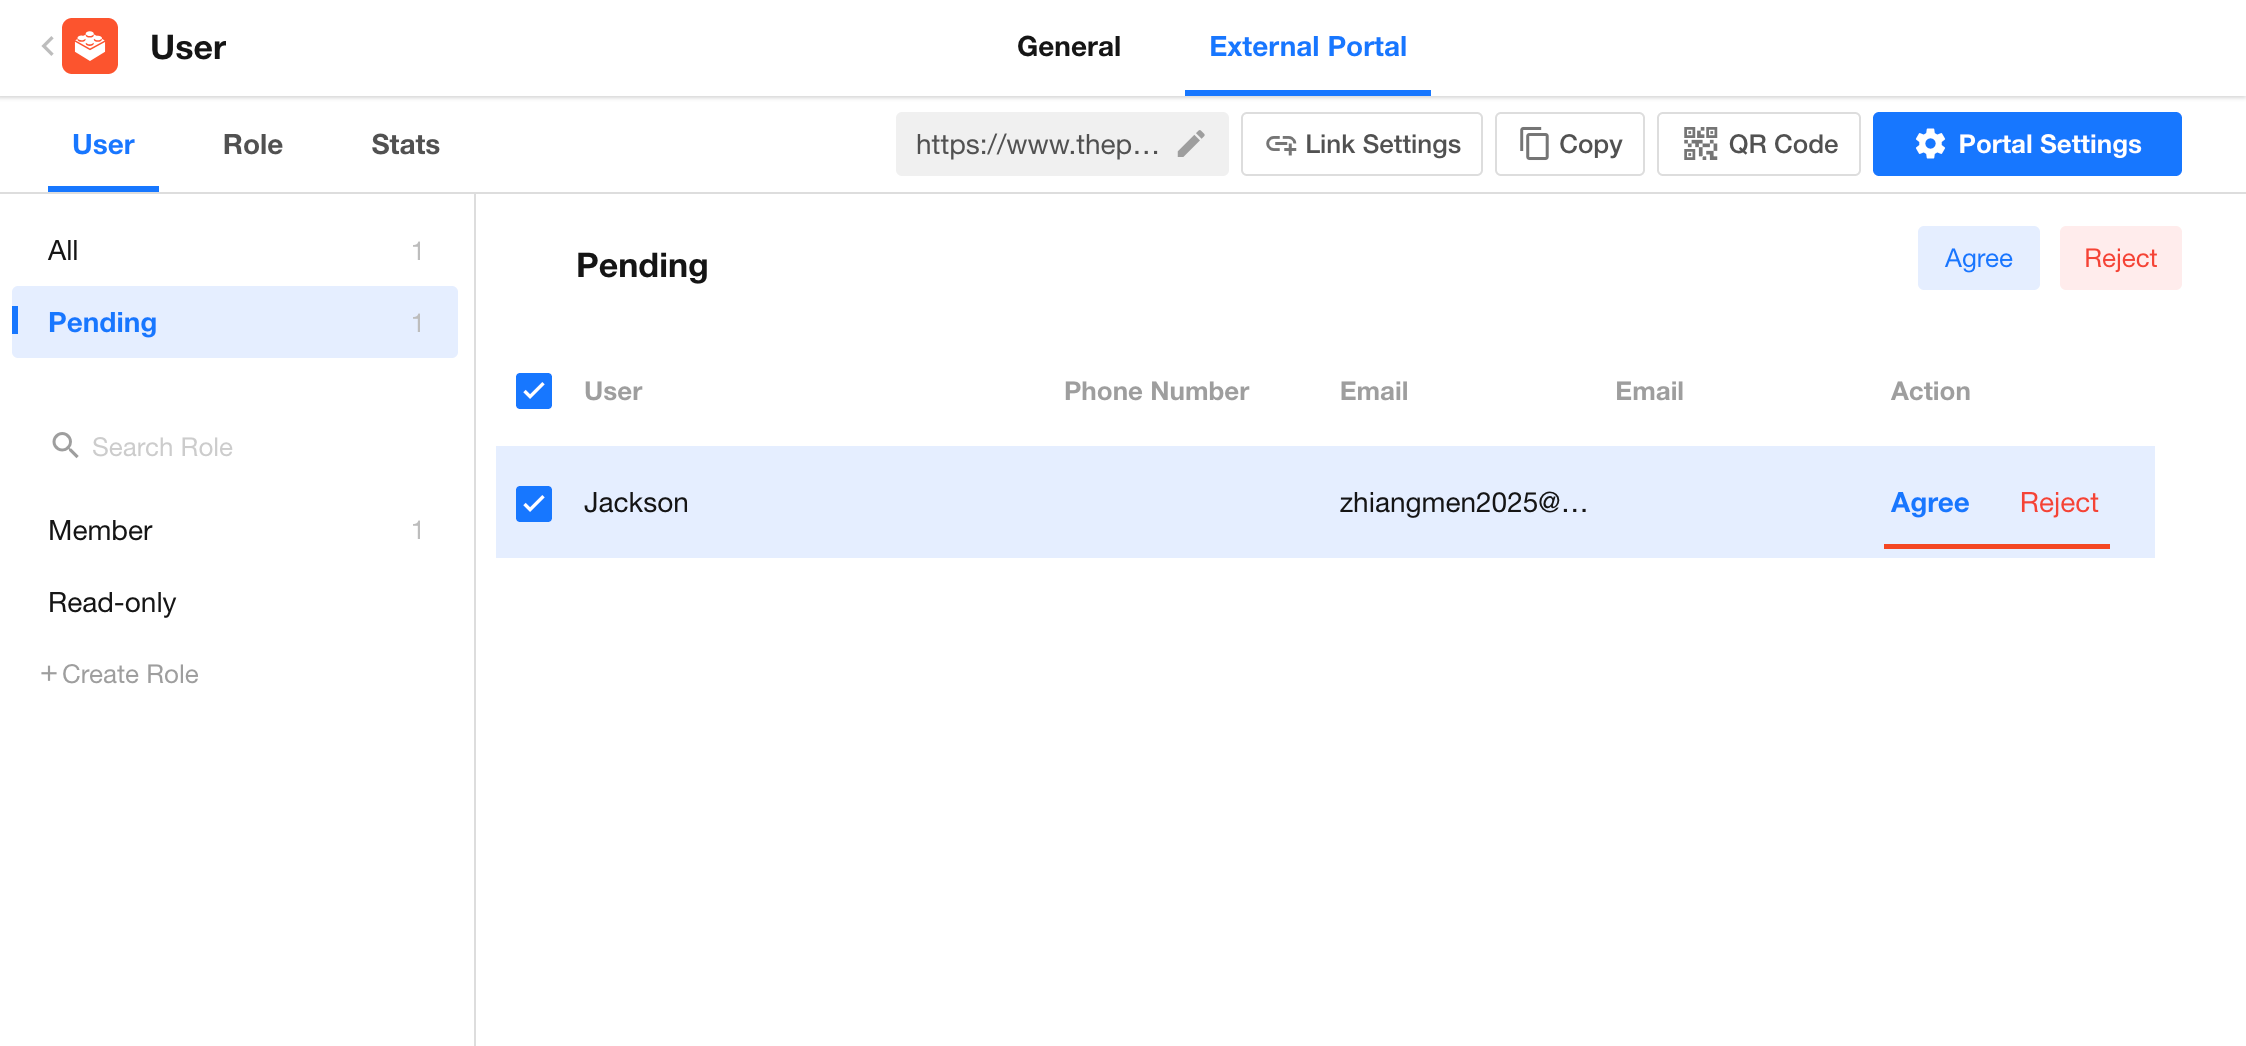
Approve Users
Go to the Pending user list. Administrators can approve or reject registration requests individually or in batches.
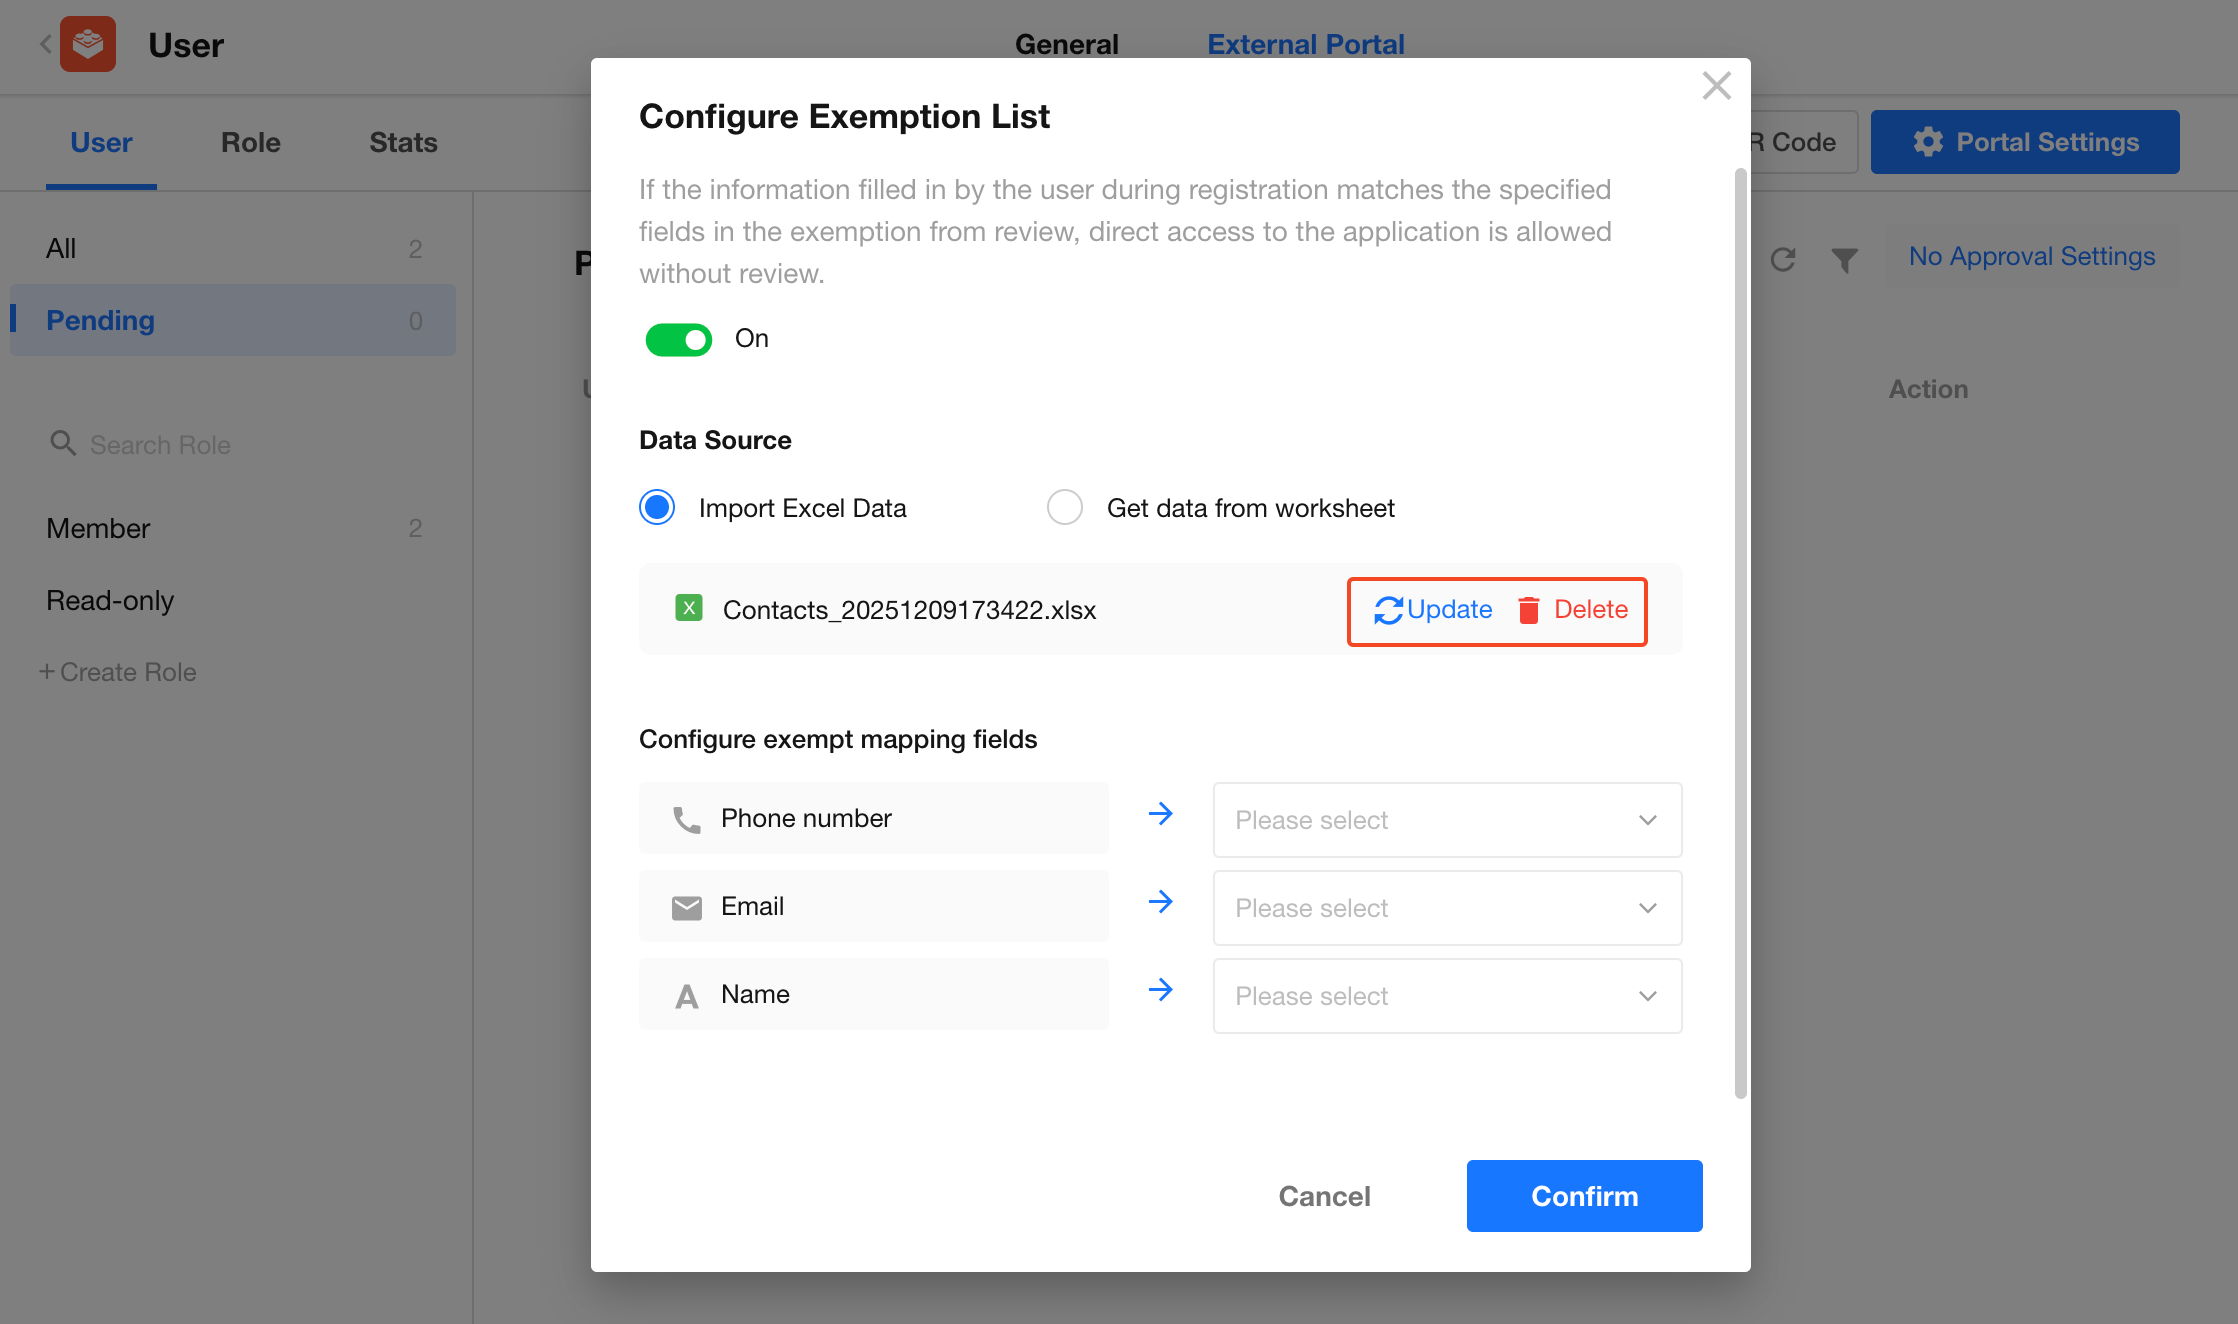
Configure the Approval-Exempt User List
Go to the Pending list under the External Portal, click No Approval Settings, and switch the feature to Enabled.
After configuration, newly registered users will be automatically matched against the approval-exempt list and approved without manual review.
When approval exemption is no longer required, switch the feature to Disabled.
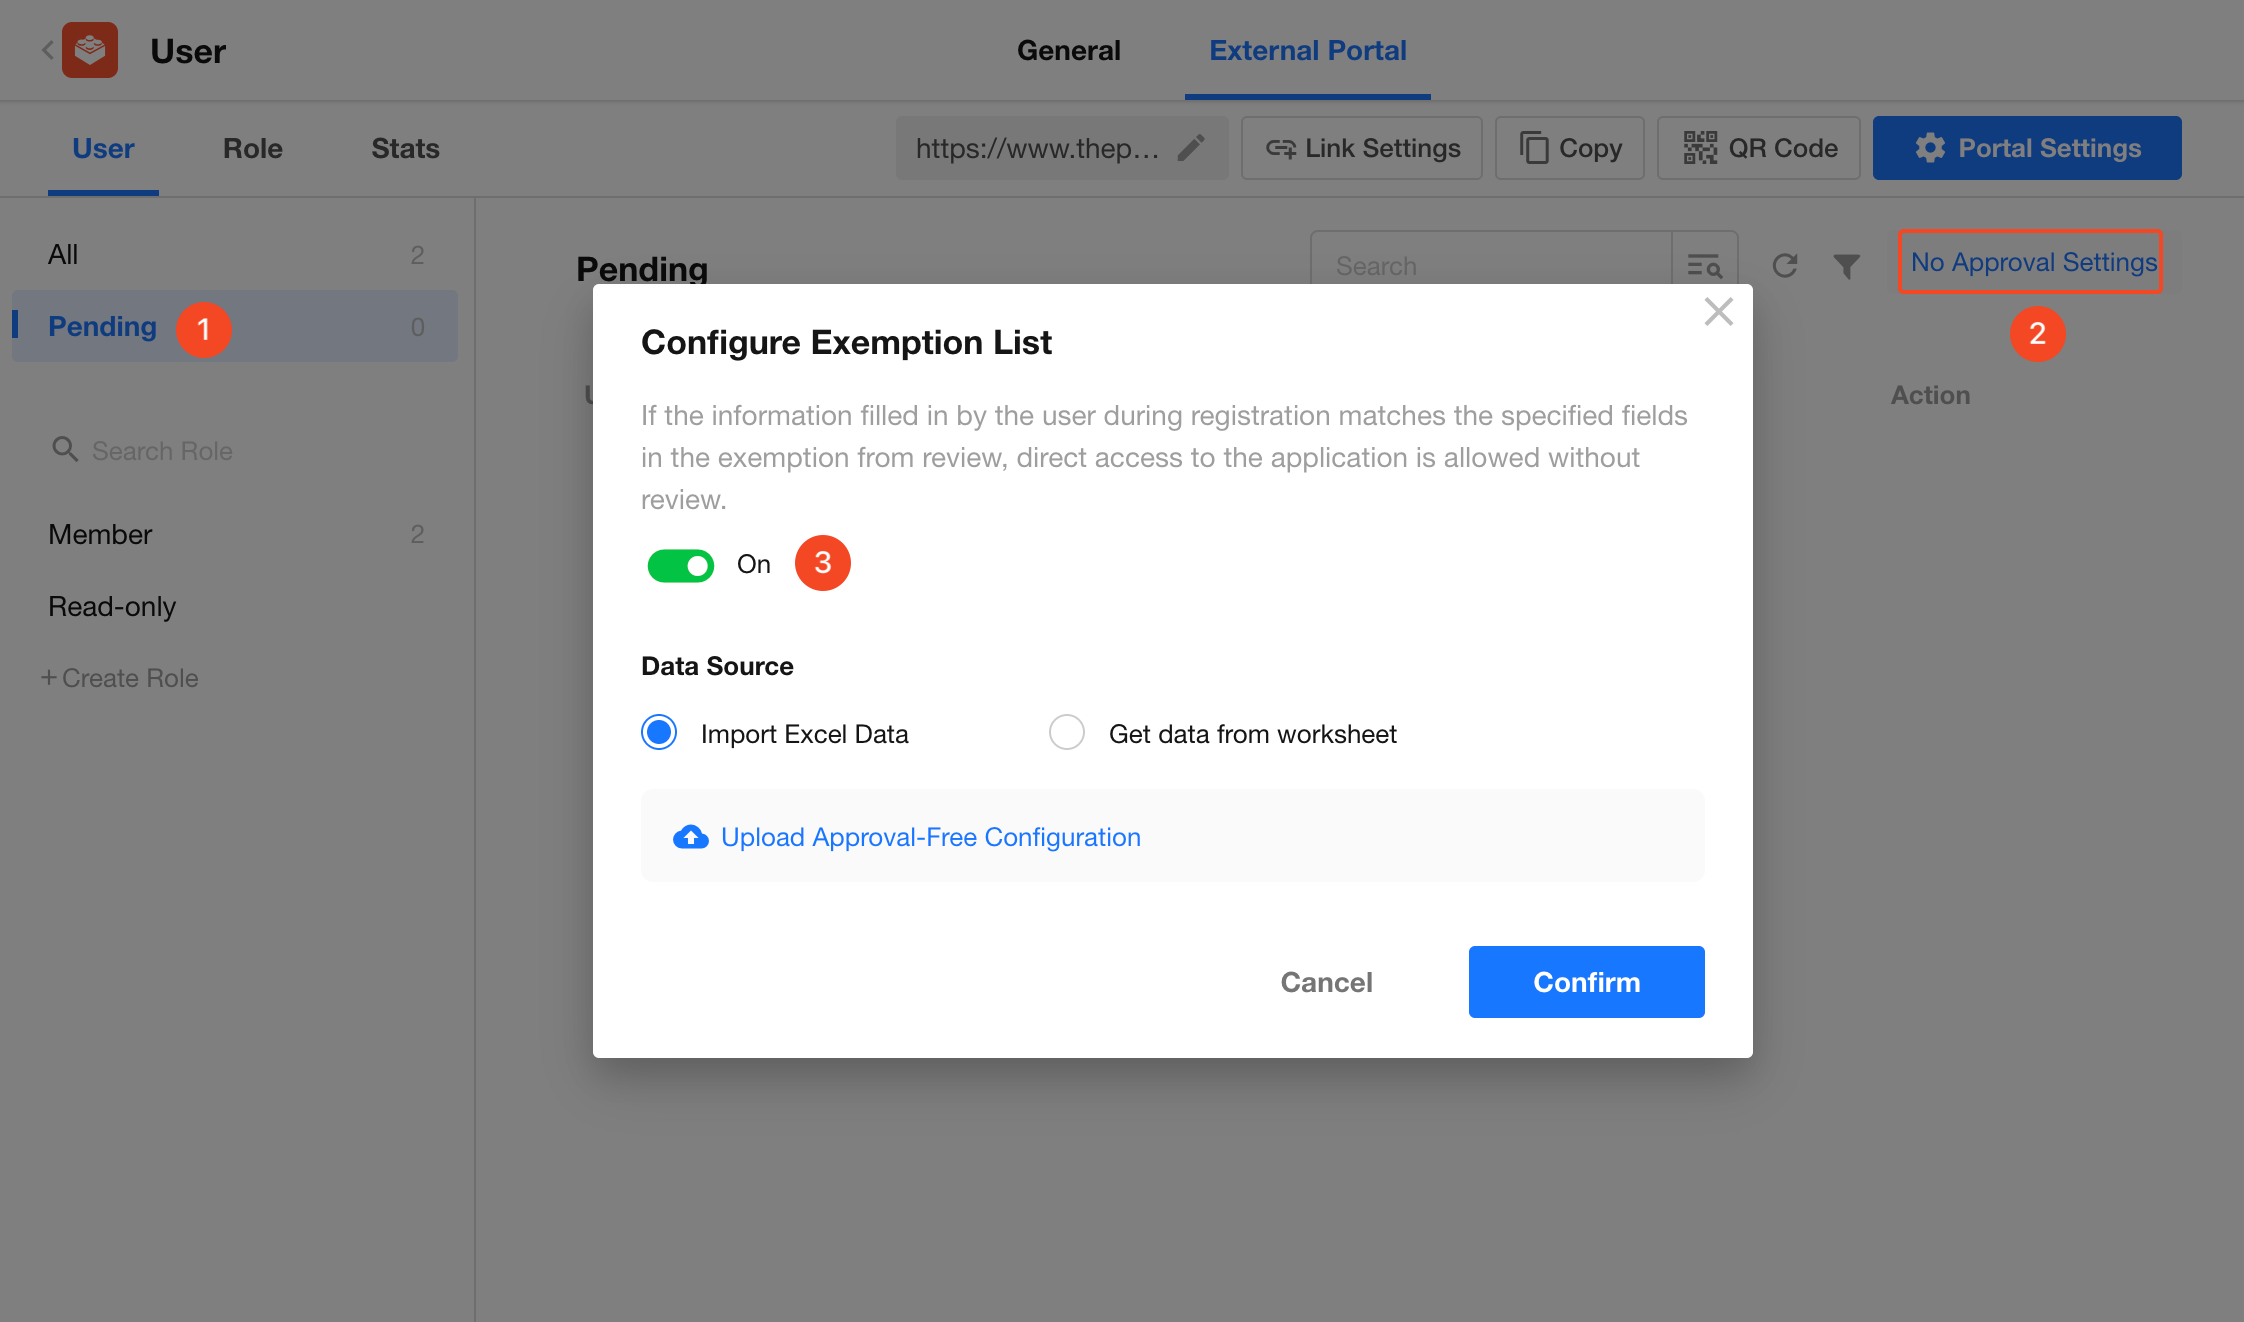
Configuring the approval-exempt user list includes the following three steps:
-
Select the user data source
The system supports the following data sources:
- Excel file: The first row must contain field names.
- Application worksheet: Supports data sources from the current application or other applications.
-
Configure field mapping
The fields entered by registered users must exactly match the mapped fields in the approval-exempt list.
If additional fields (such as name or company) are enabled in Collect Info, configure multi-field mapping. If no additional information is collected, only map the mobile number or email address.
-
Maintain the approval-exempt user list
- For worksheet-based sources, add, delete, or update users directly in the source worksheet. Changes take effect automatically.
- For Excel-based sources, upload the updated file again to update, add, or remove users.
User Analytics and Logs
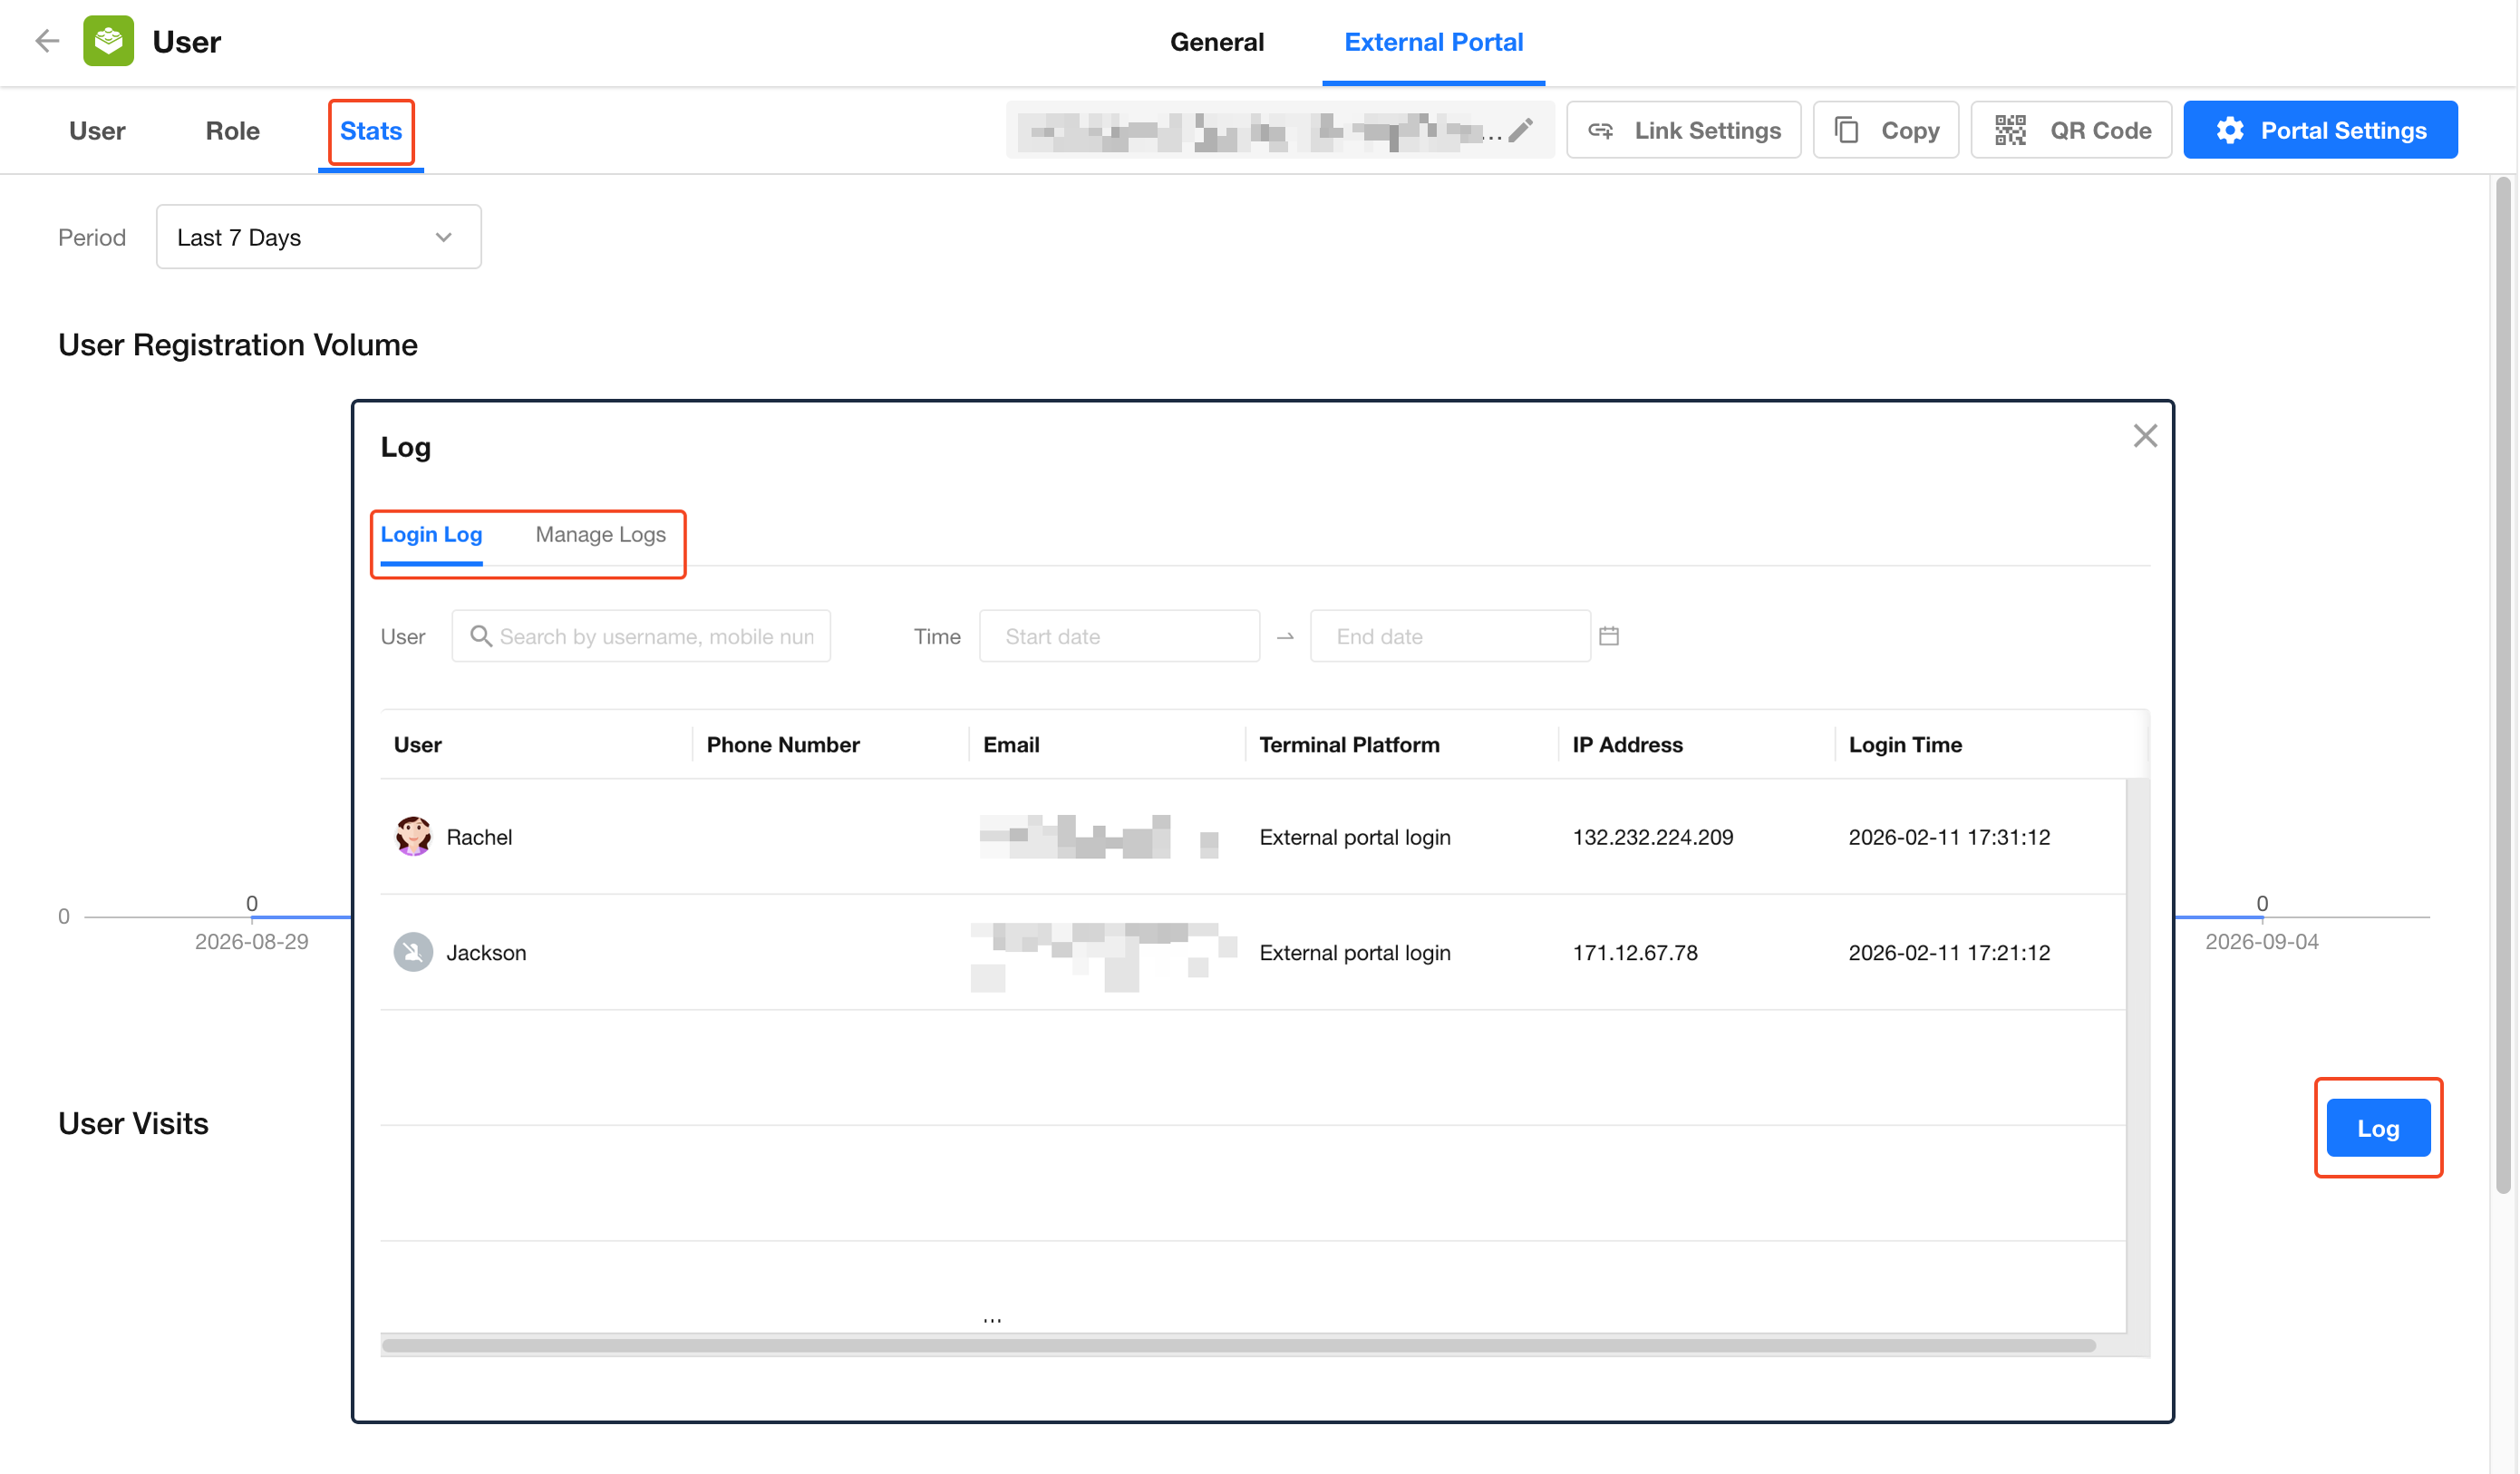
Go to External Portal > Statistics to monitor external user activity and review related logs.
The page includes:
- Activity Metrics: Daily registrations and page views.
- Logs: Security login logs and user management logs.
Send Notifications Through WeChat Service Account
When record data changes, you can send WeChat notifications to external users through the bound WeChat service account, in addition to SMS and email notifications.
Users must follow the bound WeChat service account before they can receive notifications.
Operations Available to External Users
Personal Information Settings
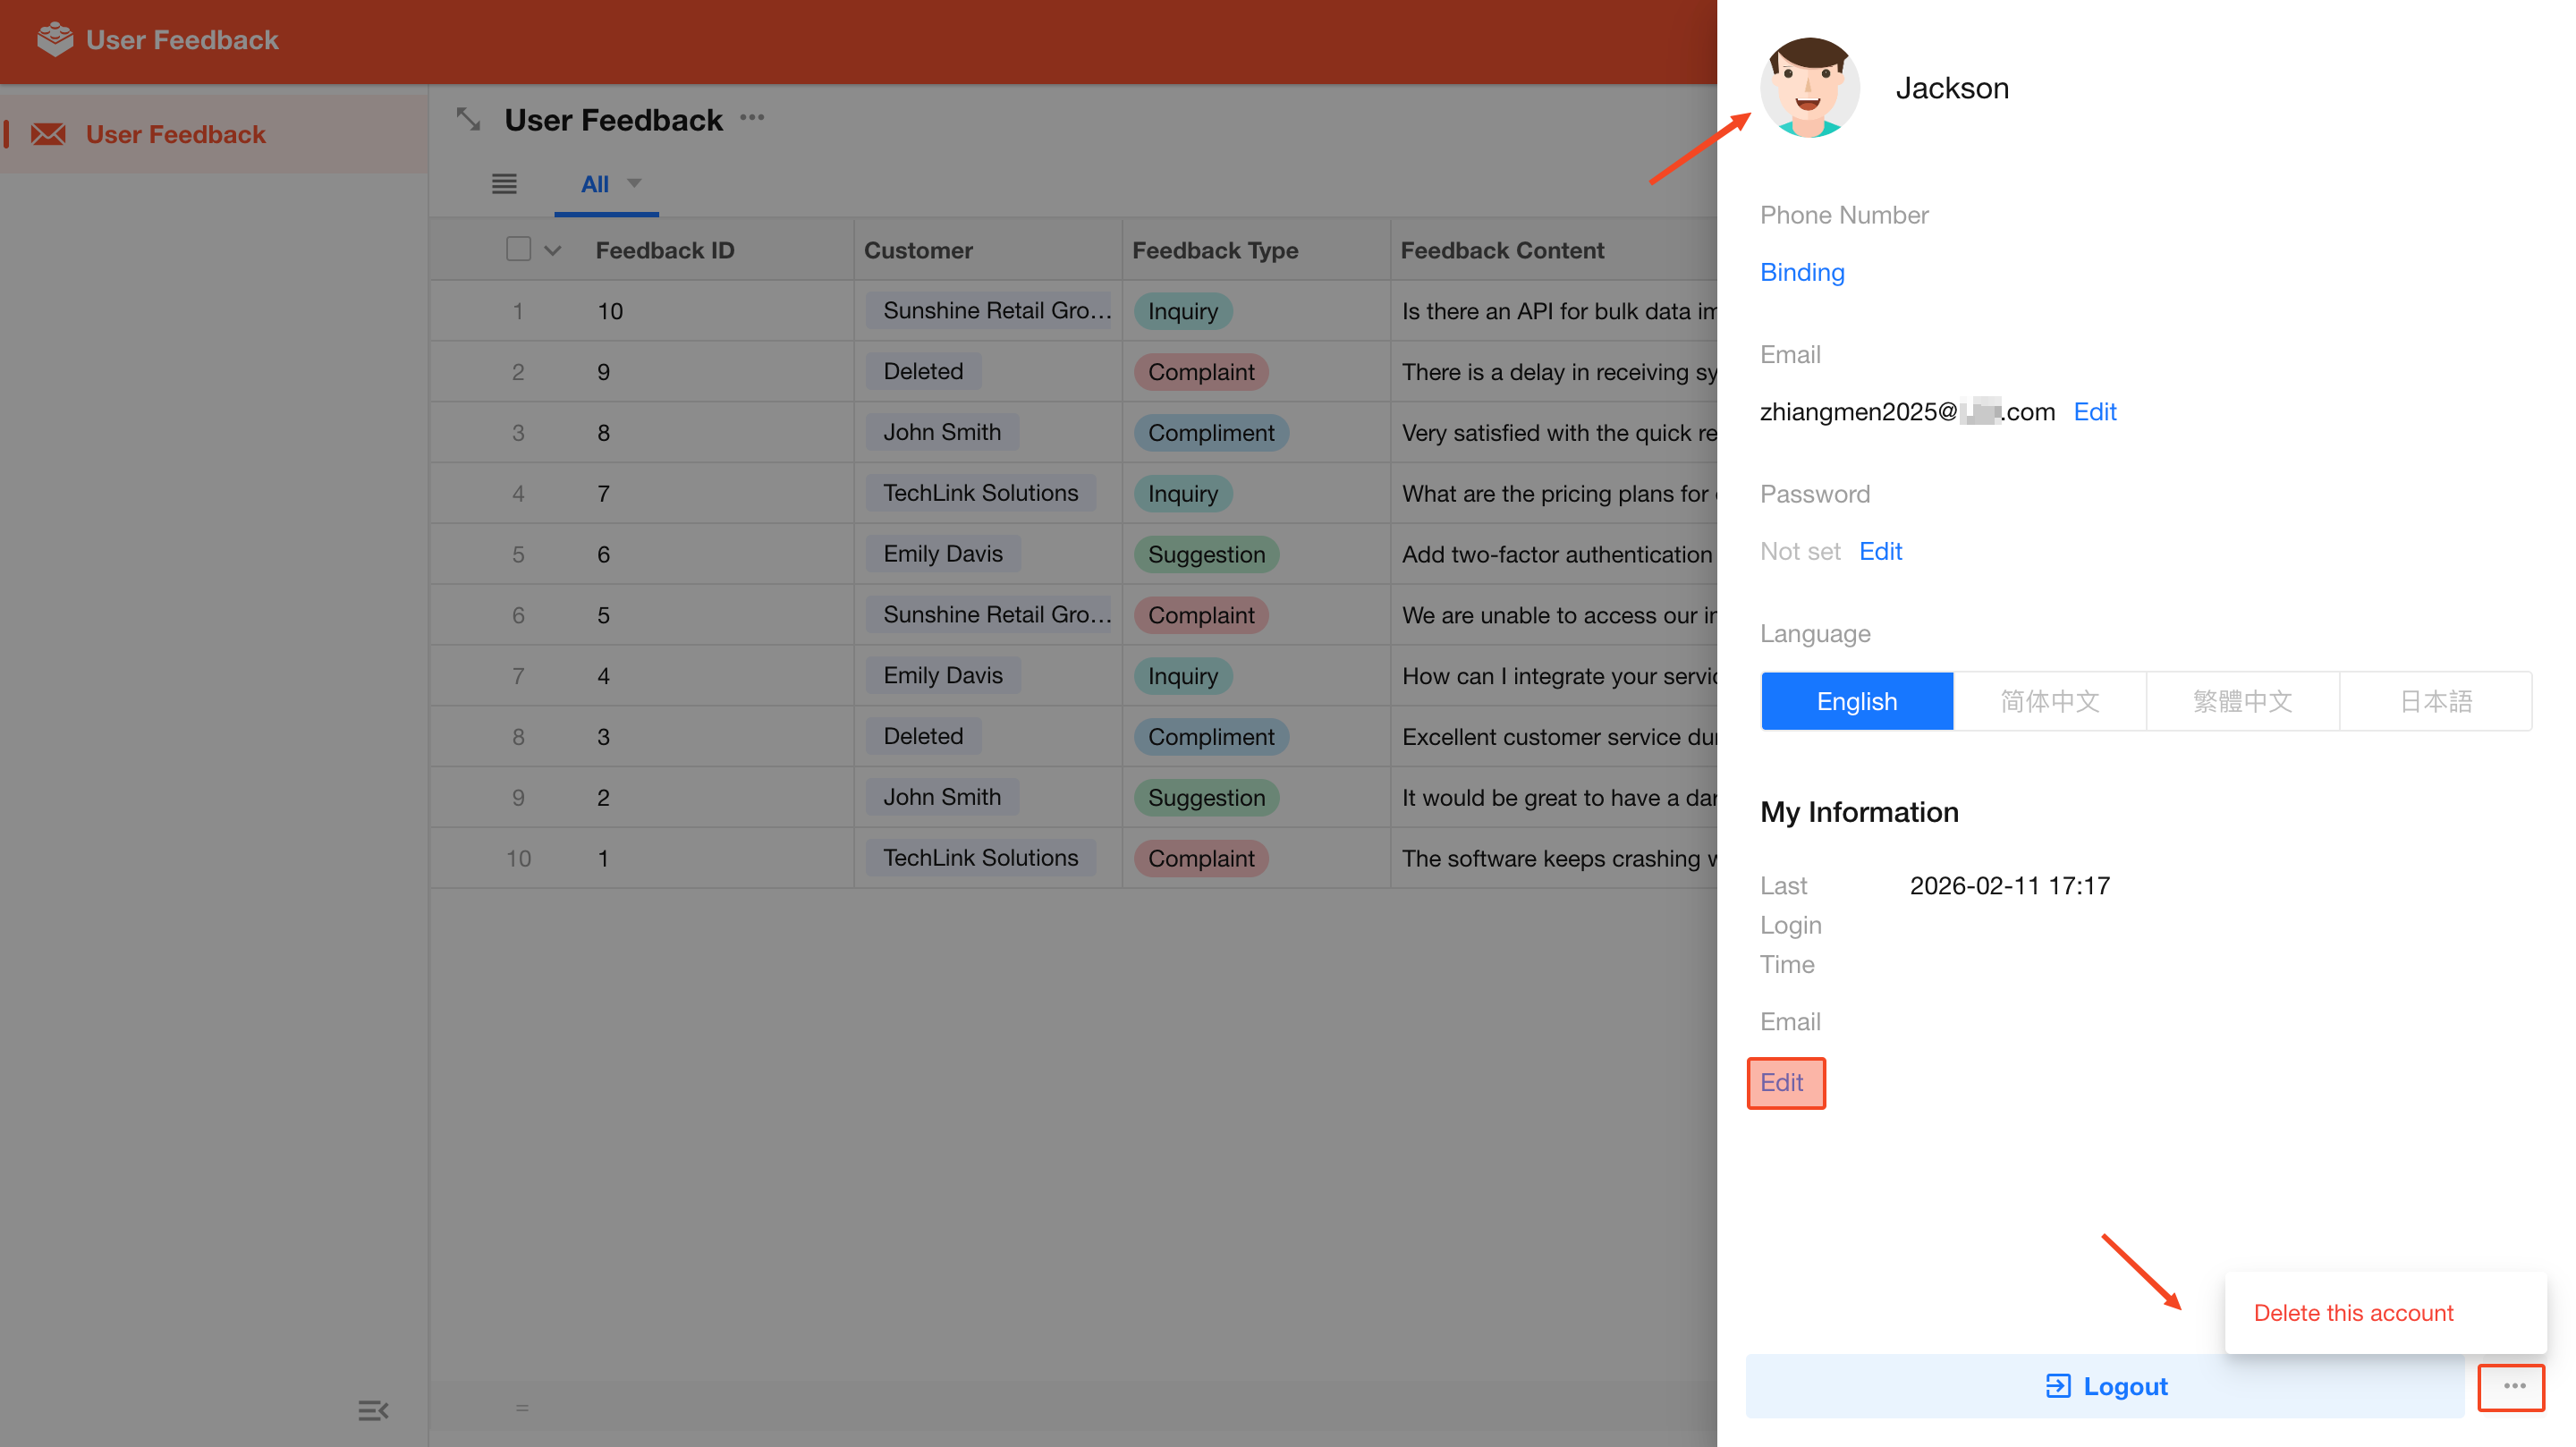
After logging in, external users can click their avatar to access the personal settings page and perform the following actions:
- Modify name:
External users can modify their name only if the administrator has enabled the name field in Collect Info. Administrators can also forcibly update user information through the Update External User Info node in a workflow. - Upload or change avatar
- Modify bound mobile number and email address
- Set login password
- Select system language
- Complete or update extended information
- Deactivate account
- Log out
Interface and Feature Restrictions
After logging in, external users can only access the current application.
External users can view specific views and perform create, read, update, and delete operations only within the scope defined by the external role permissions assigned by administrators.
External Portal users do not have access to internal collaboration features available to regular members, including collaboration tools, organization Contacts, posts, online instant messaging (IM), or other internal communication features.
Was this document helpful?