Application Roles and Permission Configuration
Types of Application Roles
In an application, there are system roles and custom roles. System roles have permissions to manage the app's structure, data, and users. Custom roles are limited to operations within their assigned data permissions.
Administrator
Administrators can manage all configurations and data within the application, except for deleting or locking the app (these actions are reserved for the App Owner only).
-
App Owner
Among administrators, there is a special role called the App Owner, who is by default the creator of the app. Ownership can be transferred to another user. Each app can have only one owner. Only the App Owner can delete or lock the app. Other permissions are identical to those of an administrator.
The administrator role has fixed permissions. It cannot be modified or deleted.
Operator
Operators focus on data and user management but cannot modify app configurations. Their main permissions include:
-
Managing Role Owners of custom roles
-
Managing members under all custom roles
-
Full access to data: view, edit, and delete all records
Note: Operators cannot copy, delete, or export the app and cannot manage users under system roles. Their permissions are fixed and can only be modified by adjusting role membership.
Developer
Developers focus on configuring the application. Key capabilities include:
-
Configure navigation/groups, workflows, worksheets, custom pages, create/edit/delete user roles (including portal roles), and external portal settings (including domain configuration)
-
For cross-app worksheet relationships, the user must be a Developer or Administrator in the referenced app
-
Data permissions: view records they've joined, edit/delete only records they own
Note: Developers cannot copy, delete, or export the app. Their permissions are fixed and can only be modified by adjusting role membership.
If a user holds both the Operator and Developer roles, their permissions are equivalent to an Administrator—except for the inability to copy, export, or delete the app.
Refer to the final section of this document for a full permission breakdown.
Custom Roles
Administrators or Developers can create new roles and configure their members and permissions independently.
Role Owner
A Role Owner is a special member type within a custom role. Role Owners can manage the role's members, including adding/removing users and assigning other Role Owners.
-
Custom Roles
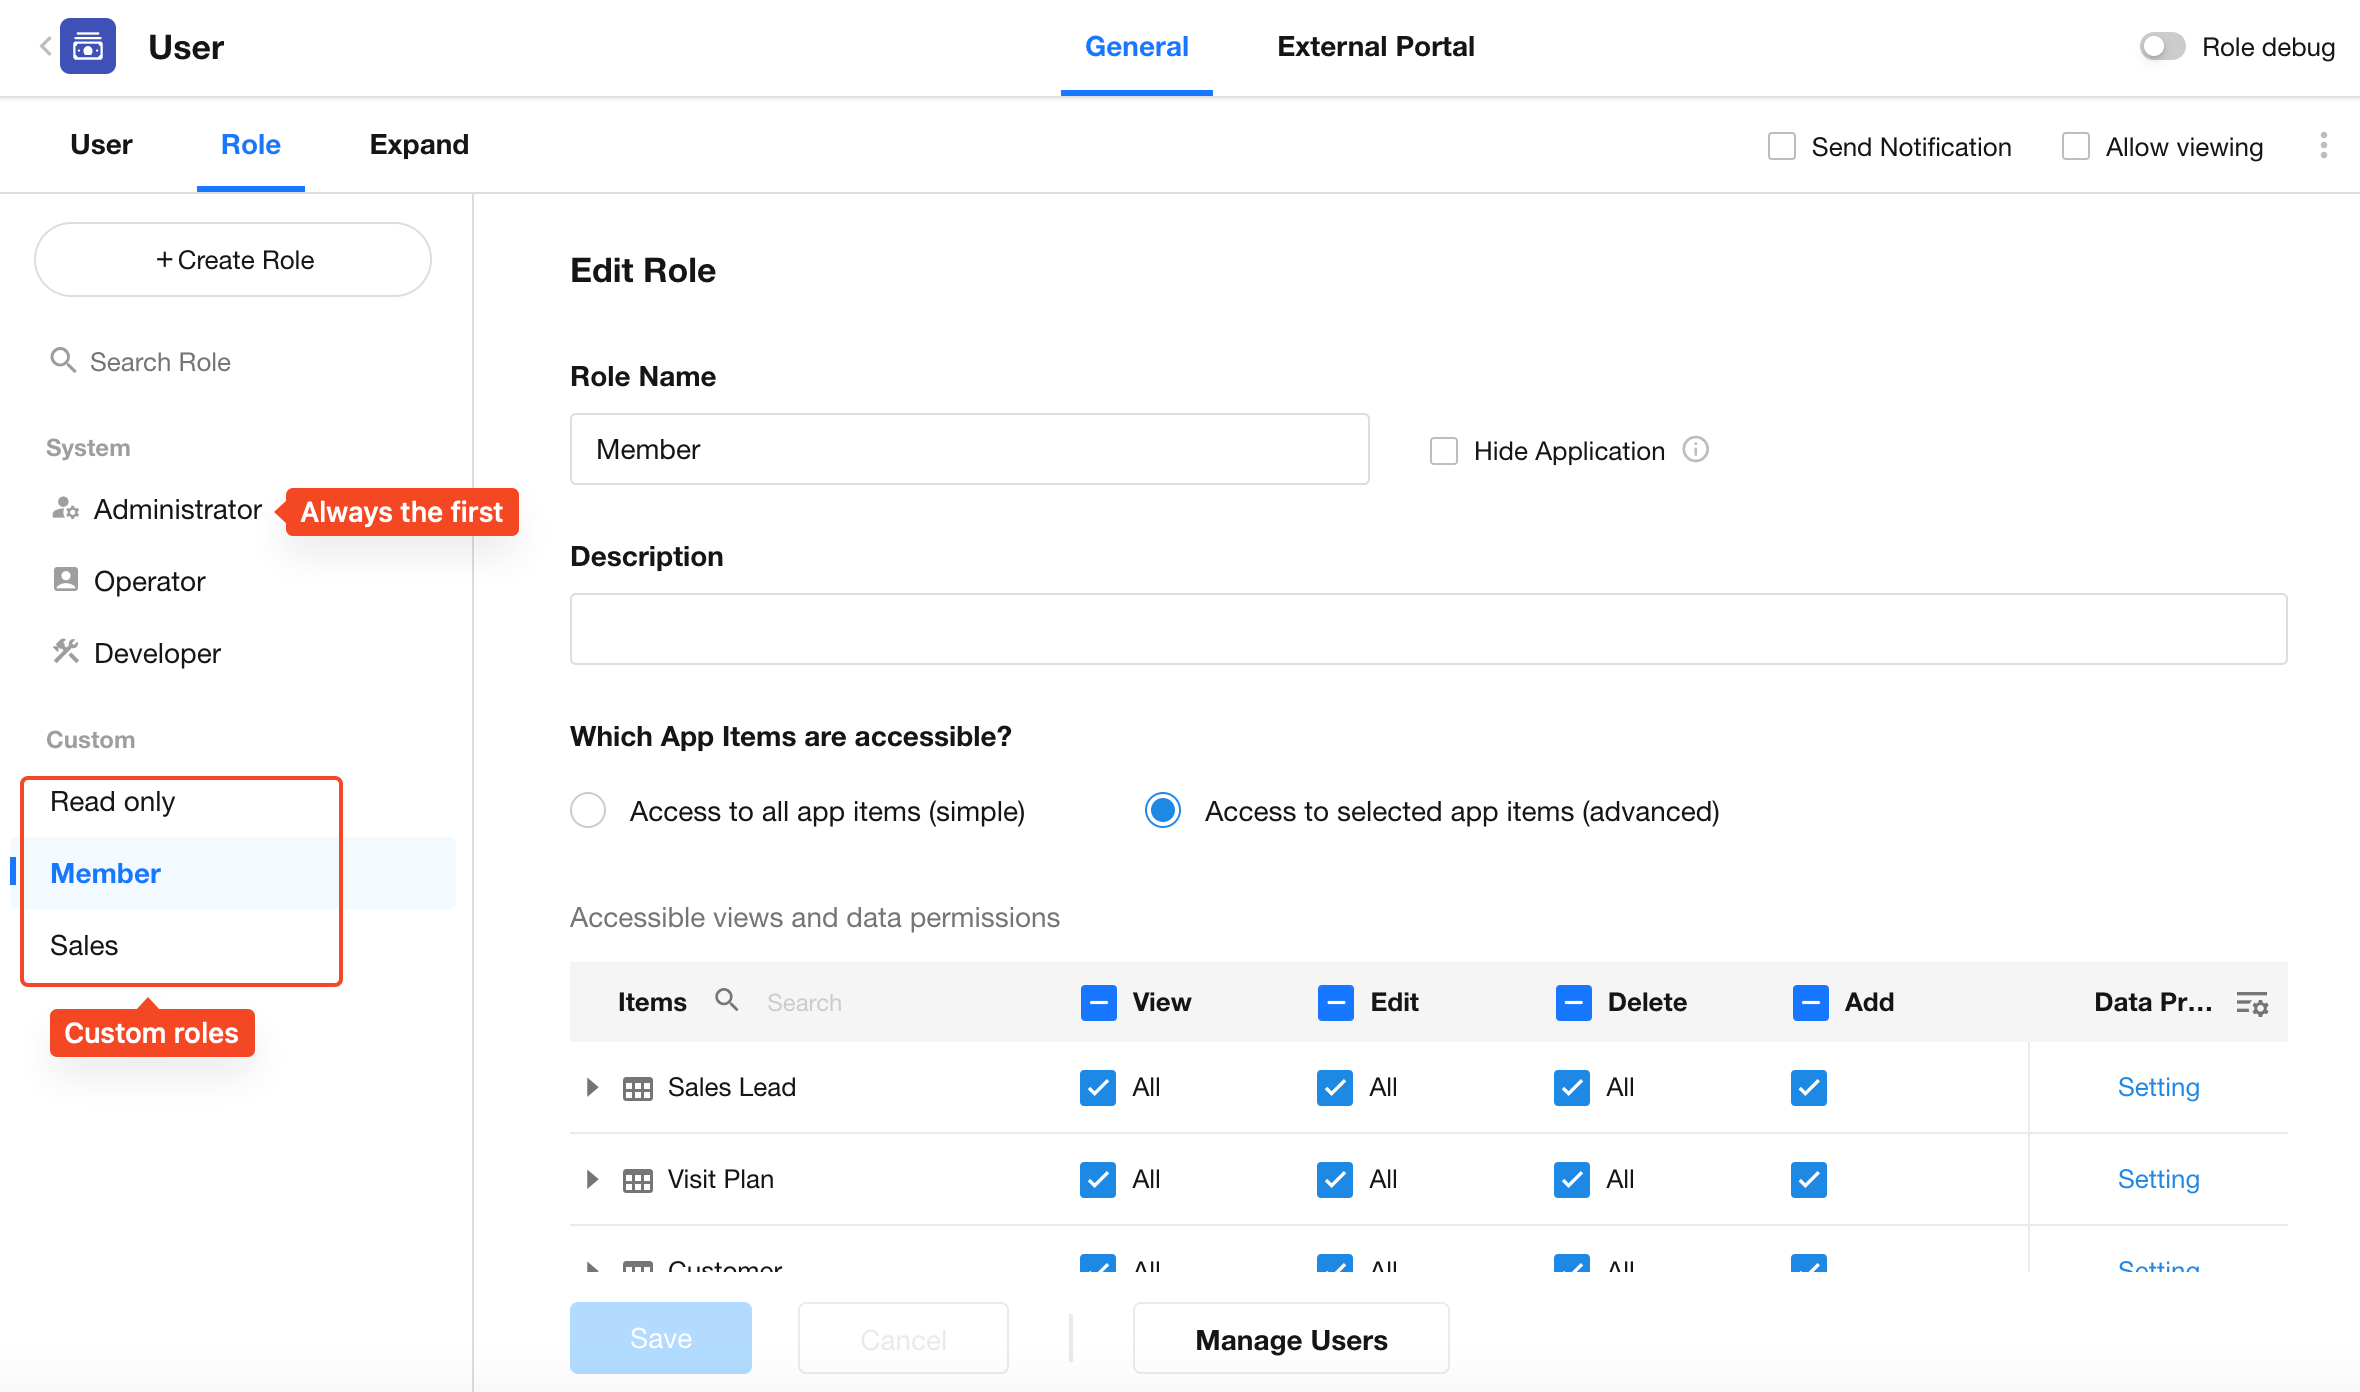
Application administrators can create new roles and configure their permissions. By default, each new app includes two predefined custom roles: Member and Read-Only. Admins can reconfigure these roles or create additional ones as needed.
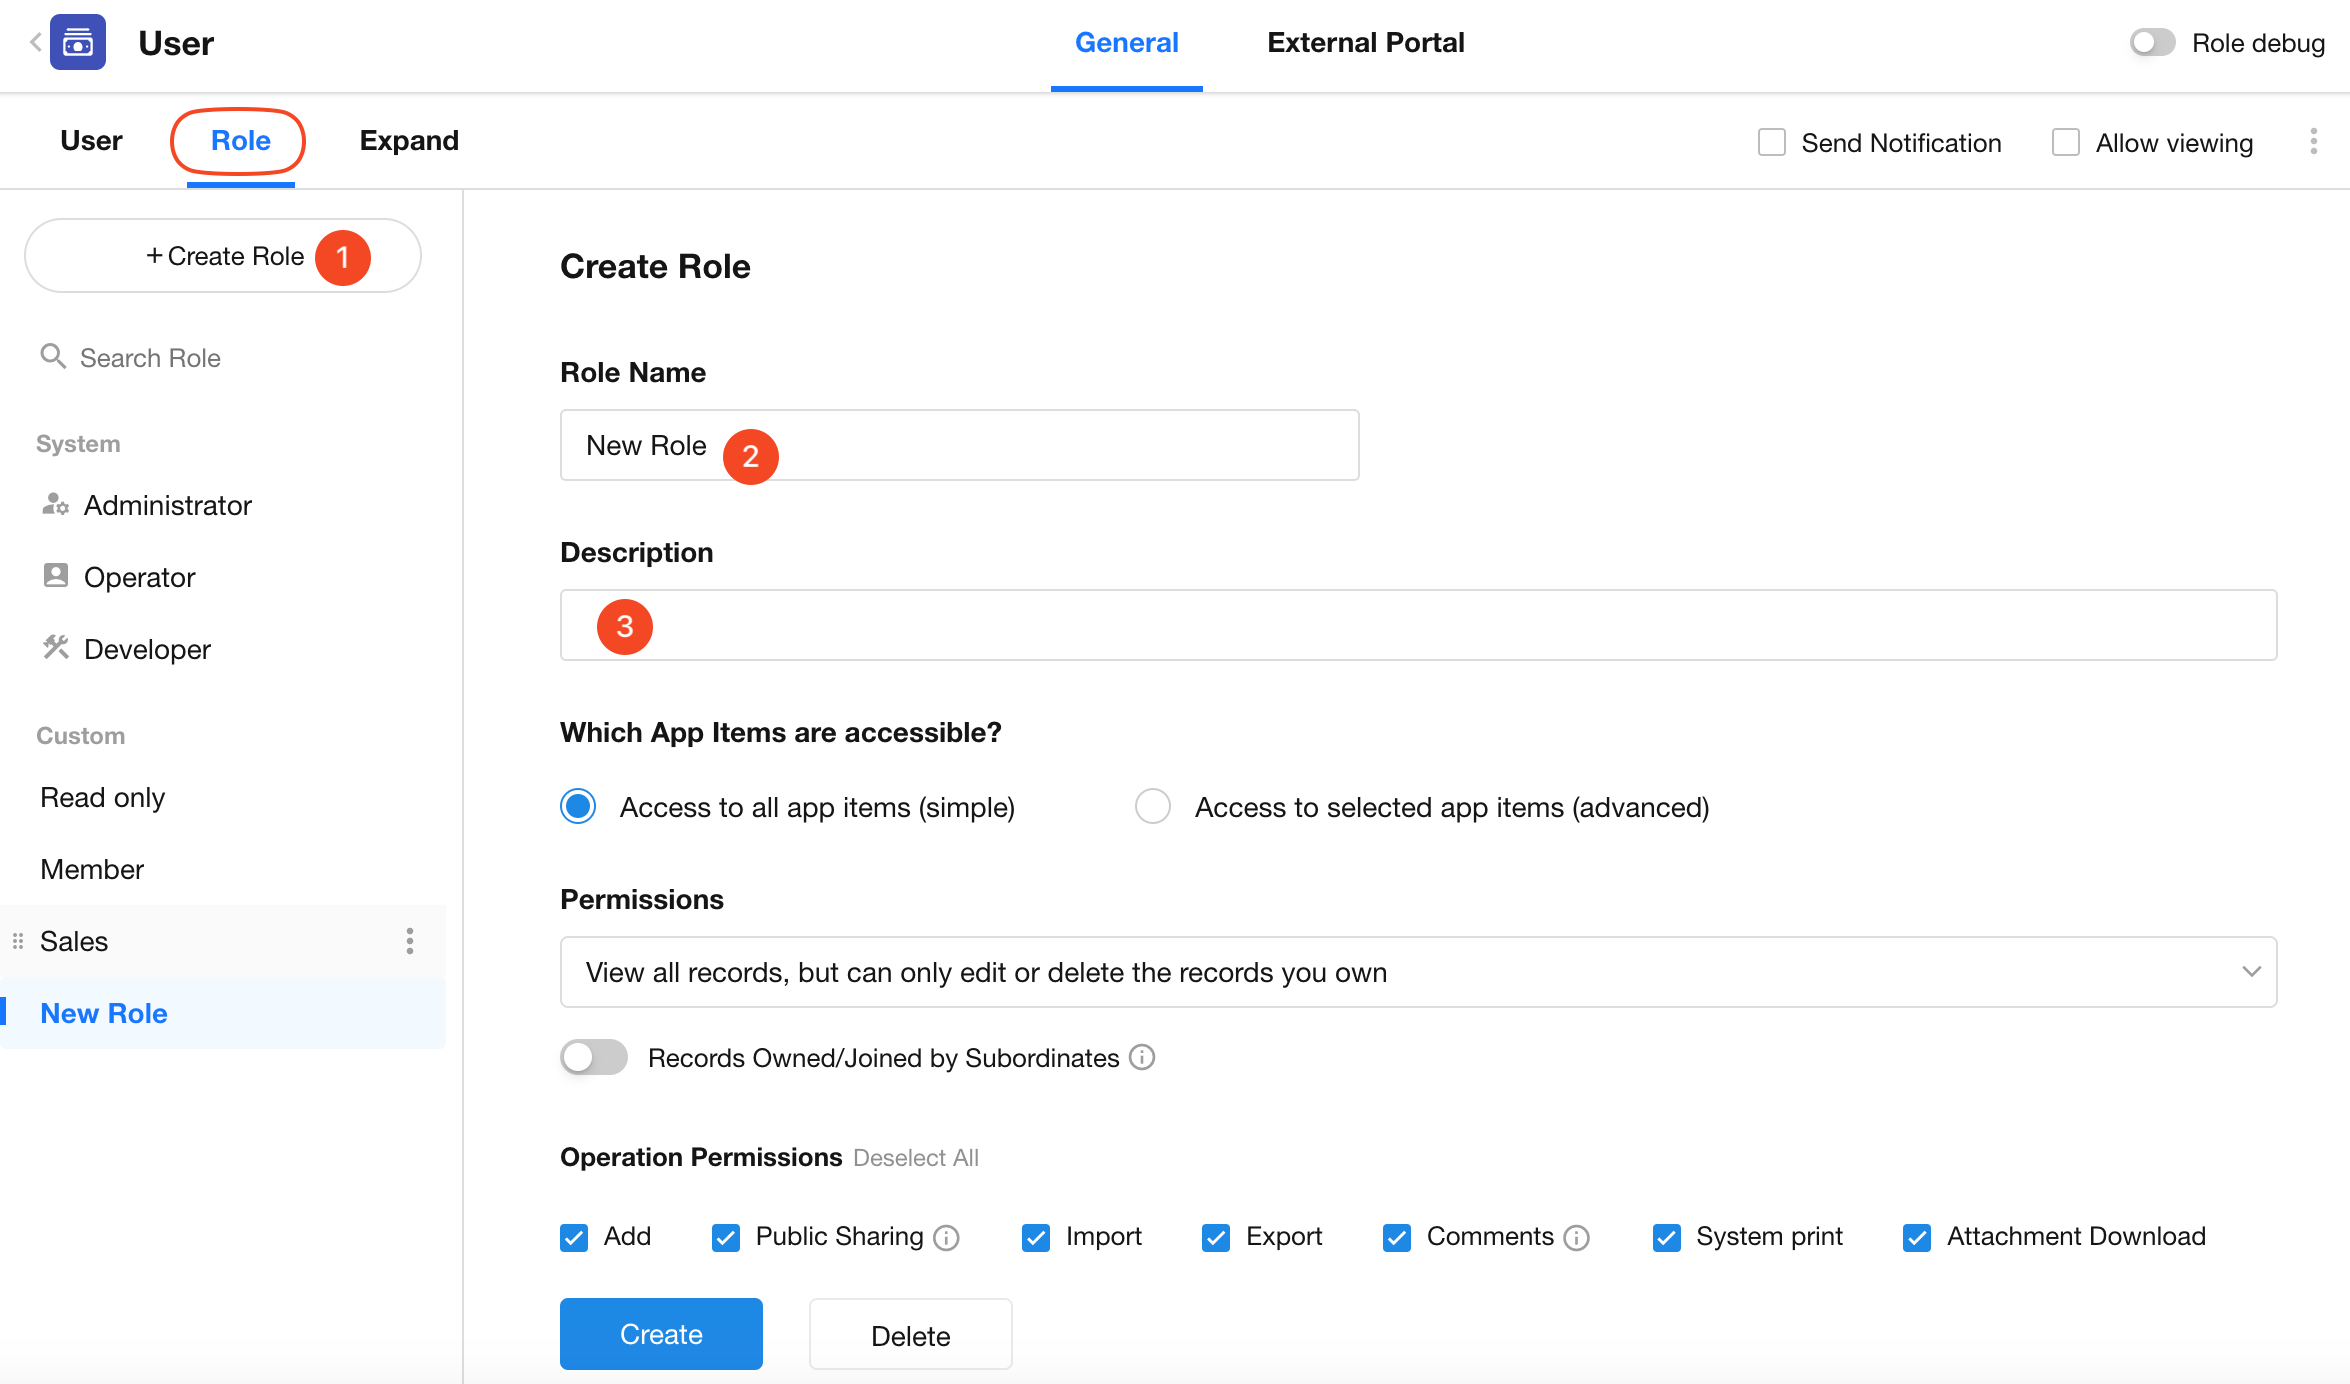
Create/Edit a Role
Create a Role
-
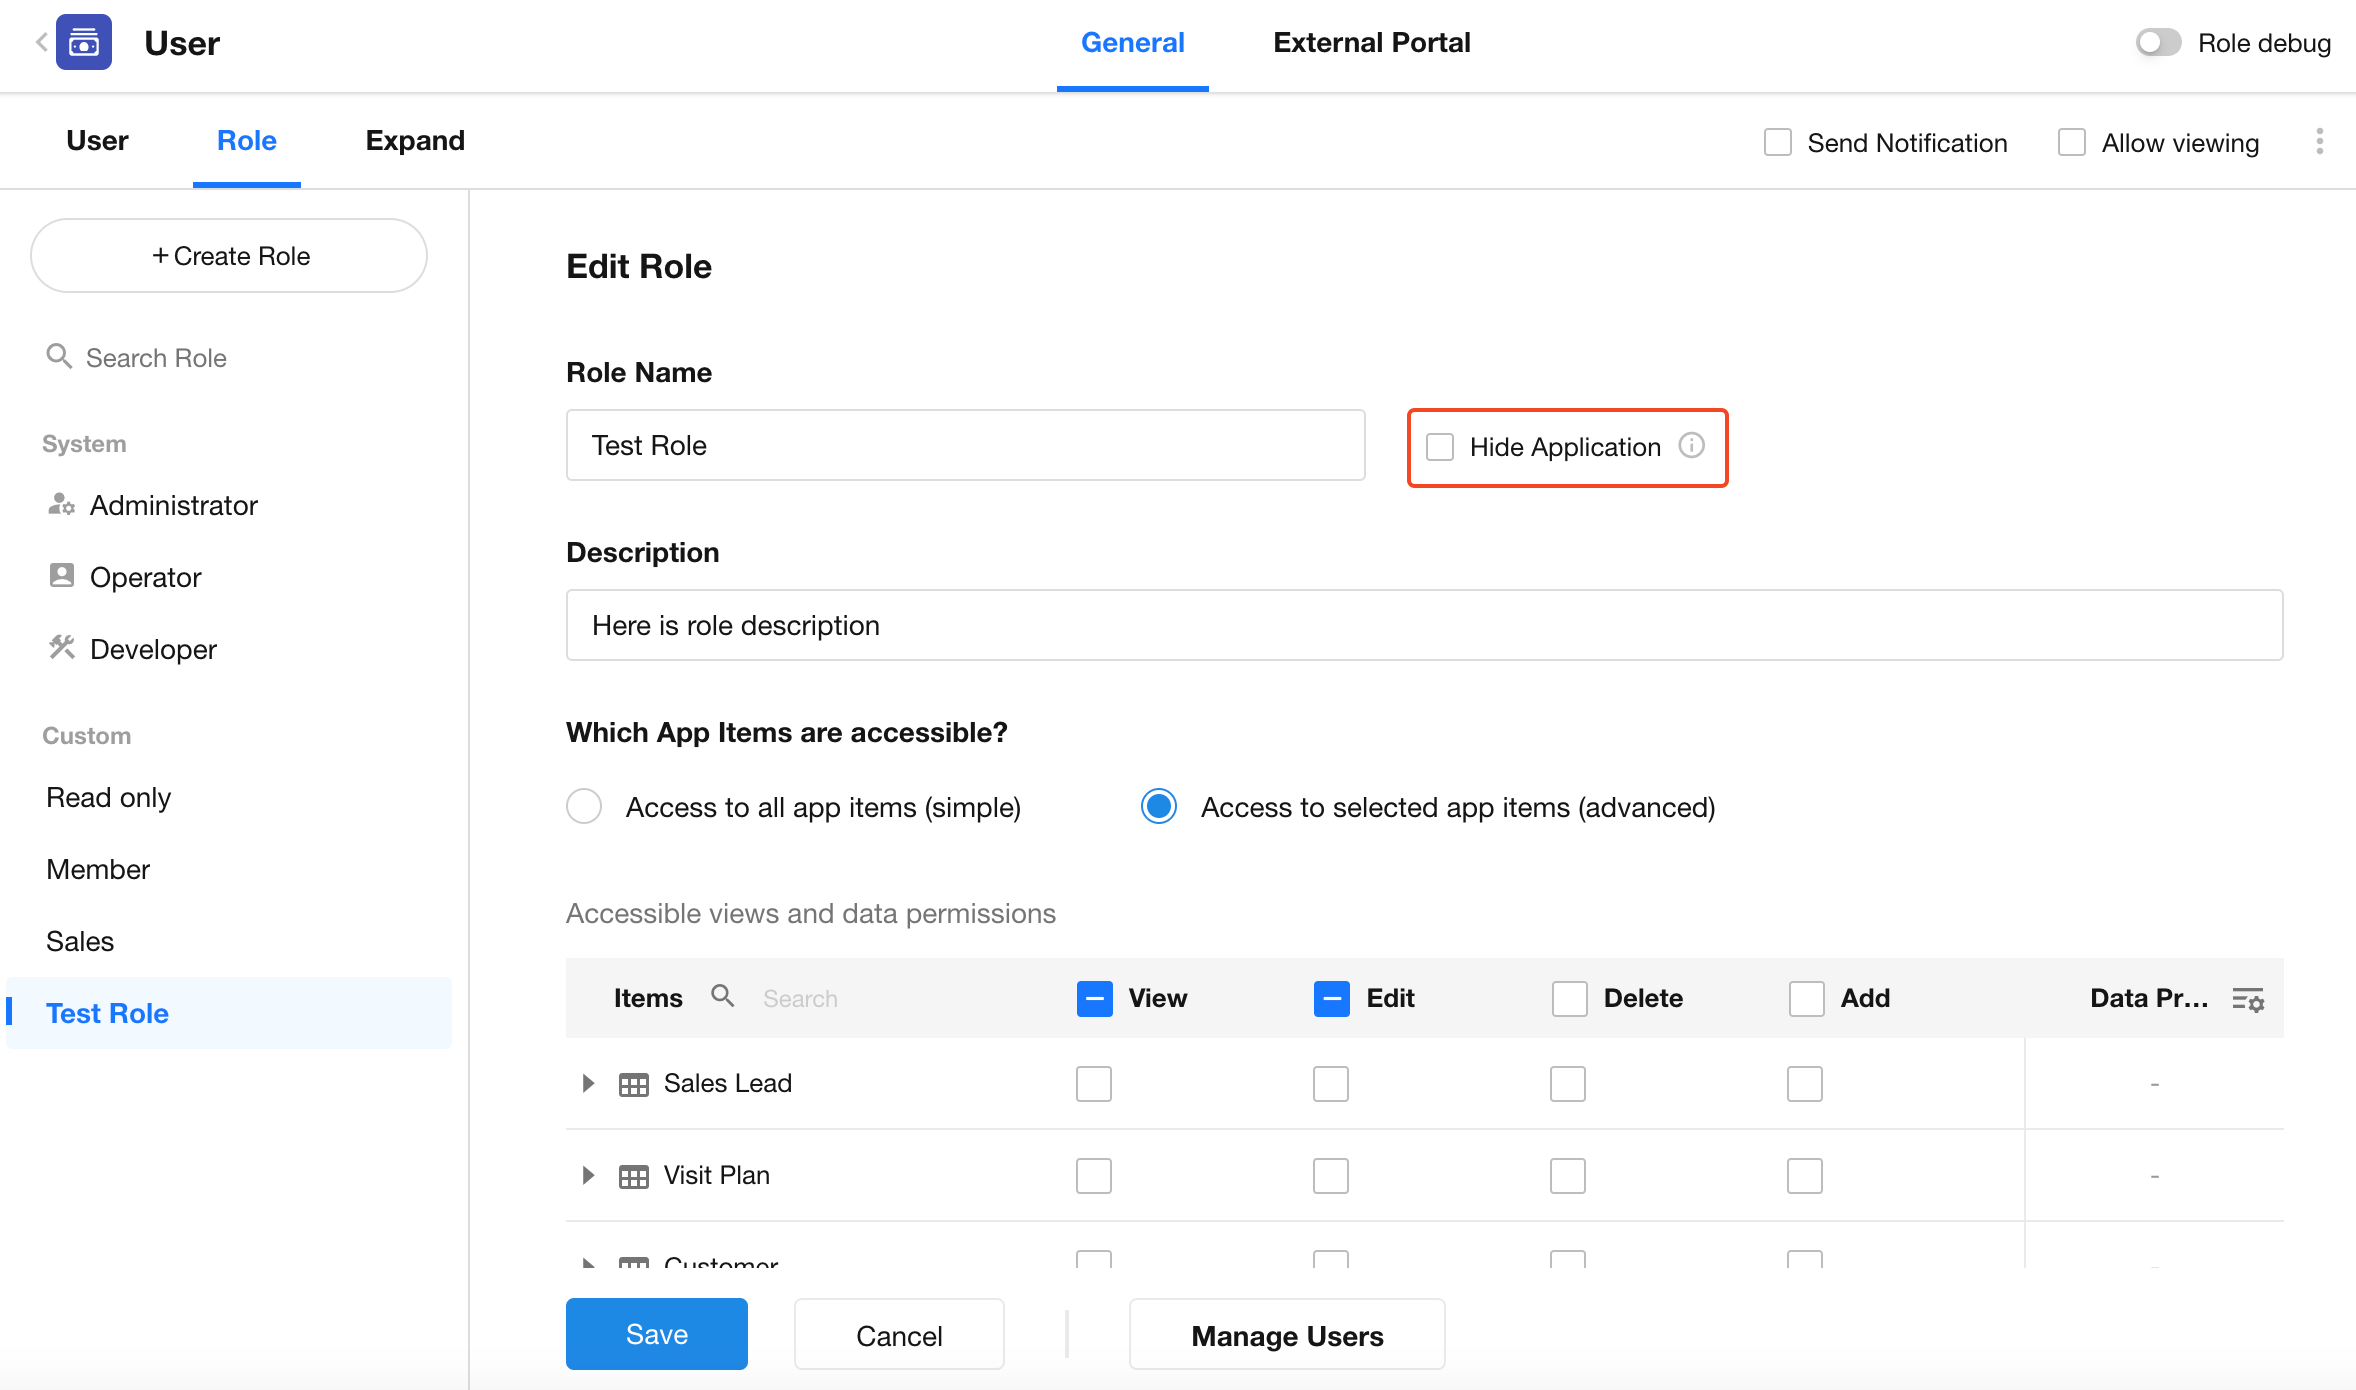
Click the Create Role button. Enter the role’s name and description, then proceed to configure its permissions.
-
Click Save at the bottom to complete the setup, or click Delete to cancel role creation.
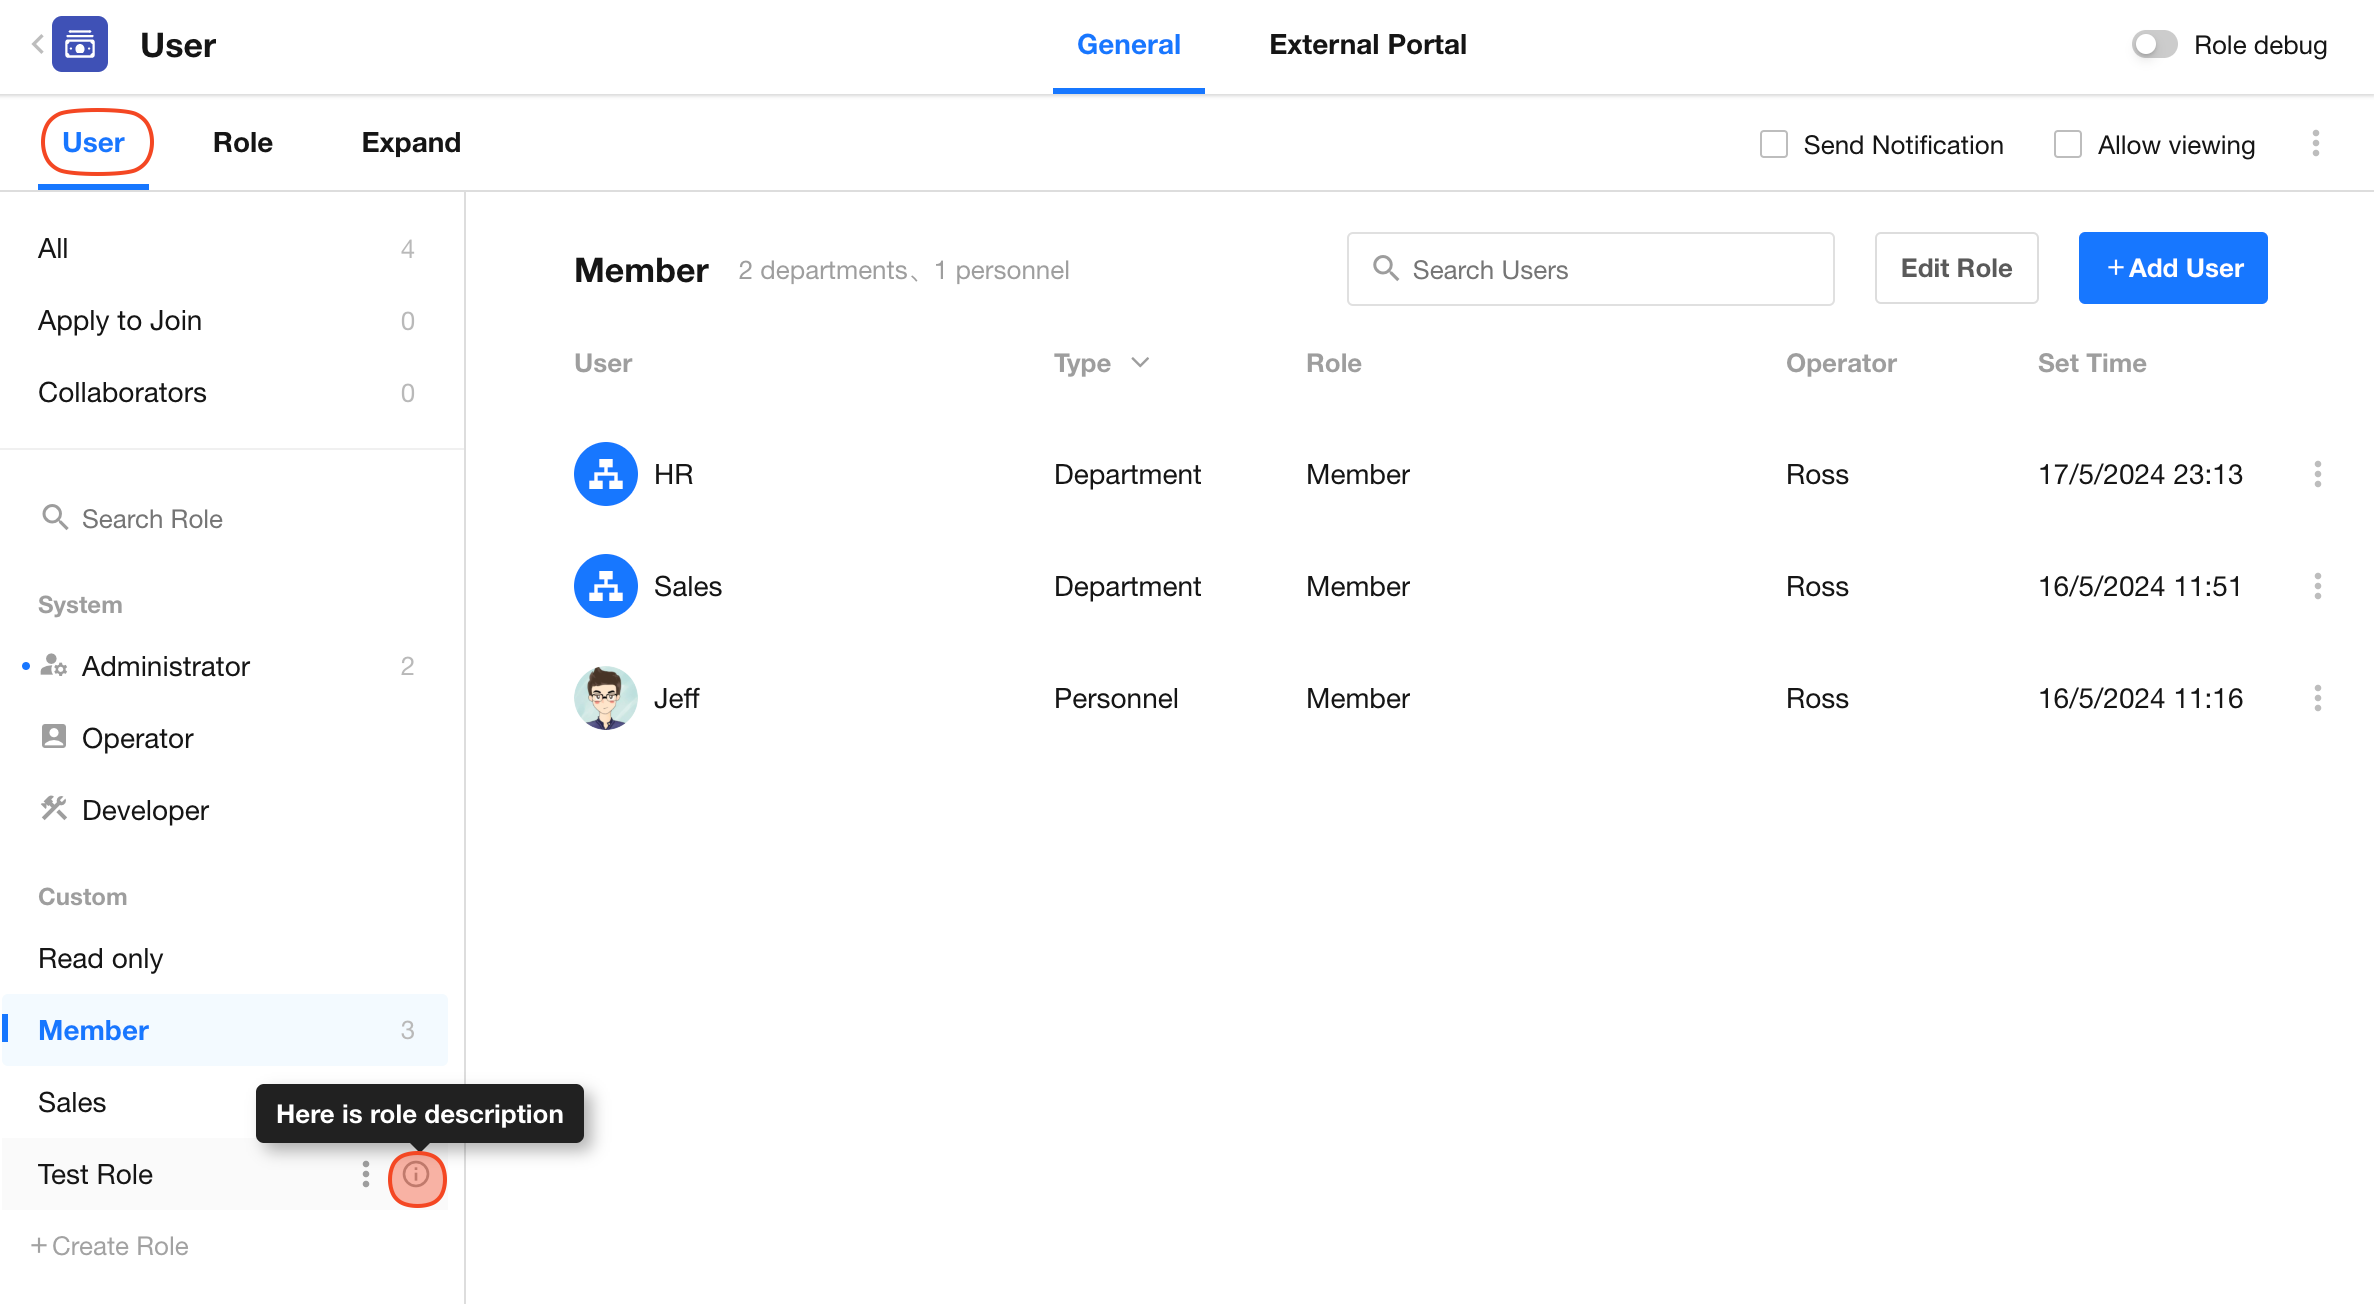
This is how the role description appears to users:
Edit a Role
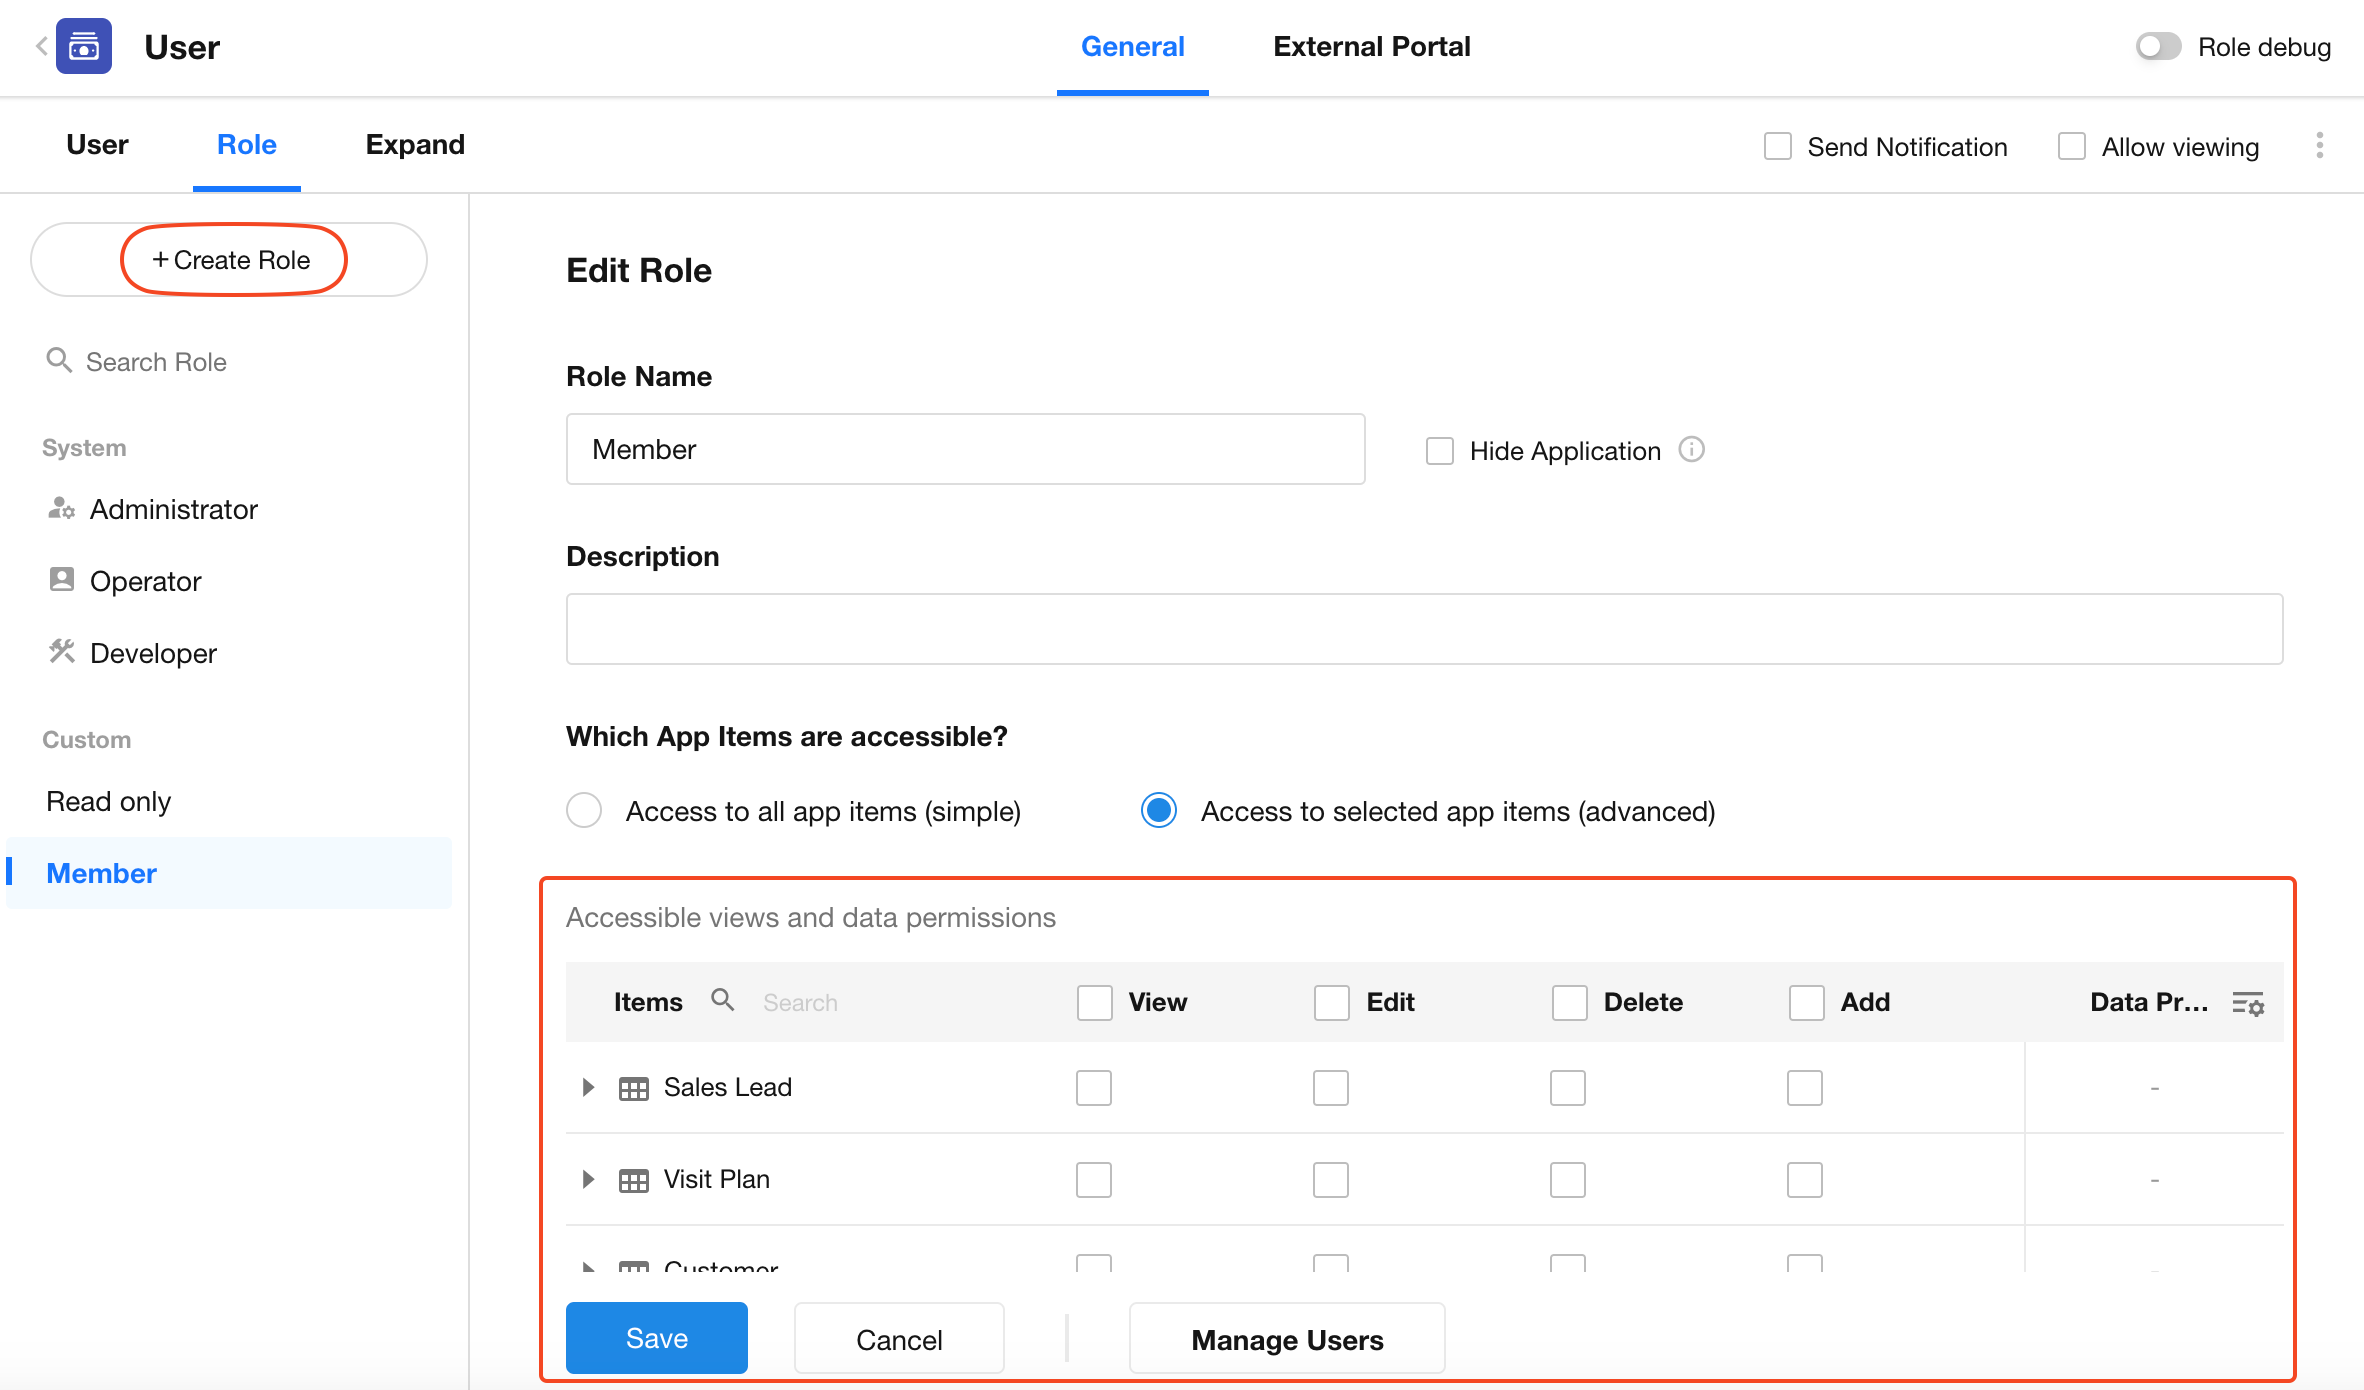
Click on the target role to edit its settings, including the name, description, and permission configurations.
After making any changes, click Save to confirm or Cancel to discard modifications.
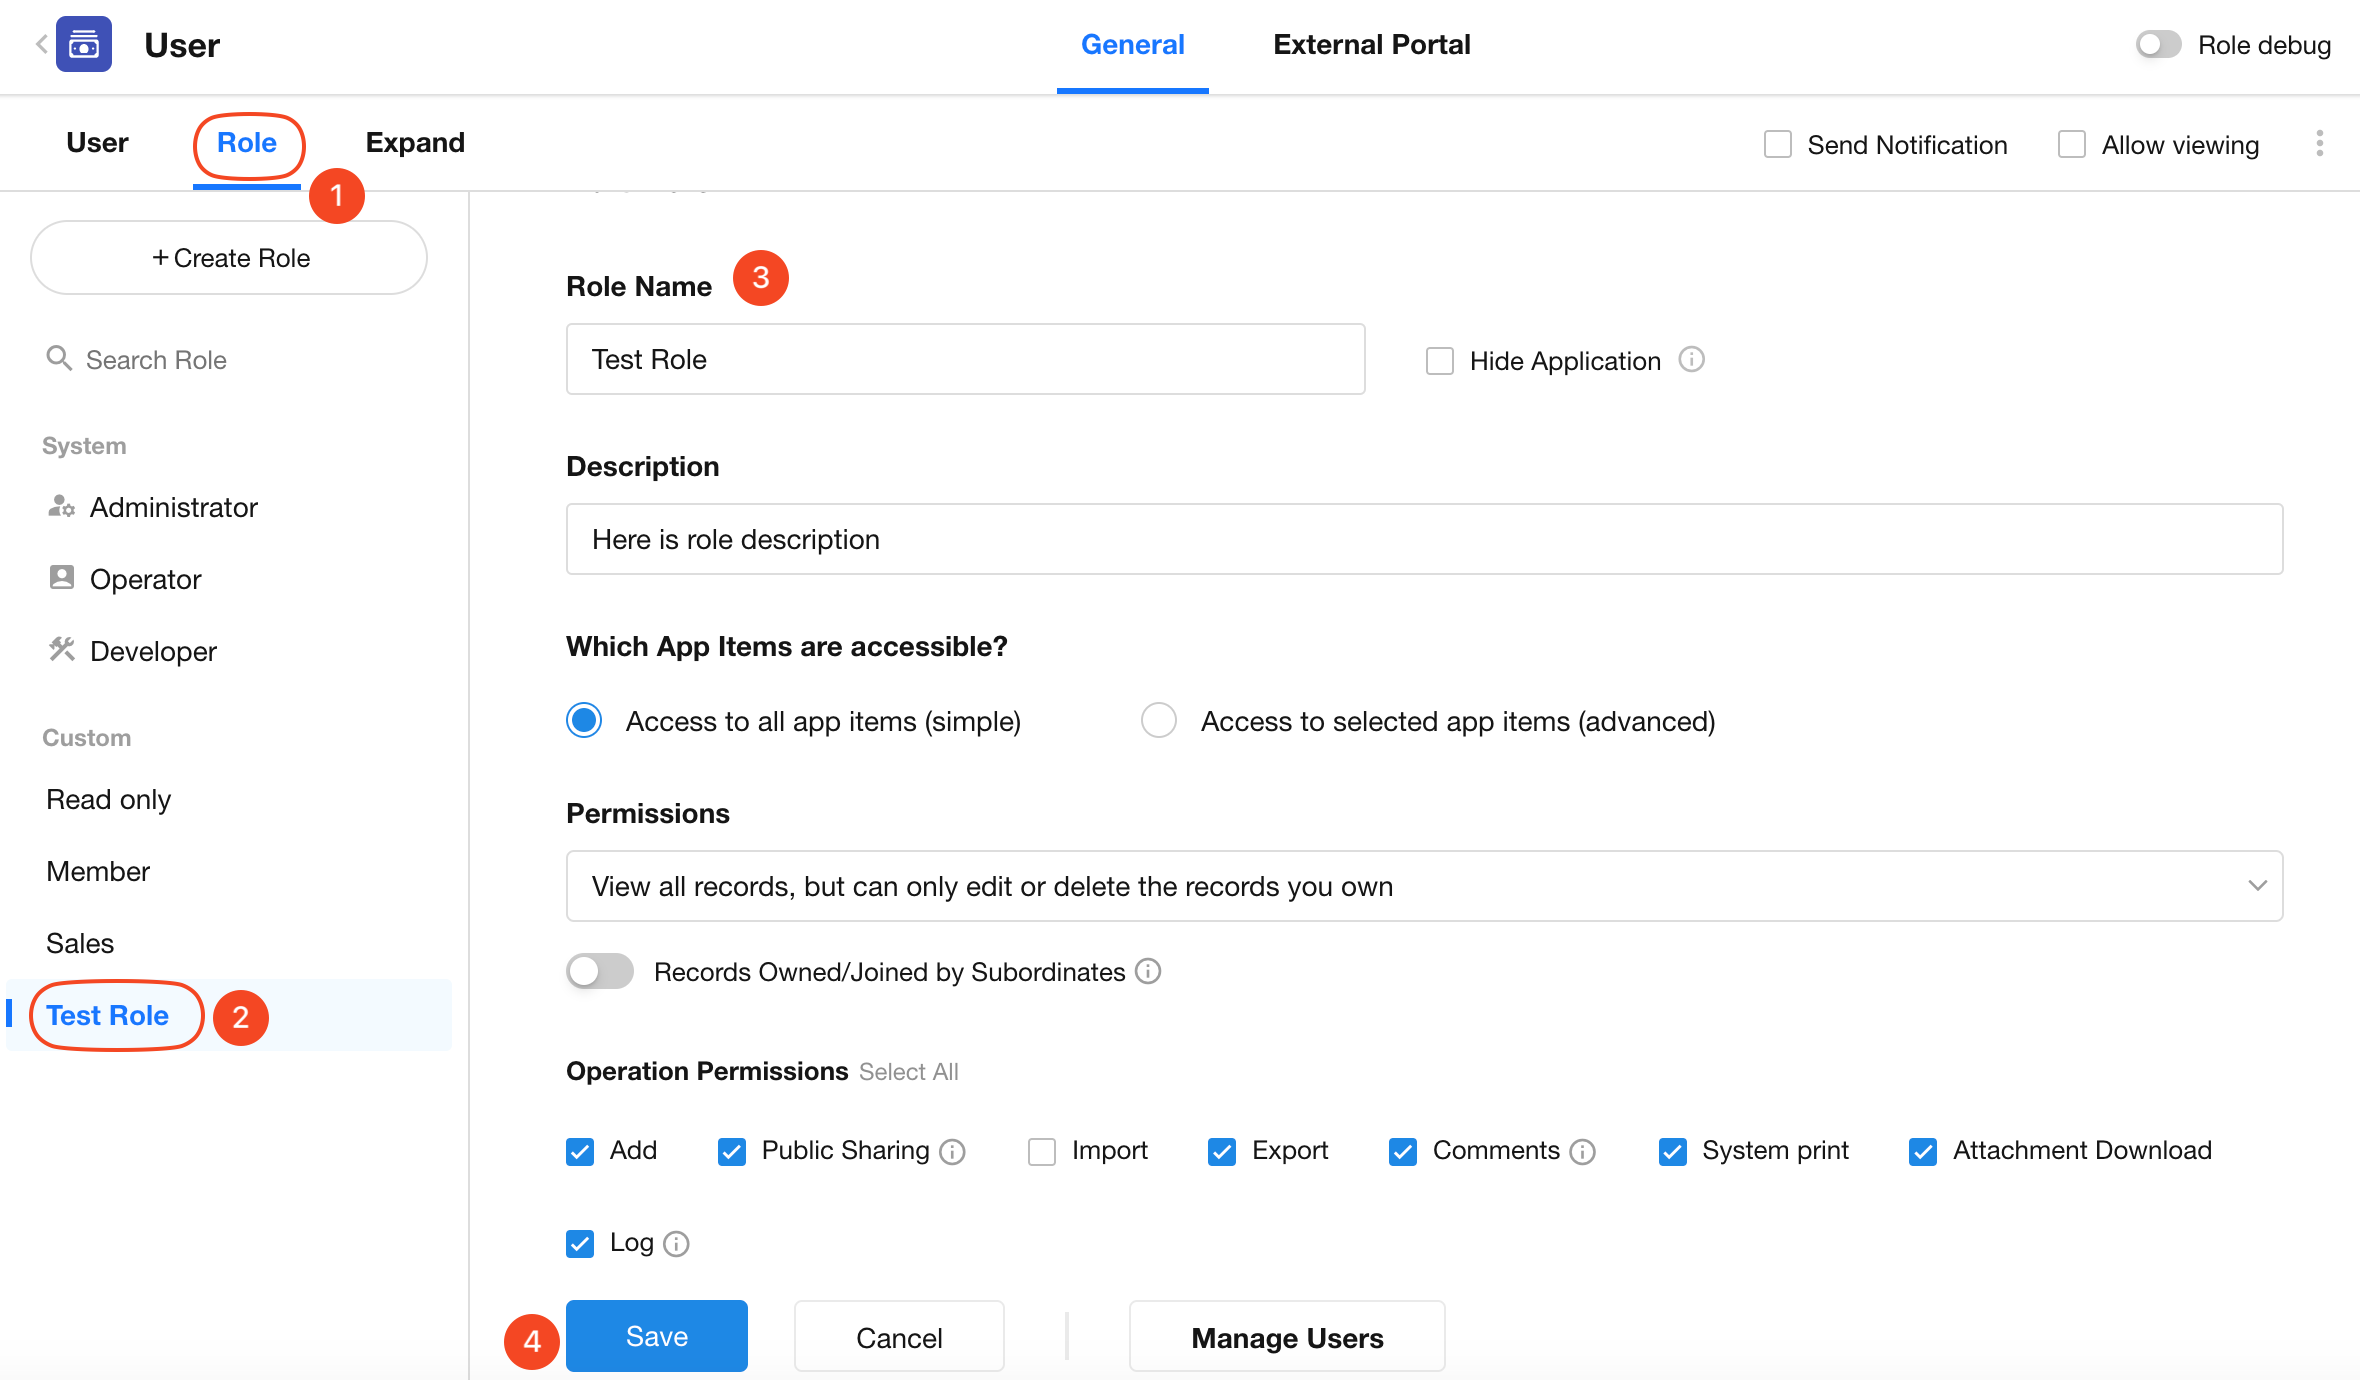
Configure Role Permissions
There are two permission configuration modes:
-
Access to all application items
All pages, worksheets, and views are visible to the role. Permissions are configured uniformly across all worksheets. -
Access to selected application items
Permissions can be configured for specific pages, worksheets, views, and fields, enabling more granular access control and differentiated record-level operations.
Mode 1: Access to All App Items (Simple Mode)
This is a quick and easy configuration mode. All custom pages, worksheets, and views in the application are visible to the role, and permissions are managed uniformly. Field-level permissions are not supported. This mode is suitable for apps with fewer users and roles.
Record View/Edit/Delete Permissions
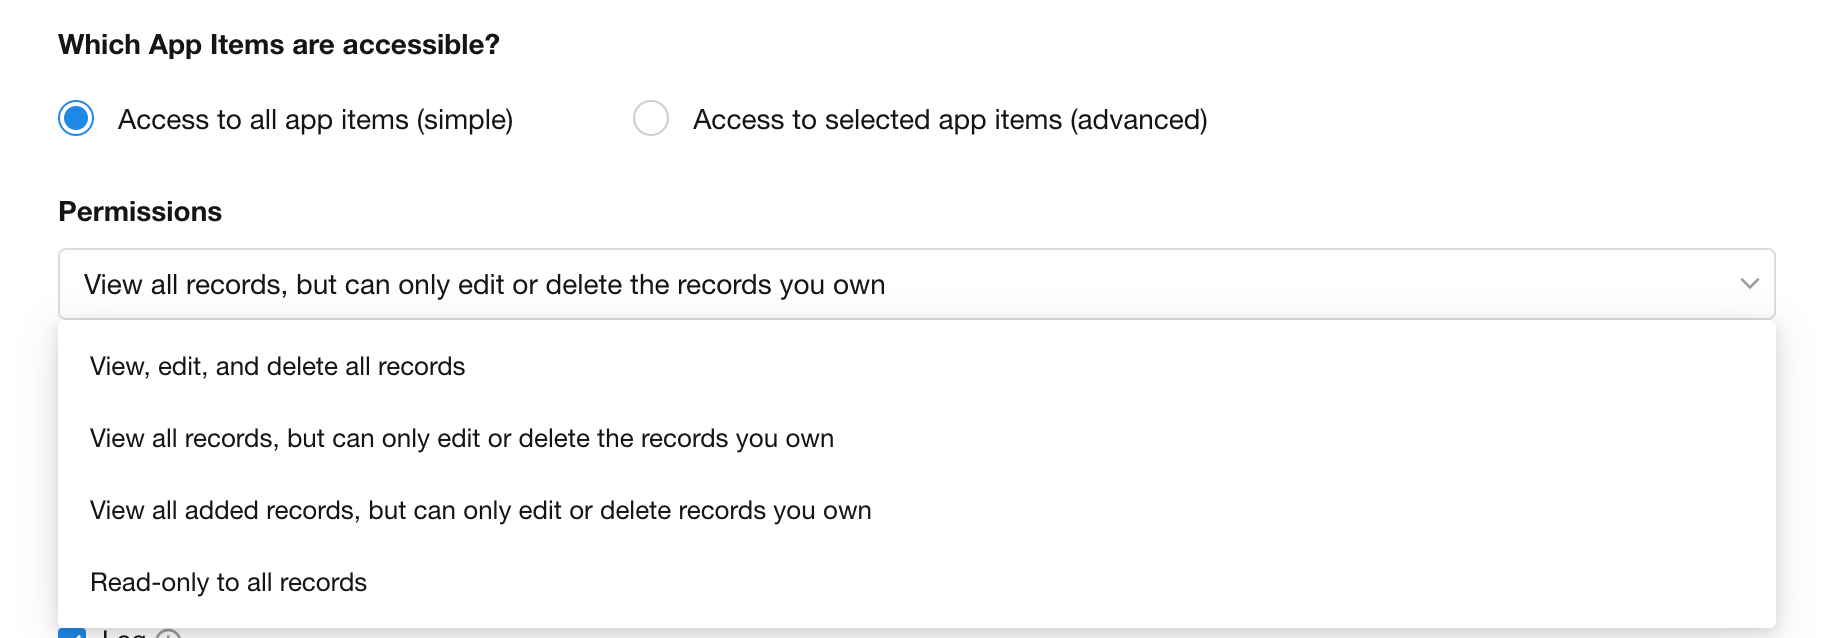
Four permission configurations are available:
-
1) View, Edit, and Delete All Records
- View records: The role can view, edit, and delete all records in all worksheets. This is the most permissive option.
- The role can manage all data in the app, except for application-level configurations.
-
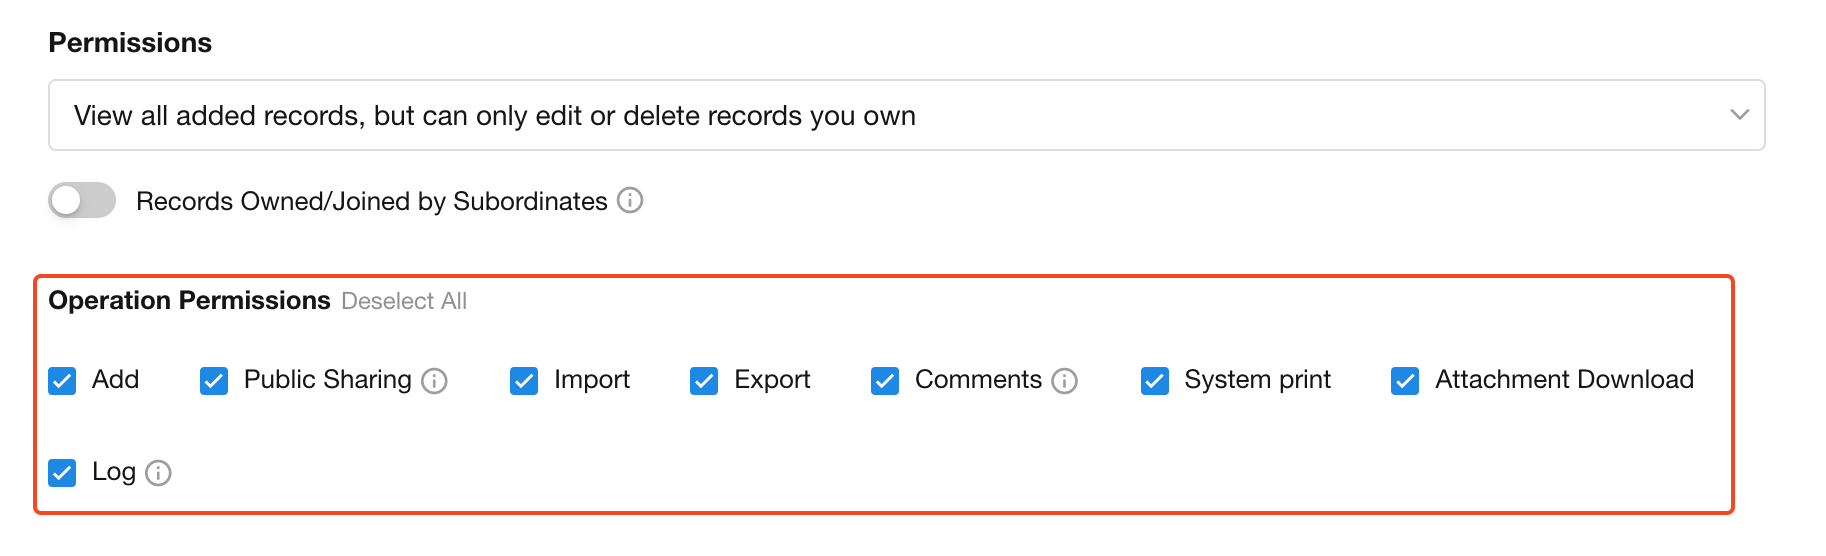
2) View All Records, But Only Edit/Delete Owned Records
- View records: The role can view all records across worksheets.
- Edit/Delete records: The role can only edit or delete records they own.
If you’re unsure what constitutes “owned records,” refer to Three Record Roles
-
3) View Joined Records, Only Edit/Delete Owned Records
- View records: The role can only see records they’ve joined. Not all records are visible in the view.
- Edit/Delete records: Only owned records can be edited or deleted.
-
4) Read-Only for All Records
All pages, worksheets, views, and records are visible but not editable or deletable.
For options 2 and 3, you may include subordinate records by enabling “Records Owned/Joined by Subordinates .” Subordinates are defined in your Org Chart.

Other Actions: Share, Print, etc.
In addition to record permissions, you can configure common actions such as create, import, export, print, etc.
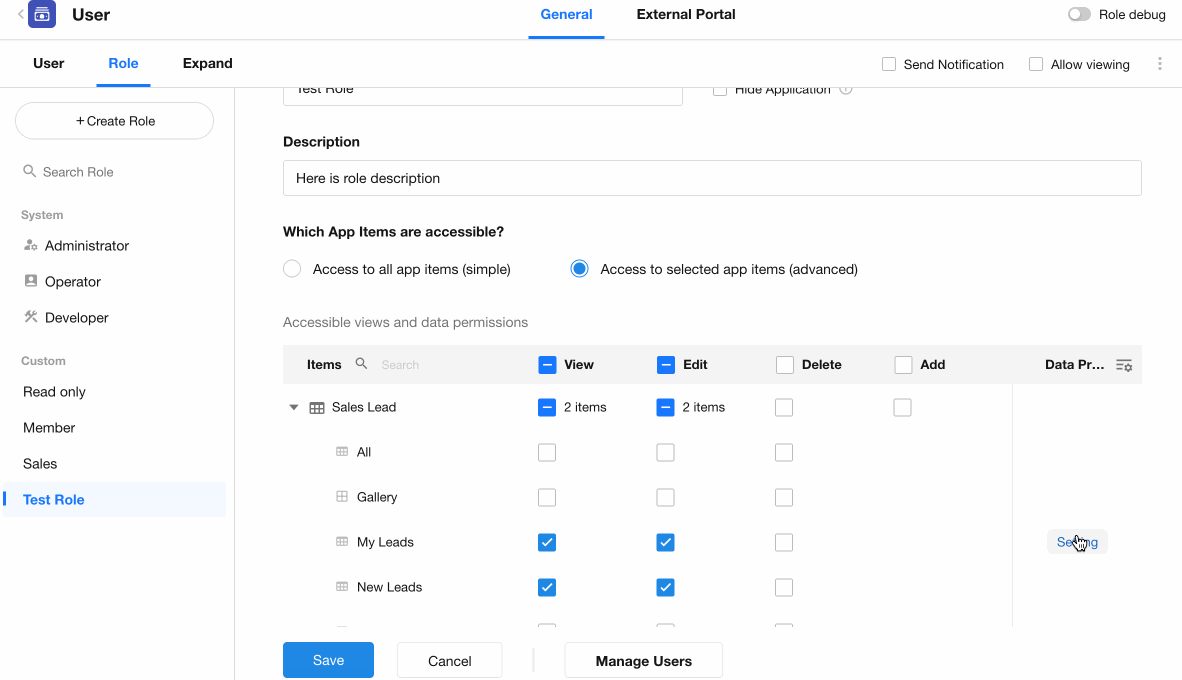
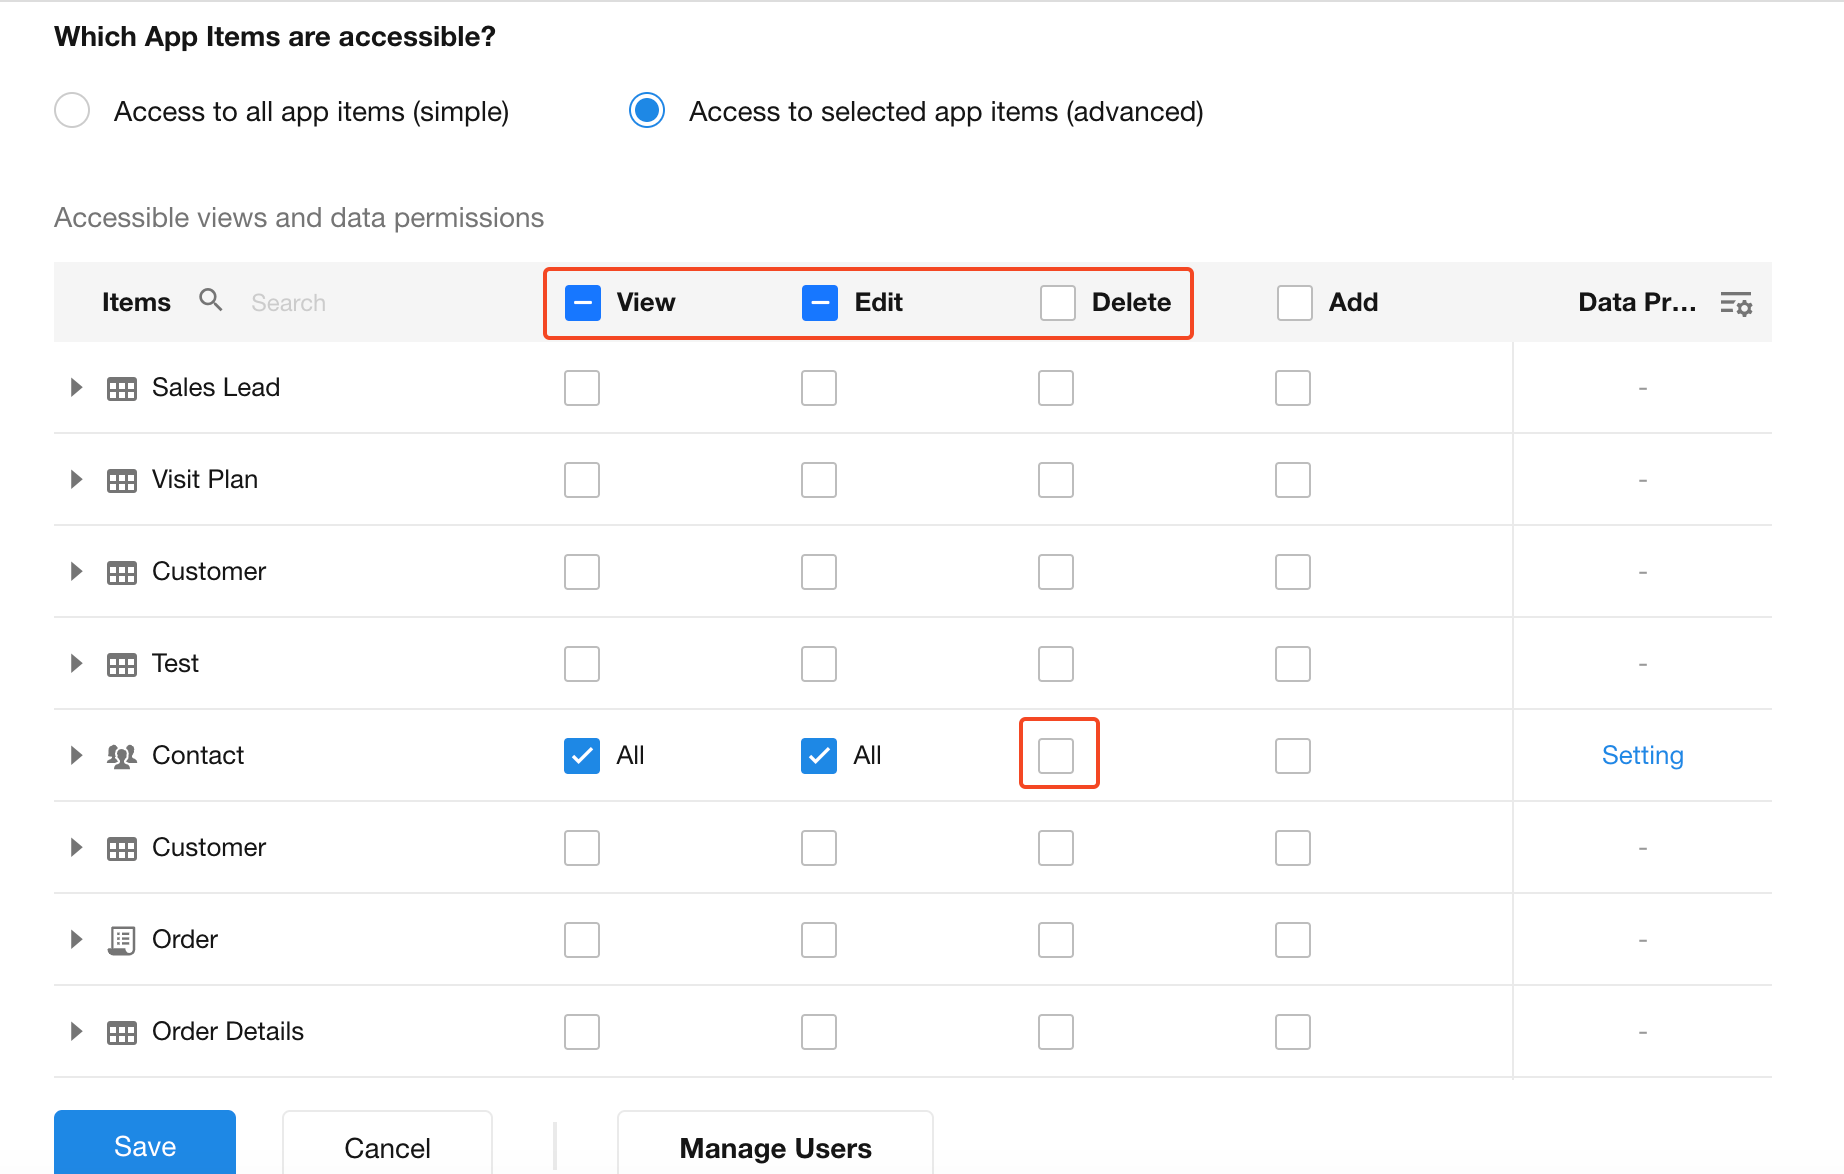
Mode 2: Access to Selected App Items (Advanced Mode)
This mode allows more flexible, granular permission configurations across four levels:
Level 1: Configure Visible Pages
Determine which worksheets, views, and custom pages a role can access. To operate on records, the view or page that contains them must be visible to the role.
-
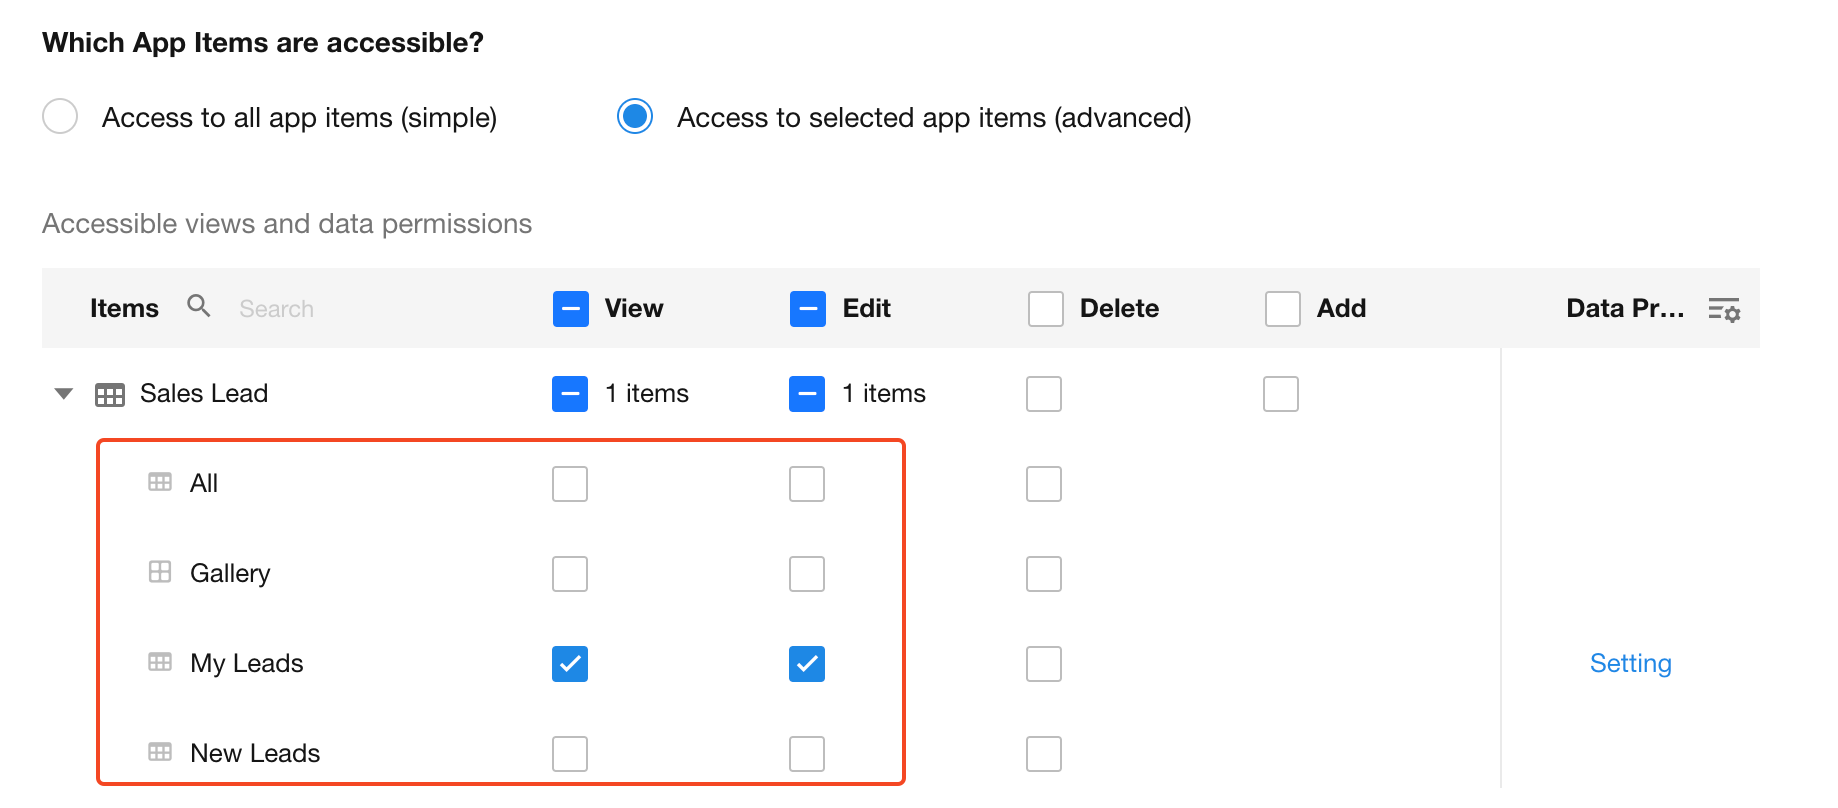
1) Configure Visible Worksheets/Custom Pages
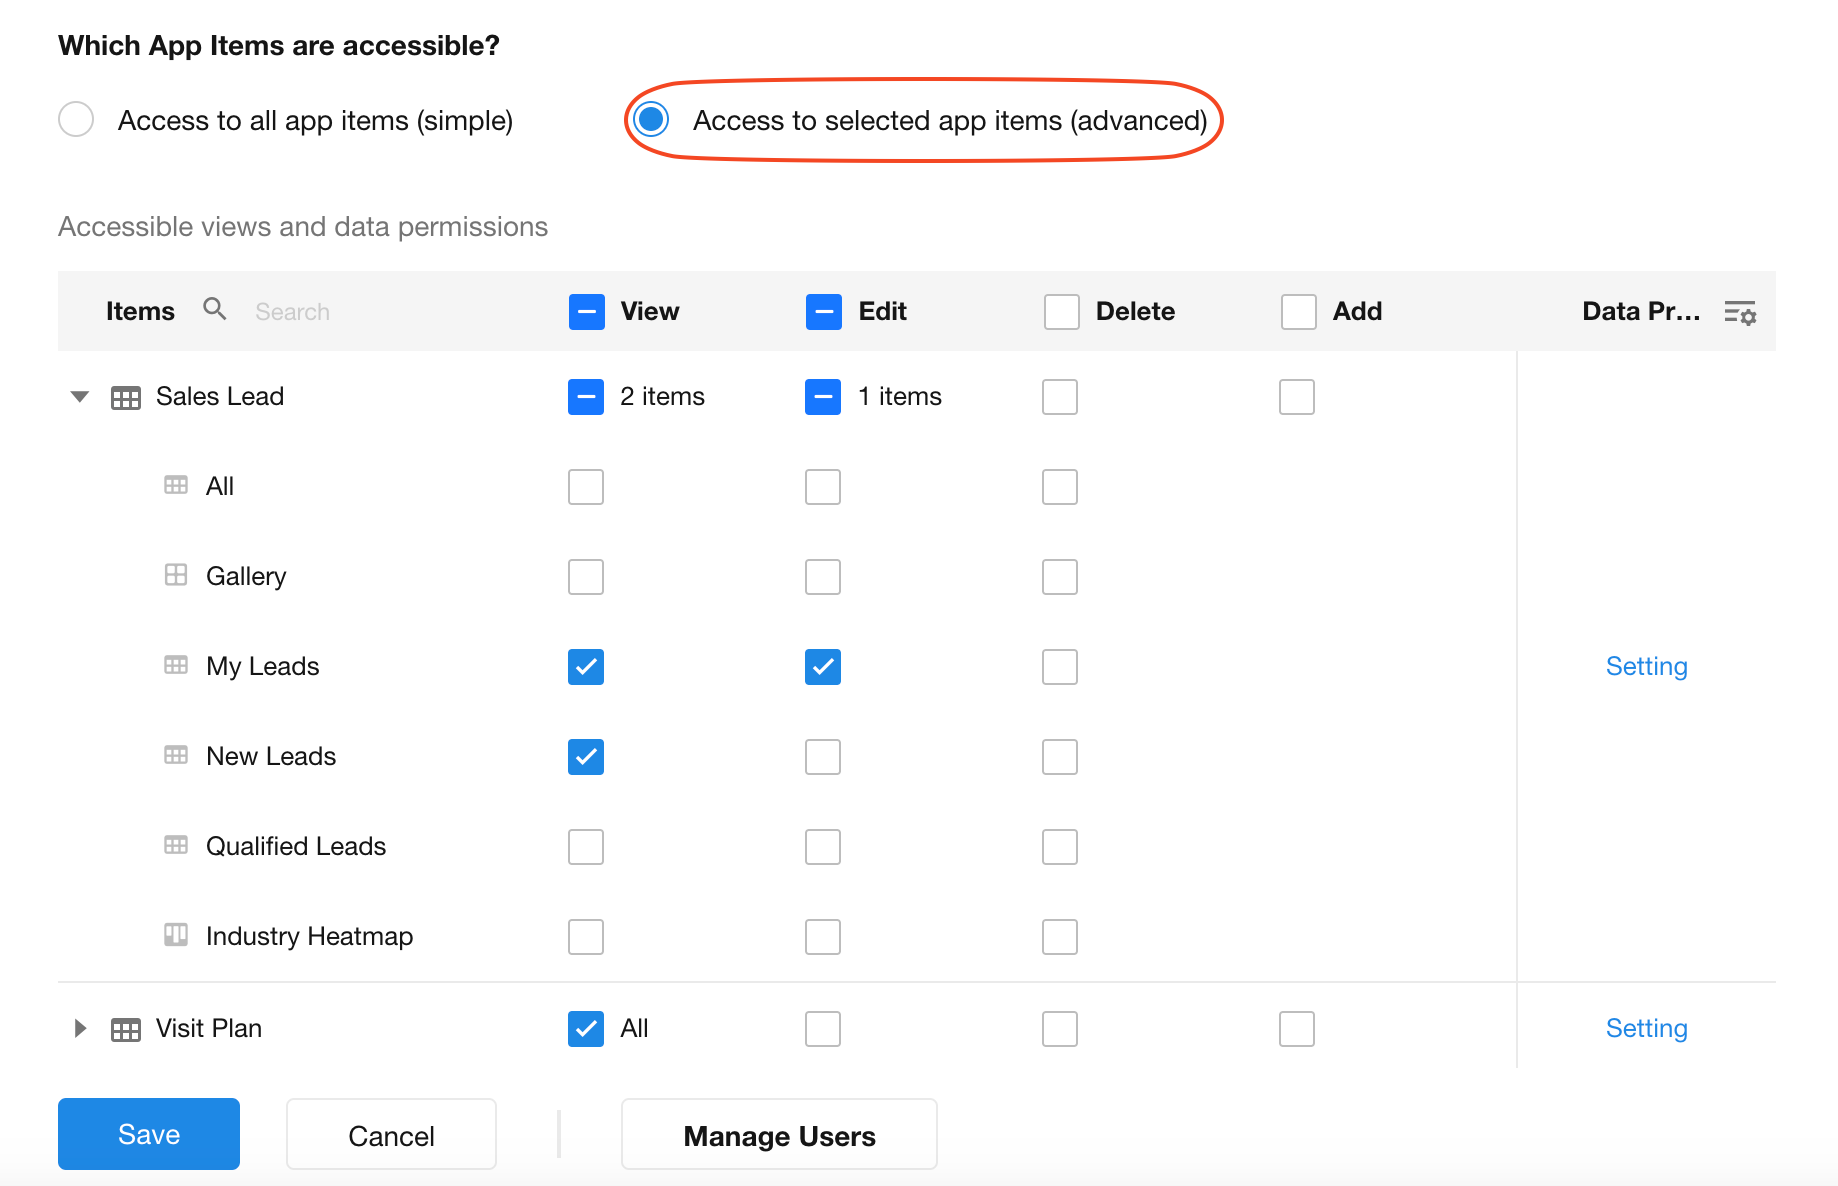
- Worksheets: Roles must have access to at least one view of a worksheet to see its data.
- Custom Pages: Only “view” permission is configurable. Edit, delete, and add are not supported for custom pages.
-
2) Configure Visible Views
Select which views are visible to the role. Views not selected will be hidden.
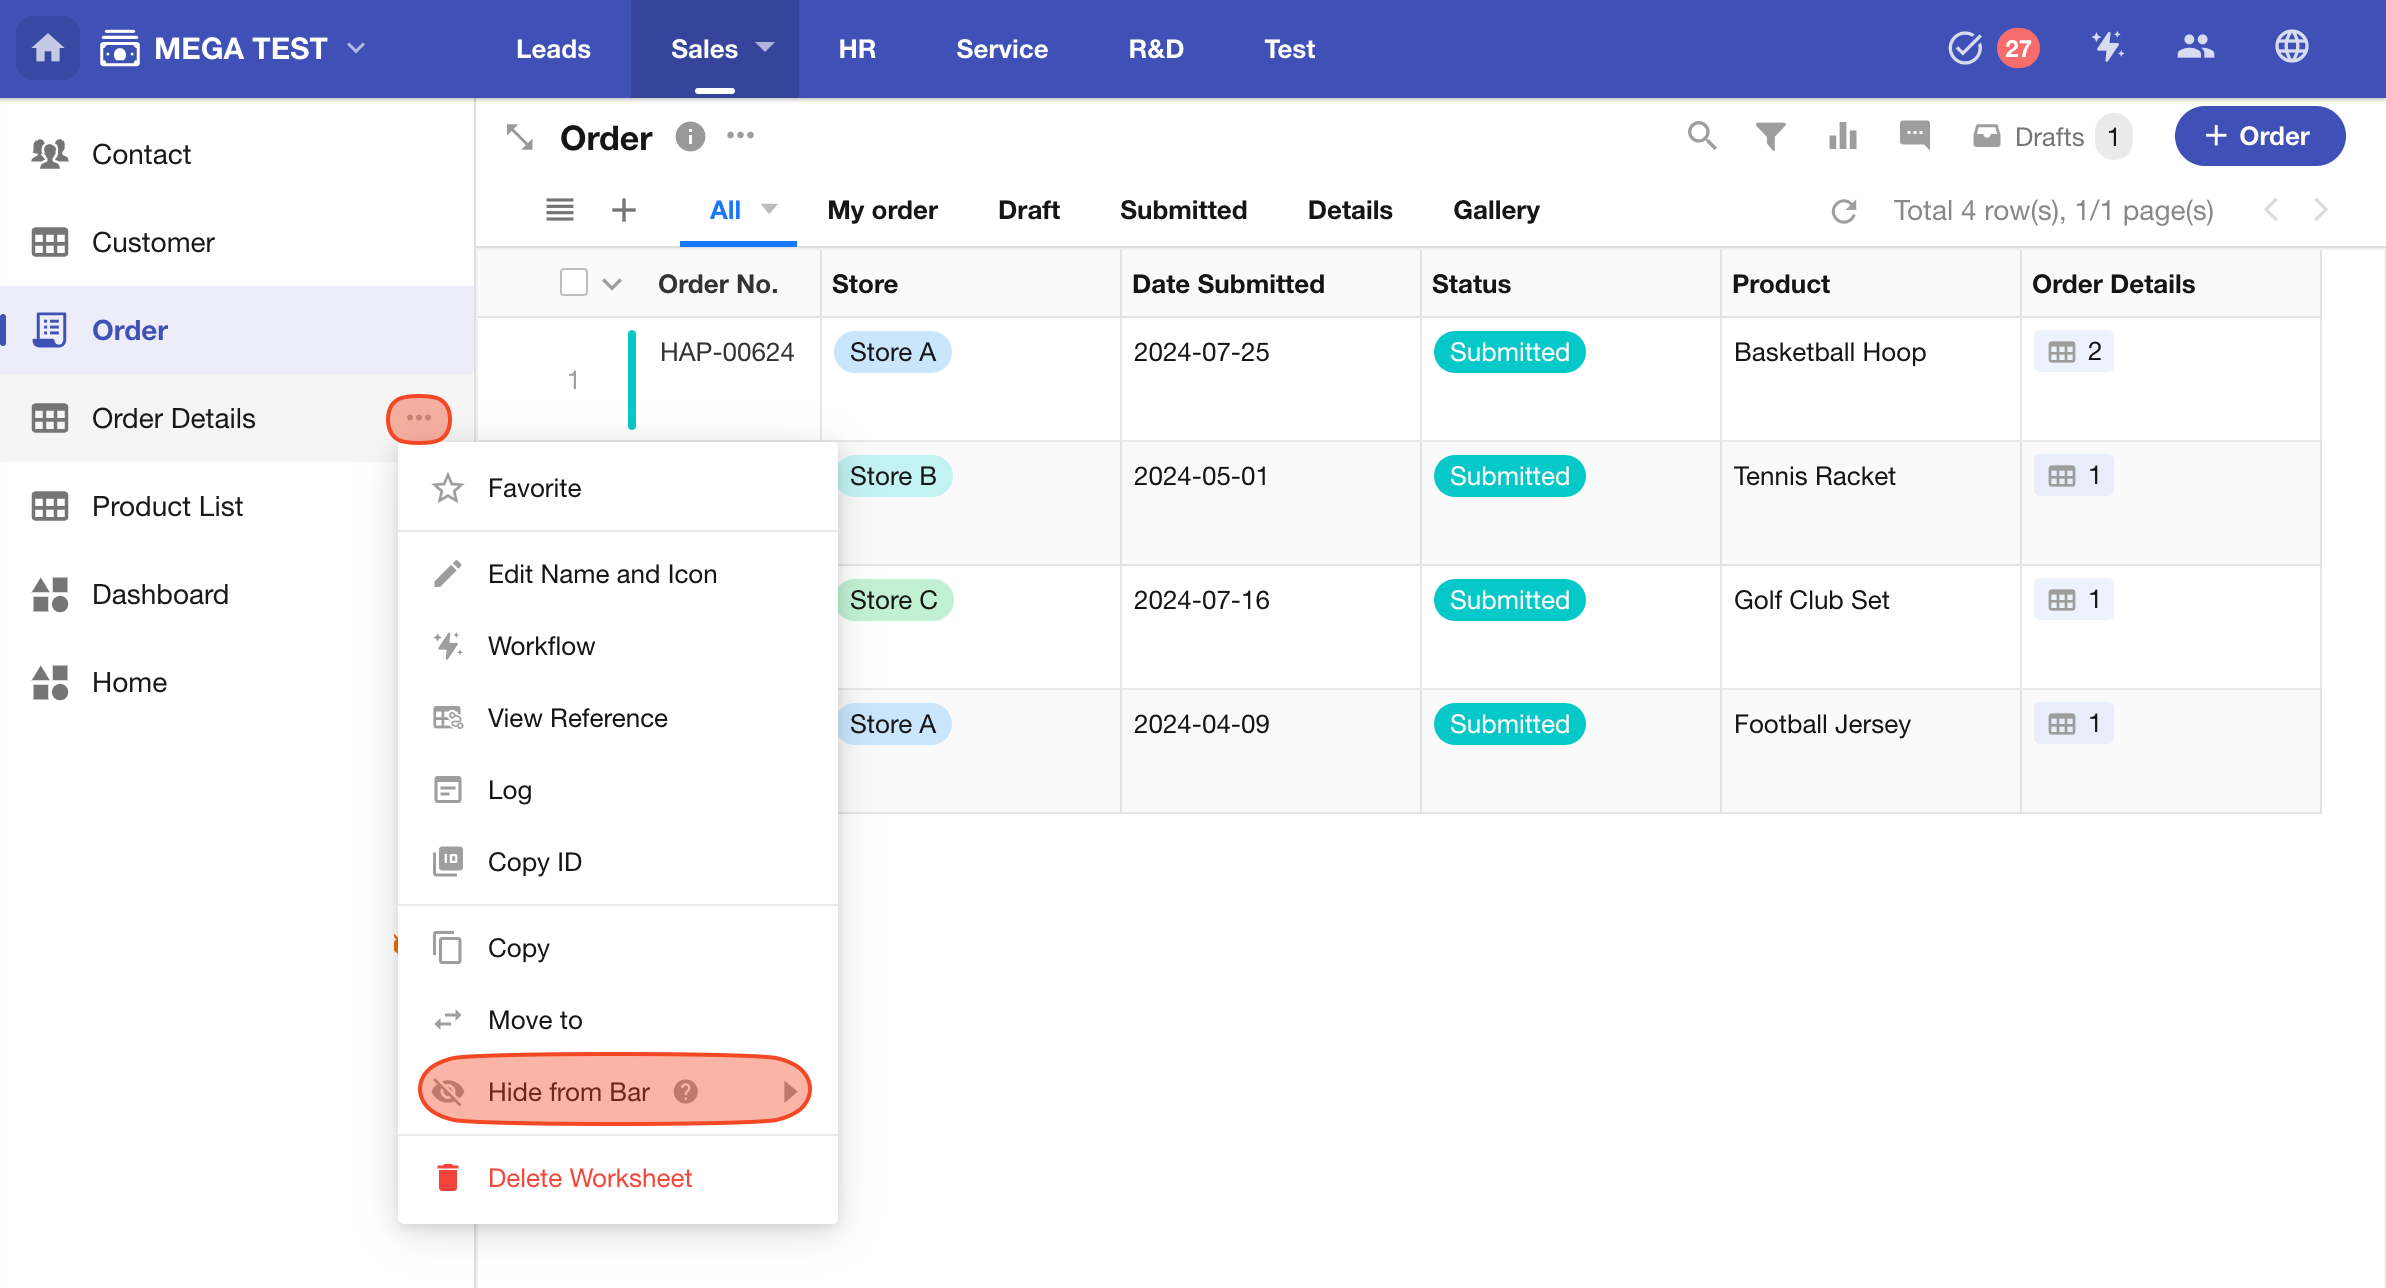
Hide from Navigation
In many scenarios, worksheets like order details are accessed only through related records (e.g., from orders). To reduce clutter, you can hide these worksheets from the app navigation while still retaining access permissions.
-
Hide from specific roles
After configuring permissions, hover over the worksheet name and click the “Hide” icon.
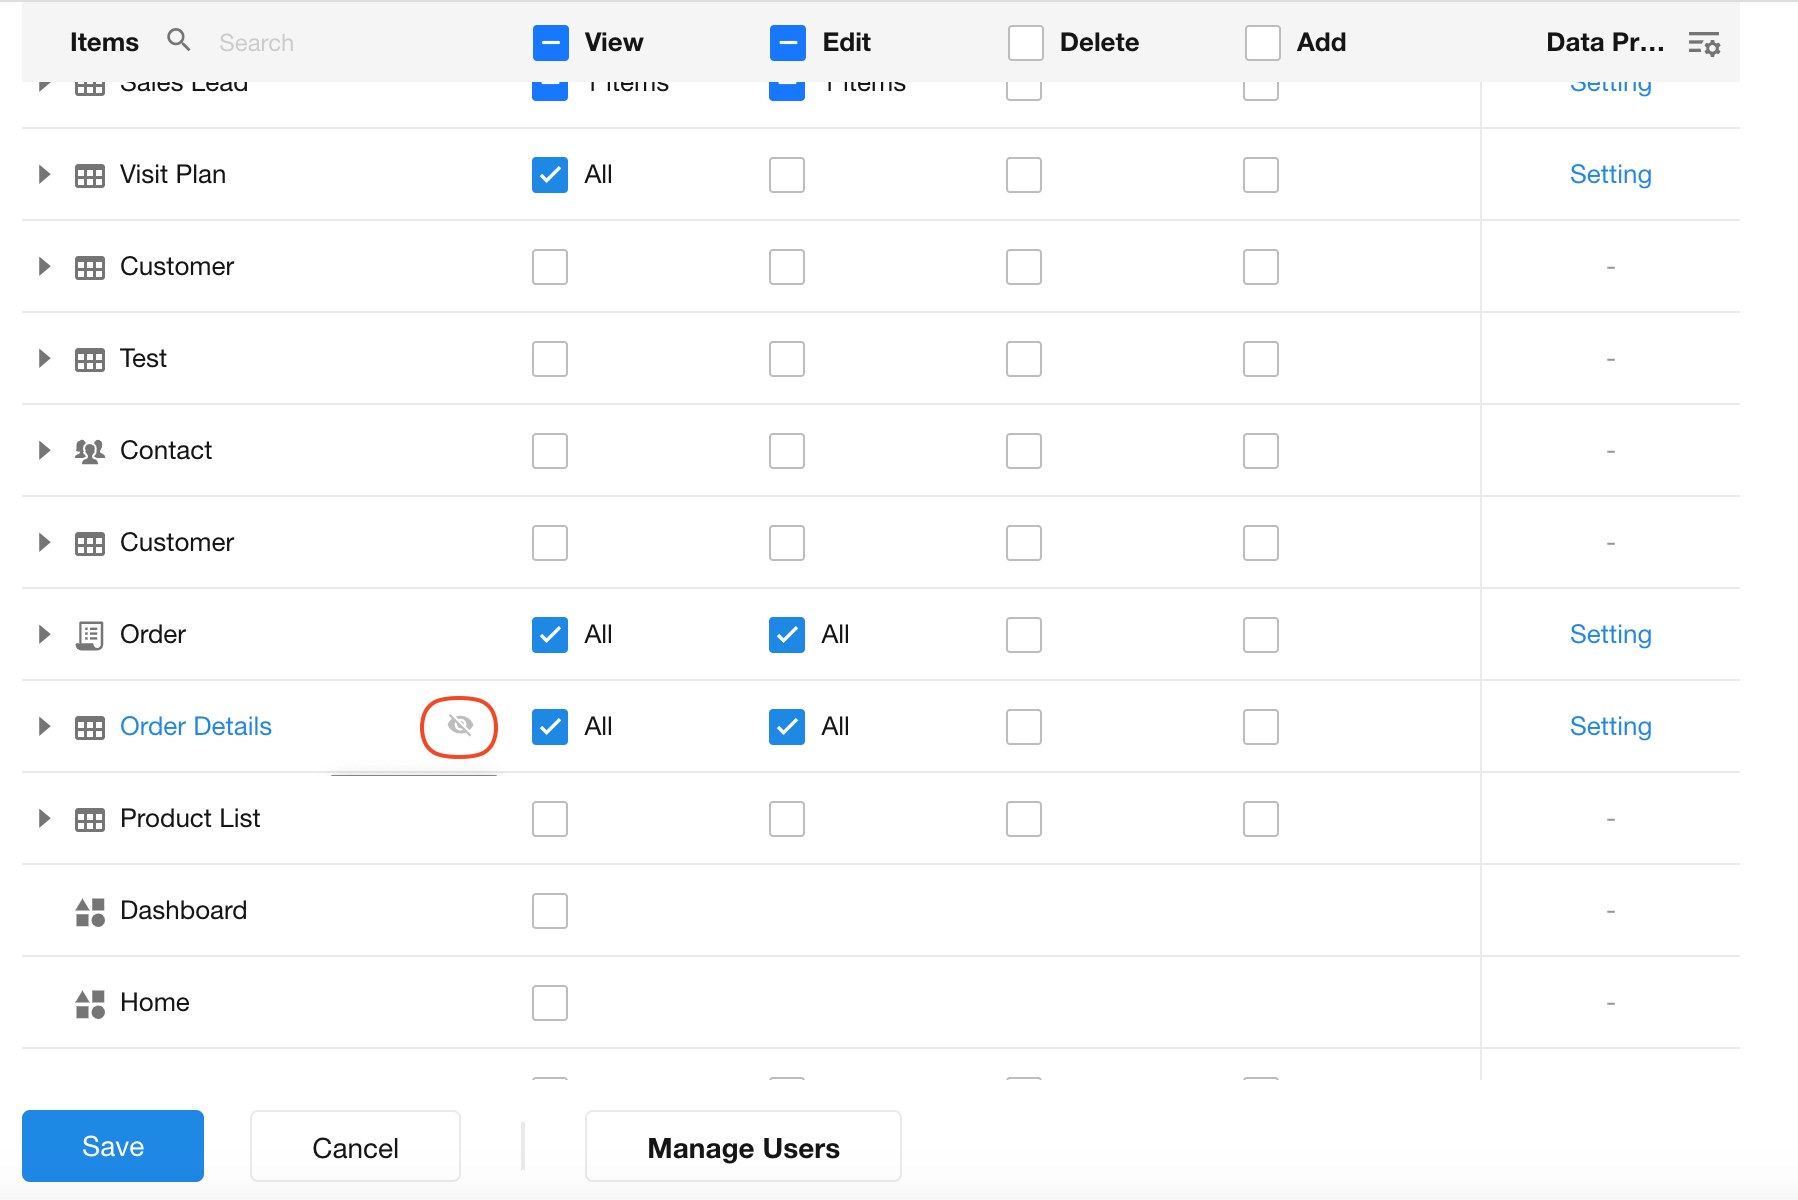
-
Hide from all non-admins
Hide a worksheet or custom page from all non-admins (non-developers).
-
Hiding a worksheet only removes it from the navigation menu. It can still be accessed via related worksheets, links, or embedded views in custom pages.
-
Admin visibility for hidden items can be configured in App Navigation settings.
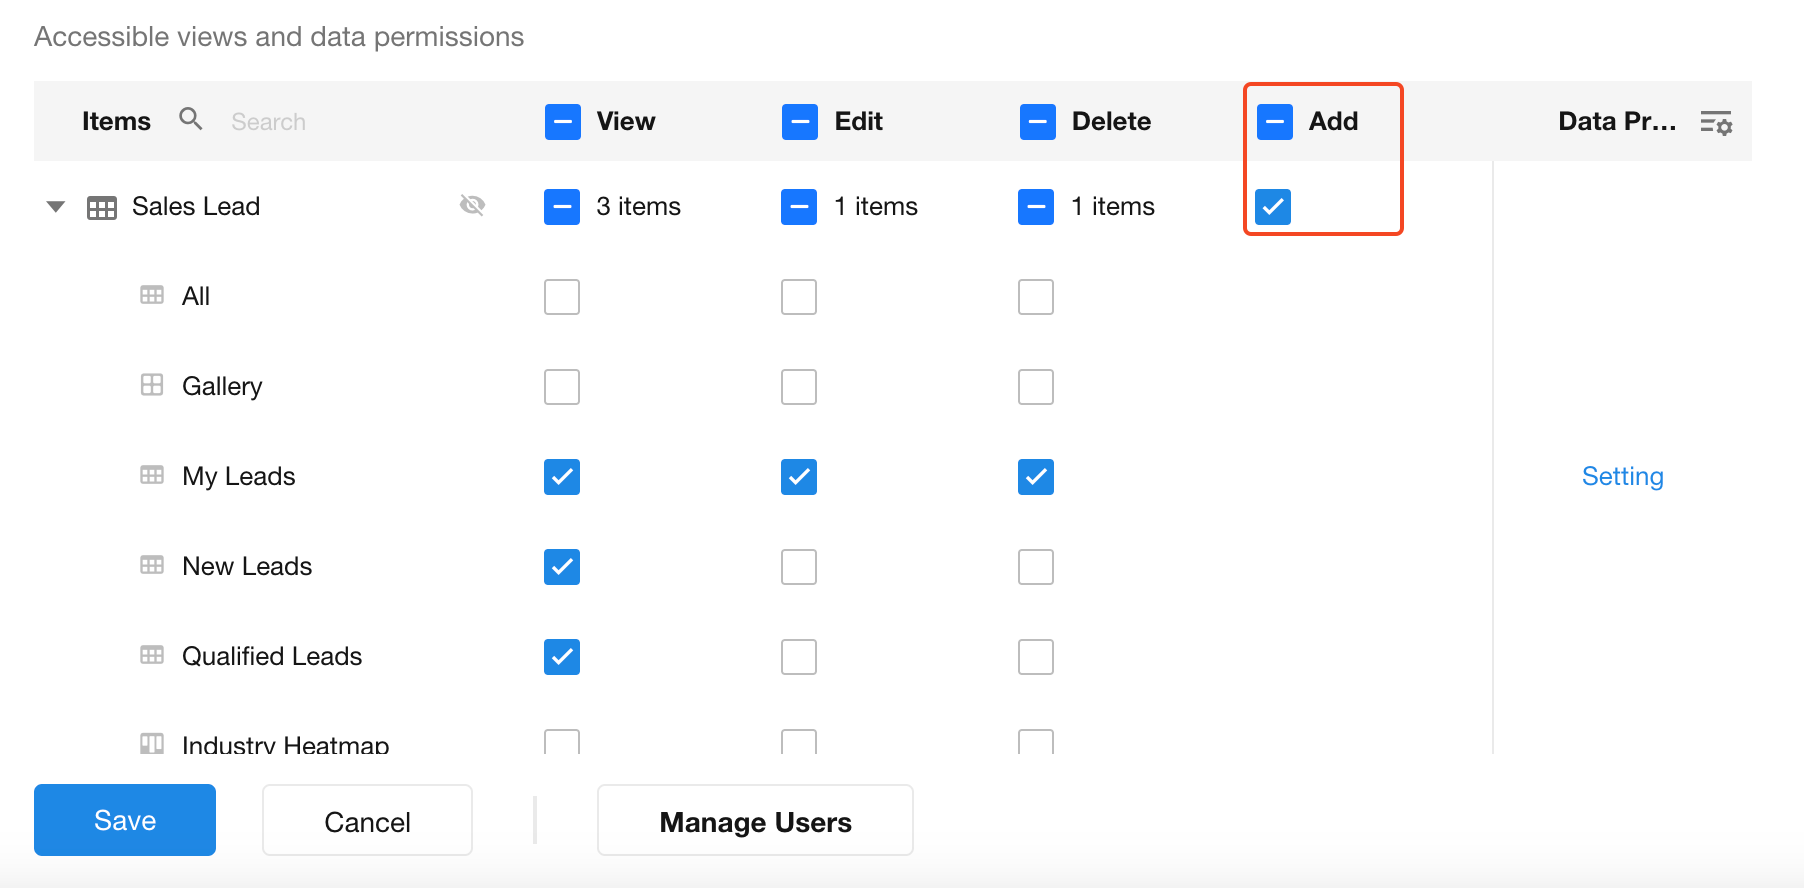
Level 2: Permissions for Records in Views
View/Edit/Add/Delete Records
There are four available permissions: View, Edit, Delete, Add.
Viewing is a prerequisite for editing or deleting.

Adding records is configured at the worksheet level, not per view.
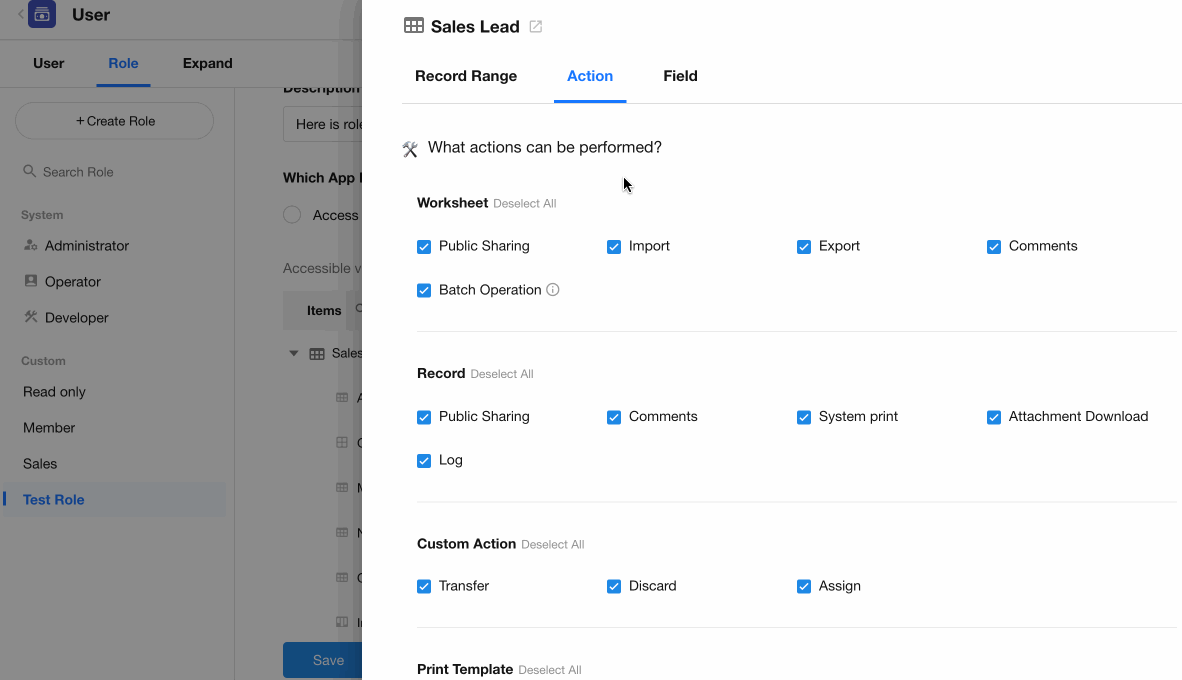
Export, Import, Print, Sharing, Logs, and Other Actions
In addition to controlling record-level CRUD permissions, you can configure which actions users are allowed to perform on worksheets and records under the Action tab.
When an action is enabled, users assigned to the current role can access the corresponding feature. When it is disabled, they will no longer be able to see or perform that action.
The following actions can be controlled:
- Worksheet: Public Sharing, Import, Export, Discussions, Bulk Operations
- Record: Public Sharing, Discussions, System Print, Attachment Download, Logs (including which log types users can view and whether log export is allowed)
- Payment: Make Payments
The same actions can also be controlled through the worksheet's Function Switch. However, Function Switch let you enable or disable these actions for specific views, whereas role permissions apply to all views in the worksheet.
A user's effective permissions are determined by the most restrictive setting between these two configurations.
Level 3: Define Operable Record Scope
After assigning add/edit/delete permissions for records in views, you can refine which records within a view a user may operate on.
For example, in the “Qualified Leads” view, all qualified leads may be visible, but only owned leads can be edited or deleted.
Click the “Settings” button on the right to configure scope.
Available scopes: “All,” “Joined,” and “Owned”.
-
Viewable Records
-
All: View all records in accessible views
-
Joined: View only joined records
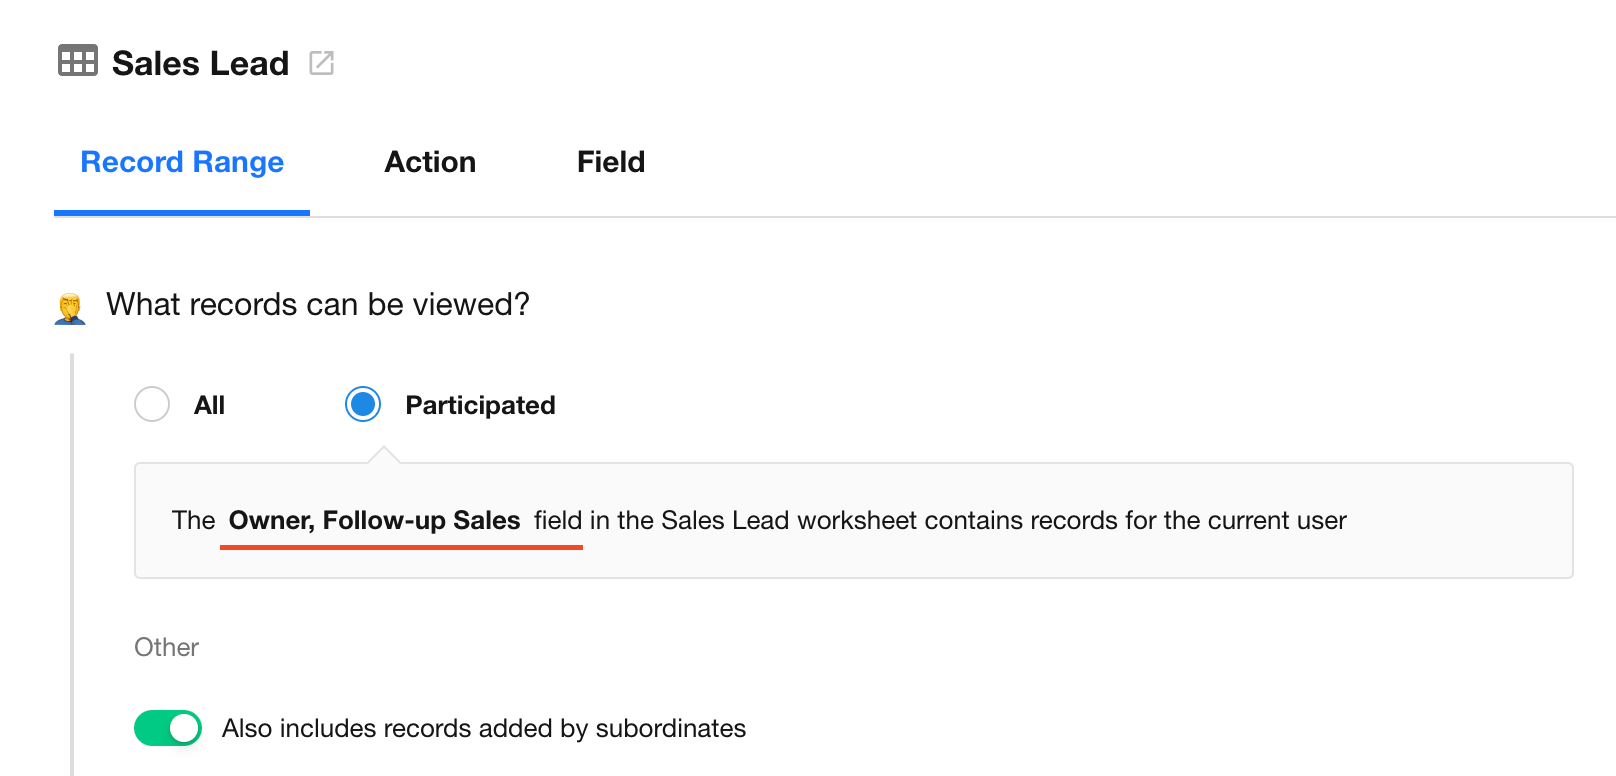
-
Subordinate Joined: View joined records by self or subordinates
See Three Record Roles for details on “joined” records.
-
-
Editable Records
-
All: Edit all viewable records
-
Owned: Edit only owned records
-
Subordinate Owned: Edit records owned by self or subordinates
-
-
Deletable Records
-
All: Delete all viewable records
-
Owned: Delete only owned records
-
Subordinate Owned: Delete owned records by self or subordinates
-
This applies to all views in the worksheet. To set different scopes per view, assign the user to multiple roles.
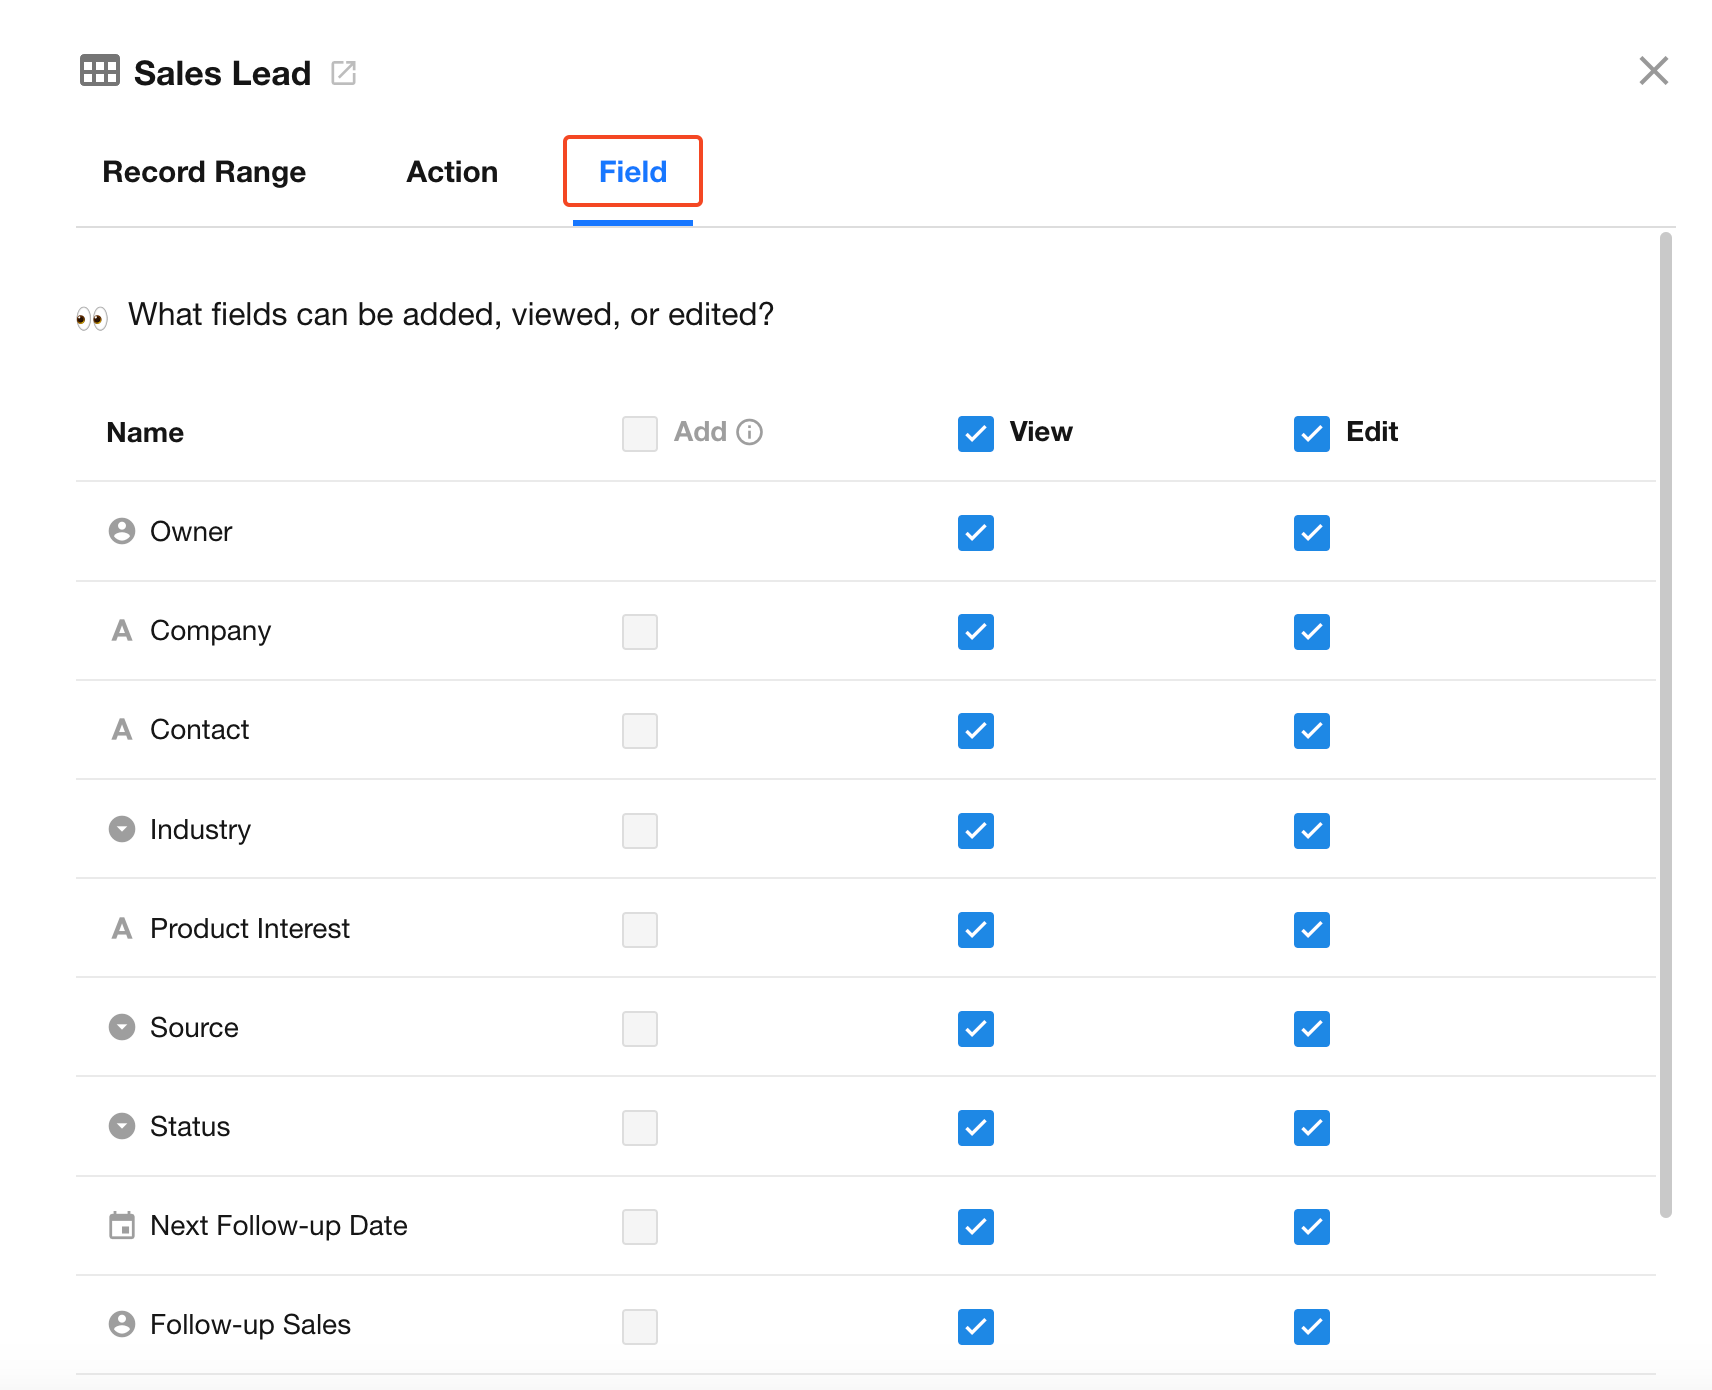
Level 4: Field-Level Permissions
Even if a record is visible, not all fields need to be visible or editable. Field-level permission allows:
-
Show/hide fields in view/edit mode
-
Define which fields are editable
-
Hide fields when creating new records
To make a field editable, it must also be visible.
Bulk Permission Configuration
Advanced mode supports batch editing permissions across multiple worksheets.
You can batch configure:
- Operable record scope
- Editable fields
- System actions: Share, Import, Export, Print, Discussion, Logs
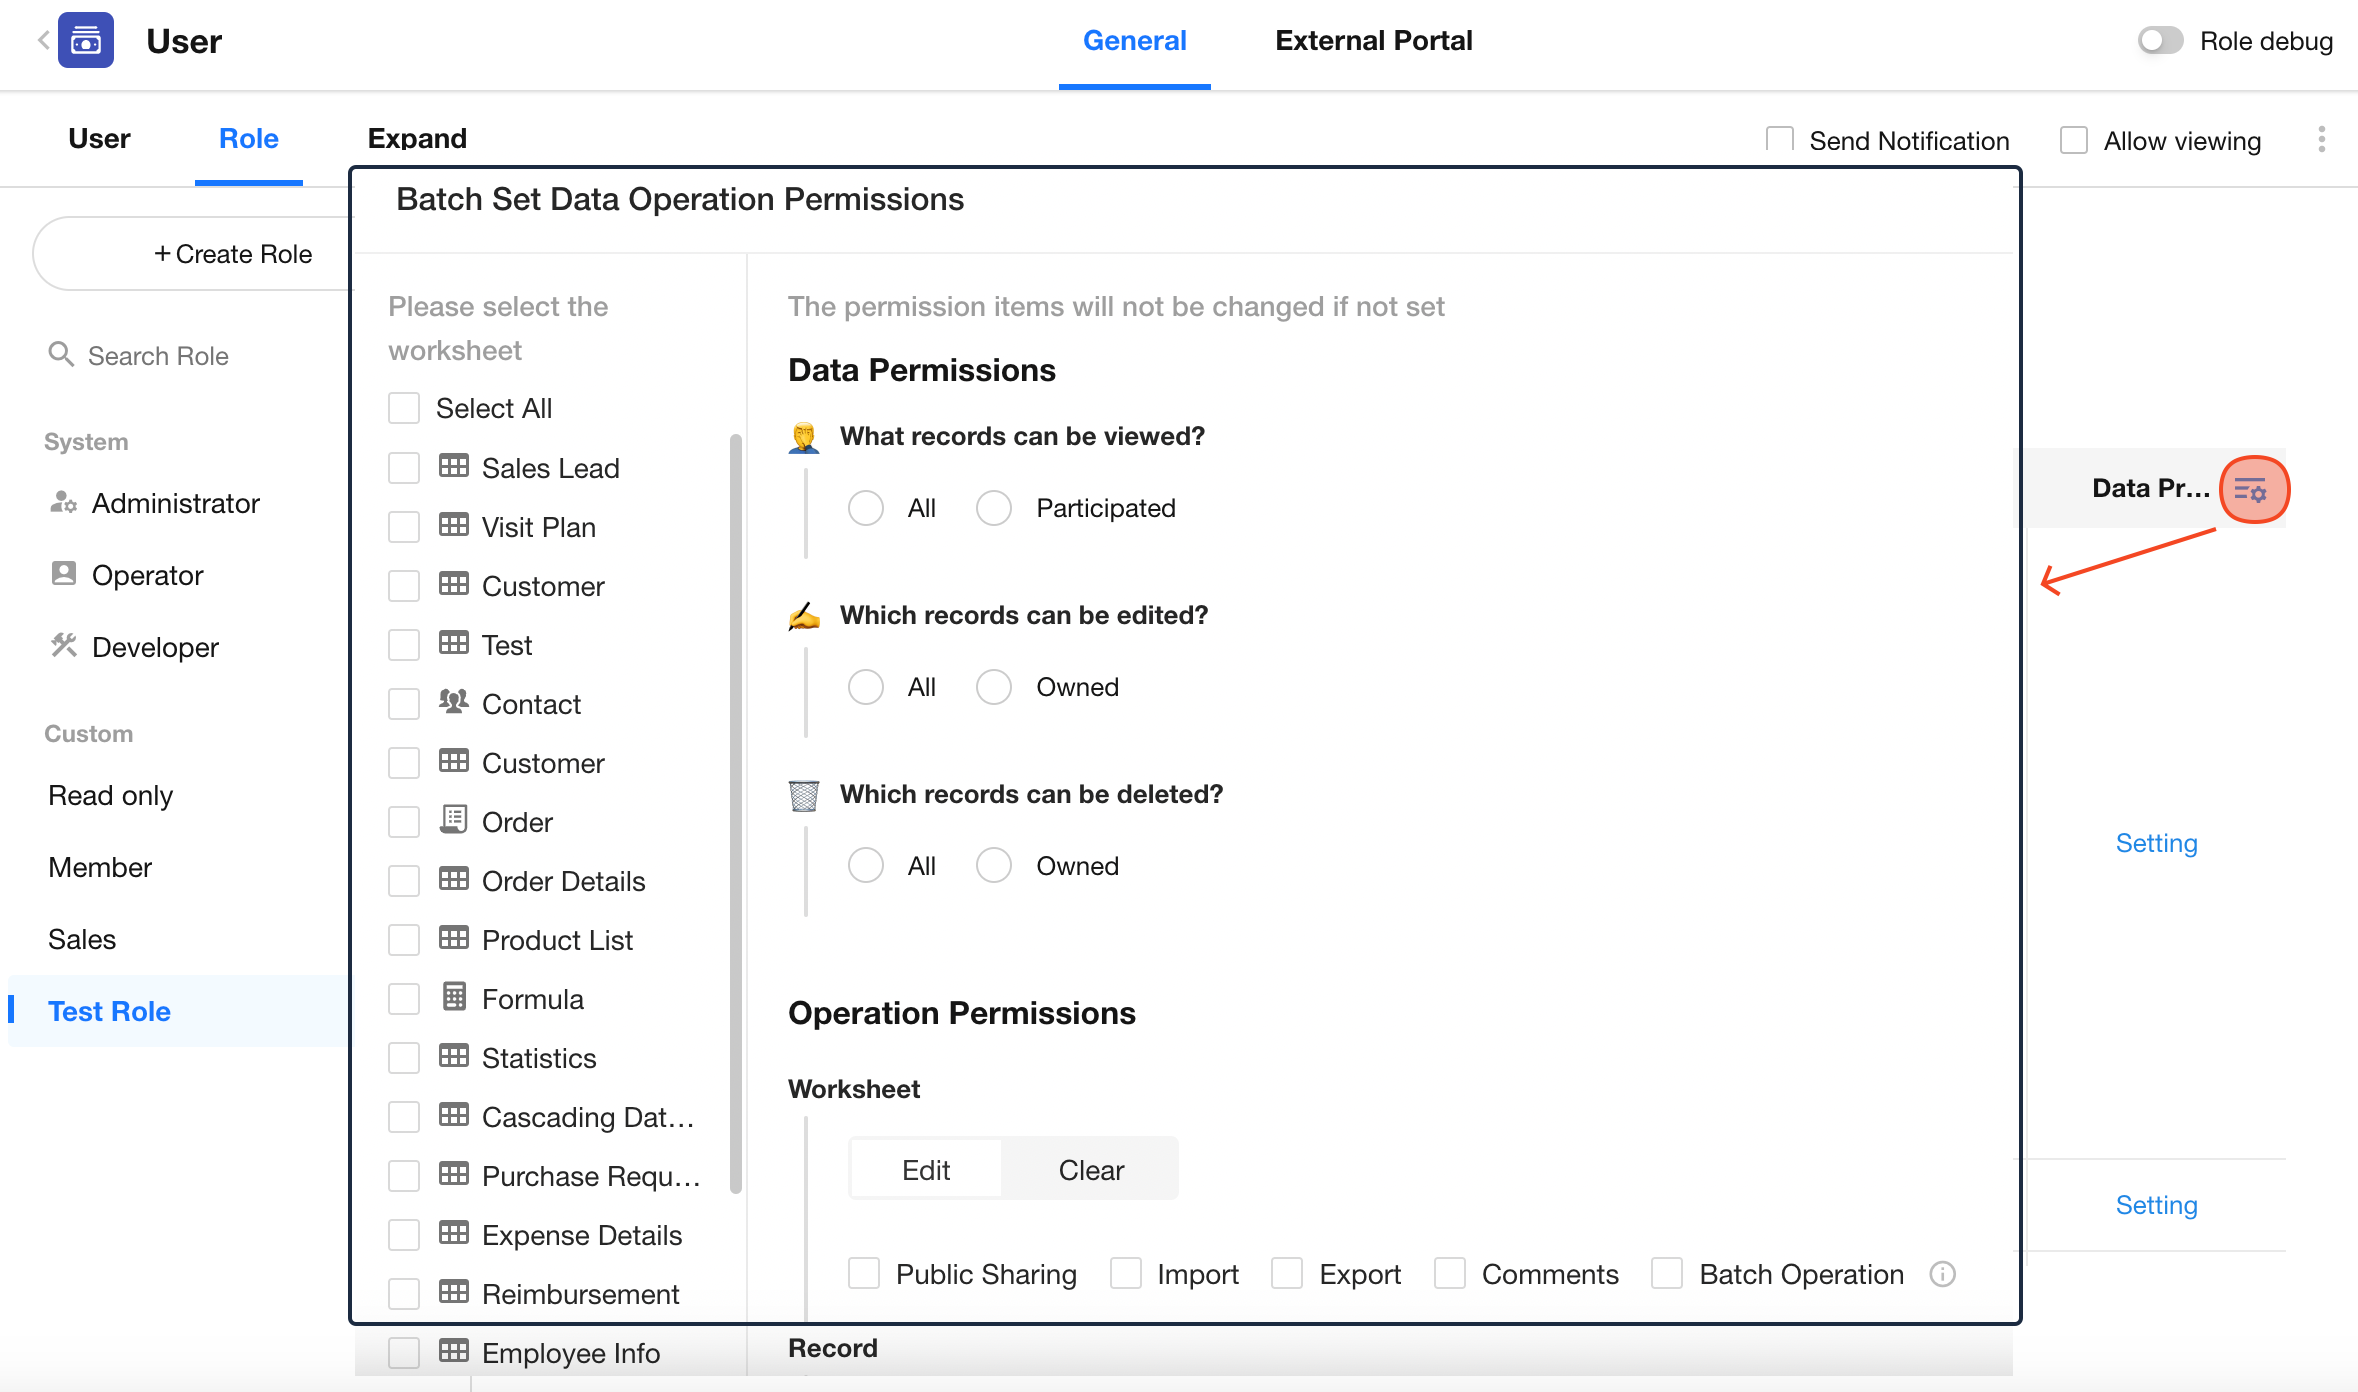
Notes:
-
Ensure you have the necessary permissions for each worksheet before editing. For example, if “Delete” is not enabled for the “Contacts” worksheet, bulk configuration of delete permissions will not apply.
-
Bulk editing does not include custom actions or payment-related settings.
Hide Applications
When an app is hidden from members, it will no longer appear in the application list on the home page.
Hiding only removes the app from the home page list. Members can still access the app through notification messages, shared links, etc.
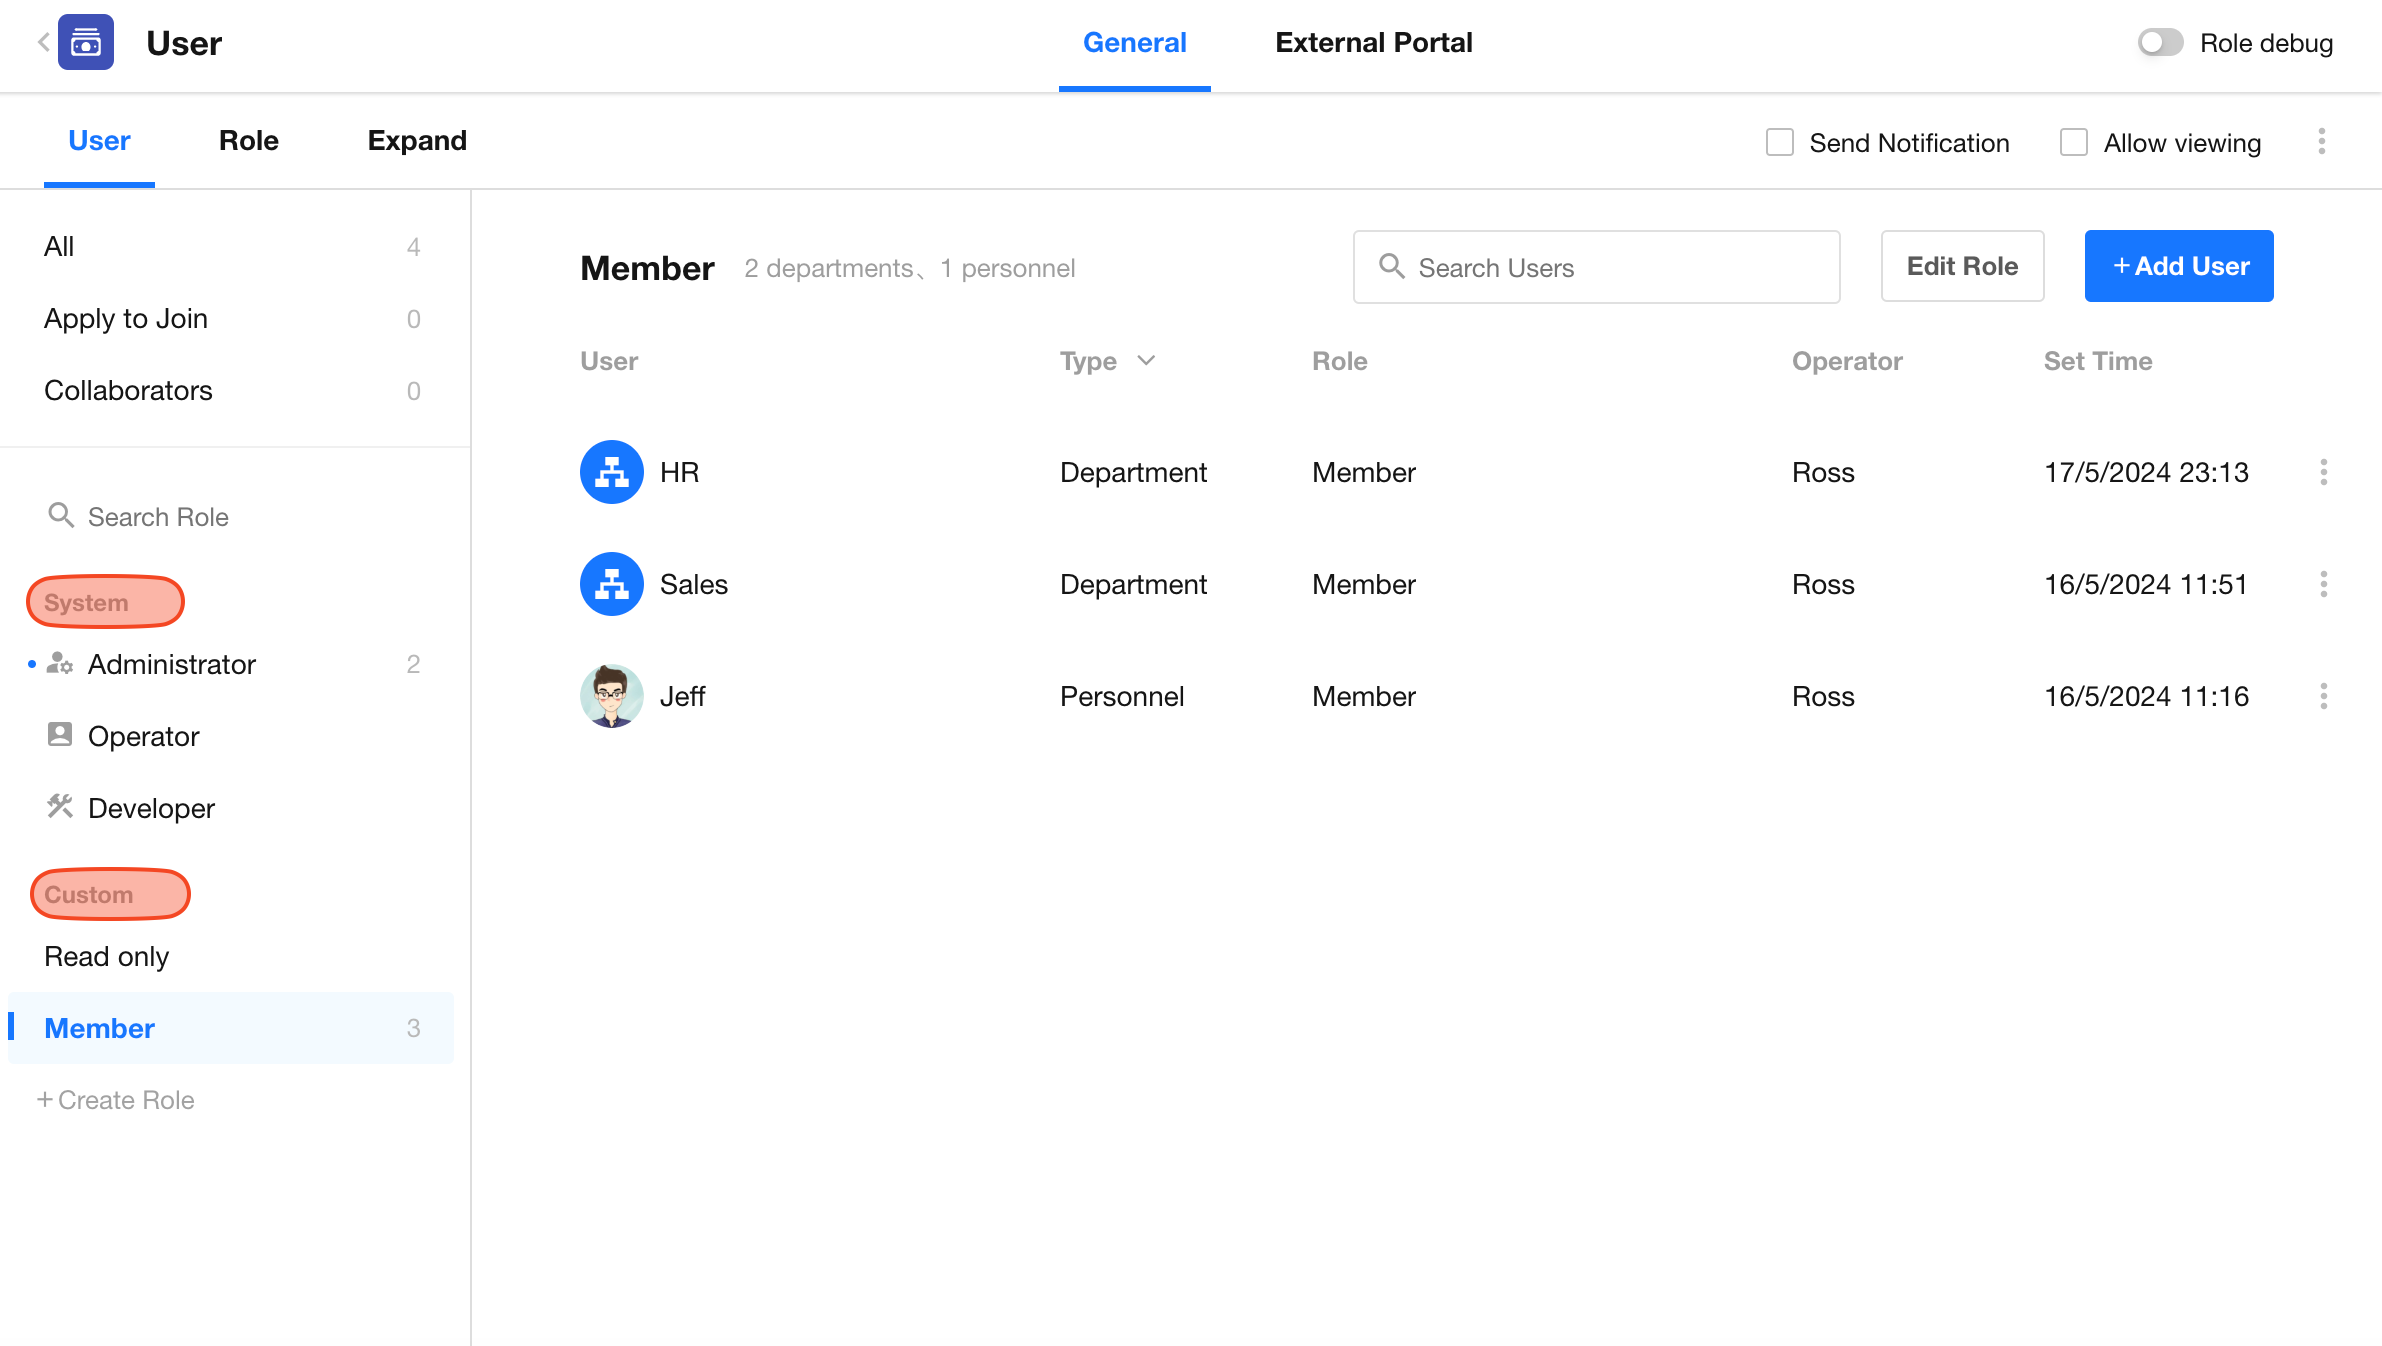
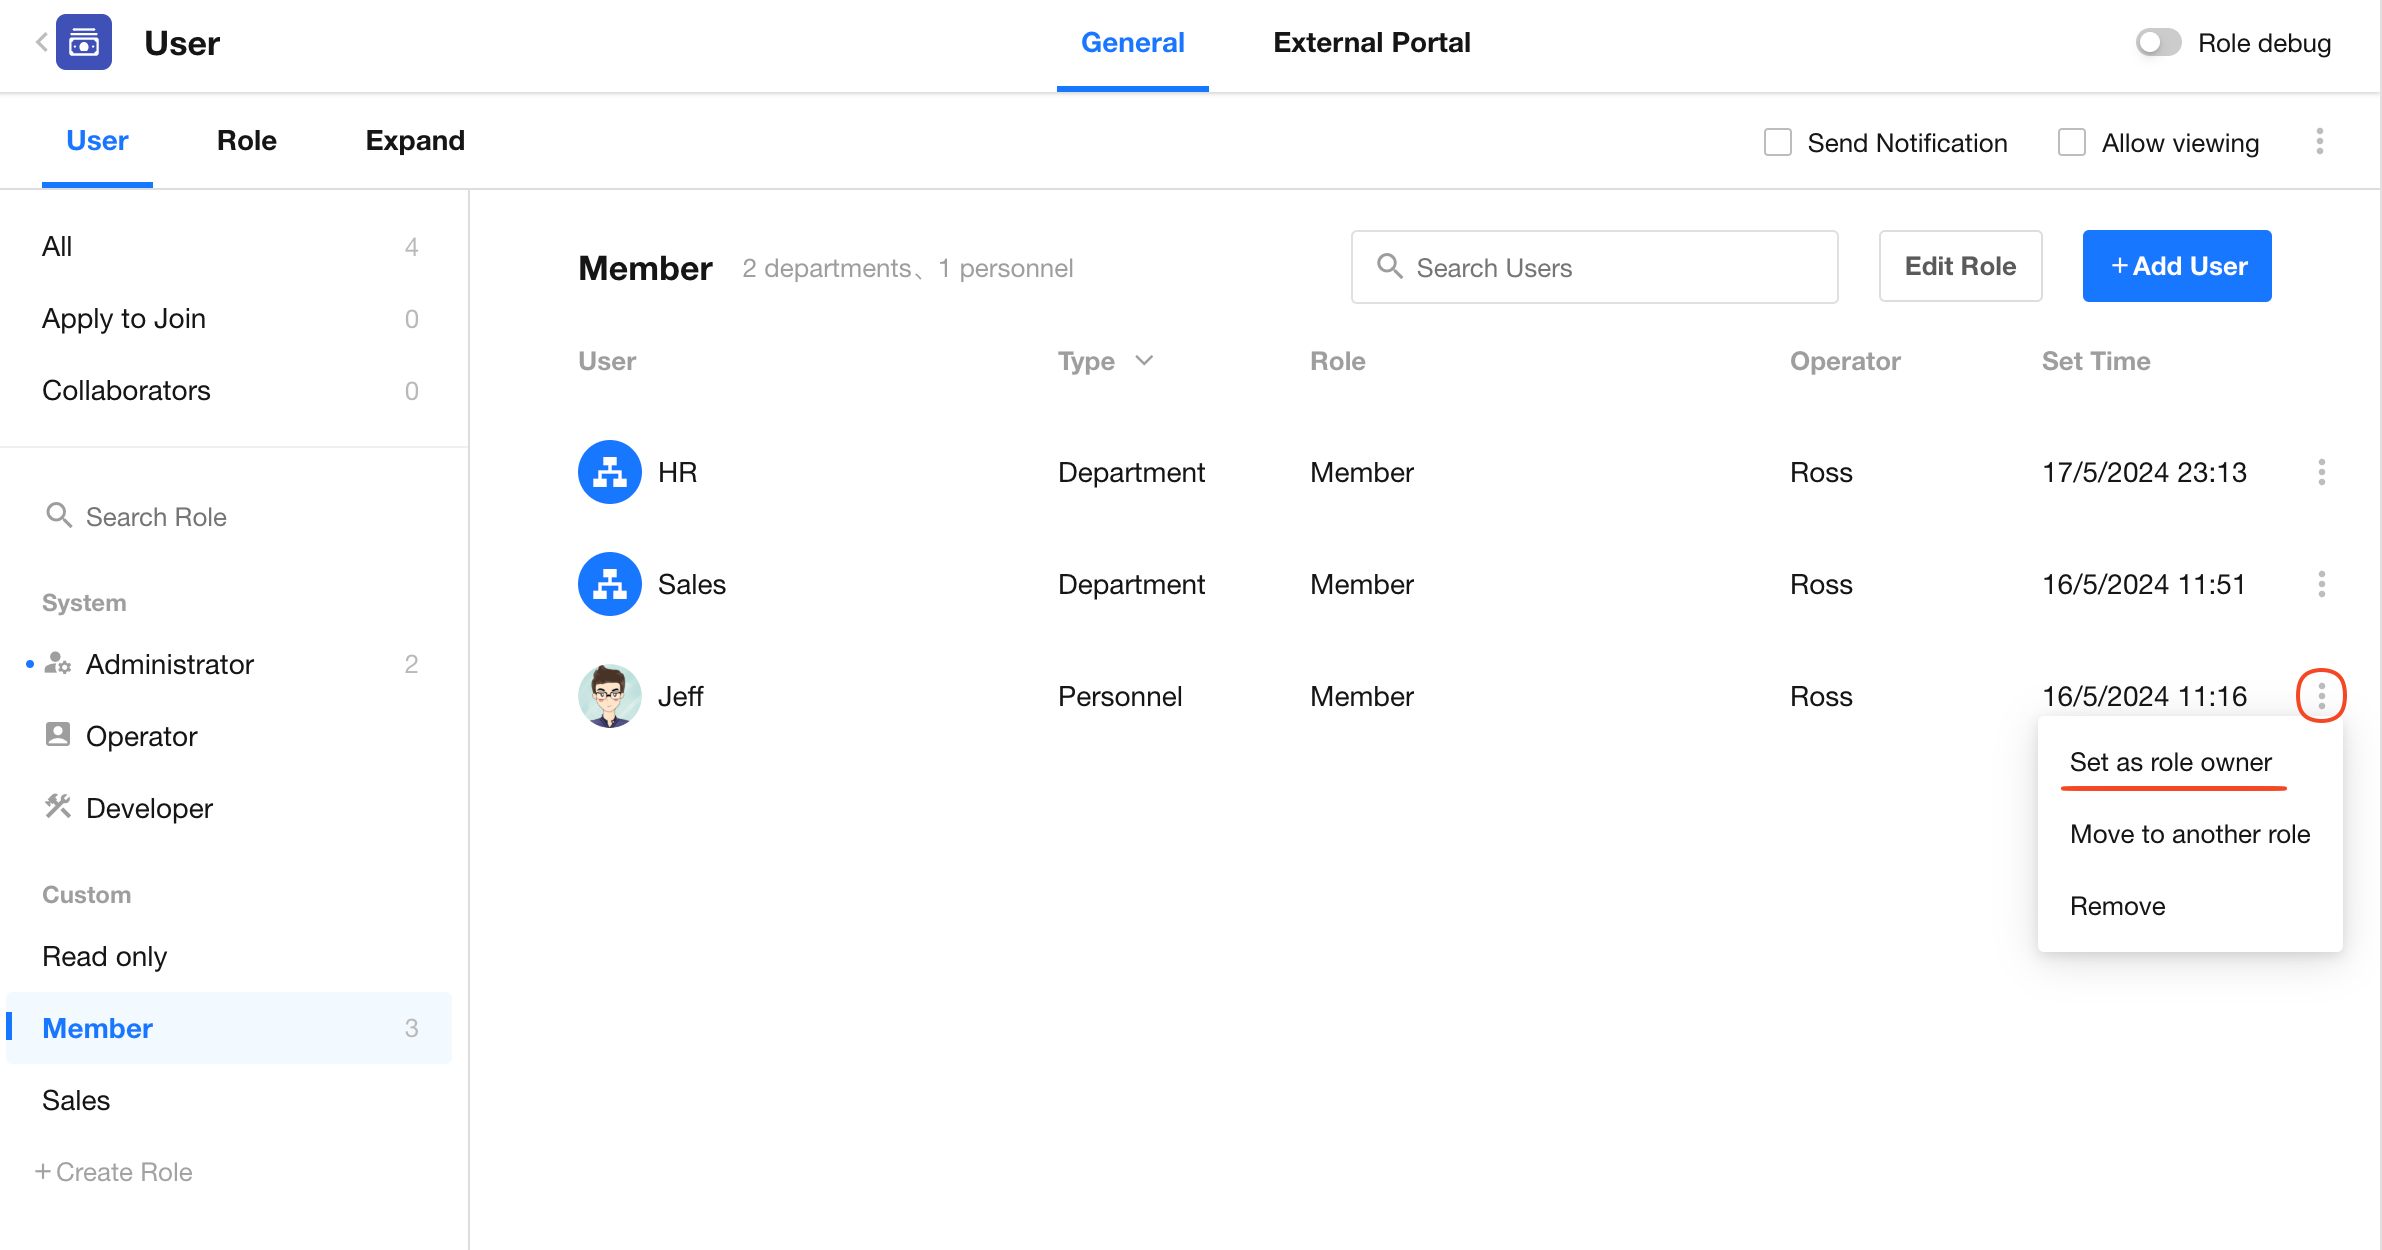
4. Add Members to a Role
After creating a role, go to the User tab, click the role name, and then click Add Users.
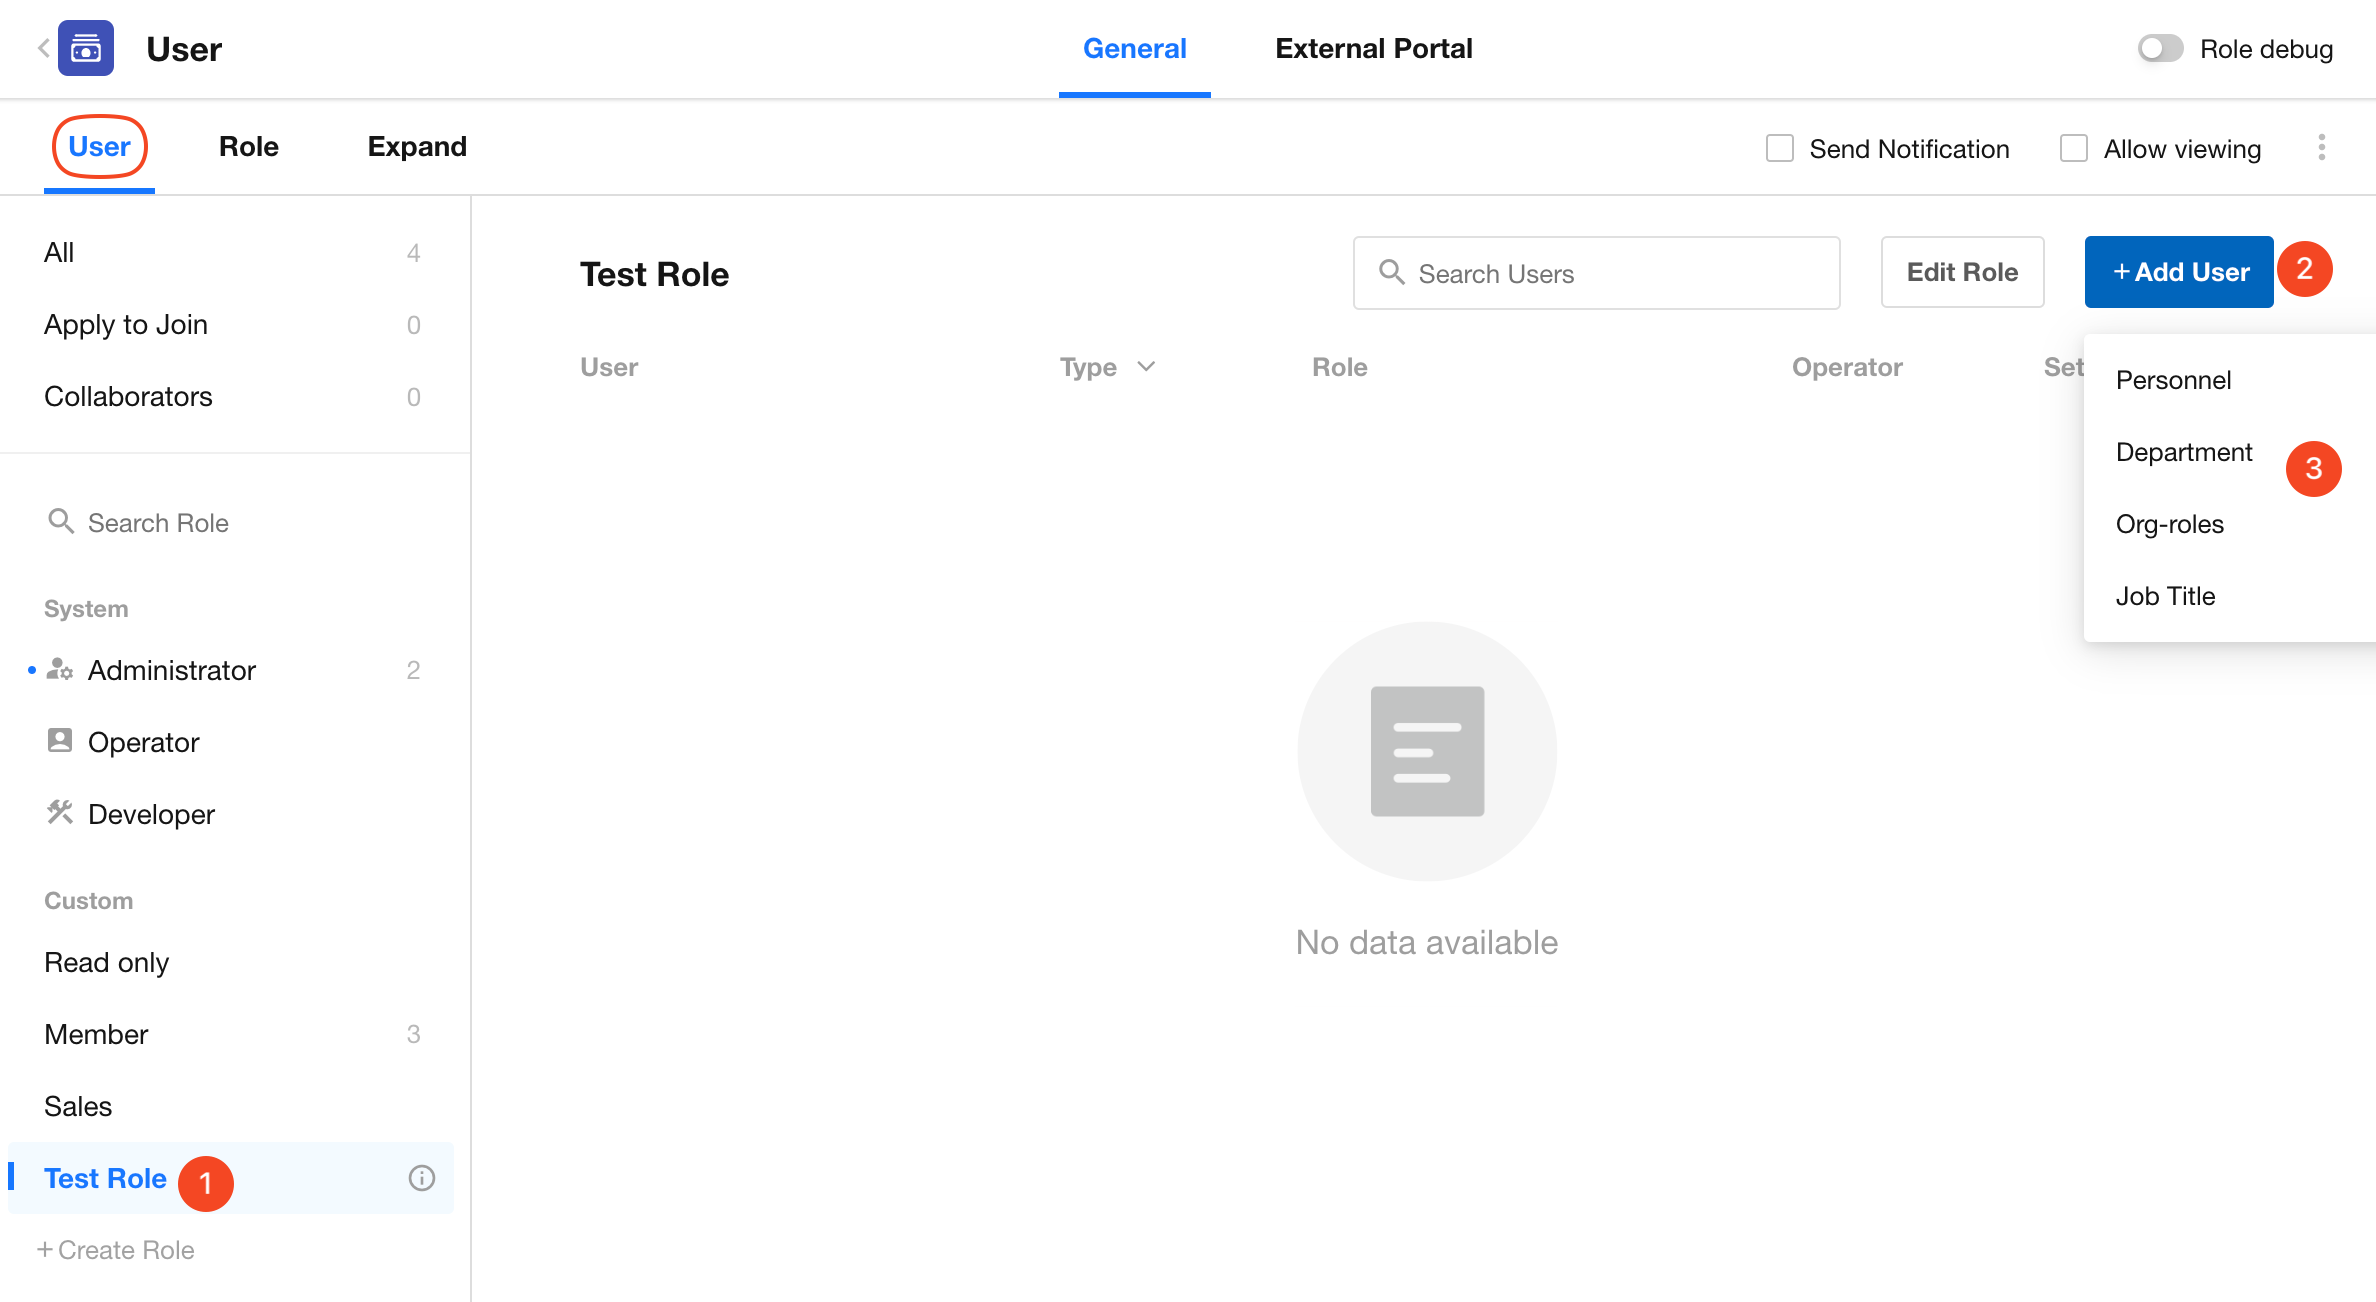
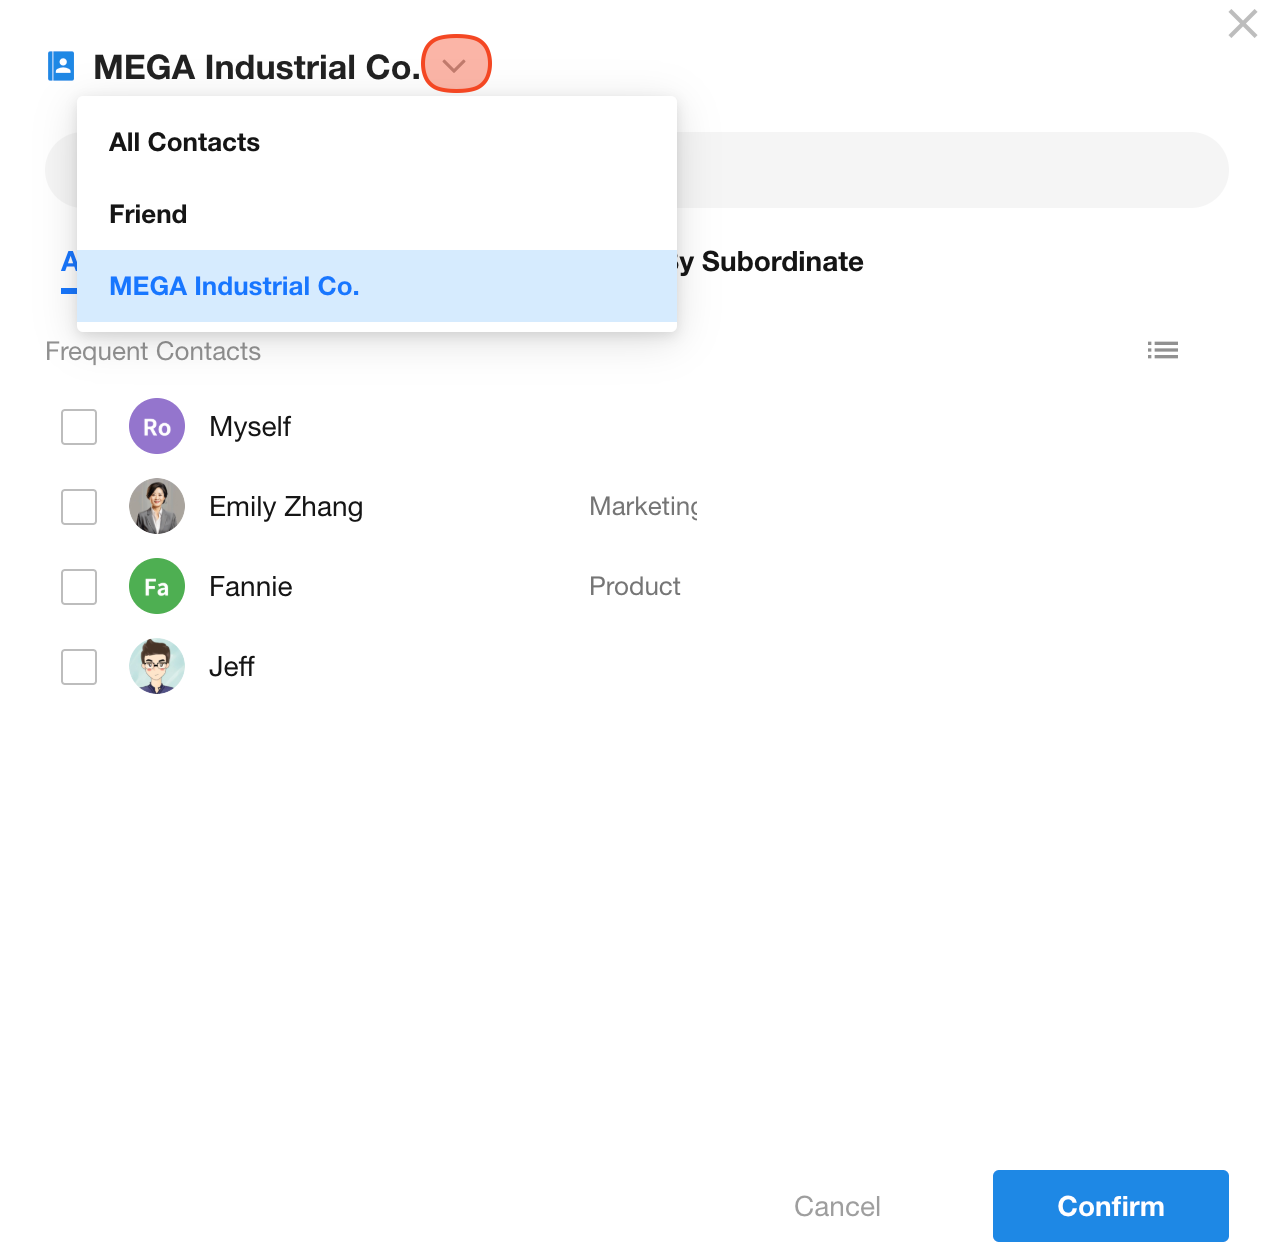
Add Members by Person
You can add members from the Contacts, including internal colleagues or external collaborators via Friends.
You may also share the application link via other channels. When users open the link, they’ll be prompted for identity verification. If they’re not yet a member, they can apply to join.
Add Members by Department/Org-role/Job Title
Adding a department to a role means all current members of that department inherit the role permissions. New members added to that department in the future will also automatically receive this role. The same applies when adding an organizational role or job title.
What does “Current Department Only” mean?
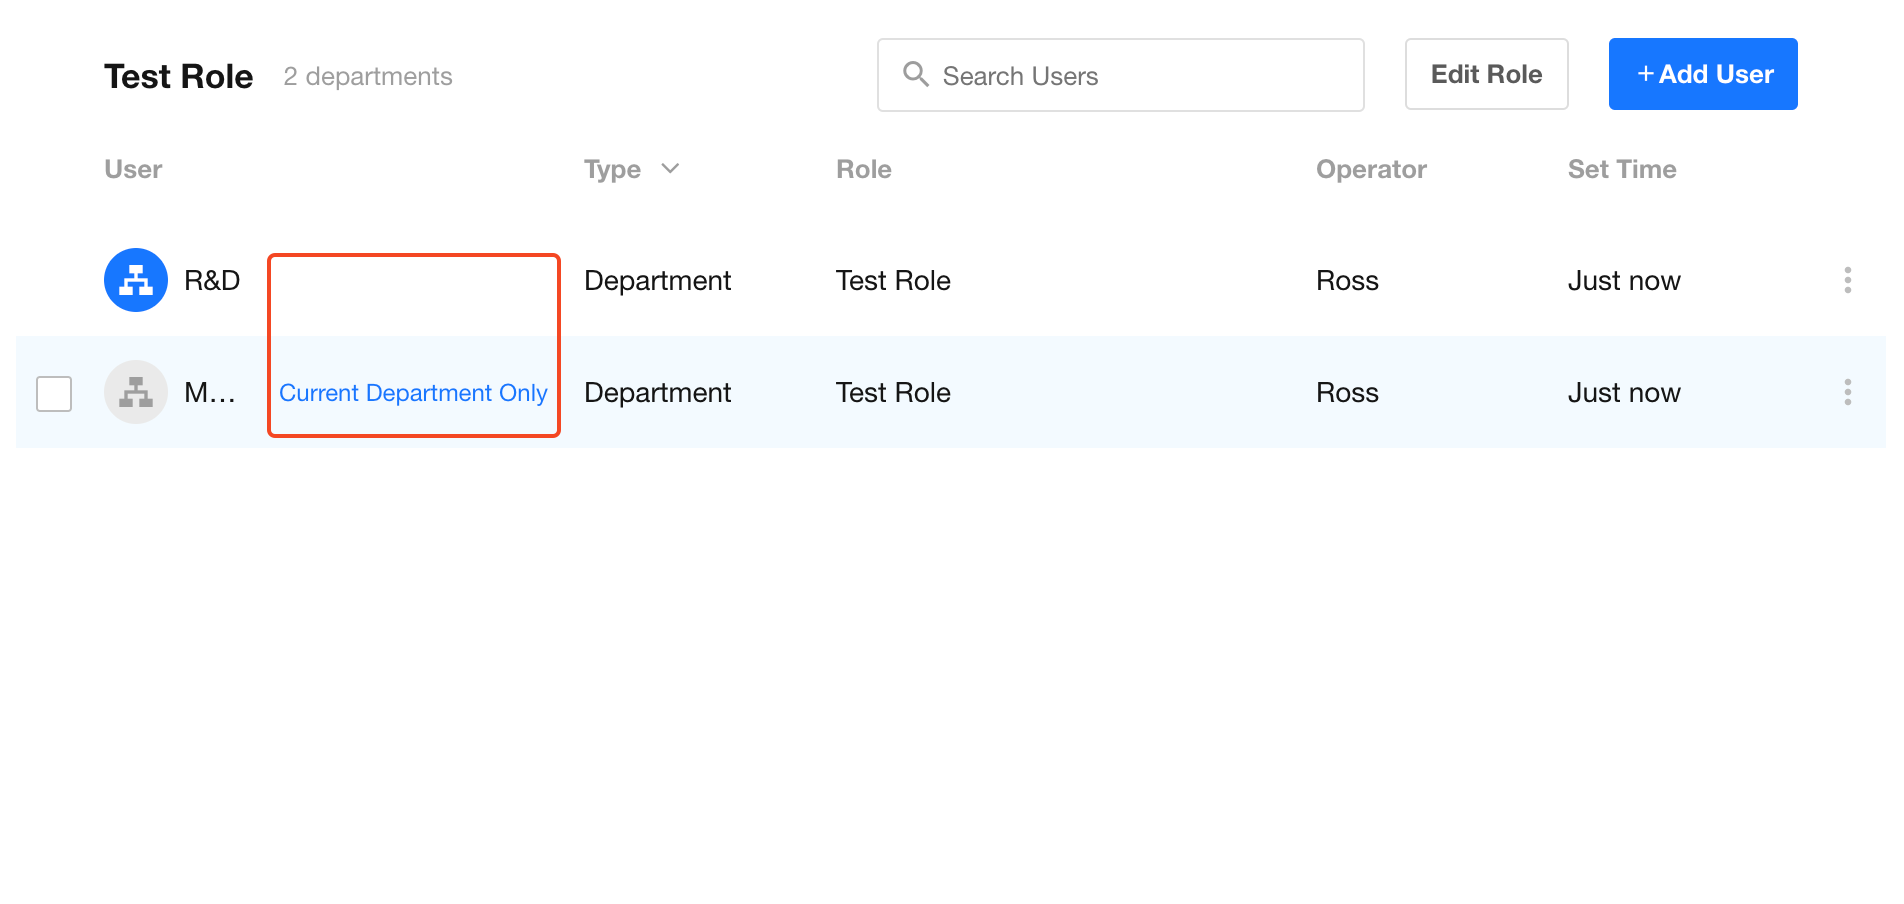
-
Only department name is shown
The selected department and all its sub-departments are included. Sub-departments are not listed separately. Newly created sub-departments will automatically inherit the role.
-
“Current Department Only” label is shown
Only the selected department is included. Sub-departments are either not selected or selected individually.
Developer & Operator Permission Details
| Module | Feature | Permissions | APP Lock | |
|---|---|---|---|---|
| Operator | Developer | Operator permissions if app locked | ||
| APP Management | Copy/Export/Delete APP | ❌ | ❌ | ❌ |
| Name & Icon | ✅ | ✅ | ✅ | |
| Navigation Settings | ❌ | ✅ | ❌ | |
| Edit Description | ✅ | ✅ | ✅ | |
| Usage Analysis | ✅ | ❌ | ✅ | |
| Option Set | ❌ | ✅ | ❌ | |
| Application Recycle Bin | ❌ | ✅ | ❌ | |
| Manage APP->Copy | ❌ | ❌ | ❌ | |
| Manage APP->Export | ❌ | ❌ | ❌ | |
| Manage APP->Backup | ❌ | ✅ | ❌ | |
| Manage APP->Restore(Note: In the list of backup files, developer does not have permission to "download backup files and restore to new apps".) | ❌ | ✅ | ❌ | |
| Publish Settings | ❌ | ✅ | ❌ | |
| External Portal-Under approval-Approval-free configuration (worksheets from other applications taken with administrator or developer role permissions) | ✅ | ❌ | ✅ | |
| API Development Documents | ❌ | ✅ | ❌ | |
| Application Item-Worksheet | Name & Icon | ✅ | ✅ | ✅ |
| Copy | ❌ | ✅ | ❌ | |
| Move to | ❌ | ✅ | ❌ | |
| Display/Hide in Navigation | ❌ | ✅ | ❌ | |
| Delete Worksheet | ❌ | ✅ | ❌ | |
| Edit Form | ❌ | ✅ | ❌ | |
| Worksheet Settings | ❌ | ✅ | ❌ | |
| Name & Icon | ✅ | ✅ | ✅ | |
| Edit Description | ✅ | ✅ | ✅ | |
| Set Field Name | ❌ | ✅ | ❌ | |
| Reset Autonumber | ✅ | ✅ | ✅ | |
| Import from Excel | ✅ | ✅ | ✅ | |
| Recycle Bin | ✅ | ✅ | ✅ | |
| Delete Worksheet | ❌ | ✅ | ❌ | |
| Public Release (Pop-up window after clicking on the [Create Record] -> [Share] button in the upper right corner) | ❌ | ✅ | ❌ | |
| Public Statistics - Add, Set, Move from Public, Copy to, Delete | ❌ | ✅ | ❌ | |
| Public Statistics - Filter, Share, Export (Excel) | ✅ | ✅ | ✅ | |
| Worksheet Logs | ✅ | ✅ | ✅ | |
| View->Configure | ❌ | ✅ | ❌ | |
| View->Change Type | ❌ | ✅ | ❌ | |
| View->Copy | ❌ | ✅ | ❌ | |
| View->Share | ✅ | ✅ | �✅ | |
| View->Share->Public Share | ✅ | ✅ | ✅ | |
| View->Export | ✅ | ✅ | ✅ | |
| View->Display/Hide in Navigation | ❌ | ✅ | ❌ | |
| View->Delete | ❌ | ✅ | ❌ | |
| View->Record->Calibration | ✅ | ✅ | ✅ | |
| Import Data-[Do not allow users to modify the default configuration] | ✅ | ✅ | ✅ | |
| Public Filter | ❌ | ✅ | ❌ | |
| Save as Printing Template ( System Printing, Print QR Code, Print Barcode ) | ❌ | ✅ | ❌ | |
| Application Item-Custom Page | Name & Icon (Menu) | ✅ | ✅ | ✅ |
| Copy | ❌ | ✅ | ❌ | |
| Move to | ❌ | ✅ | ❌ | |
| Display/Hide in Navigation | ❌ | ✅ | ❌ | |
| Delete custom page | ❌ | ✅ | ❌ | |
| Edit custom page | ❌ | ✅ | ❌ | |
| Name & Icon (Details Page) | ✅ | ✅ | ✅ | |
| Edit description | ✅ | ✅ | ✅ | |
| Display settings | ❌ | ✅ | ❌ | |
| Delete Page | ❌ | ✅ | ❌ | |
| Share Page->Public Share | ✅ | ✅ | ✅ | |
| Share Chart->Public Share | ✅ | ✅ | ✅ | |
| Application-User | Edit/Delete Role, Permissions, Extended Info | ❌ | ✅ | ❌ |
| Add User | ✅ | ✅ | ✅ | |
| [Send Notification], [Allow View] | ✅ | ✅ | ✅ | |
| Application-External Portal | Roles and Permissions, Portal Settings, Edit Custom Domain Name (when locked, developer identity hides the entire external portal)) | ❌ | ✅ | ❌ |
Was this document helpful?