Import Excel Data into a Worksheet
Once your worksheet structure is set up, you can quickly initialize data or batch update records by importing an Excel or CSV file.
1. Import Data (Quick 5-Step Import)
-
Entry Point
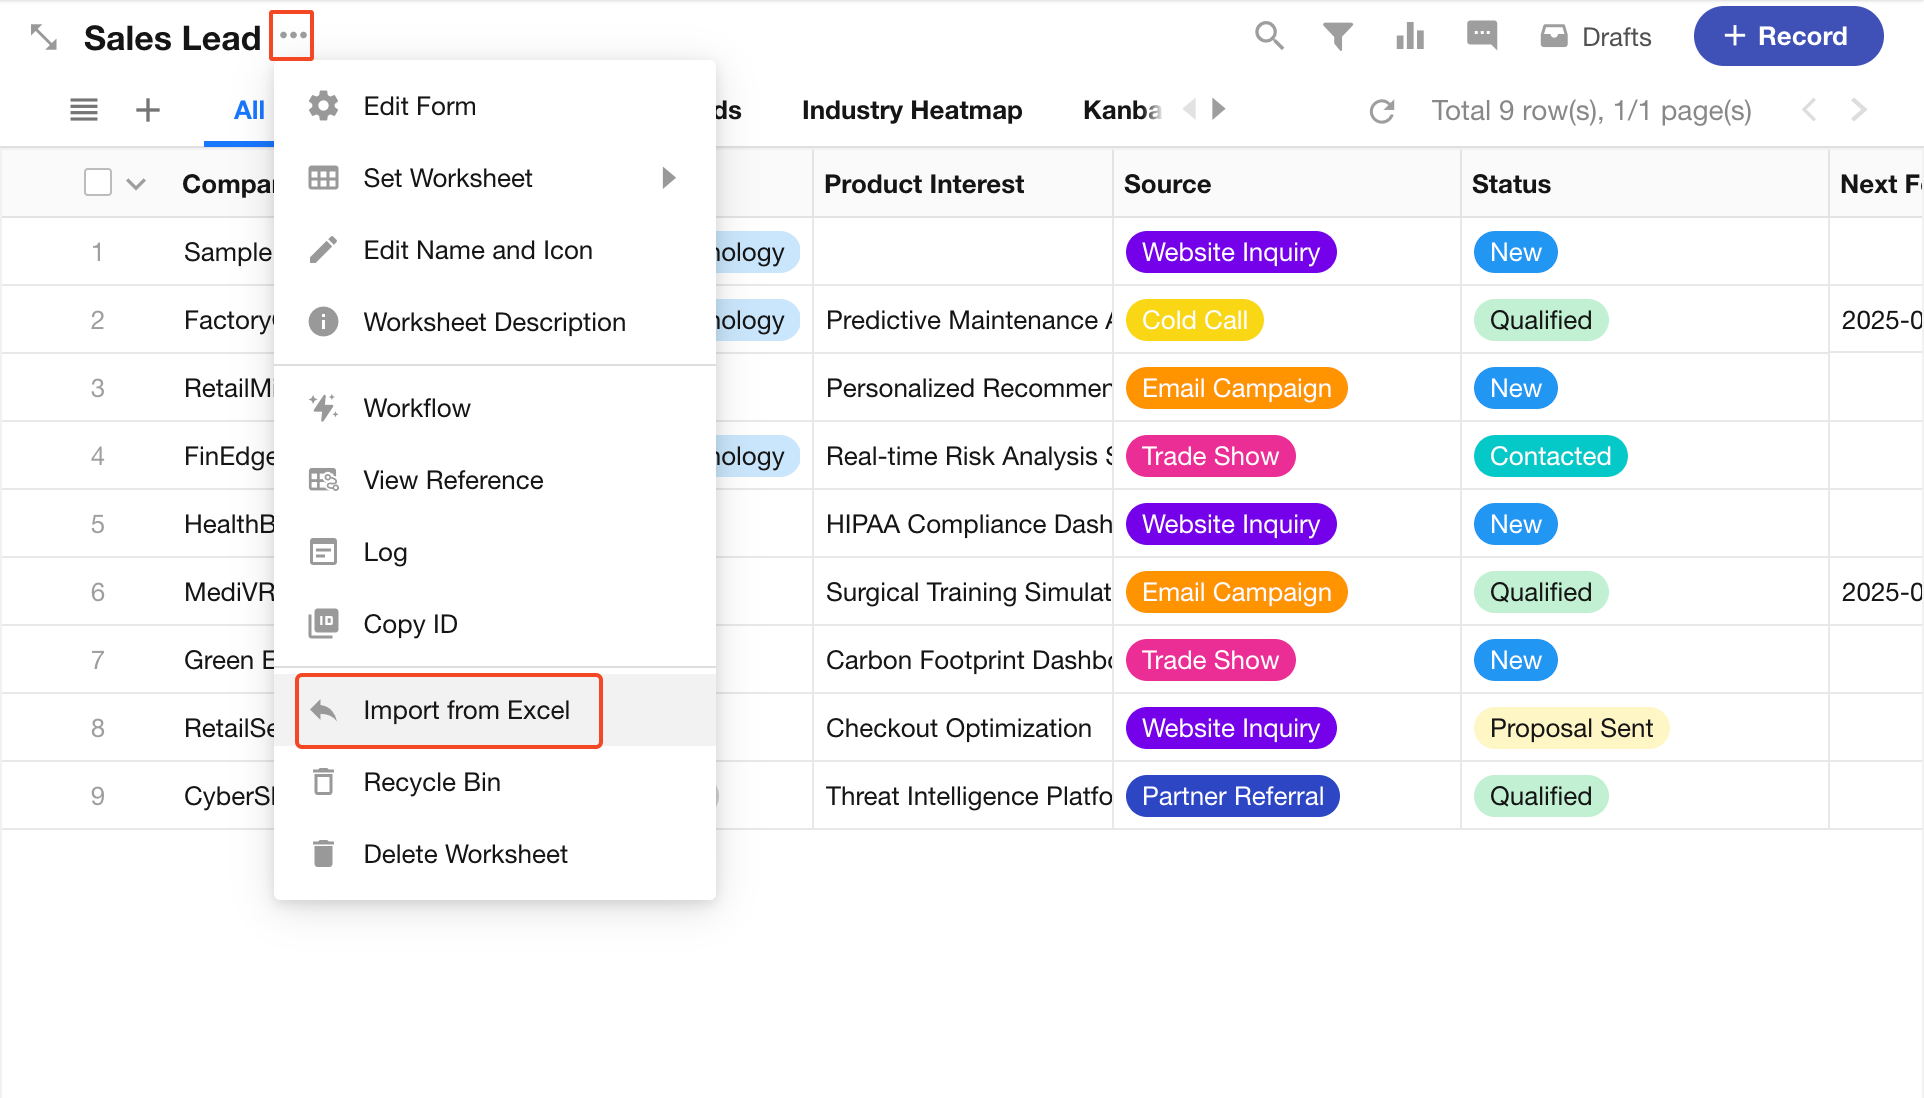
In the worksheet top toolbar, click the Import icon and select Import Excel.
-
Upload the Excel File
Drag and drop the file into the blue area, or click the upload button to select a file. After the upload is complete, click Next.
- File Limits: Less than 10 MB, fewer than 20,000 rows, and fewer than 200 columns
- Supported Formats:
.xls,.xlsx,.csv
-
Confirm Header Row and Preview
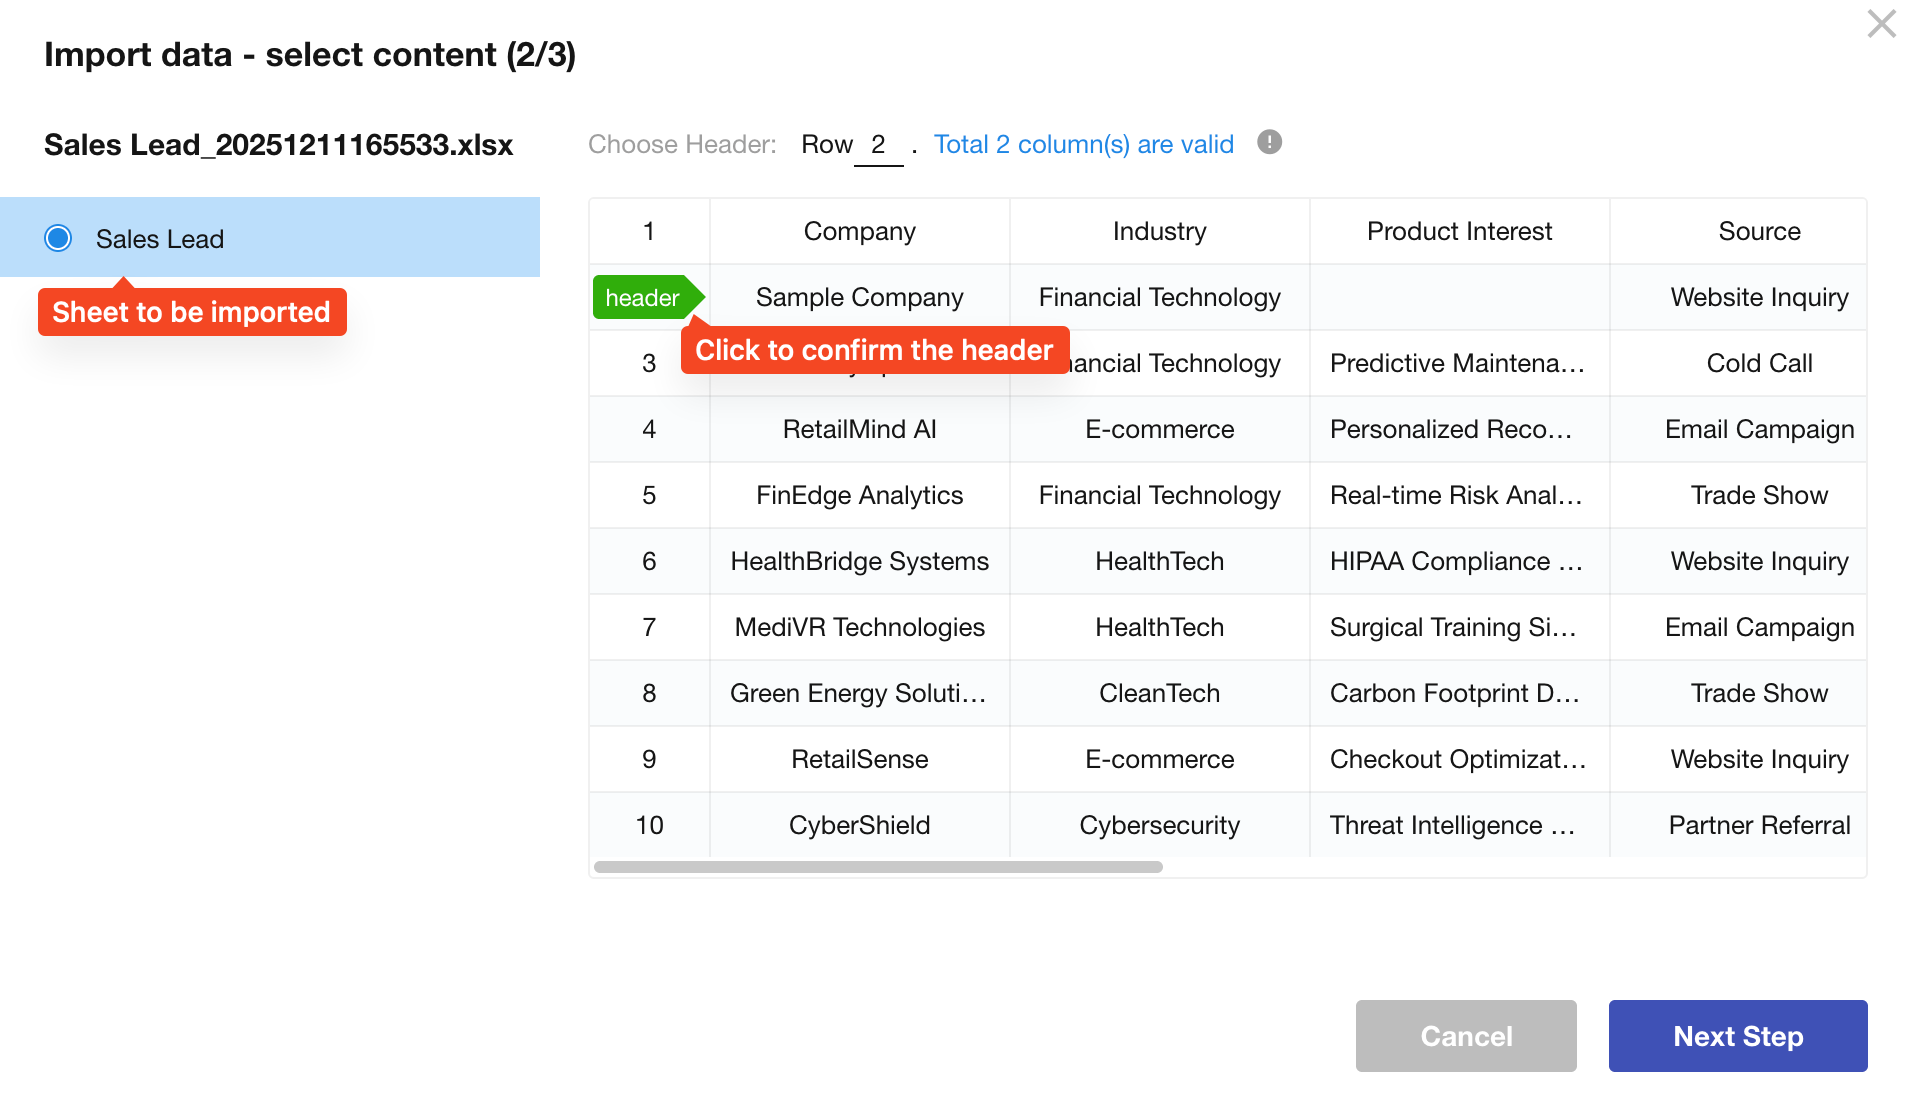
Select a row as the header. Data below the header will be imported into the worksheet (the header row itself will not be imported).
- The header row cannot be empty
- If any column header is empty, the import will fail
-
Map Worksheet Fields to Excel Columns
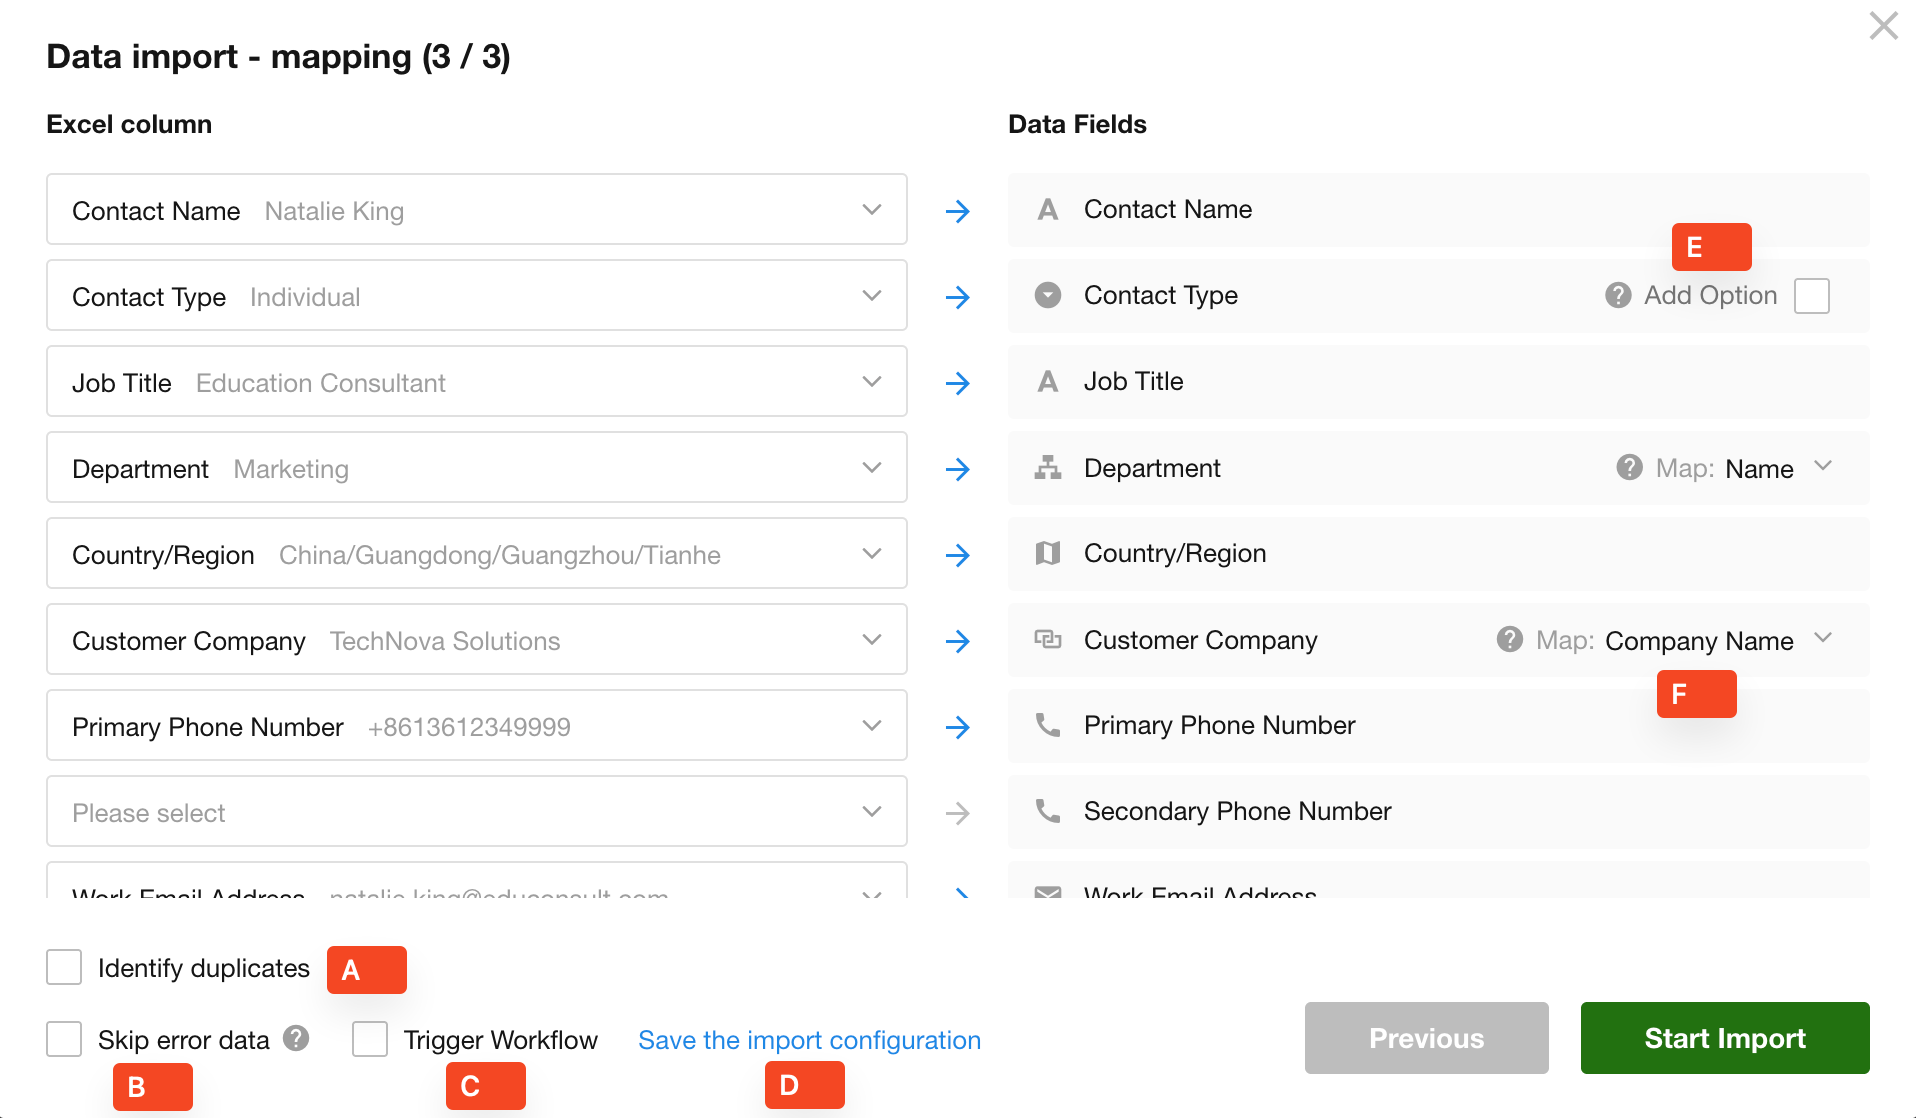
Map Excel column names to worksheet fields.
- Auto Mapping: Fields are automatically matched when names are identical
- Skip Import: If a column should not be imported, select Please Select for that column
-
Confirm Import
Click Start Import to import the Excel data as new records.
2. Import Settings
Identify Duplicate Records
Enable Identify Duplicate Records to identify whether data in the Excel file already exist in the worksheet, based on selected matching fields (such as employee ID or phone number).
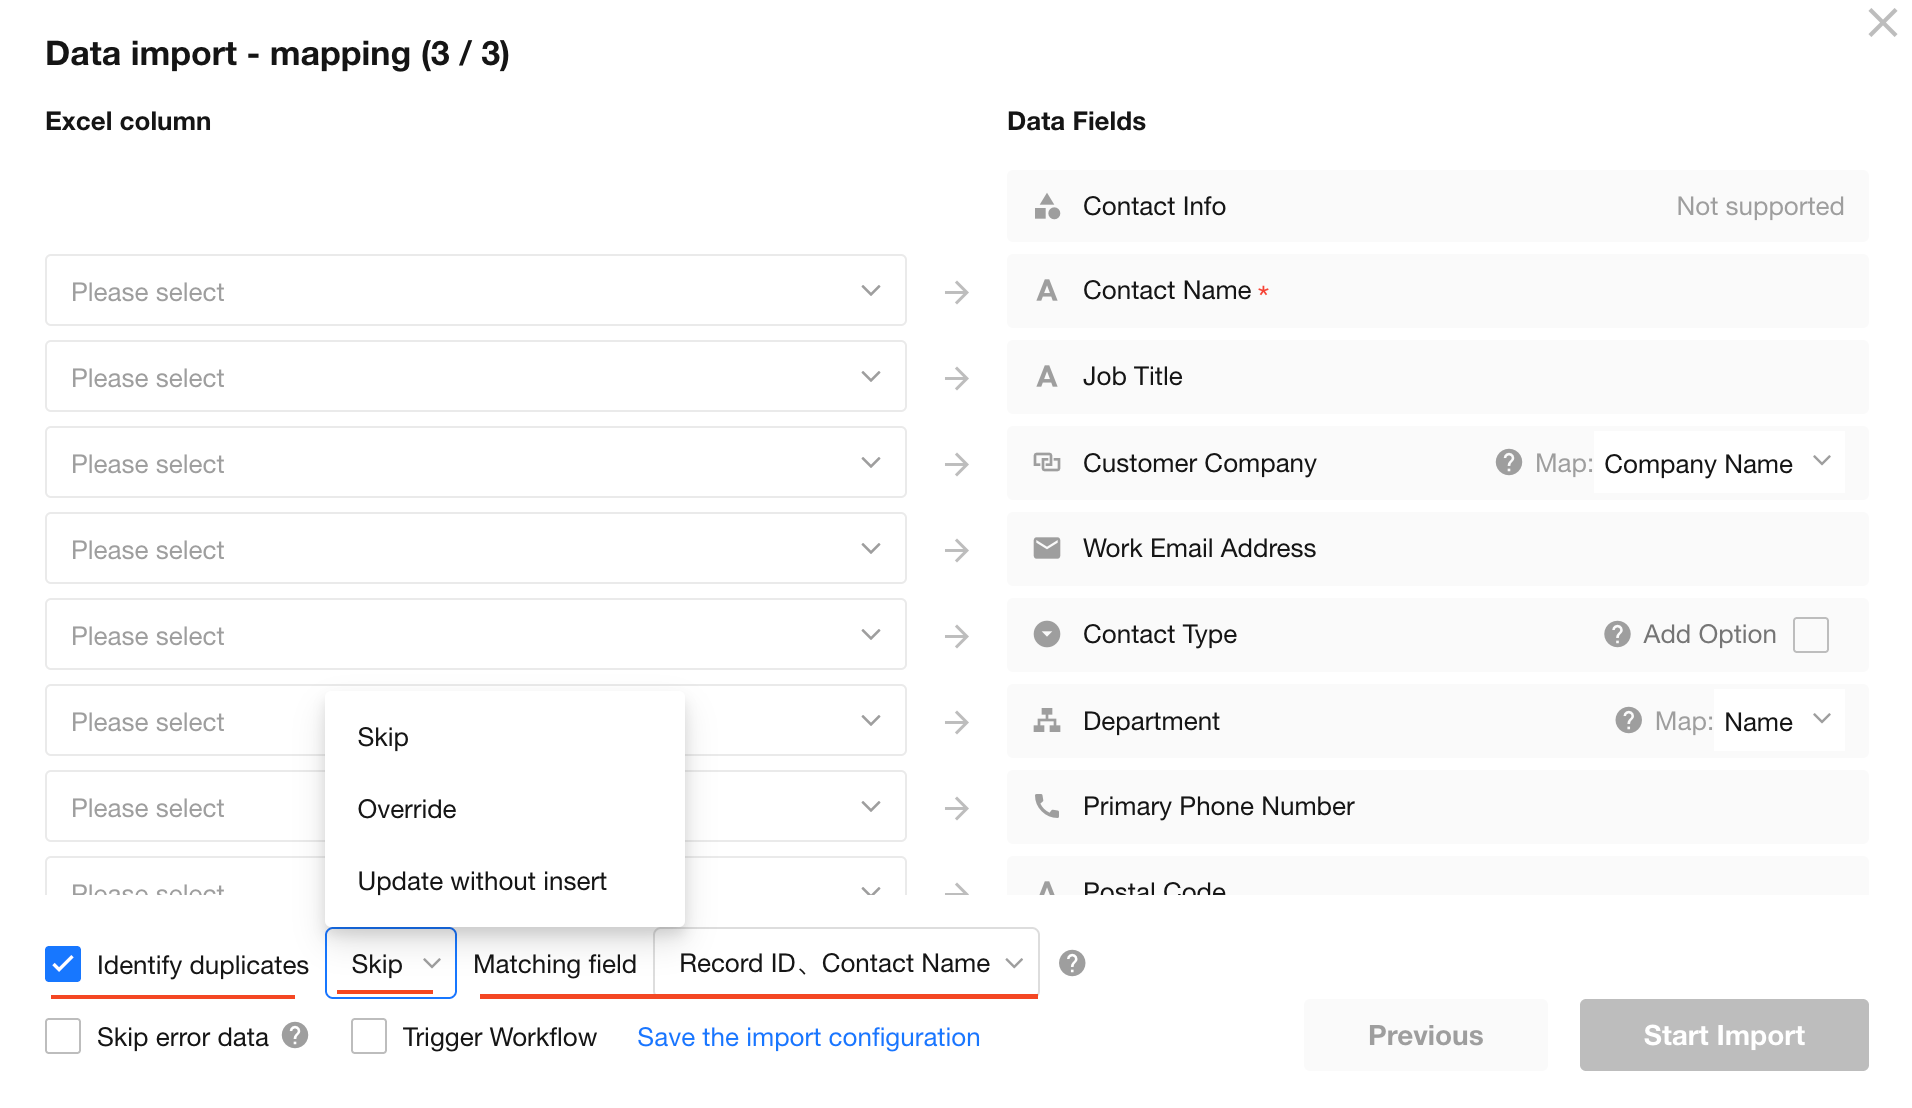
You can choose how to handle matching records using one of the following options:
-
Skip:
The system checks the worksheet using the selected matching fields. If a matching record exists, the data row is skipped. If no match is found, the data is imported as a new record.- Supported field types for matching: Text, Phone, Email, ID, Auto Number, Record ID, and Member (single select).
- When multiple matching fields are selected, all conditions must be met (AND logic). Up to 5 fields can be selected.
-
Overwrite:
If a matching record exists, it will be updated with data from the Excel file. If no match is found, a new record will be created. -
Update Only (No New Records):
Only existing records that match will be updated. Rows without a match will be ignored and no new records will be created.
Skip Error Data
When importing data from Excel, a field is considered invalid if it does not meet the required format or if a required field is left empty.
-
If Skip Error Data is enabled, any row containing invalid data will be skipped entirely and not imported.
-
If this option is not enabled, the row will still be imported. However, invalid fields will be set to empty values, while other valid fields will be imported as normal.
What counts as invalid data?
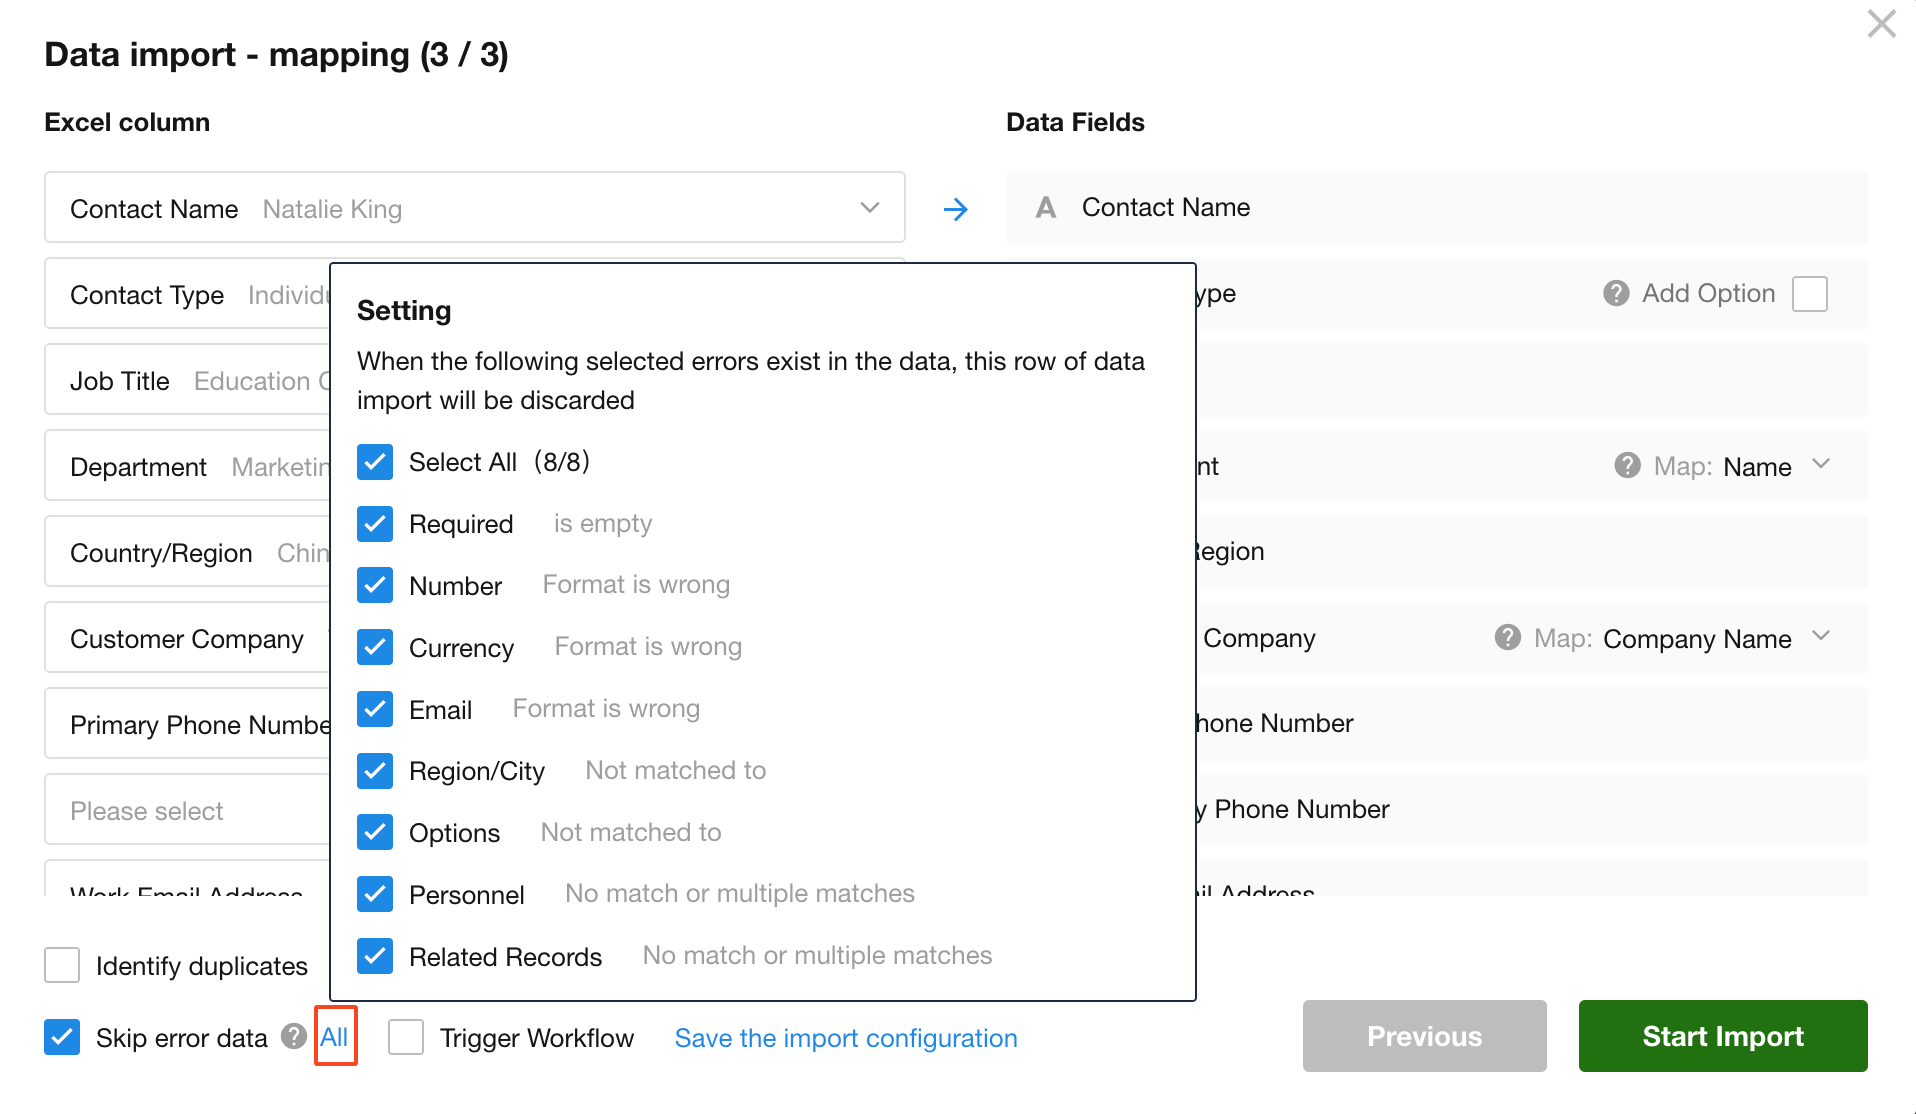
There are 8 types of validation errors that can be treated as invalid data. You can select which types to enforce during import.
For example, if only Email (Invalid Format) is selected:
- Rows with incorrectly formatted email addresses will be skipped entirely.
- Rows with other types of invalid data will still be imported, with those fields set to empty values while other fields are imported as usual.
Trigger Workflow
If your workflow is configured to trigger upon new record creation or record updates, you can decide whether to trigger it during bulk imports. In most cases, workflows are only needed when a single record is manually added or edited. For bulk imports, you can uncheck this option to skip workflow execution.
If you uncheck "Trigger workflow," workflows triggered by date/time fields will also be skipped on the import date. For example, if a workflow is set to trigger 1 hour after record creation and data is imported before 23:00, the workflow will not run (since the trigger time is before midnight). However, if records are imported after 23:00, and the trigger is scheduled after midnight, then the workflow will be triggered as expected the next day.
Save Import Configuration
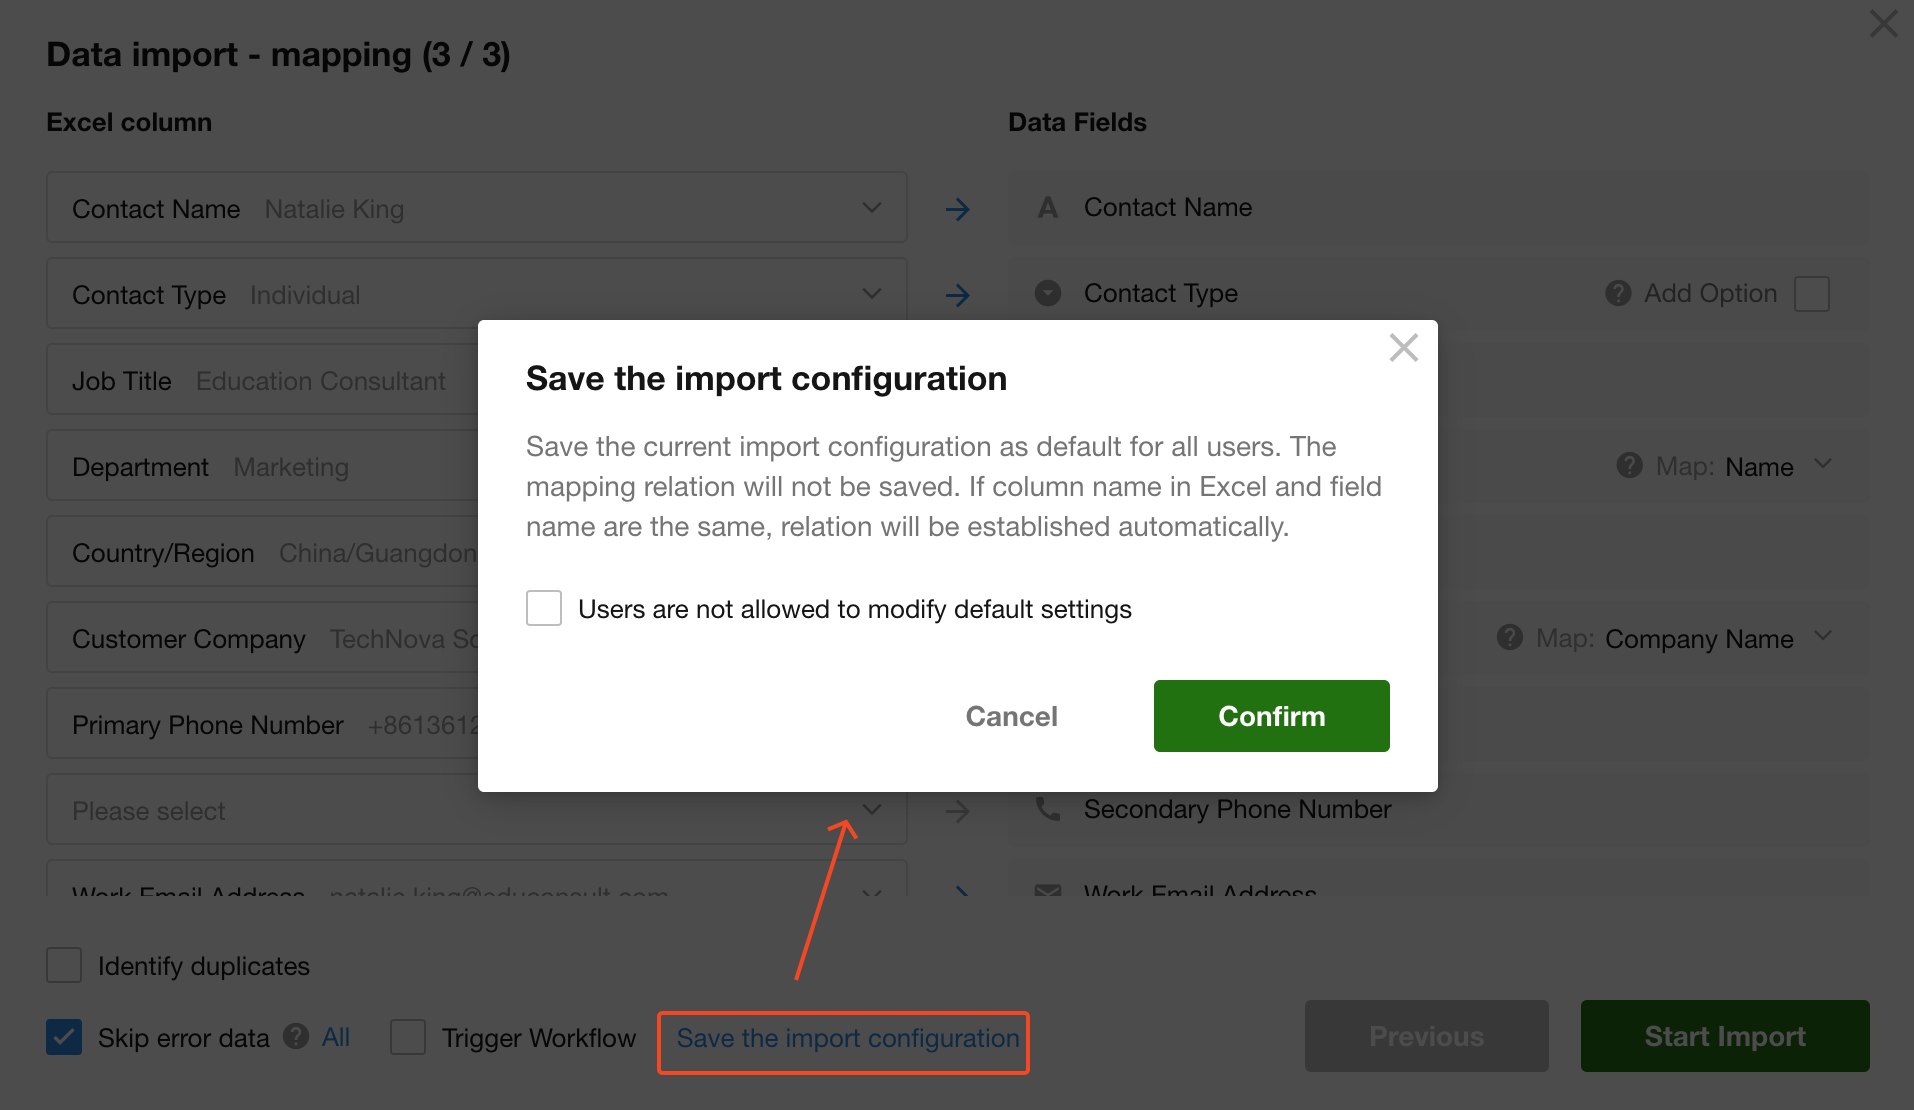
You can save your current configuration steps (field mapping, duplicate detection, etc.) as a default template for future imports.
If you select "Restrict non-admin users from modifying the default configuration", only application admins can edit the import settings. Regular users will only see and use the saved configuration, and configuration options will not be displayed to them.
Allow New Options
If the Excel file contains a select option that doesn’t yet exist in the worksheet, enabling “Allow new options” will automatically add it as a new selectable value during import.
Associate with Other Worksheets
You can auto-associate imported records with records in another worksheet via relationship fields.
For example, if you are importing Contacts, and the Excel includes a "Company" column, and the Company already exists in a Customer worksheet, the system will automatically associate the contact with the corresponding company record.
3. Import Result Notifications
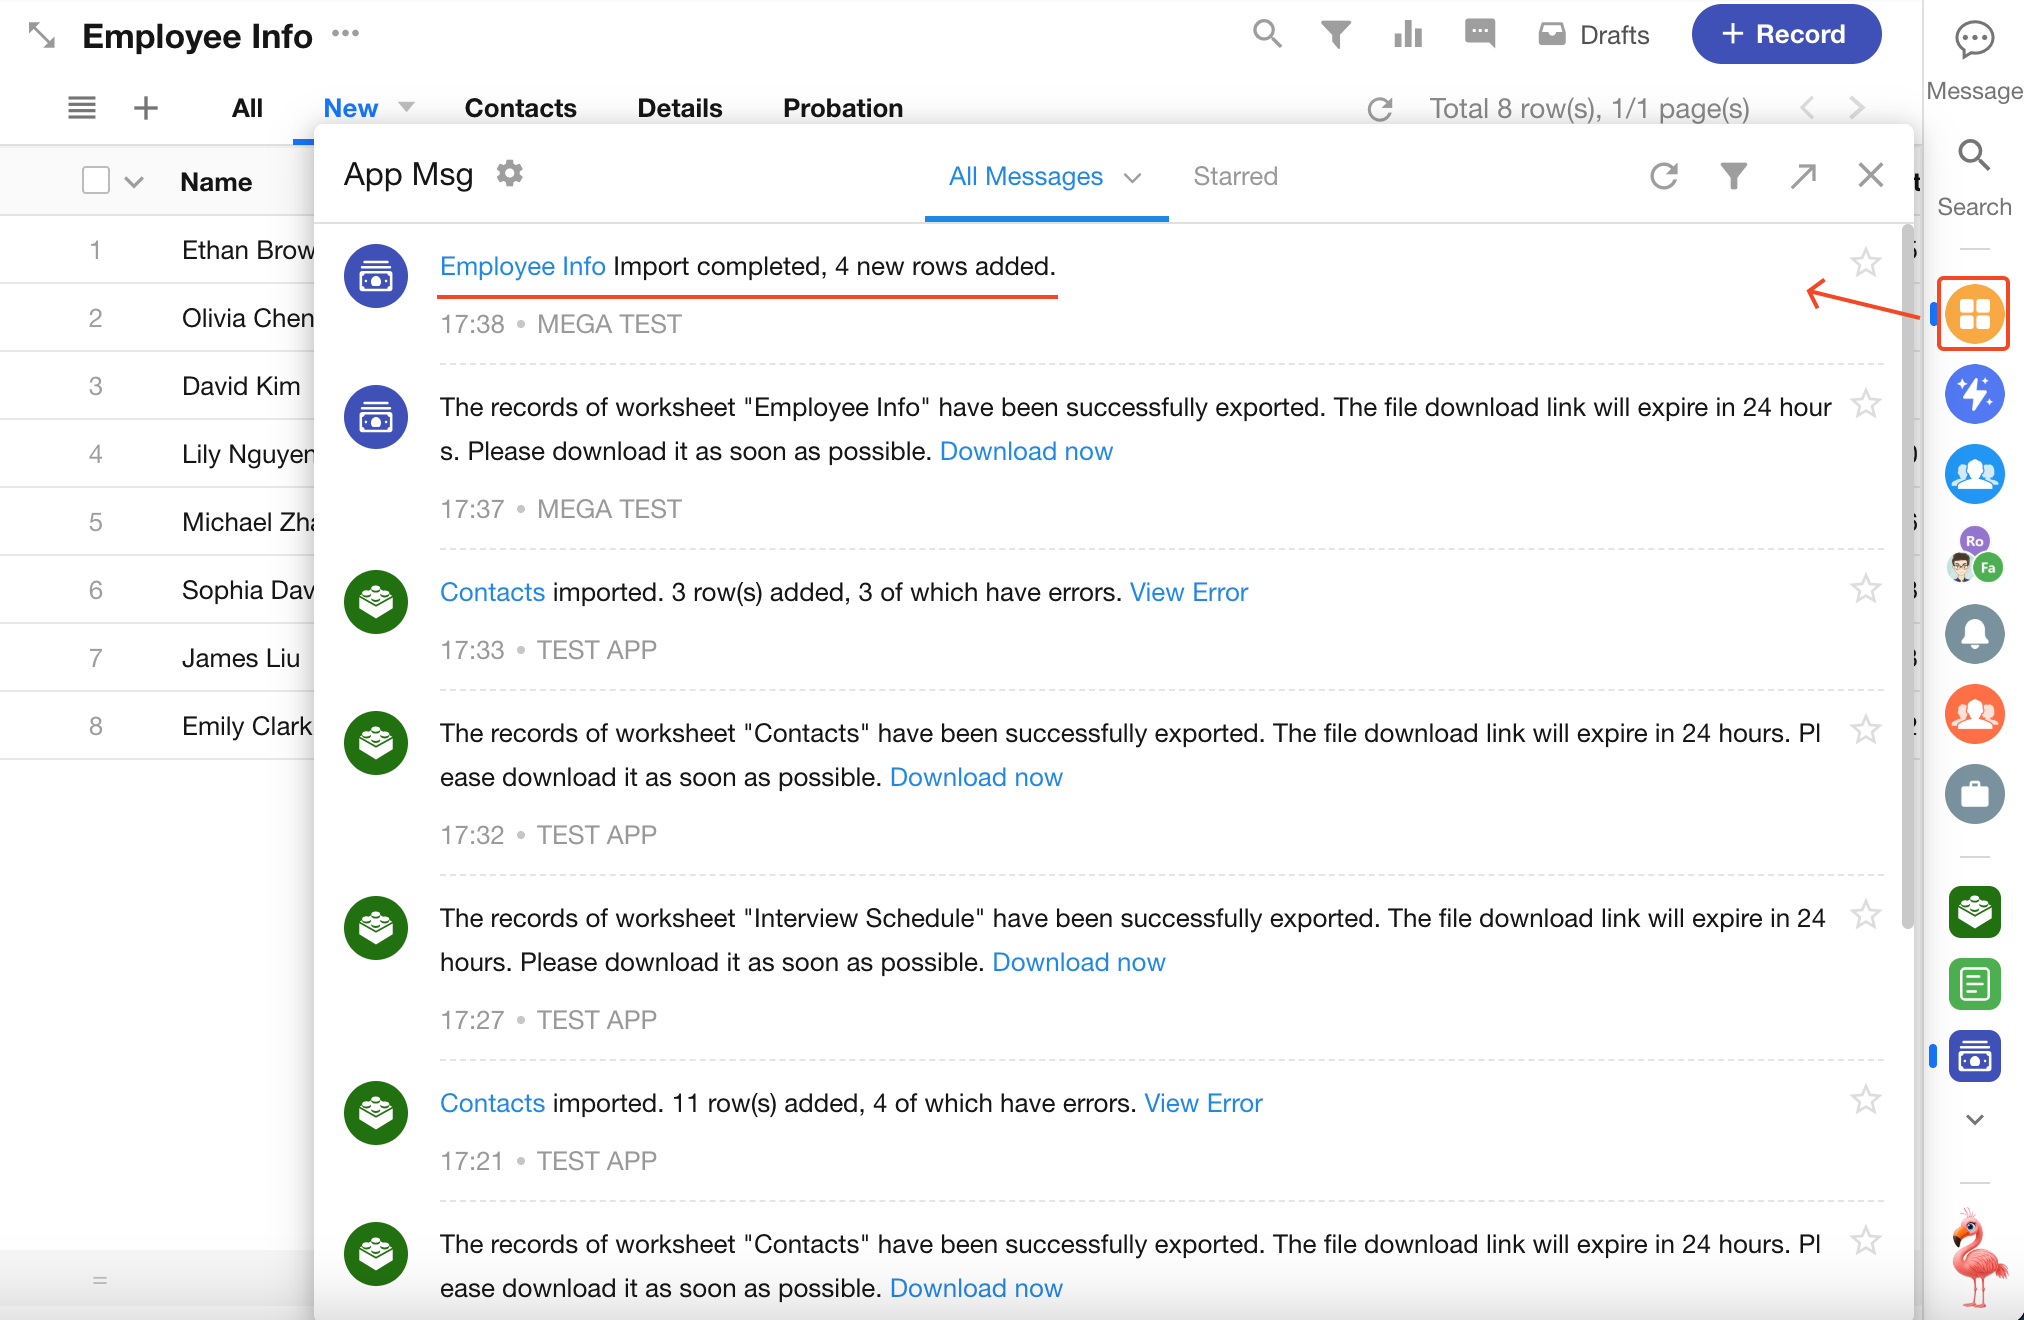
Import Success
A successful import will display a summary like the one below:
Import Failure
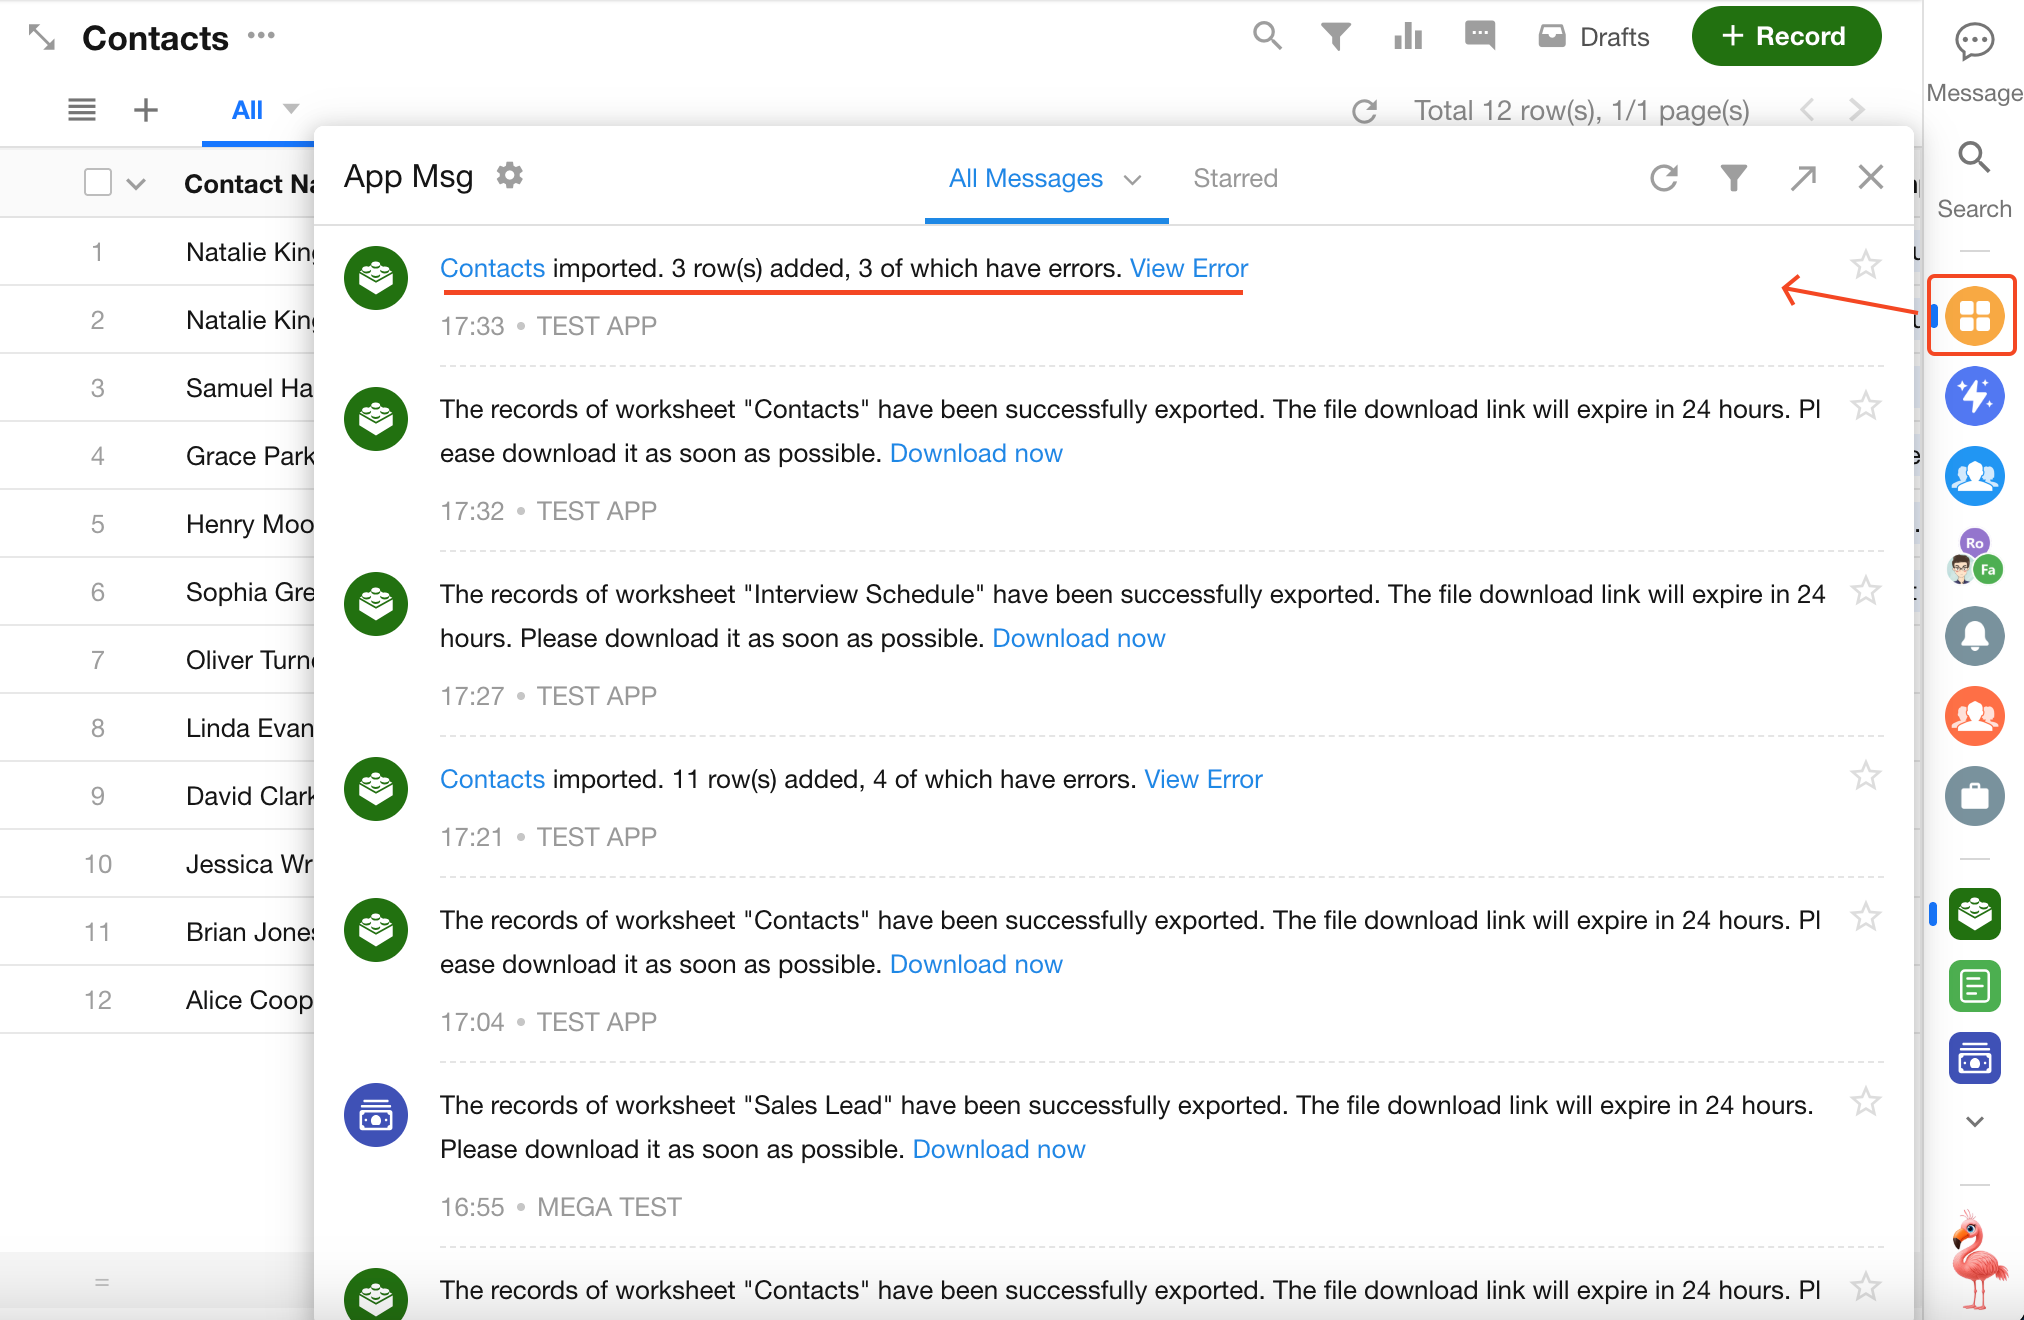
If any records fail to import, you will also receive an error message with an option to download a text-based error report for review.
Import Logs
The result summary will show the number of newly added and updated records. If you want to further analyze the changes (e.g., only updates), you can view detailed logs in the worksheet logs.
4. Rules for Importing Data
### Fields That Do Not Support Import
-
Subform, Formula, Uppercase, Positioning, Foreign field, Rollup, Cascading, Signature, Barcode, Embed, Section, and Remarks.
These field types are not supported for data import under any circumstances:
-
Fields with the following attributes also restrict import:
Fields marked as Hide, Hide when Create, or Read-only.
Only app administrators can import data into these fields.
-
Fields restricted by role-based permissions and therefore not visible when creating records.
Only app administrators can import data into these fields.
### Field Default Values Are Not Applied During Import
If a field is configured with a default value, this default will not be applied during import. To include such values, please prepare them directly in your Excel file before importing.
### Import File Size & Format Limits
-
Supported formats: .xls, .xlsx, .csv
-
Maximum file size: 10MB
-
Maximum rows: 20,000
-
Maximum columns: 200
If your file exceeds these limits, please split it into multiple files and import them separately.
Importing Multi-select/Department/Members/Org-Role Fields
Fields such as multi-select, members, departments, and org-roles support multiple values during import. Please make sure each option is separated by a comma in your Excel data.
Department fields do not support importing based on hierarchical paths. The system will only match based on the lowest-level department name. For precise matching, it is recommended to import using department IDs.
Example Format in Excel:

Result in Worksheet:

### Importing Data into Members Fields
-
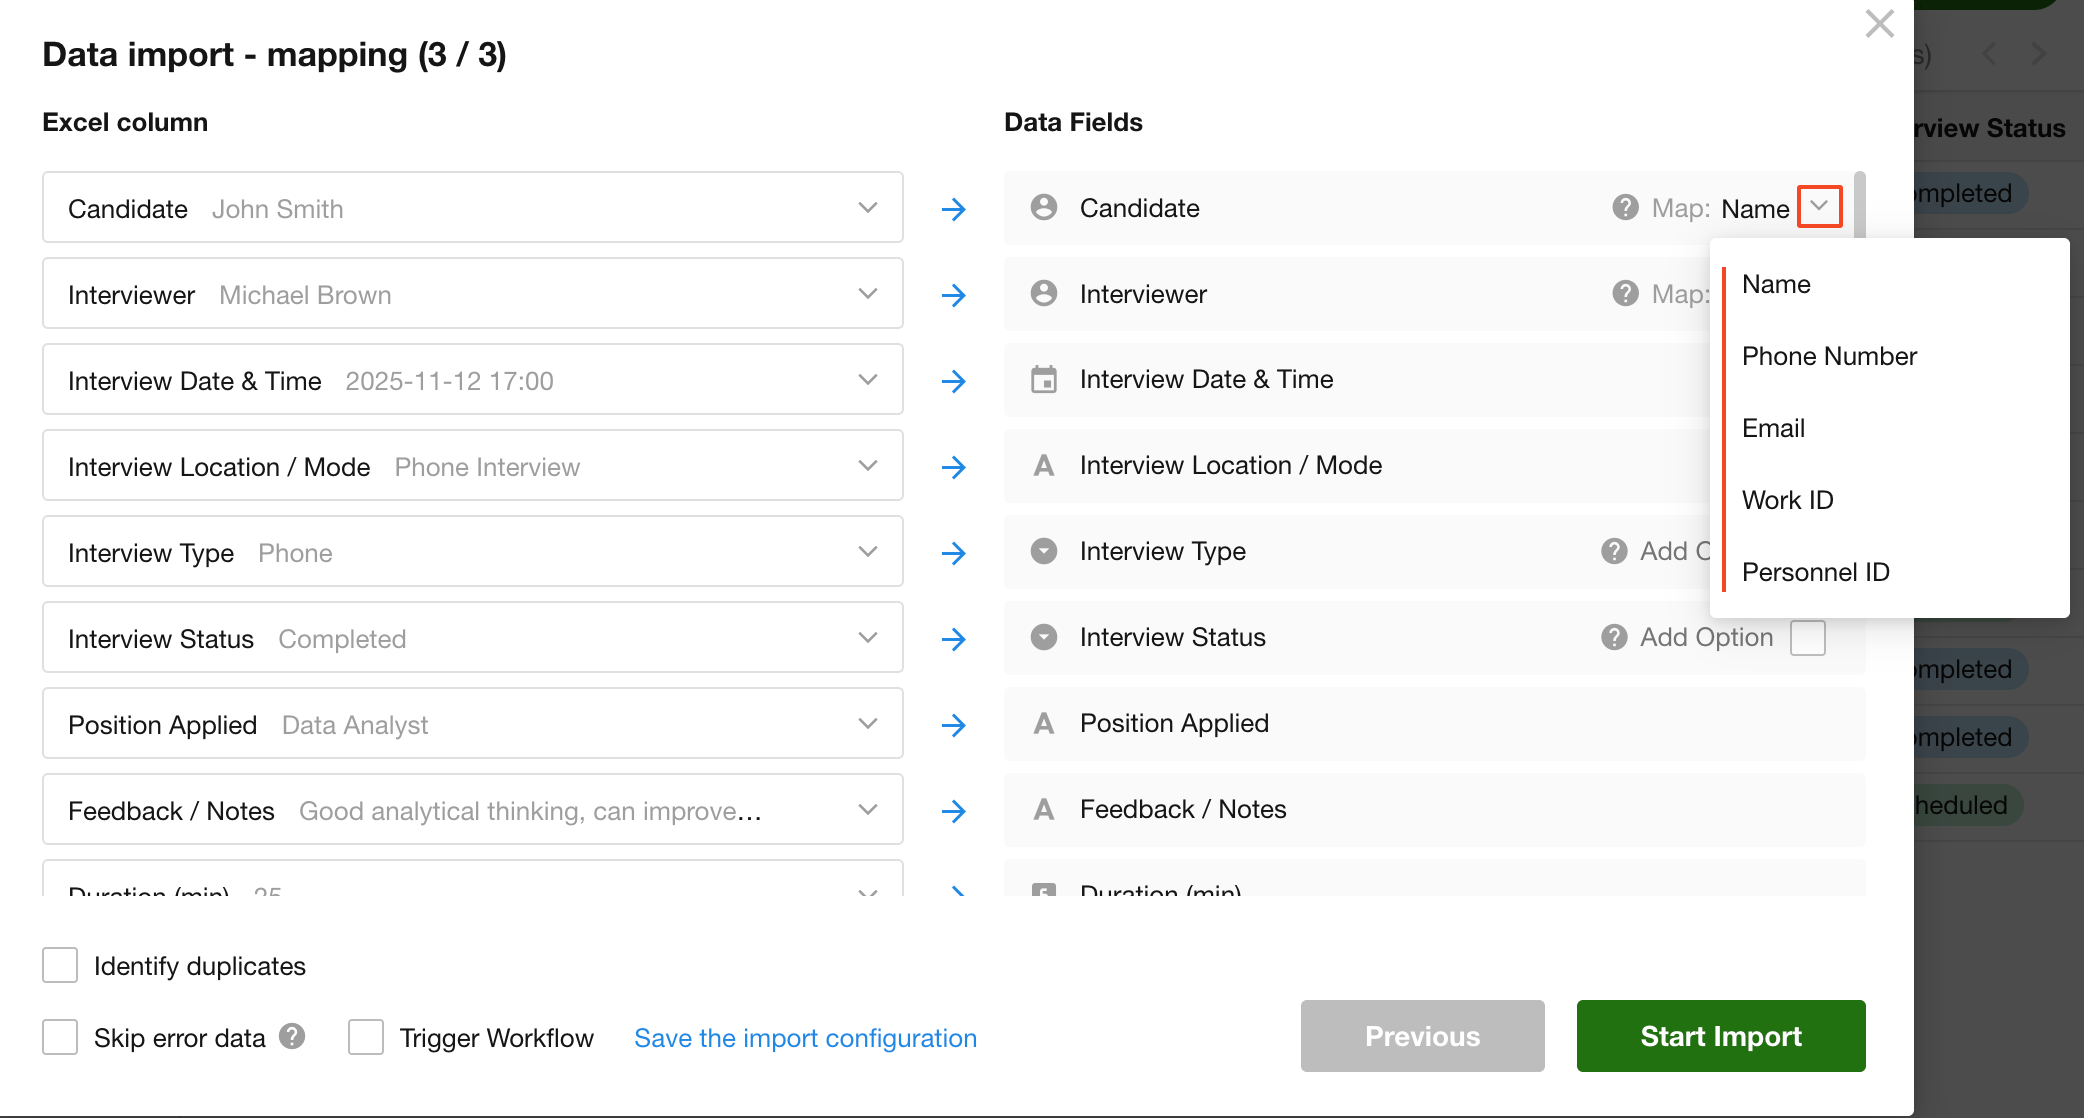
Matching fields for the Members field
Includes name, telephone, email, employee ID, and user ID.
These are system fields in the Contacts and can be used to identify the corresponding account.
-
What if there are duplicate names?
-
Multi-select member fields: If imported using names, all users with the same name will be imported.
-
Single-select member fields: If multiple matches exist, no user will be imported.
-
Importing Data into Region/City Fields
When importing data into region/city fields, the hierarchy of province/city/district(county) must be separated by a forward slash ( / ) in the Excel file.
Correct format: Province/City/District(County), e.g., Jiangxi Province/Shangrao City/Yanshan County
If the separator "/" is missing (e.g., “Henan Province Zhengzhou City”), the system will attempt an exact match with the full string as a single entry, which may fail if no such province exists.
Import Rules:
-
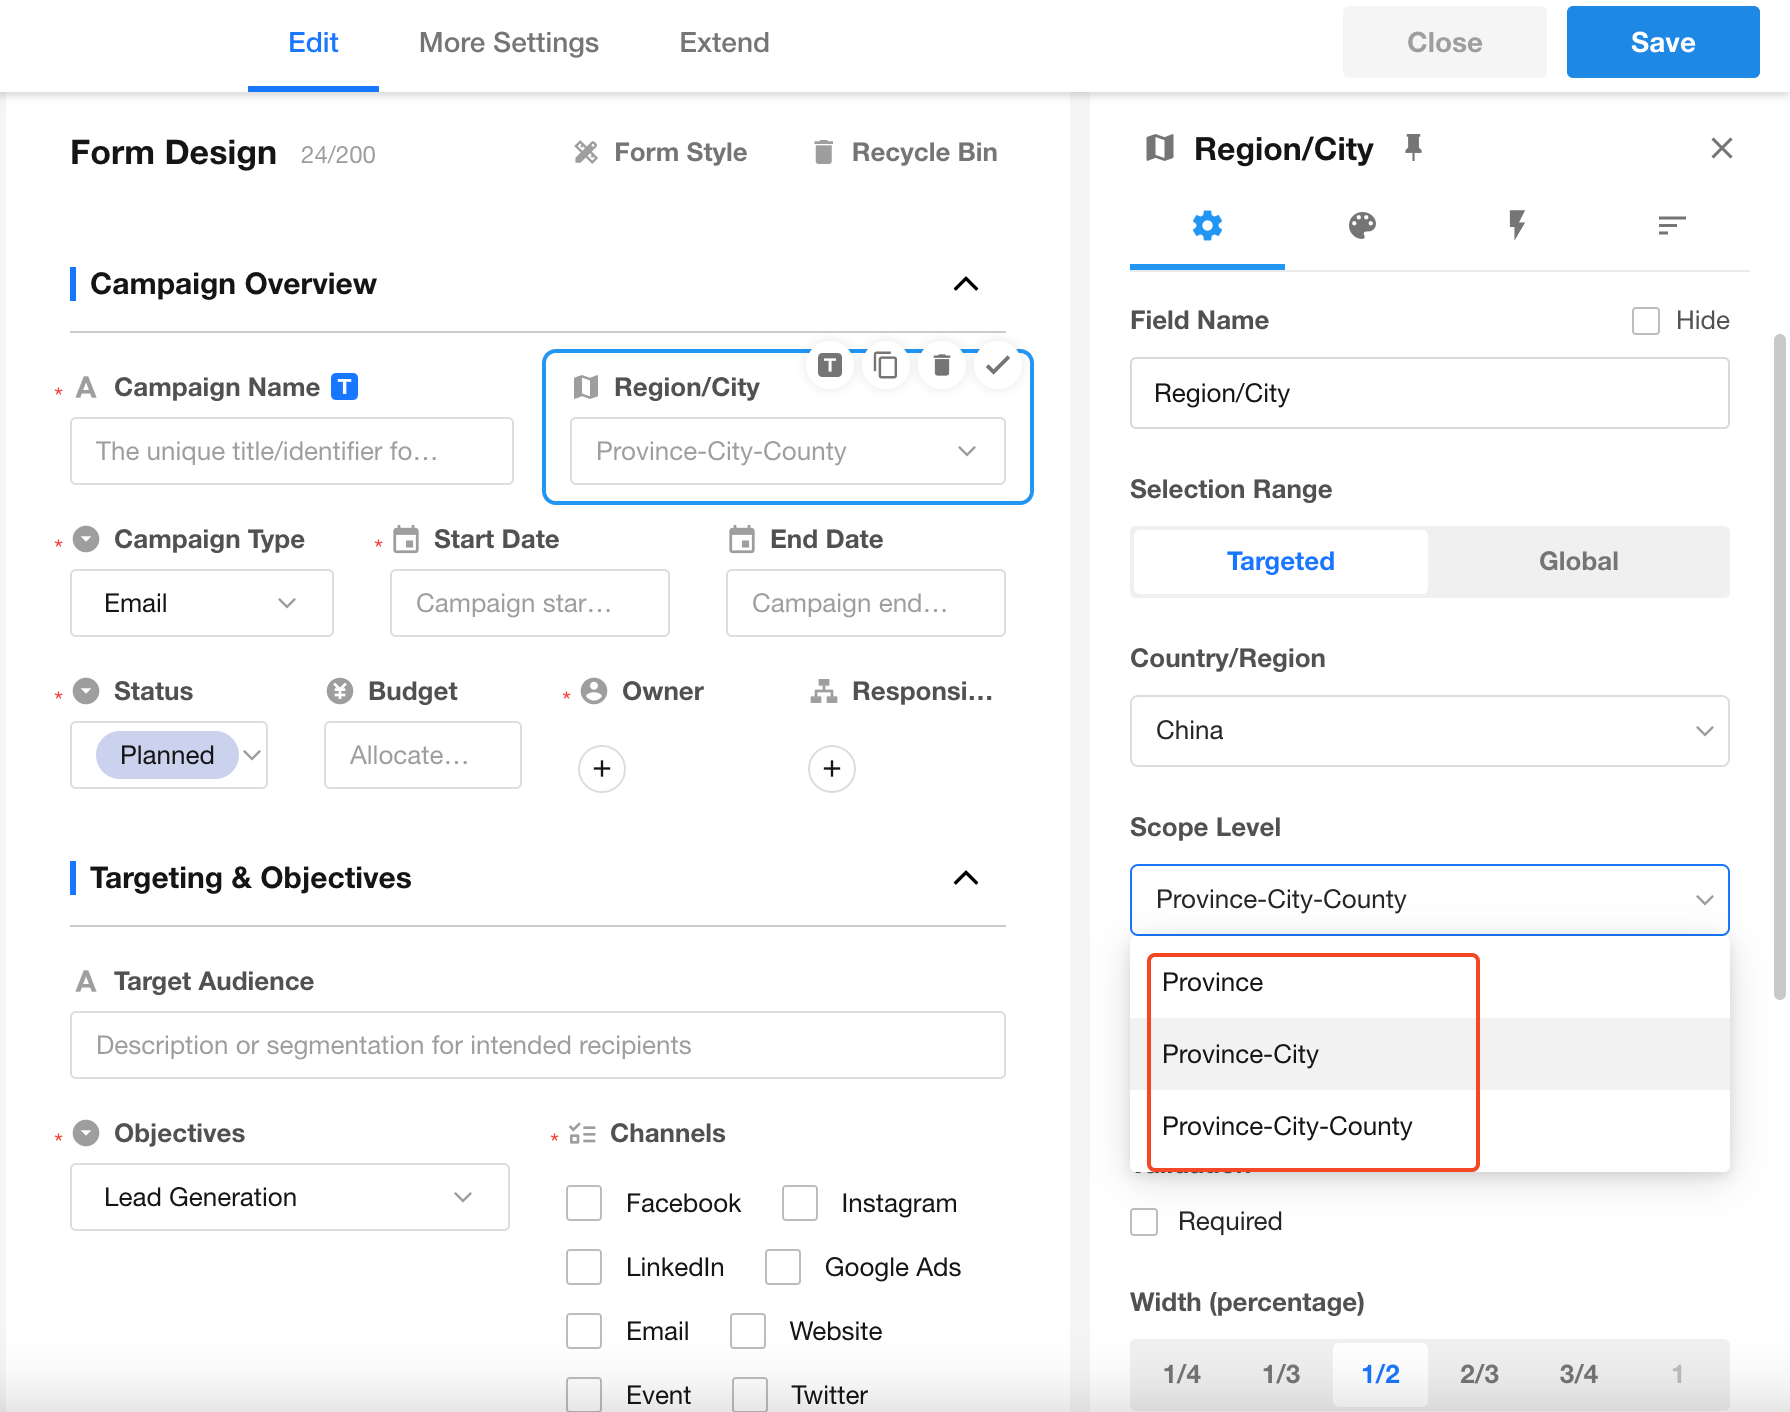
The import respects the configured region hierarchy of the field (e.g., Province-City-District(County)). Only data that matches this structure will be imported.
-
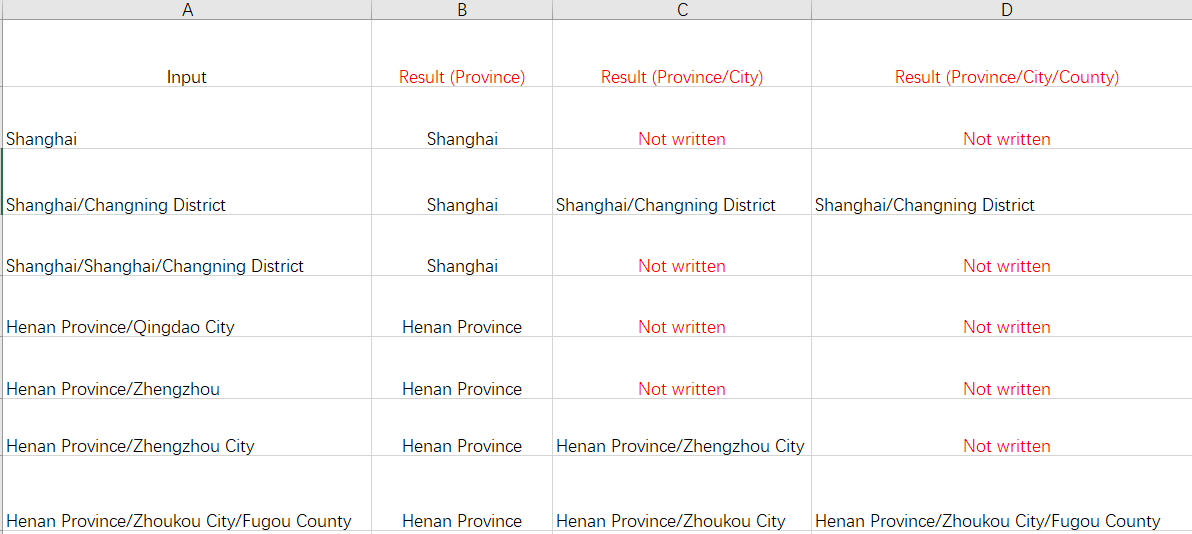
The hierarchy must be logically consistent. For example, Henan Province/Qingdao City is invalid because Qingdao is not part of Henan.
-
The region format must be complete. Partial structures like Henan/Zhengzhou will be ignored.
-
For municipalities (e.g., Beijing, Shanghai), use the format: City/District.
### Importing Attachments
How to export/import files and images
### Recommended Excel Format for Import
To ensure a smooth import process, please follow these guidelines:
-
Only include the fields you plan to import in the Excel sheet.
-
Make sure the first row contains the column headers (i.e., field names).
-
Starting from the second row, enter the data to be imported.
-
Delete any unnecessary rows or unrelated content from the file.
Importing Data into Cascading Fields
-
When the imported data includes a record ID, the system performs an exact match based on the record ID.
-
When importing text values:
- If the text contains a path (for example,
Shanghai/Minhang District), the system matches using the last segment (Minhang District). - If no path is included, the entire text is used as the matching value.
- If the text contains a path (for example,
-
When the cascading field is configured for multiple selection, matching is performed item by item.
Was this document helpful?