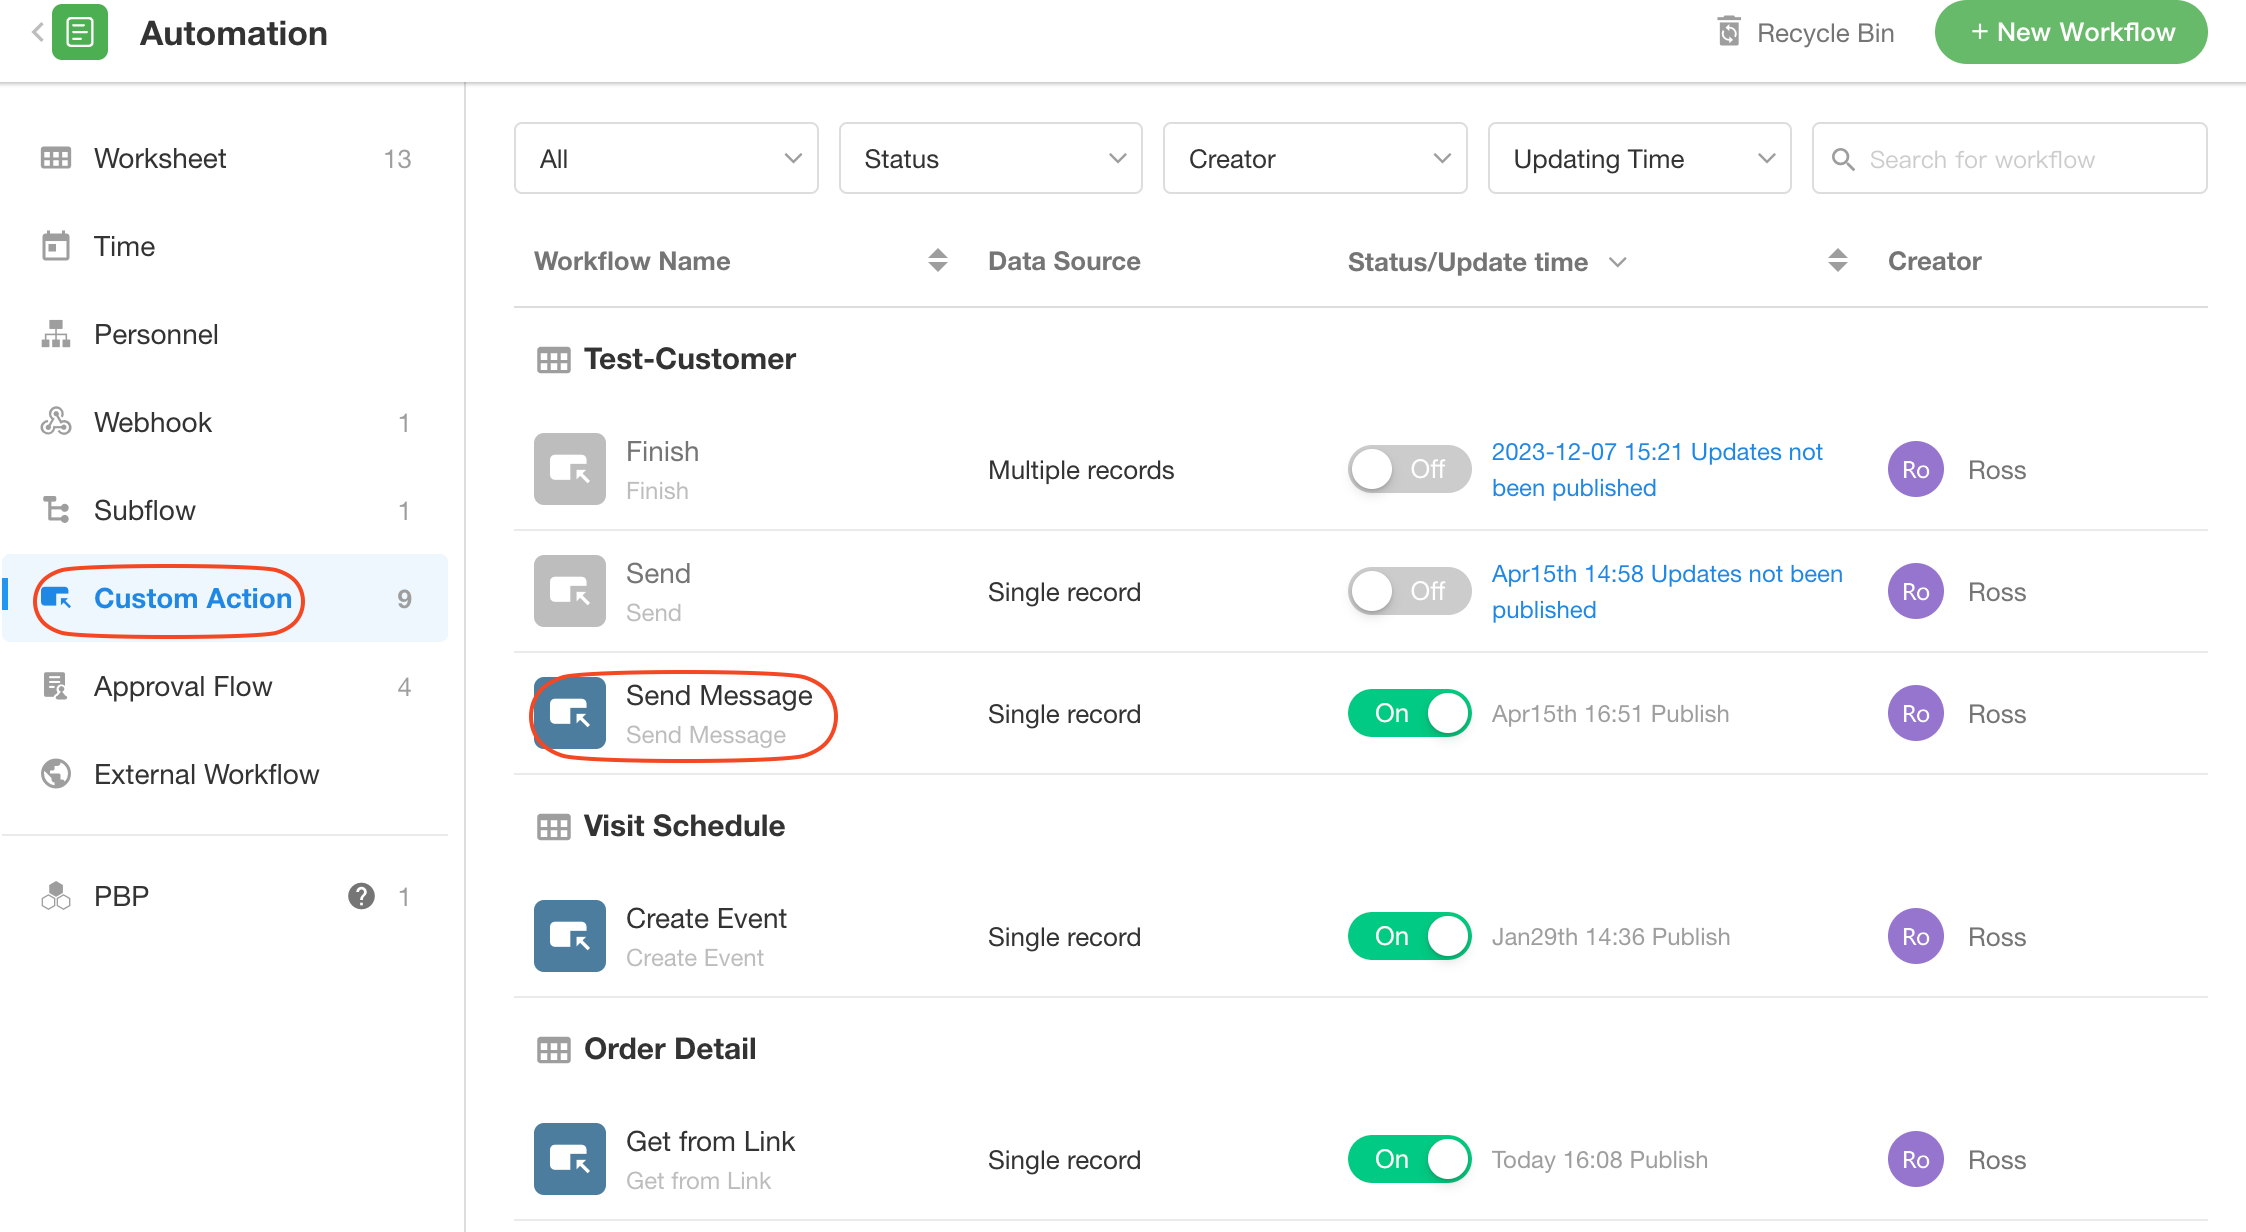
Global Workflow Configuration
On the Workflow Configuration page, you can configure global settings for a workflow. These settings mainly include basic workflow configuration, manual node settings, and workflow parameter configuration.
I. Basic Workflow Configuration
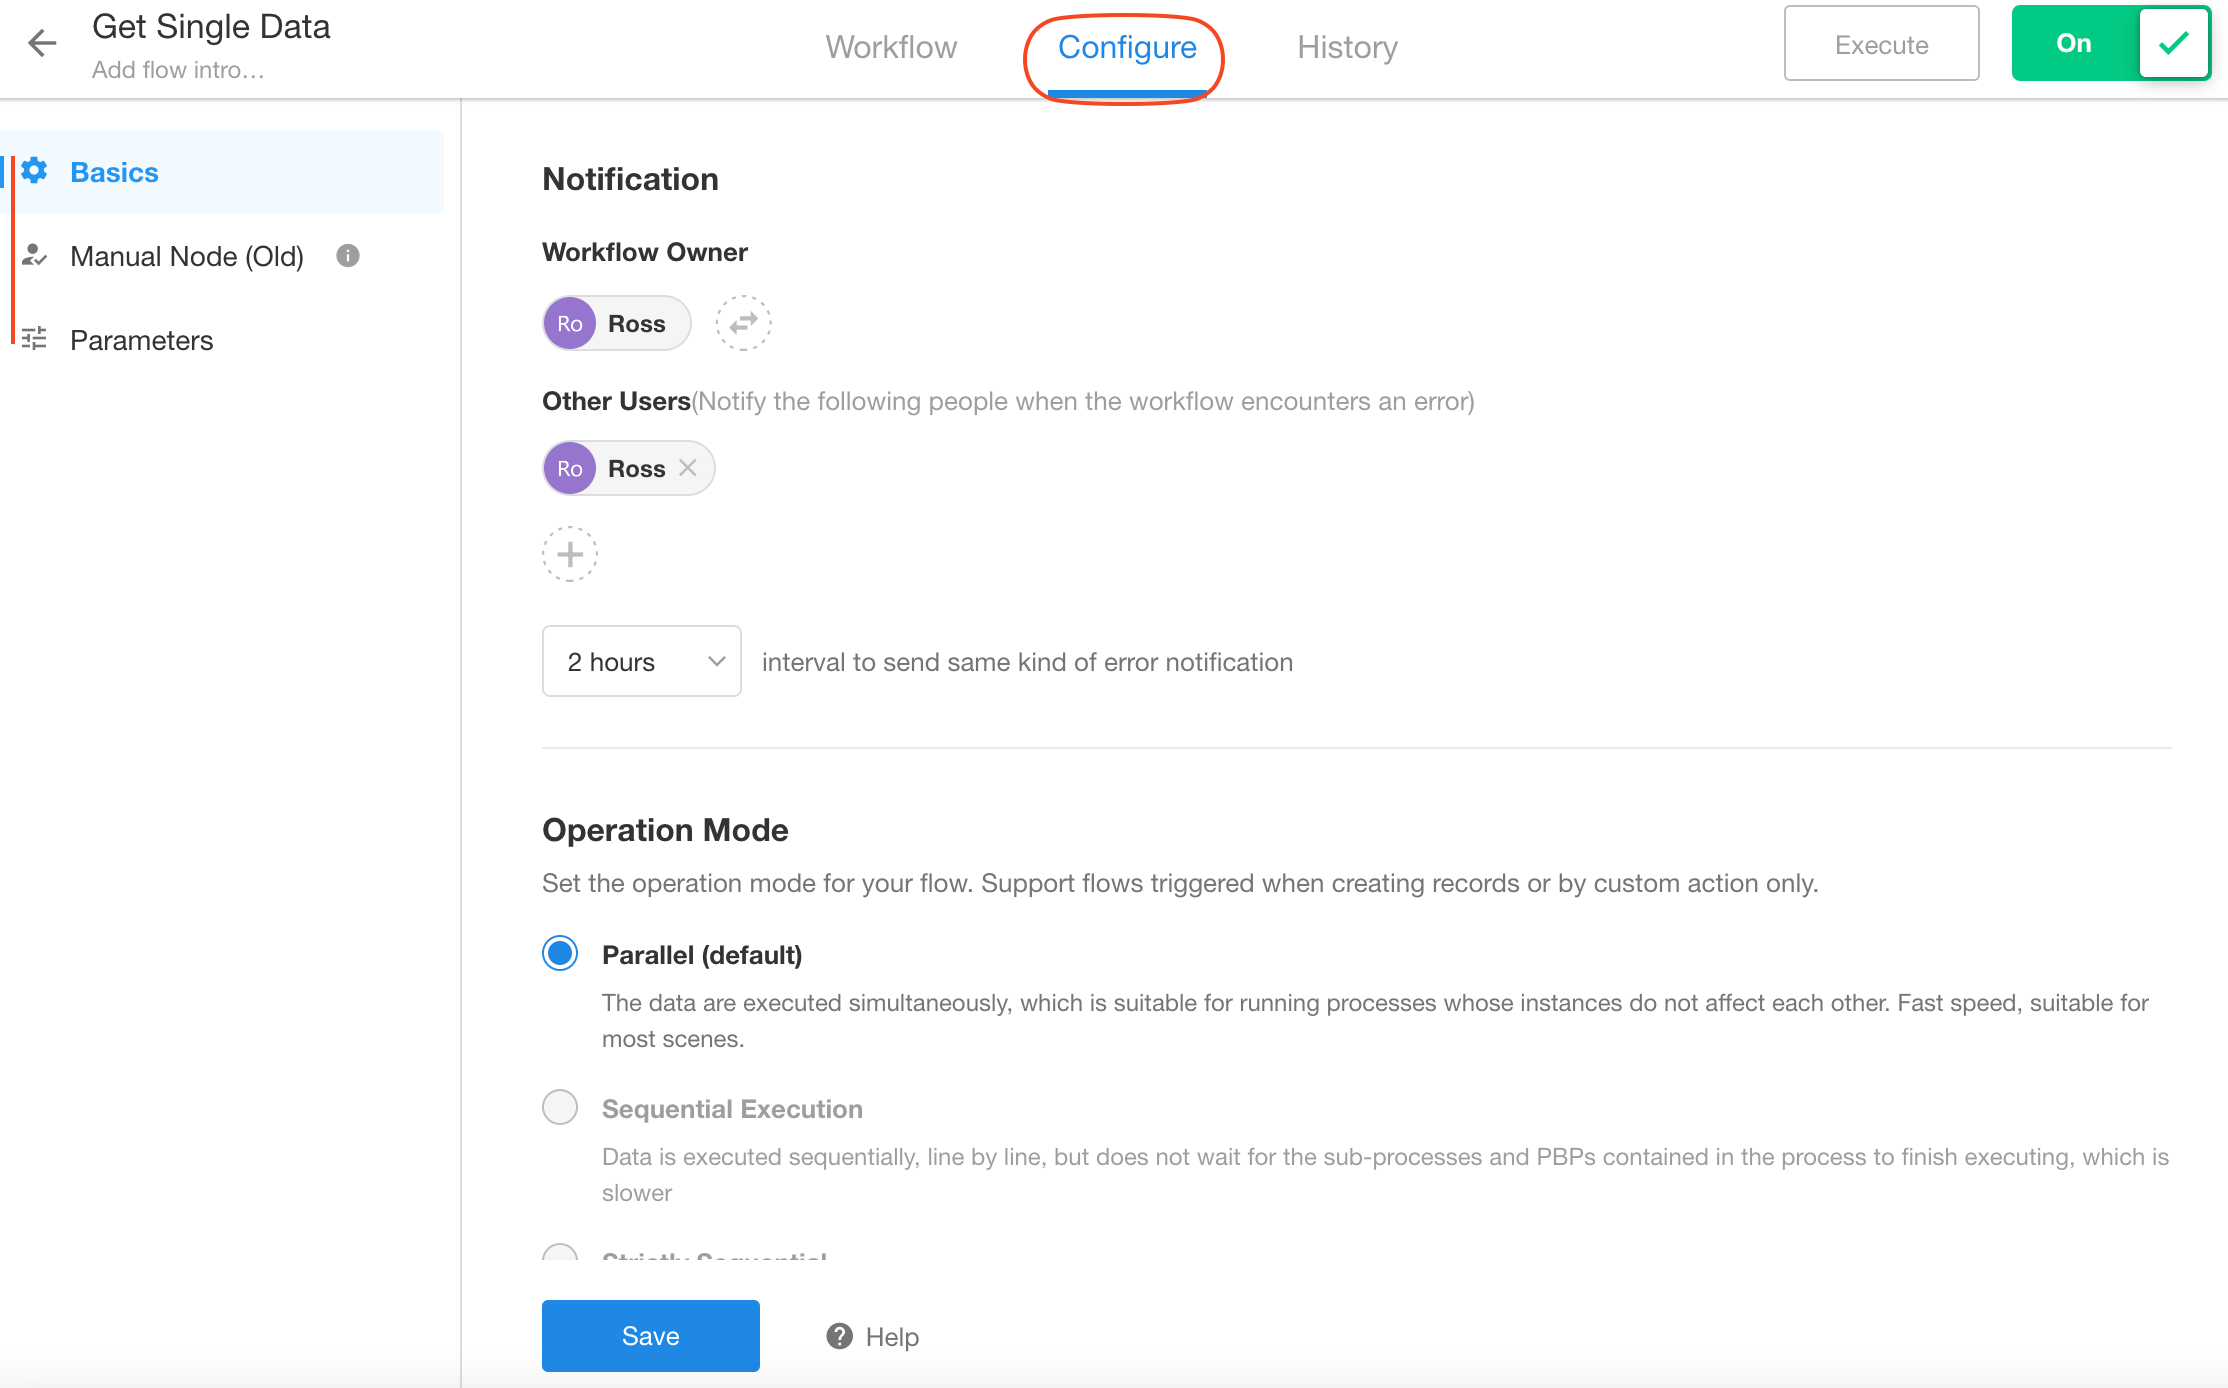
1. Workflow Error Notification Recipients
When a workflow encounters an error, notifications can be sent to designated users. You can notify the workflow owner or other specified users.
If the same error occurs repeatedly within a certain period, you can configure the system to suppress duplicate notifications during that time.

-
Workflow Owner
By default, the workflow creator is the owner. The owner can be changed, but only one person can be assigned as the owner.
-
Notify Additional Users
In addition to notifying the owner, you can also notify other designated users.
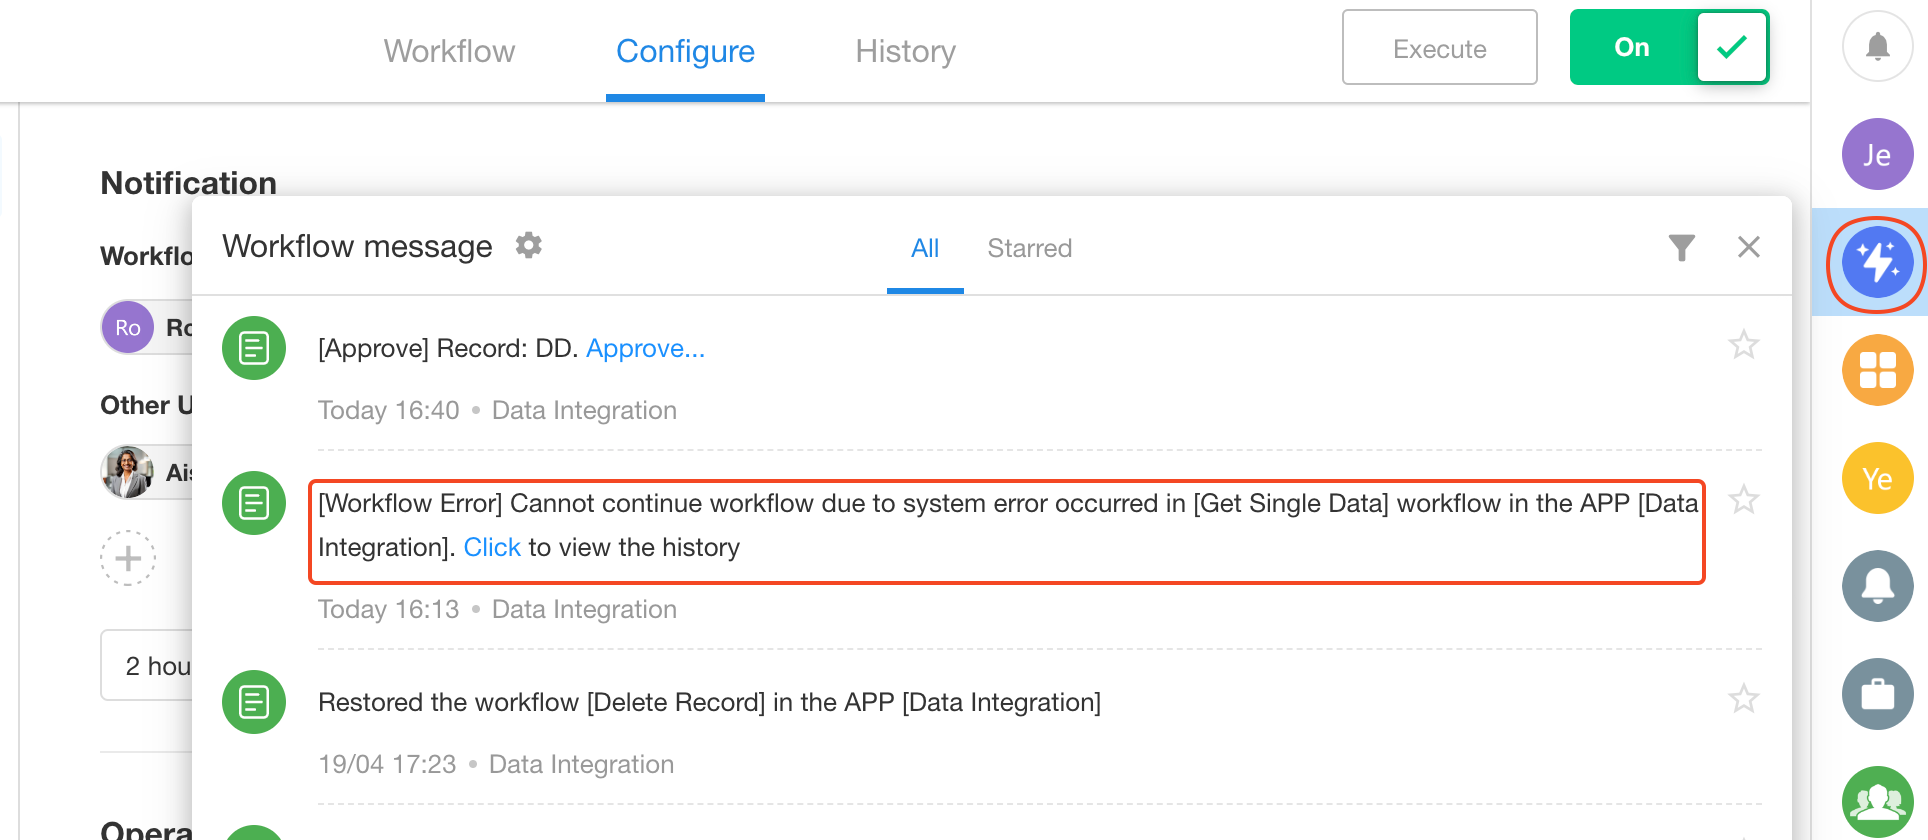
Example notification:
2. Execution Mode
For a workflow, multiple records may trigger it simultaneously.
For example, if a workflow is configured to trigger only when a record is created, importing an Excel file that creates 100 records will instantly trigger the workflow 100 times.
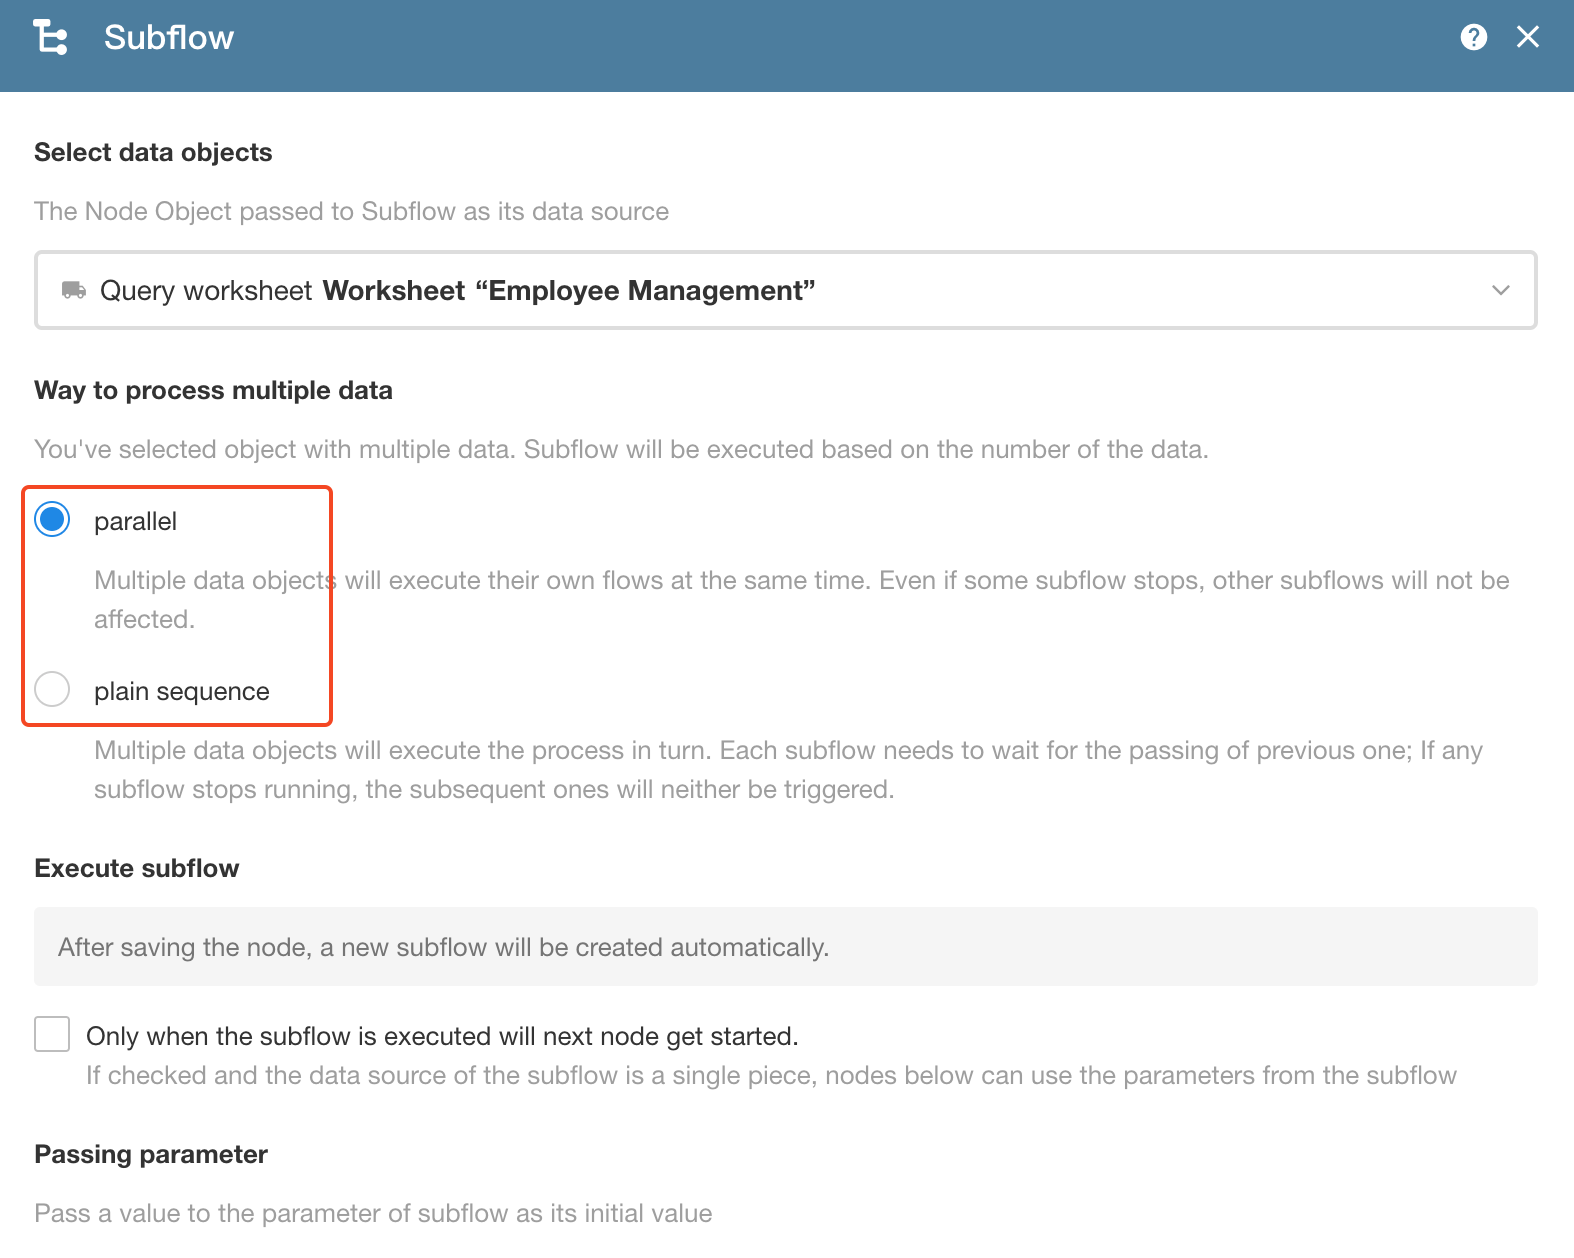
Based on your business requirements, you can choose whether these workflow instances run in parallel, in sequence, or in strict serial order.
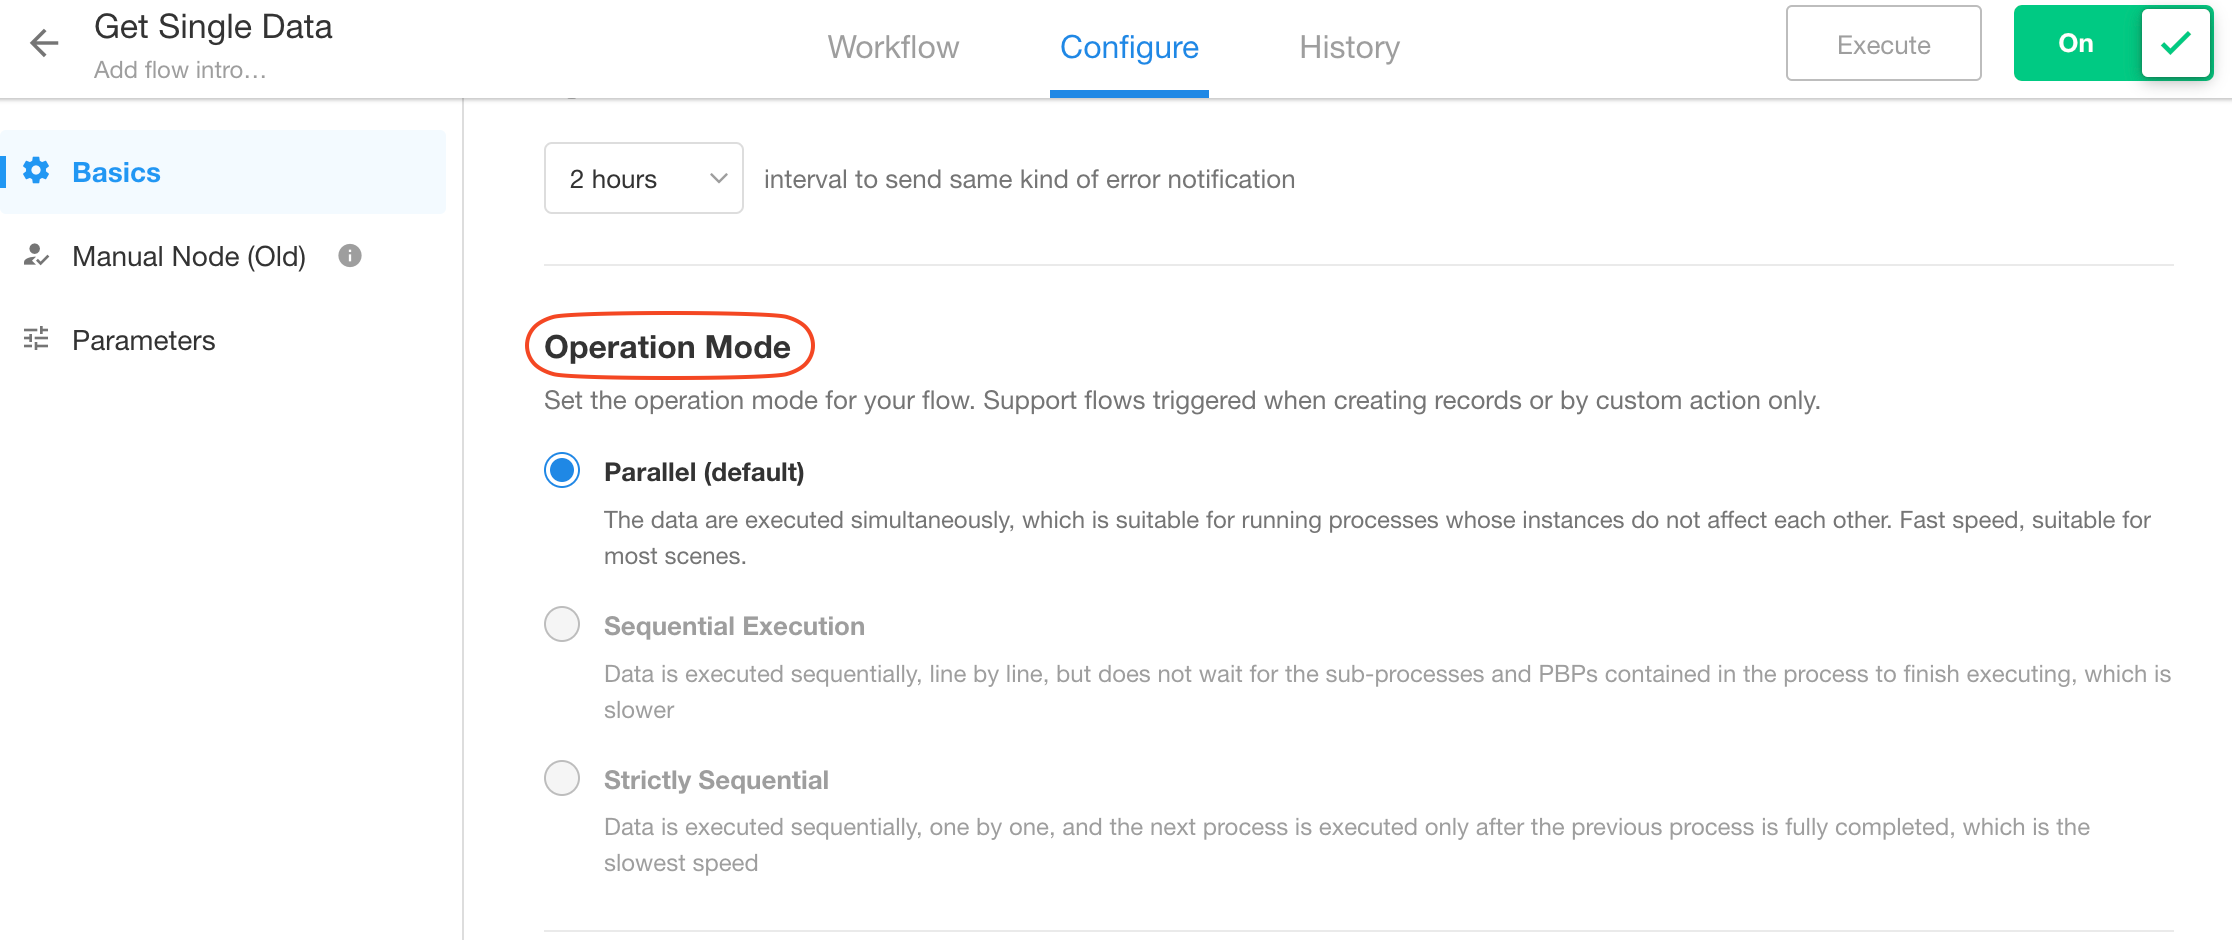
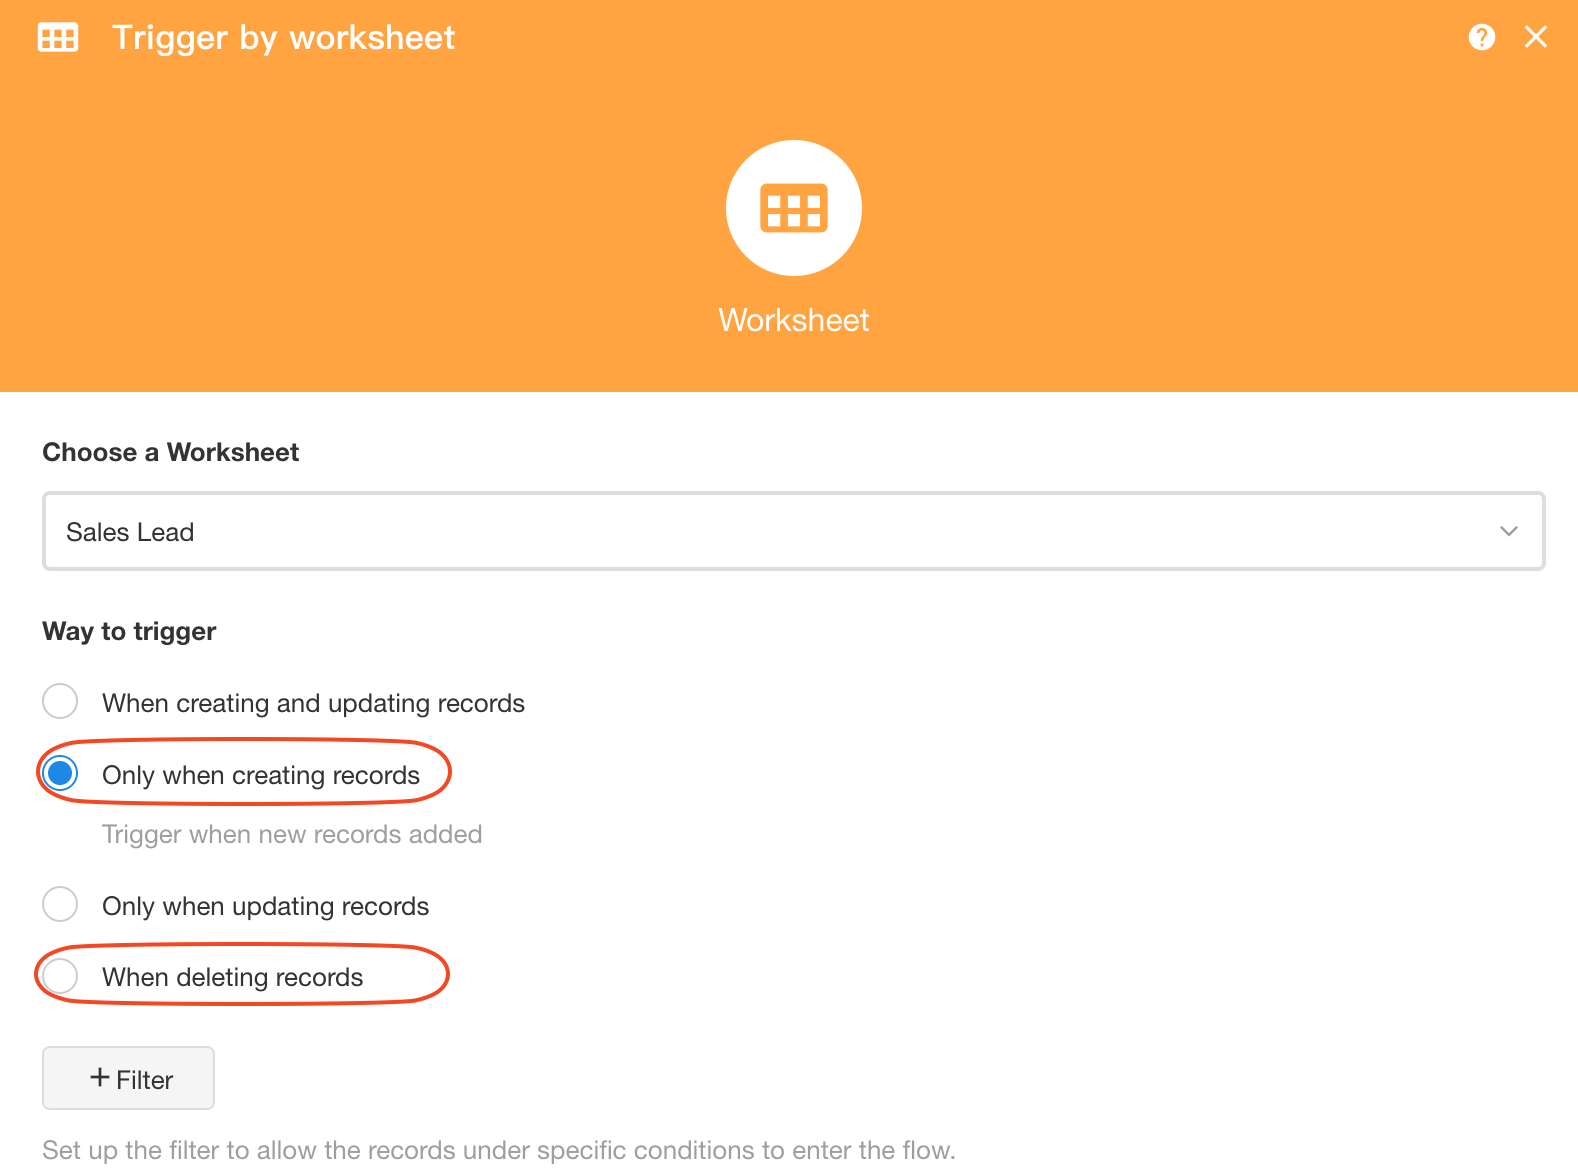
Workflow Types That Support Execution Mode Selection
Execution mode can only be configured for the following workflow types:
-
Triggered only when a record is created
-
Triggered when a record is deleted
A common scenario is importing Excel data that instantly triggers multiple workflows, or when workflows perform batch creation or batch deletion.
-
Triggered by a custom button
This commonly occurs when multiple records are selected and a button is clicked to trigger workflows in batch.
Only workflows triggered by:
- Record creation
- Record deletion
- Custom button
can configure execution mode. All other trigger types always run in parallel and cannot be modified.
The execution mode of subprocesses and packaged business processes depends on the configuration within the subprocess node or the call PBP node.
Parallel Execution
In this mode, workflows run faster and are suitable when instances do not affect each other.
Example
In a Bug Management application, 19 bugs have been fixed and need to notify the reporters for verification. You can select all 19 records and click Notify for Verification to trigger the notification workflow.
Since these workflow instances do not depend on each other and have no execution order requirements, they can run simultaneously. In this scenario, parallel execution is recommended.
Execution order in parallel mode:
There is no defined order.

Sequential Execution
In this mode, workflows execute one by one based on a defined order. This is suitable when workflow instances affect shared data.
Example
In an Device Request worksheet, when a request record is created, the workflow checks available devices in the inventory worksheet.
If multiple users submit requests simultaneously for the same device, inventory conflicts may occur.
For example:
- Laptop inventory: 5 units
- Three users request 2 units each
If workflows run in parallel, each request may read the inventory as 5 units, allowing all requests to proceed, which would be incorrect.
Instead, workflows must execute sequentially:
- First request: inventory 5 → allocate 2 → remaining 3
- Second request: inventory 3 → allocate 2 → remaining 1
- Third request: inventory insufficient → workflow stops
Execution Order in Sequential Mode:
- If records are manually selected and a button triggers the workflow in batch, execution follows the selection order.
- If Select All is used, workflows run according to the current record order on the page (top to bottom).
- If workflows are triggered by record creation, execution follows the record creation order.
When Does the Next Workflow Start?
In sequential mode, the next workflow starts when:
- The previous workflow finishes successfully
- The previous workflow terminates due to an error
- The previous workflow enters a delay node
- The workflow reaches an approval node or fill-in node
Because approval and fill-in nodes may require an unknown waiting time, the next workflow begins immediately when these nodes are reached.
Subprocess and Packaged Business Process Behavior
When a workflow enters a subprocess or packaged business process, the total execution time becomes uncertain.
Two behaviors are possible:
-
If “Wait for subprocess to complete before executing subsequent nodes” is enabled:
When workflows are queued in batch execution, the system will not wait for the subprocess to finish. Once the subprocess is entered, the next workflow begins.
-
If the option is not enabled:
The workflow proceeds to the following nodes immediately. The next workflow starts only after the current workflow finishes execution.

Strict Serial Execution
In sequential execution, when a workflow enters a subprocess or packaged business process, the system does not wait for it to complete before starting the next workflow.
Strict serial execution solves this issue by ensuring that the next workflow starts only after the previous workflow has fully completed.
When Does the Next Workflow Start in Strict Serial Mode?
- After the workflow fully completes, including any subprocesses or packaged business processes
- After the workflow terminates due to an error
3. Data Format
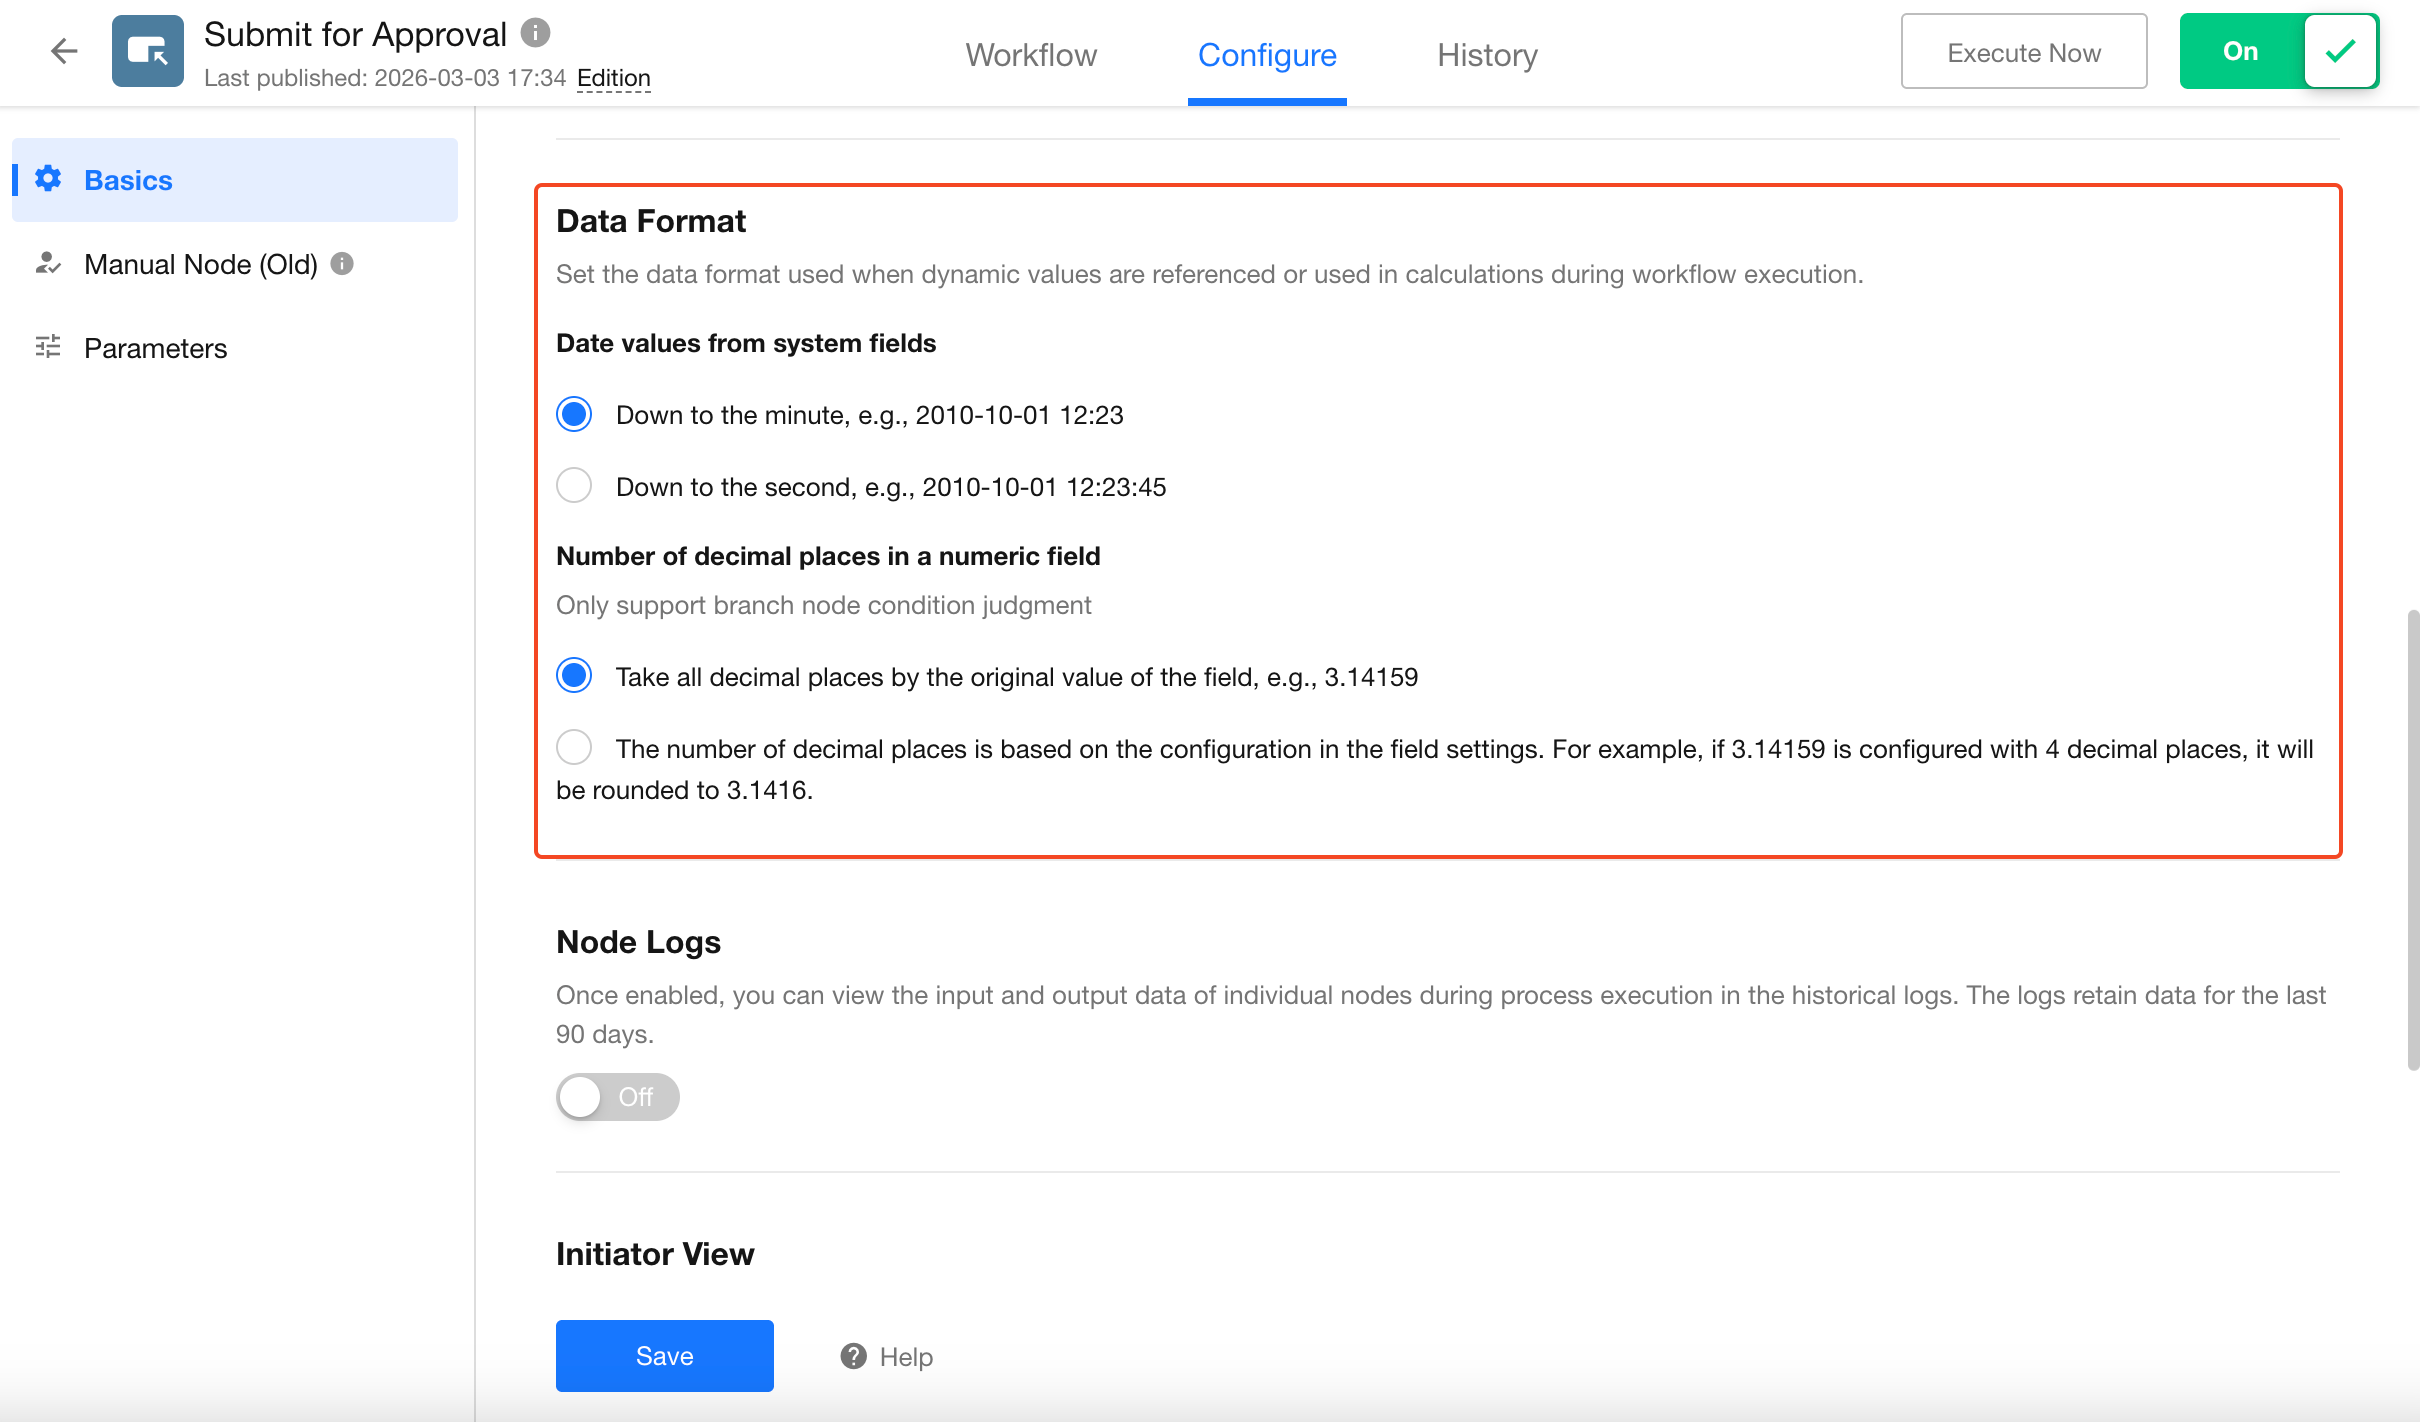
Decimal Places for Number Fields
Number fields in a worksheet can be configured with a specific number of decimal places for display. When using these fields in conditions within workflow branch nodes, you can choose whether to compare values using the original value or the configured decimal precision.
This option only applies to branch node conditions. In all other nodes, the original value is always used.
For example, if the stored value in a number field is 3.14159:
- If the original value is used, the comparison value is 3.14159.
- If the field is configured to display 2 decimal places, the comparison value becomes 3.14.
System Time Fields
On the Workflow Configuration page, you can set the time precision used by system time fields in workflows.
The default precision is minutes. If changed to seconds, all workflow system time fields will reference and calculate time with second-level precision.
System time fields mainly include:
- Worksheet – Created Time
- Worksheet – Approval – Initiated Time
- Worksheet – Approval – Node Start Tim (valid within the approval block)
- Worksheet – Approval – Remaining Time (valid within the approval block)
- Workflow – Trigger Time
- Workflow Parameters – DateTime parameters
- Calculation Node – Add/Subtract time from a date - the output format is Date + Time
The current system time is always accurate to the second.
This setting mainly affects:
- Code Block nodes
- Calculation nodes
- Other nodes that reference date/time fields
When used as a query condition in the Get Data node with the operator Equals or Not Equals, the date-time field is compared by day. For other query operators, the precision is seconds.
Text Formatting
Date, time, number, and currency fields support formatted output. When these fields are used in approval summaries, CC summaries, or notification content (such as SMS messages and emails), you can choose one of the following display formats:
-
Display Original Value: Outputs the raw field value directly. For example:
3141592.6 -
Display Field Format: Displays the value according to the field's formatting settings. For example:
3,141,592.6
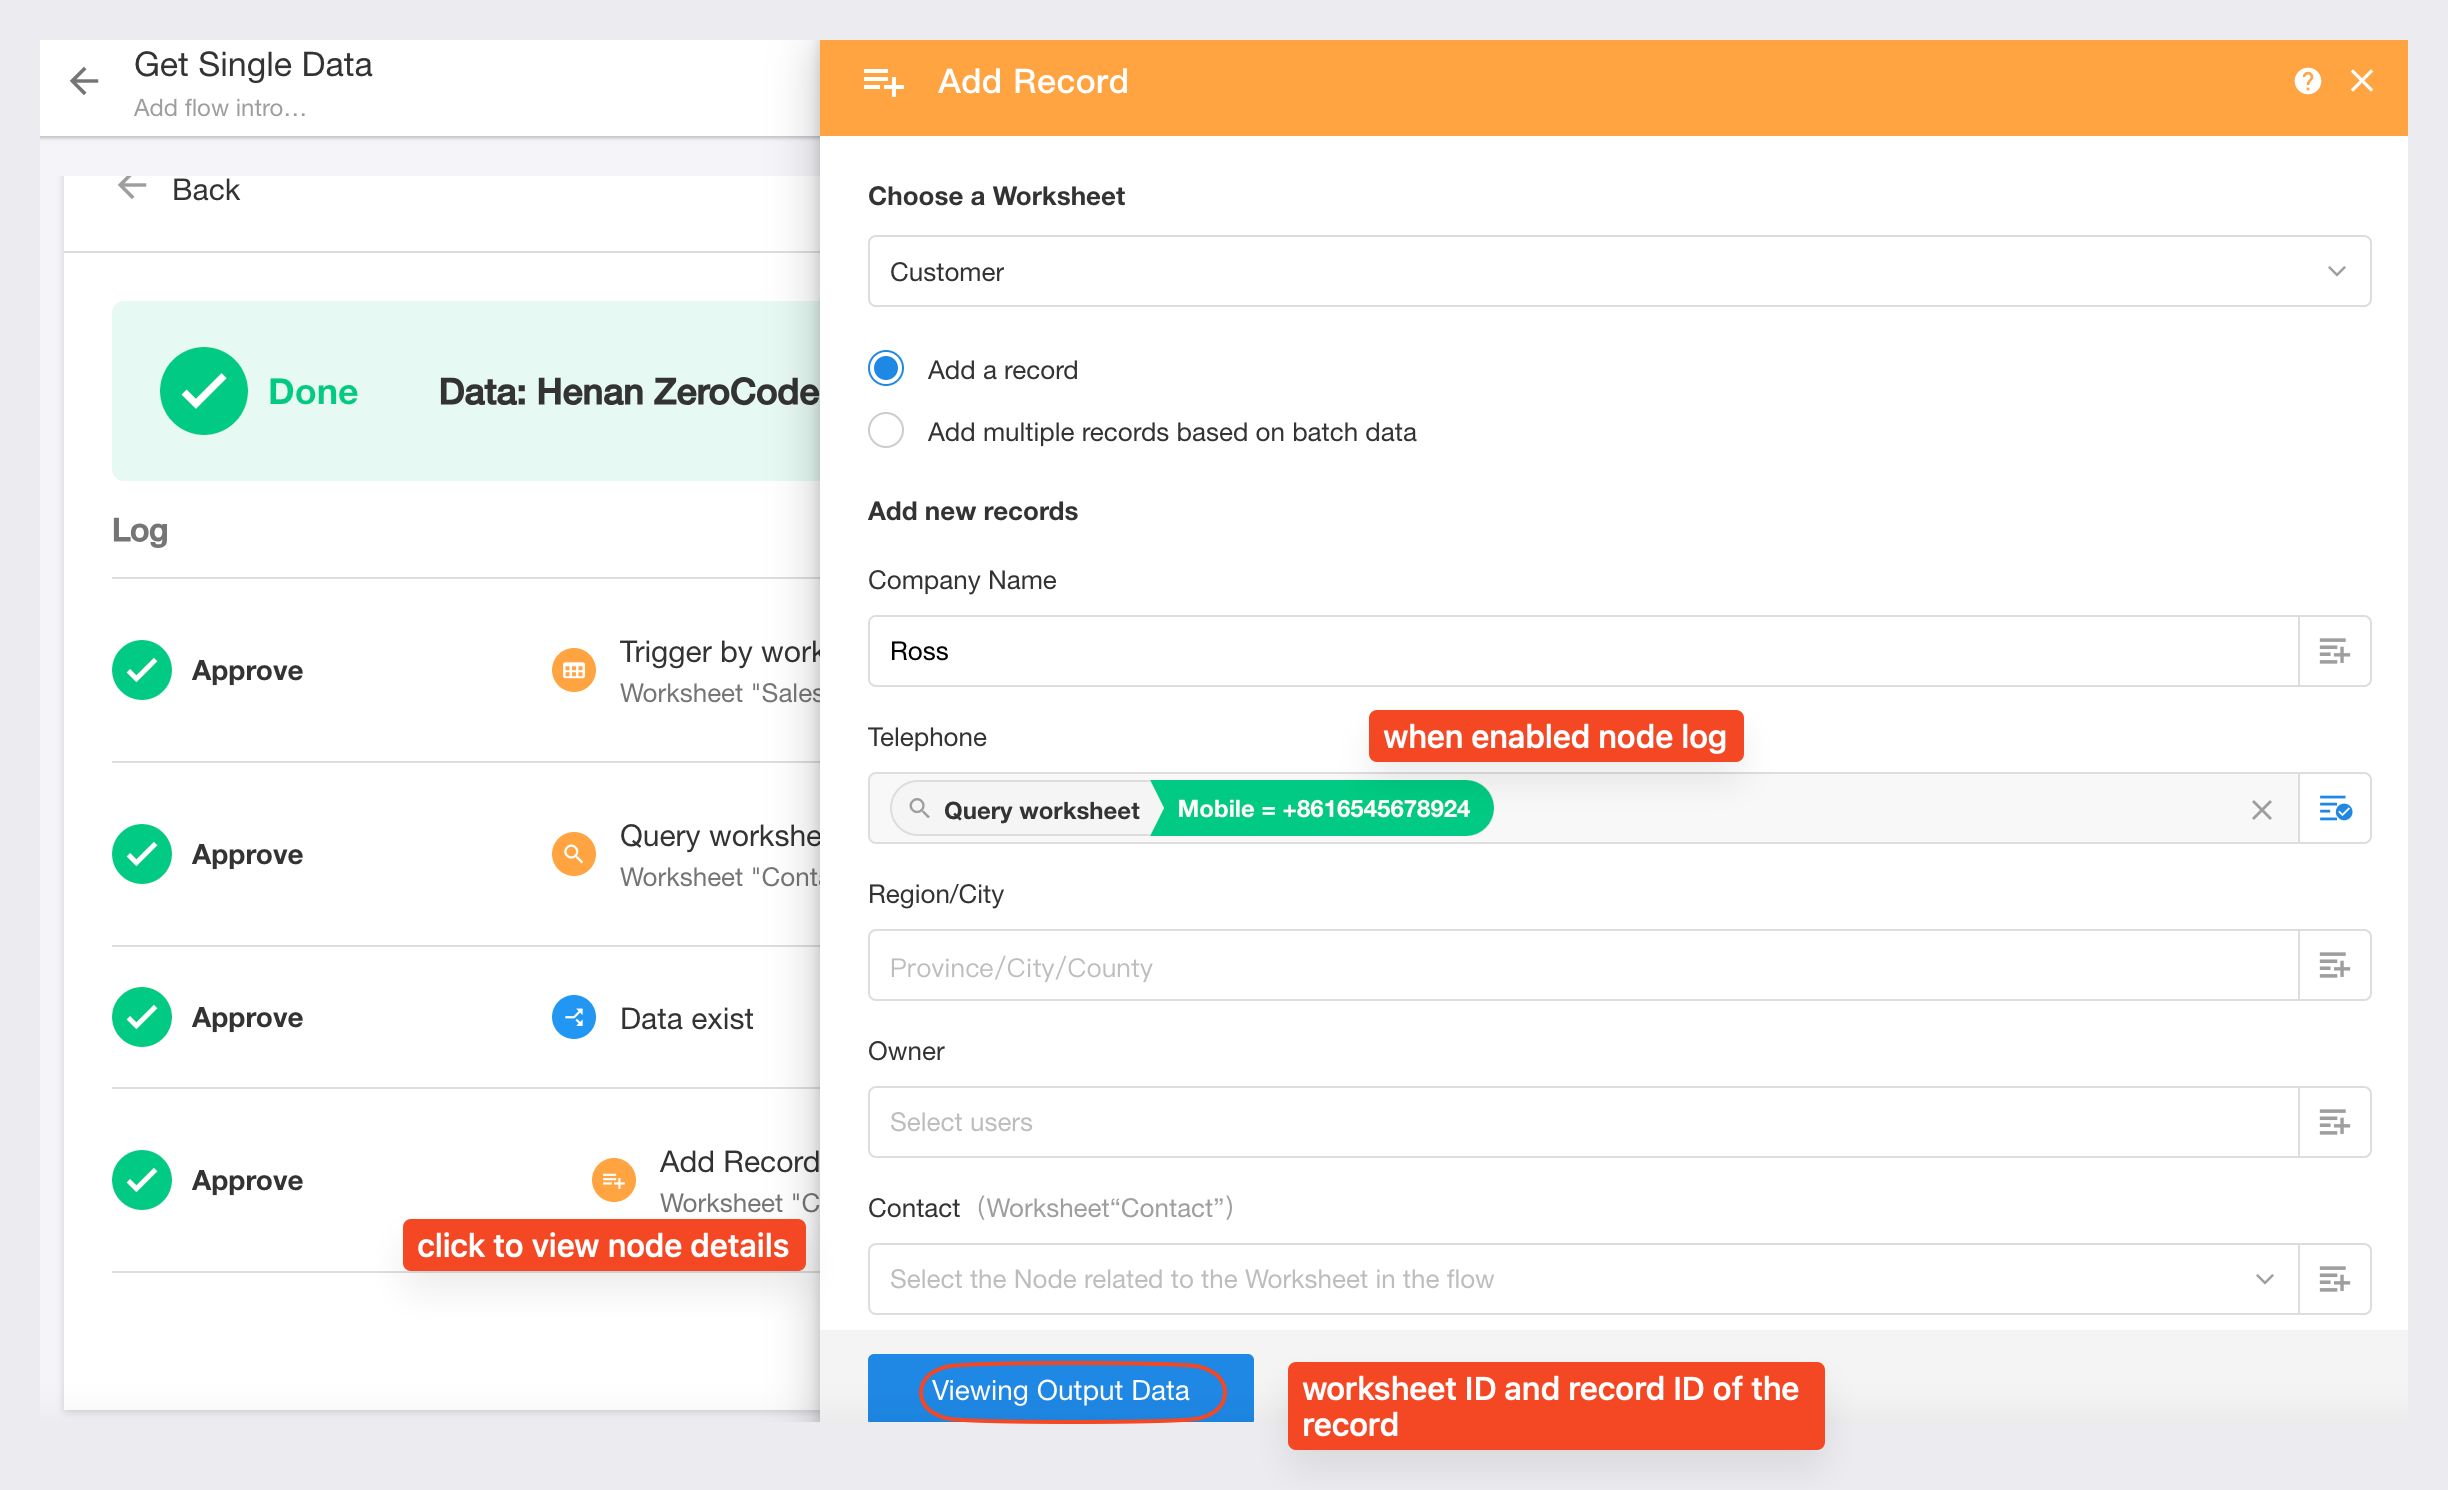
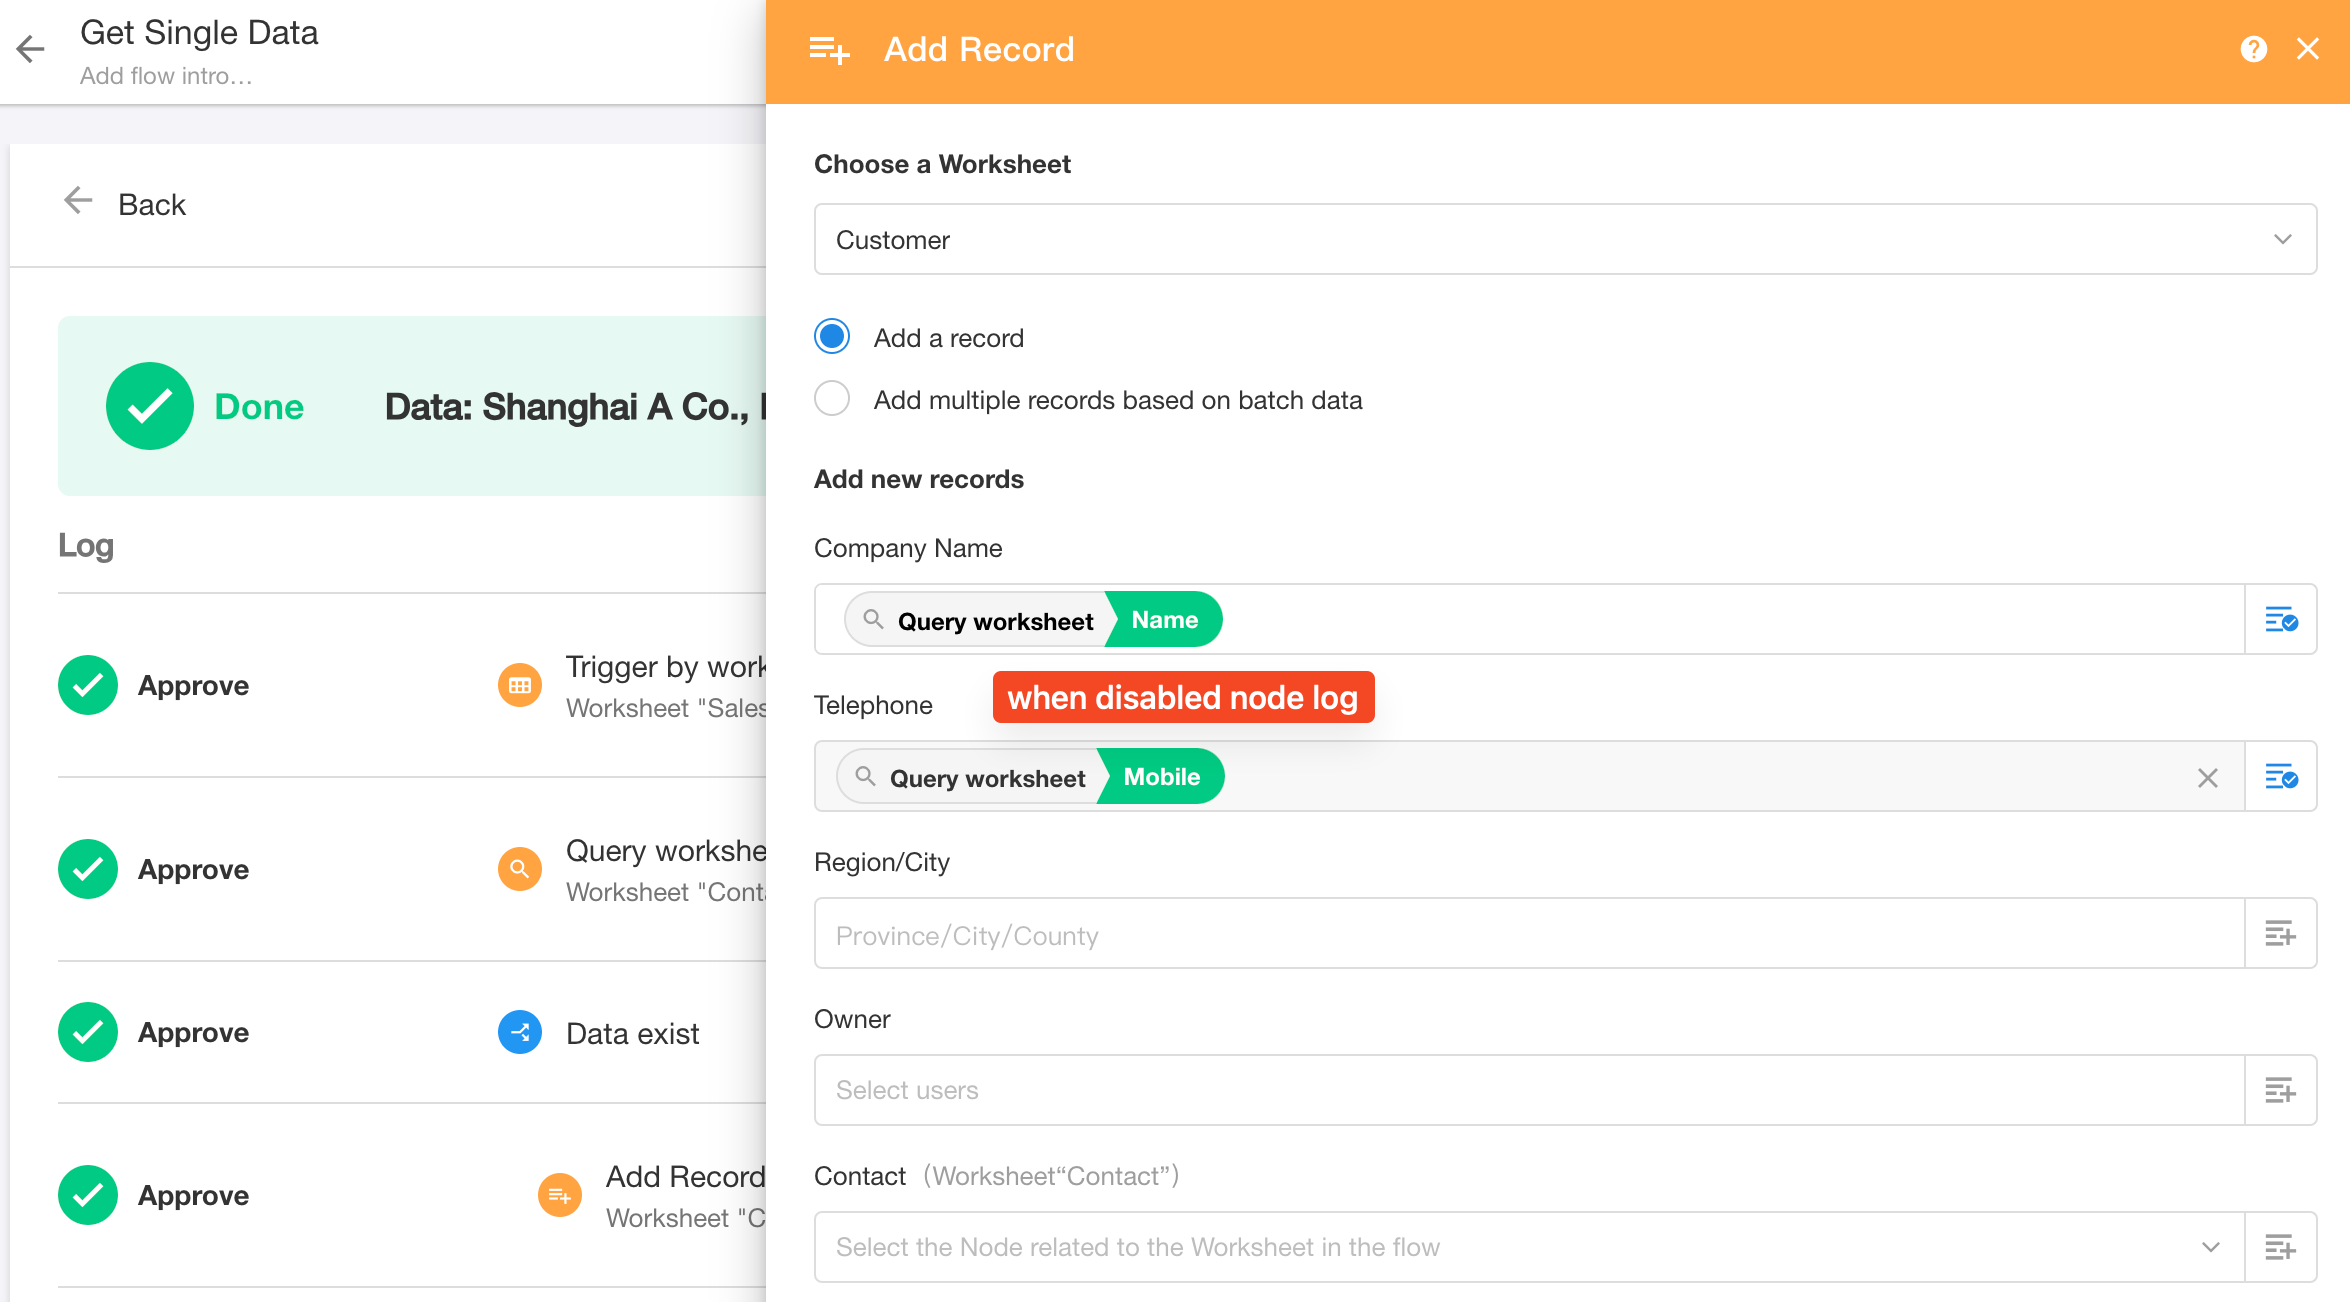
4. Node Log
On the Workflow Configuration page, you can enable Node Log.
After enabling this feature, the workflow runtime history will display the execution details of each node, including the data used during node execution. Log data is retained for 90 days.
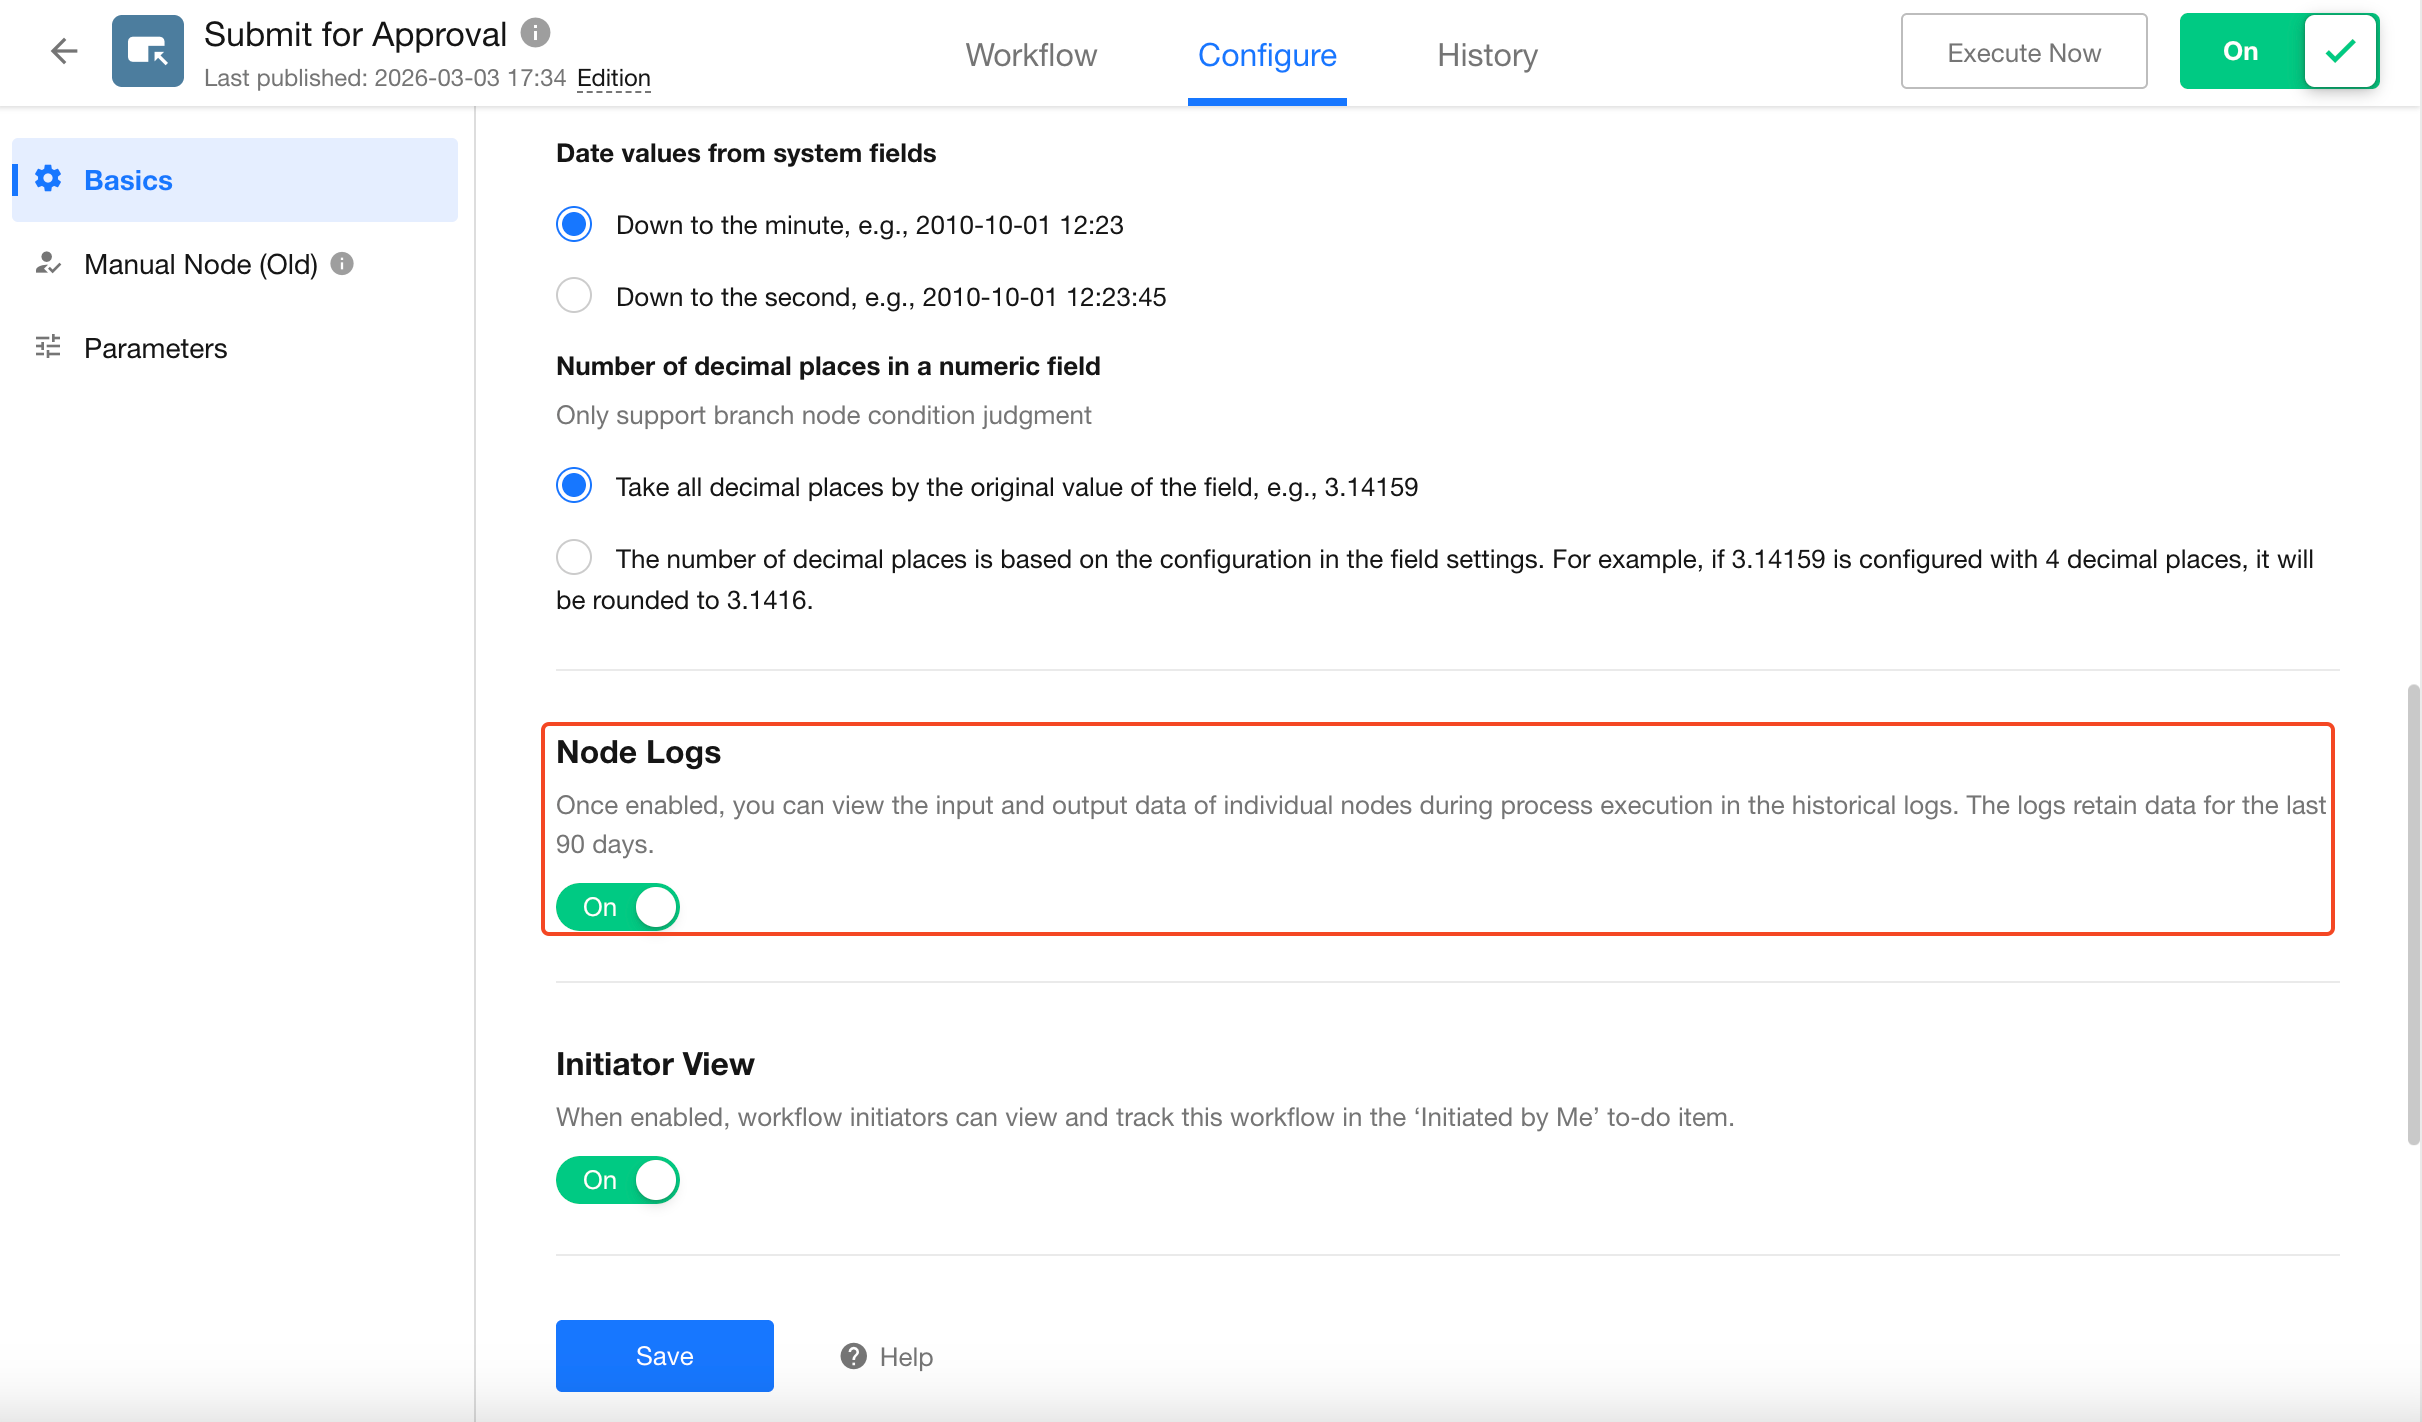
After enabling node logs, when viewing nodes in the runtime history, dynamic fields will display the actual values at the time of execution.
If node logs are disabled, viewing nodes in the runtime history will only show configuration information.
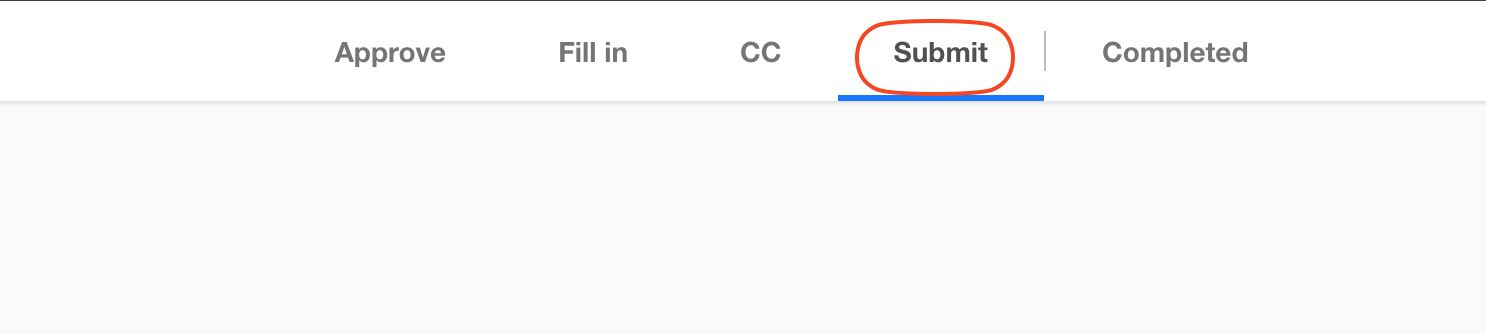
4. Initiator View
If you are the workflow trigger initiator and do not want this workflow to appear under Submit in your workflow to-do, you can disable this option.

After disabling it, the workflow will not appear under the Submit category when viewed by the initiator.
For newly created workflows, this option is disabled by default. If the workflow includes approval nodes, fill-in nodes, or CC nodes, the option will be enabled automatically. (However, if these nodes are added within Initiate Approval Flow, this option will not be enabled automatically.)
5. Trigger Other Workflows
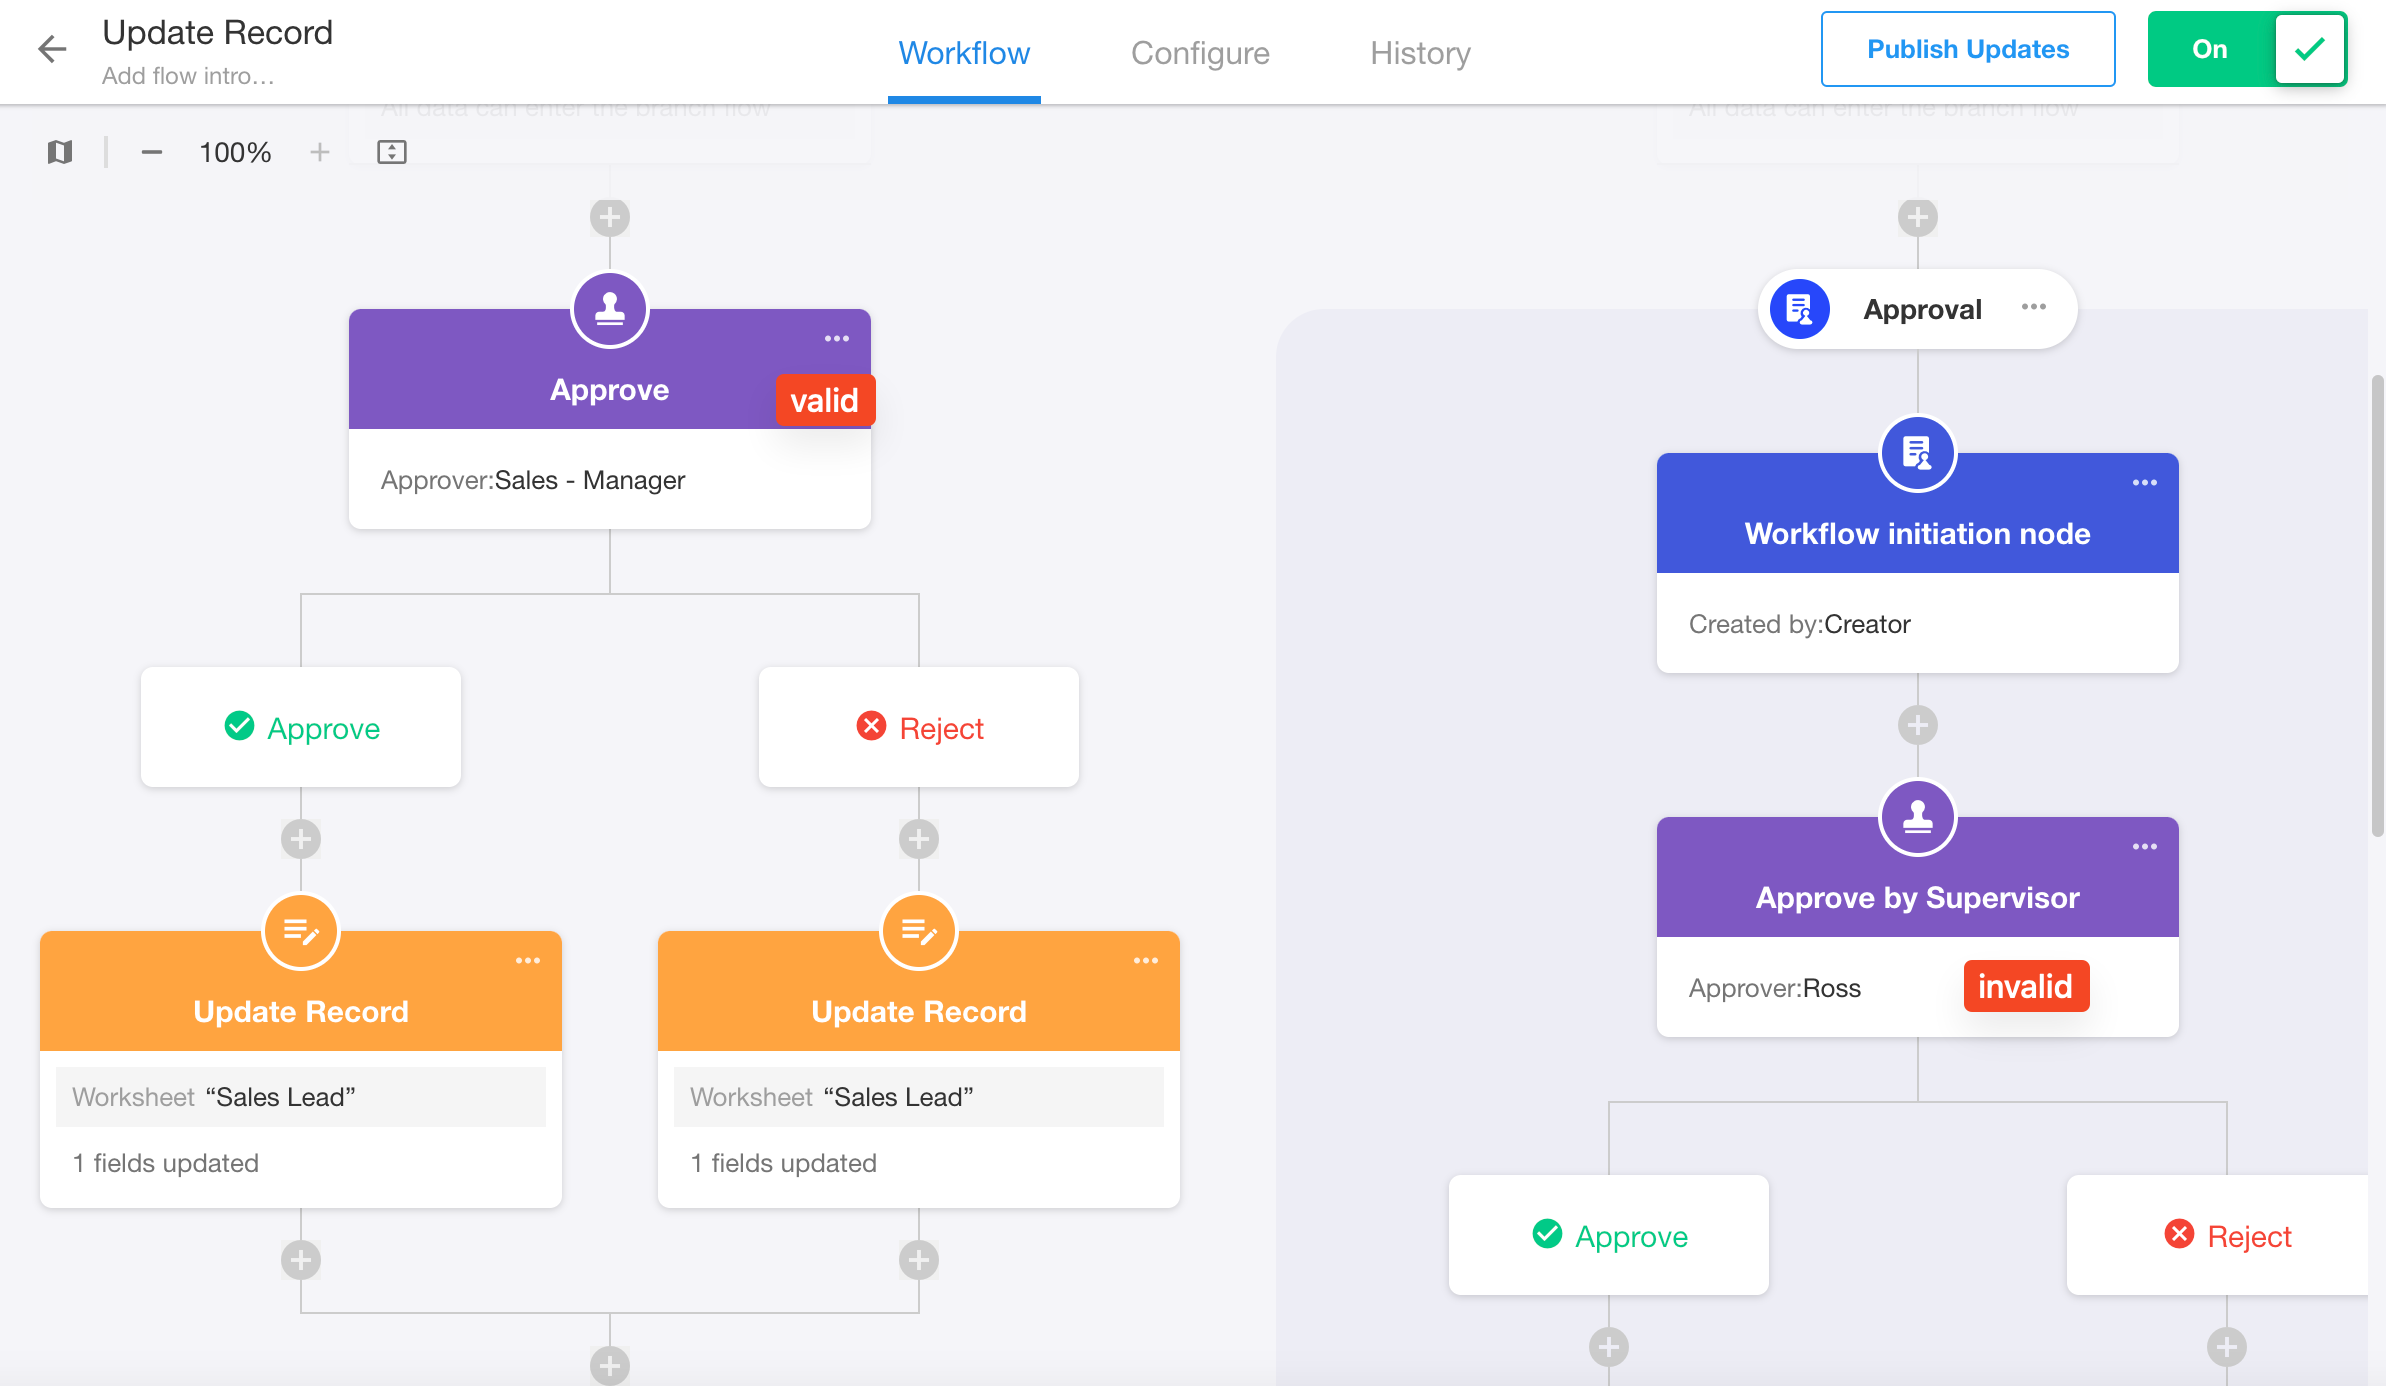
In a workflow, nodes such as Update Record, Add Record, or Delete Record may modify data and potentially trigger other workflows.
Example:
Workflow A adds a new record to Worksheet 1 using an Add Record node. Another workflow, Workflow B, is configured to trigger when a new record is created in Worksheet 1.
When Workflow A creates a record in Worksheet 1, it meets the trigger condition of Workflow B. Whether Workflow B should be triggered can be controlled through configuration.
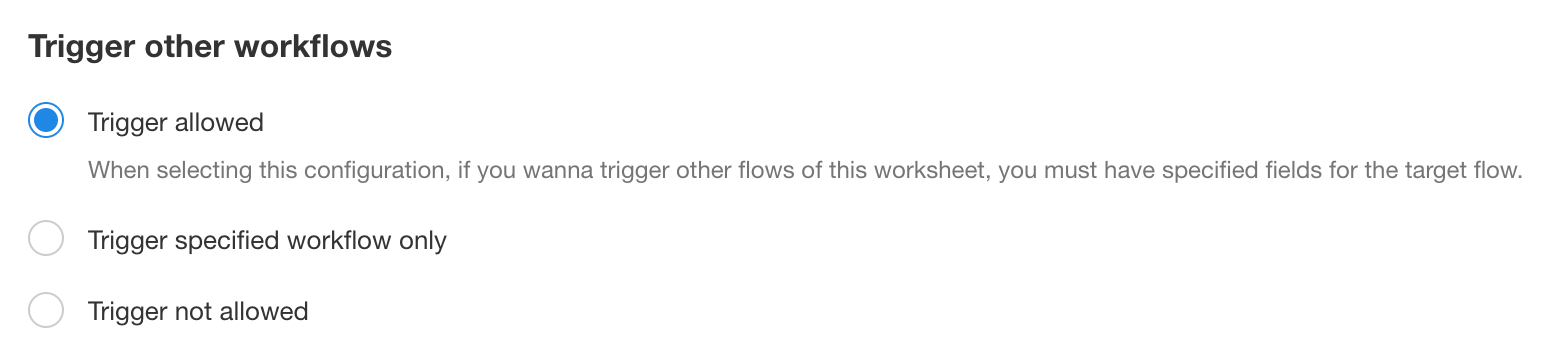
-
Allow Triggering
Other workflows can be triggered.
However, if the current workflow and the triggered workflow both use the same worksheet as the trigger source, the triggered workflow must specify a trigger field in its trigger node.
As shown below, the triggered workflow must specify the trigger field.

If Workflow A is triggered by a button, Workflow B does not need to specify a trigger field. If Workflow A is triggered automatically, Workflow B must specify a trigger field.
-
Only Trigger Specified Workflows
Operations in the current workflow (such as updating records in other worksheets) may trigger multiple workflows.
With this option, you can select specific workflows to trigger, while preventing other related workflows from running.
These workflows can belong to the current application or other applications.
-
Do Not Allow Triggering
Any data changes performed automatically by workflows will not trigger other workflows, even if the changes meet their trigger conditions.
If a record is created via a button, it can still trigger Workflow B (which triggers on record creation), because the record was created manually.
However, if a record is created by a workflow after clicking the button, it will not trigger Workflow B, because the record was created automatically by a workflow and triggering has been disabled.
II. Configuration for Manual Nodes (Approval / CC / Send Notification)
This configuration only applies to approval processes configured directly with approval nodes. It does not apply to approval nodes configured within Initiate Approval Flow.
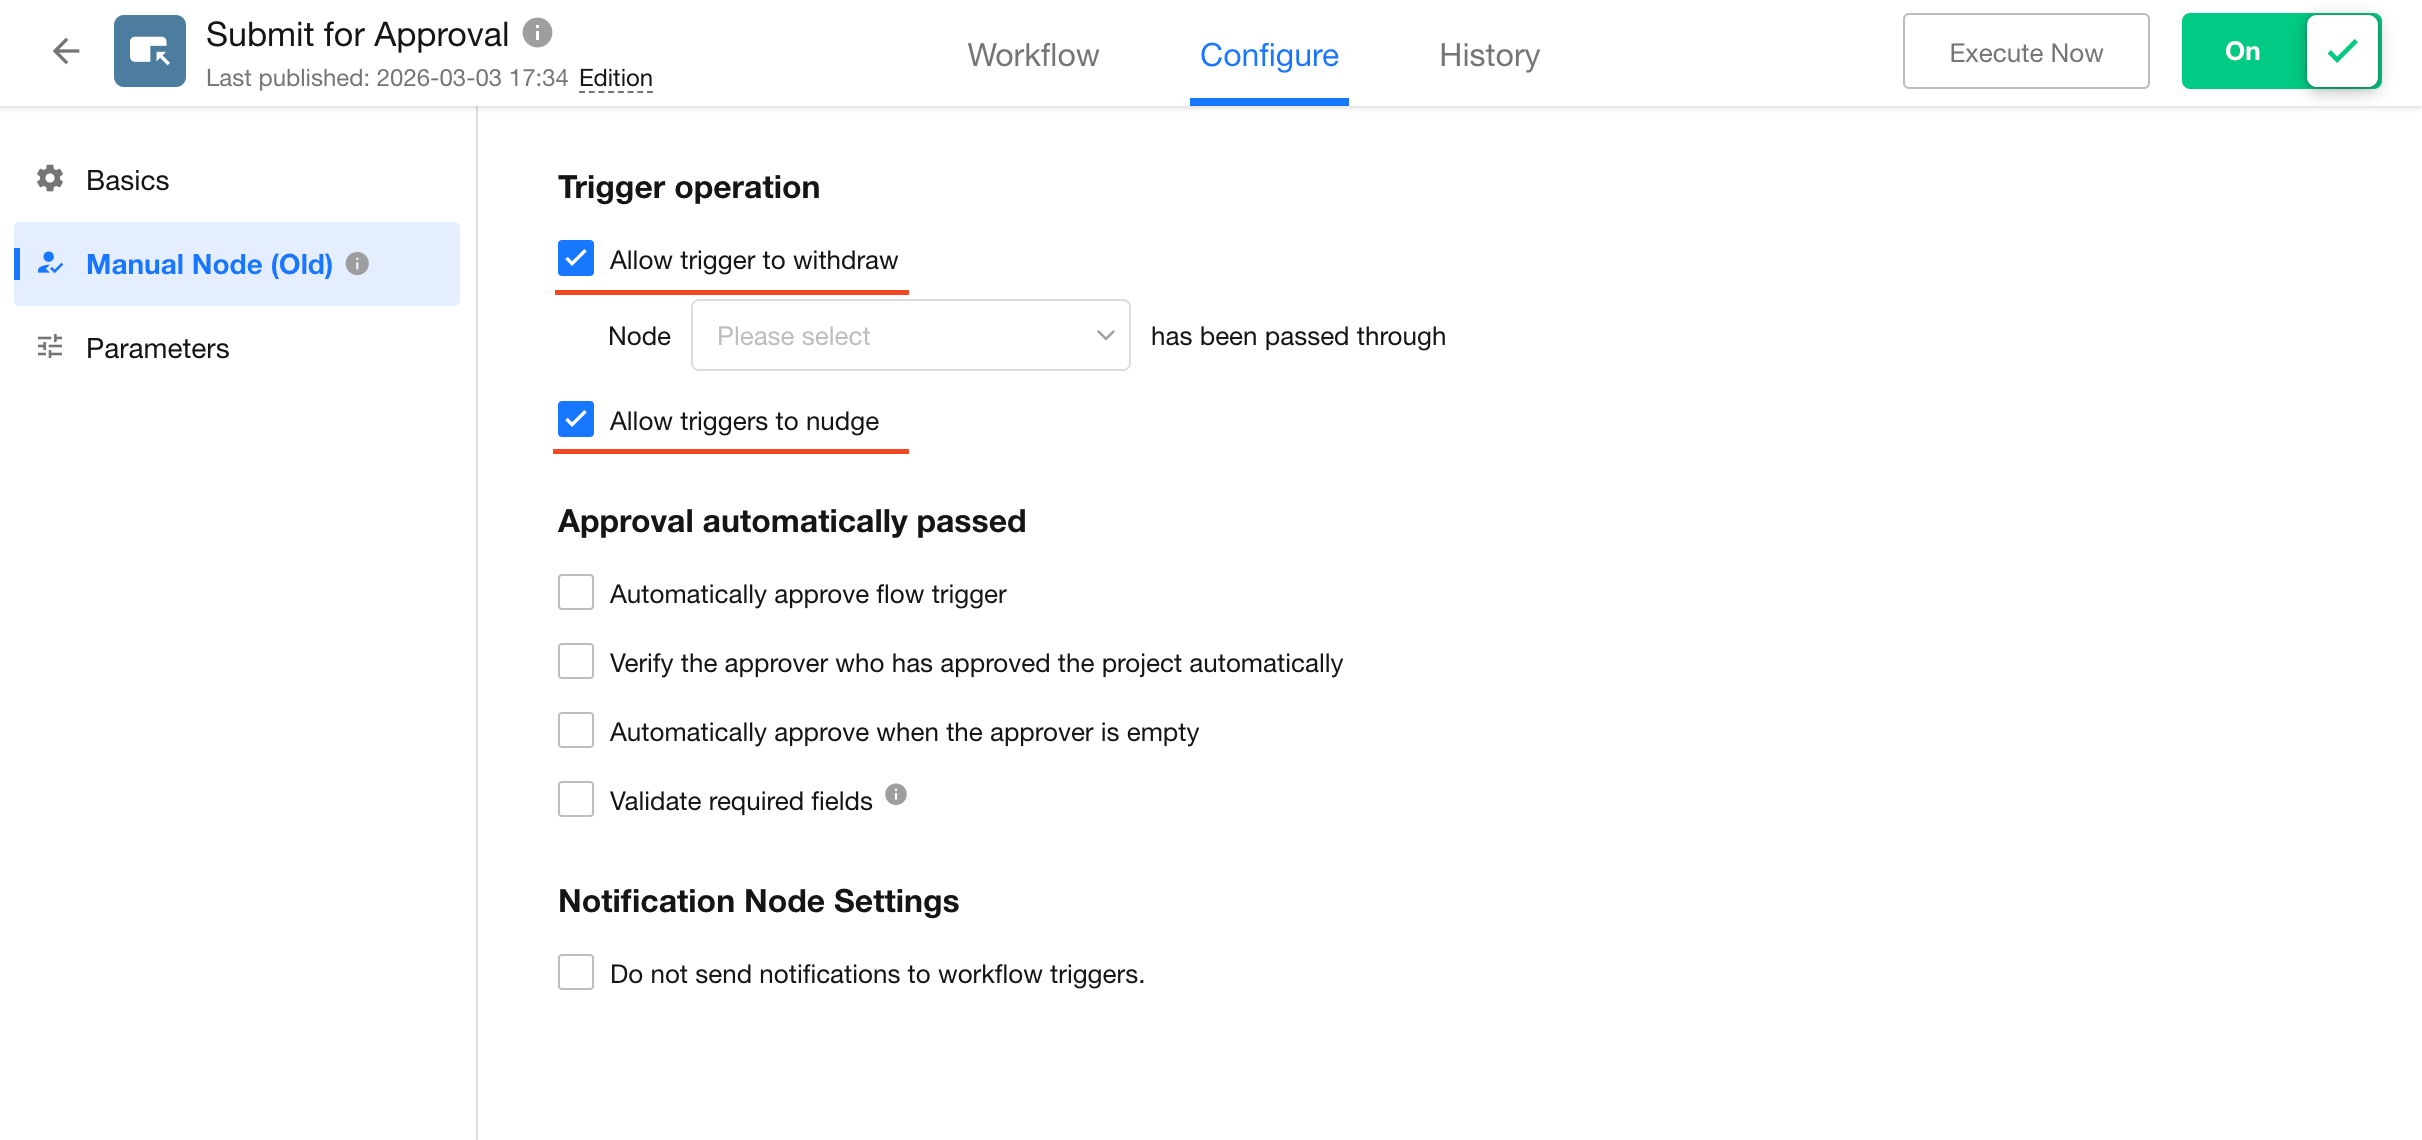
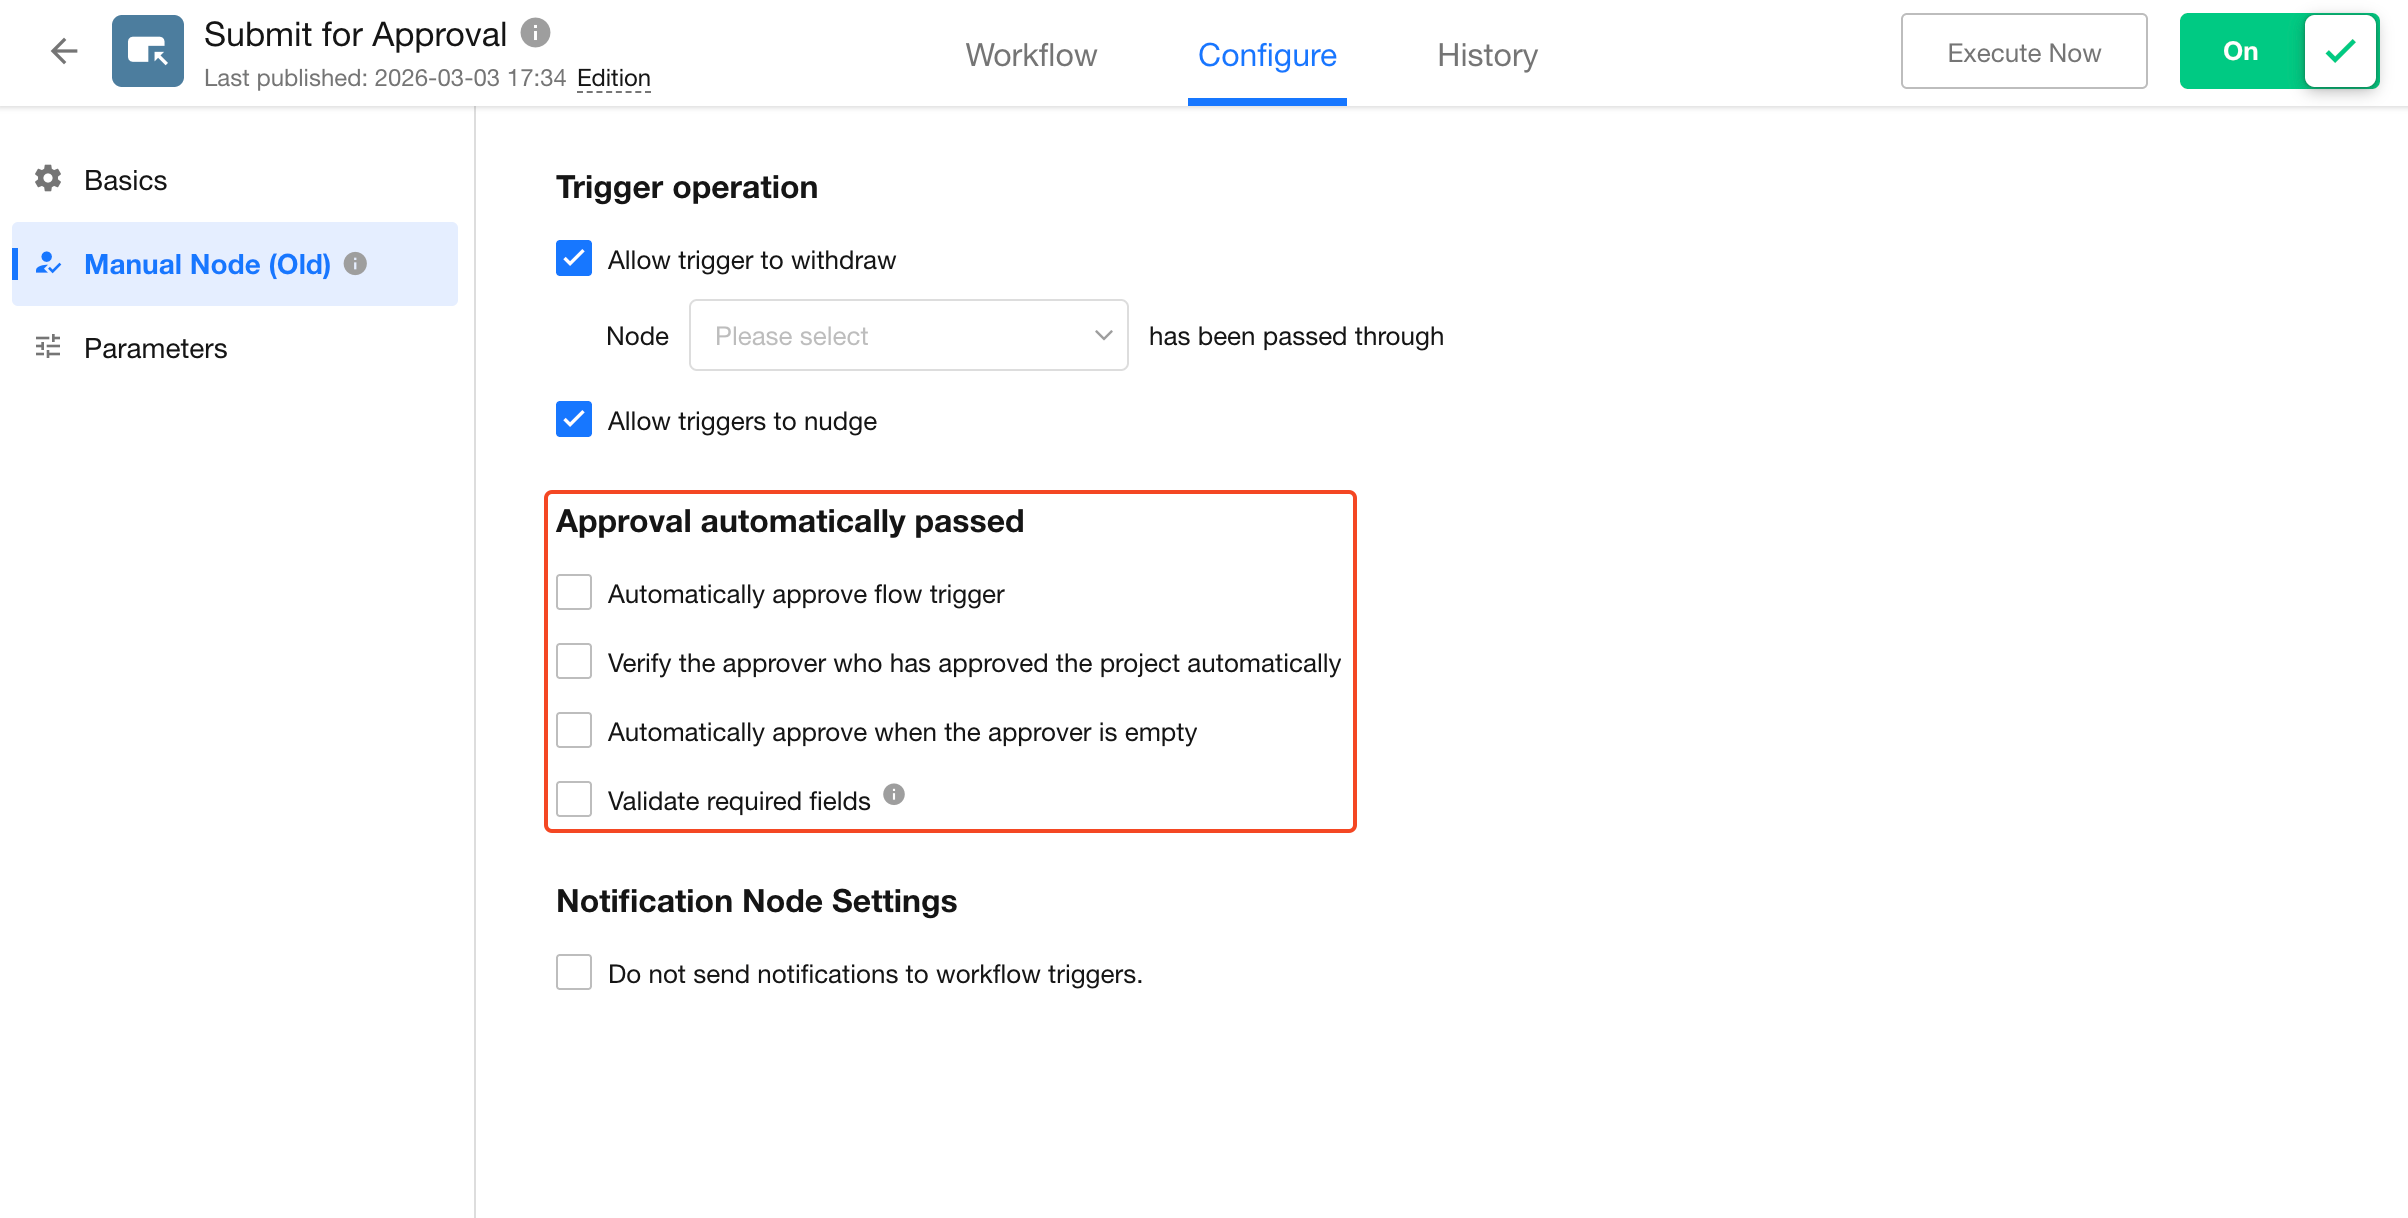
1. Withdraw and Nudge
After a workflow is triggered, the workflow initiator can withdraw or send a reminder.
-
Withdraw
- You can configure whether the initiator is not allowed to withdraw the workflow after a specific approval node has been approved.
- Once recalled, the workflow is terminated.
-
Nudge
If the approver does not process the approval for a long time, the initiator can send a reminder to prompt the approver to take action.
How to Withdraw or Nudge
The workflow initiator can go to [To-do] > [Submit], open the workflow, and use the Withdraw or Nudge buttons.
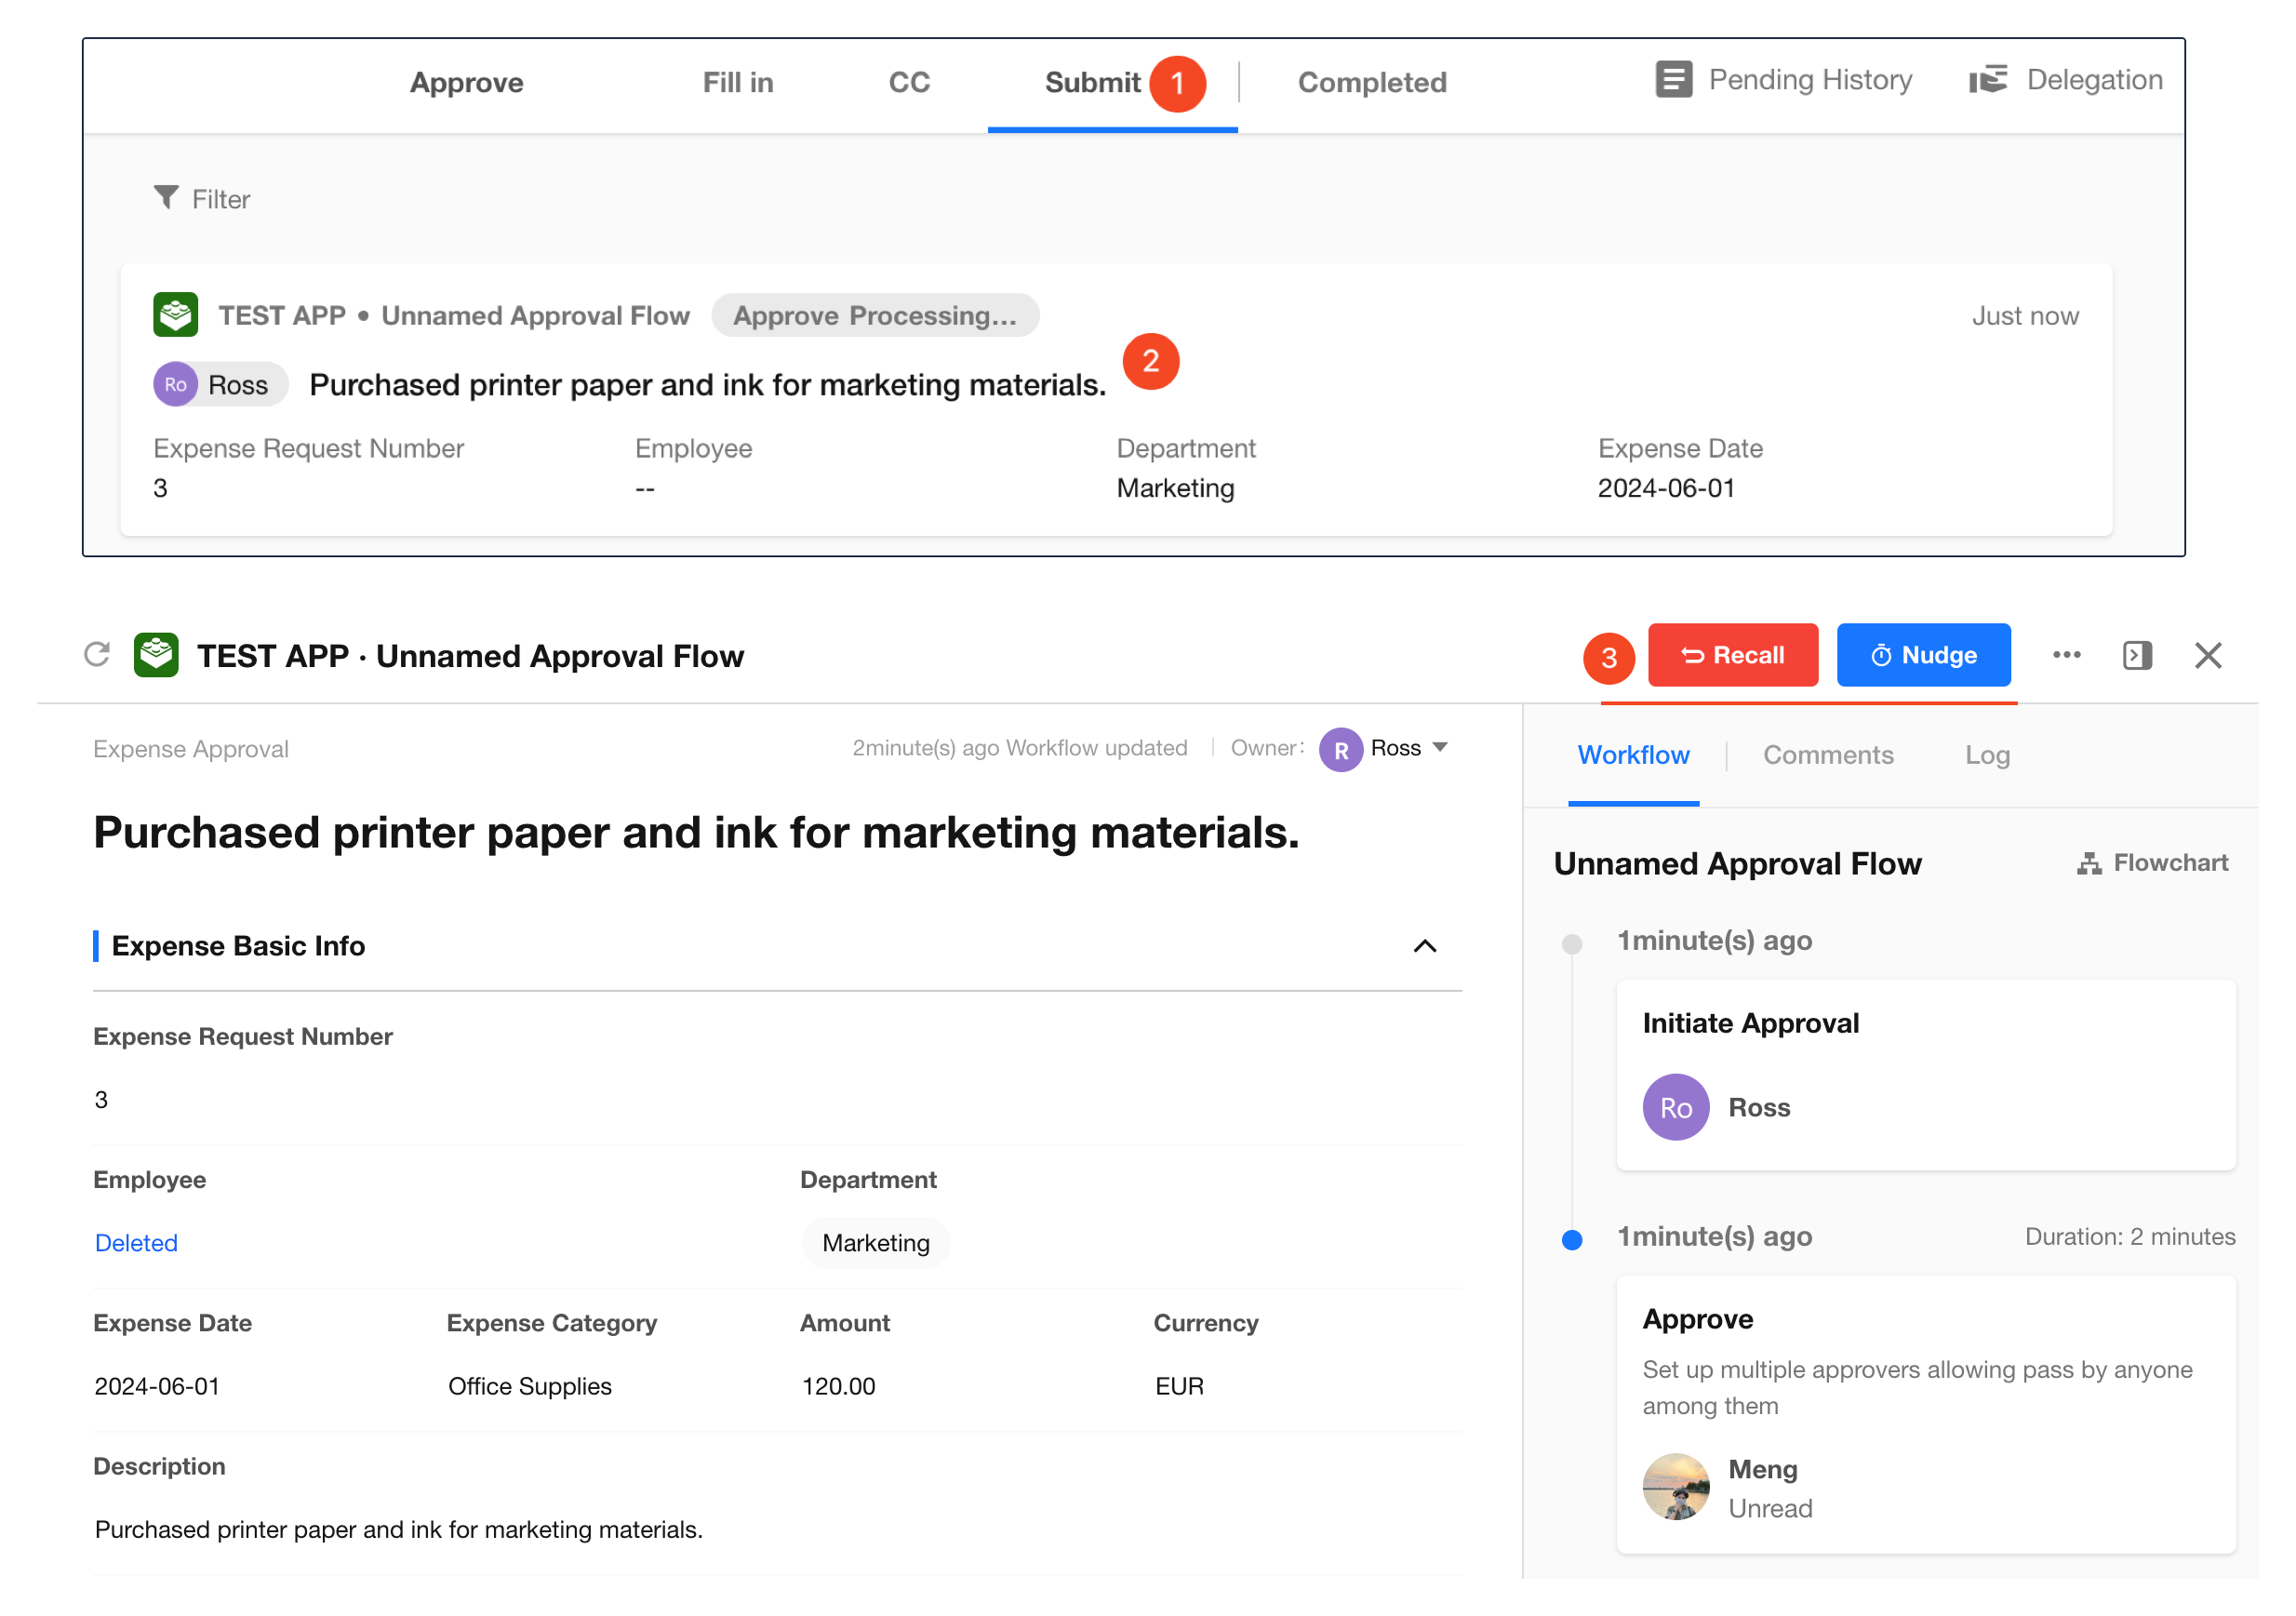
How Application Admins Can Check Whether a Workflow Was Withdrawed
Application admins can view the workflow status in the workflow runtime history.
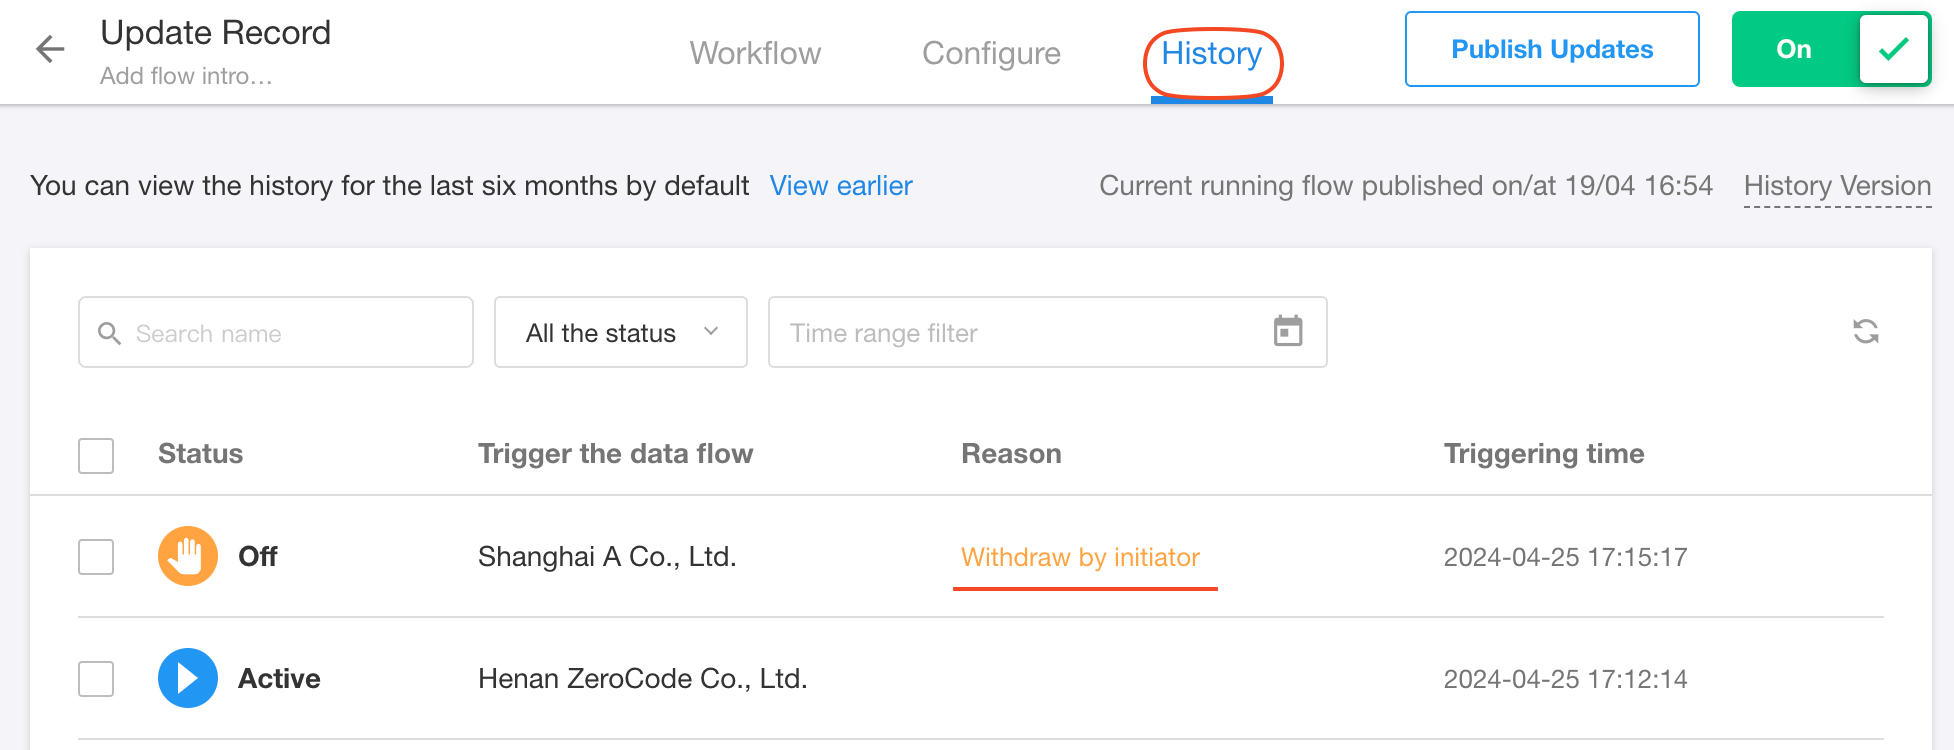
When a workflow is recalled, actions already executed in previous nodes will not be reverted.
For example, suppose the workflow configuration is:
Trigger Node → Update Record Node → Approval Node
After the workflow is triggered, the Update Record node runs automatically and updates a field value from A to B, then enters the Approval node and waits for approval.
If the initiator recalls the workflow at this point, the approval process will stop, but the field value will remain B and will not revert to A.
2. Auto-Approval Configuration
This configuration only applies to approval processes configured directly with approval nodes. It does not apply to approval nodes configured within Initiate Approval Flow.
-
1) Auto-approve When the Initiator Is the Approver
If the workflow initiator is also the approver of the current approval node:
- If enabled, the approval node automatically passes.
- If disabled, the initiator must approve the node manually.
-
2) Auto-approve If the Approver Has Already Approved the Same Record
If there are multiple approval nodes in a workflow, for example:
Approval Node 1 → Approval Node 2 → Approval Node 3 → Approval Node 4
If Approval Node 1 and Approval Node 4 both approve the same record and the approver is the same person, then after Node 3 is completed, Node 4 will automatically pass, because the approver has already approved the same record earlier.
-
3) Auto-approve When the Approver Is Empty
If no approver is configured or the approver is invalid, enabling this option allows the approval node to automatically pass.
-
4) Validate Required Fields
This mainly applies to the first two auto-approval scenarios.
If required fields are configured in the current approval node:
- If enabled, the node cannot auto-approve, and the approver must review it manually.
- If disabled, the node auto-approves.
When the approver is empty, the node always auto-approves, regardless of this setting.
3. Notification Nodes
Configure whether to send notifications to the workflow initiator.
This setting applies to all CC nodes and Send Internal Notification nodes within the workflow.
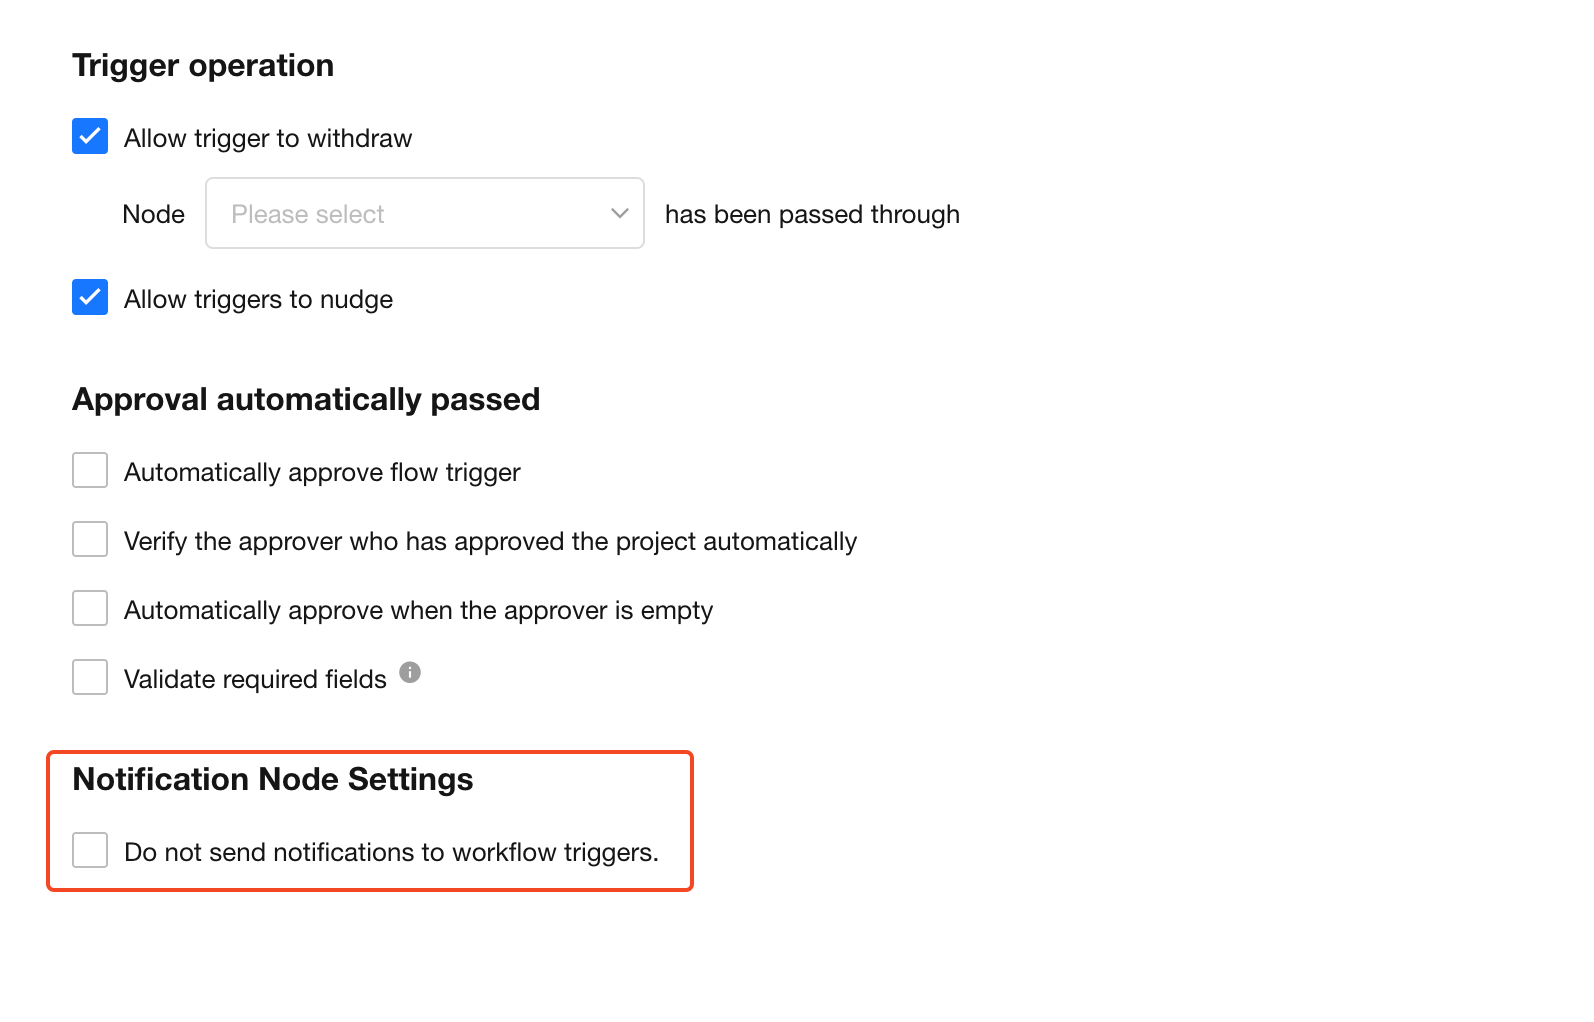
When a user triggers a workflow that contains Send Internal Notification or CC nodes, the following scenarios may occur:
- If the notification recipient is only the initiator, the node will be skipped automatically.
- If other recipients are included, the node will execute normally, but no notification will be sent to the initiator.
If notification nodes appear not to execute or notifications are not received, check this configuration.
III. Workflow Parameters
You can define a workflow parameter as a temporary variable within the workflow.
It behaves similarly to a temporary field and can store:
- A field value
- A calculated result
- A value passed from another workflow
These parameters can then be referenced by other nodes. Once the workflow finishes running, all parameter values are cleared and reset.
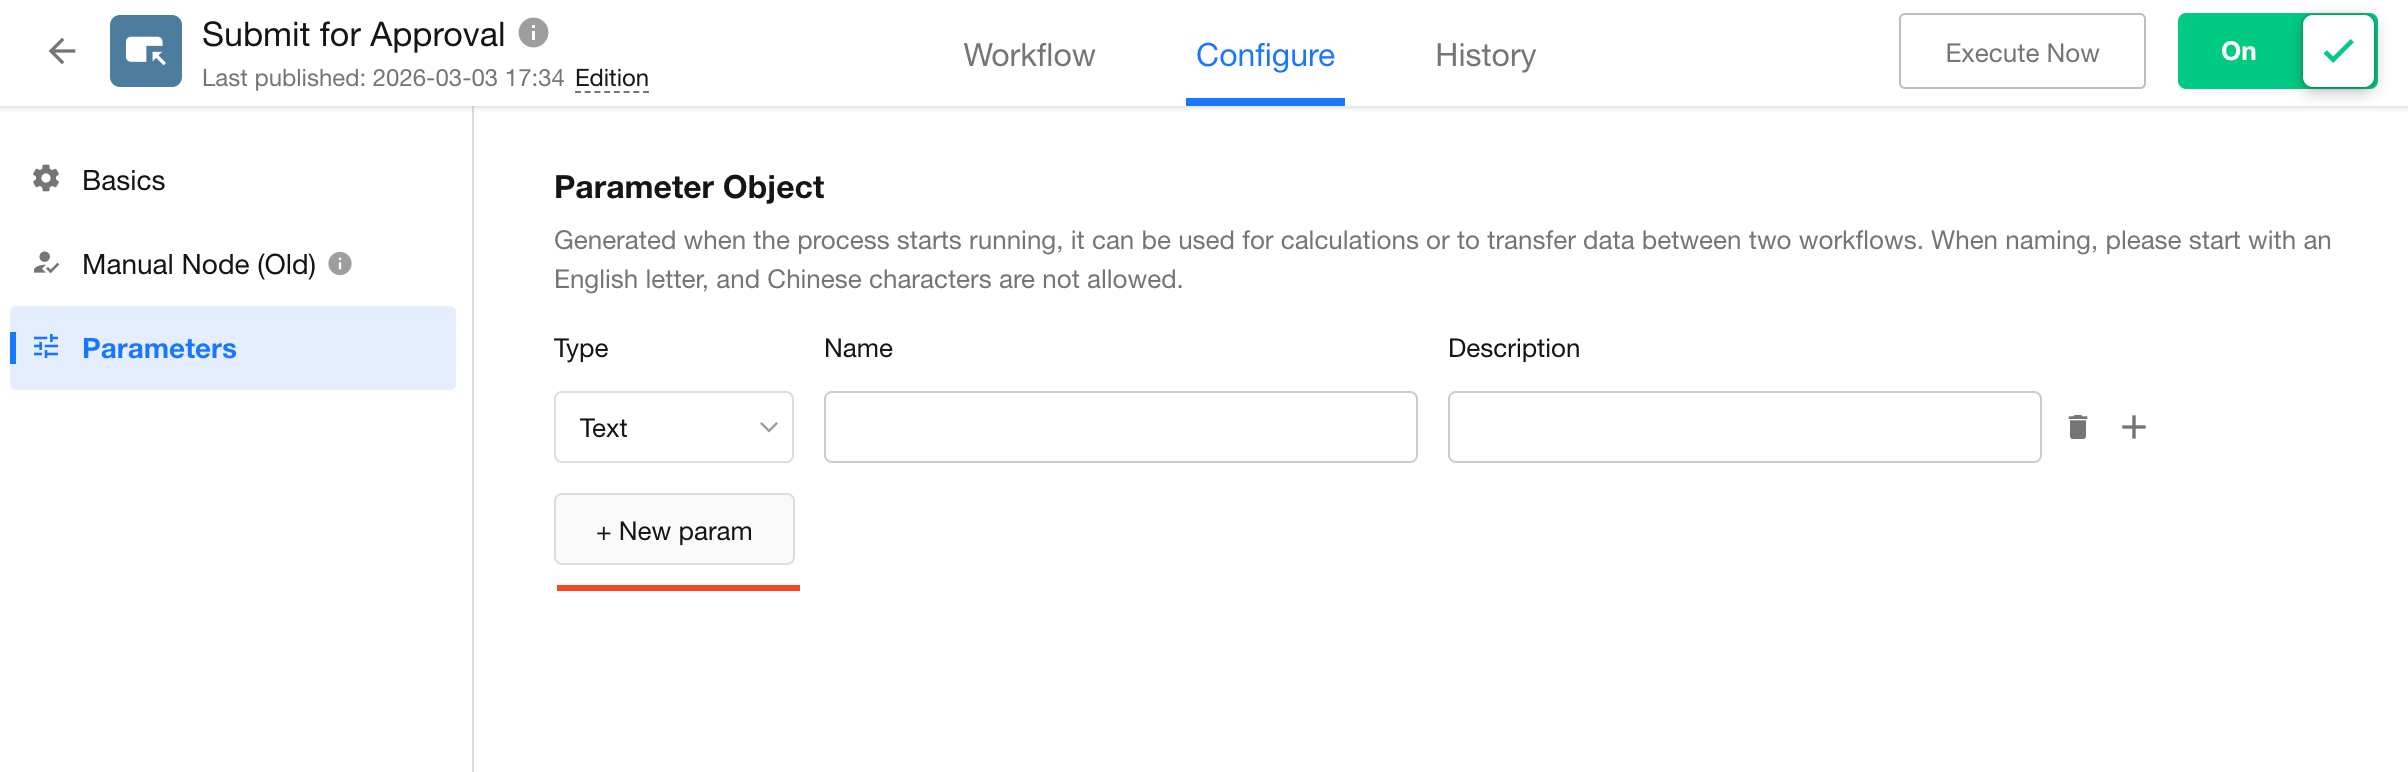
-
Parameter Types
The following parameter types are currently supported:
- Text
- Number (Amount)
- DateTime
- Member
- Department
-
Parameter Name
Parameter names must:
- Start with a letter
- May include numbers and underscores
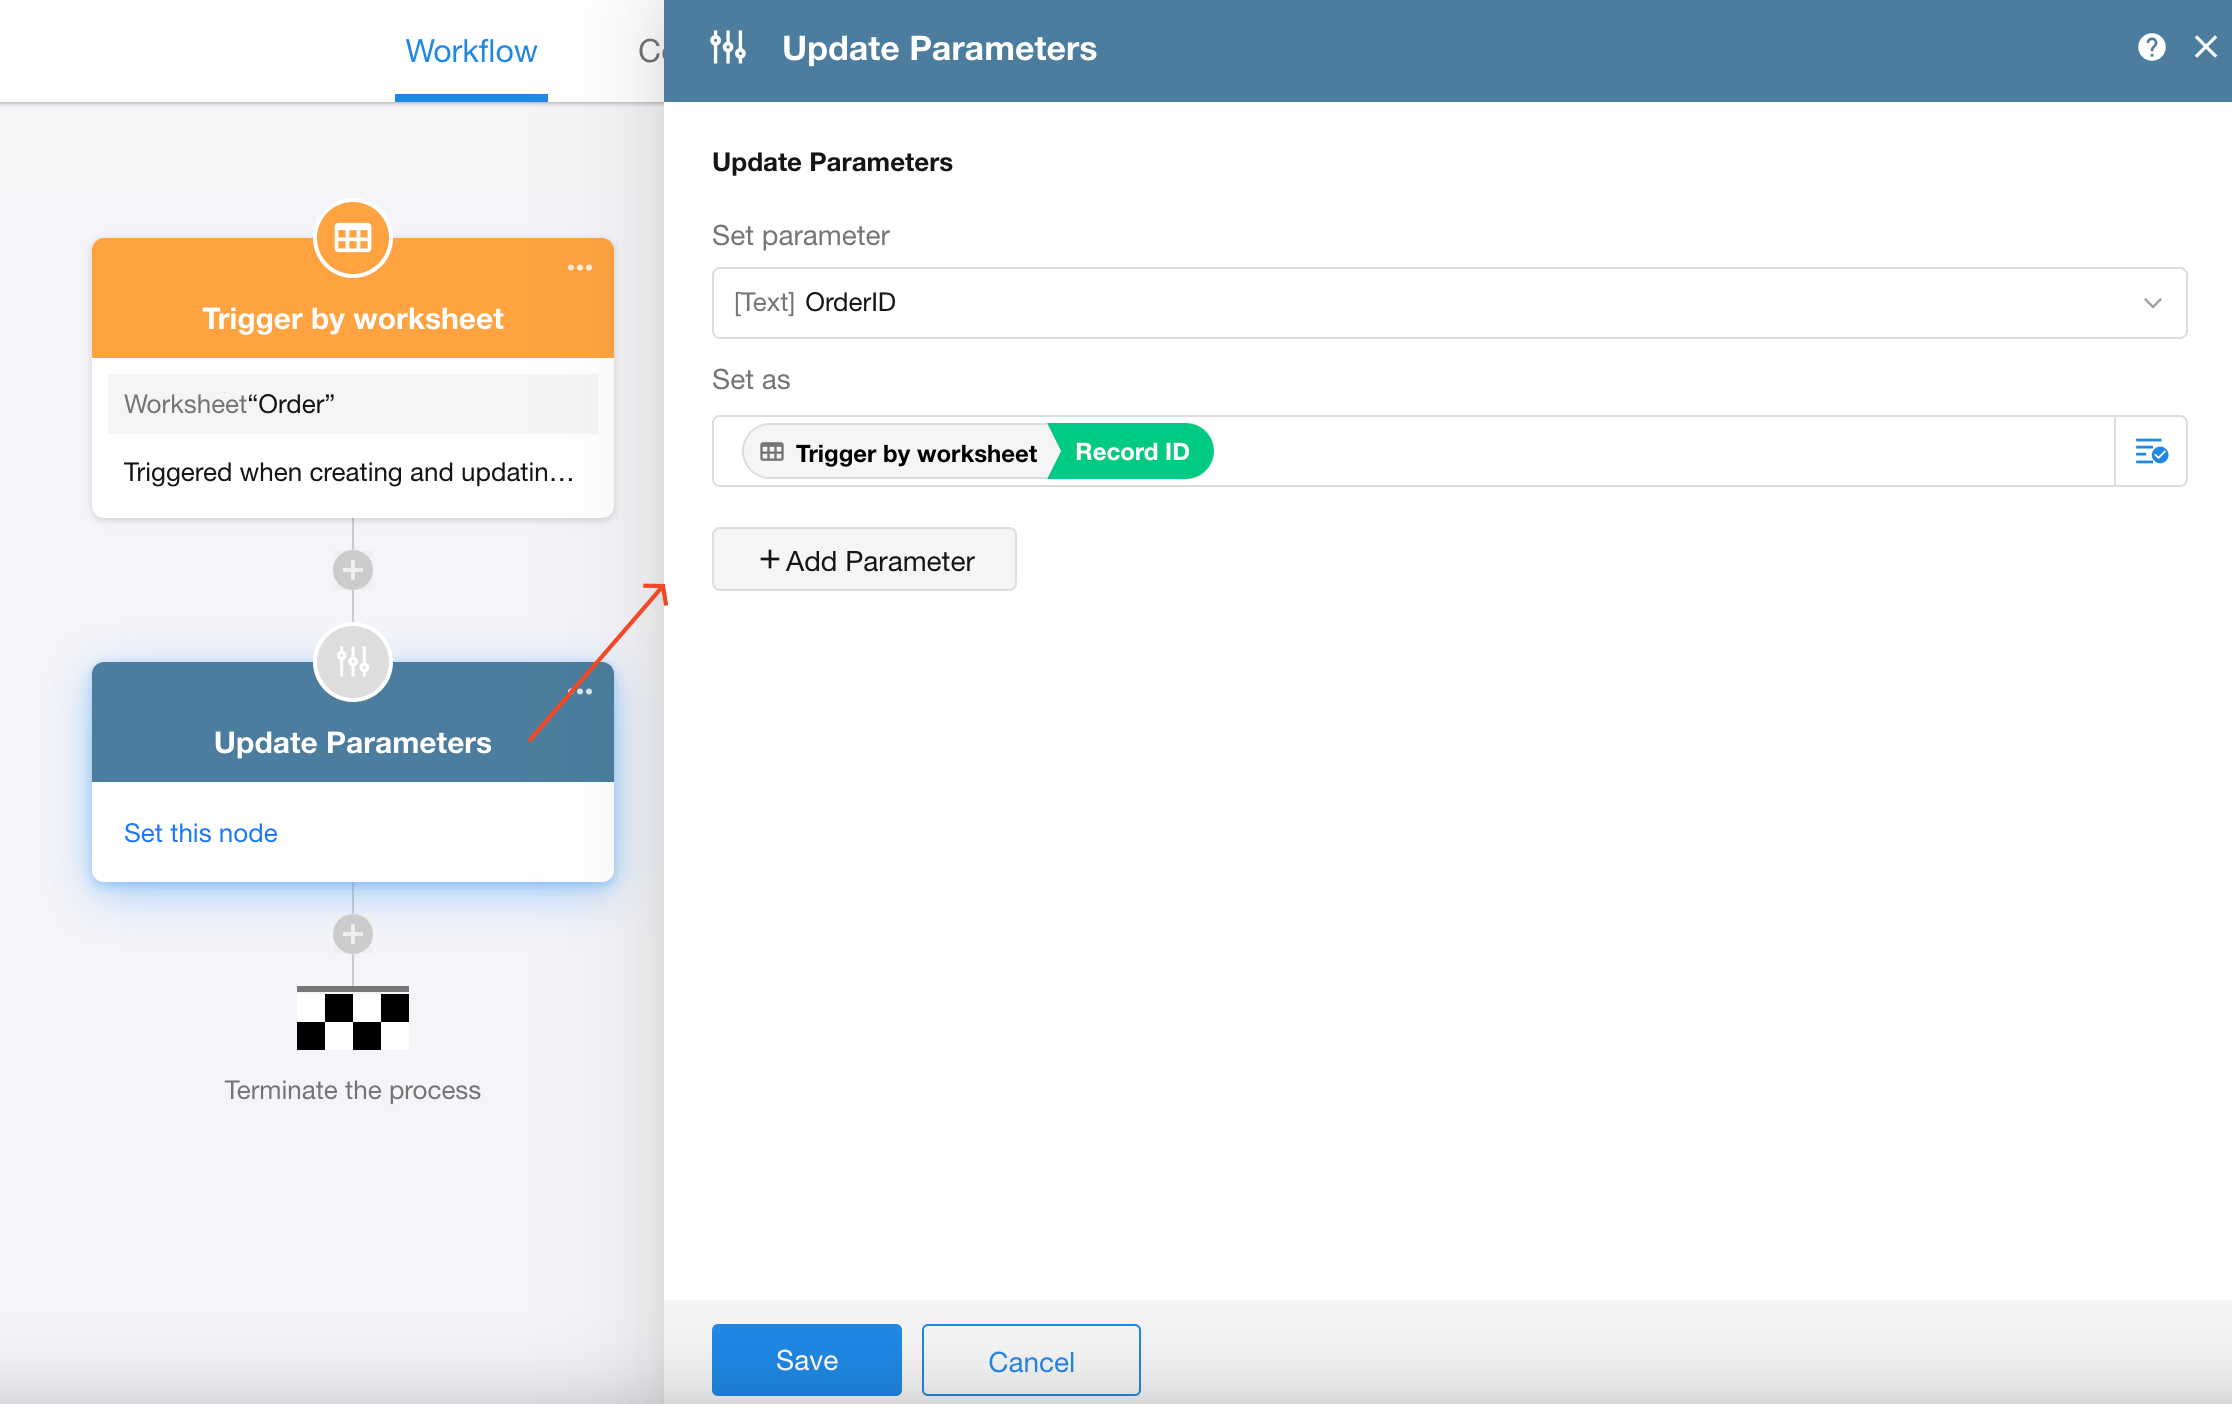
Assign Values to Parameters
You can assign values to workflow parameters in the following ways:
-
Assign Values Using the Update Parameters Node
-
Assign Values to Subprocess Parameters
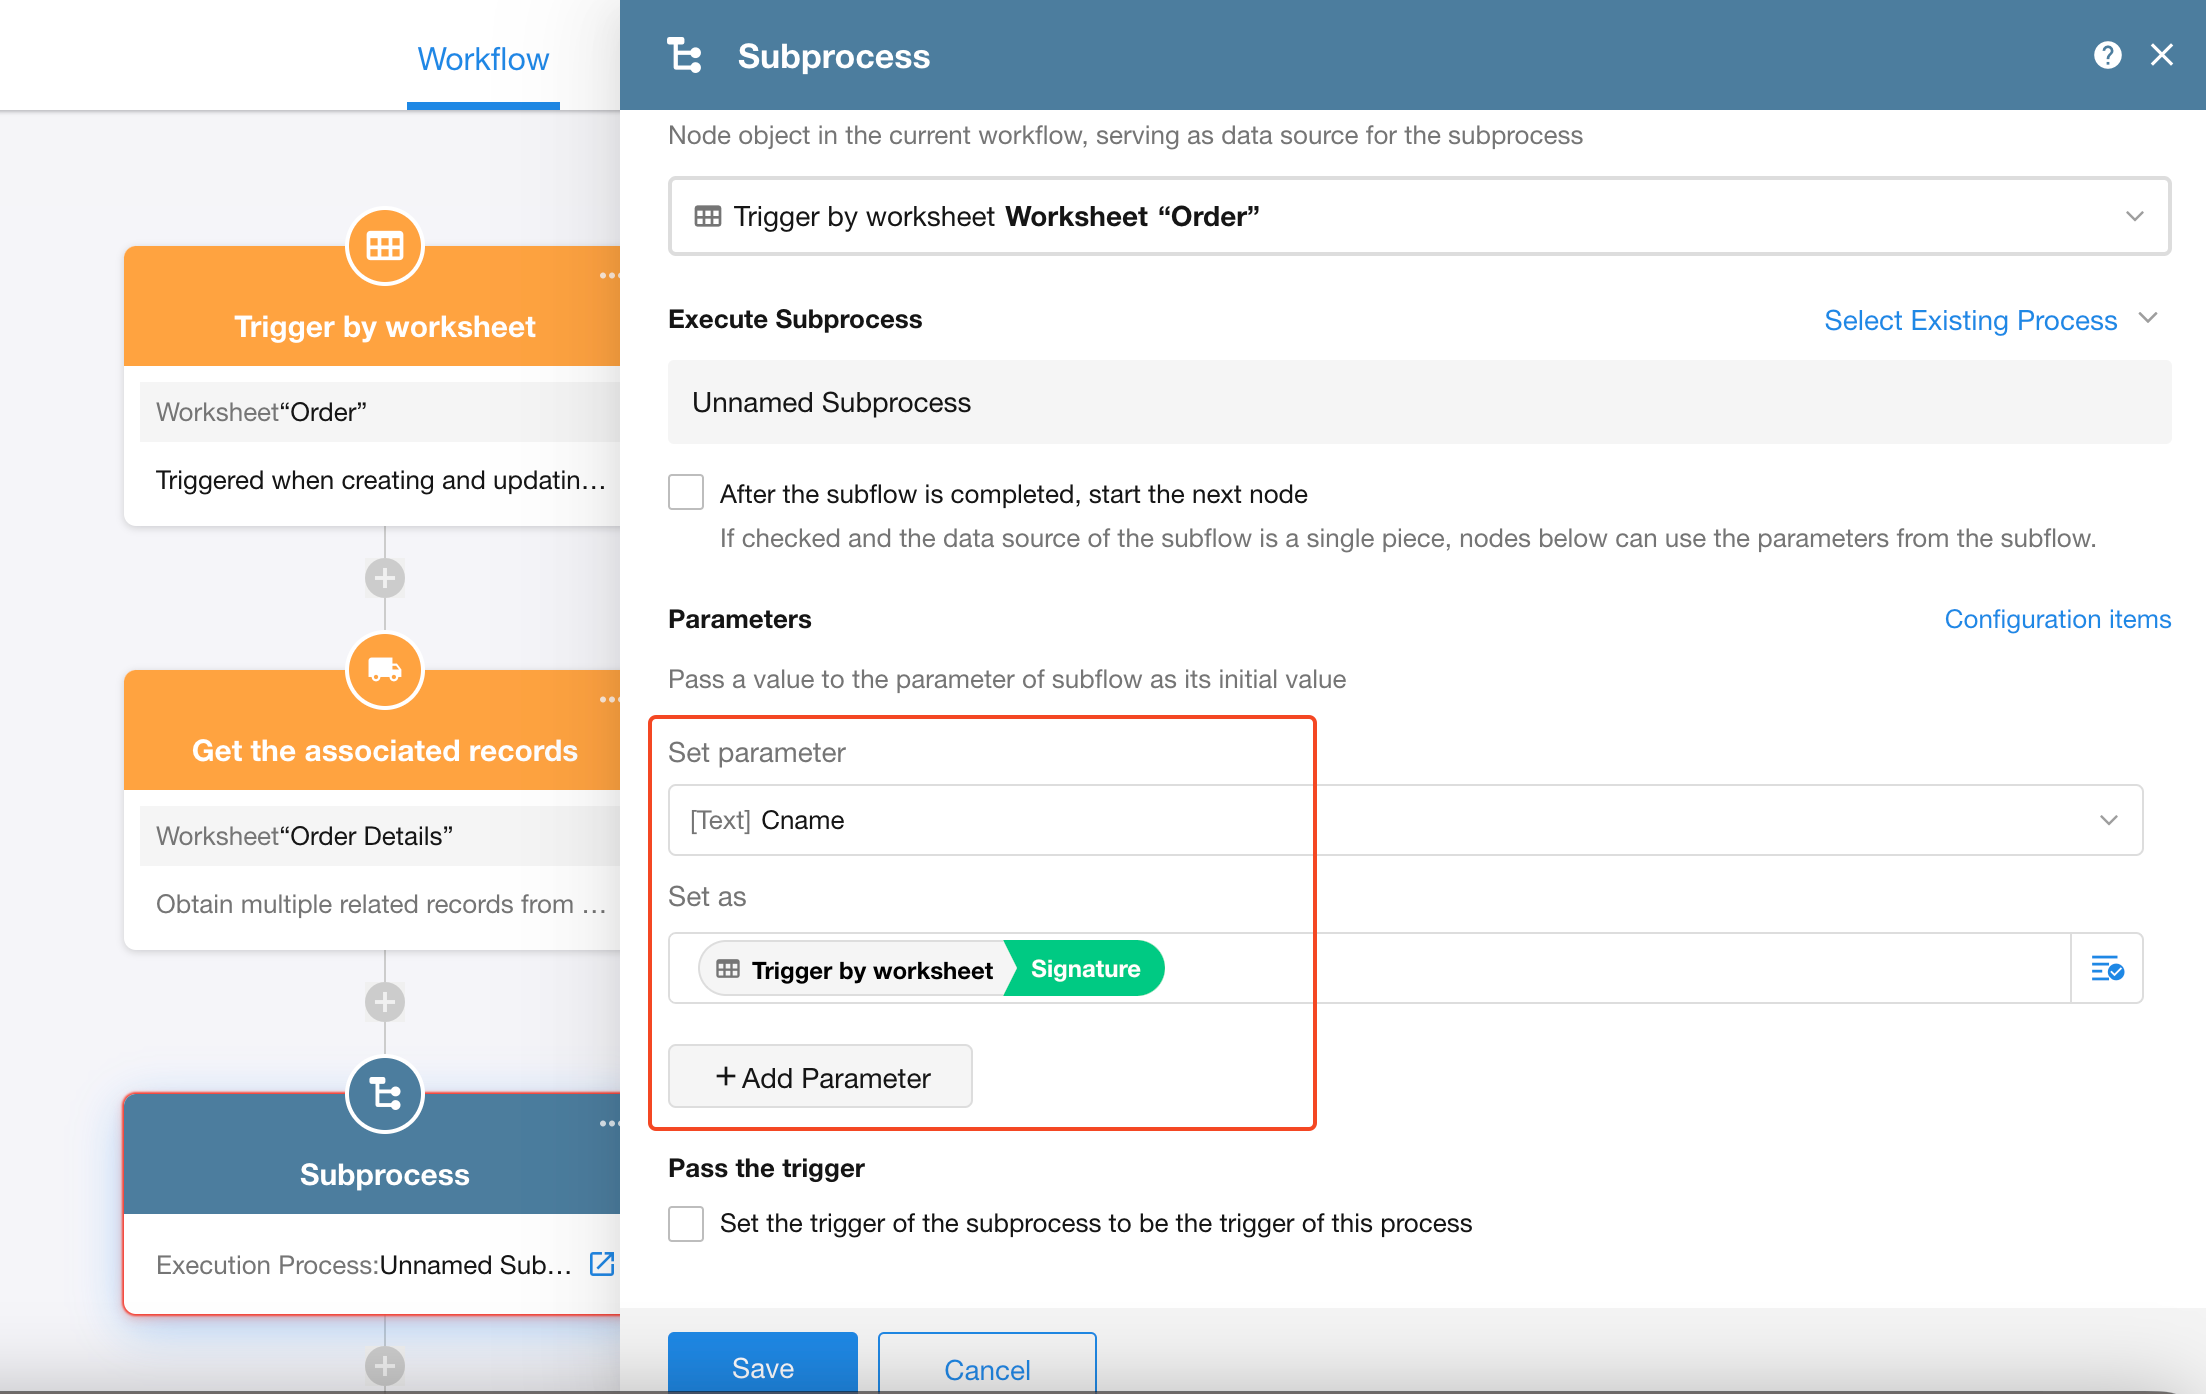
You must first open the subprocess and configure its parameters before assigning values here. When the subprocess runs, the parameters will automatically receive these initial values.
Was this document helpful?