Control - Subform
What is a subform
When filling out a form, sometimes you need to enter multiple items of the same type. The number of rows can vary, but all belong to the same category of business data. A subform field allows you to standardize the input of these records.
Examples:
- For an employee’s multiple work experiences, the main worksheet can be Employee Information, and the subform can be Work Experience.
- For a sales order containing multiple product line items, the main worksheet can be Order, and the subform can be Order Details.
Use Case: Create an Order Details subform in a Sales Order worksheet
1. Add a Subform field
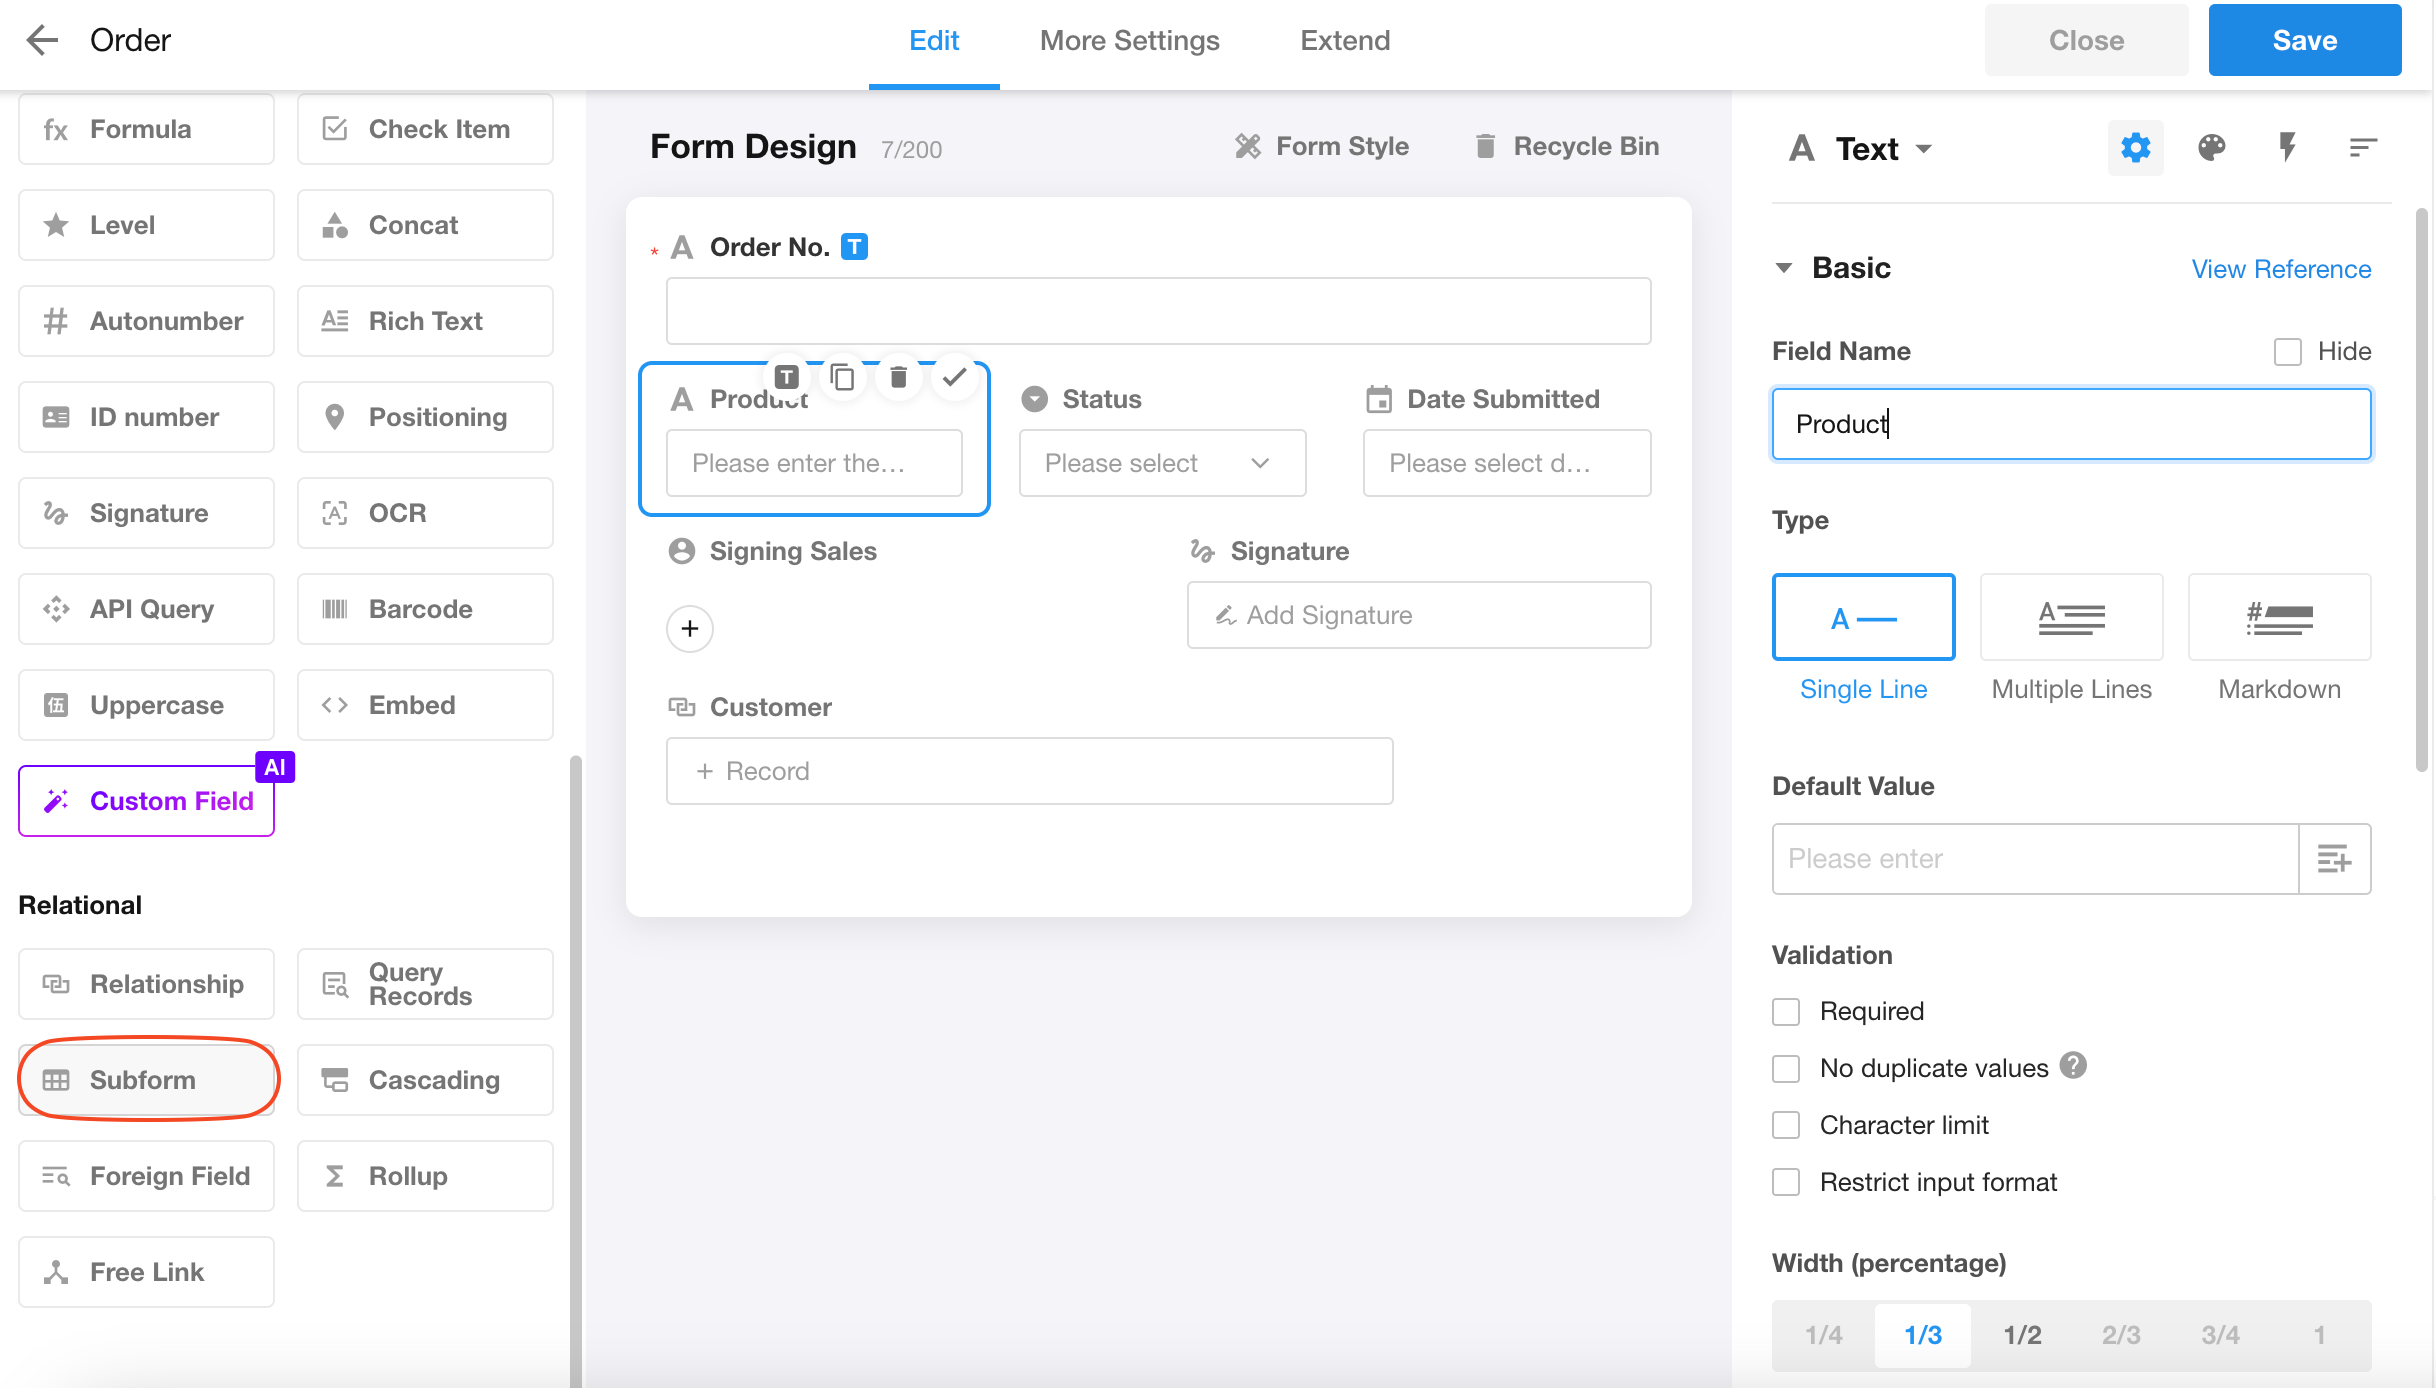
2. How to add a subform
There are two ways to add a subform, "Add from blank" and "Use an existing sheet".
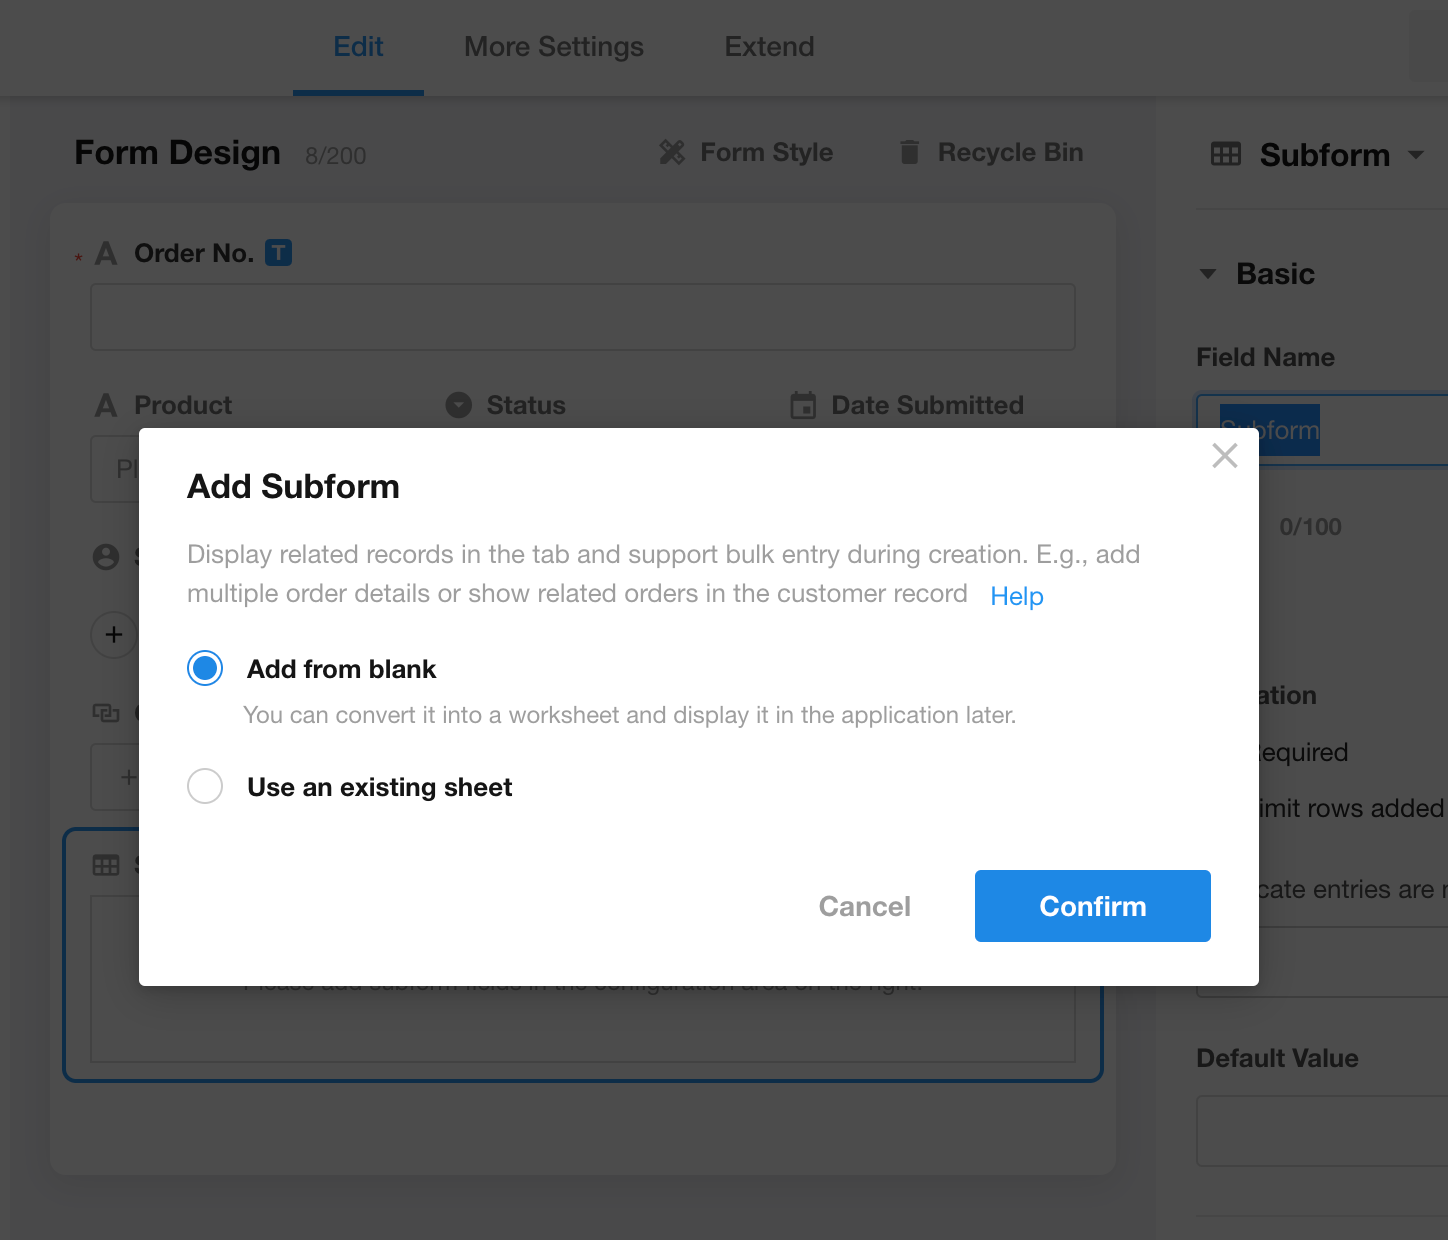
-
Add from blank: Create and design a new subform. This subform is a virtual or hidden worksheet that won't appear in the worksheet navigation. It can only be viewed and added data when accessing the main worksheet (e.g., the order worksheet is the main worksheet).
-
Use an existing sheet: Reference an existing worksheet as the subform. Such subforms have physical worksheet entities.
We'll first explain how to add a subform from blank.
3. Add a subform from blank
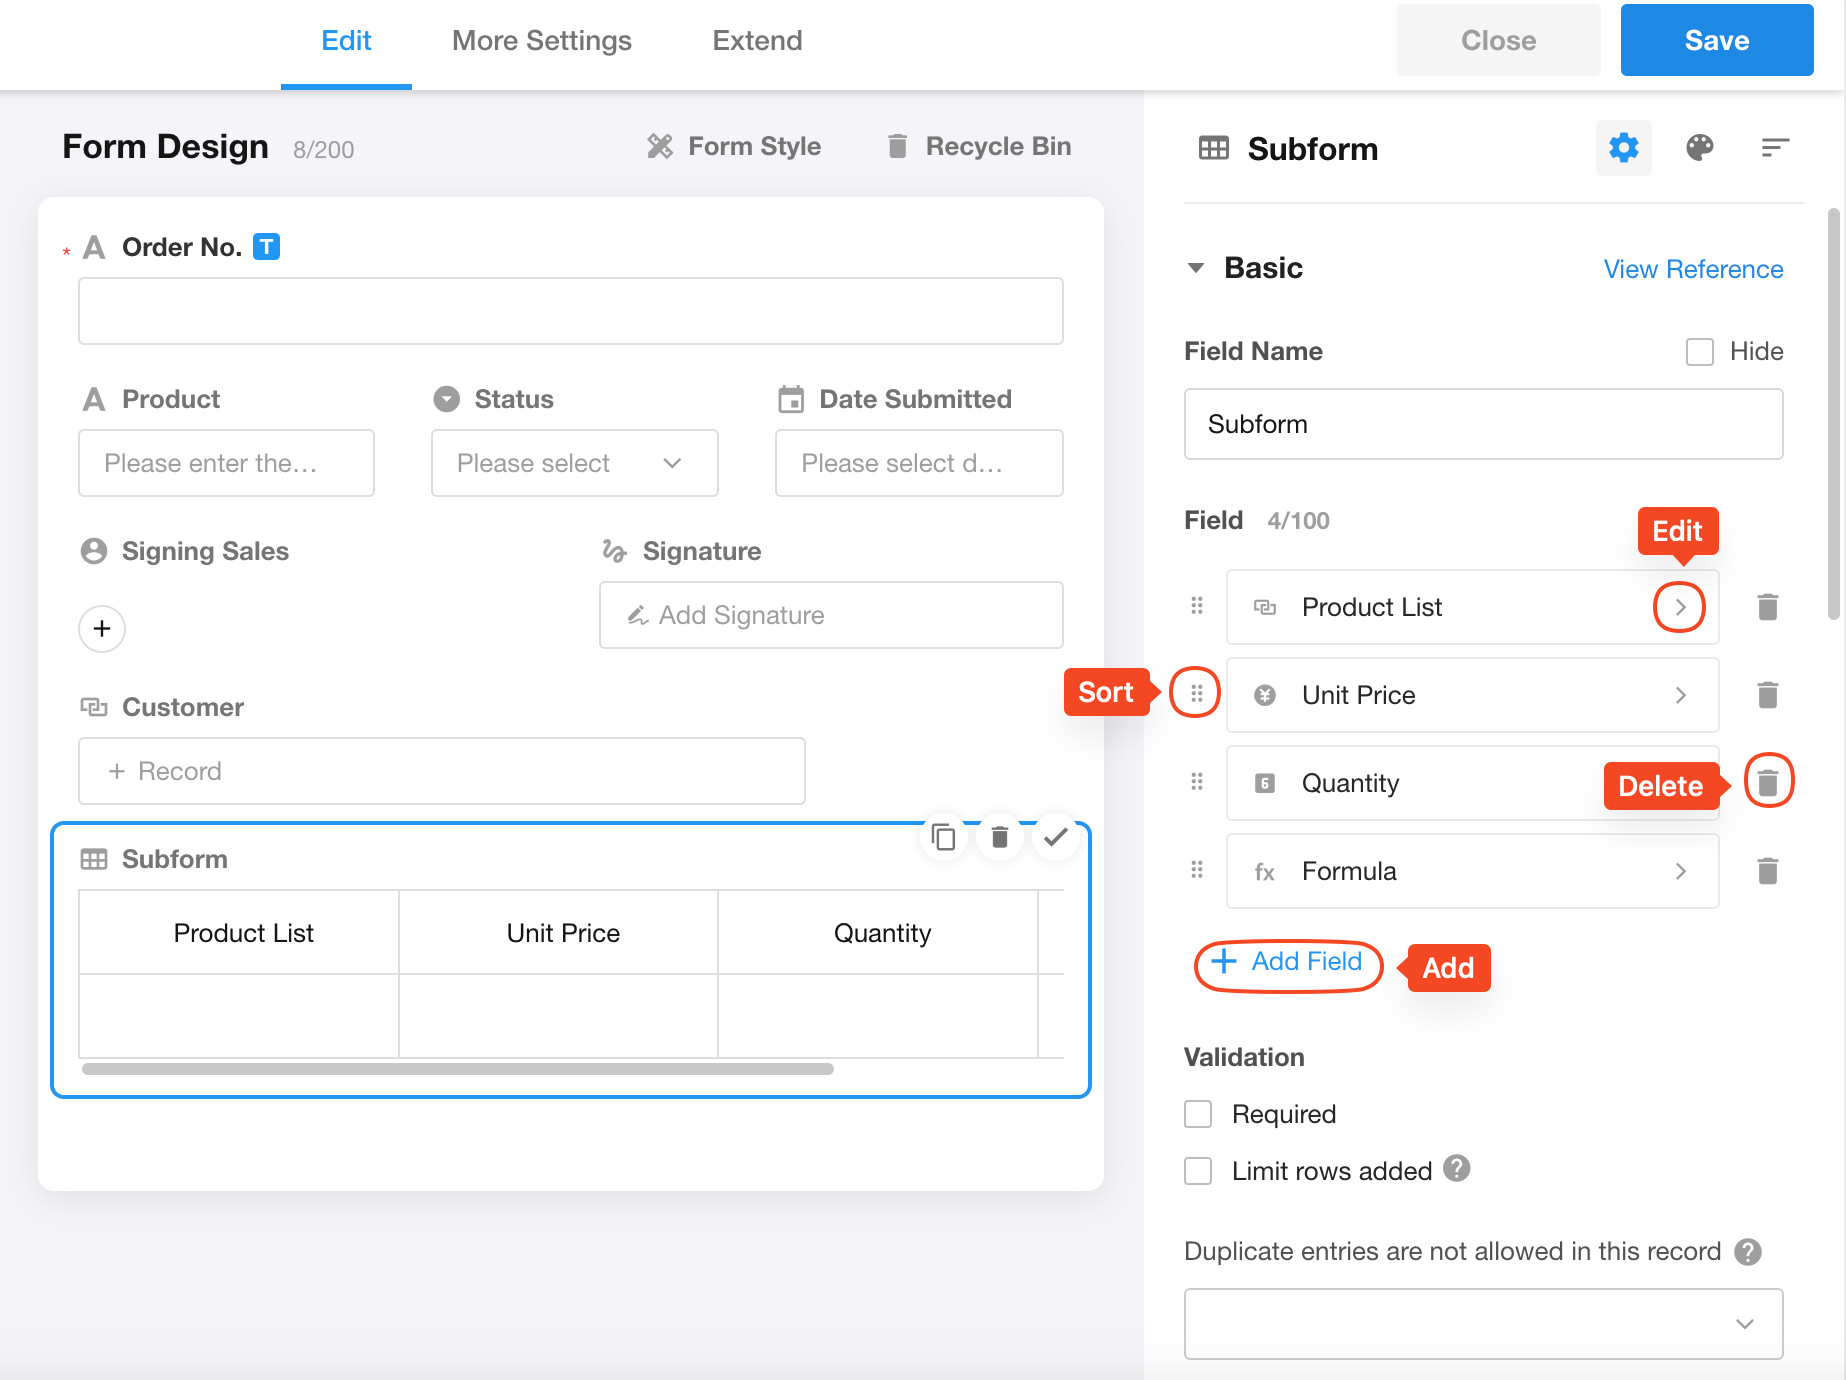
1). Add fields to the subform

2). Configure subform fields
-
Set the subform name
-
Adjust the field order
-
Delete fields in subform
-
Modify field configurations in subform
3). Save and test
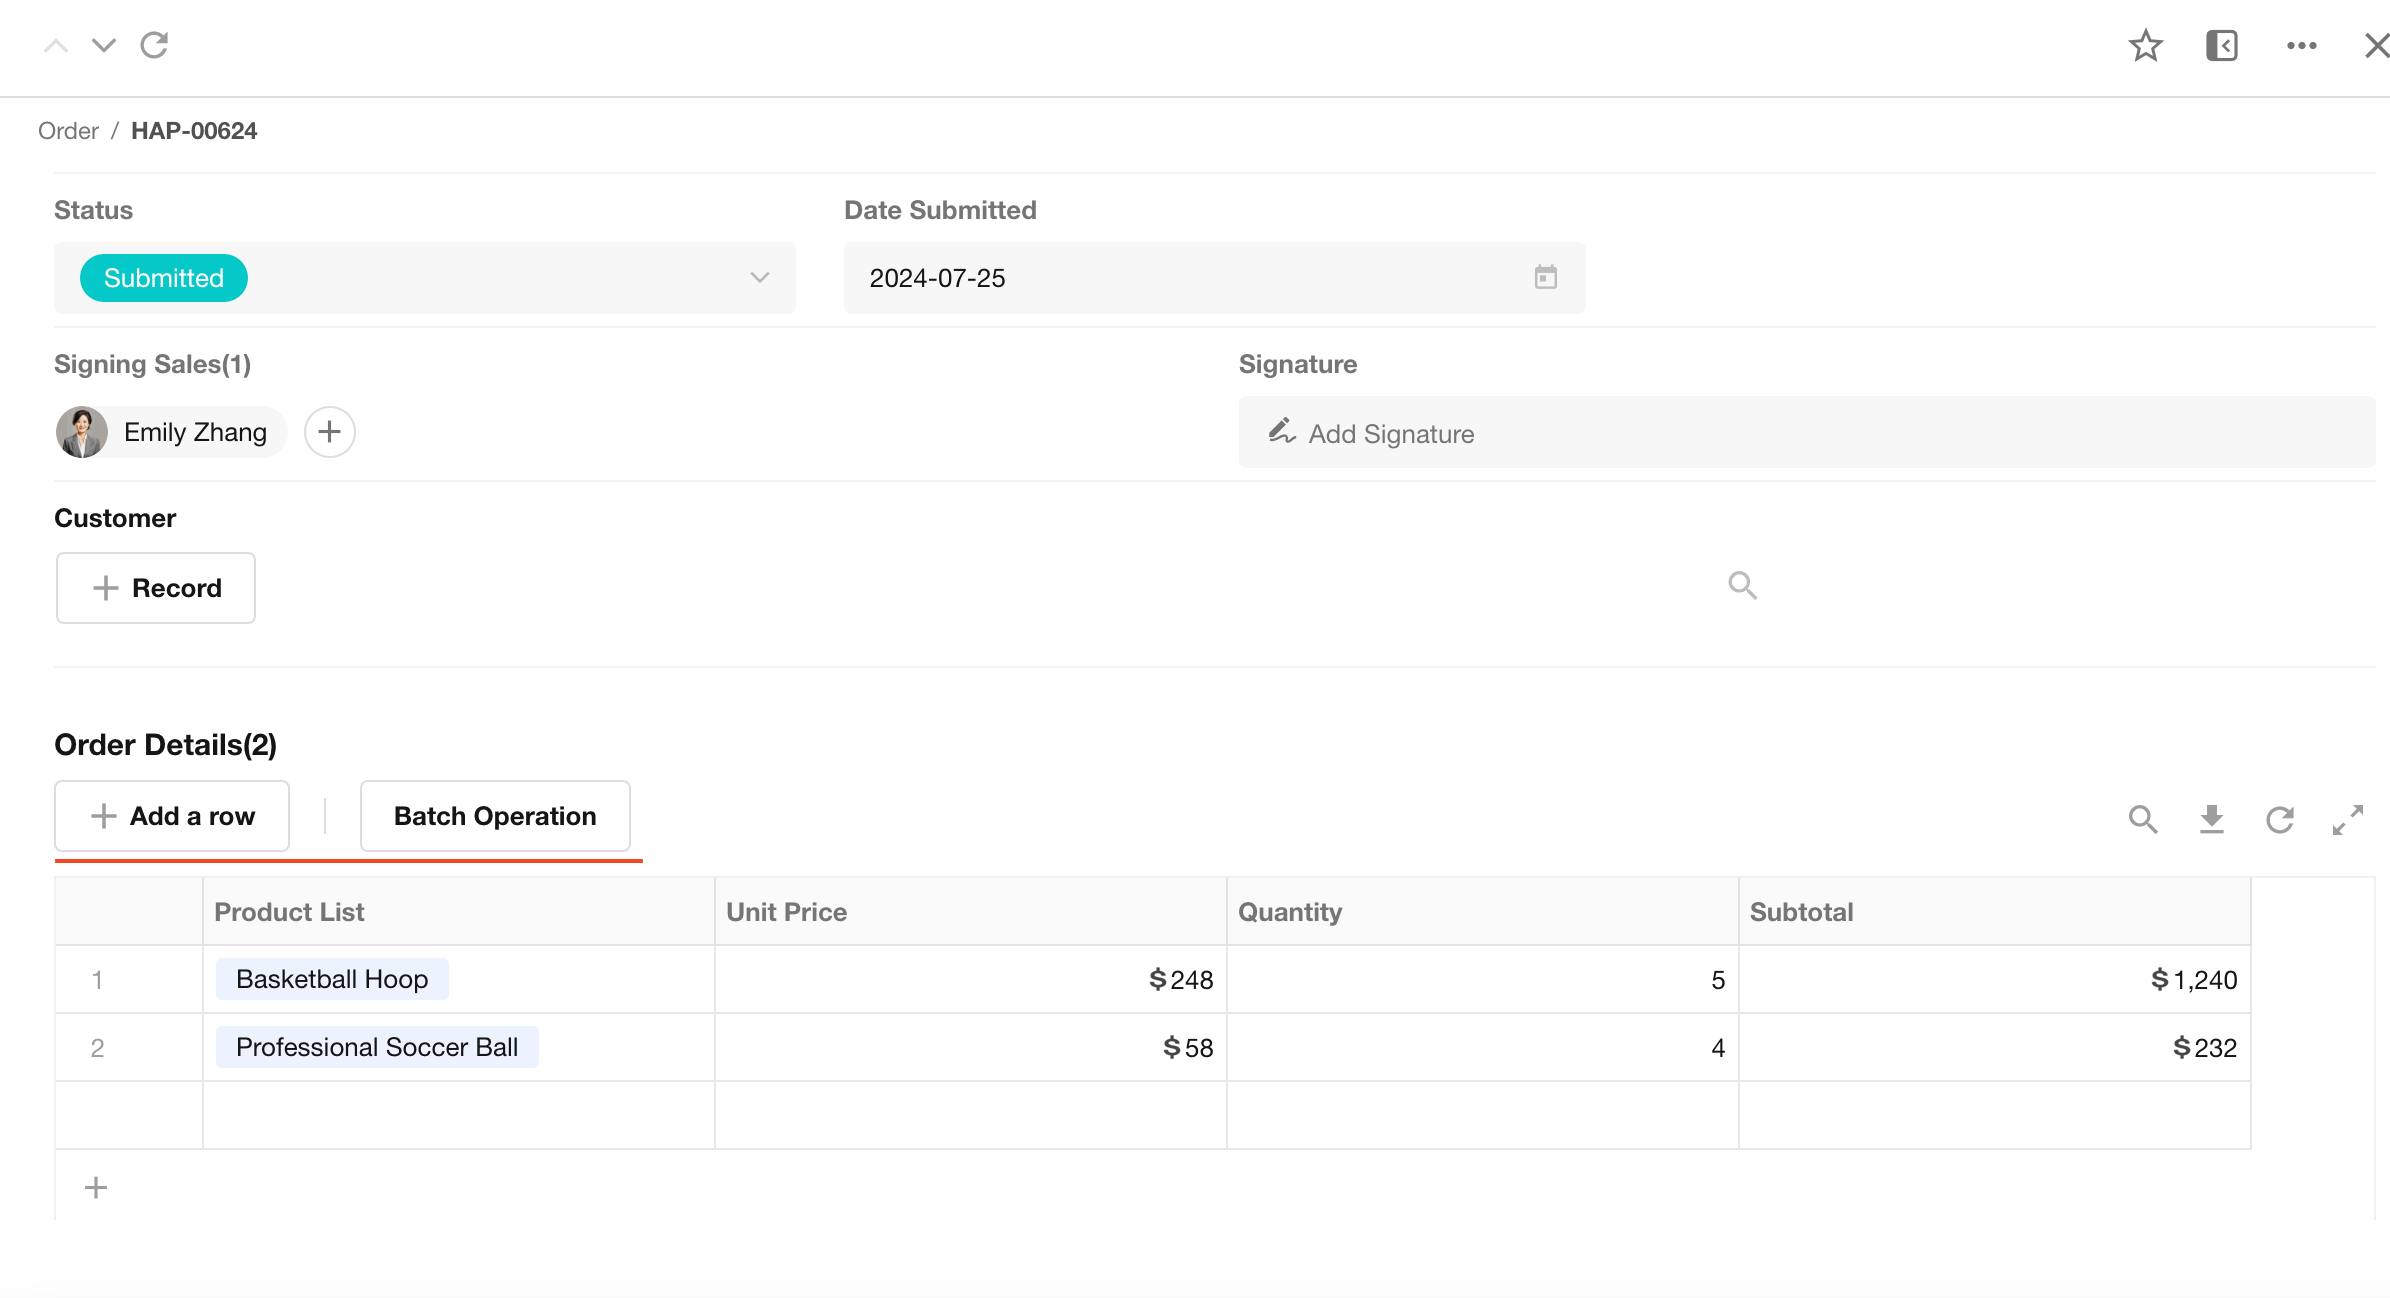
After setting up the subform fields, add some data to test.
4. Use an existing sheet as a subform
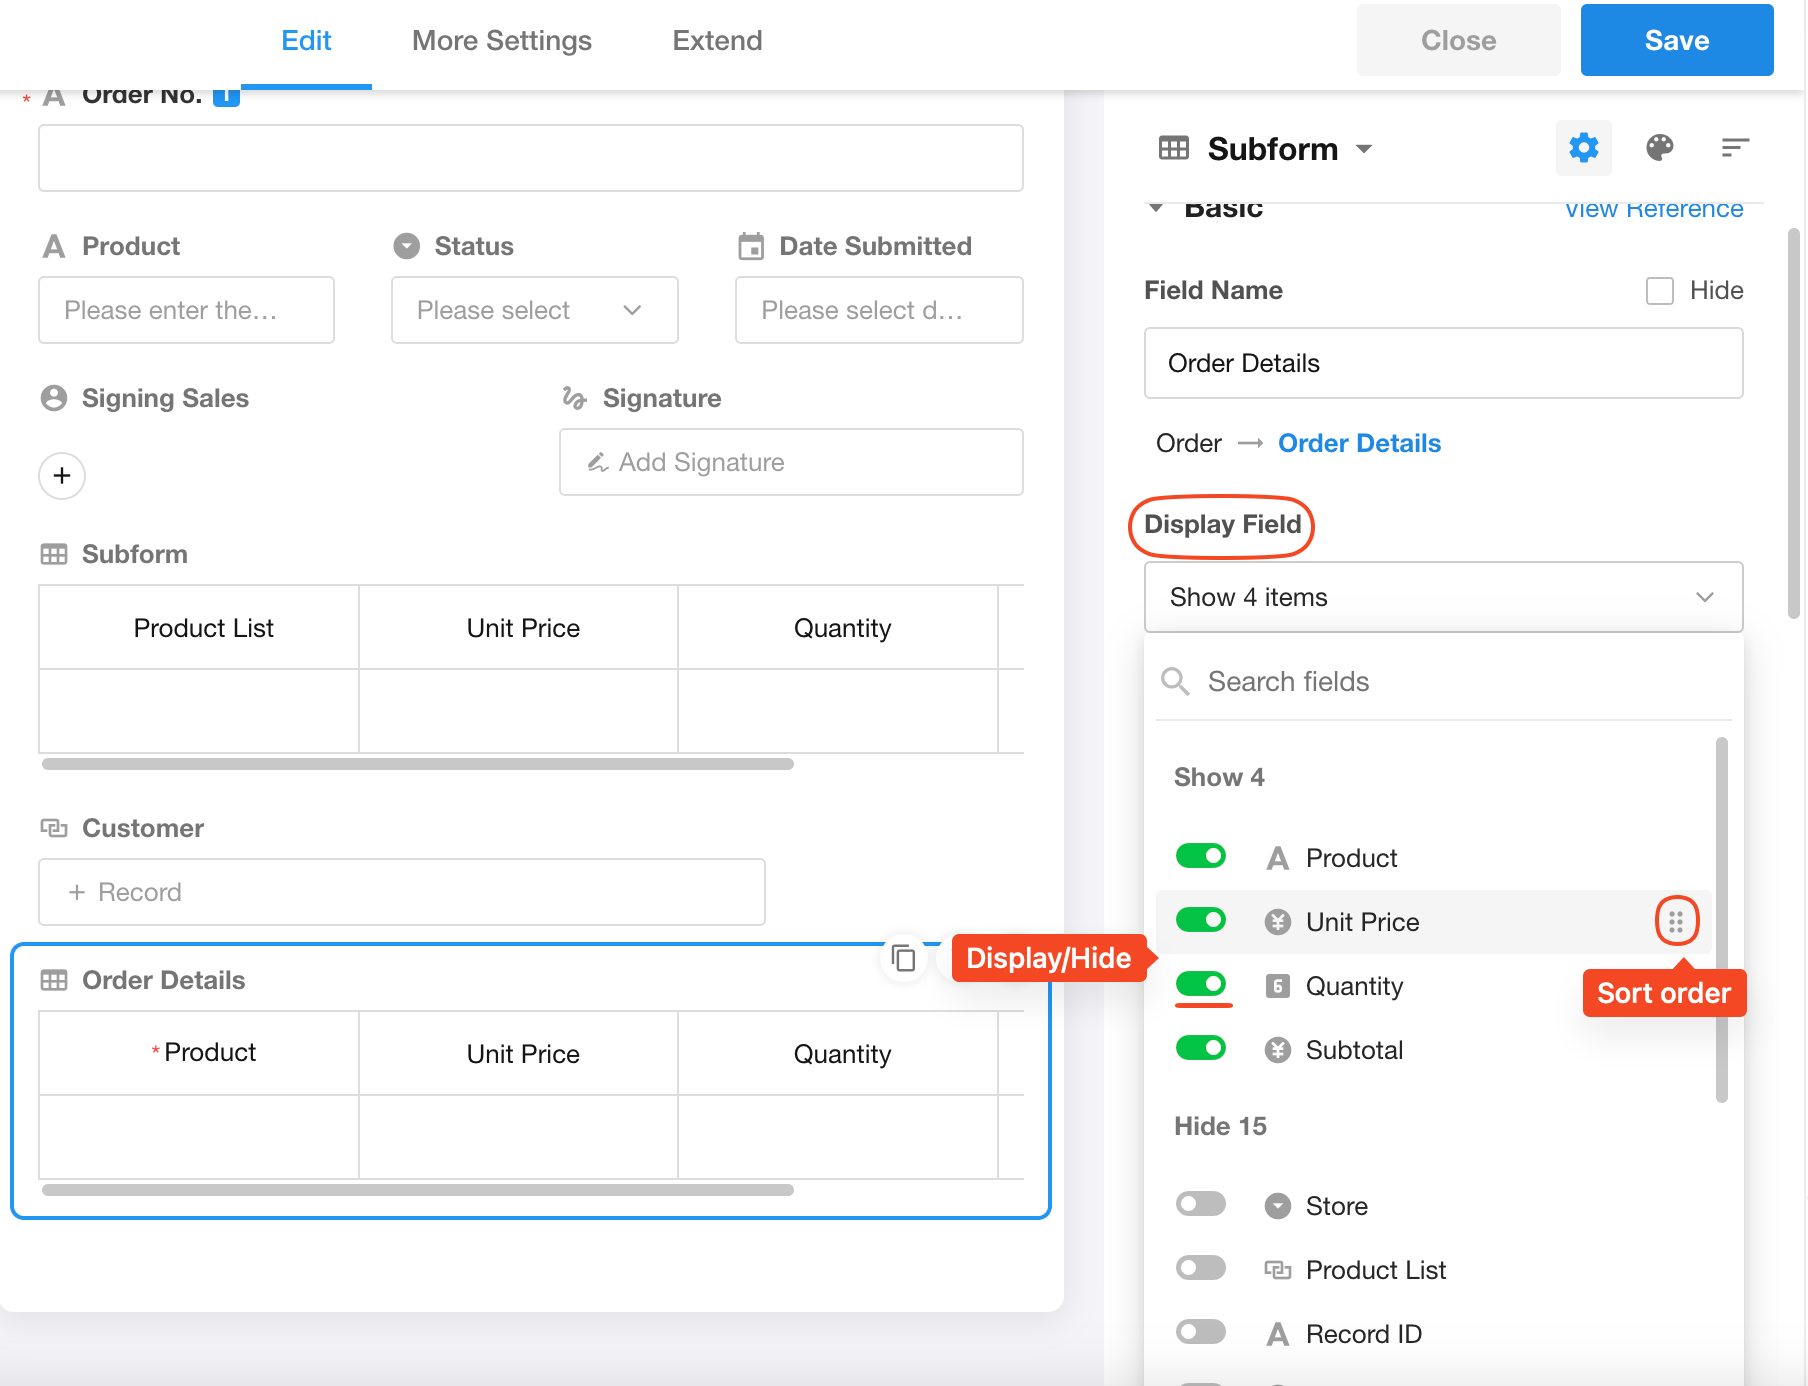
If you've already created a worksheet with a structure suitable for a subform, you can directly reference it as a subform. This eliminates the need to configure subform fields - you only need to specify which fields to display.

Configure fields displayed in subform
When selecting an existing worksheet as a subform, users cannot perform operations like deleting or renaming subform fields. They can only configure which fields to display in the subform and the display order.
5. Add data to a subform
There are multiple ways to add data to a subform. You can manually add a single row, add multiple rows at once (via a relationship field), import data directly, or copy existing subform data.
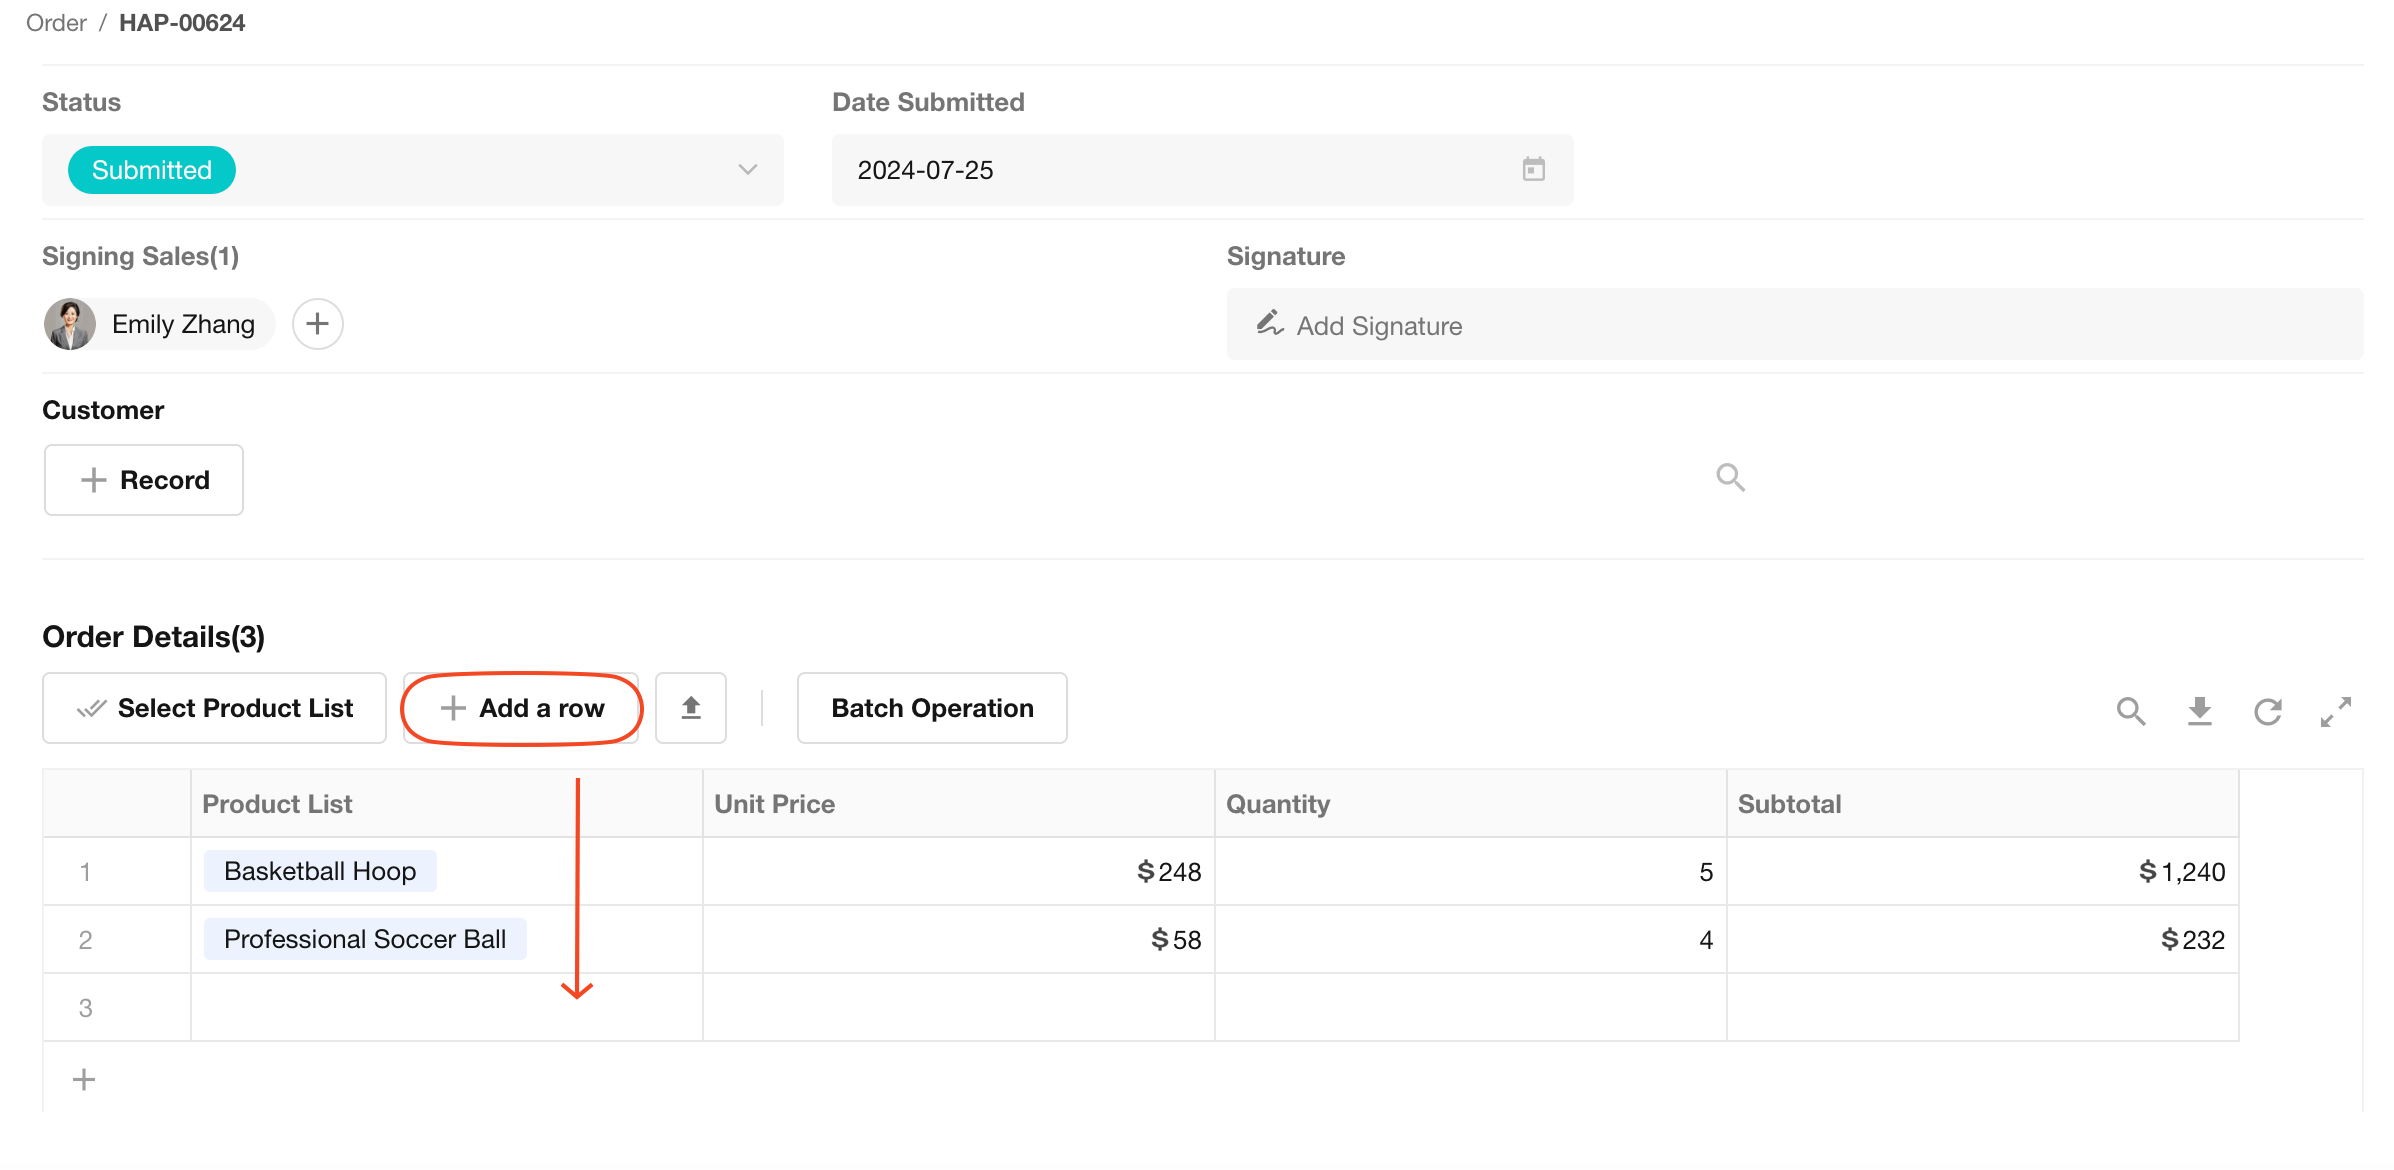
Add a single row
Click the "Add a Row" button to insert a new row into the subform. Then enter the field values as needed.
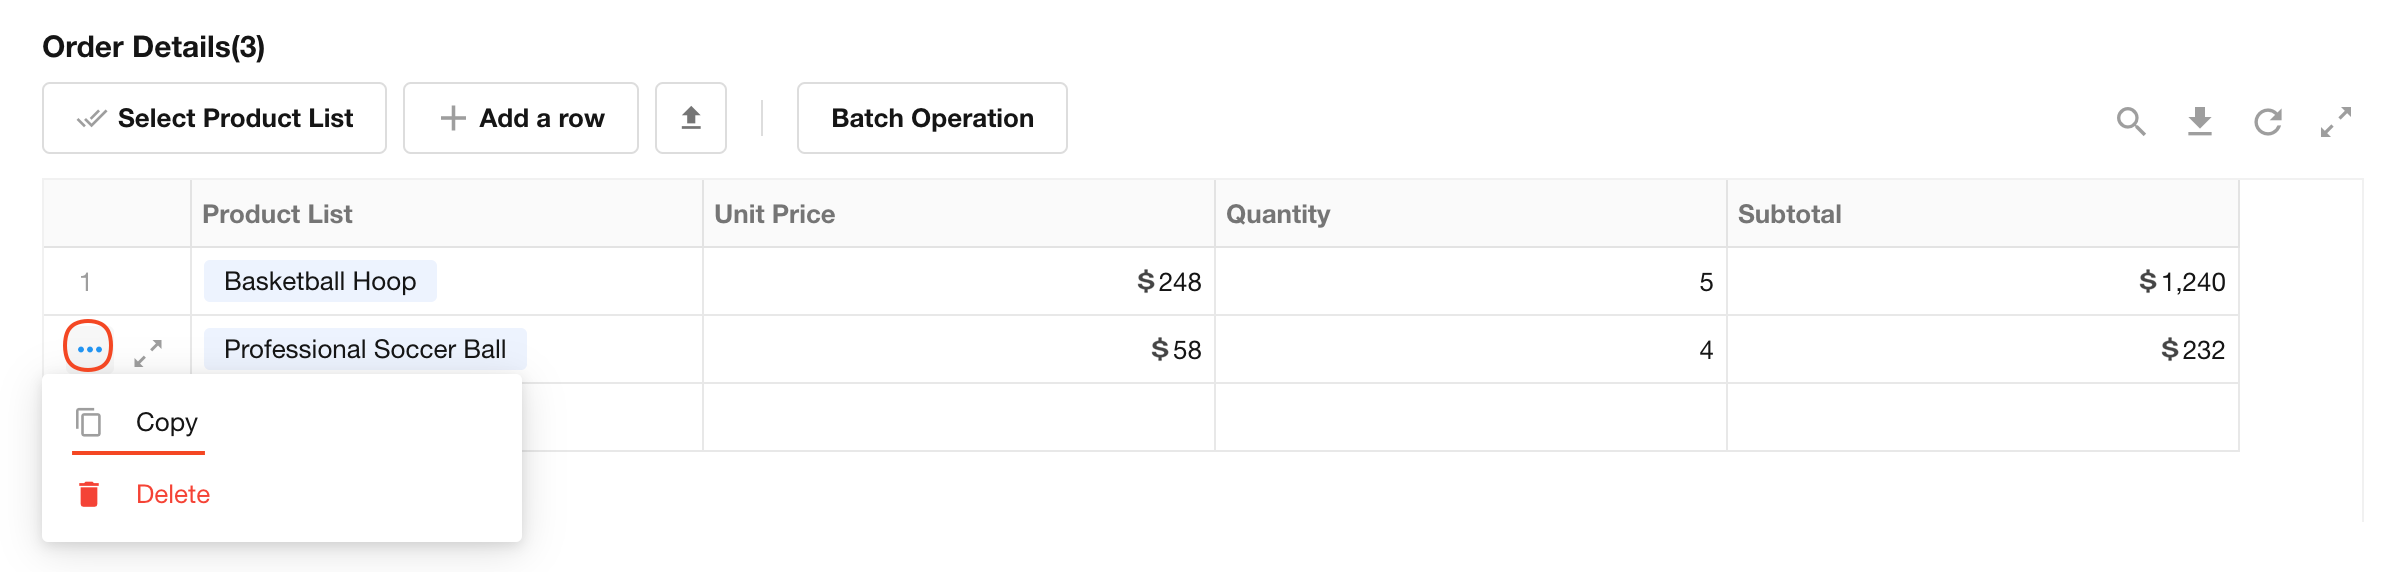
Copy data
If the Copy option is unchecked, the copy button will not appear in the subform action bar.
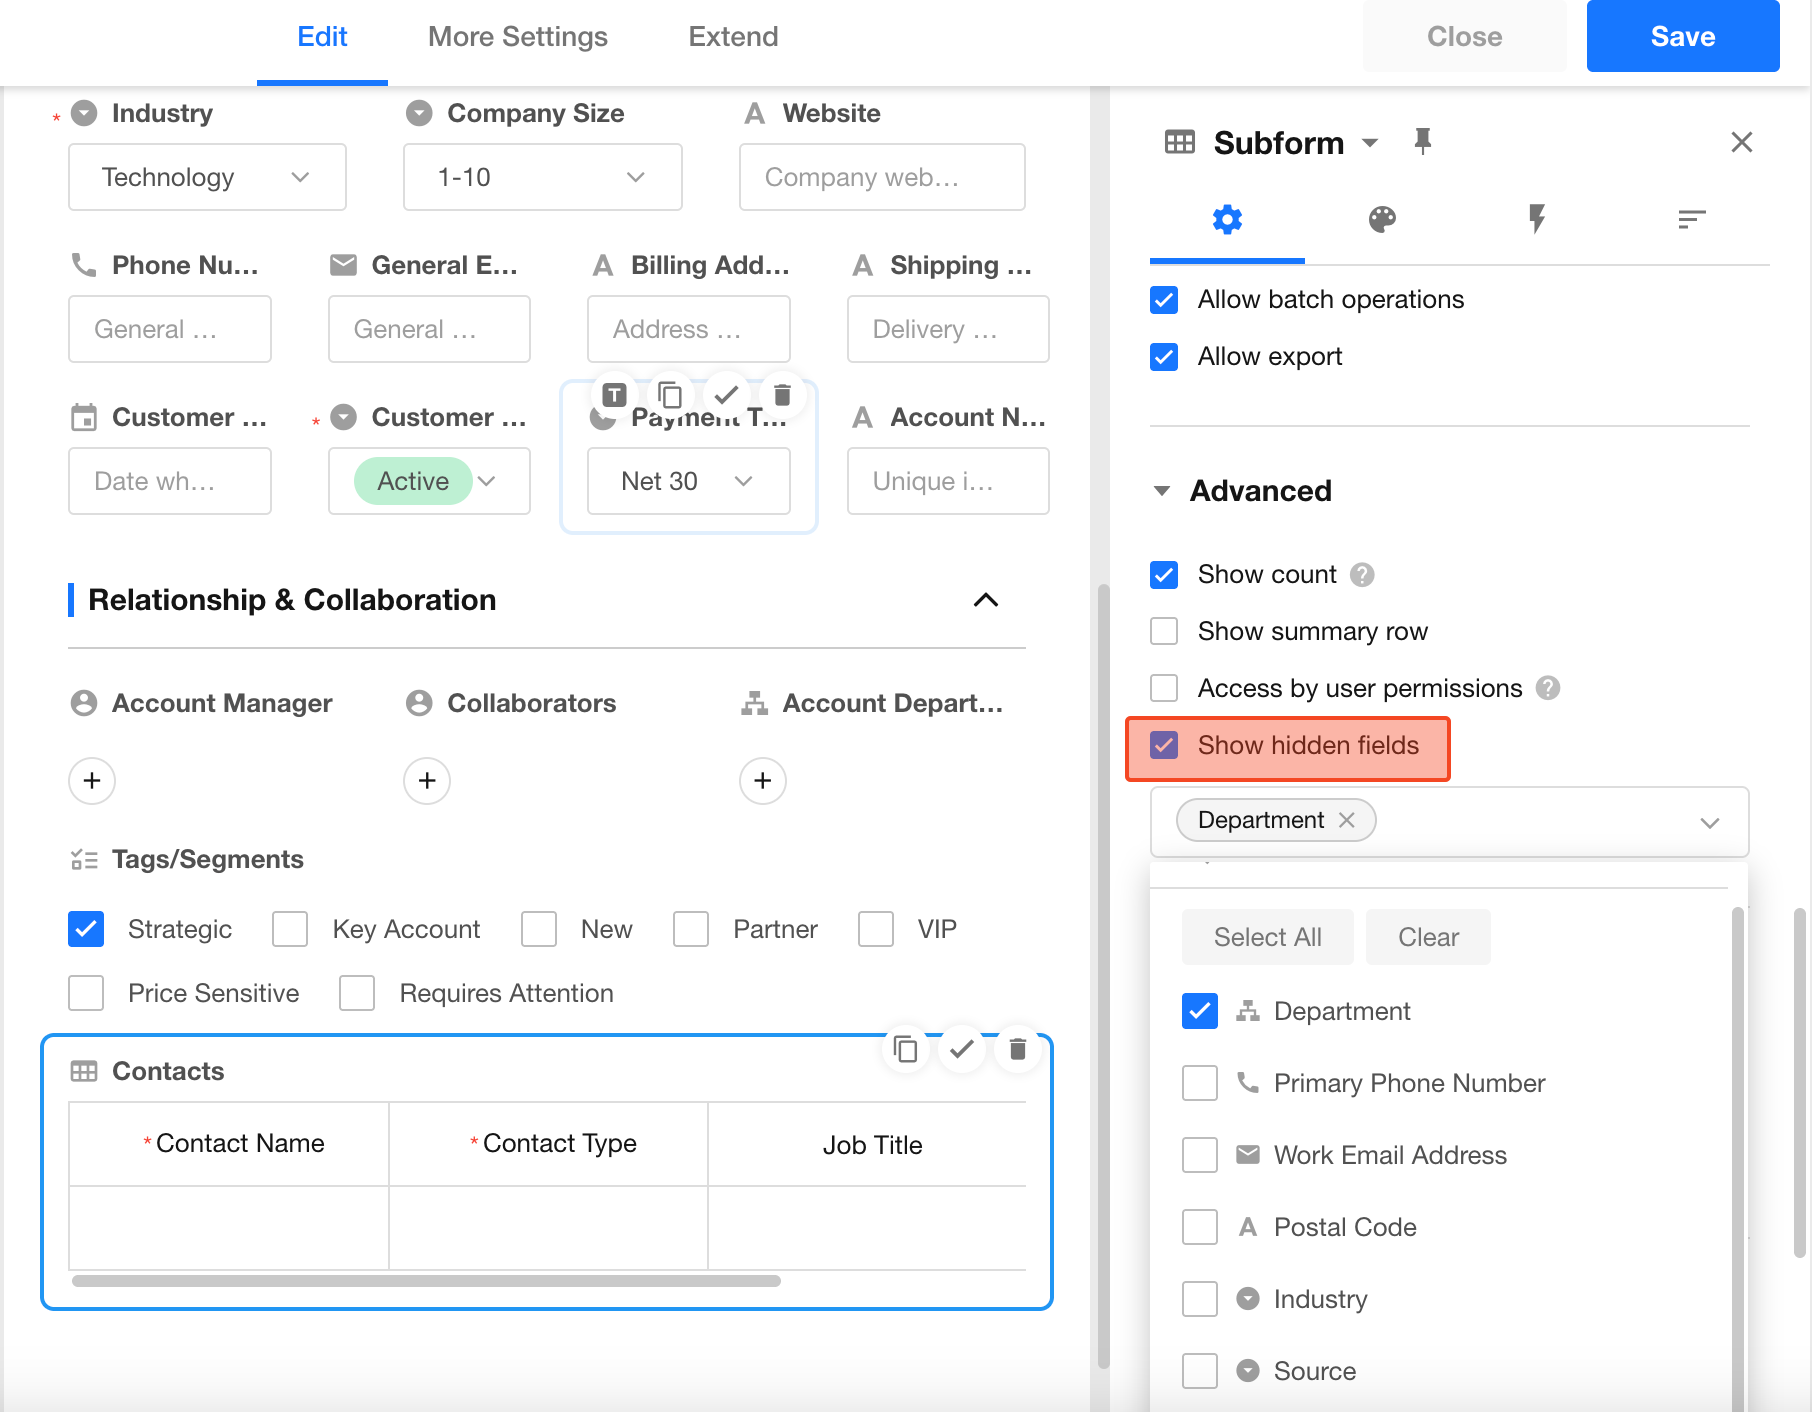
Copy hidden fields
If the subform is an entity table, it may not display all fields as a subform. When copying a data row, these hidden fields will not be copied. If business rules use hidden fields, they may fail.
You can enable hidden fields to be returned by checking the desired fields in the subform’s Advanced Settings > Return Hidden Fields.
- Only entity subforms support the Return Hidden Fields option.
- Only custom fields can be returned.
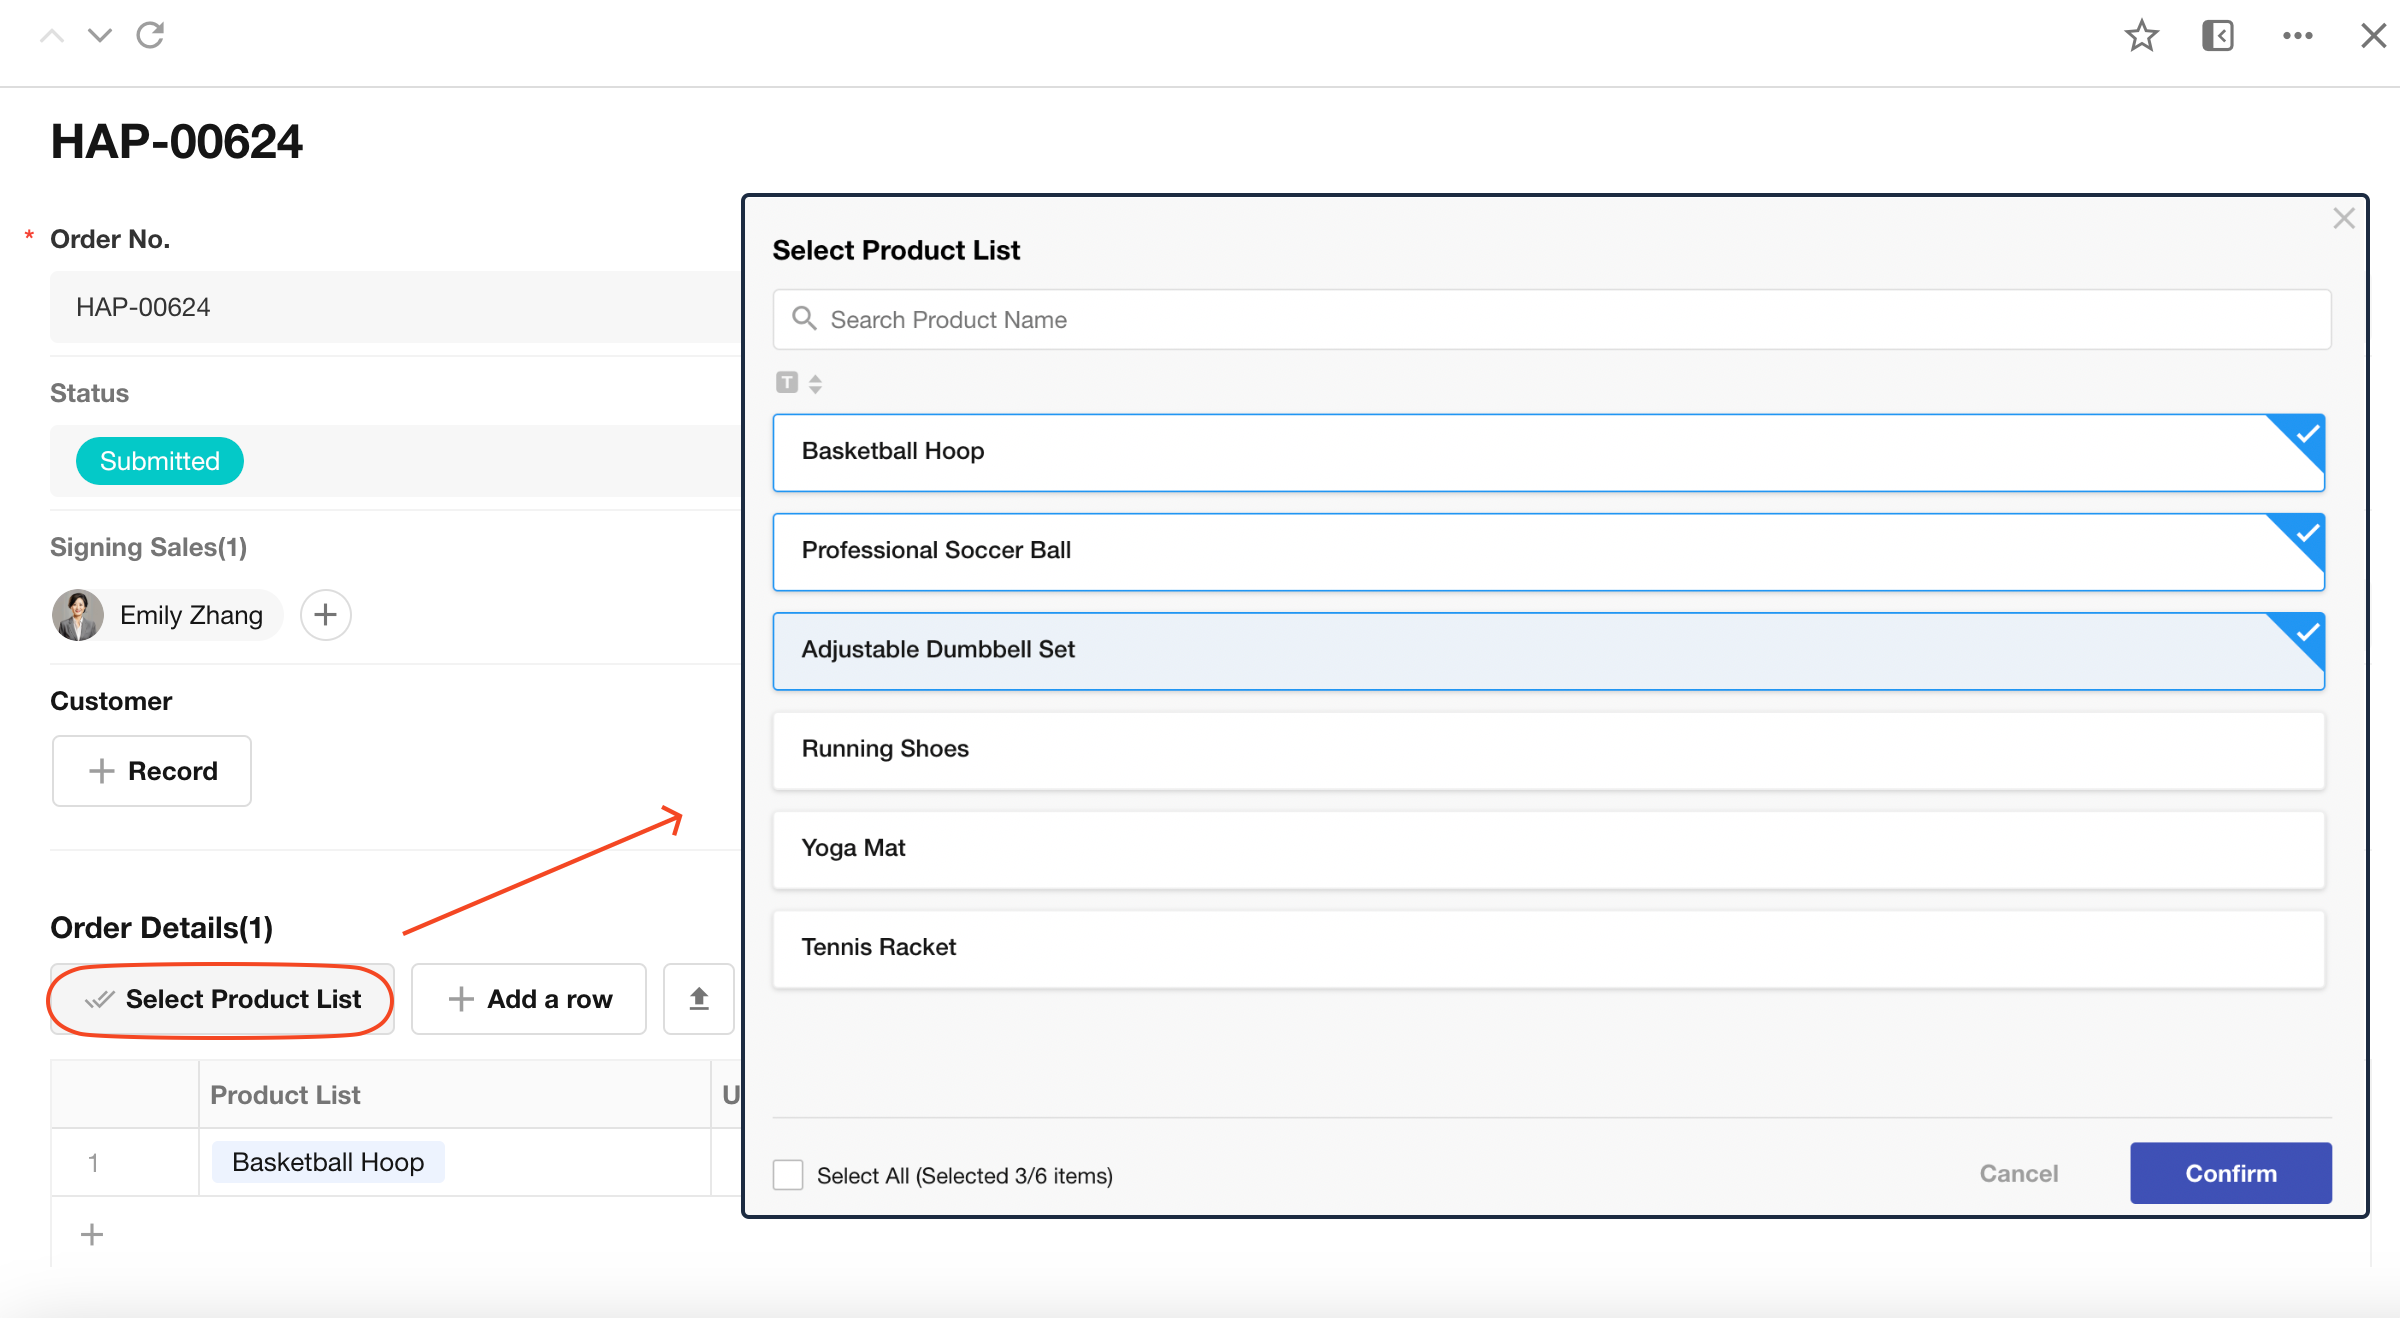
Bulk add data (via relationship fields)
This method requires the subform to contain relationship fields.
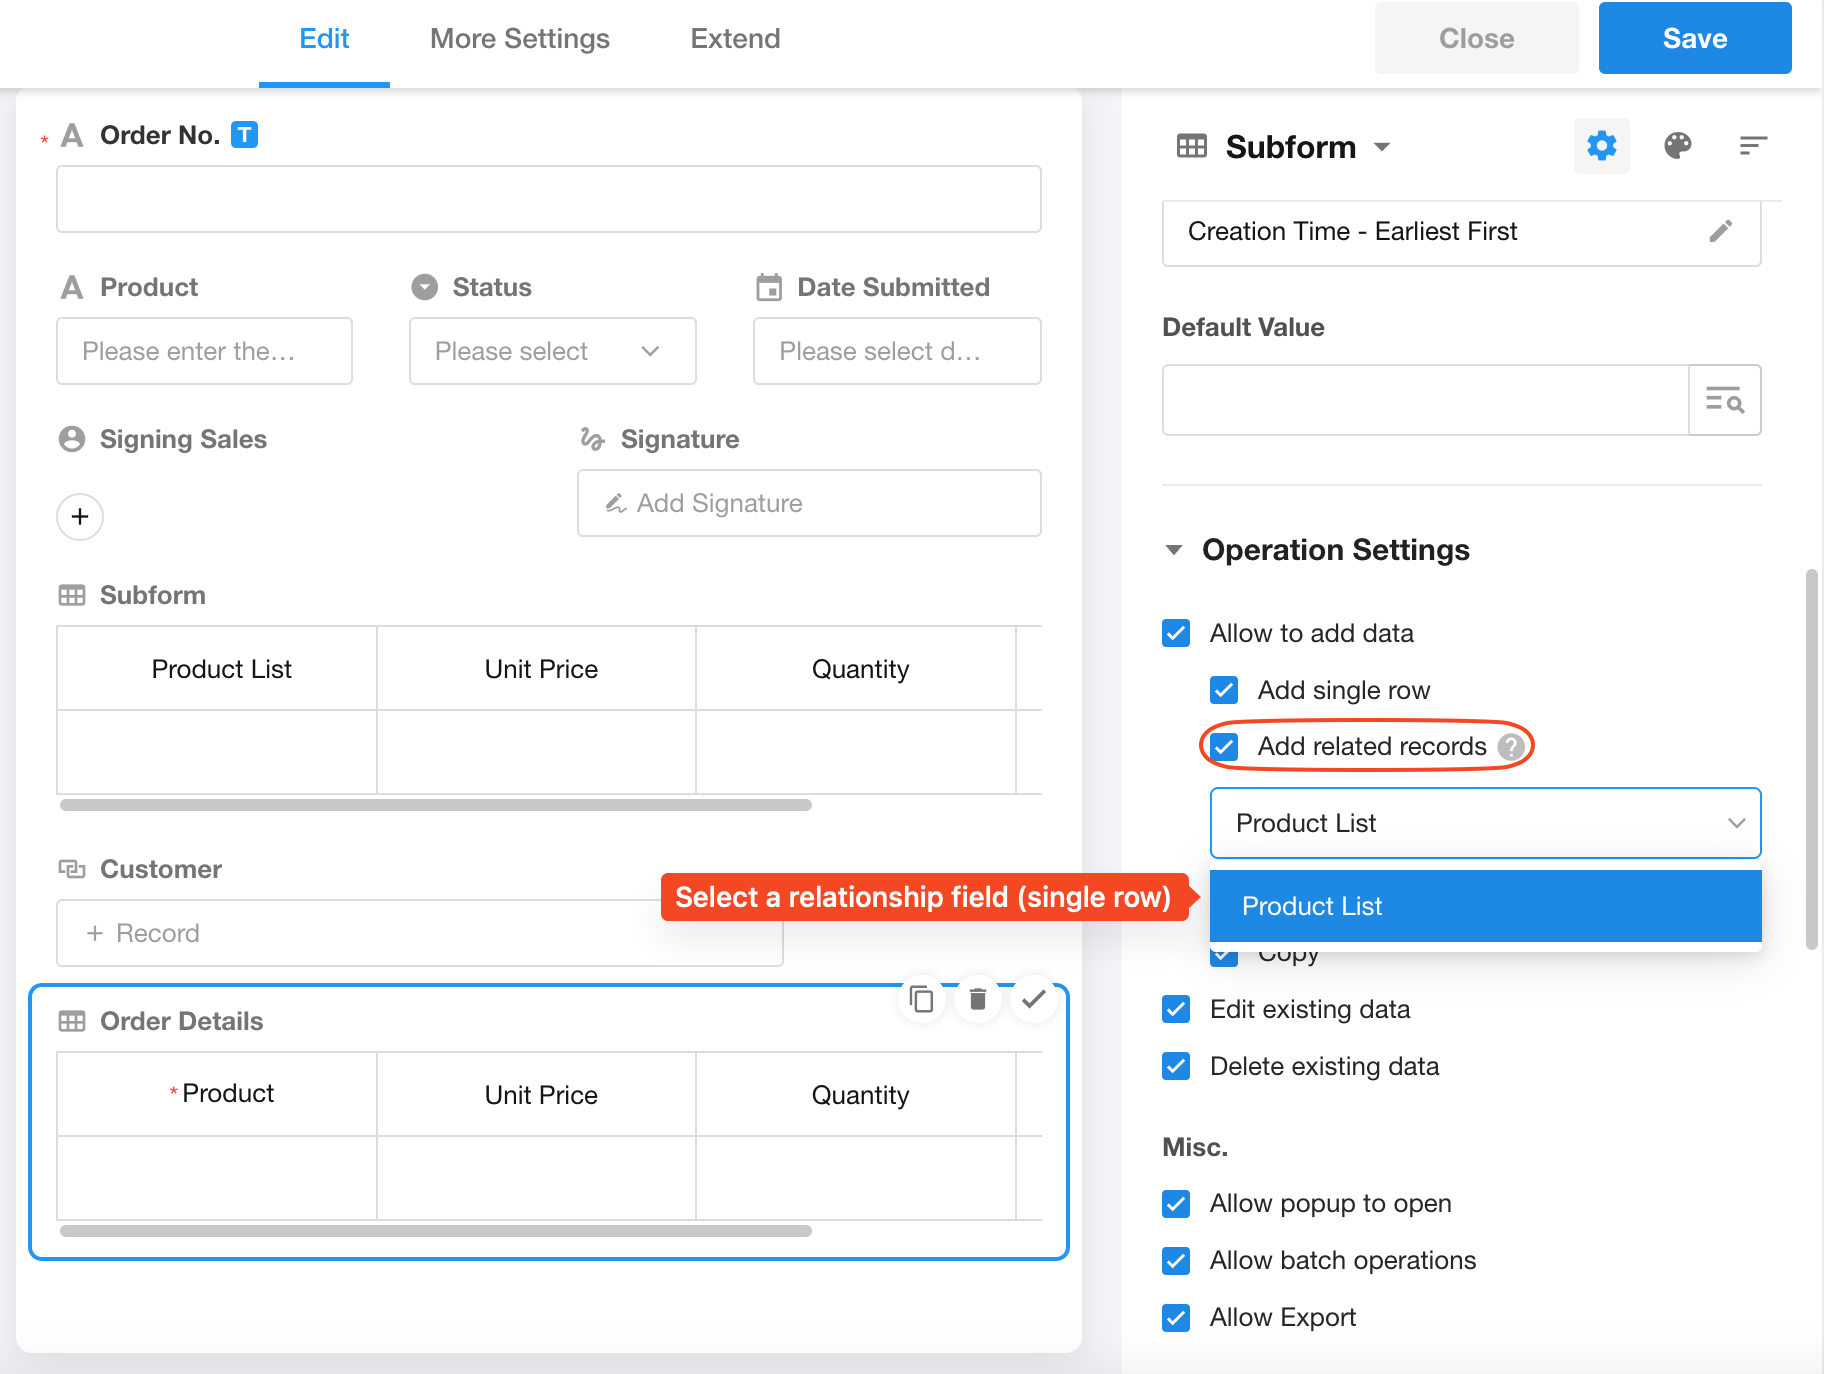
Effect:
The bulk selection button appears as "Select Product" (where "Product" represents the relationship field name).
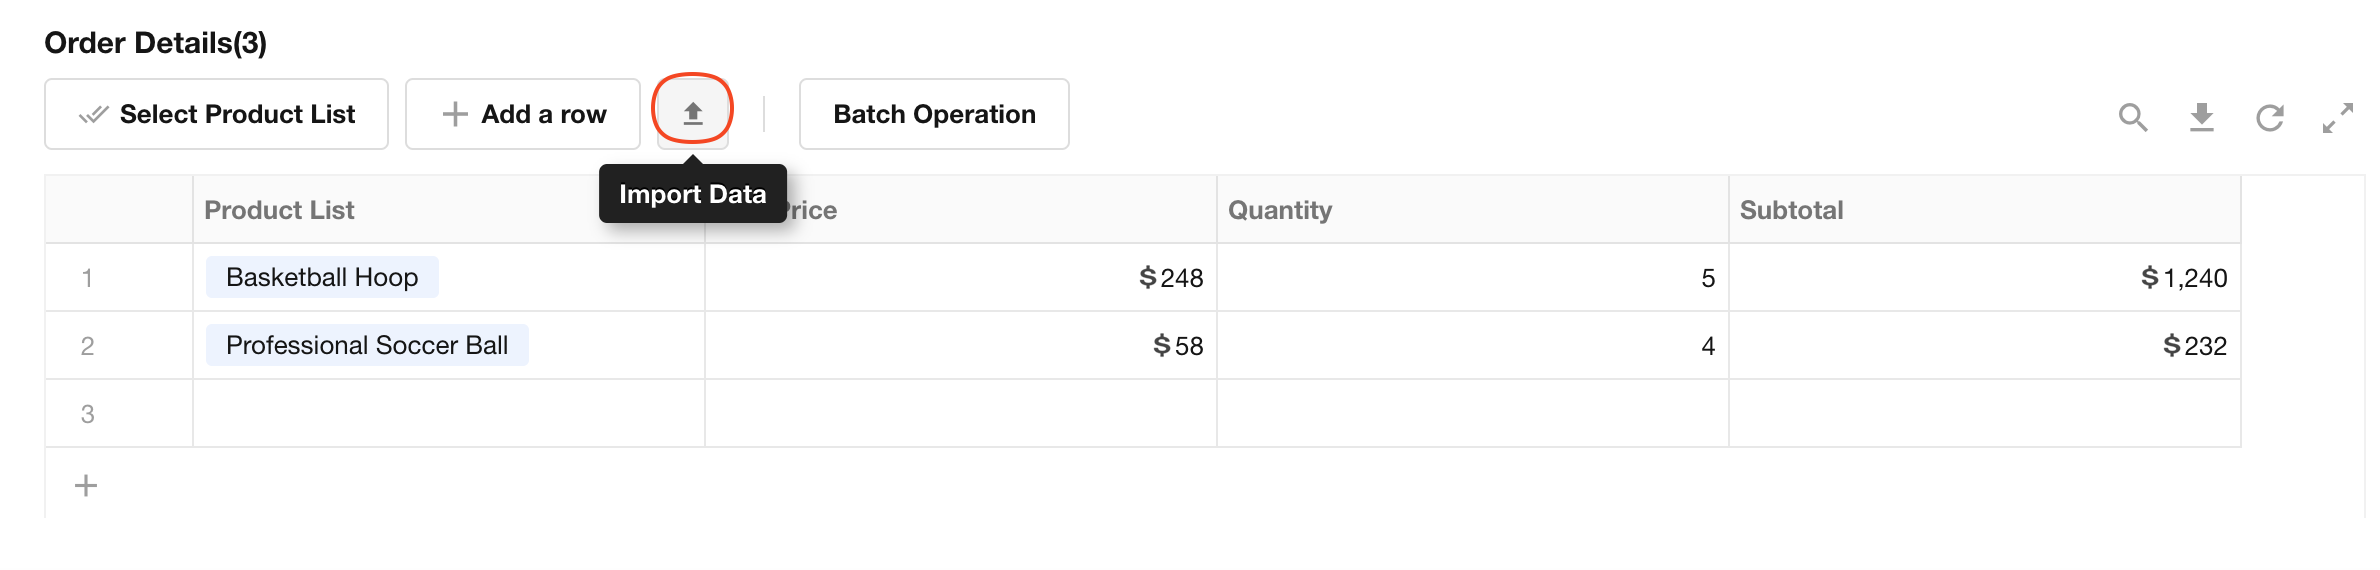
Import data into a subform
There are two methods to import data into subforms:
• Import Excel to subform • Paste plain text and import to subform
-
Import Excel to a subform
Supported file types: *.xls, *.xlsx, *.csv, with a maximum file size of 20MB.
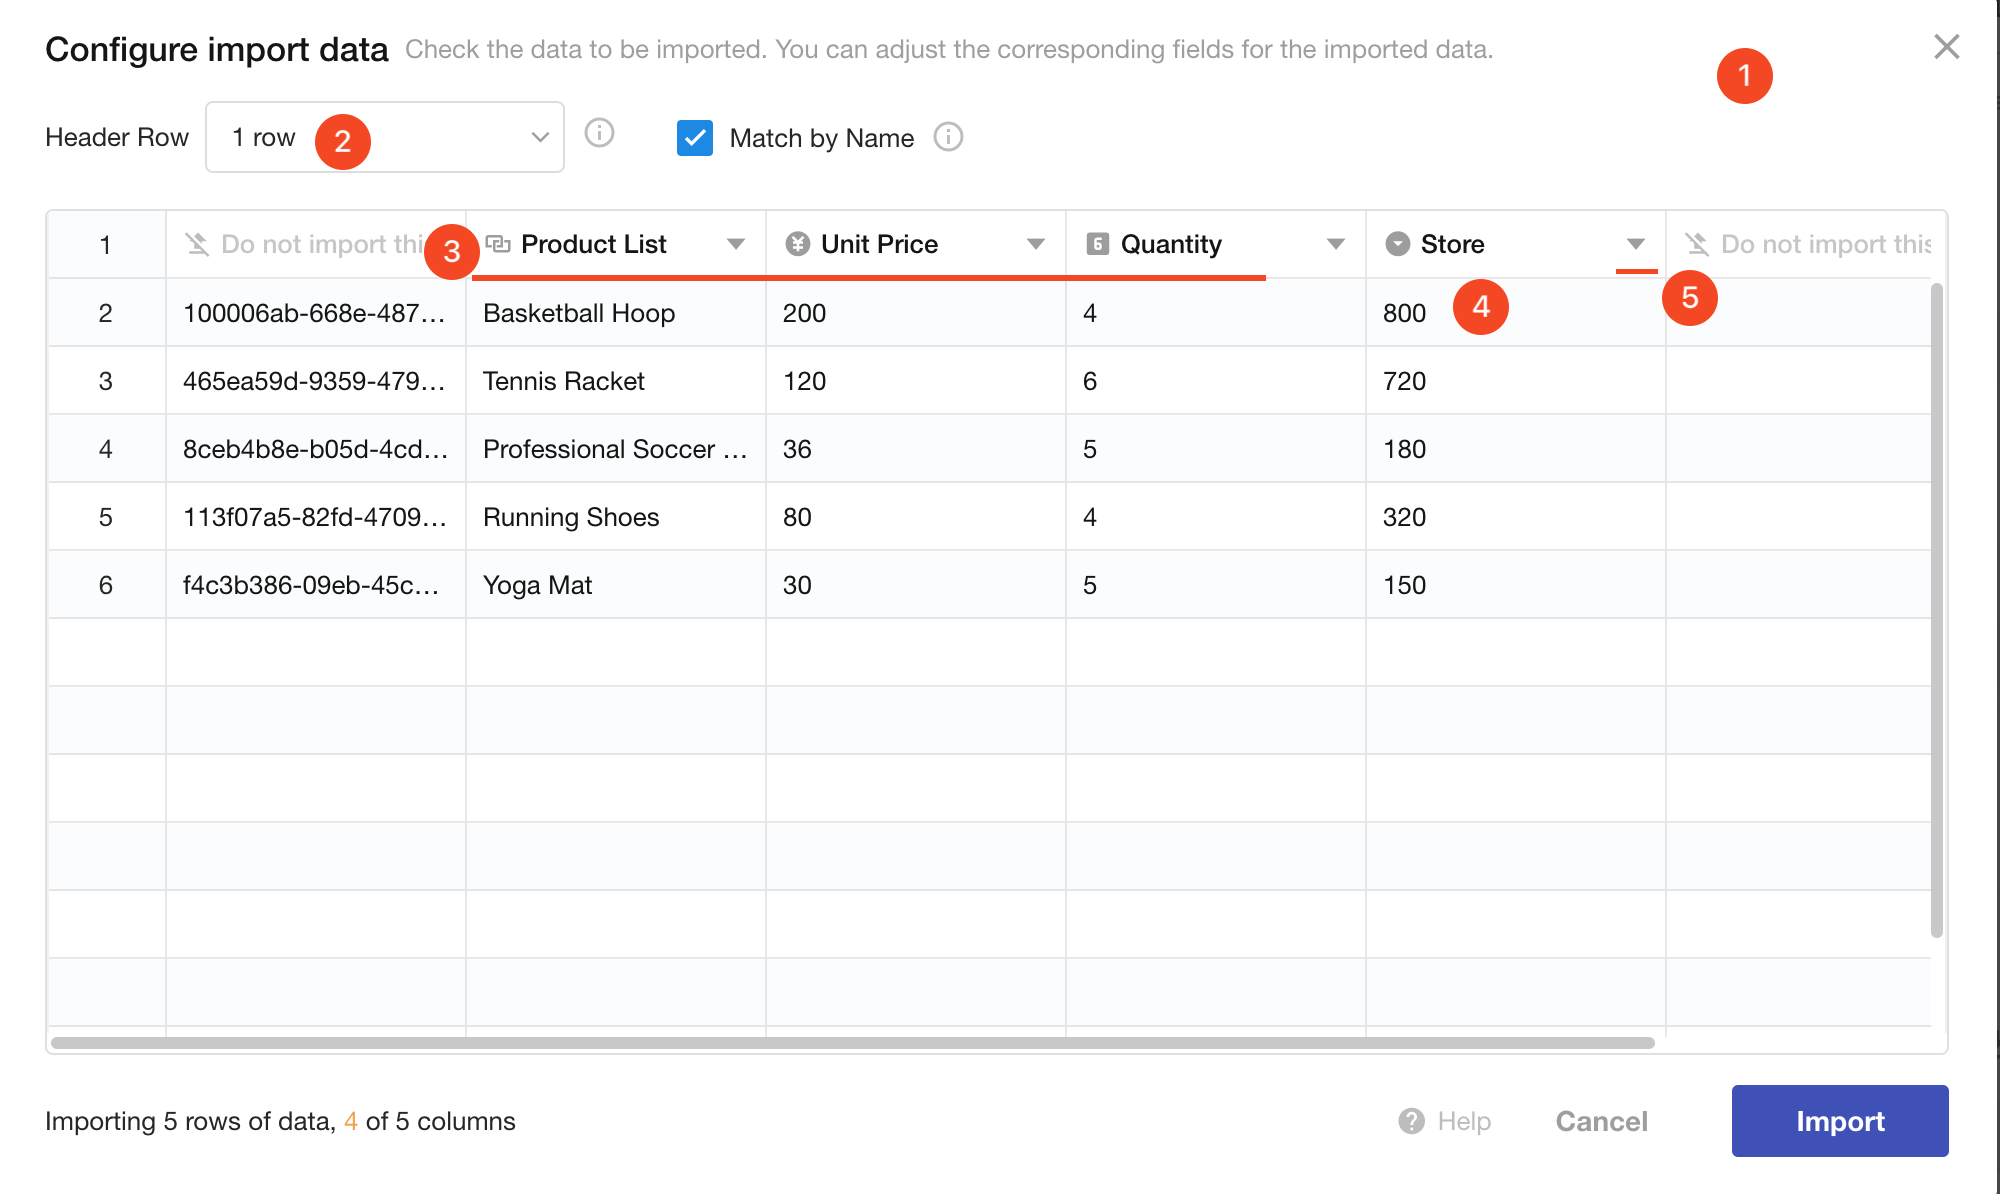
a. When the Excel file contains multiple sheets, the first sheet is selected by default. Users can switch between sheets. This option is not displayed when there's only one sheet.
b. Select which row in the sheet should be treated as the header row. Data below the header row will be imported.
c. The header in the preview area displays field names from the subform, shown in the subform's field order. Fields that cannot accept imported data won't be displayed.
d. Data in the preview area is displayed left-to-right exactly as it appears in Excel columns, without automatic field matching.
e. For each Excel column, click the button as shown in te picture to choose which subform field should receive that column's data. To exclude a column, select "Do not import this column".
-
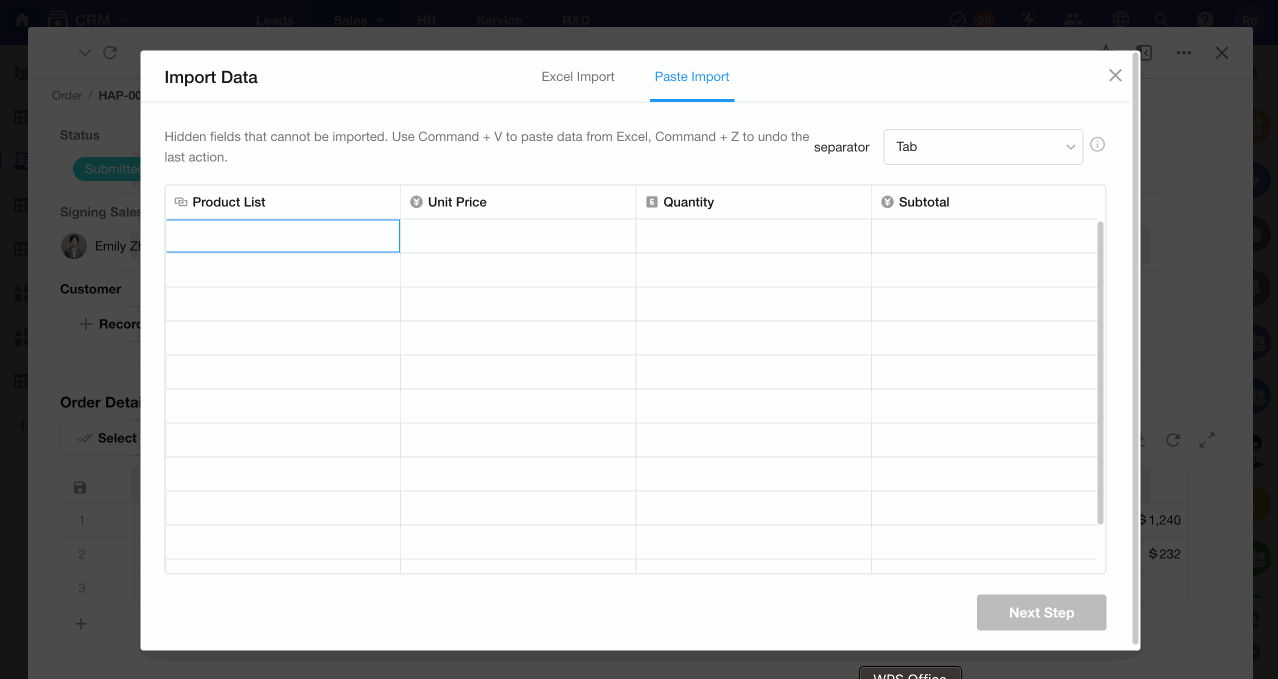
Paste plain text and import to subform
Paste copied data directly into the editing area, where it can be further modified before importing.
- Use shortcut Ctrl+V (Command+V) to paste data.
- Data fills fields sequentially from left to right, skipping non-importable columns.
- Data failing format validation will be discarded.
- Field contents are seperated using seperators.
- Users can switch between different seperators (colon, vertical line, comma, space).
When subform fields have default values set, imported data takes precedence and will not be overwritten by default values during import.
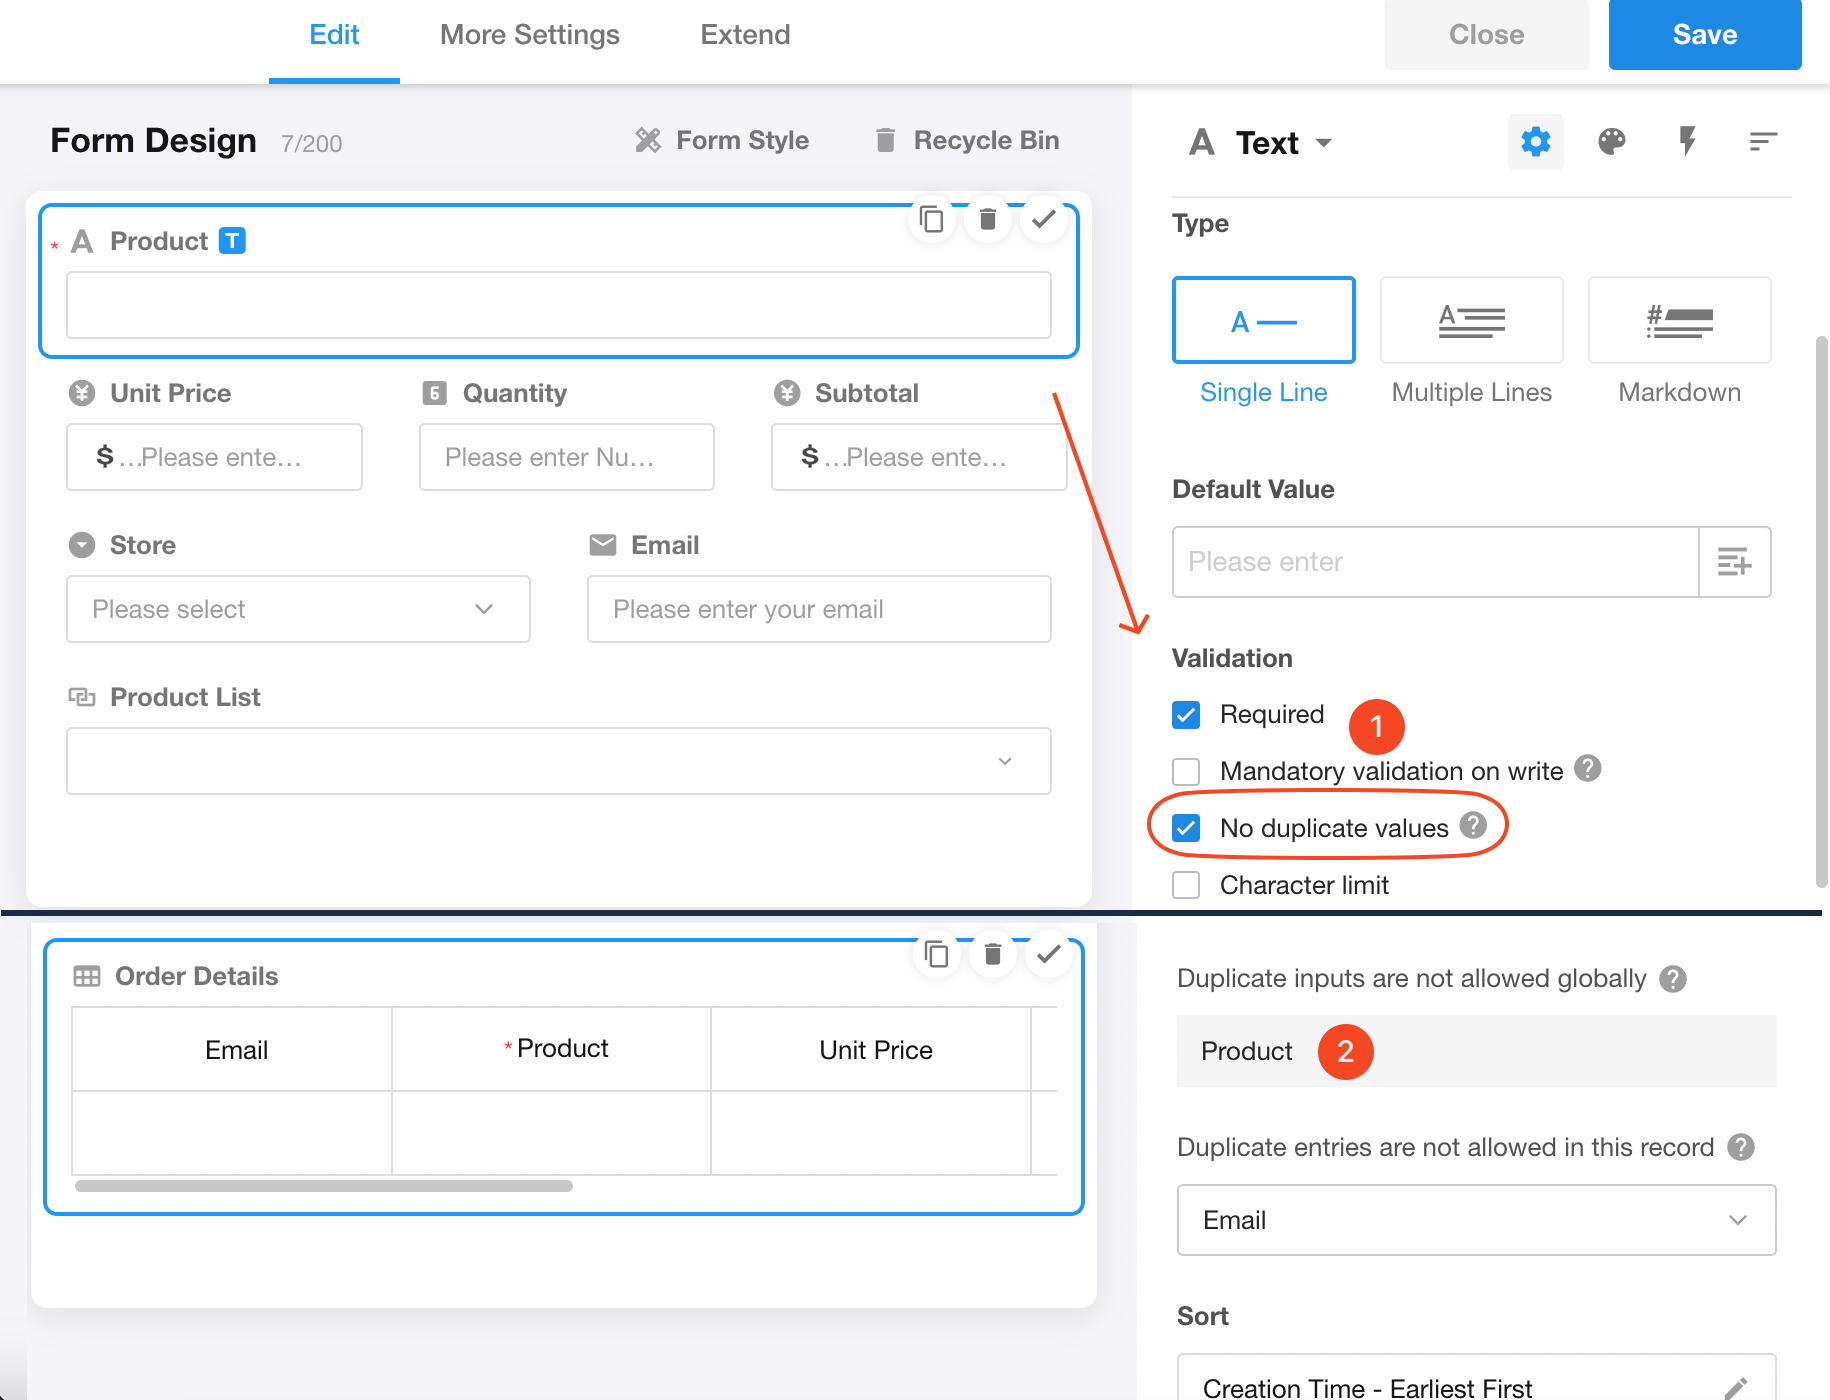
No duplicate data in subforms
When adding data to subforms, there are two levels of duplicate data validation:
-
Duplicate inputs are not allowed globally
Available for subforms with physical worksheets. If the referenced worksheet has fields configured with "No duplicate values", the system will check all records in the main worksheet for duplicates when adding data to the subform.
-
Duplicate inputs are not allowed in this record
Only check for duplicates within the current record's subform. Example: In an order record, a product details can only be added once to the subform.
Duplicate inputs are not allowed in this record
Select and enable the fields where duplicates are not allowed.
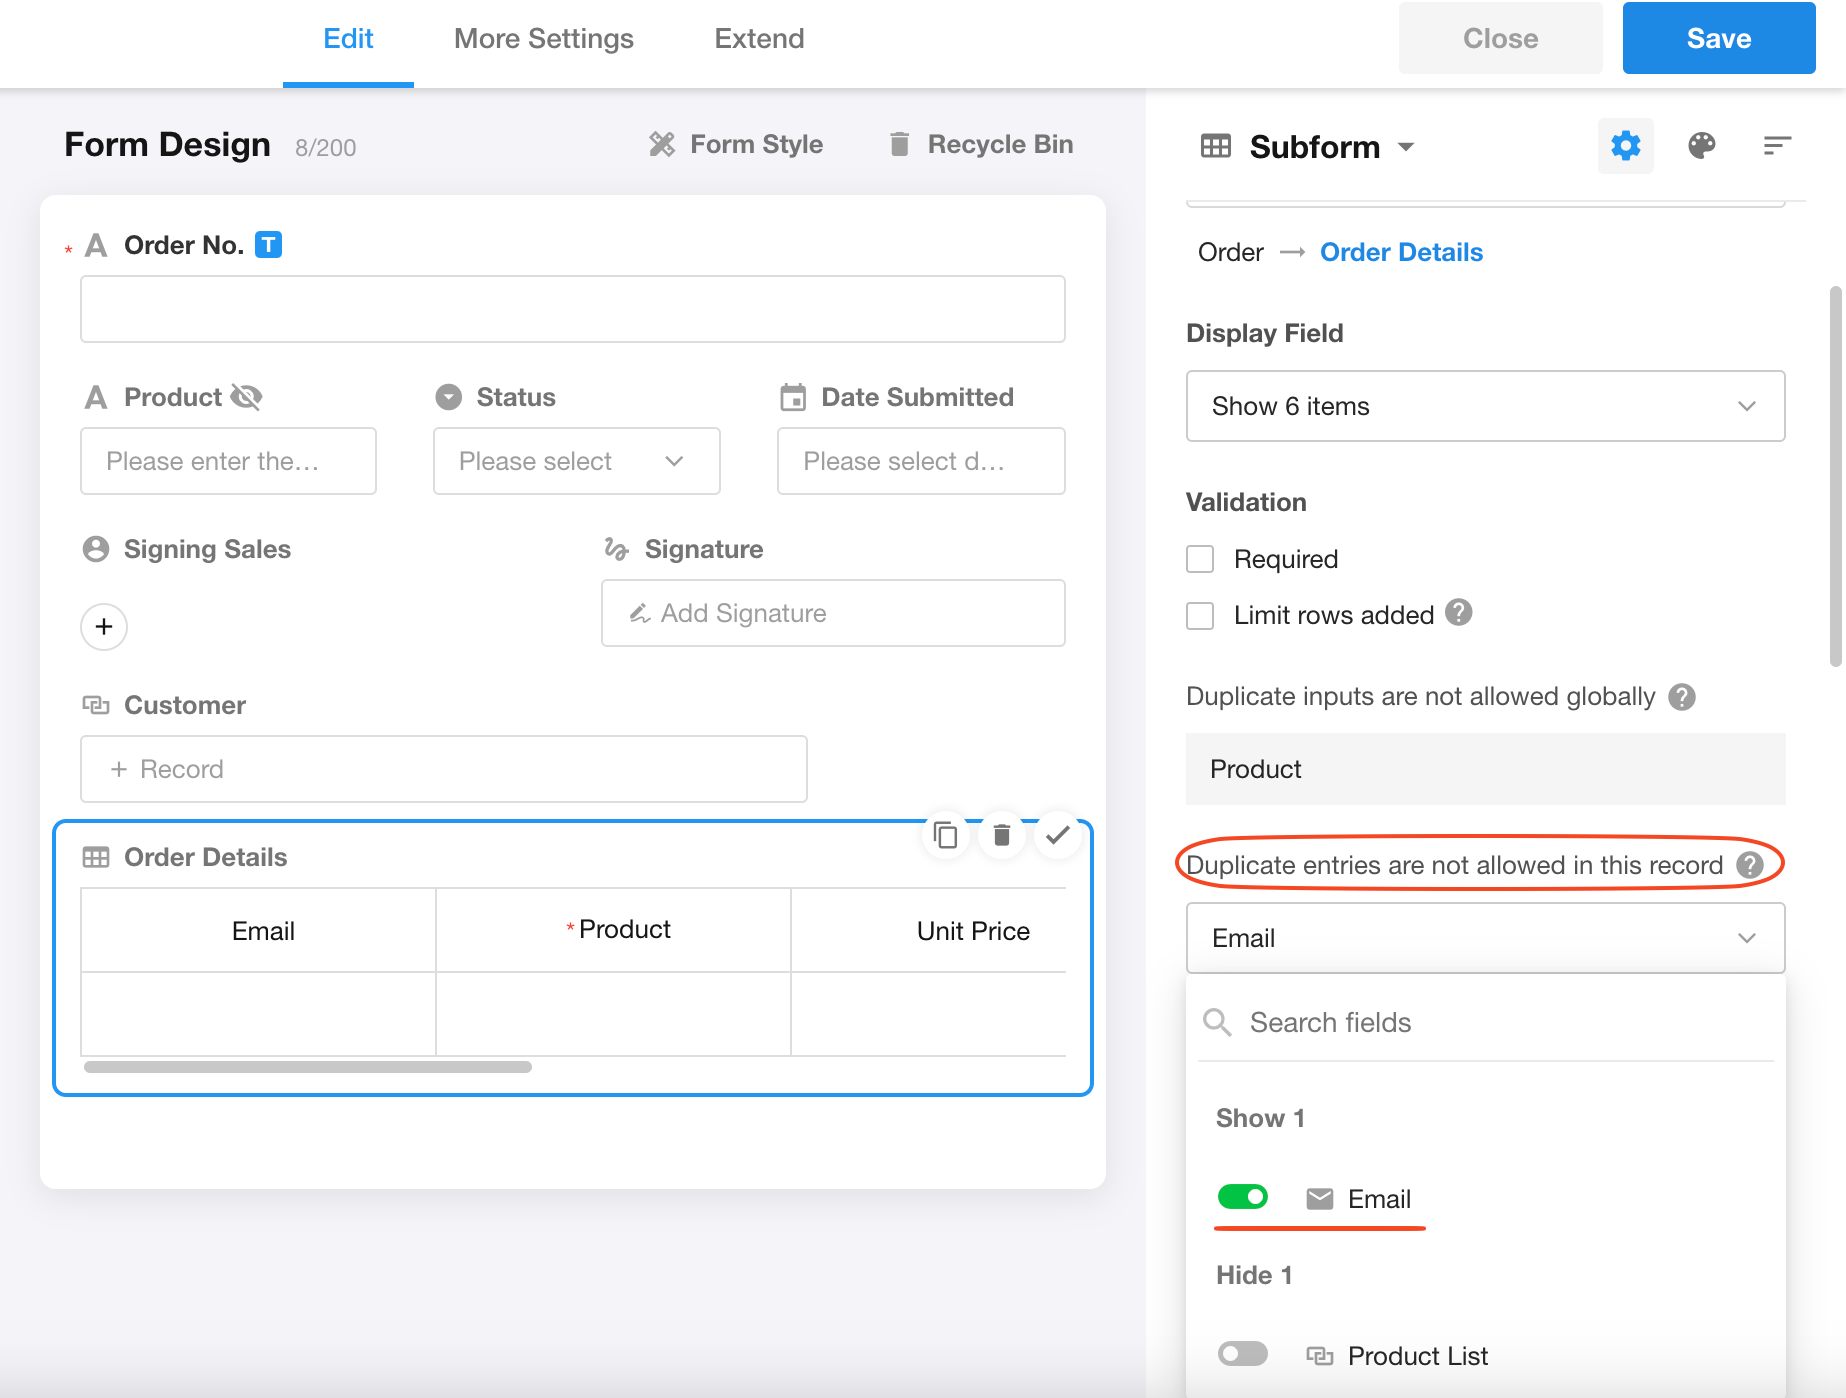
The system only checks for duplicate field values within the current record's subform. If duplicates exist, the data cannot be saved. Duplicates in other records' subforms don't affect the current operation.
Duplicate inputs are not allowed globally
To enable global duplicate prevention:
- Go to the physical worksheet referenced by the subform.
- Set the target field to "No duplicate values".
- The current worksheet's edit page will indicate which fields have duplicate prevention enabled.
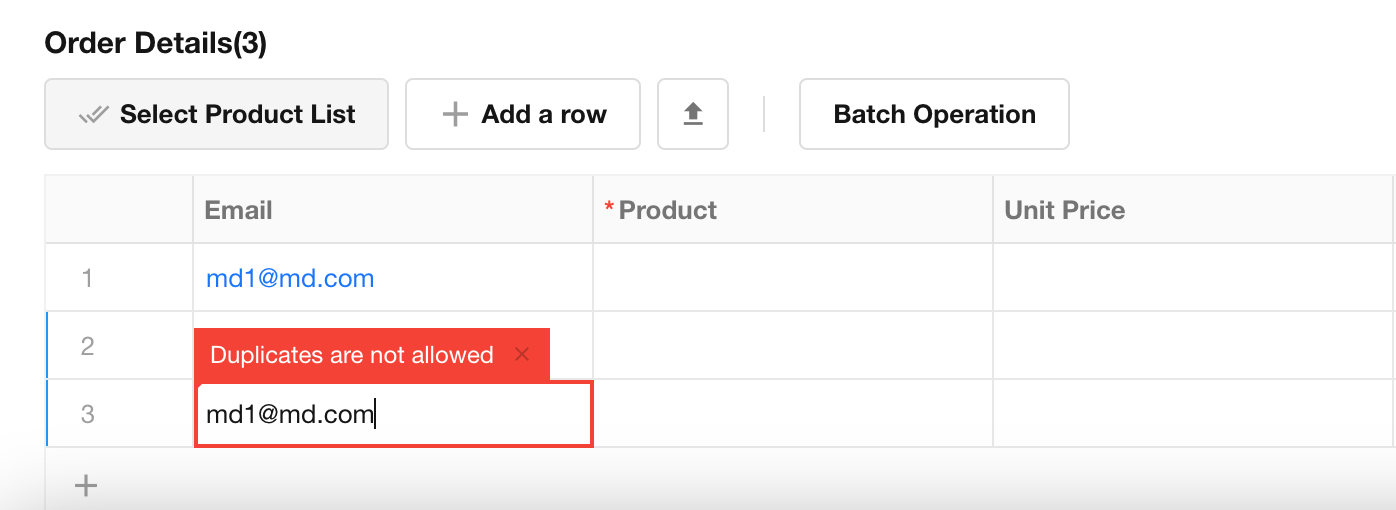
As shown below, the system immediately flags duplicate data (after adding just one row), indicating the email already exists in the main worksheet.
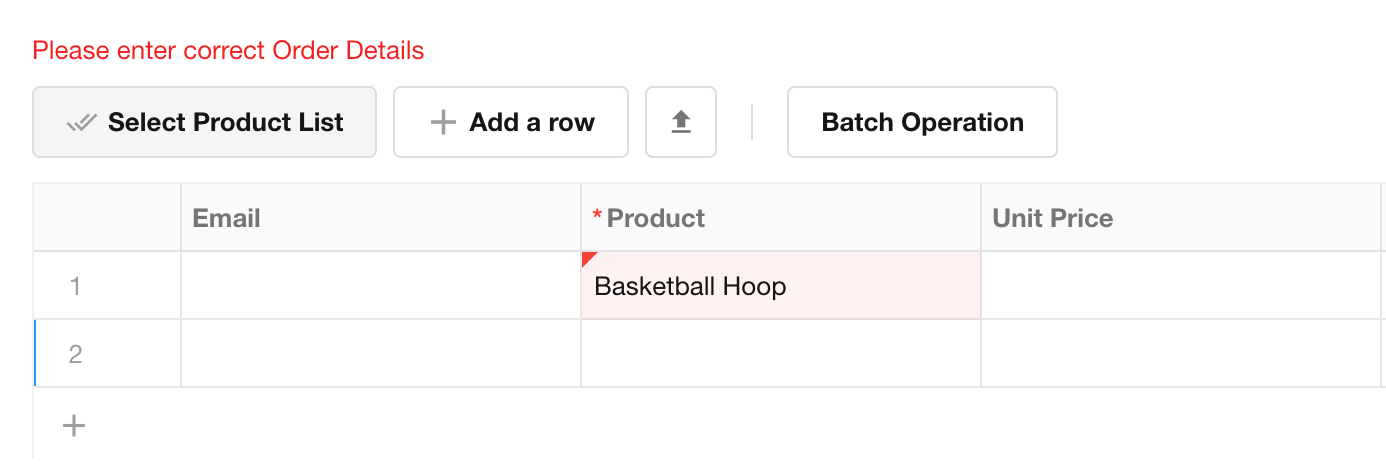
Relationship fields in subforms with duplicate prevention
When the duplicate-prevention field in a subform is a relationship field, the related records won't be dispalyed in the selection list when adding new data.
Example: If "Basketball Hoop" is already selected in the subform, it won't be displayed in the list when adding another row to the subform.

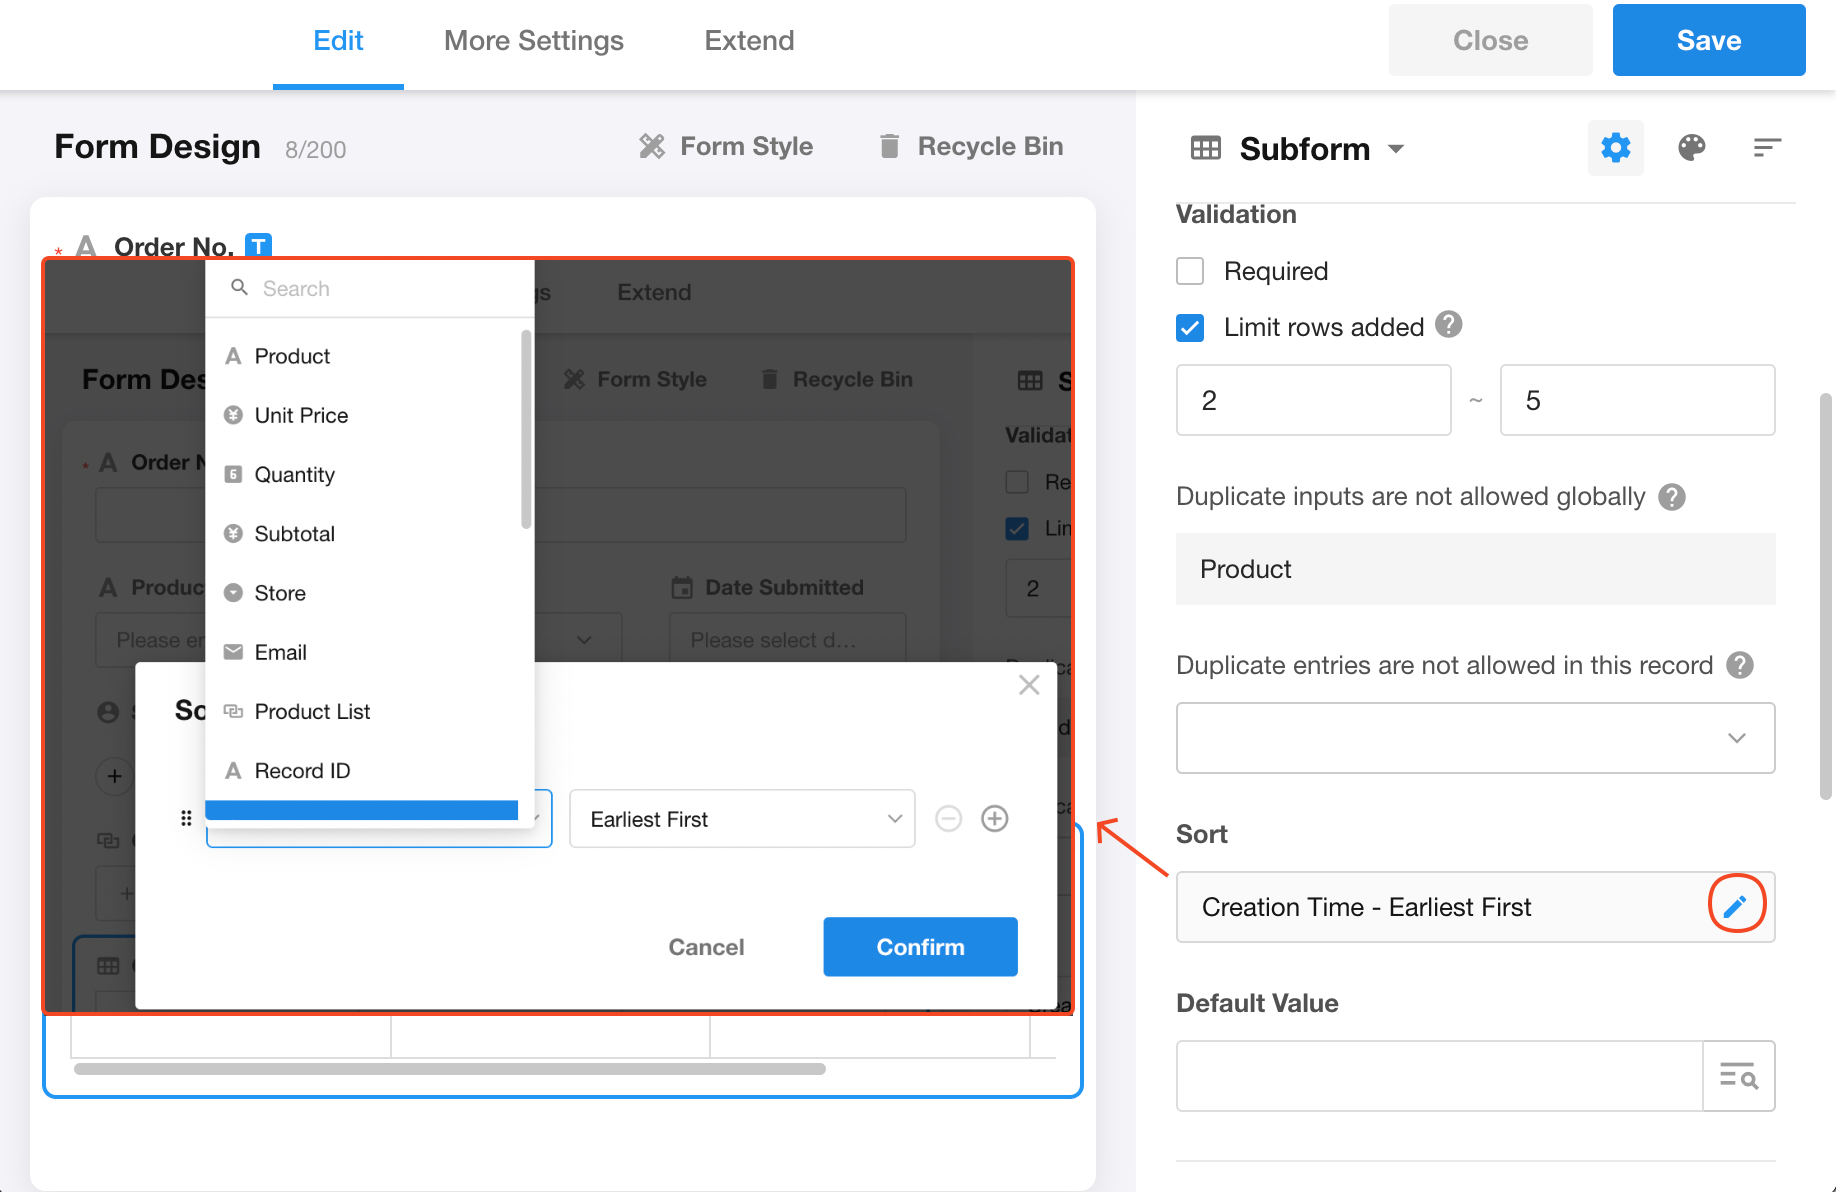
6. Limit rows in a subform
A subform supports a maximum of 1000 rows of data, but you can set specific limits on the number of rows.
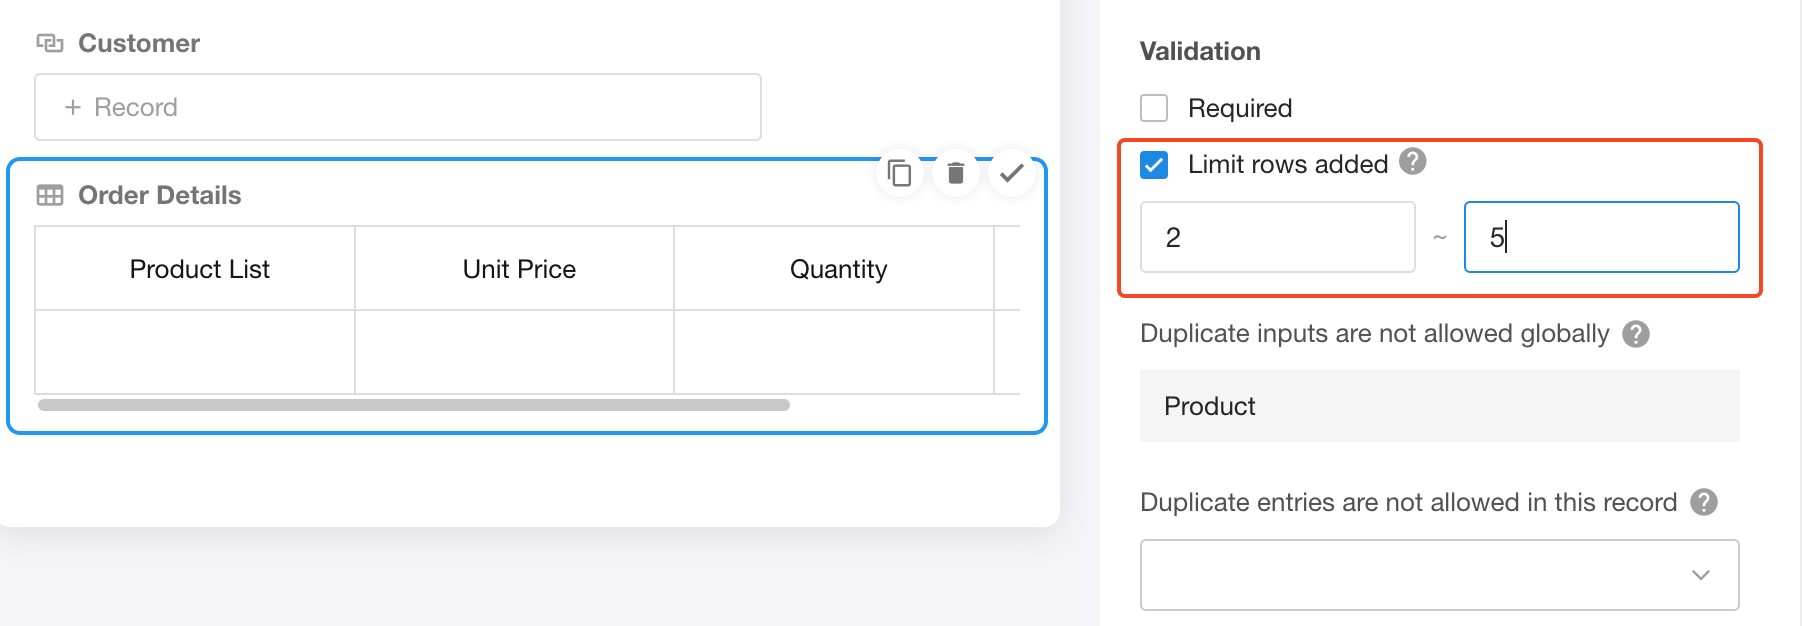
As shown above, the subform is set between 2-5 rows. When adding or deleting subform data, the row count must remain within this range to save successfully. If there are fewer than 2 rows, the system will prompt that at least 2 rows are required. When there are 5 rows, the "Add a row" button becomes unavailable.
To fix the subform at exactly N rows, simply set both the minimum and maximum values to N.
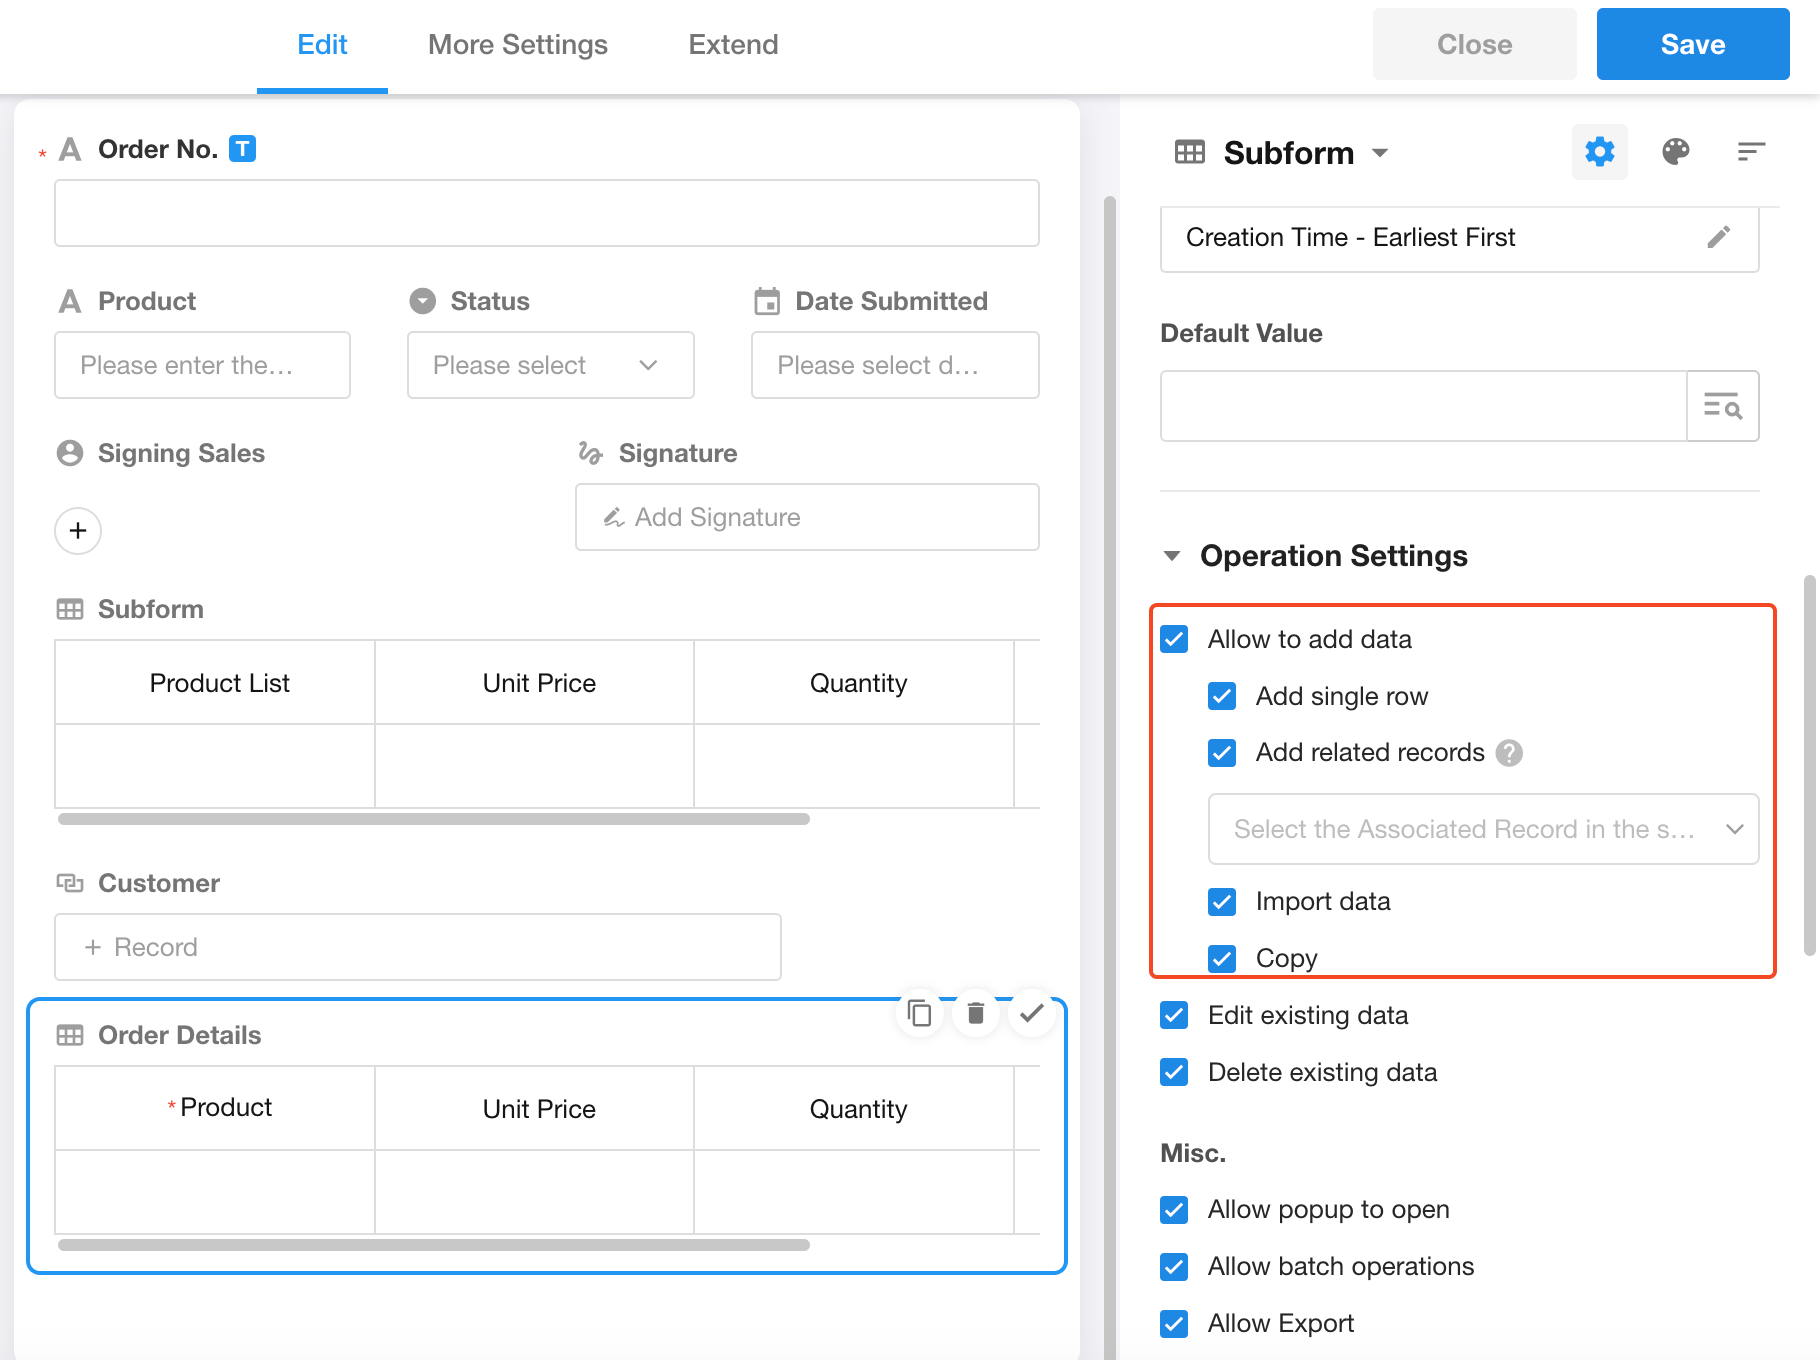
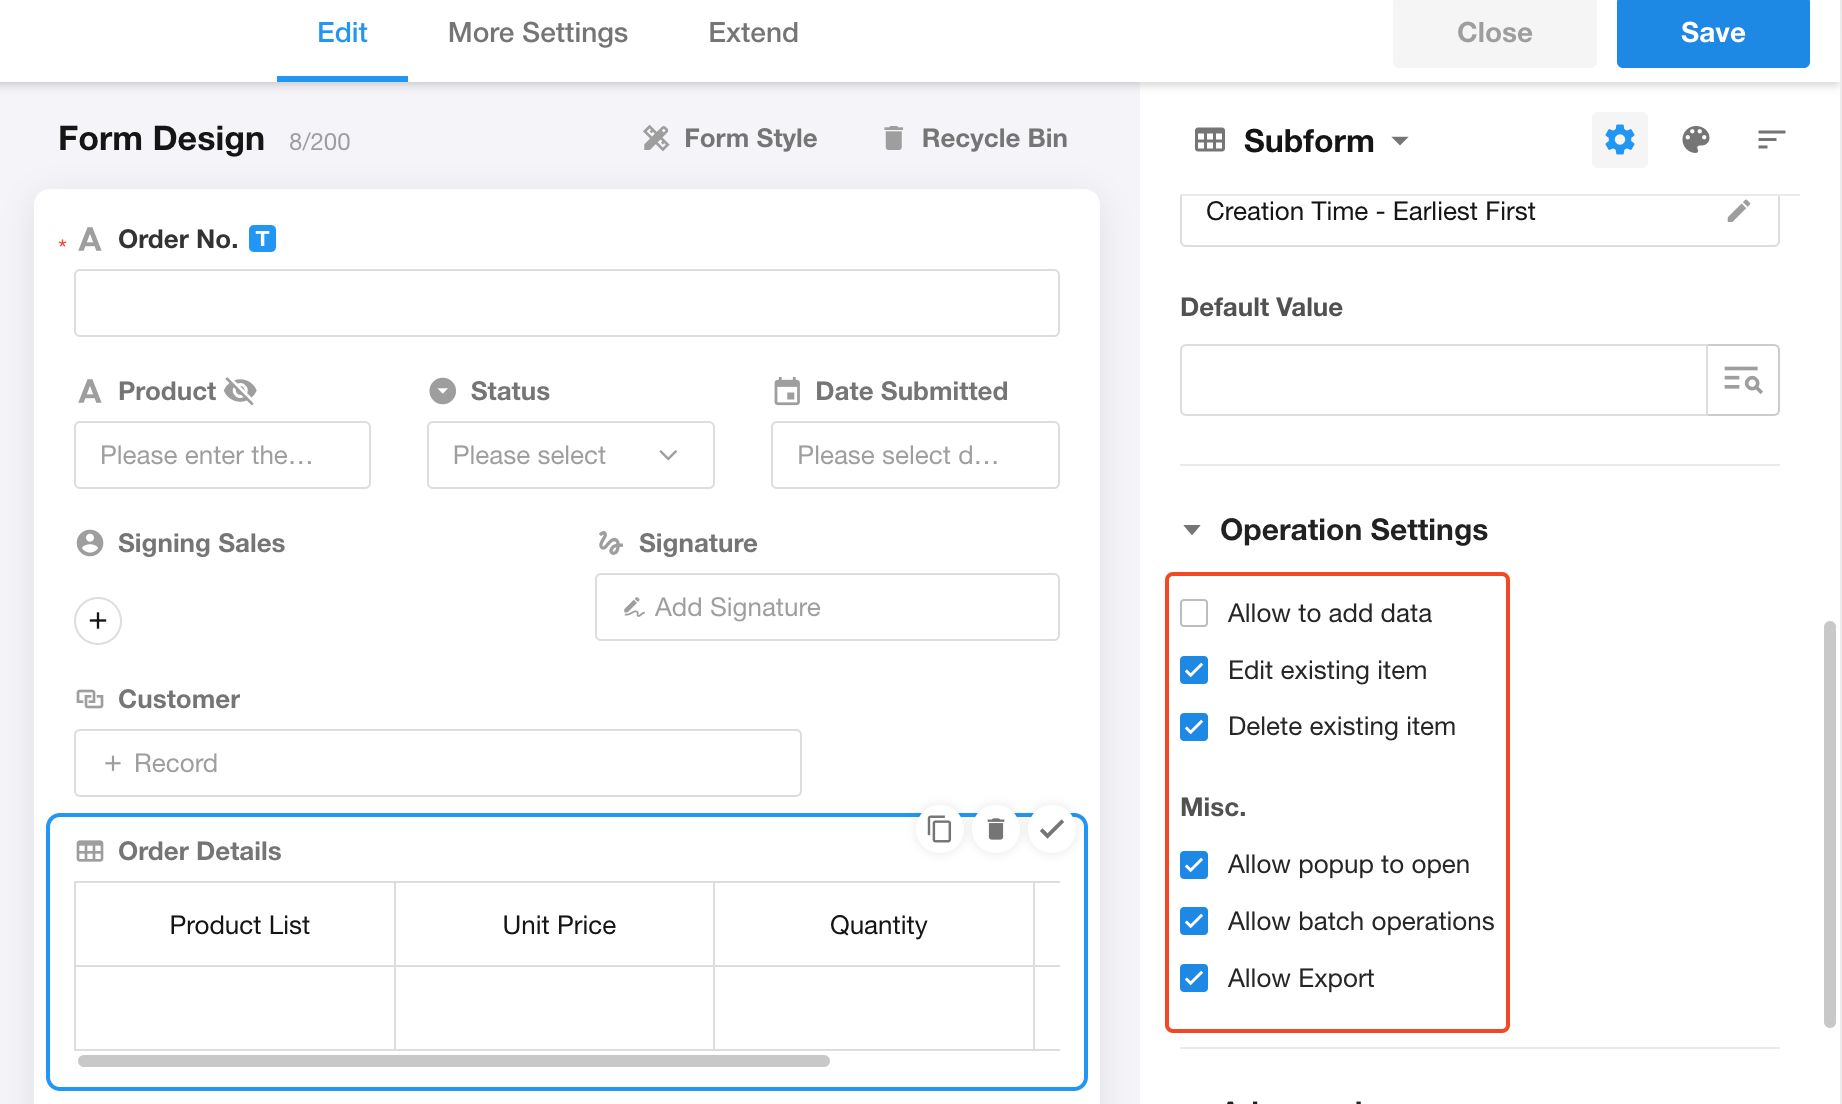
7. Add/Delete/Edit/Export subform data
-
Allow adding data
If unchecked, users cannot manually add data to the subform. If checked, users can add data row by row or in bulk. See details
-
Edit existing data
If unchecked, users cannot activate subform fields to edit data after it has been added.
-
Delete existing data
If unchecked, there will be no Delete button for previously saved data (newly added data can still be deleted before saving).

-
Allow popup to open
If checked, clicking the Expand button will display subform data in a pop-up window.
-
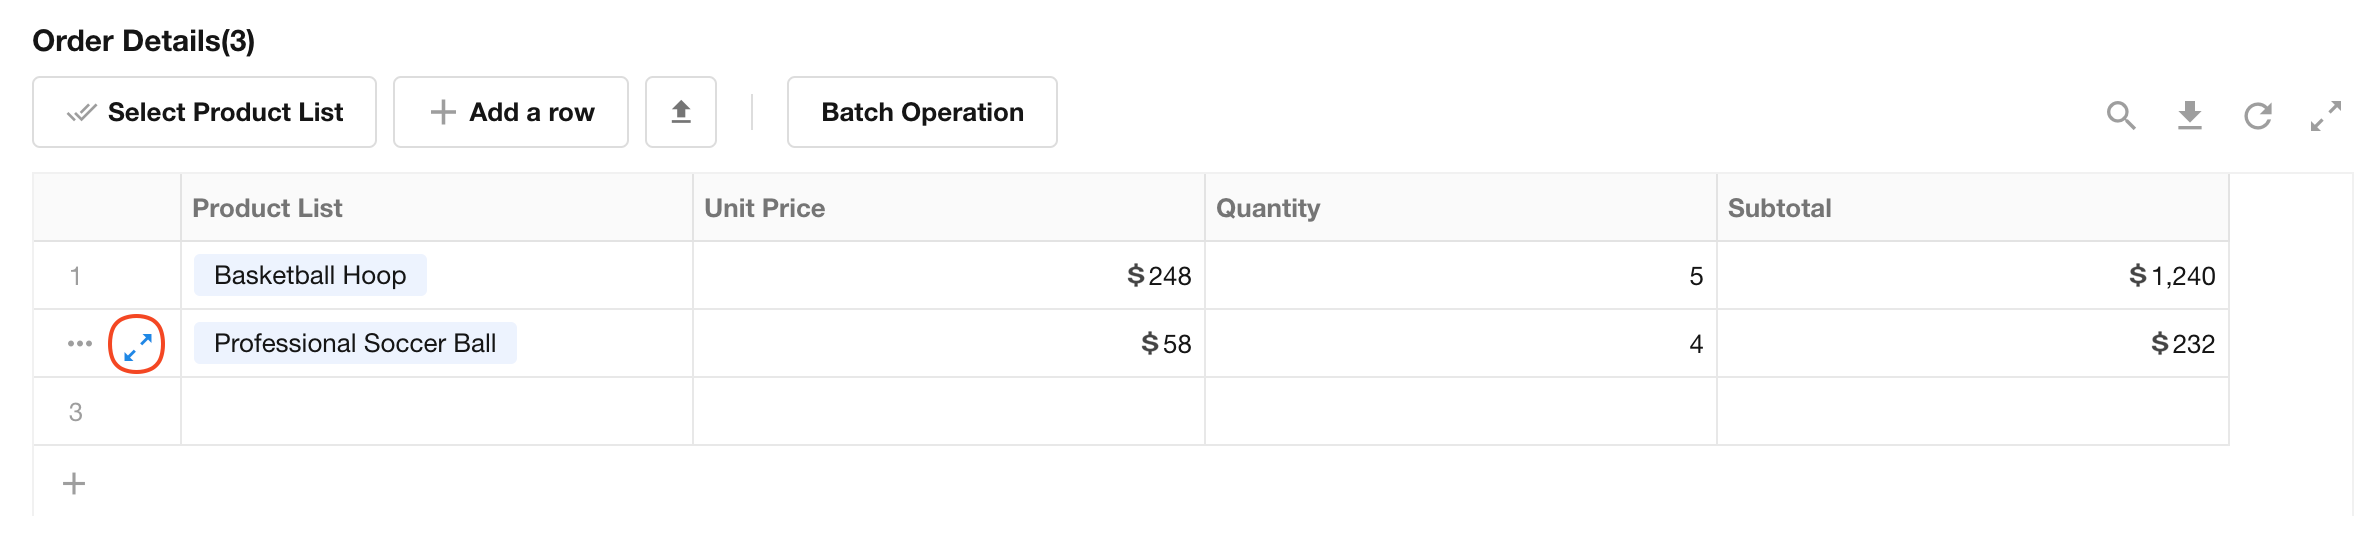
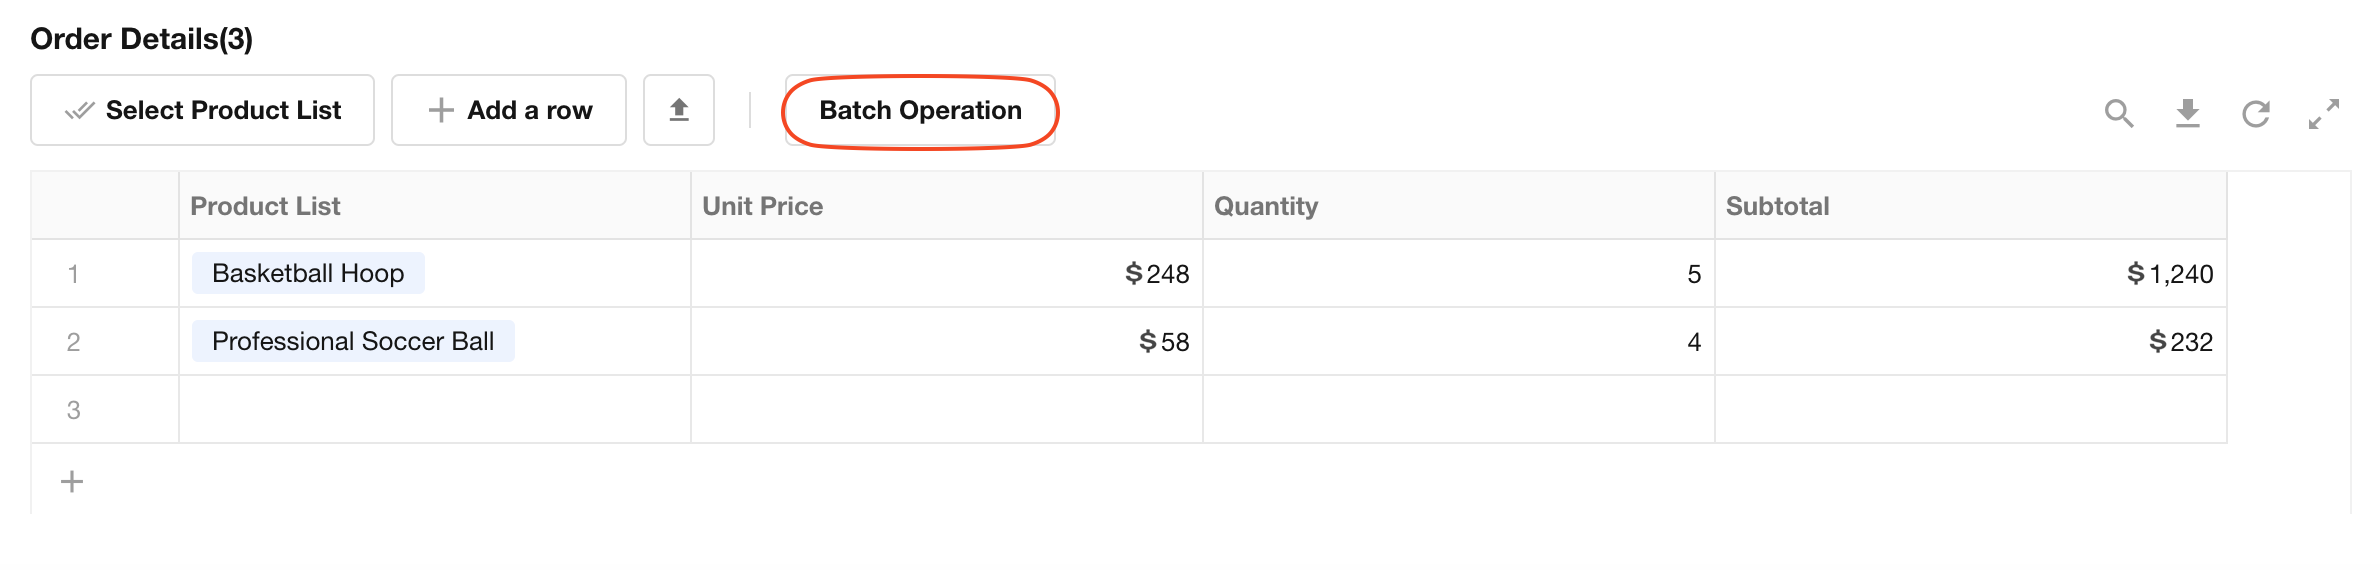
Allow batch operations
If checked, users can click the "Batch Operations" button to select multiple rows for batch editing, deletion, or copying. When unchecked, the "Batch Operations" button will be hidden.
-
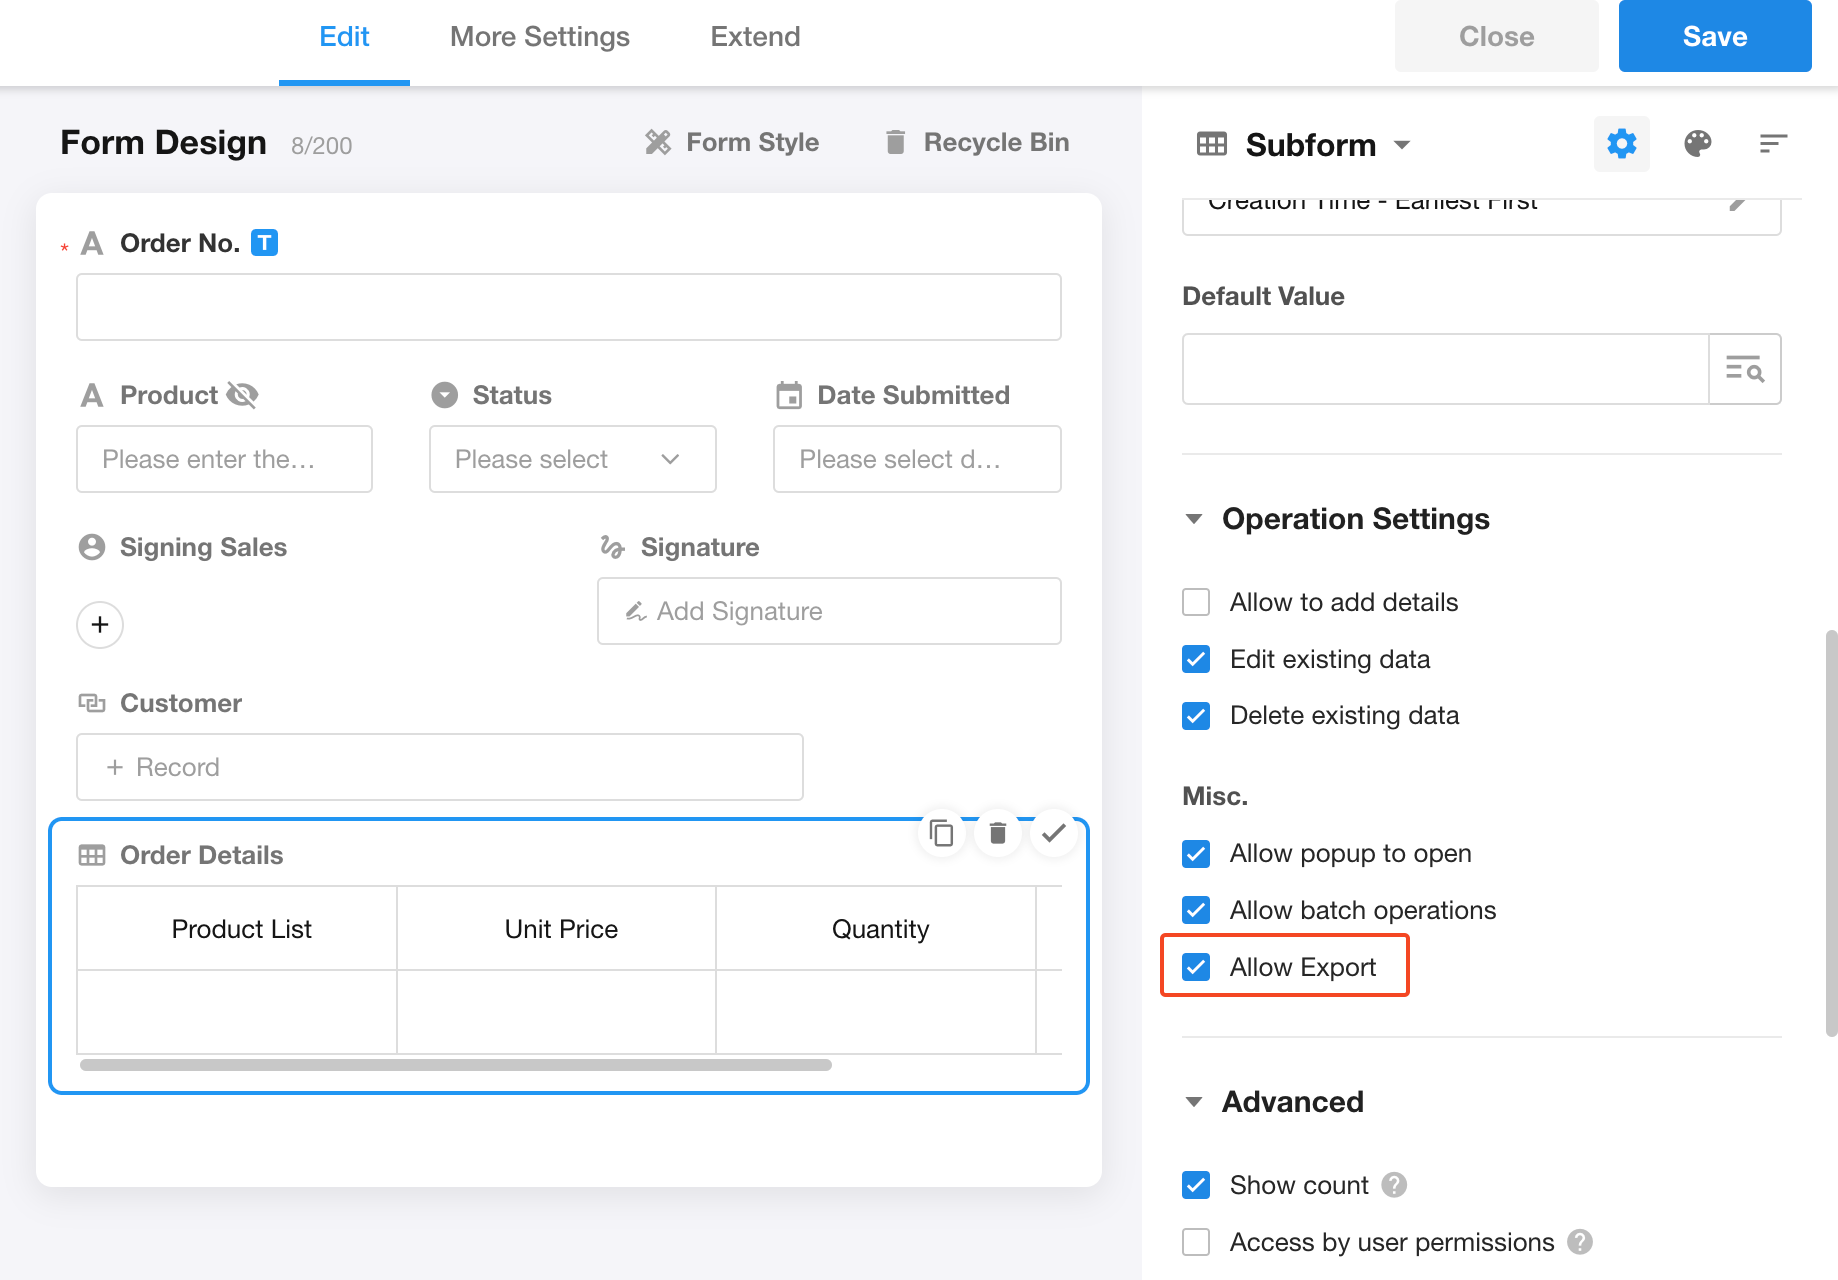
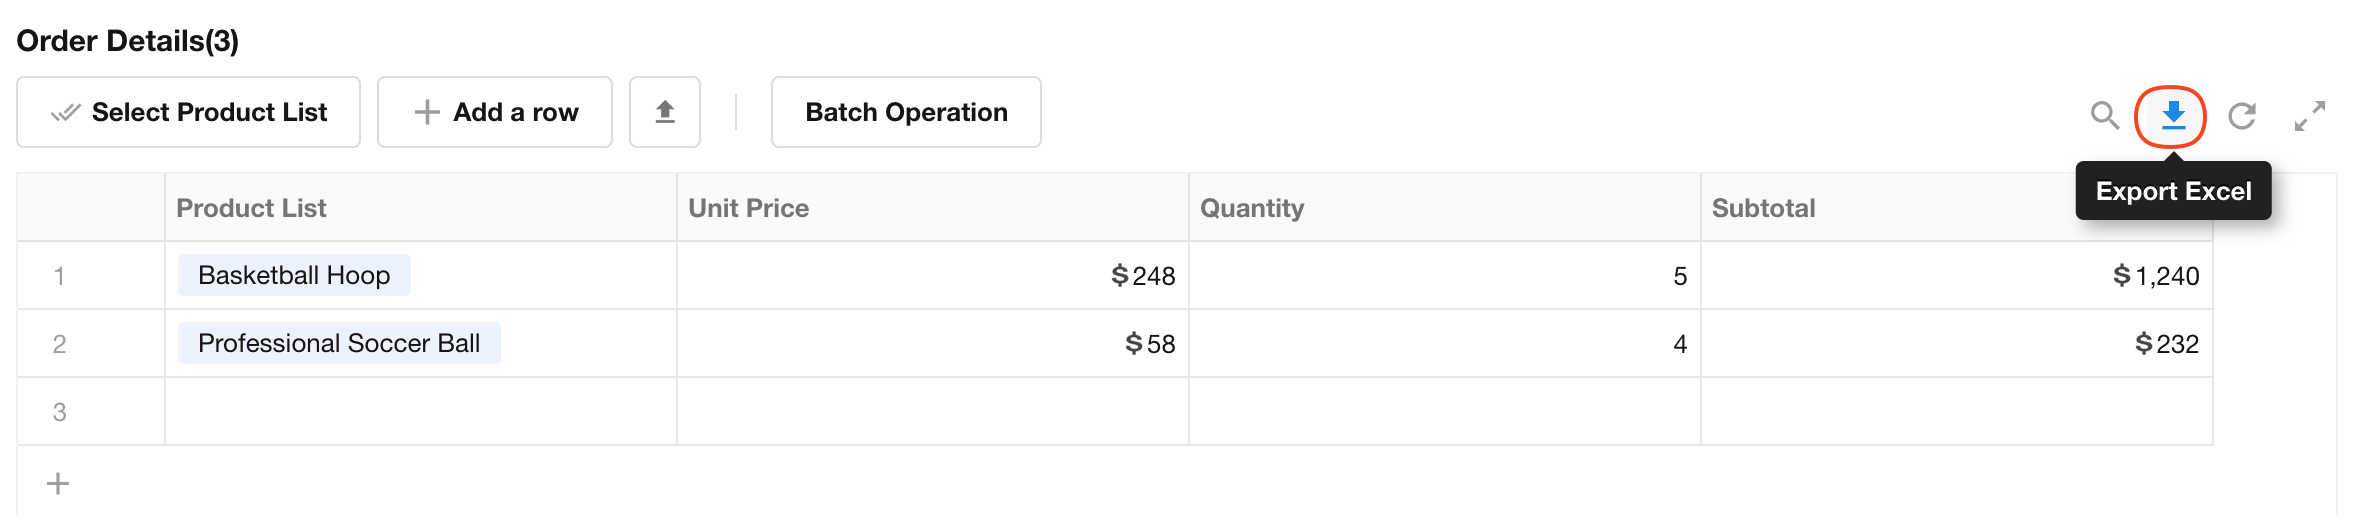
Export subform data
When "Allow Export" is checked, users can export subform data from the record page.
Export button:
Notes on Subform Data
-
When a parent record is deleted, all associated subform records are deleted as well.
-
Subform records cannot be printed, shared, or converted into tasks independently.
-
Filtering in Subforms
- Filtering is not supported when a subform is displayed as a tree table.
- Filtering is not available while editing subform records.
- When editing a subform, newly added records are excluded from the current filter by default. New rows are temporarily displayed at the top of the current list.
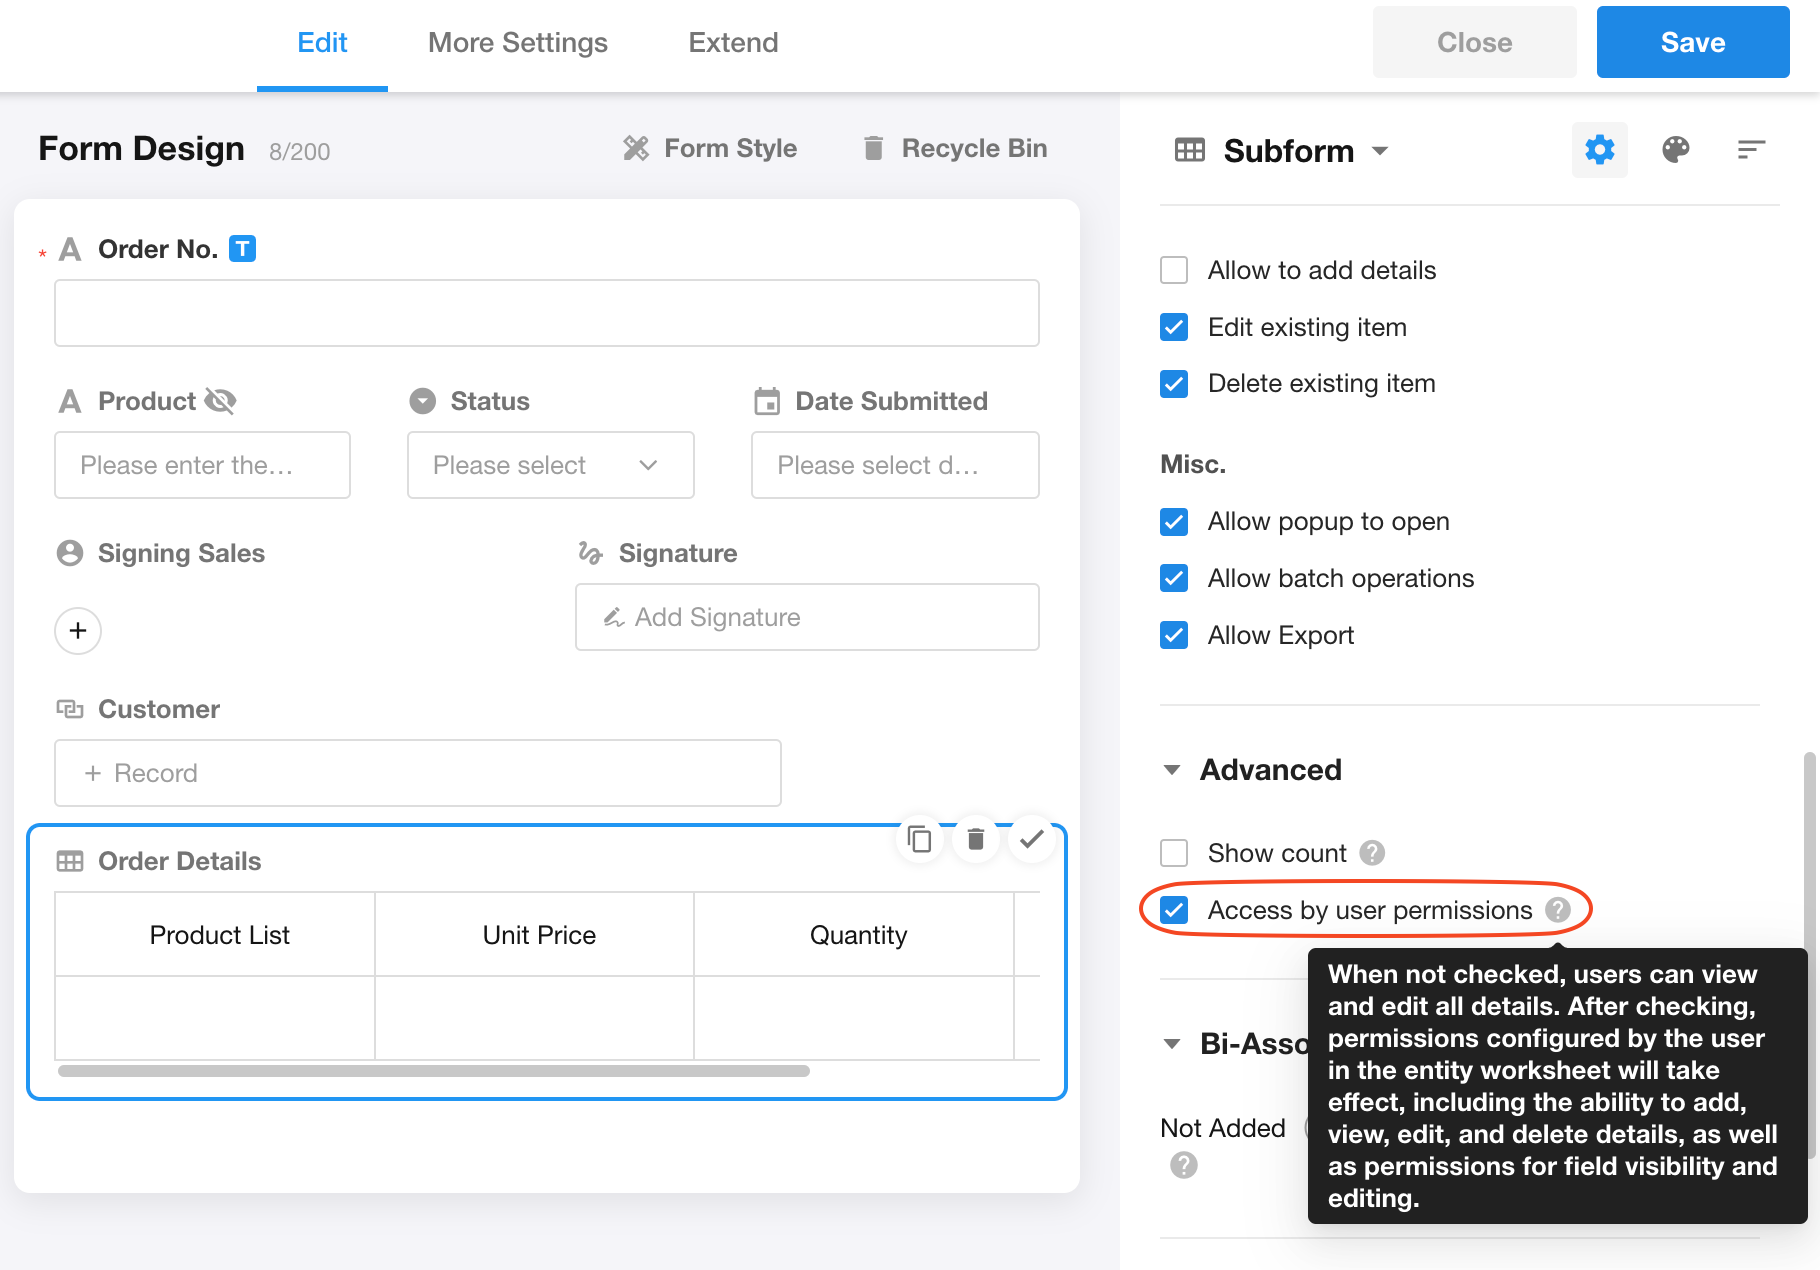
8. Access subform data by user permissions
For subforms that reference physical worksheets, checking the "Access by user permissions" option will enforce the user's role-based permissions from the referenced worksheet when editing subform data.
When enabled, user permissions for subform data follow their permissions in the referenced worksheet:
-
Record-level permissions:
- View (Records the user has no permission to view will be hidden)
- Edit (Records the user cannot edit will be read-only)
- Delete (Delete buttons will be hidden for records the user cannot delete, including both single-record and bulk-delete options)
-
Field-level permissions:
- View (Columns containing fields the user cannot view will be hidden)
- Edit (Fields the user cannot edit will be read-only)
-
Add new records: If the user has no permissions to add records, all "Add new record" buttons will be hidden (including options to add single records, import data, or add records via relationship fields).
9. When the subform is read-only
If checked read-only, all fields in the subform become non-editable. To configure specific fields individually, adjust their settings in the Subform field's detailed configuration.

10. Sort subform data
Subform data supports custom sorting rules (applied only when viewing existing records). Newly added rows always appear at the bottom initially, but will be reordered according to the sorting rules after saving.
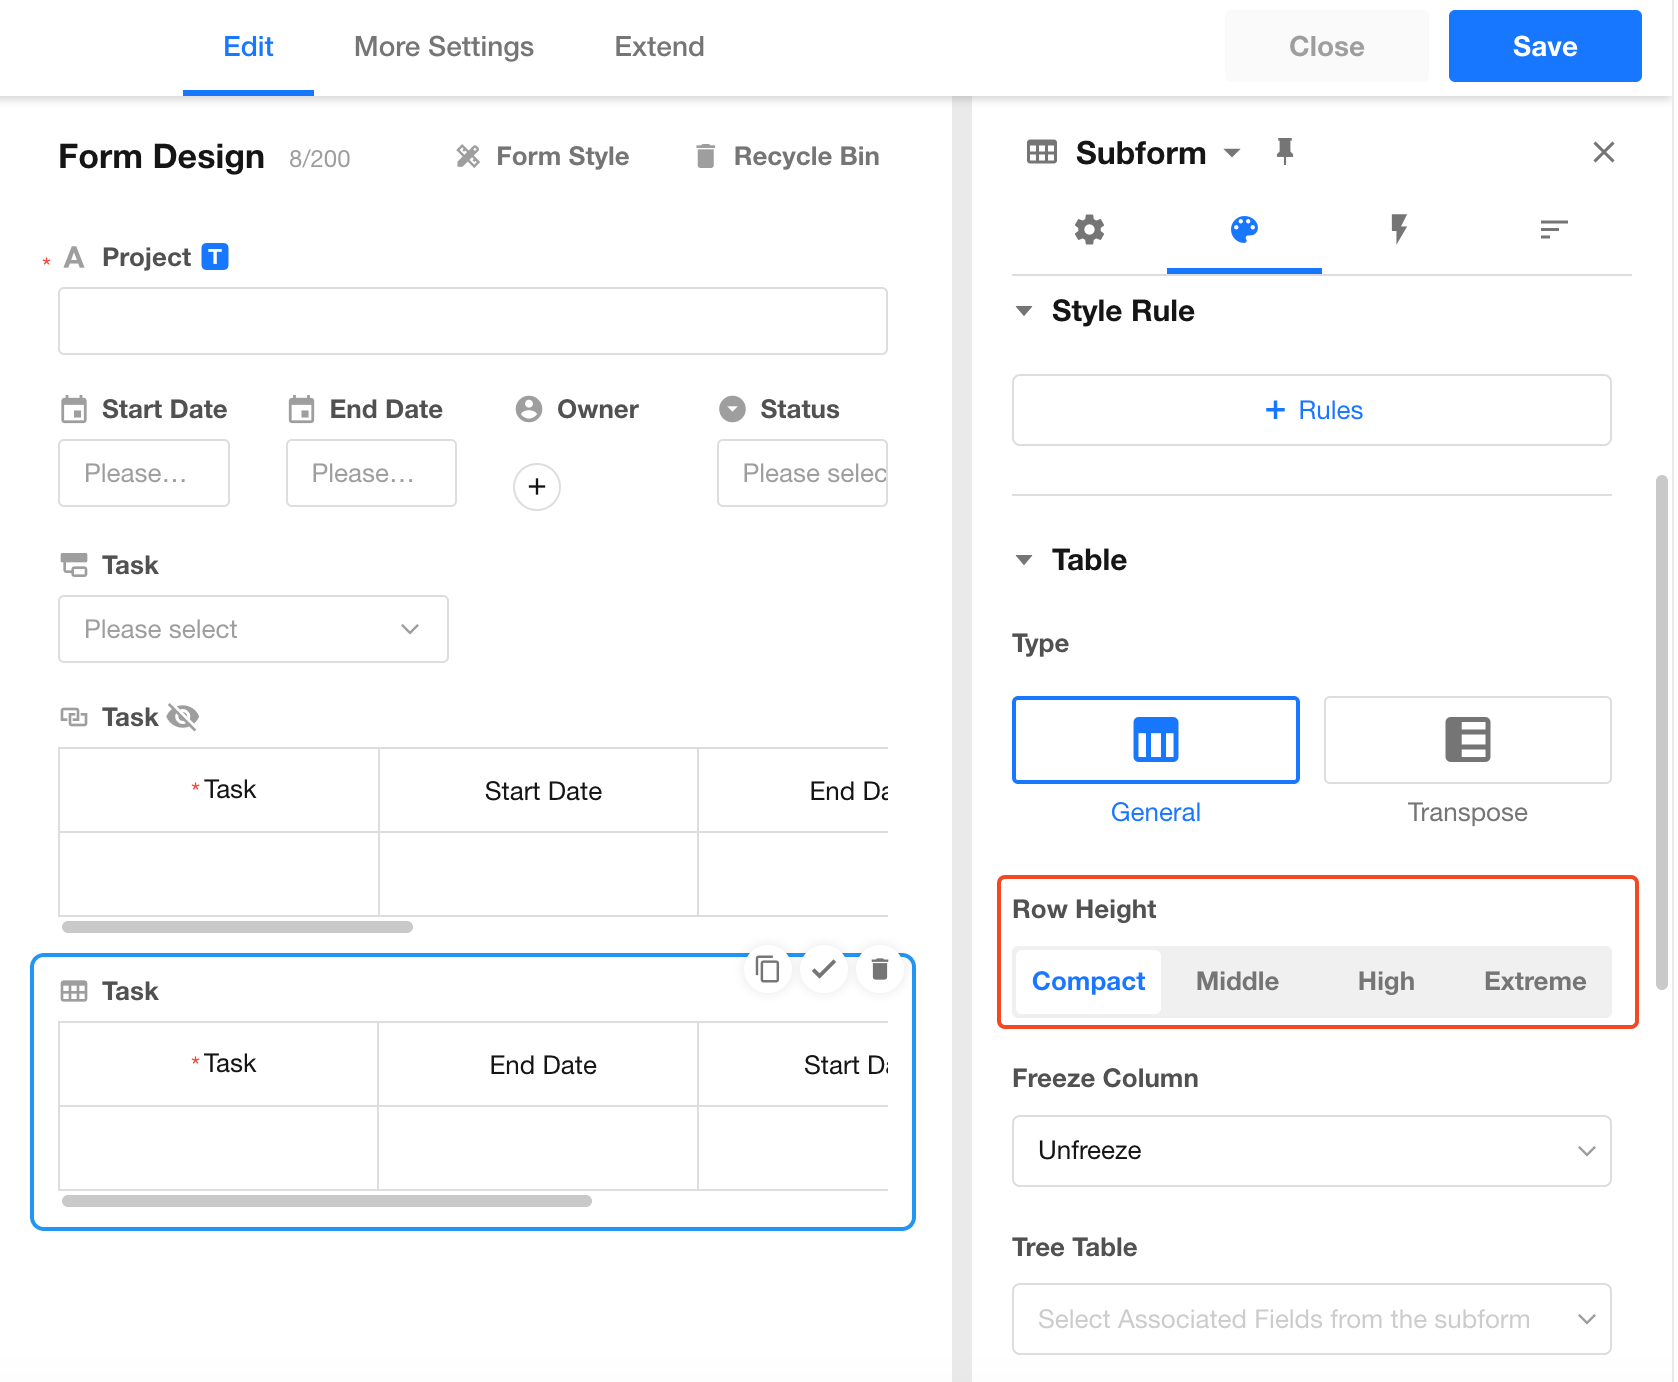
11. Subform style settings
In the Style settings of a subform field, you can configure row height, column width, frozen columns, maximum height, and more.
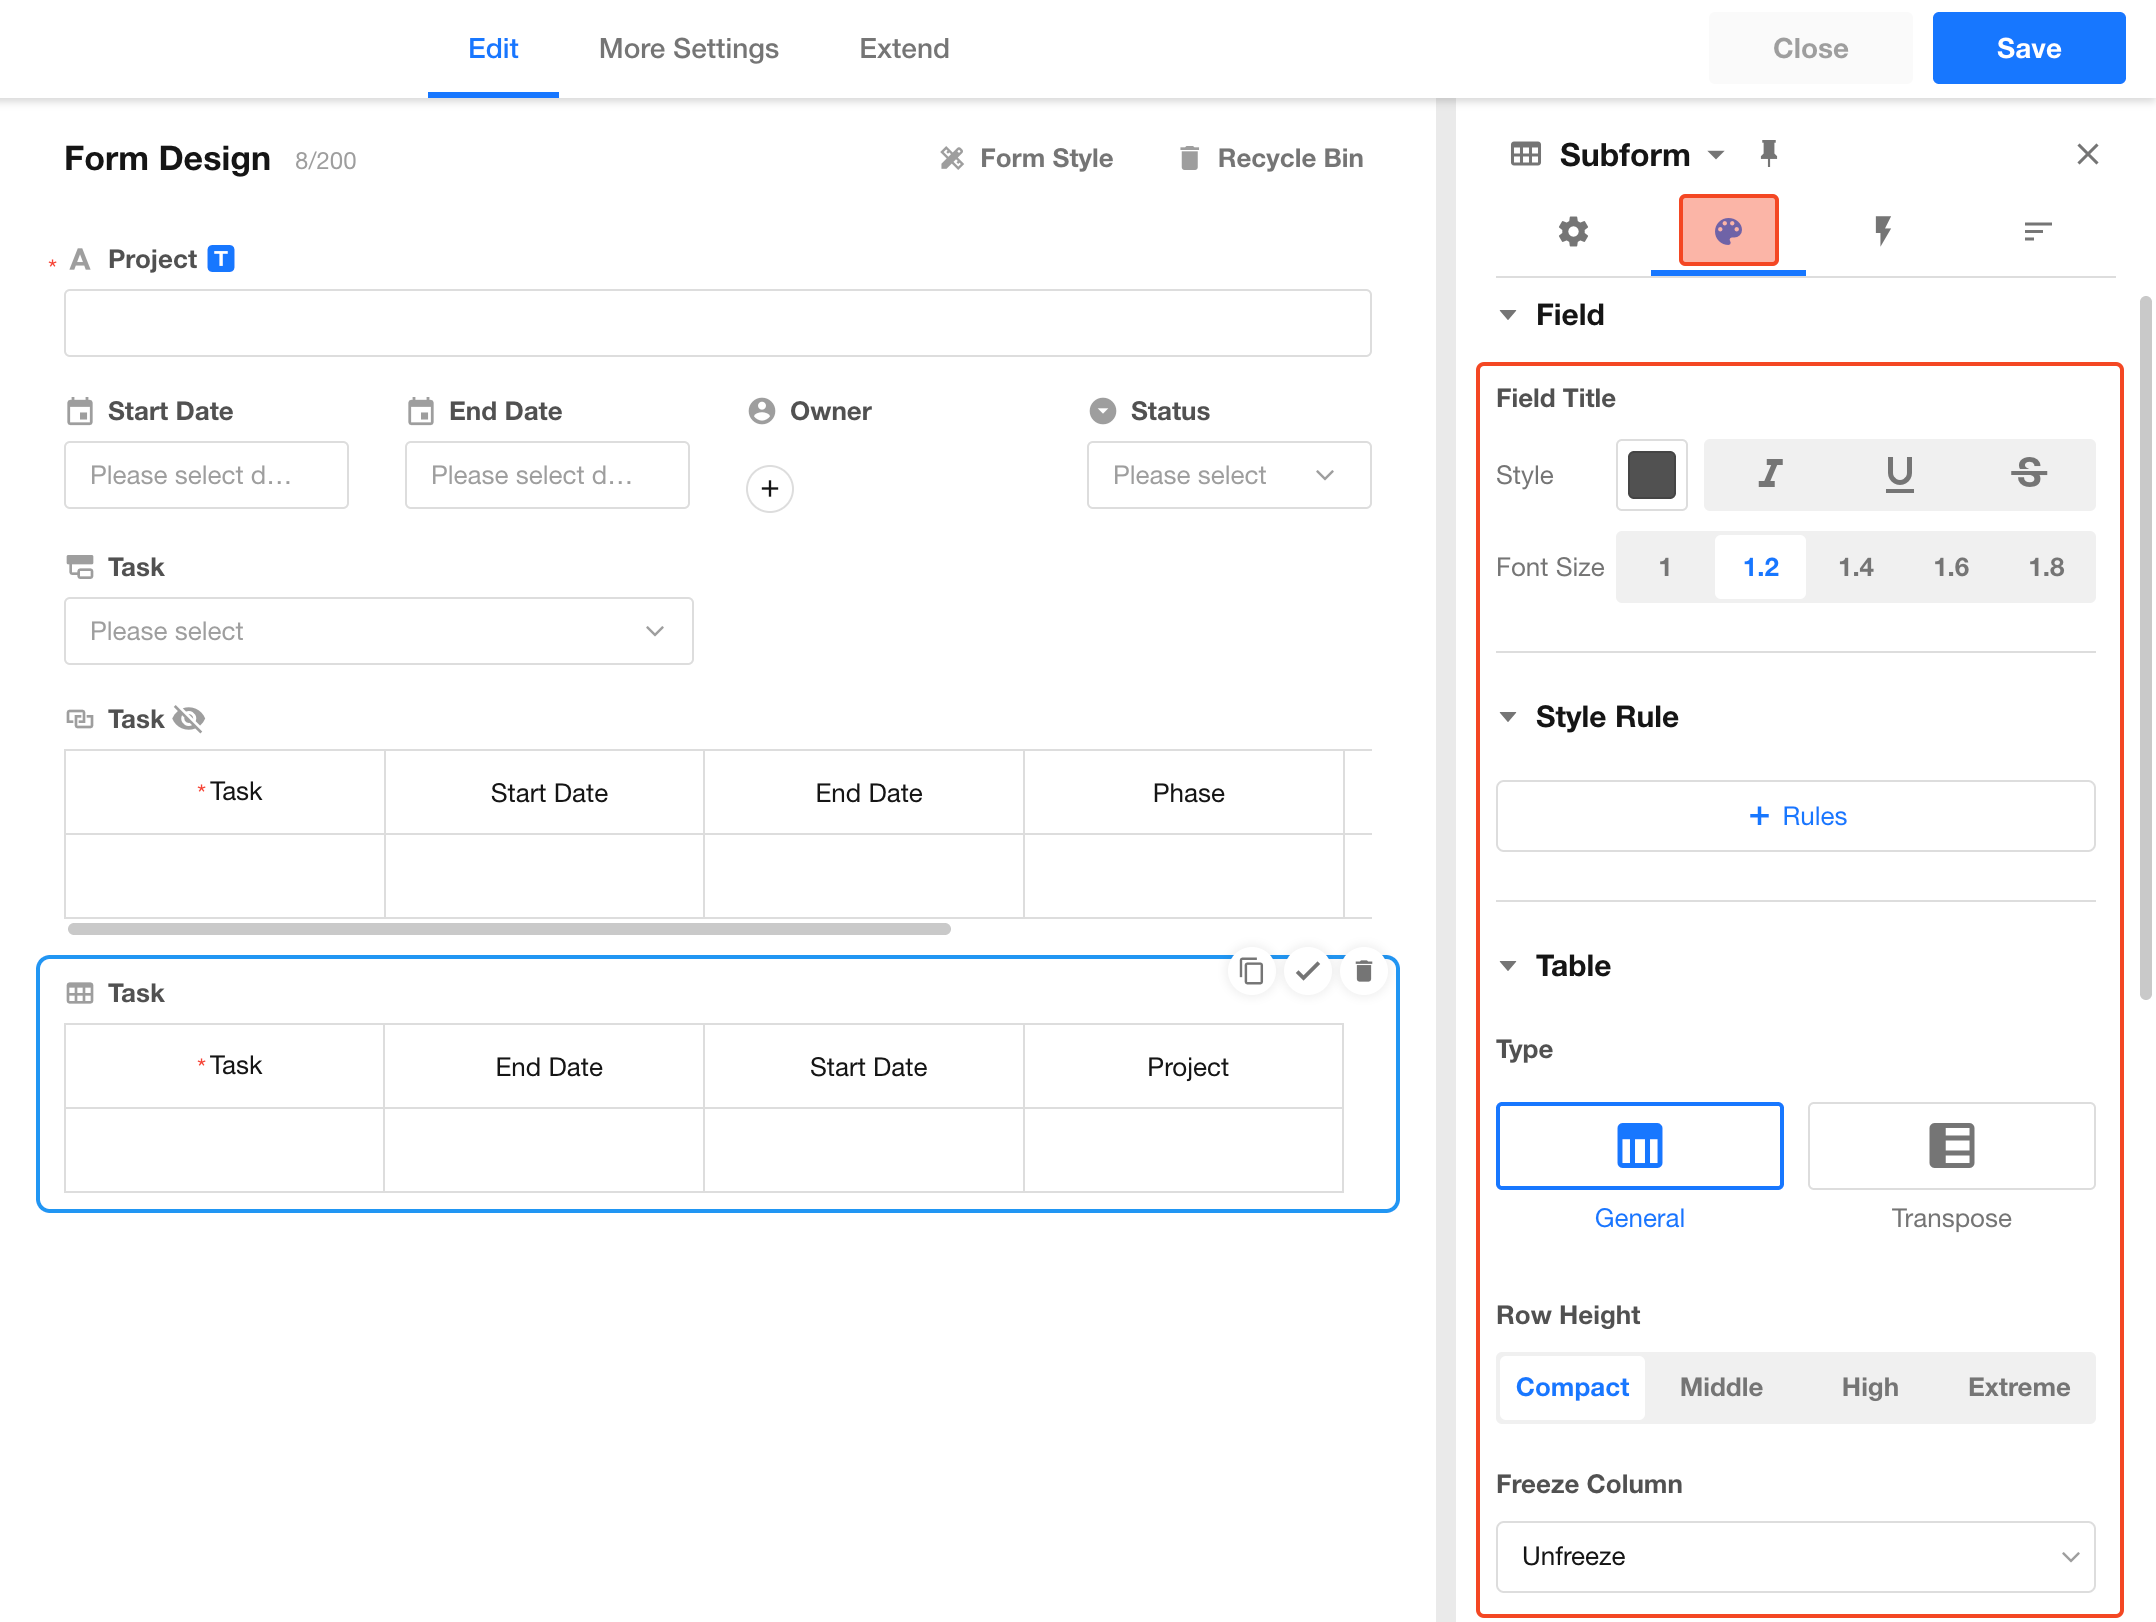
Table Type and Interaction Mode
-
Supports both General and Transpose table types. For more inform-to-Columnation, see Row-to-Column Transposition.
-
Supports two interaction modes for table views: Classic and Grid. For more information, see Interaction Methods.
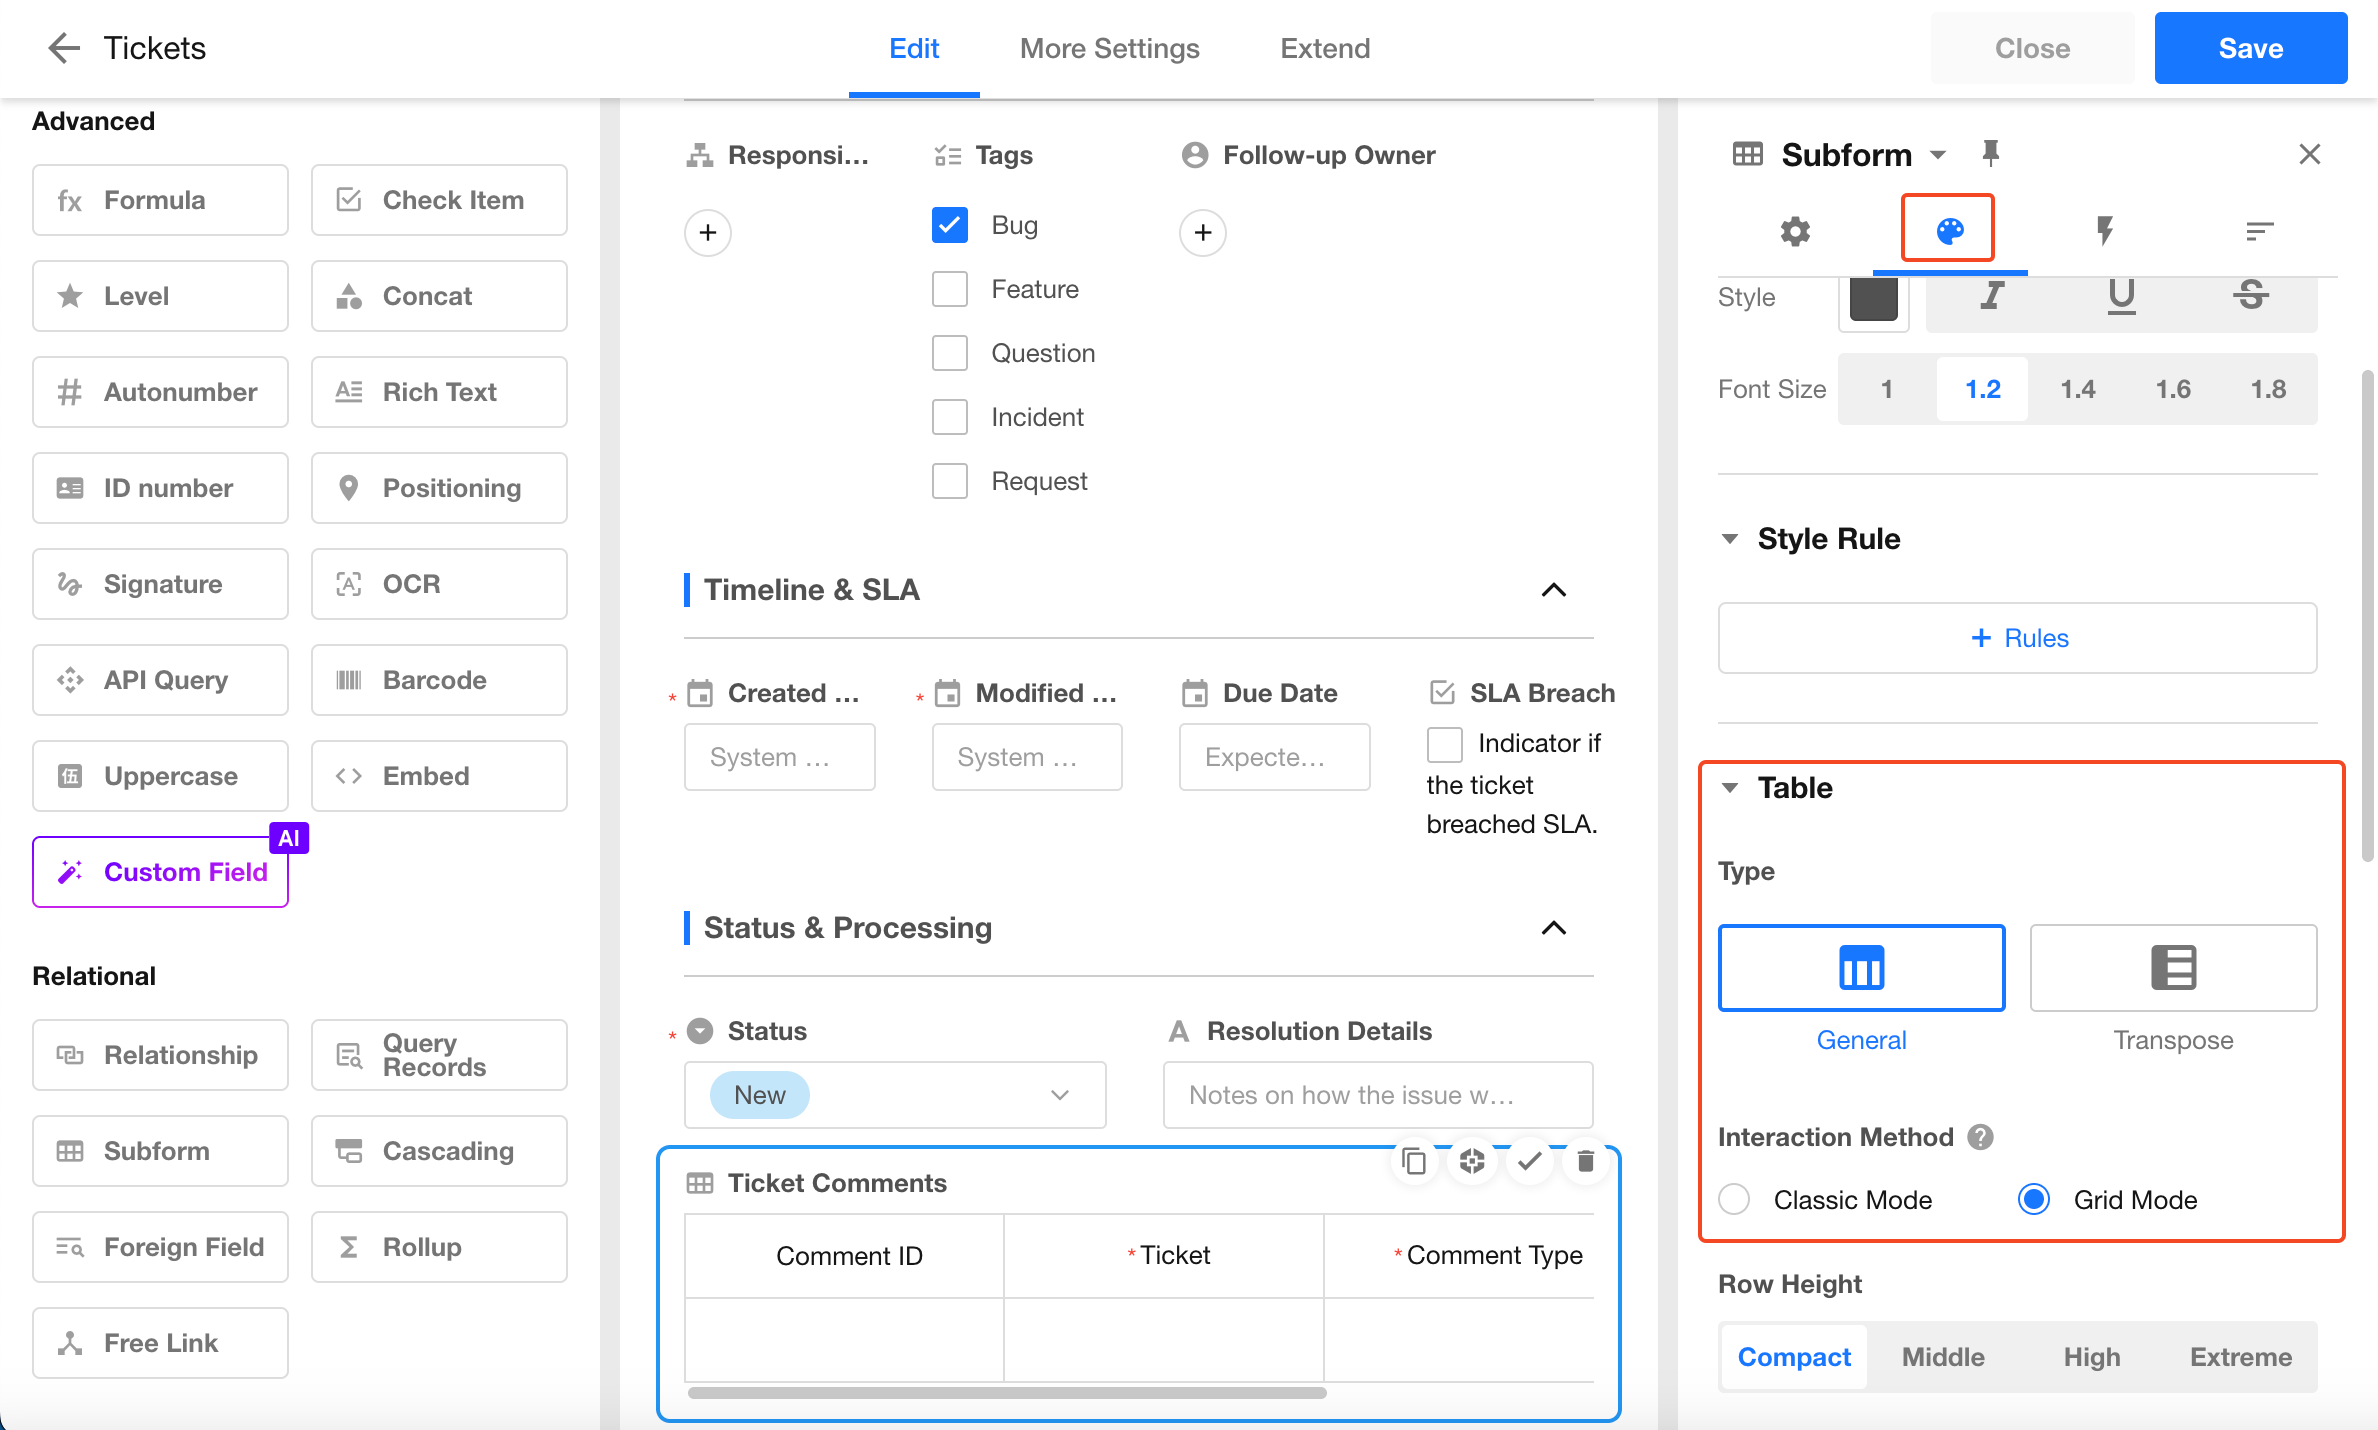
Subform row height
Four row height options are available: Compact, Middle, High, and Extra.
Subform column width
Open an existing record, drag to adjust the column width in the subform, and save the record to apply the changes.
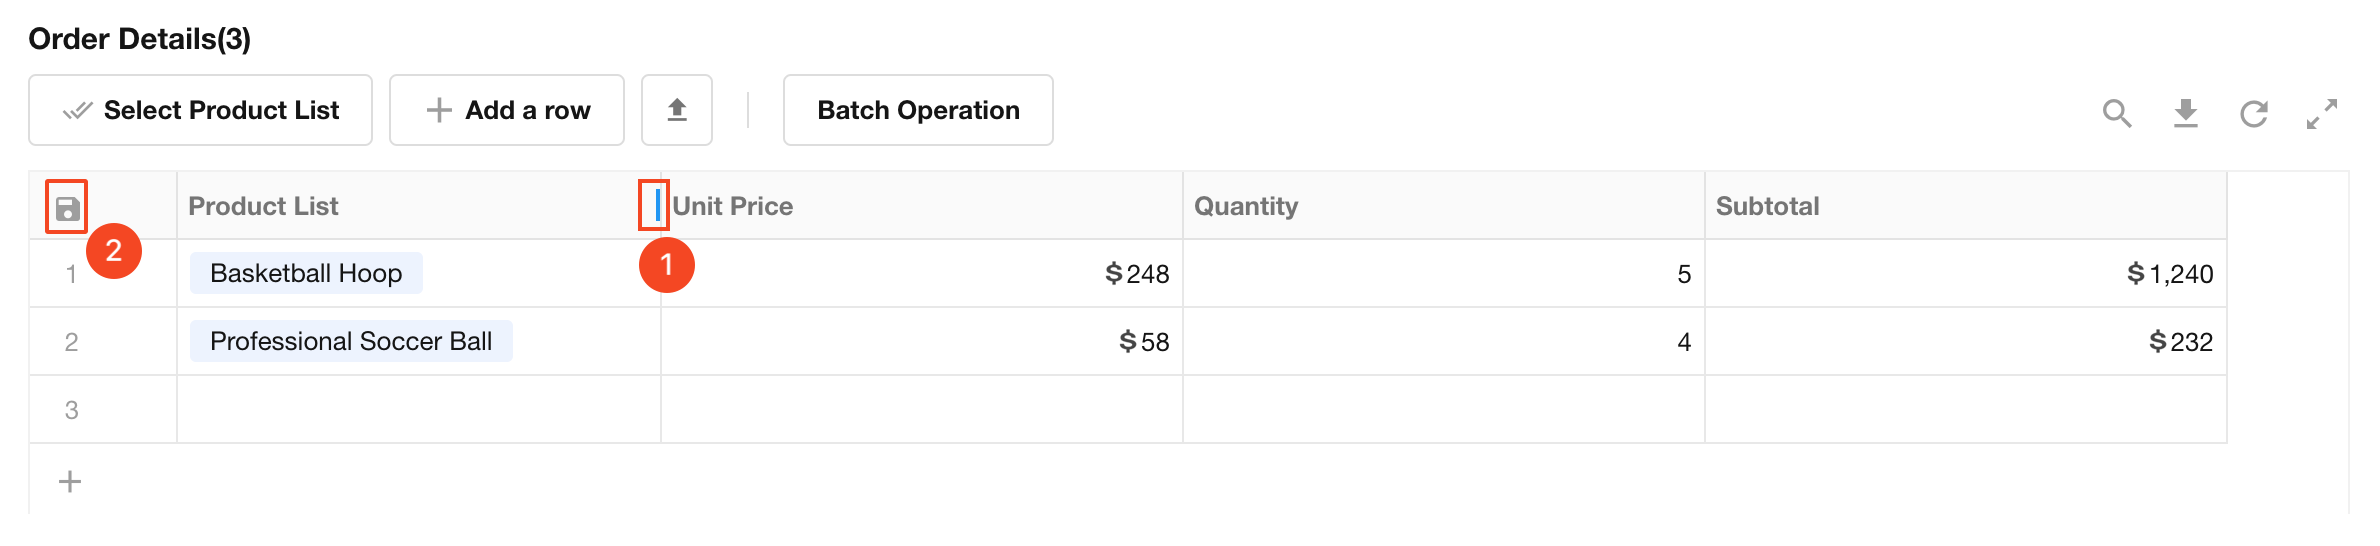
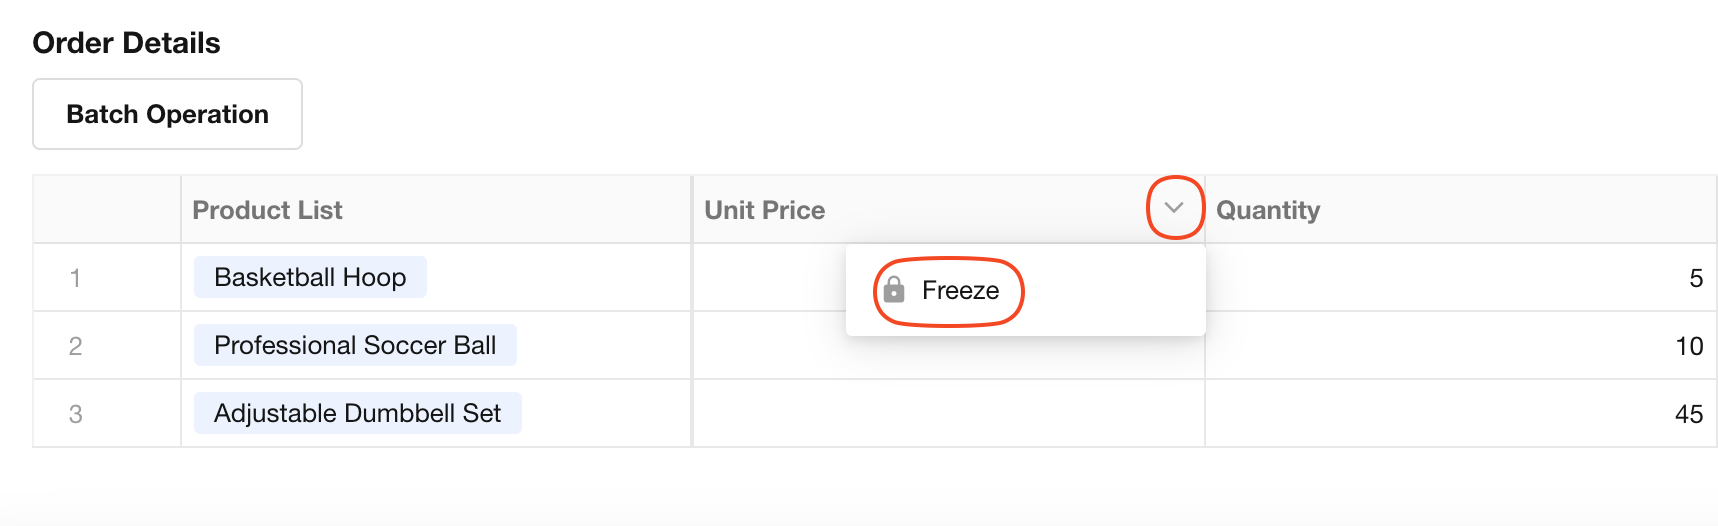
Frozen columns
Subforms support column freezing, with a maximum of 10 frozen columns.
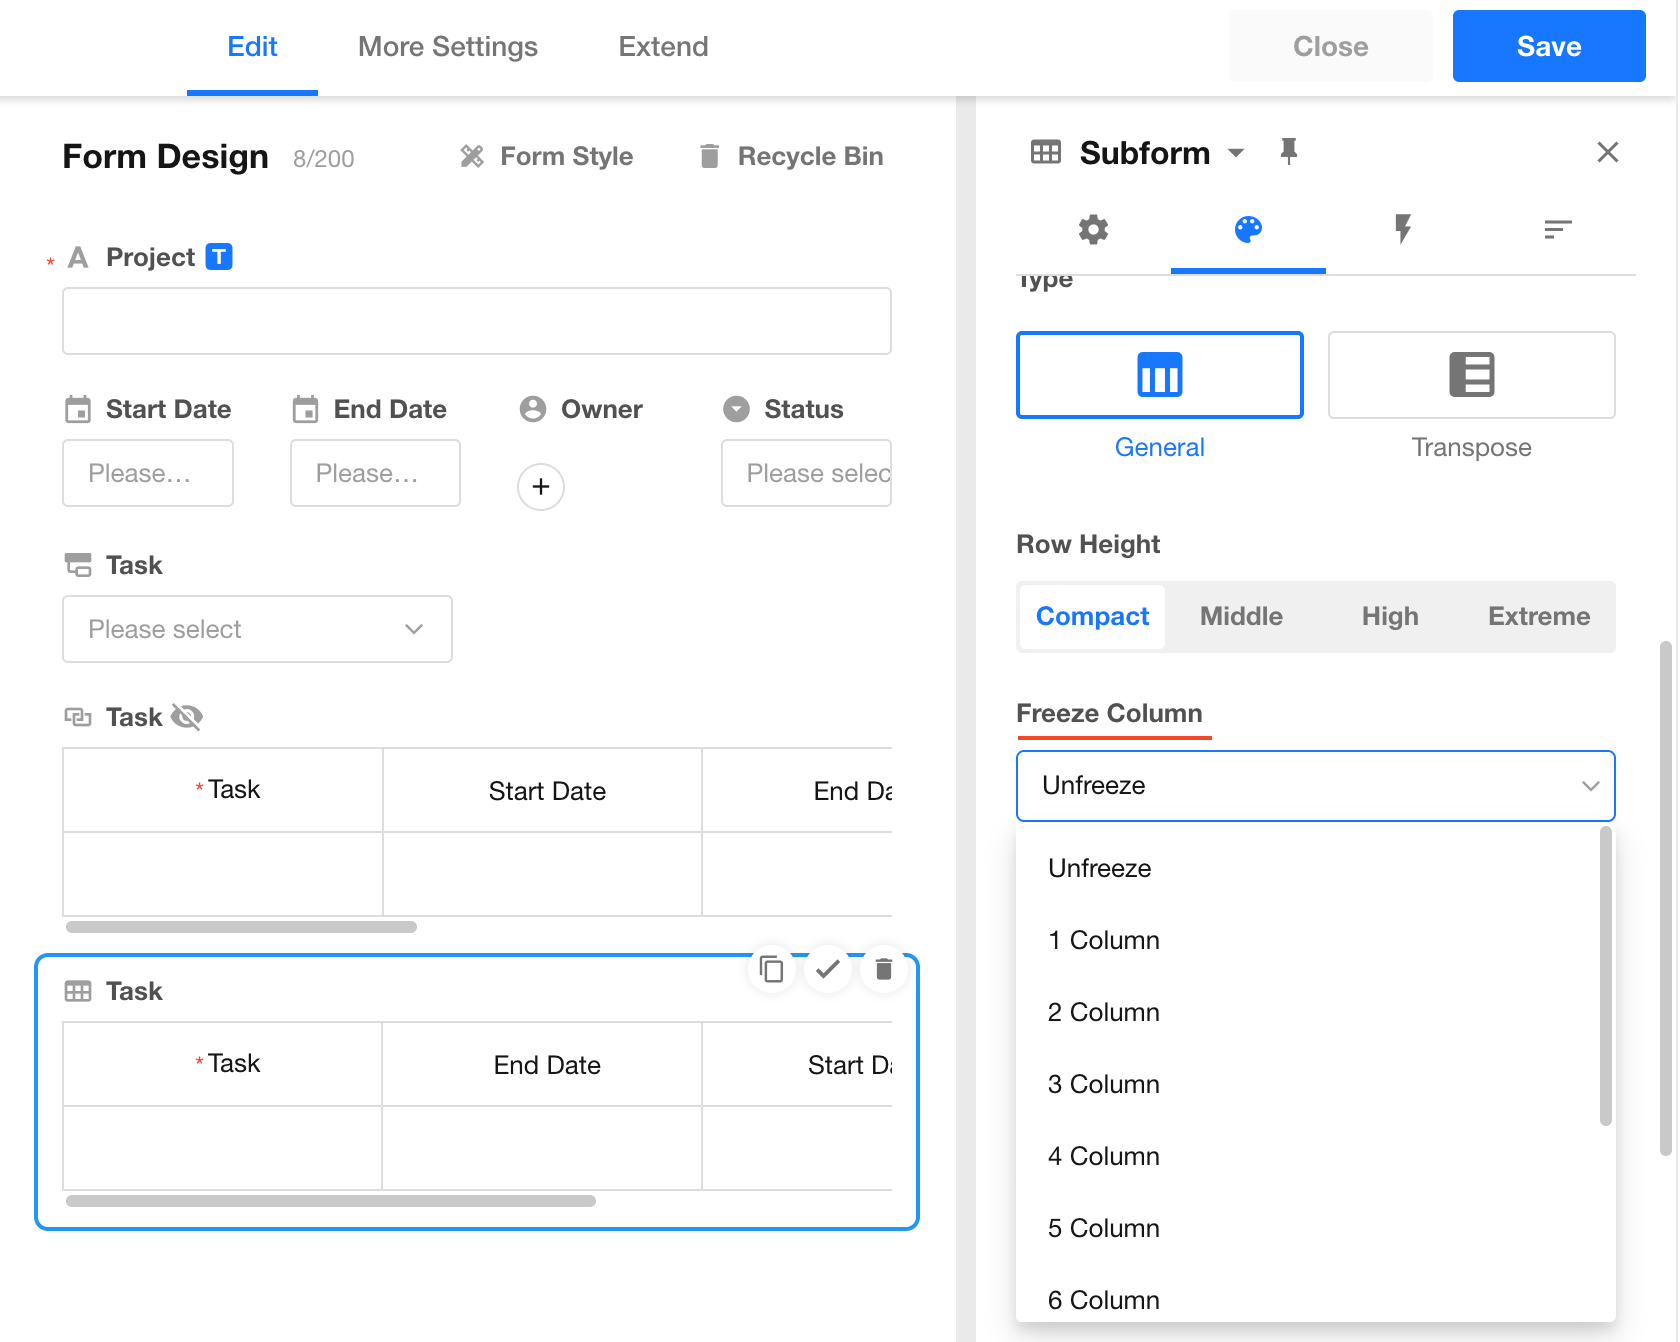
Users can freeze columns while viewing subform data, with changes only affecting their own view after saving. Adjustments made by application administrators will apply to all members after saving.
Tree table
When a subform (referencing a physical worksheet) contains fields that relate to its worksheet, the subform can display in a tree table. See details
Subform display mode
For subforms with large datasets, choose between: paginated display (load more via pages) and scrolling display (load more via vertical scroll).
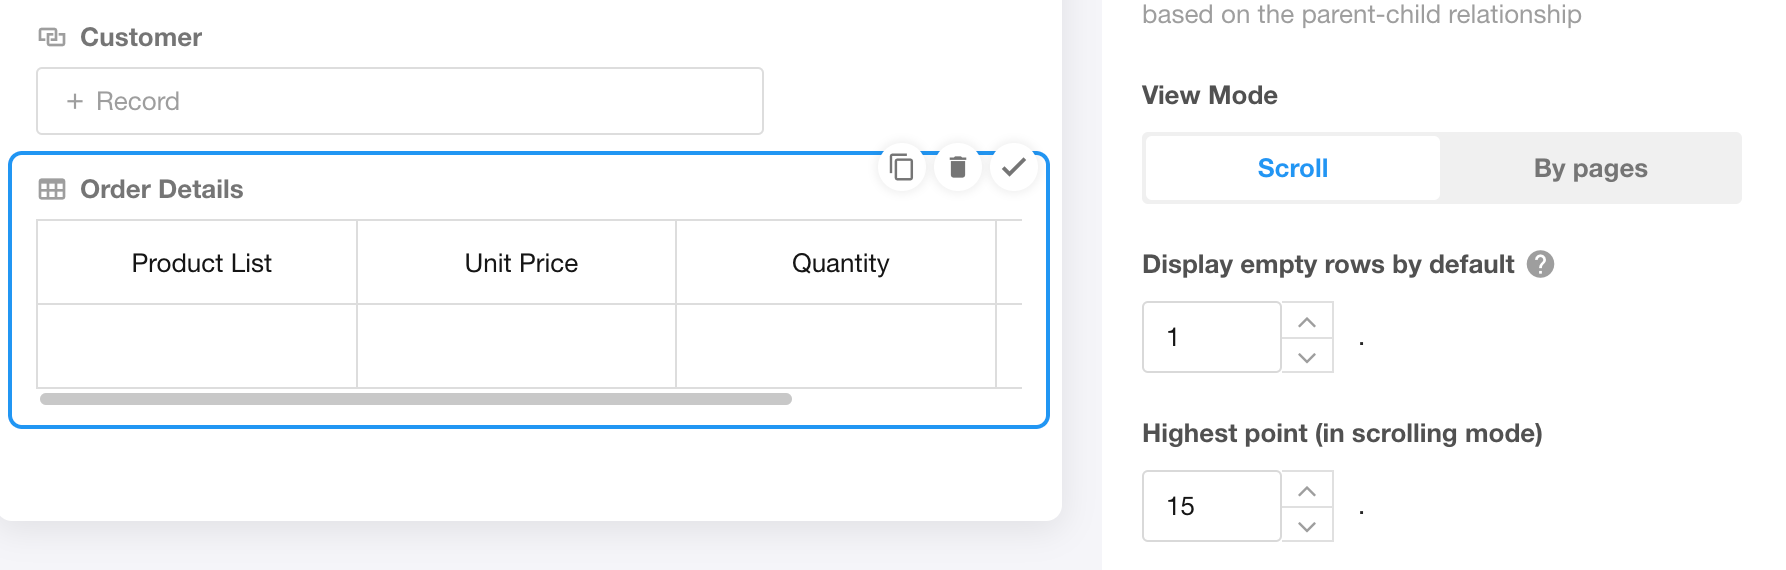
Maximum height
Set a fixed display height for the subform on the record page. When exceeded, users must scroll or page to view additional data (up to 200 rows maximum).
Display empty rows
Show up to 5 empty rows (configurable). If the subform contains fewer records than the set rows, empty rows will display.
Example: When set to 3 rows:
- If there is one existing record, it shows 2 empty rows;
- If there are no records, it shows 3 empty rows.
Note: Subform counts still reflect actual records only.
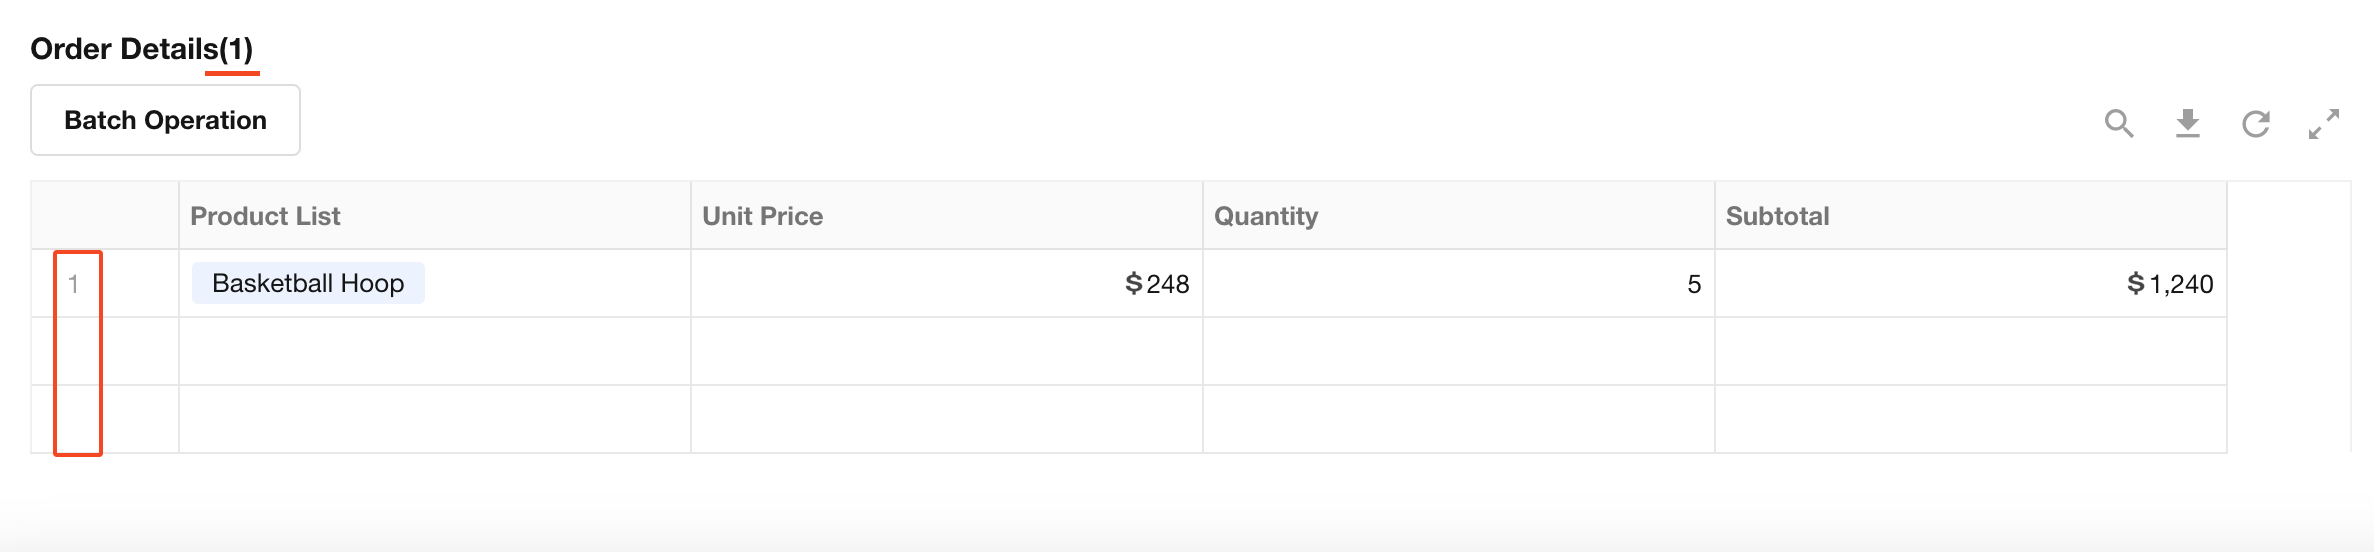
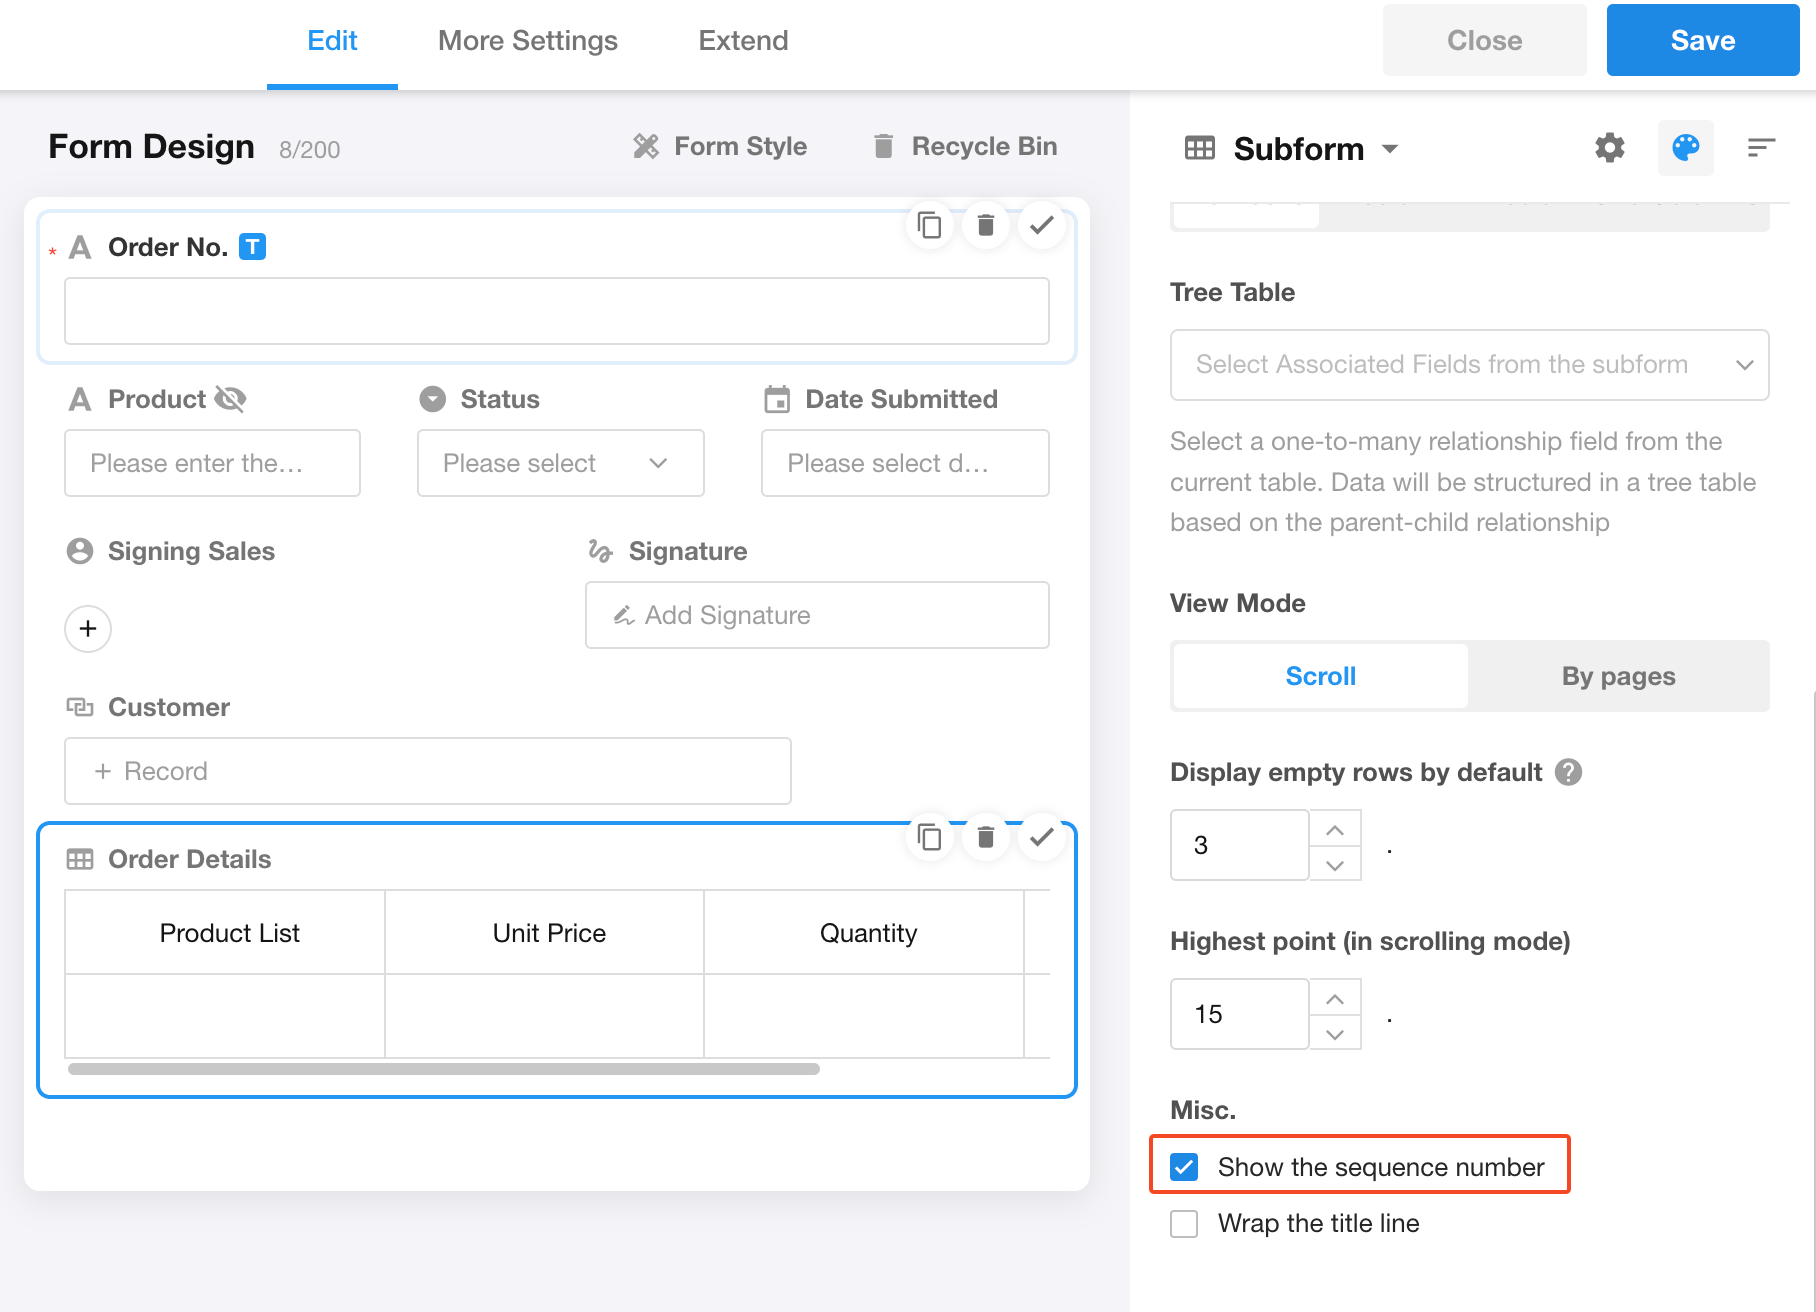
Show row numbers
When "Show the sequence number" unchecked, the leftmost numbering column will be hidden.

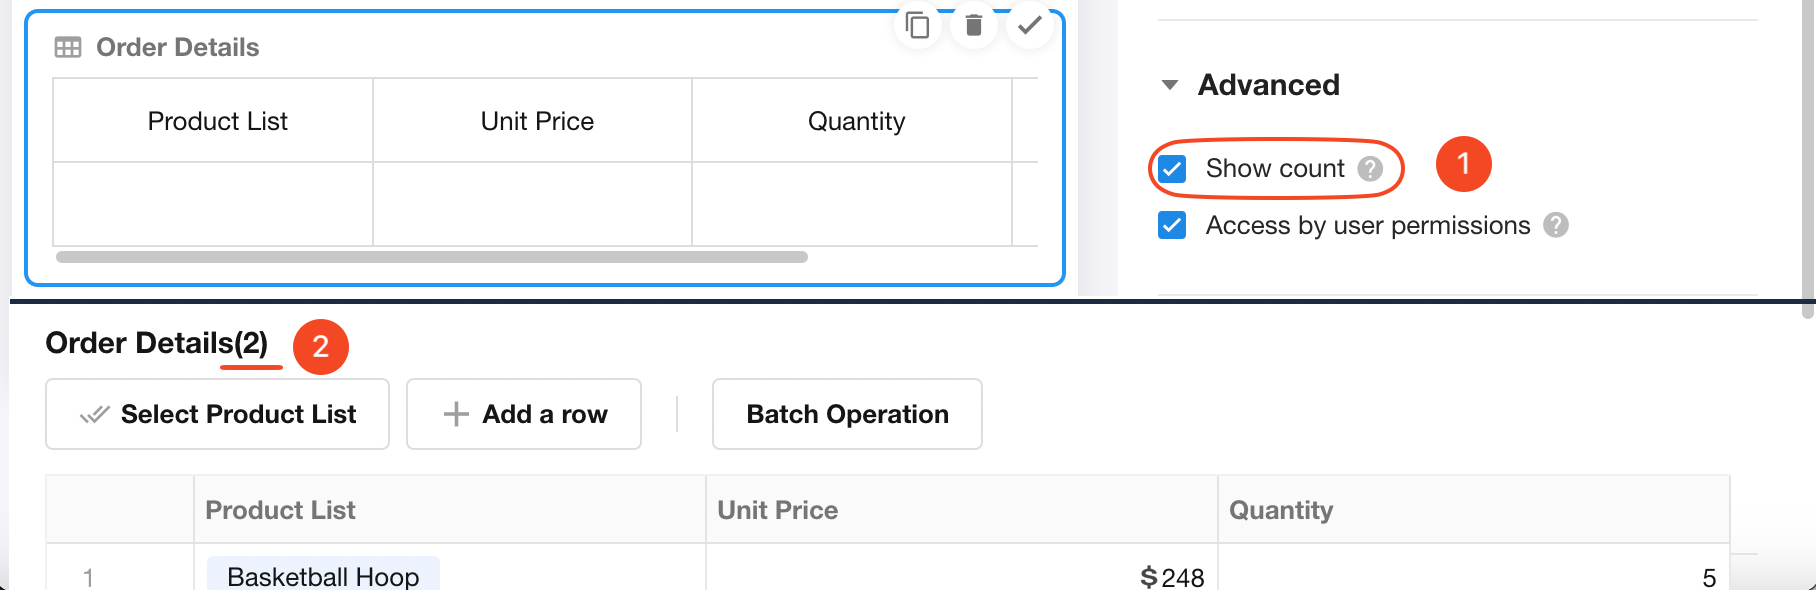
Show record counts
When "Show count" unchecked, the row count will not display next to the subform field name.
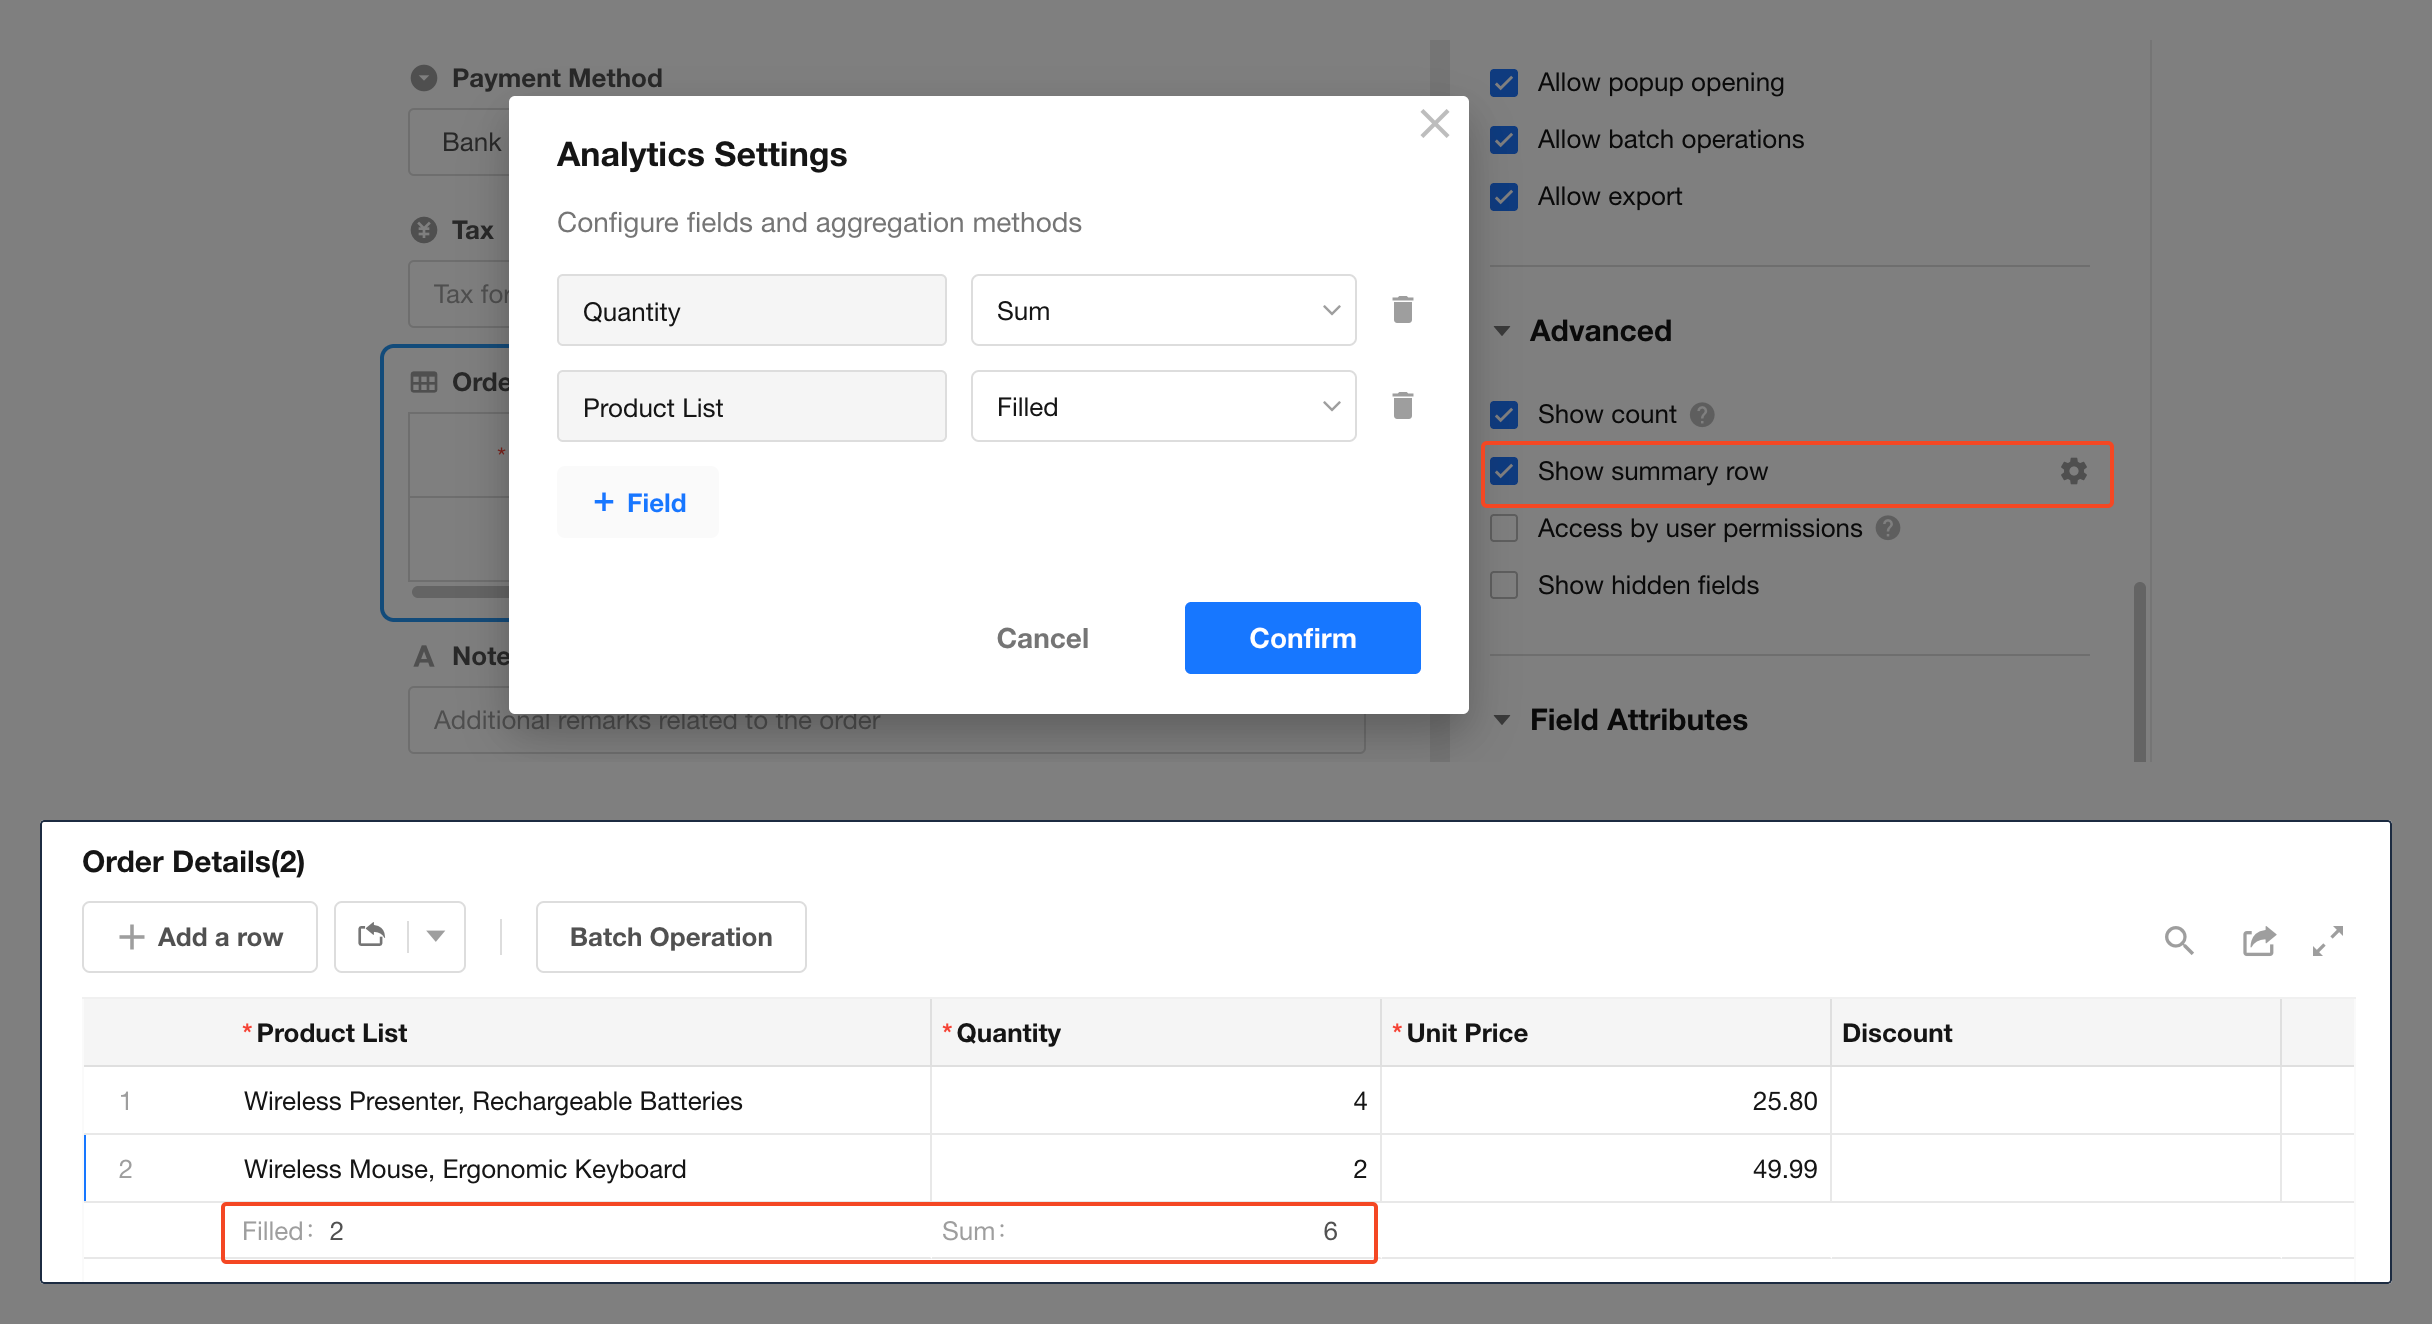
Summary row
For details about the Summary Row in subforms, see Summary Row in the Relationship Field documentation.
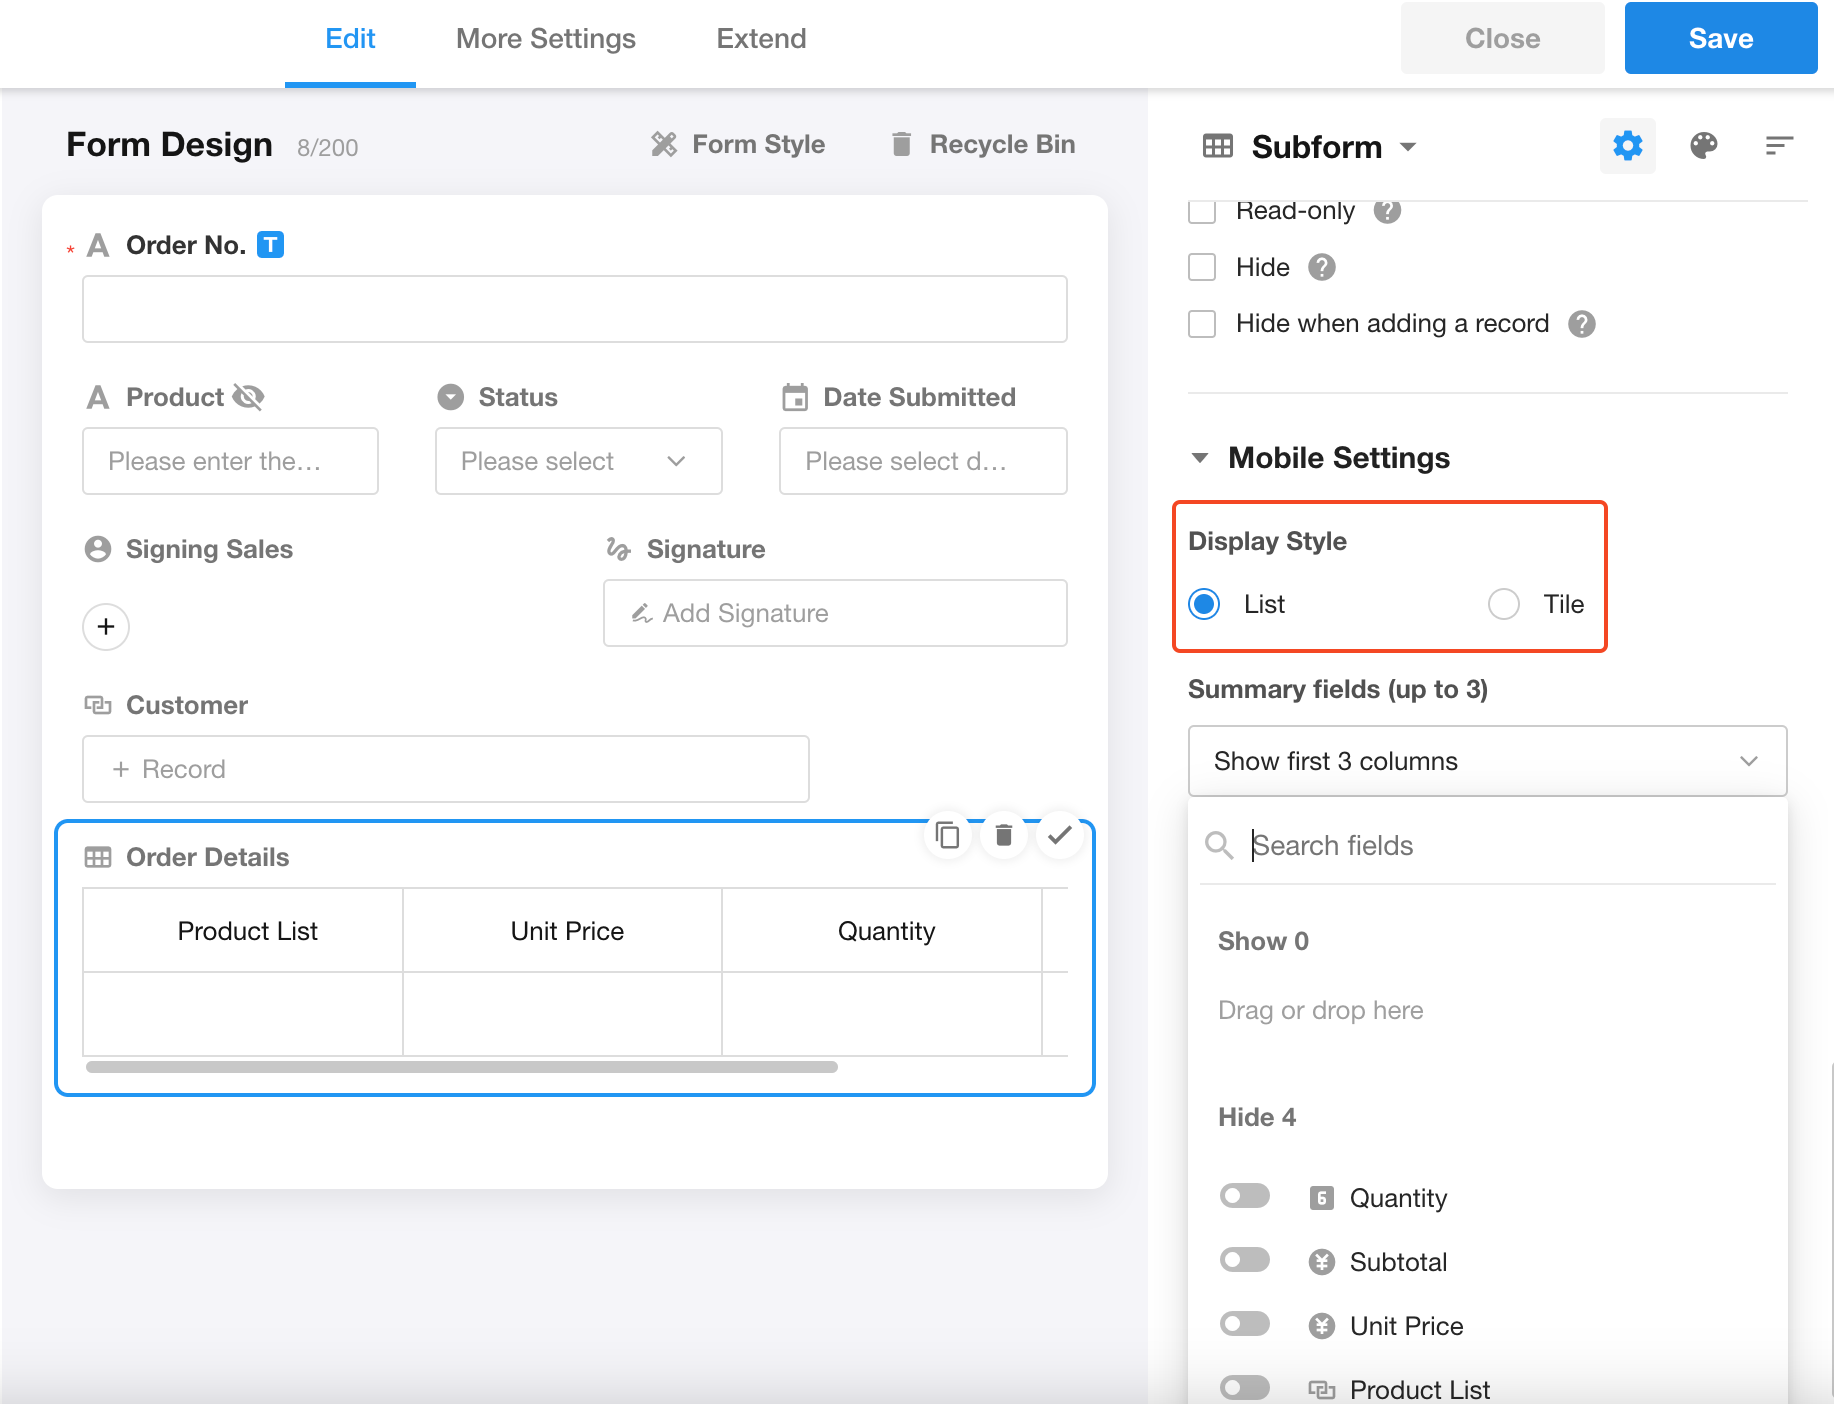
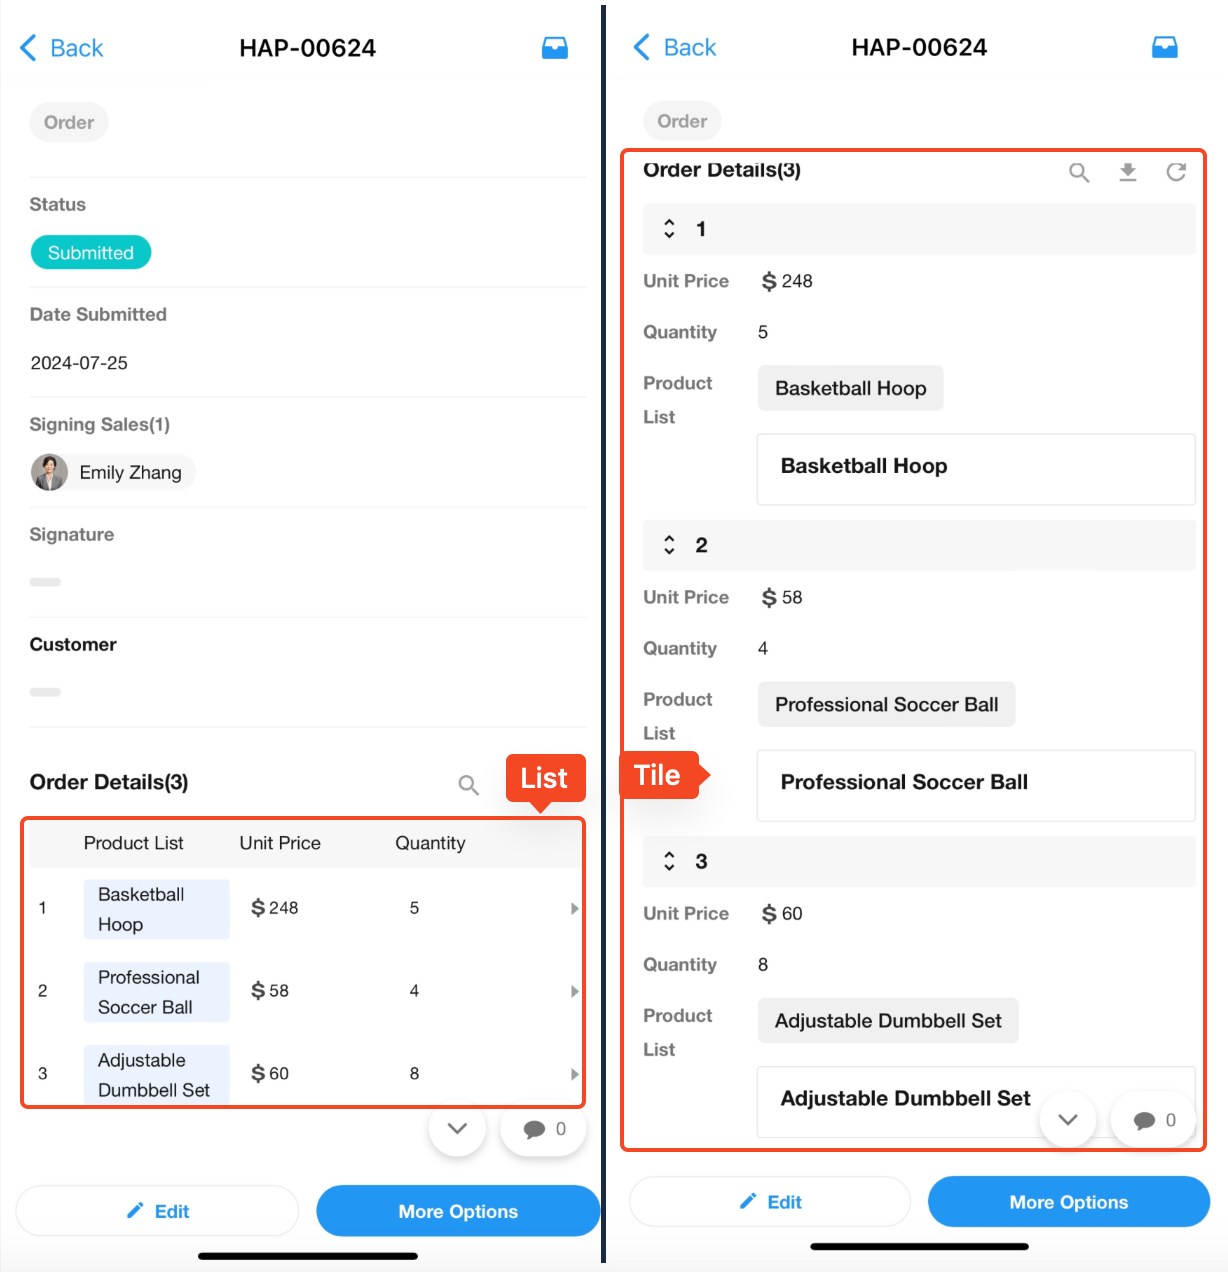
12. Subform display on mobile web
On mobile web, it supports two subform display modes: List and Tile.
Tile: Subform data is visually presented as expandable/collapsible cards. In the collapsed state, the displayed fields can be configured by users.
Effect:
13. Default values for subform fields
Users can set both static (fixed) default values and dynamic default values (query worksheets) for subform fields.
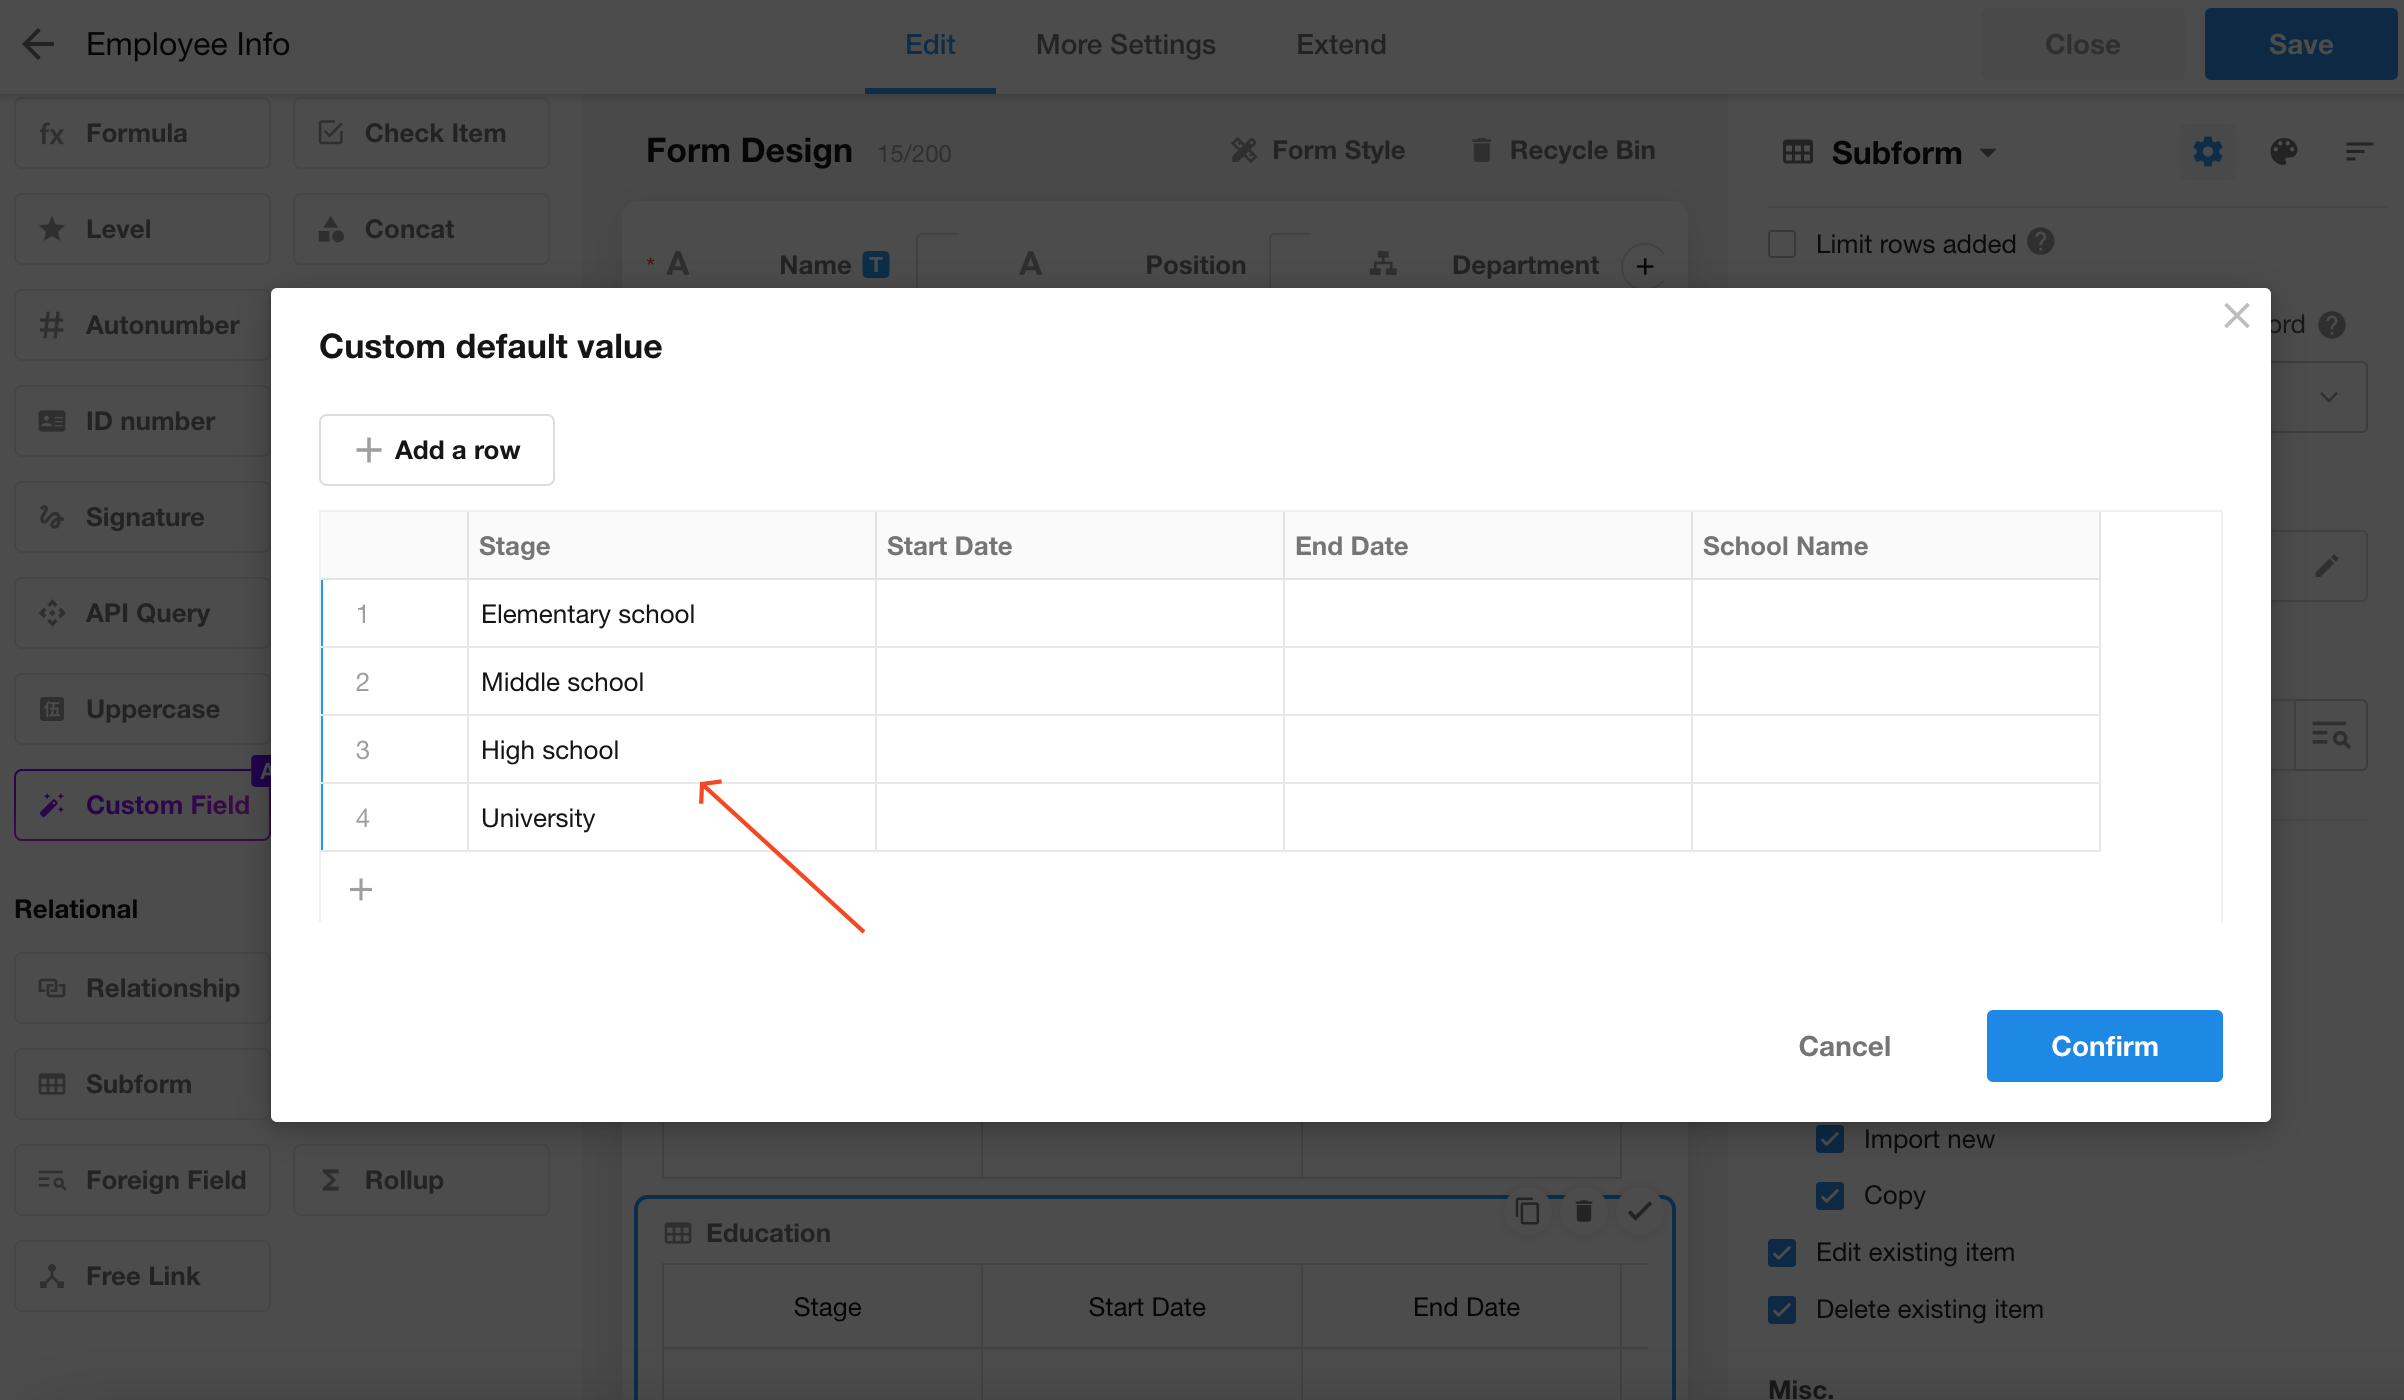
1) Static default values
After setting default values, each time a new record is created in the main worksheet, the subform fields with default values will automatically display the preset values. For example: In an employee information worksheet containing an education experience subform (typically including elementary school, middle school, high school, and university stages), setting default values allows users to simply modify dates and school names when entering data.
Static default values
2) Dynamic default values
Dynamic default values involve querying data from another worksheet based on specified conditions to automatically populate the subform (up to 500 rows maximum).
Dynamic default values
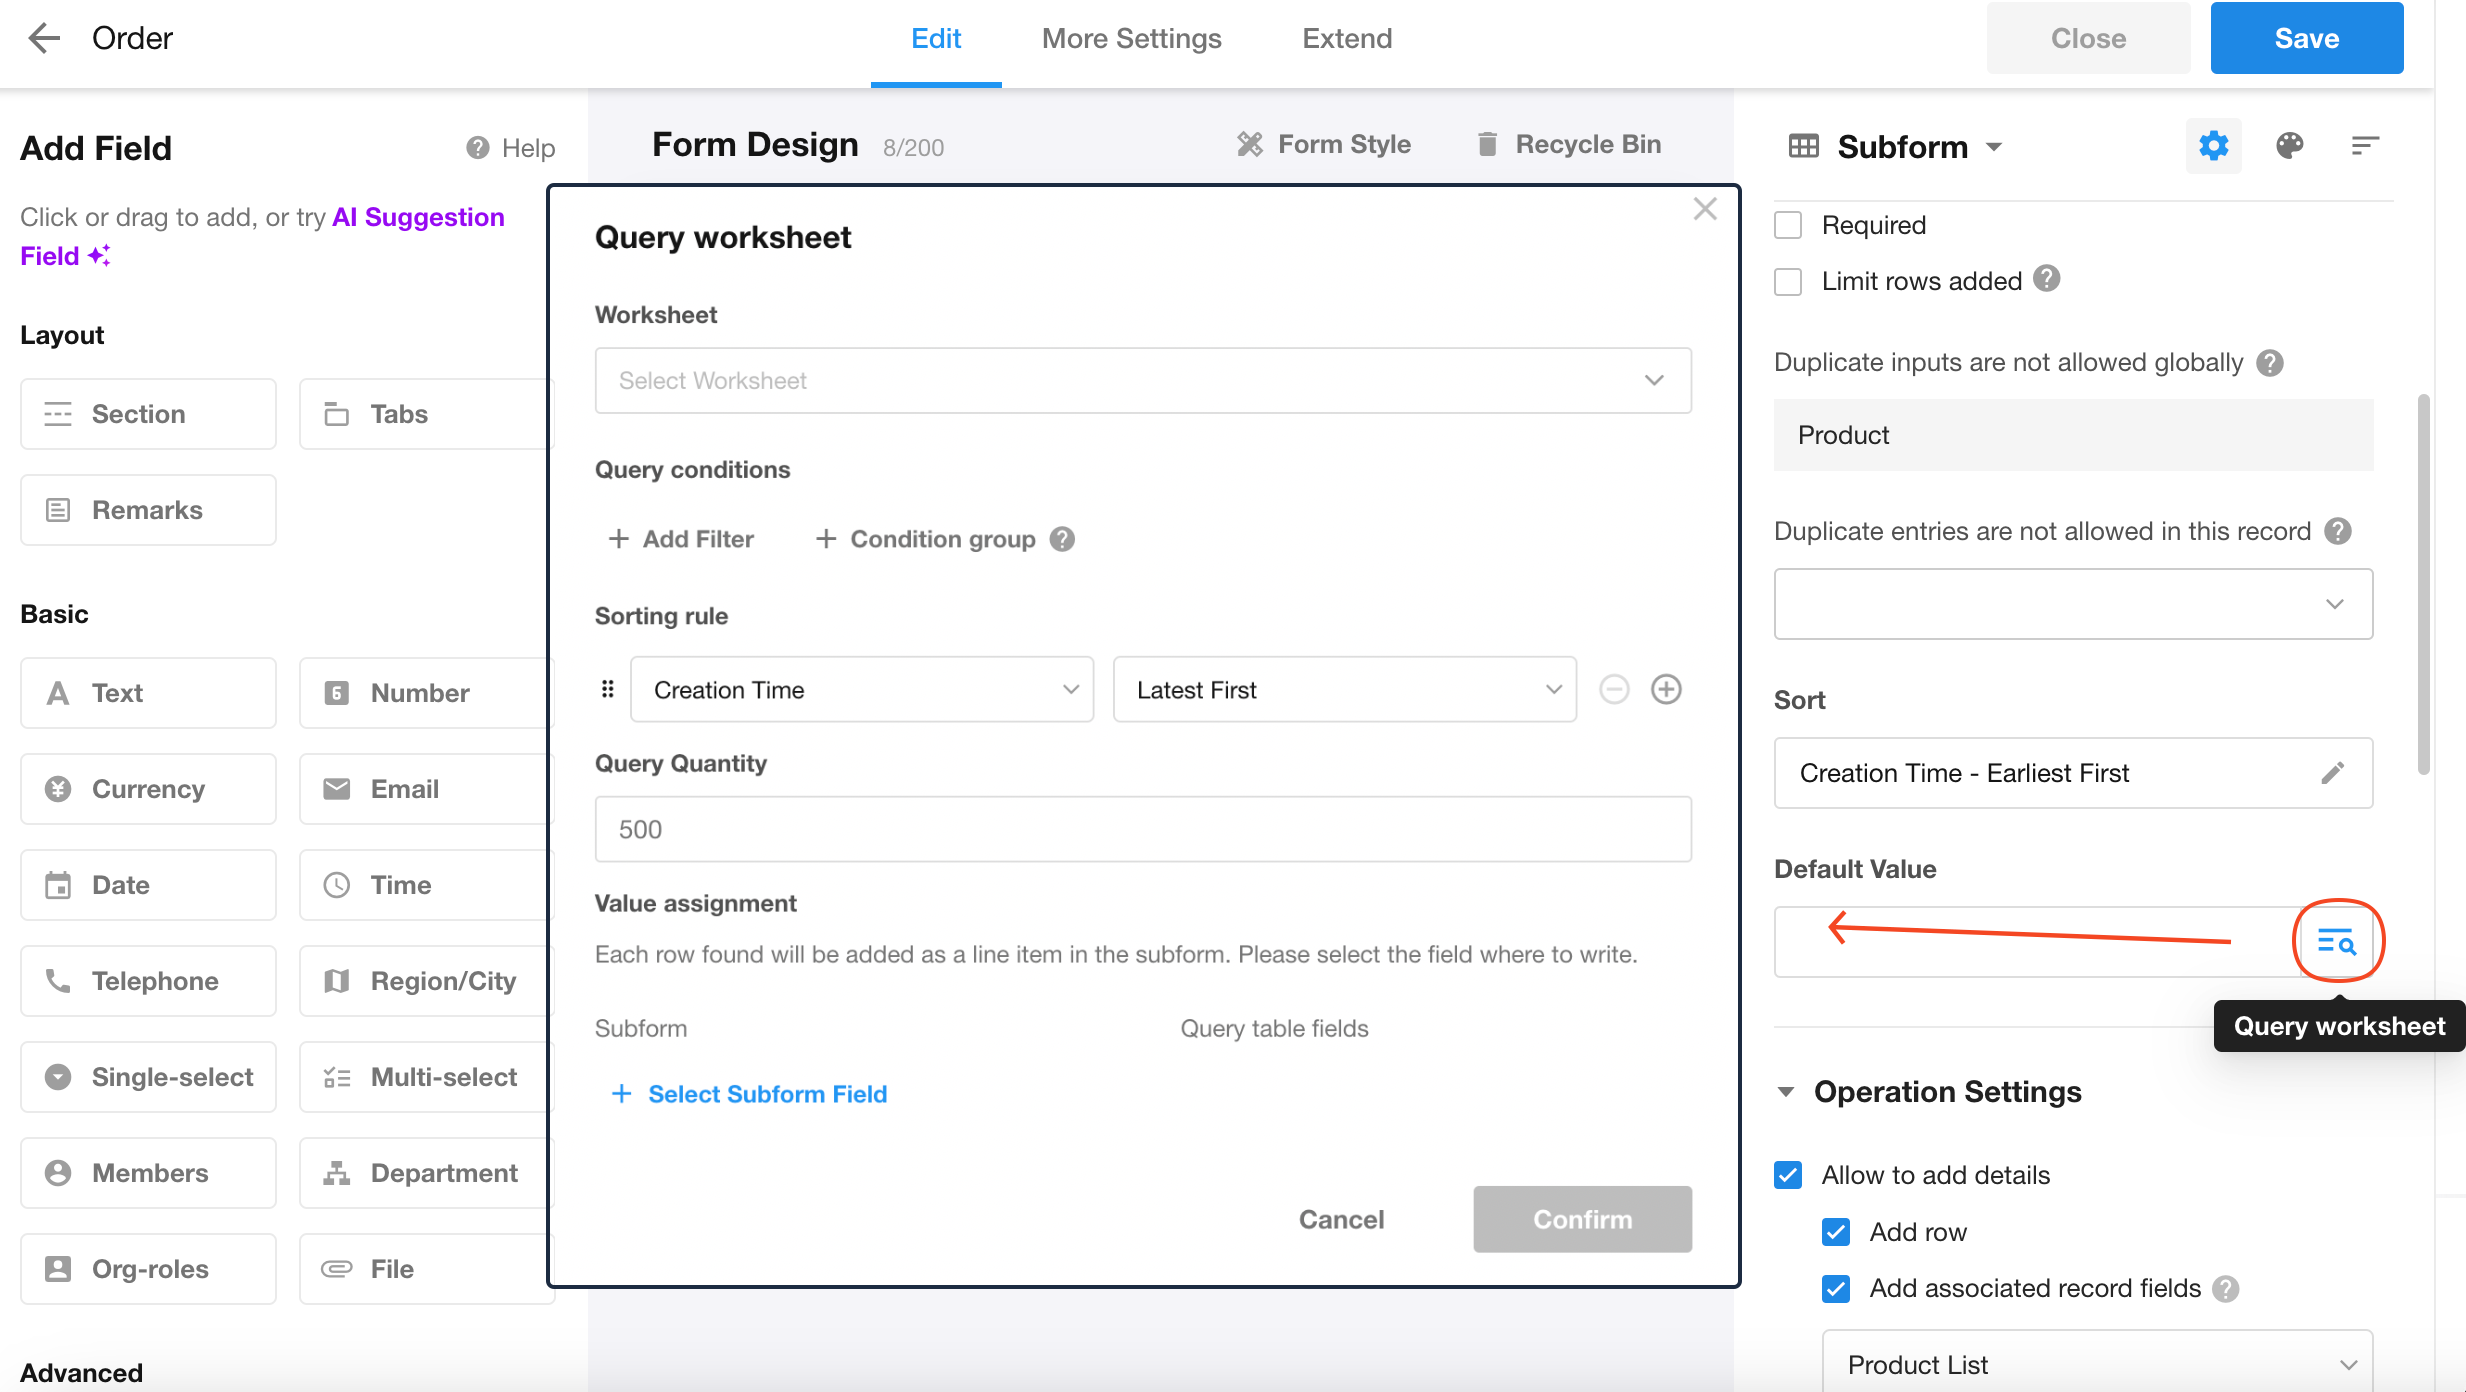
See more details about setting field default values by querying worksheets
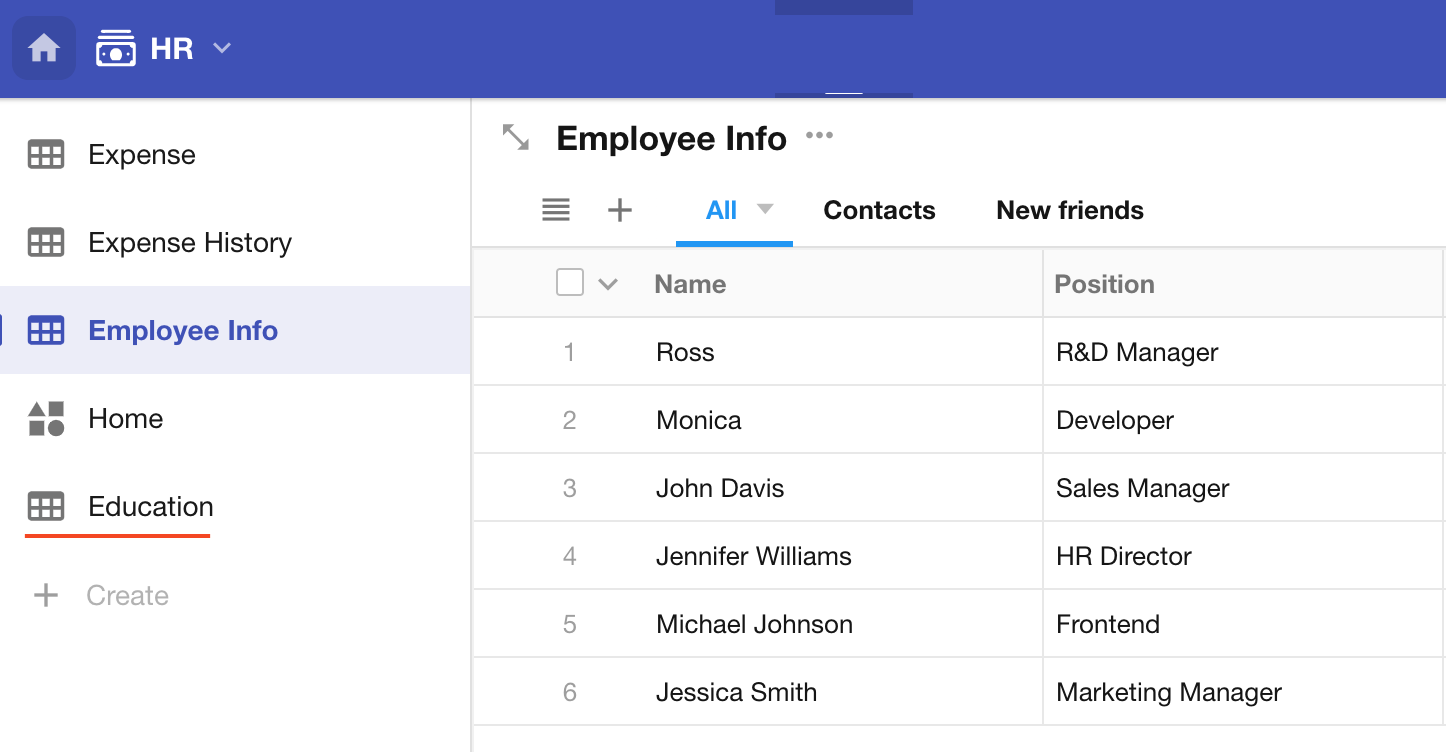
14. Convert an added-from-blank subform to a worksheet
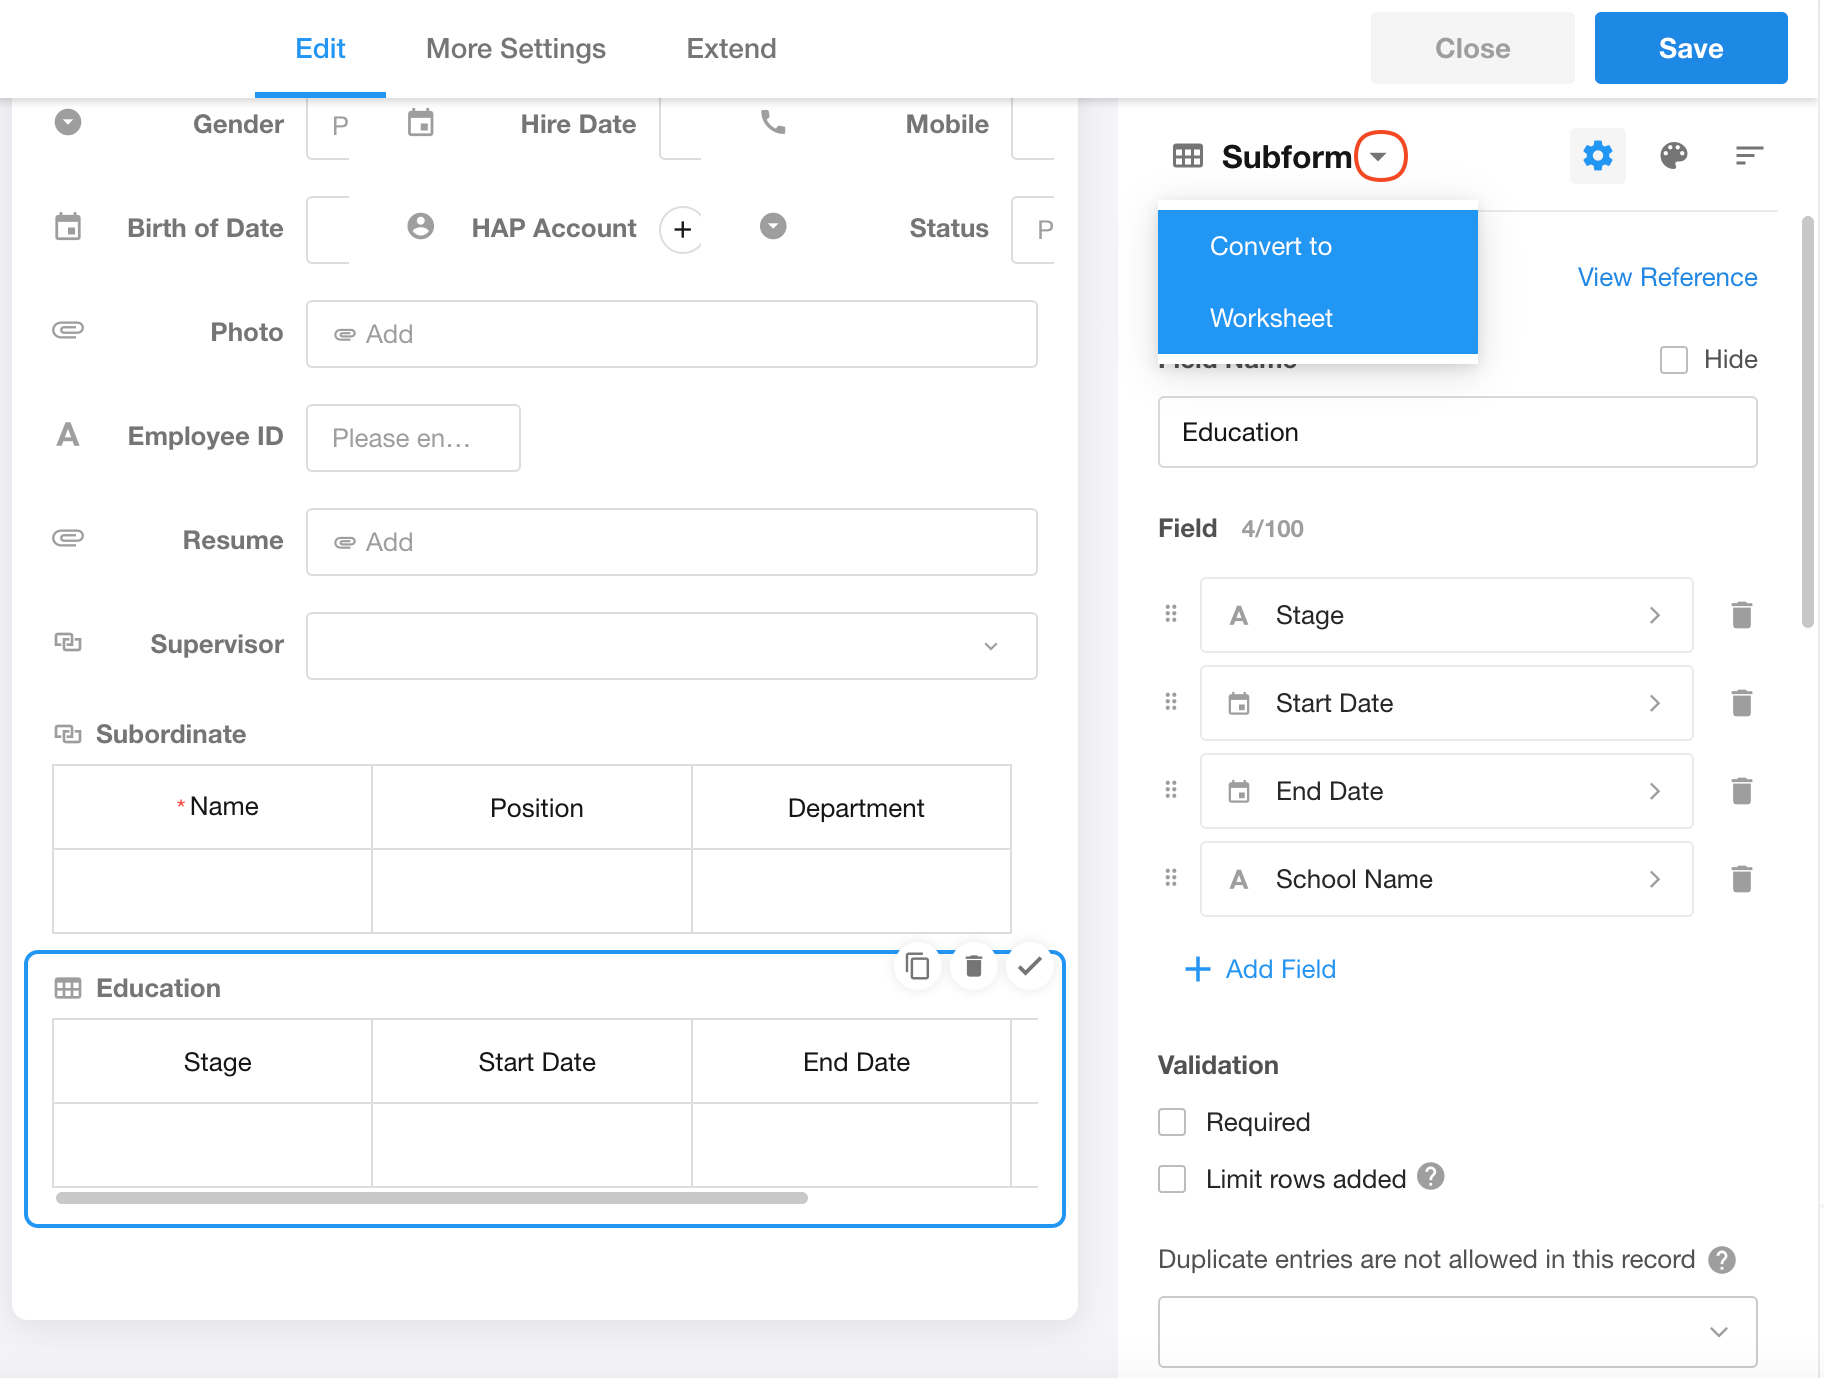
After conversion, the converted worksheet will appear in the application navigation.
TIPS:
-
After converting a subform into a physical worksheet, there will be no relationship control between the two worksheets.
-
When the "Order Details" subform is converted into a physical worksheet, deleting the subform field in the main worksheet (Order worksheet) will not delete the converted "Order Details" worksheet or its data.
-
Once a subform field is converted into a worksheet, it cannot be reverted back.
15. Subform field and Relationship field
1) Conversion between Subform field and Relationship field

-
Click the button in the upper right to convert a subform field (already converted to a worksheet) into a relationship field.
-
Similarly, a relationship field can be converted into a subform field, effectively referencing an existing worksheet as a subform.
2) Differences between Subform field and Relationship field
16. How to batch retrieve and add data in subforms
Was this document helpful?