Control - Relationship
Overview
In an application, each worksheet represents a type of business object (such as customers, contacts, projects, or tasks). In real-world scenarios, these objects often have relationships such as ownership, association, or containment. A record in one worksheet frequently needs to be linked to a specific record in another worksheet.
Without establishing these relationships, the same information may be entered repeatedly across multiple worksheets, making data maintenance difficult and increasing the risk of missed updates.
A relationship field acts as a connector between worksheets. It allows a record in the current worksheet to select and reference a record from a target worksheet. This is a reference-based relationship, not a data copy. As a result, it helps reduce duplicate data entry, keeps information consistent, and enables quick navigation to related records for more efficient querying and presentation.
For example, in a Customers worksheet and a Contacts worksheet, one customer company typically has multiple contacts, and each contact belongs to a specific customer. With a relationship field, when creating a contact record, you only need to select the corresponding customer record—no need to re-enter customer details. When viewing a contact, you can also quickly navigate to the associated customer record to see its full details.
Relationship Example
-
Relate multiple records
-
Relate one record
Field Configuration
Use Case: In order to better manage customer information and its related contacts, we need to establish a relationship between the customer worksheet and the contact worksheet. The following are the specific steps:
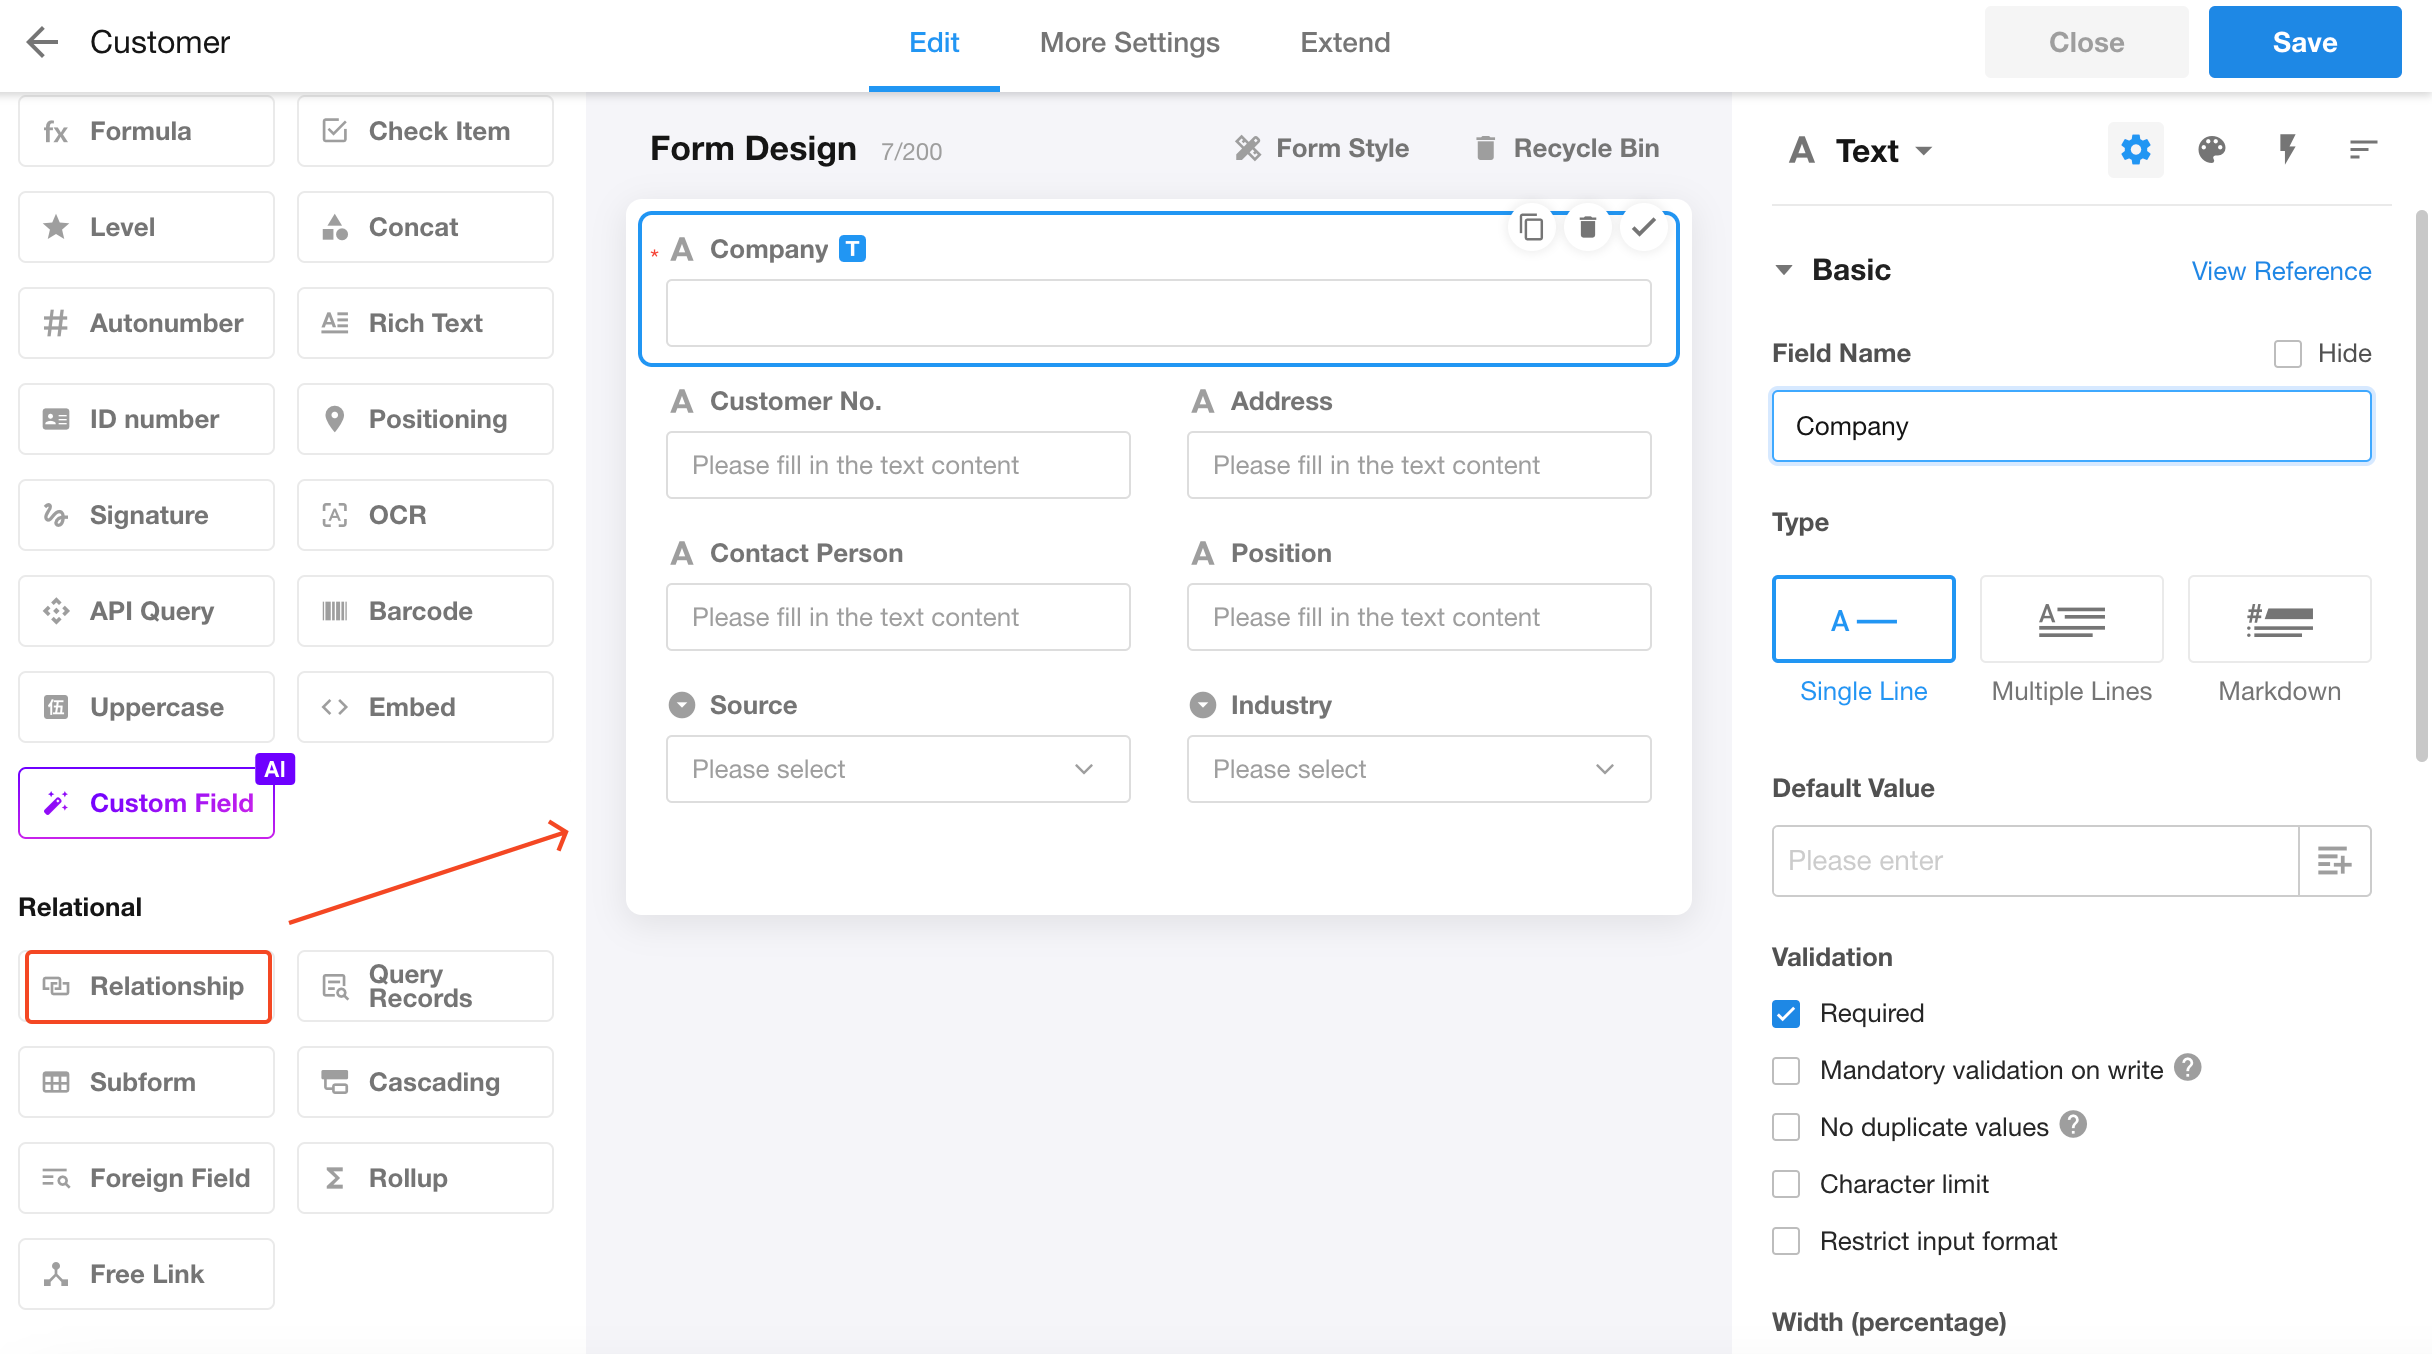
1. Add a relationship control
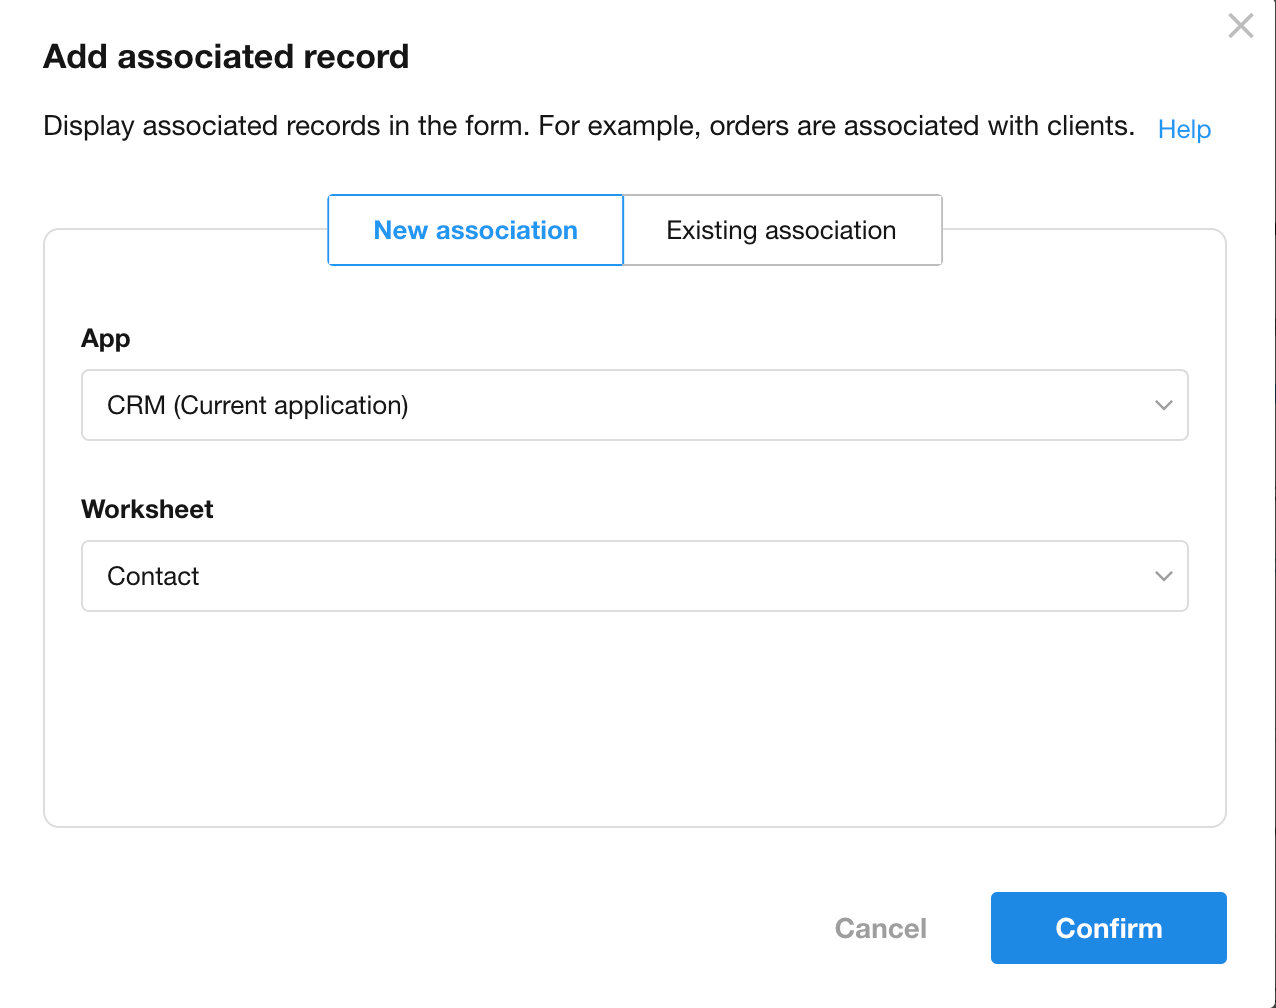
2. Relate to the target worksheet
Select which worksheet to relate to the current worksheet. Here, we choose the Contacts worksheet in the current app. Users can also select a worksheet from another app.
If you want to relate to a worksheet in another app, you must be an administrator or developer of the target app to have permission to select it.
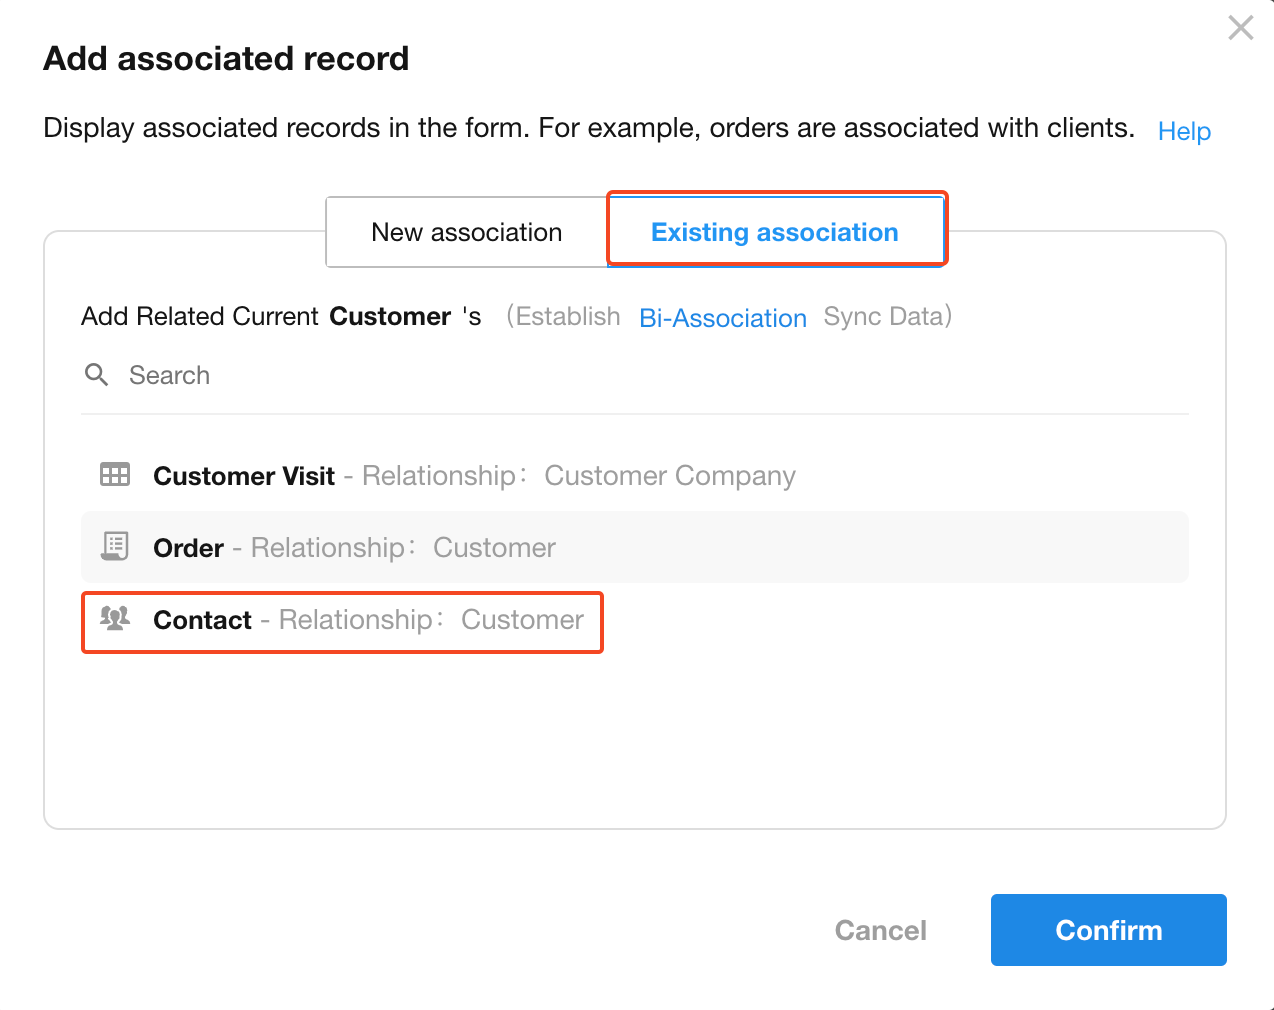
If a relationship has already been added in the other worksheet, you need to choose from the existing relationships. For example, if we have already enabled the relationship with the Contacts worksheet in the Customers worksheet, then when setting up the relationship in the Contacts worksheet, you only need to add it from the existing relationships.
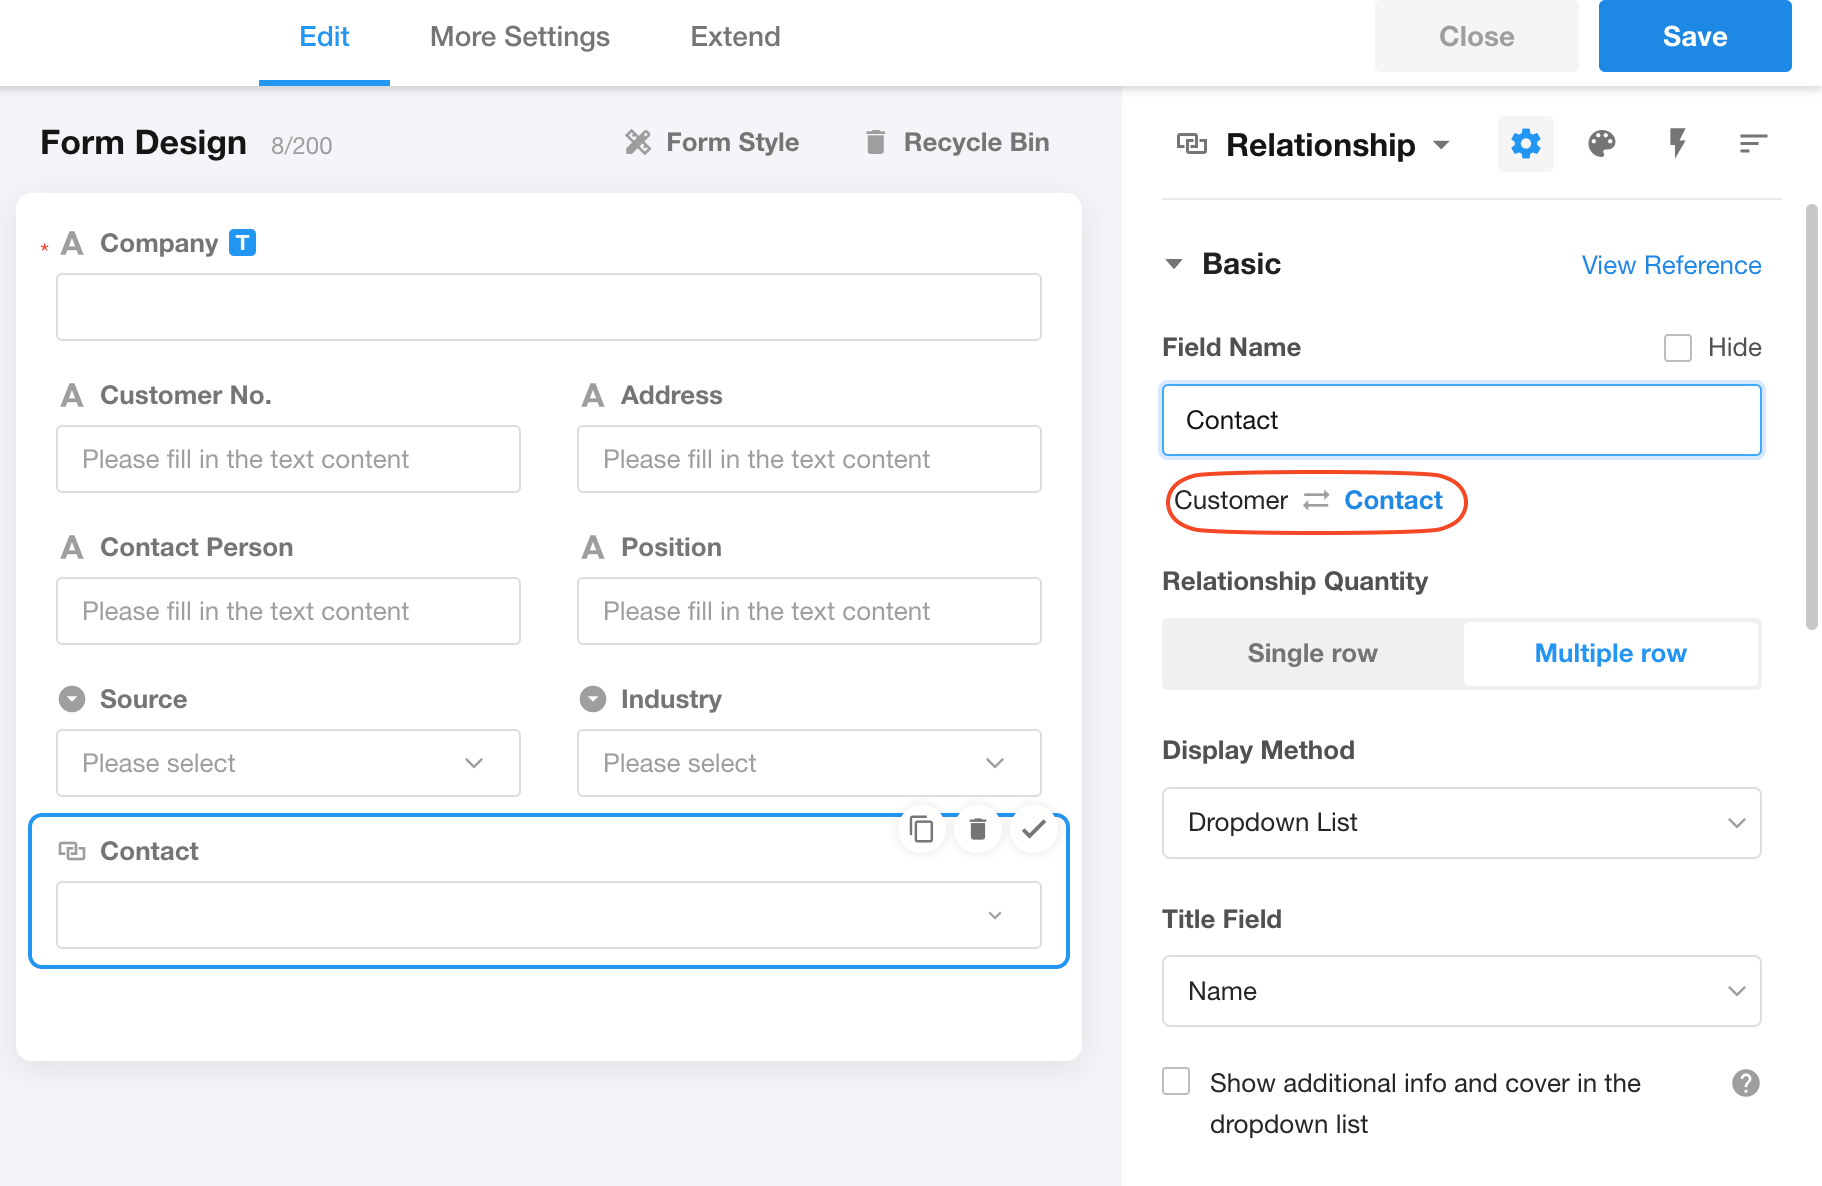
Bi-directional relationship
Take the Customers and Contacts worksheets as an example. In a customer record, you may need to relate certain contacts, while in a contact record, you may need to specify which customer it belongs to. These two worksheets can be related and synchronized through relationship fields — this is called a bidirectional relationship. If a customer record is related to a contact record, the contact record will automatically display its link to that customer.
In relationship field settings, the following icon indicates a bidirectional relationship.
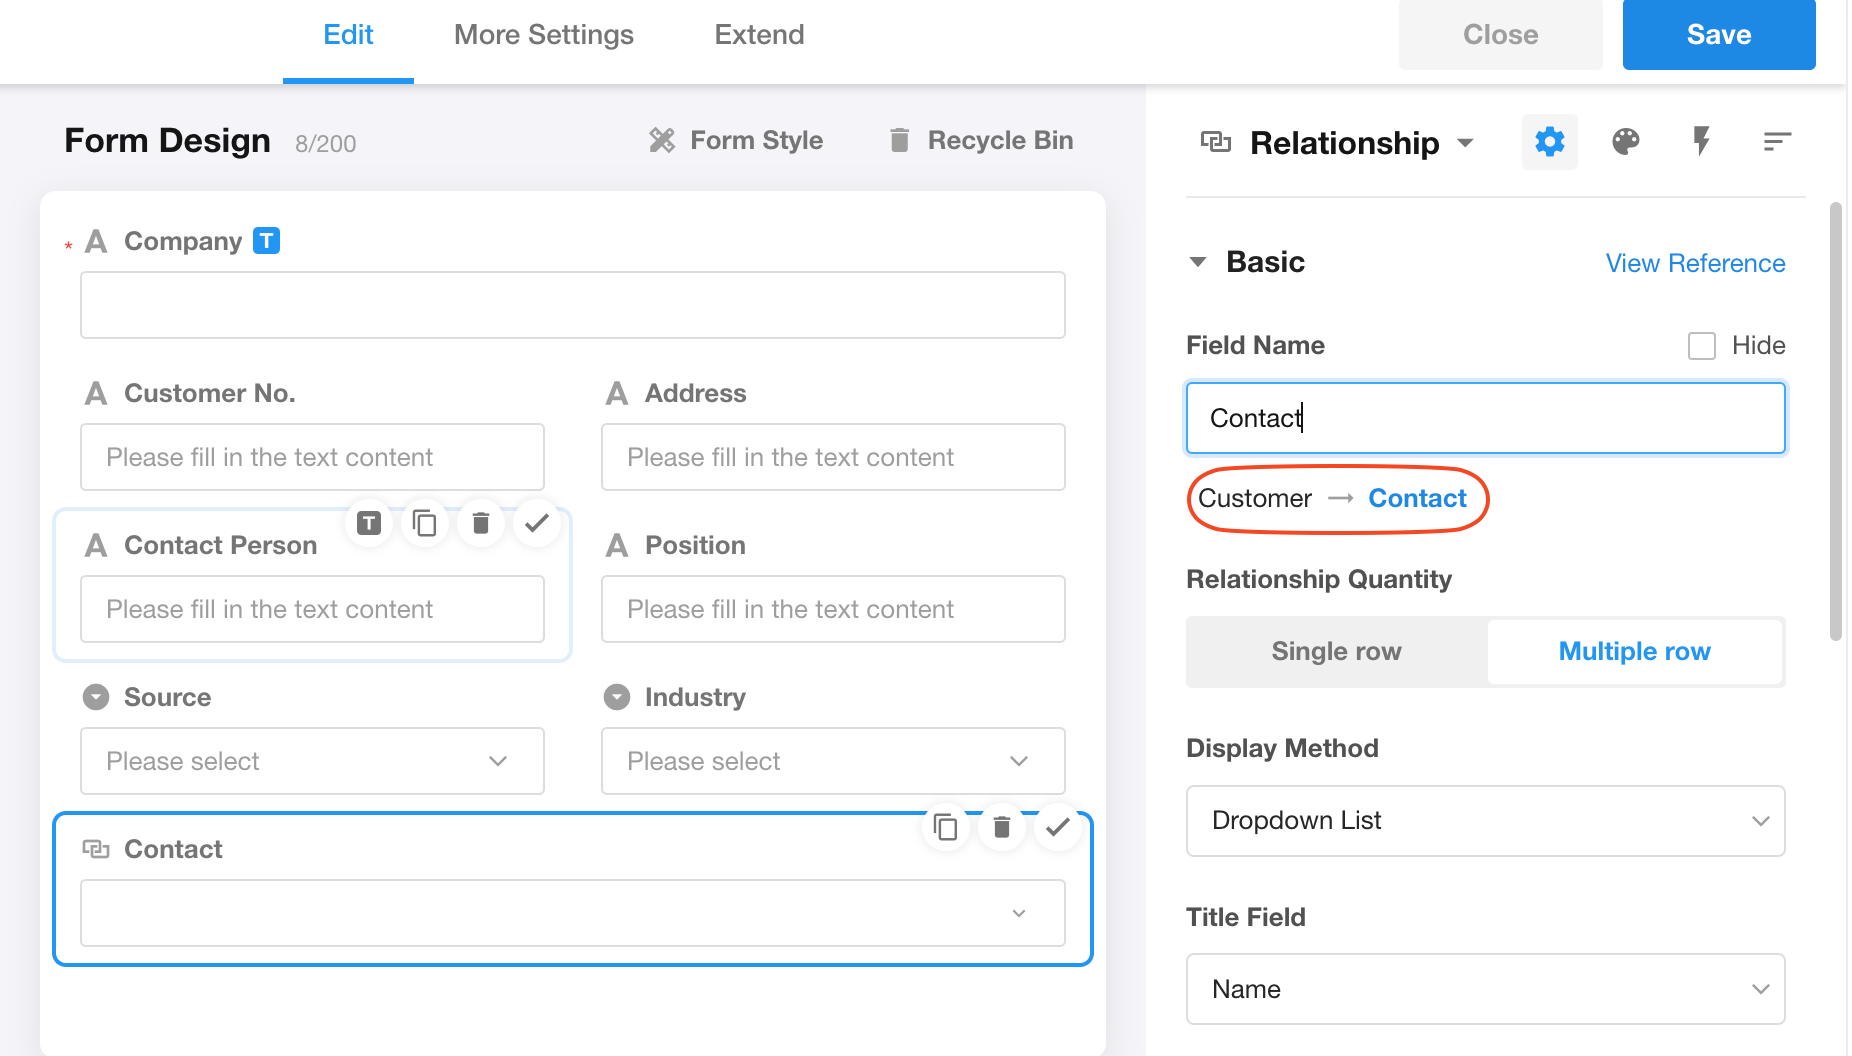
Uni-directional relationship
In relationship field settings, the following icon indicates a unidirectional relationship.
3. Attributes of relationship field
Basic settings
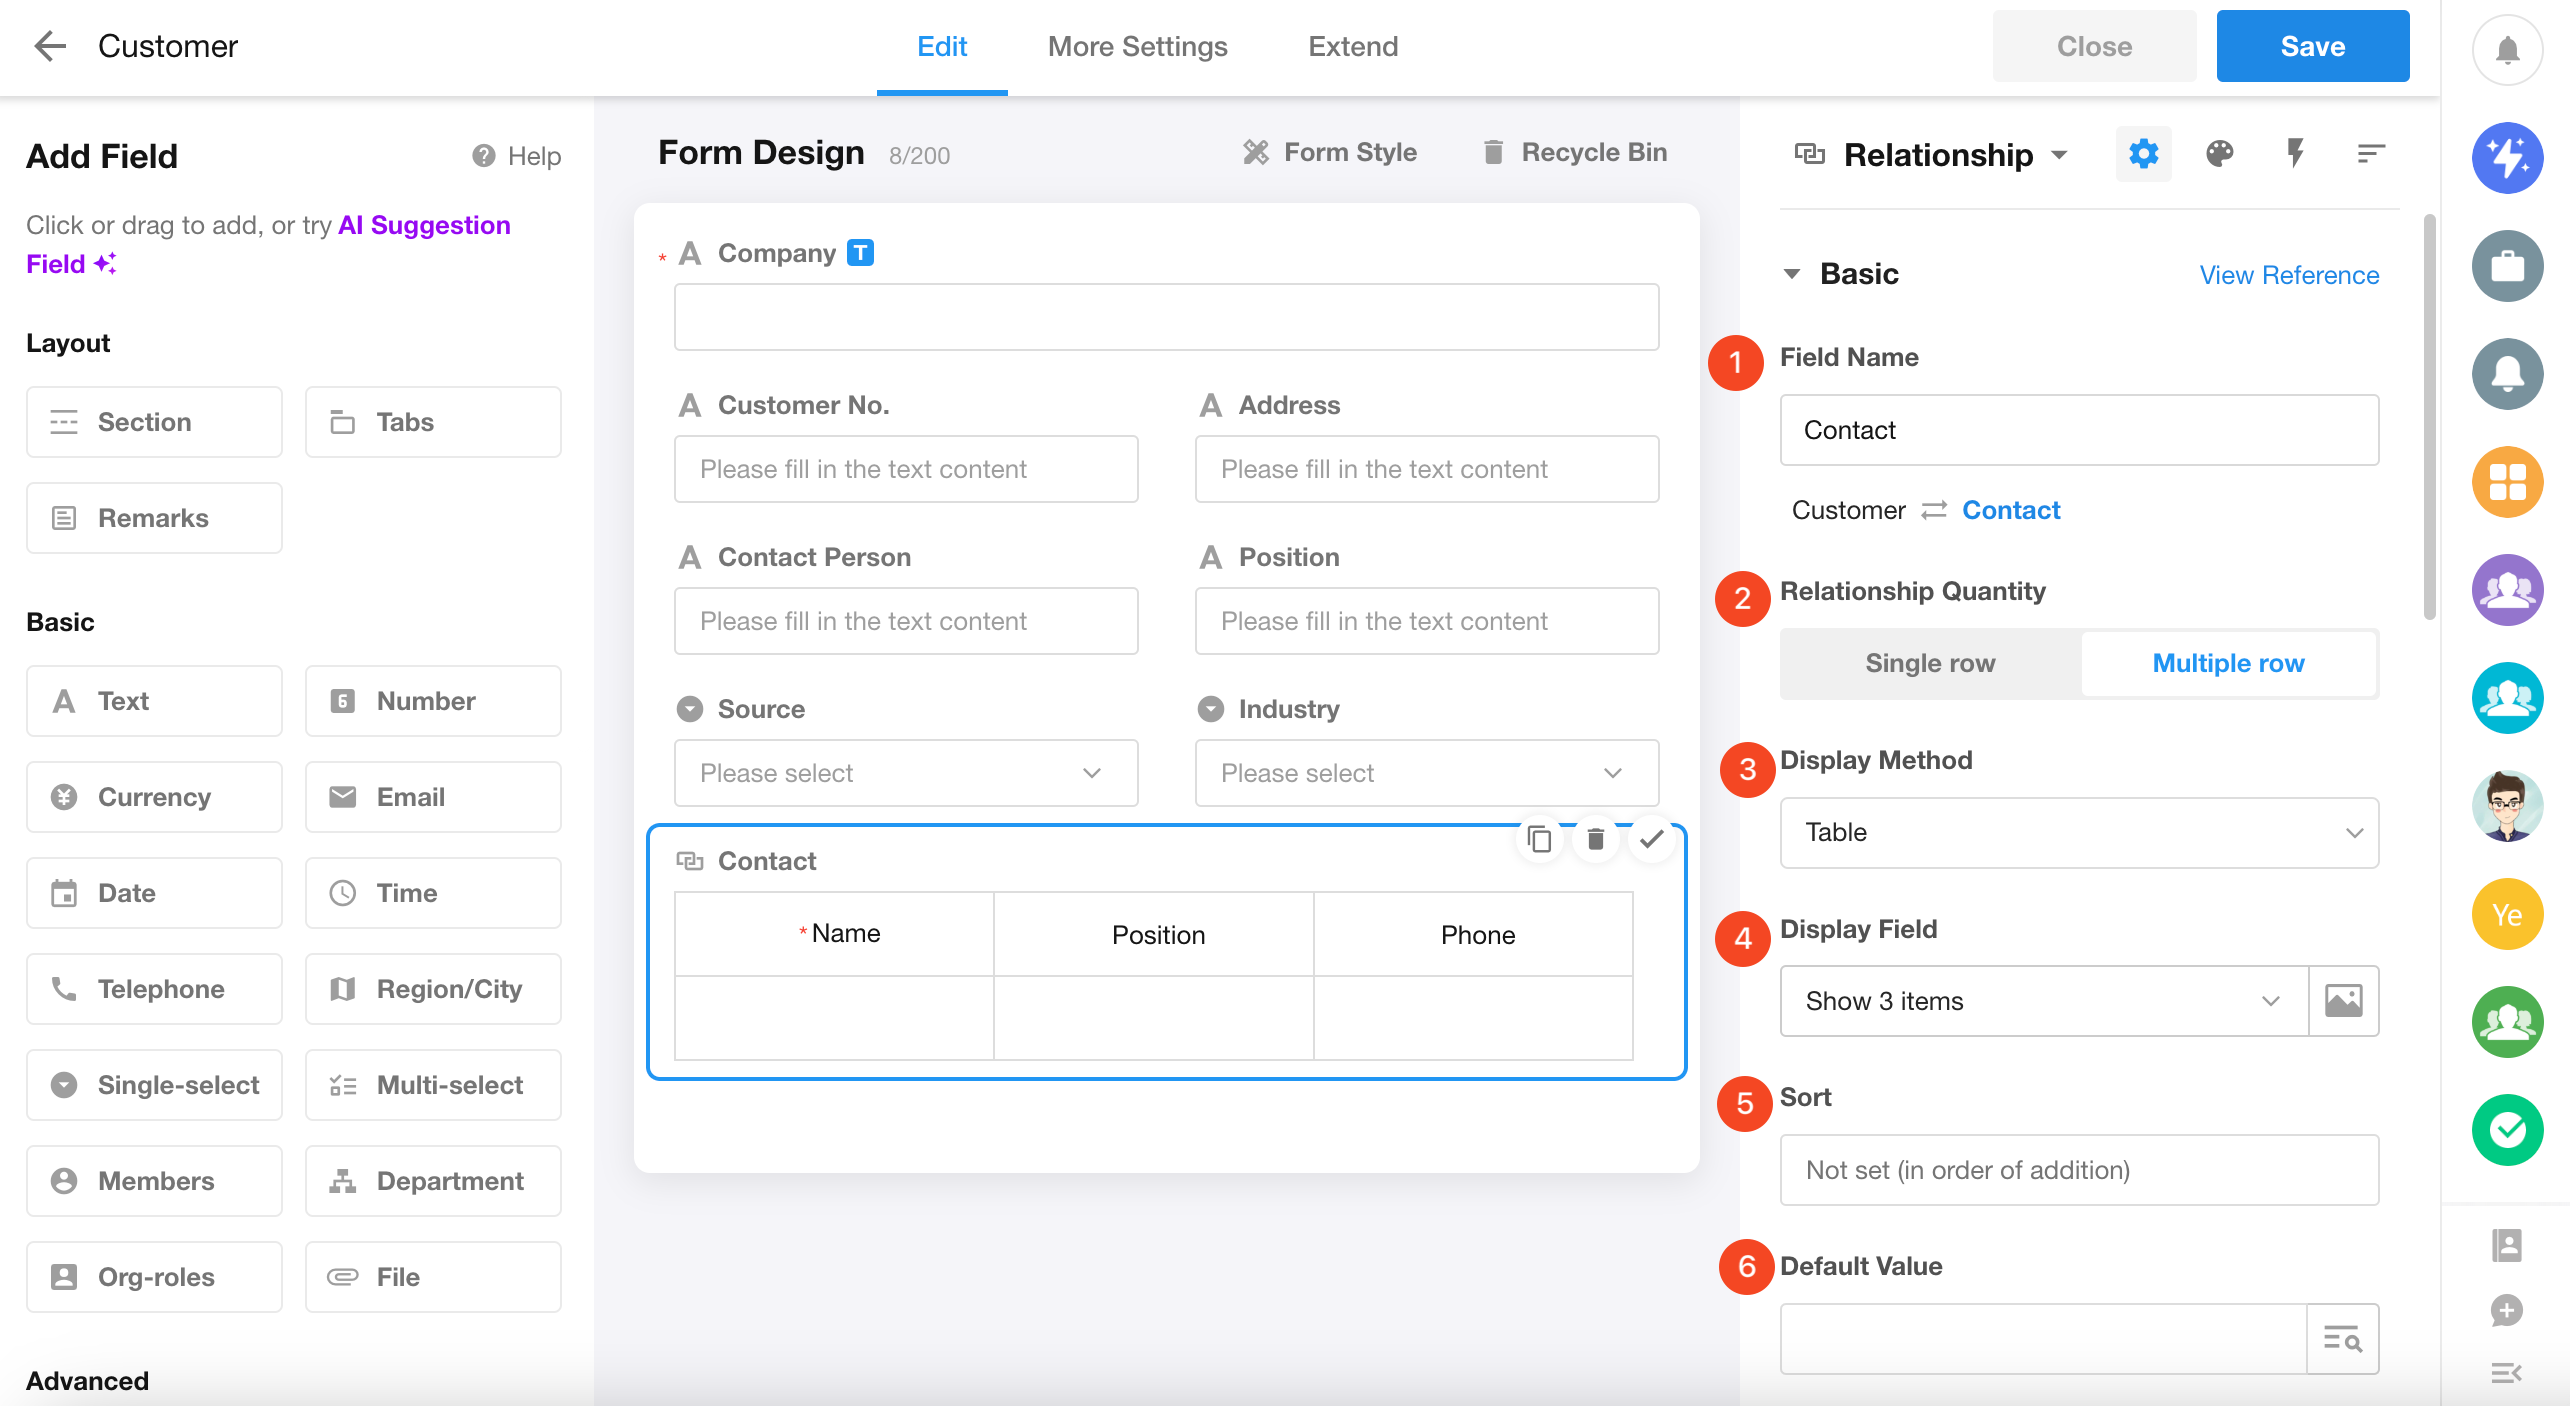
Field name
Set the relationship field name to display the contact records in this customer worksheet.
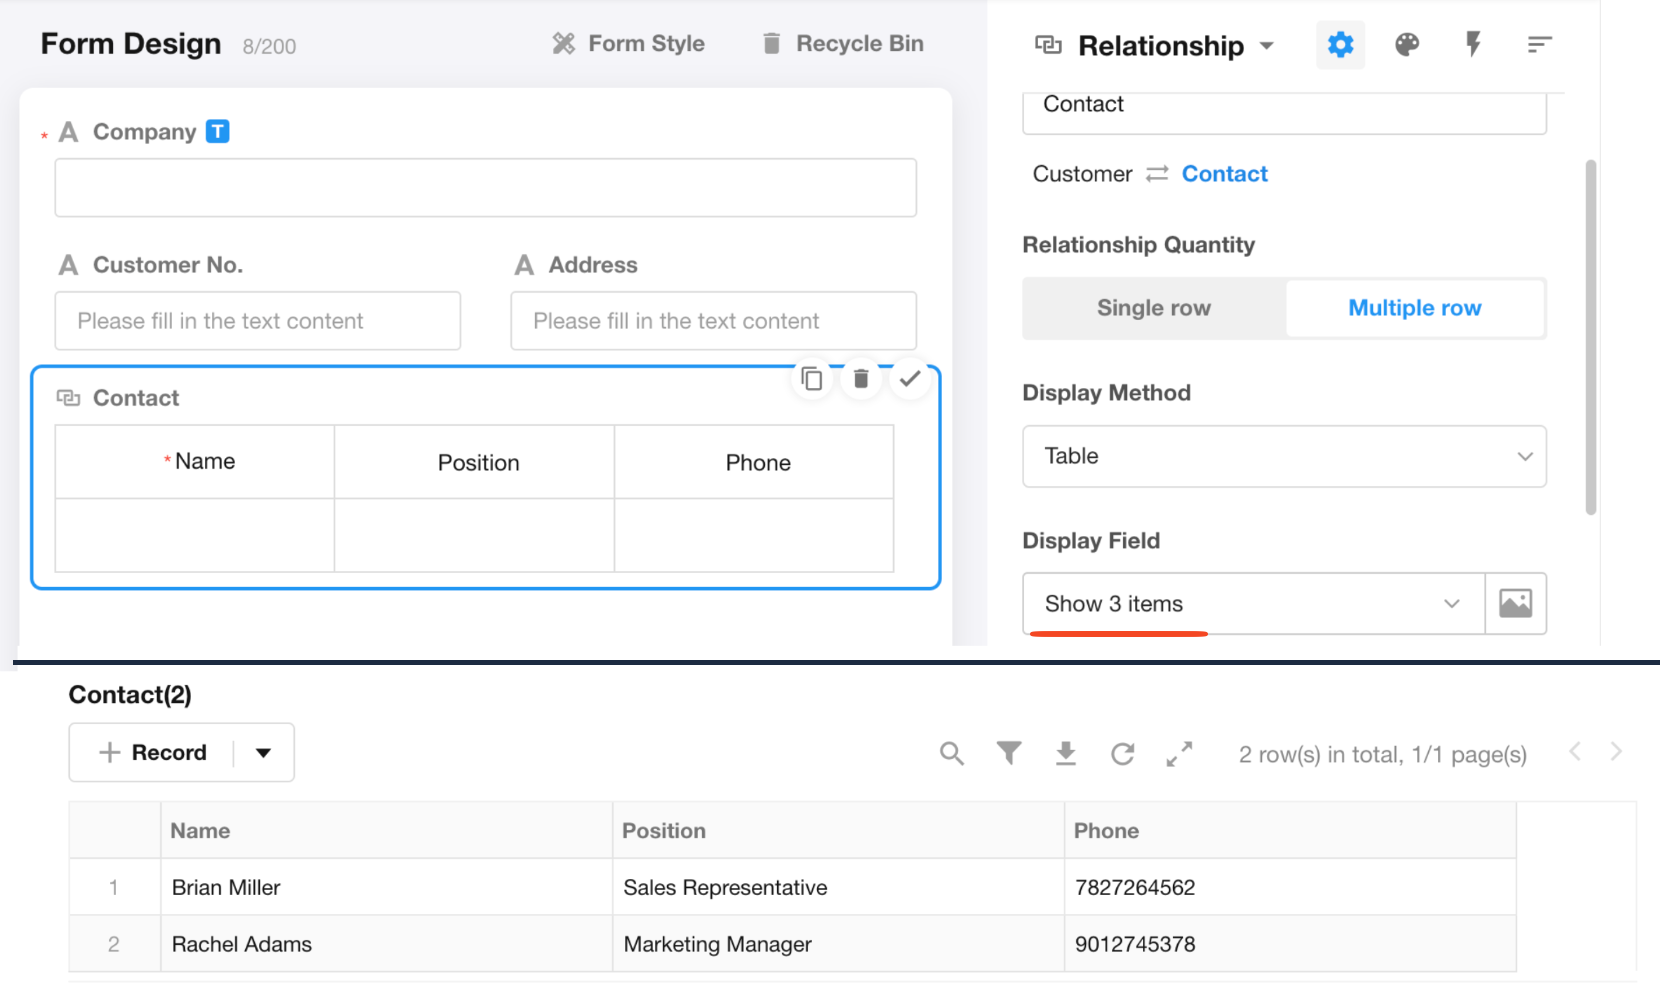
Relationship quantity
Multiple rows: Allow relating one or multiple records.
Single row: Only allow relating one record.
Choosing the proper relationship quantity has a significant impact on data loading efficiency and data display. It is recommended to choose relating a single record whenever possible, if it logically allows and meets the business requirements. This helps improve data consistency and query efficiency.
Always choose the correct relationship quantity (single or multiple), as this affects data loading performance and display. Follow this rule: If single row is sufficient, always prefer single row over multiple rows.
Introduction to three types of relationships
Display modes of related records
To select and display multiple related records
When there is a need to select and display multiple related records, we provide the following four methods:
-
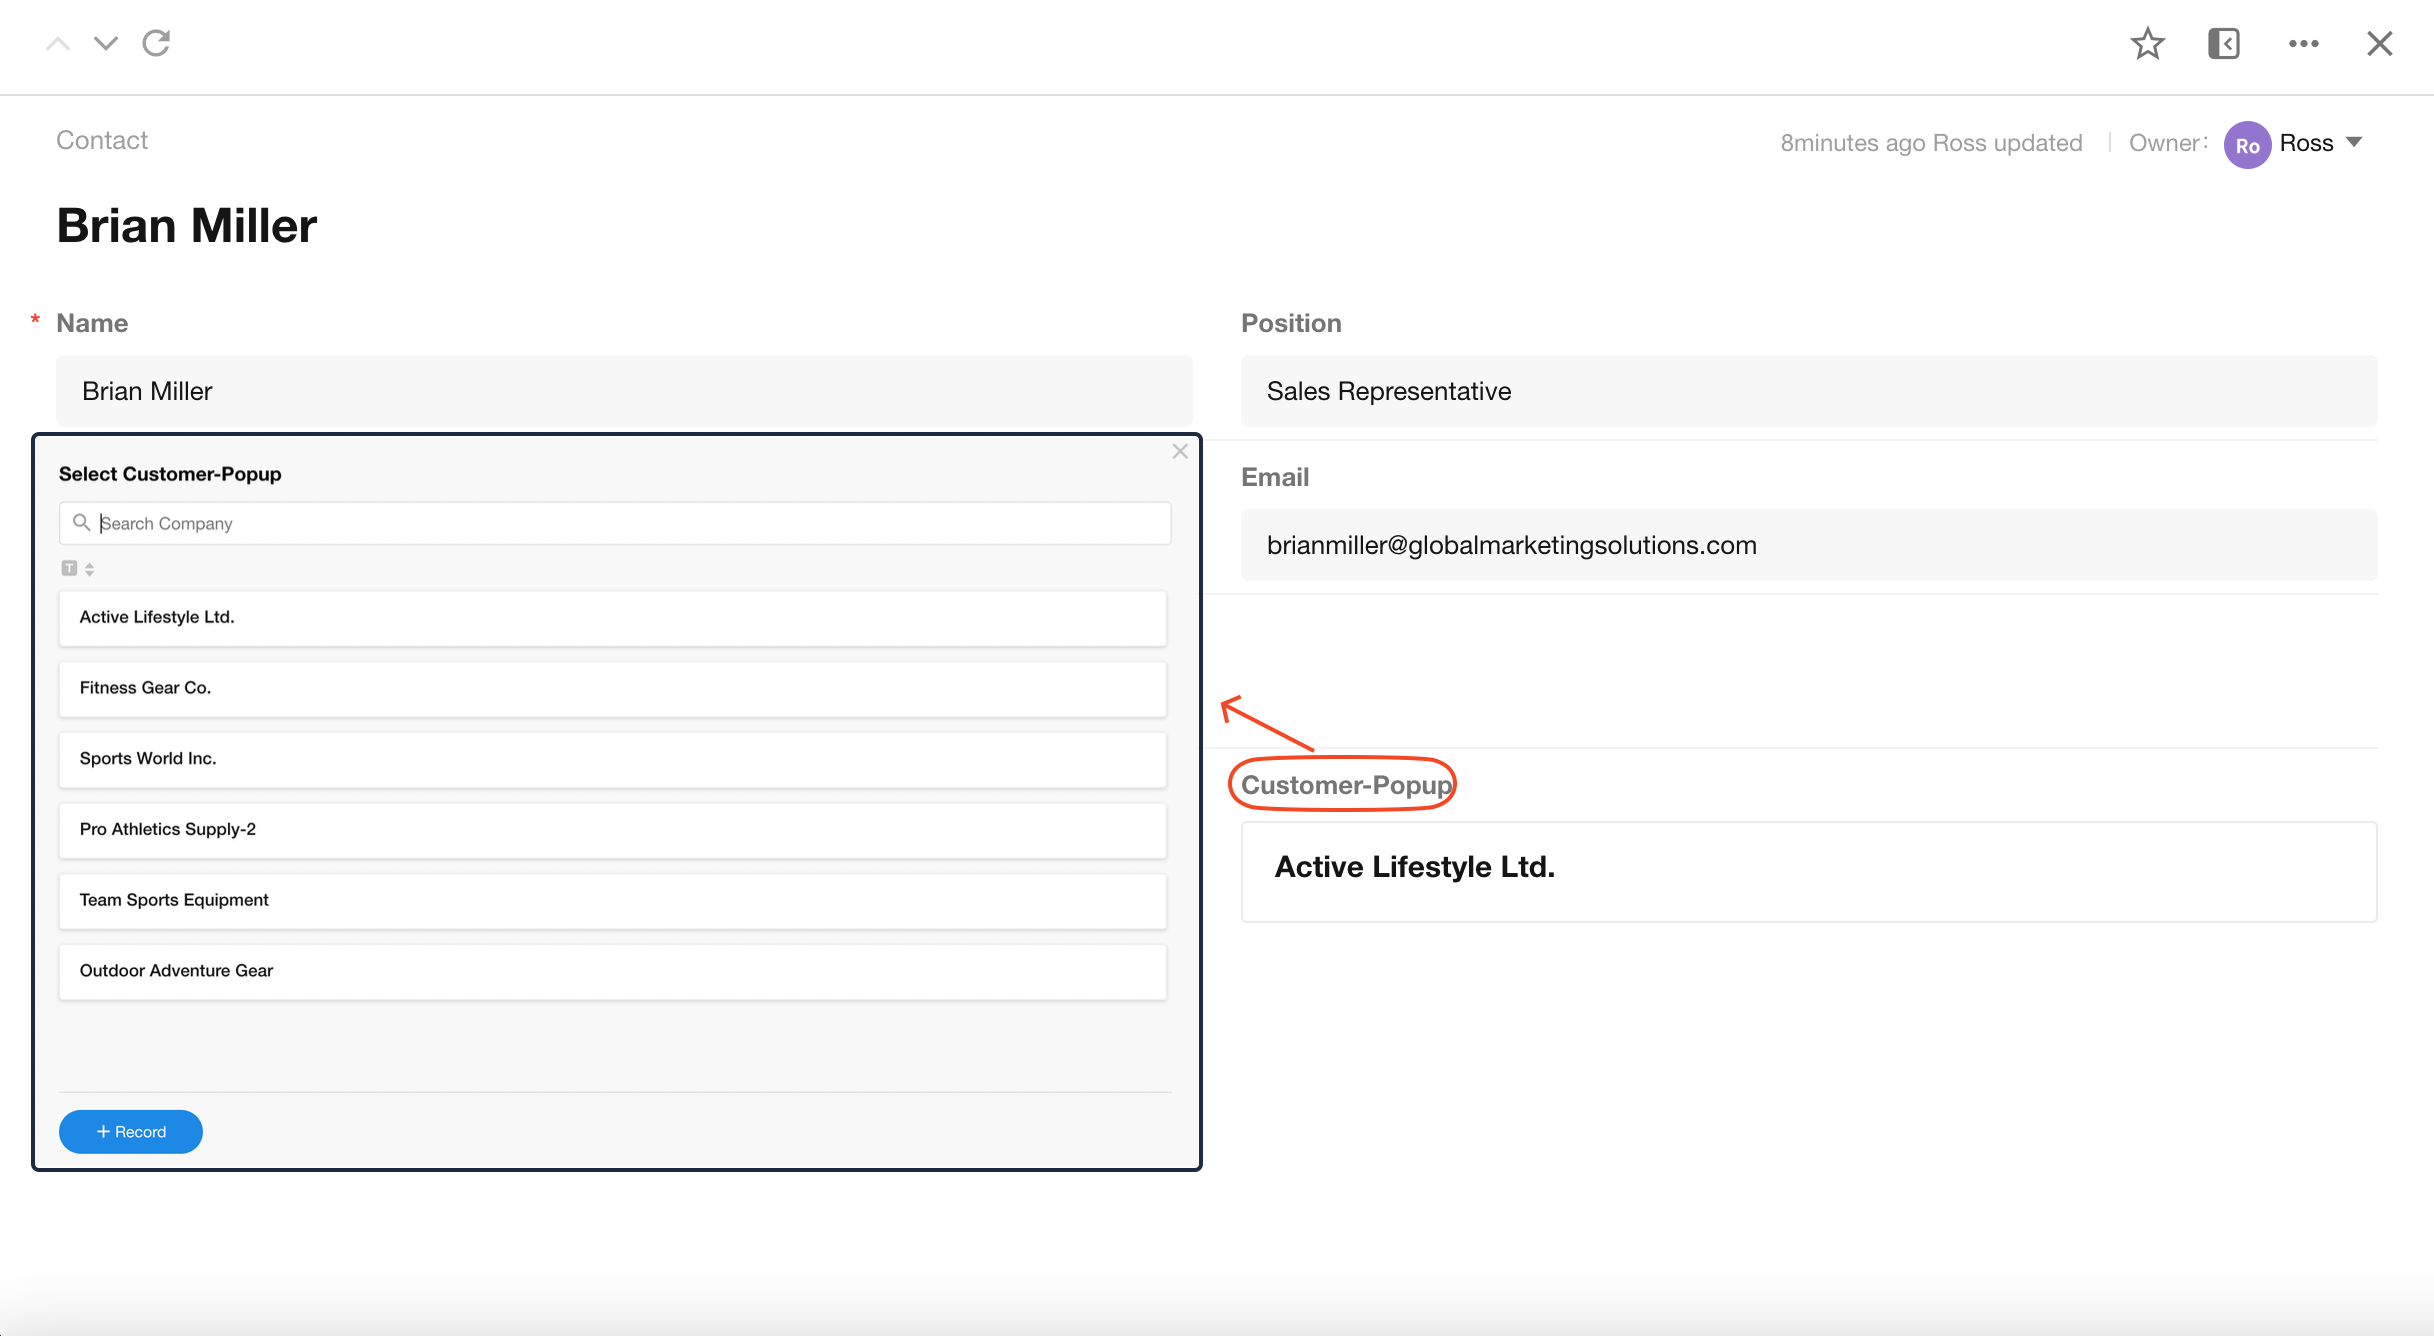
Card: Display selectable records in a pop-up window, showing the related records in card format.
-
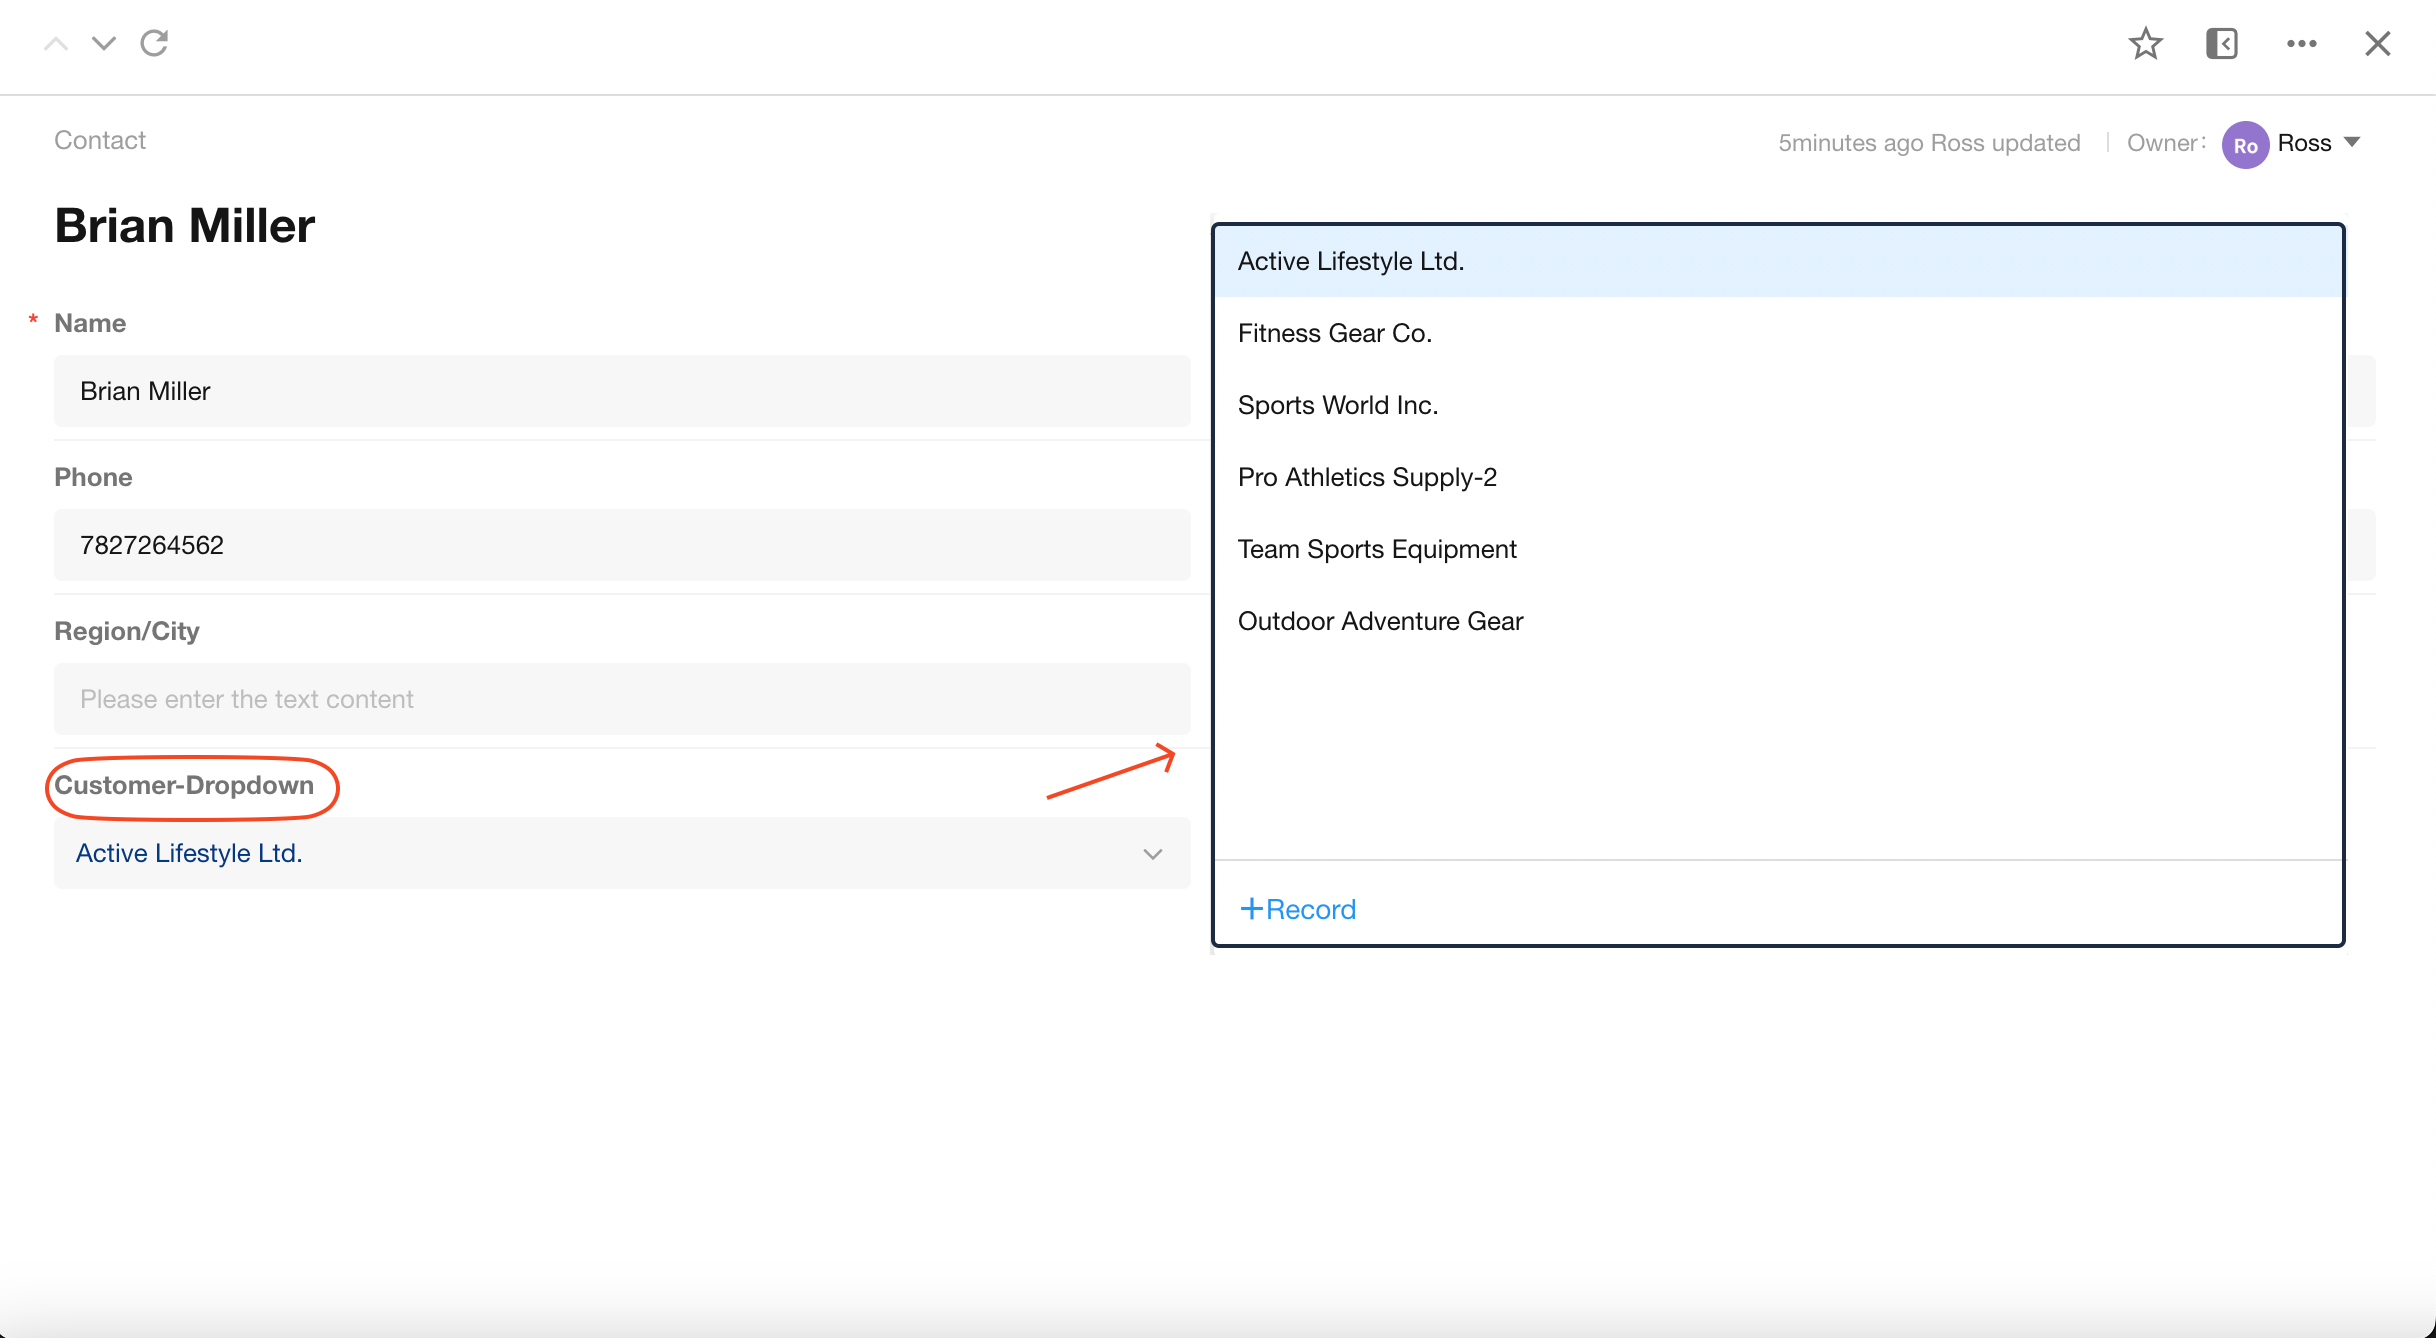
Dropdown List: Select and display related records through a dropdown menu.
-
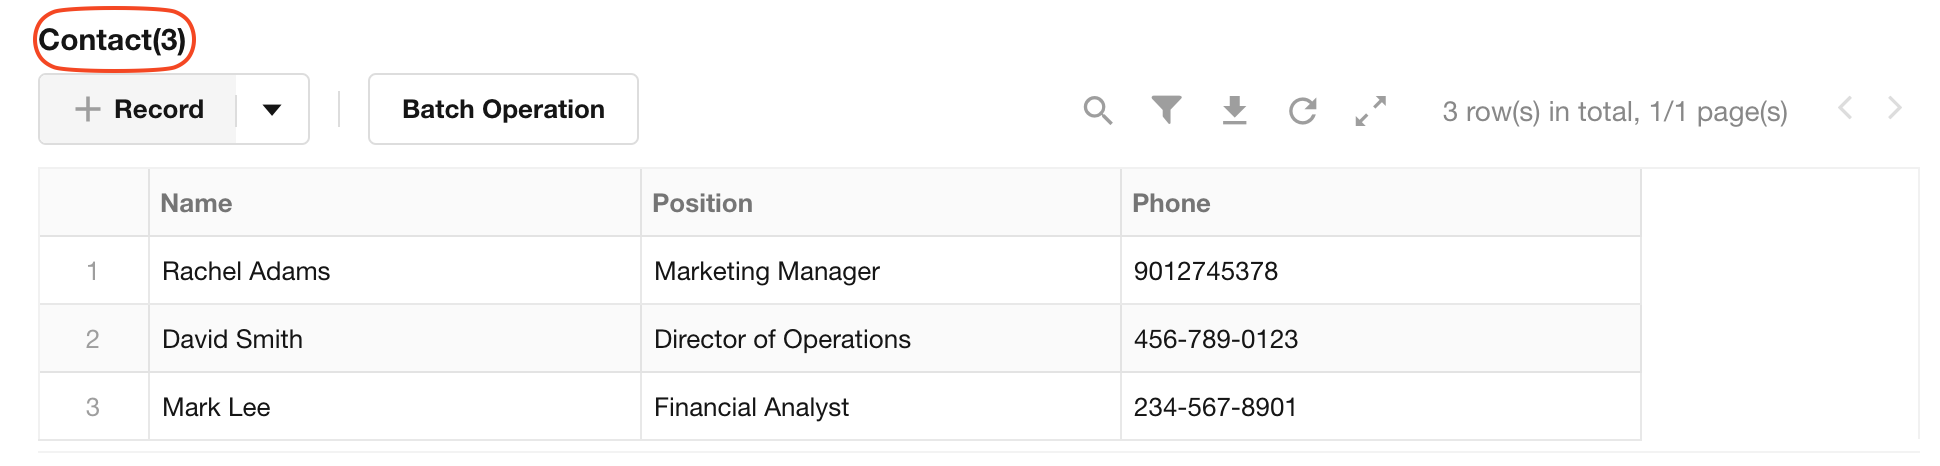
Table: Display related records in a table, providing a clear view of detailed information for multiple related records.
-
Tab table: Display records in a table under a tab, suitable for requirements where detailed display and switching between different related records are needed.
Note:
- Dropdown mode: Up to 50 related records
- Card mode: Up to 200 related records
- Table / Tab table mode: No limit on the number of related records


To select and display a single related record
There are two ways, dropdown list and pop-up. After selecting the related records in the pop-up, display these records in card format.
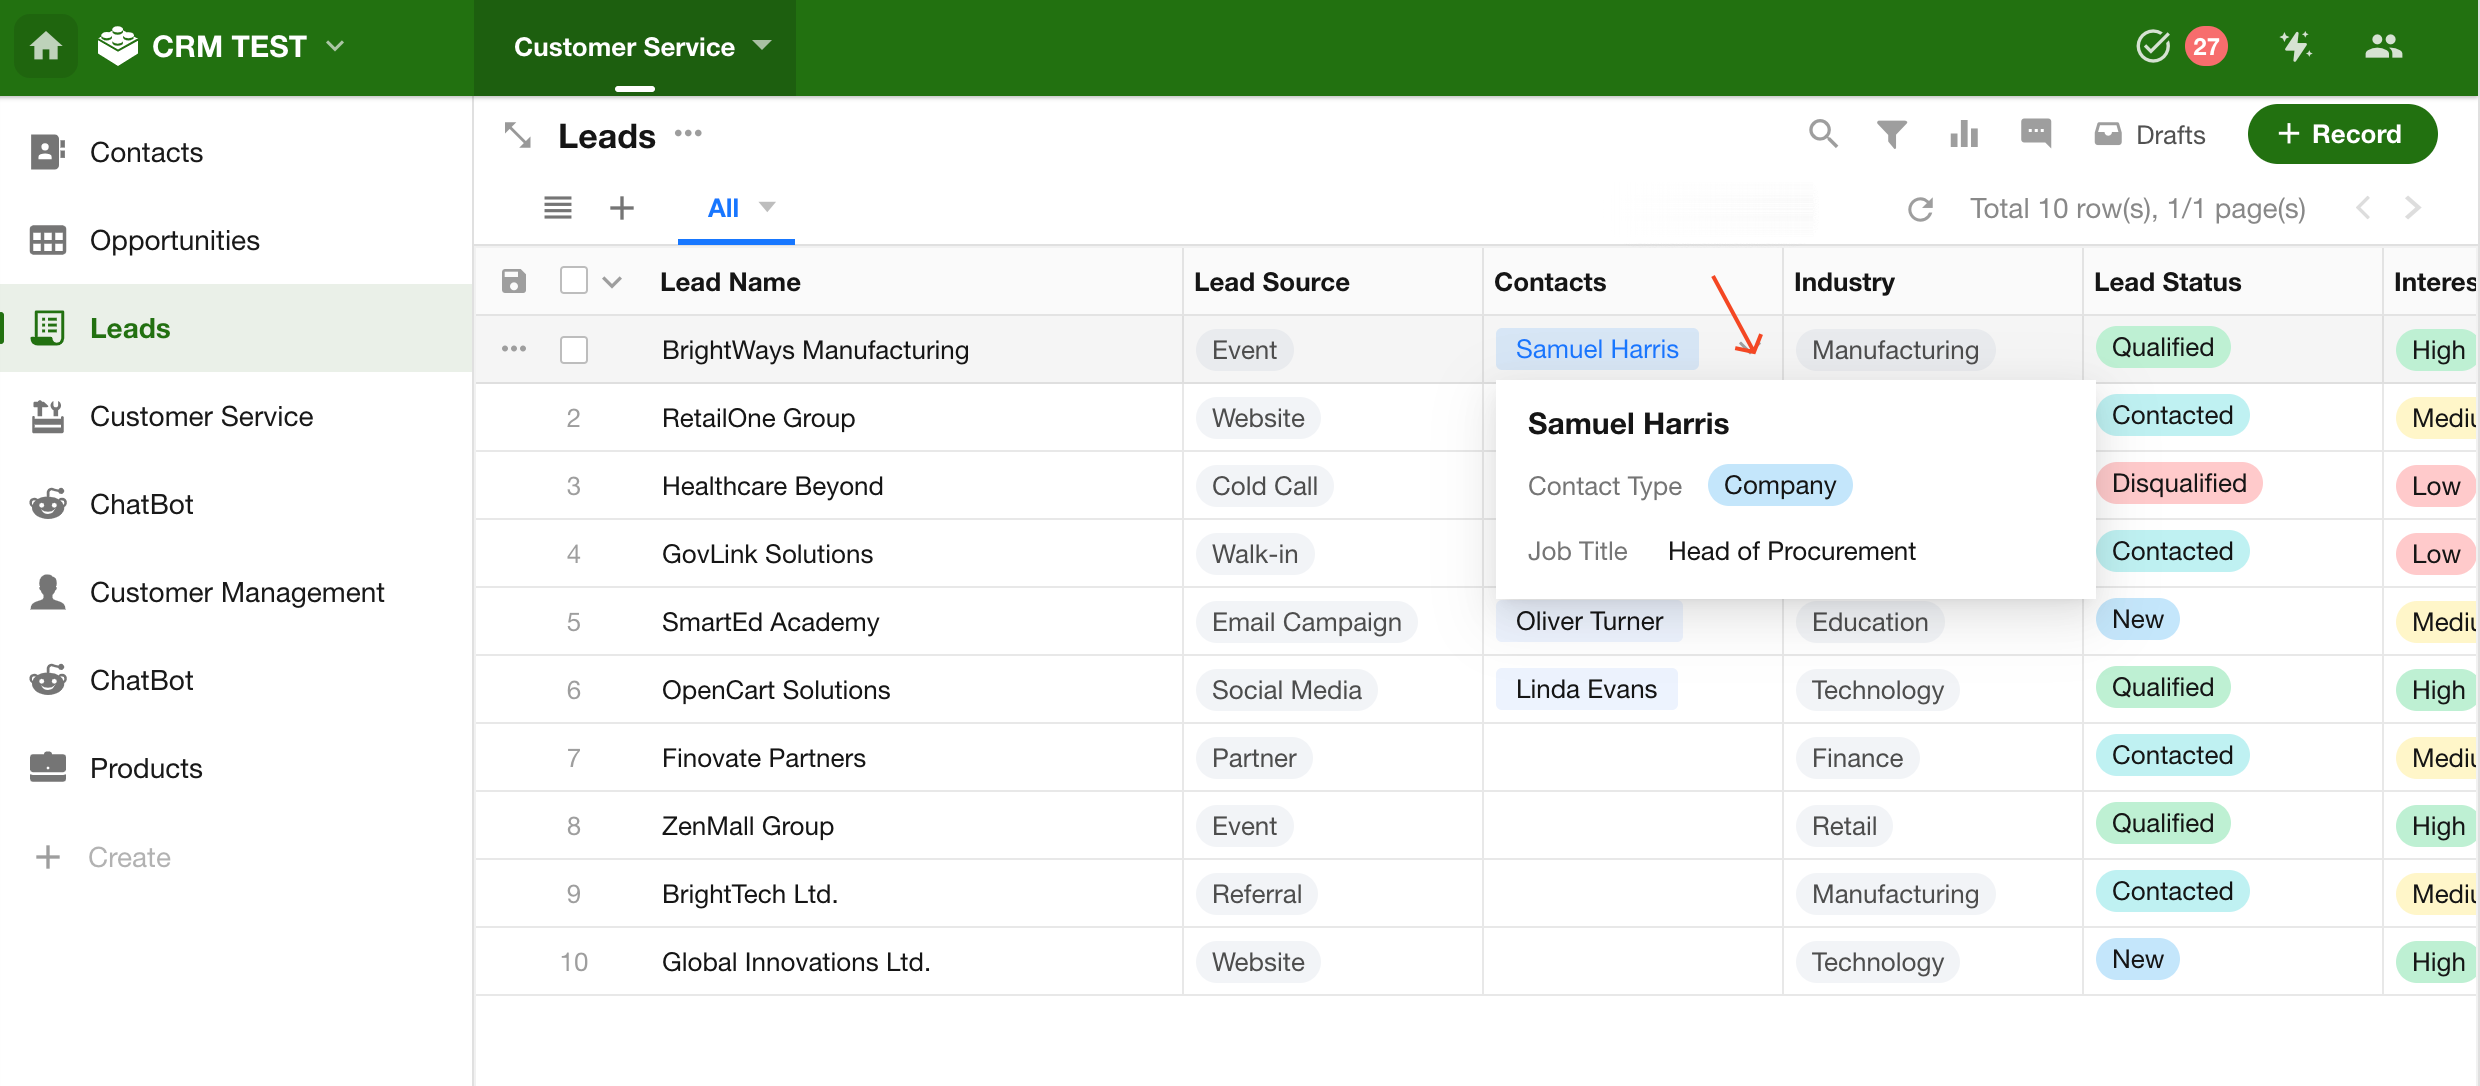
When viewing records in a view, if a relationship field is configured in single record + card mode or single record + dropdown mode, hovering over the relationship field will display a record preview card.
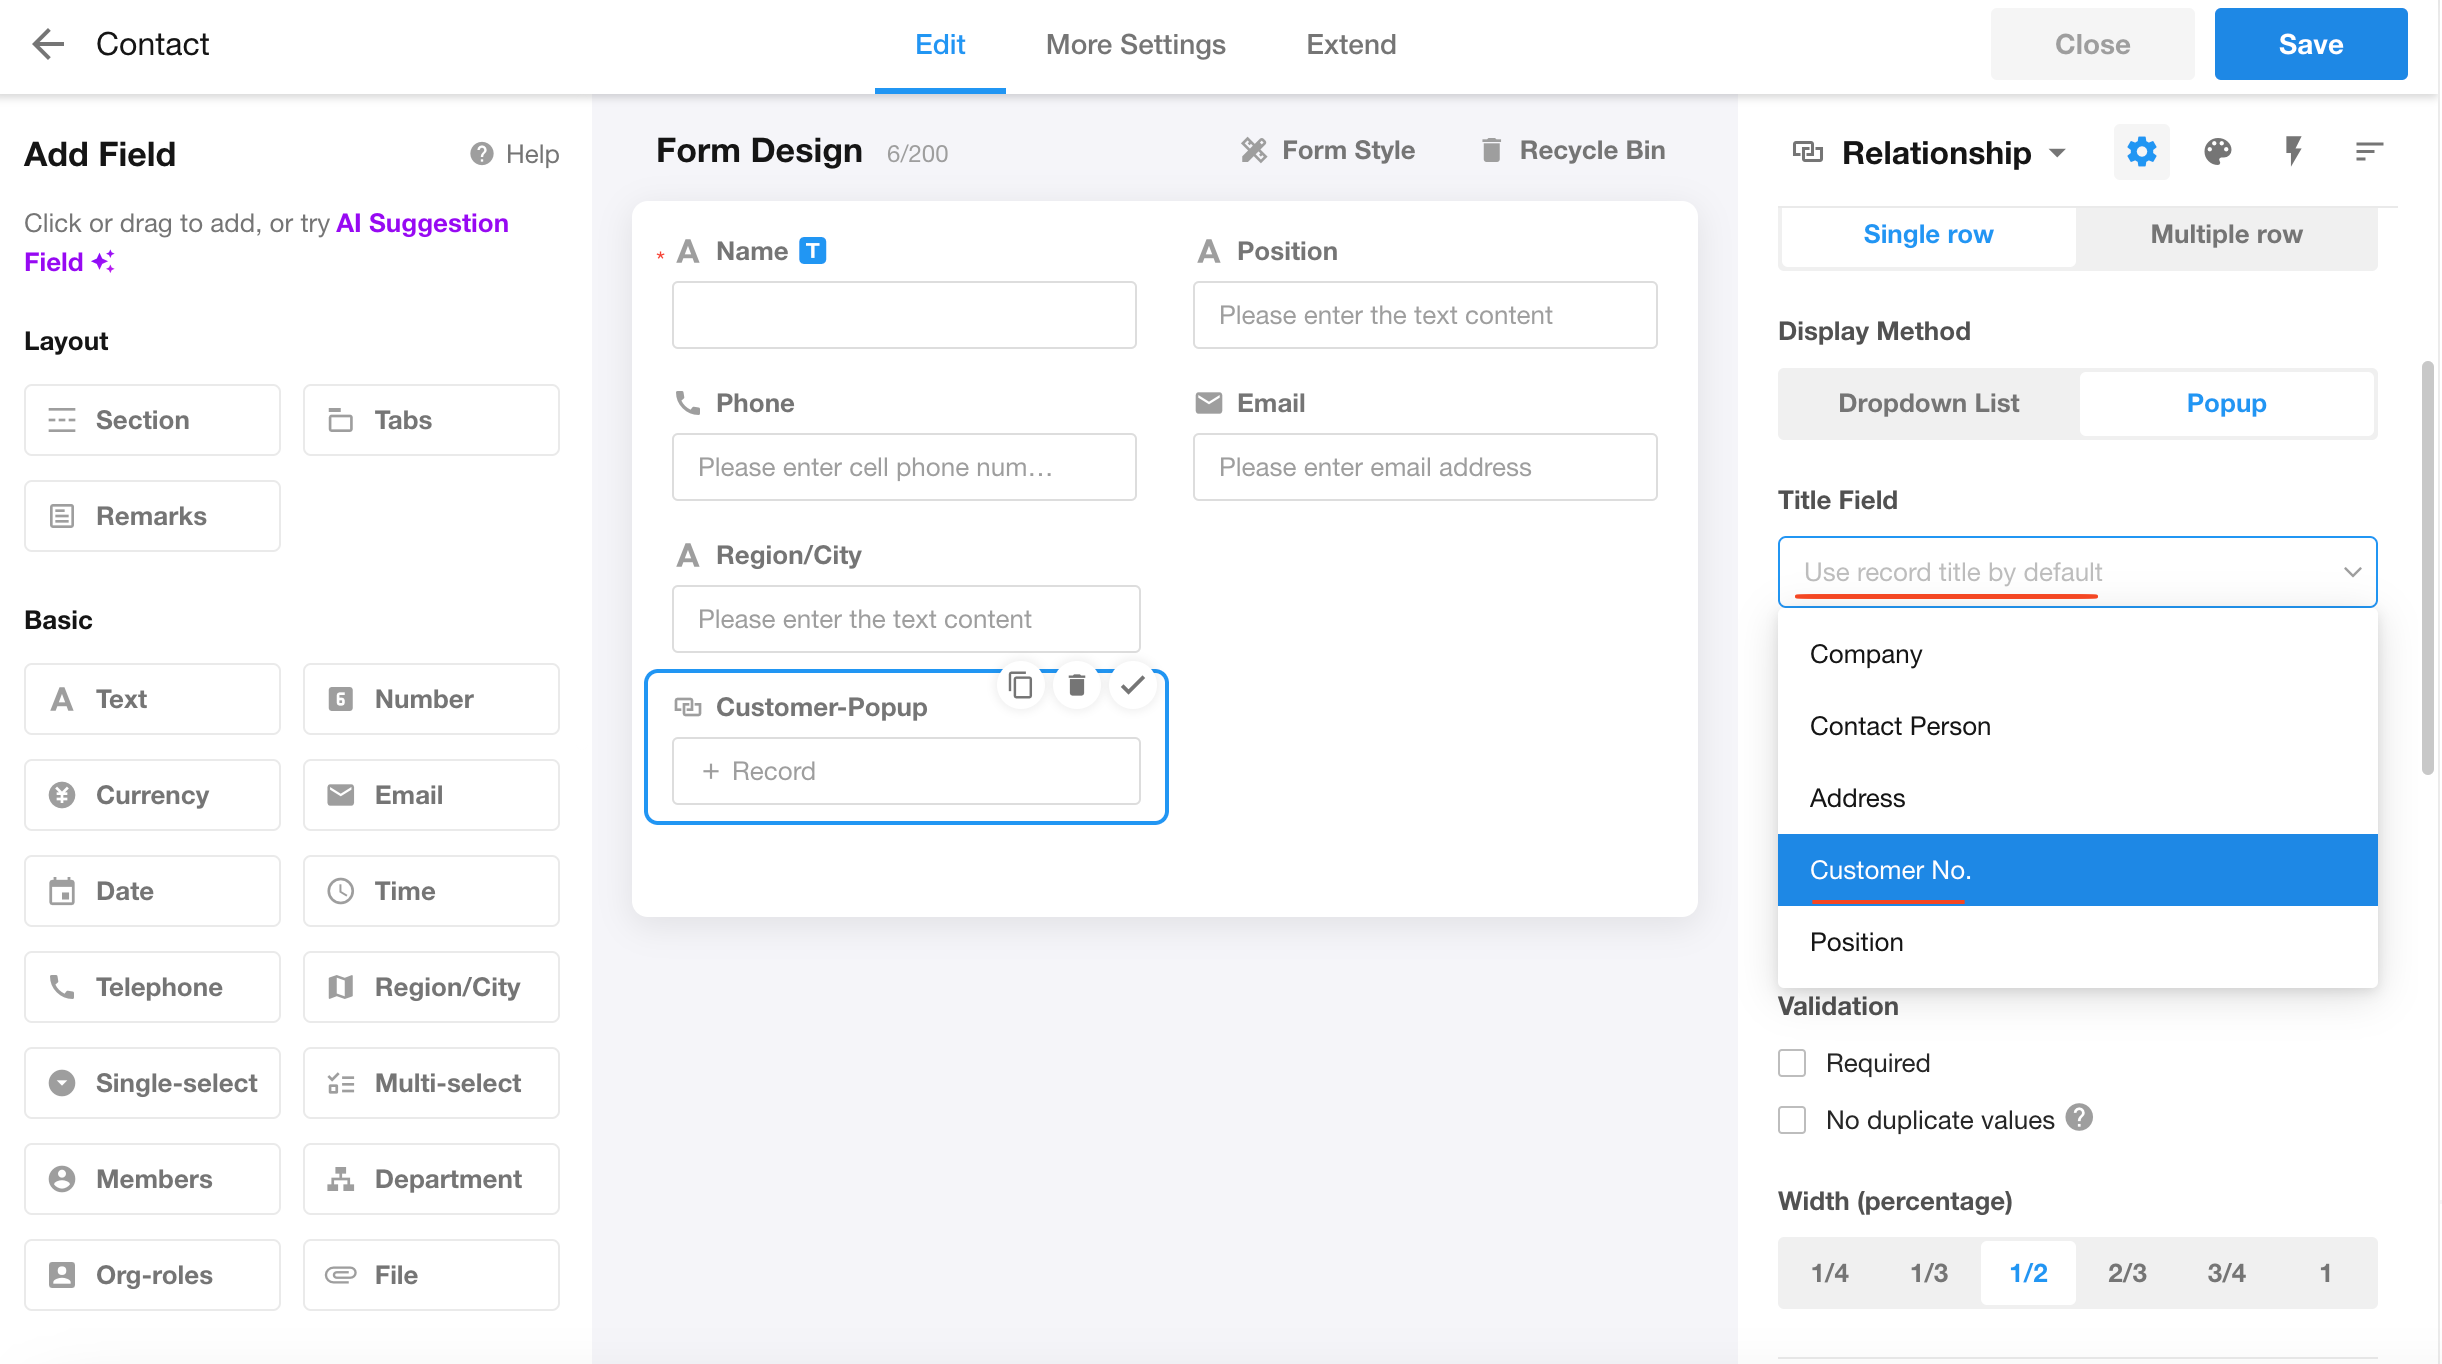
Title field
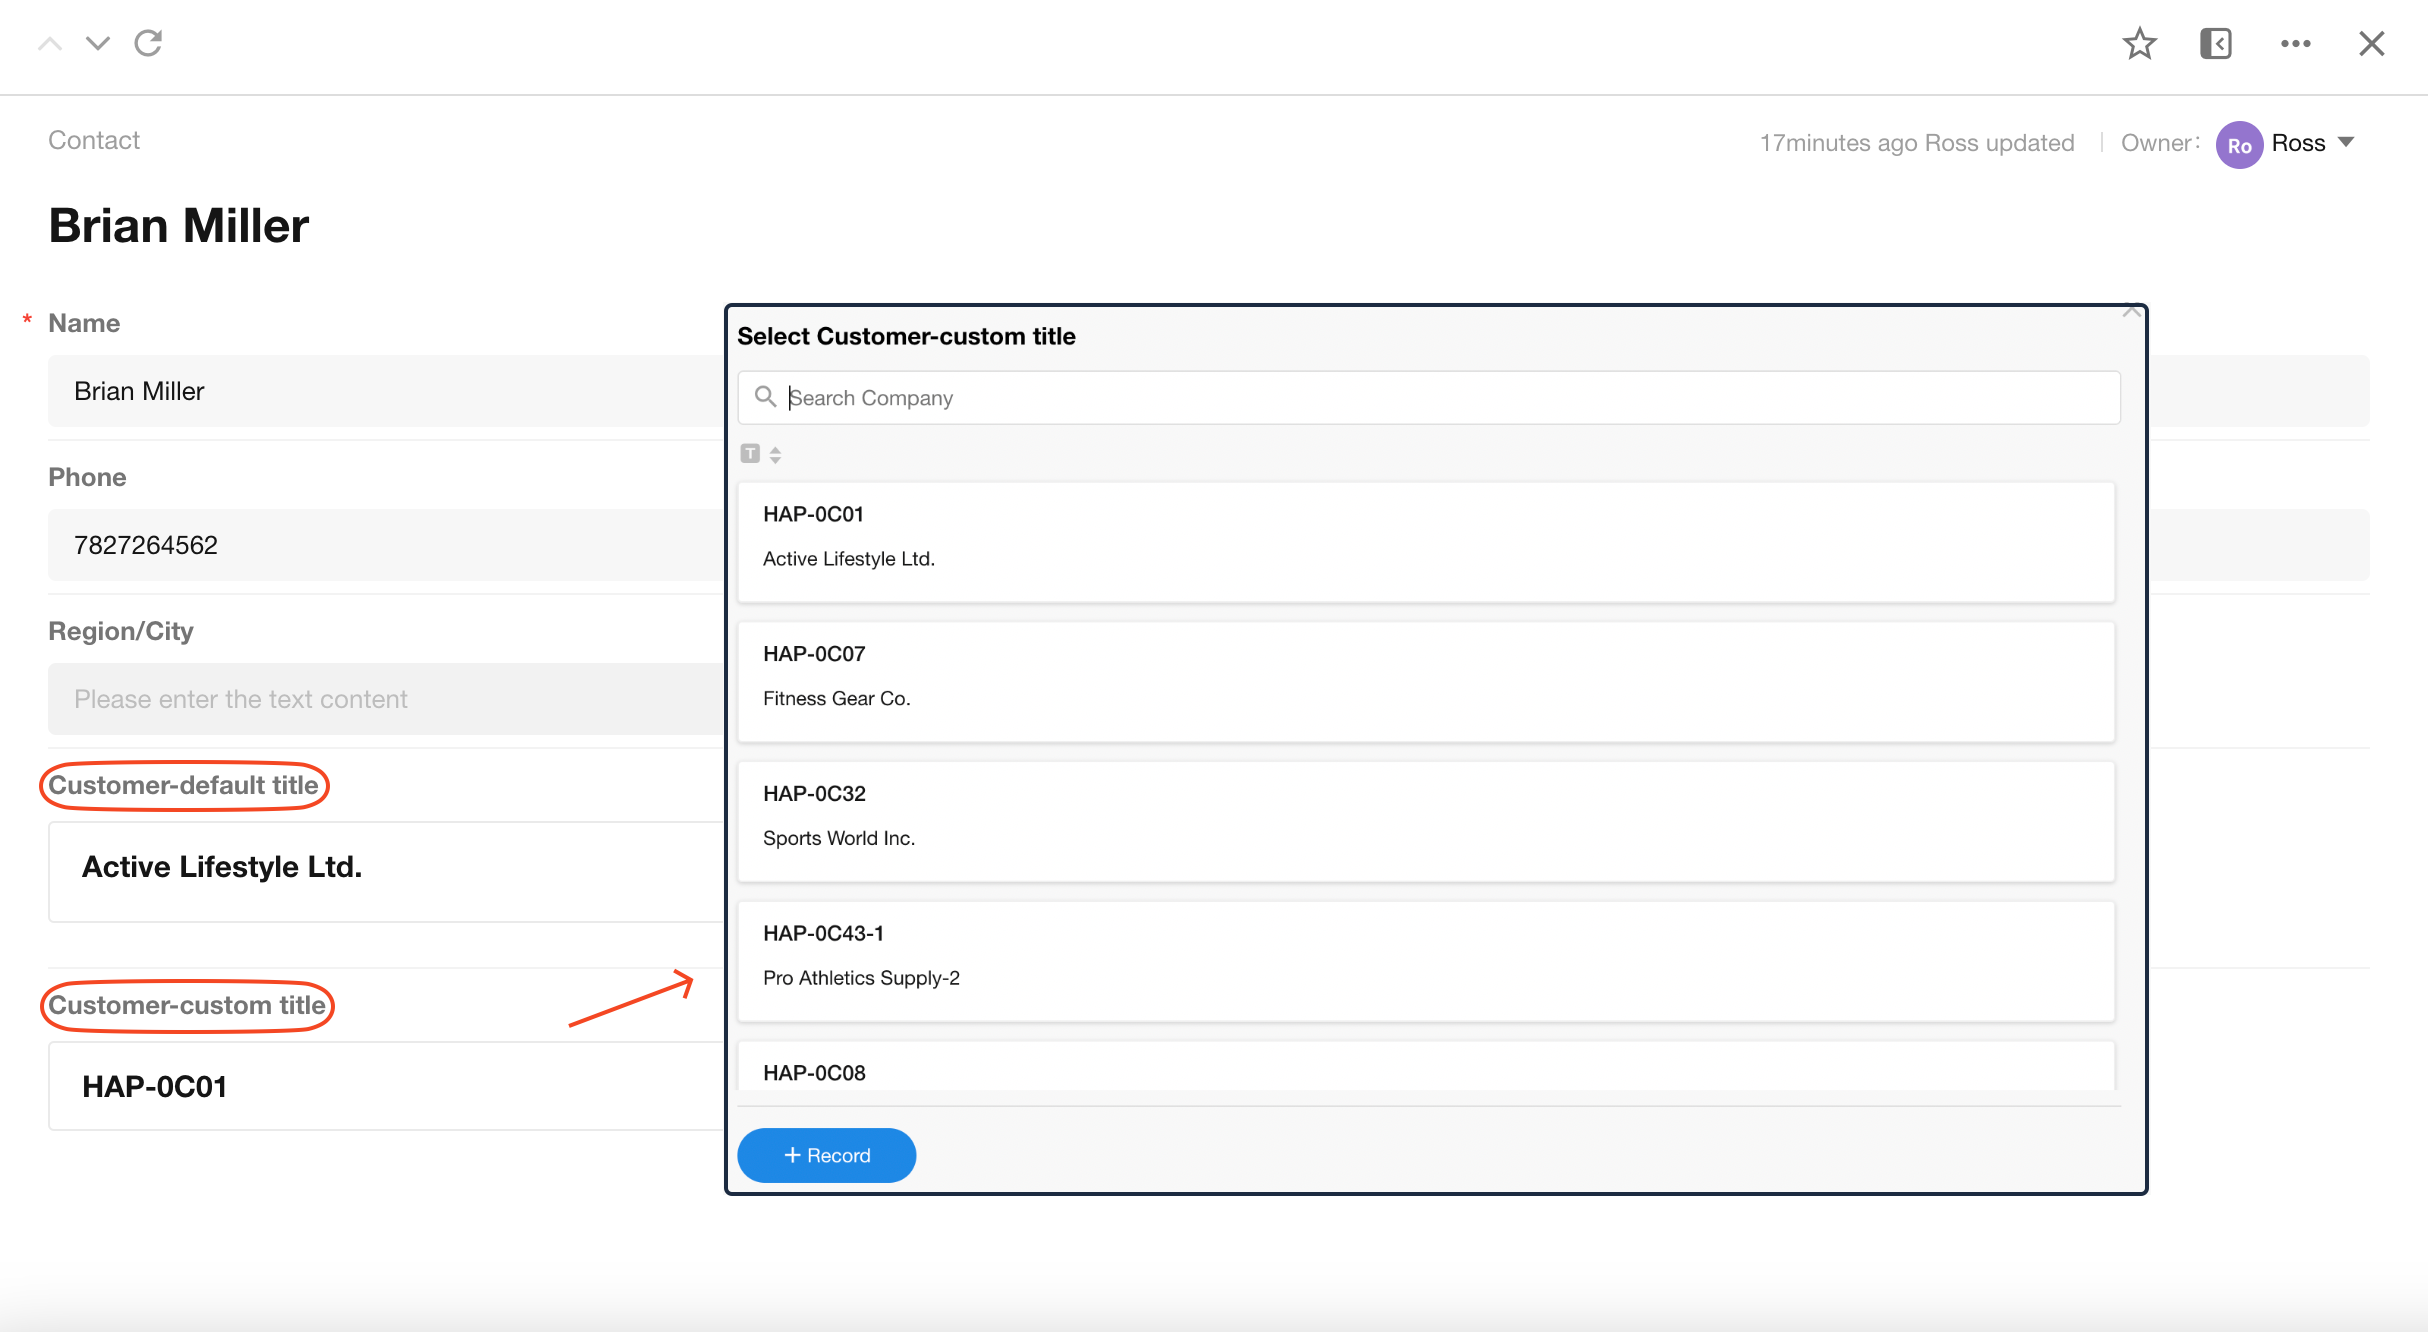
In dropdown list and card modes, users can set the title field of the related records, which is by default the title field of the related worksheet.
Effect:
Display fields
When selecting related records, in addition to the title field, it is often necessary to display more field information of the records. Users can drag and drop display fields to sort them.
-
Card
When selecting and displaying related records, other display fields and the title field are shown in the same card, displayed below the title field.
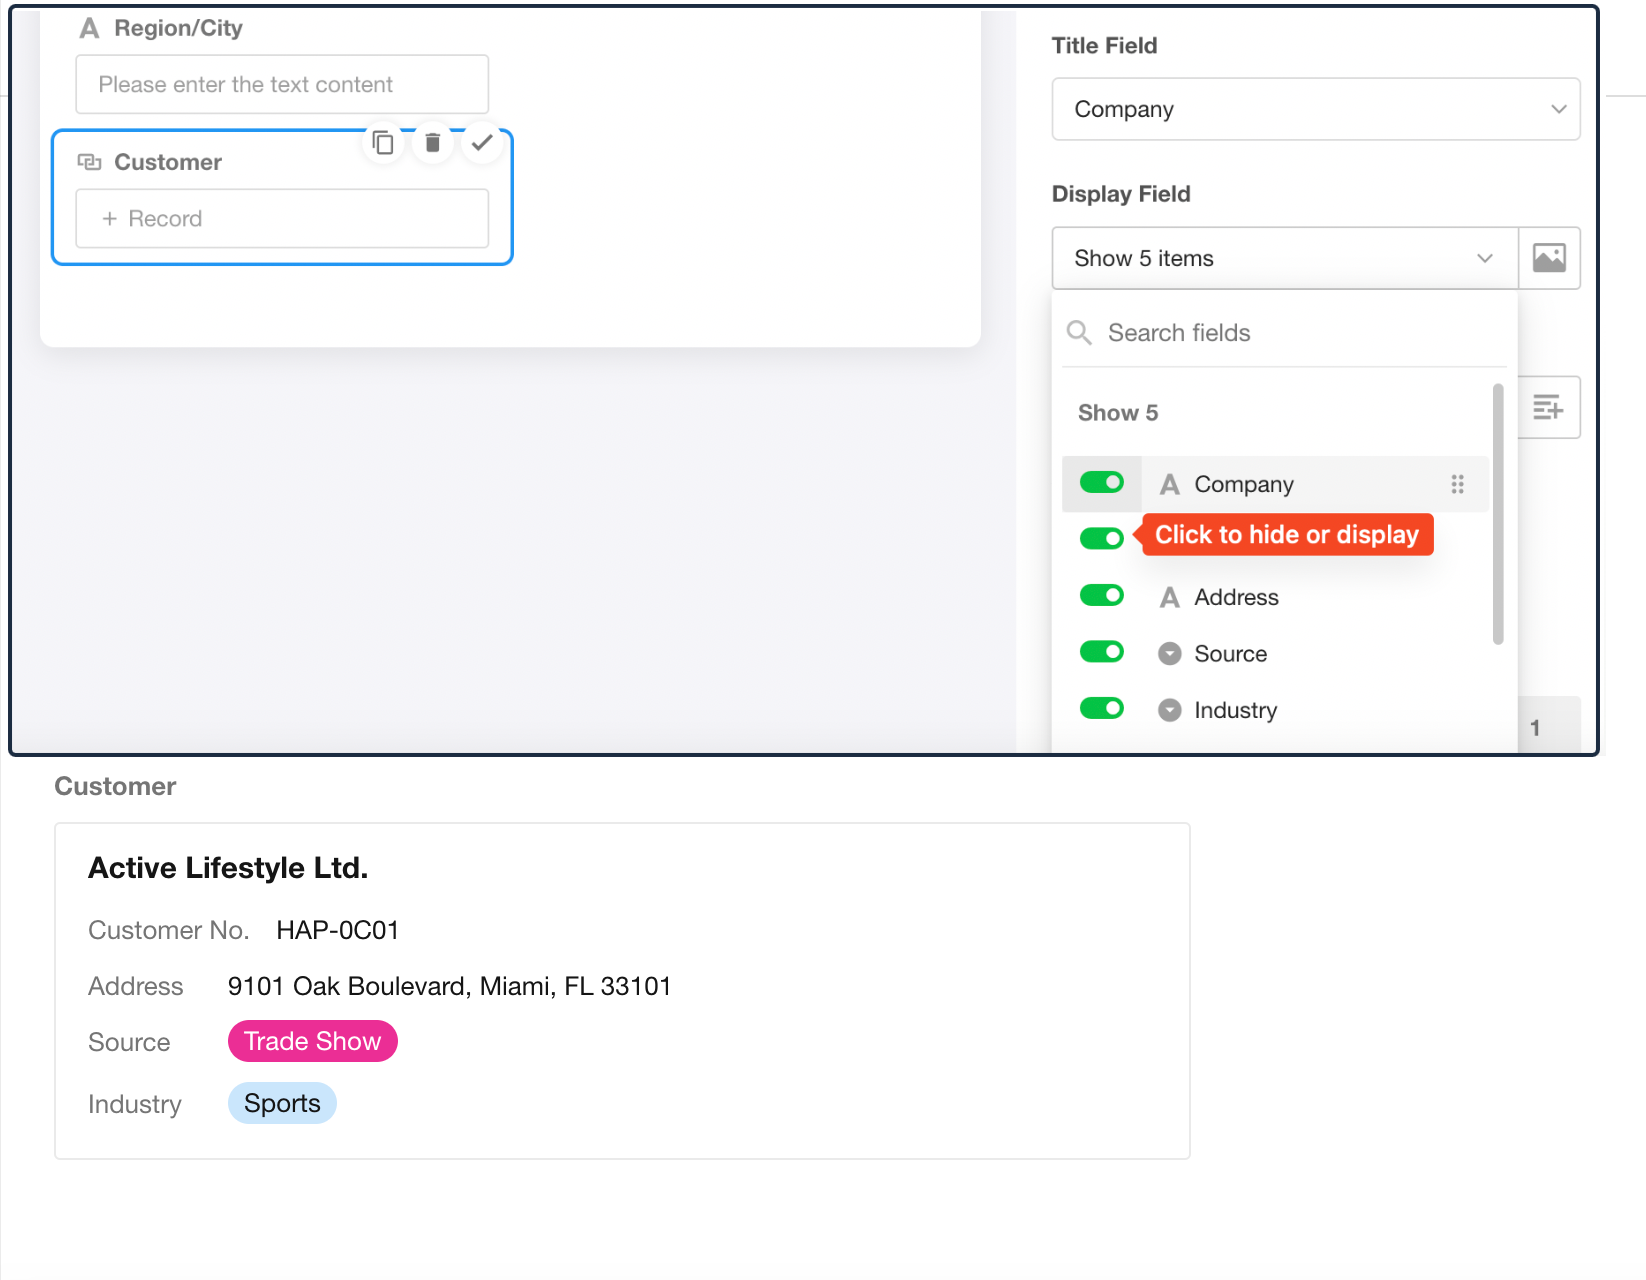
-
Dropdown list
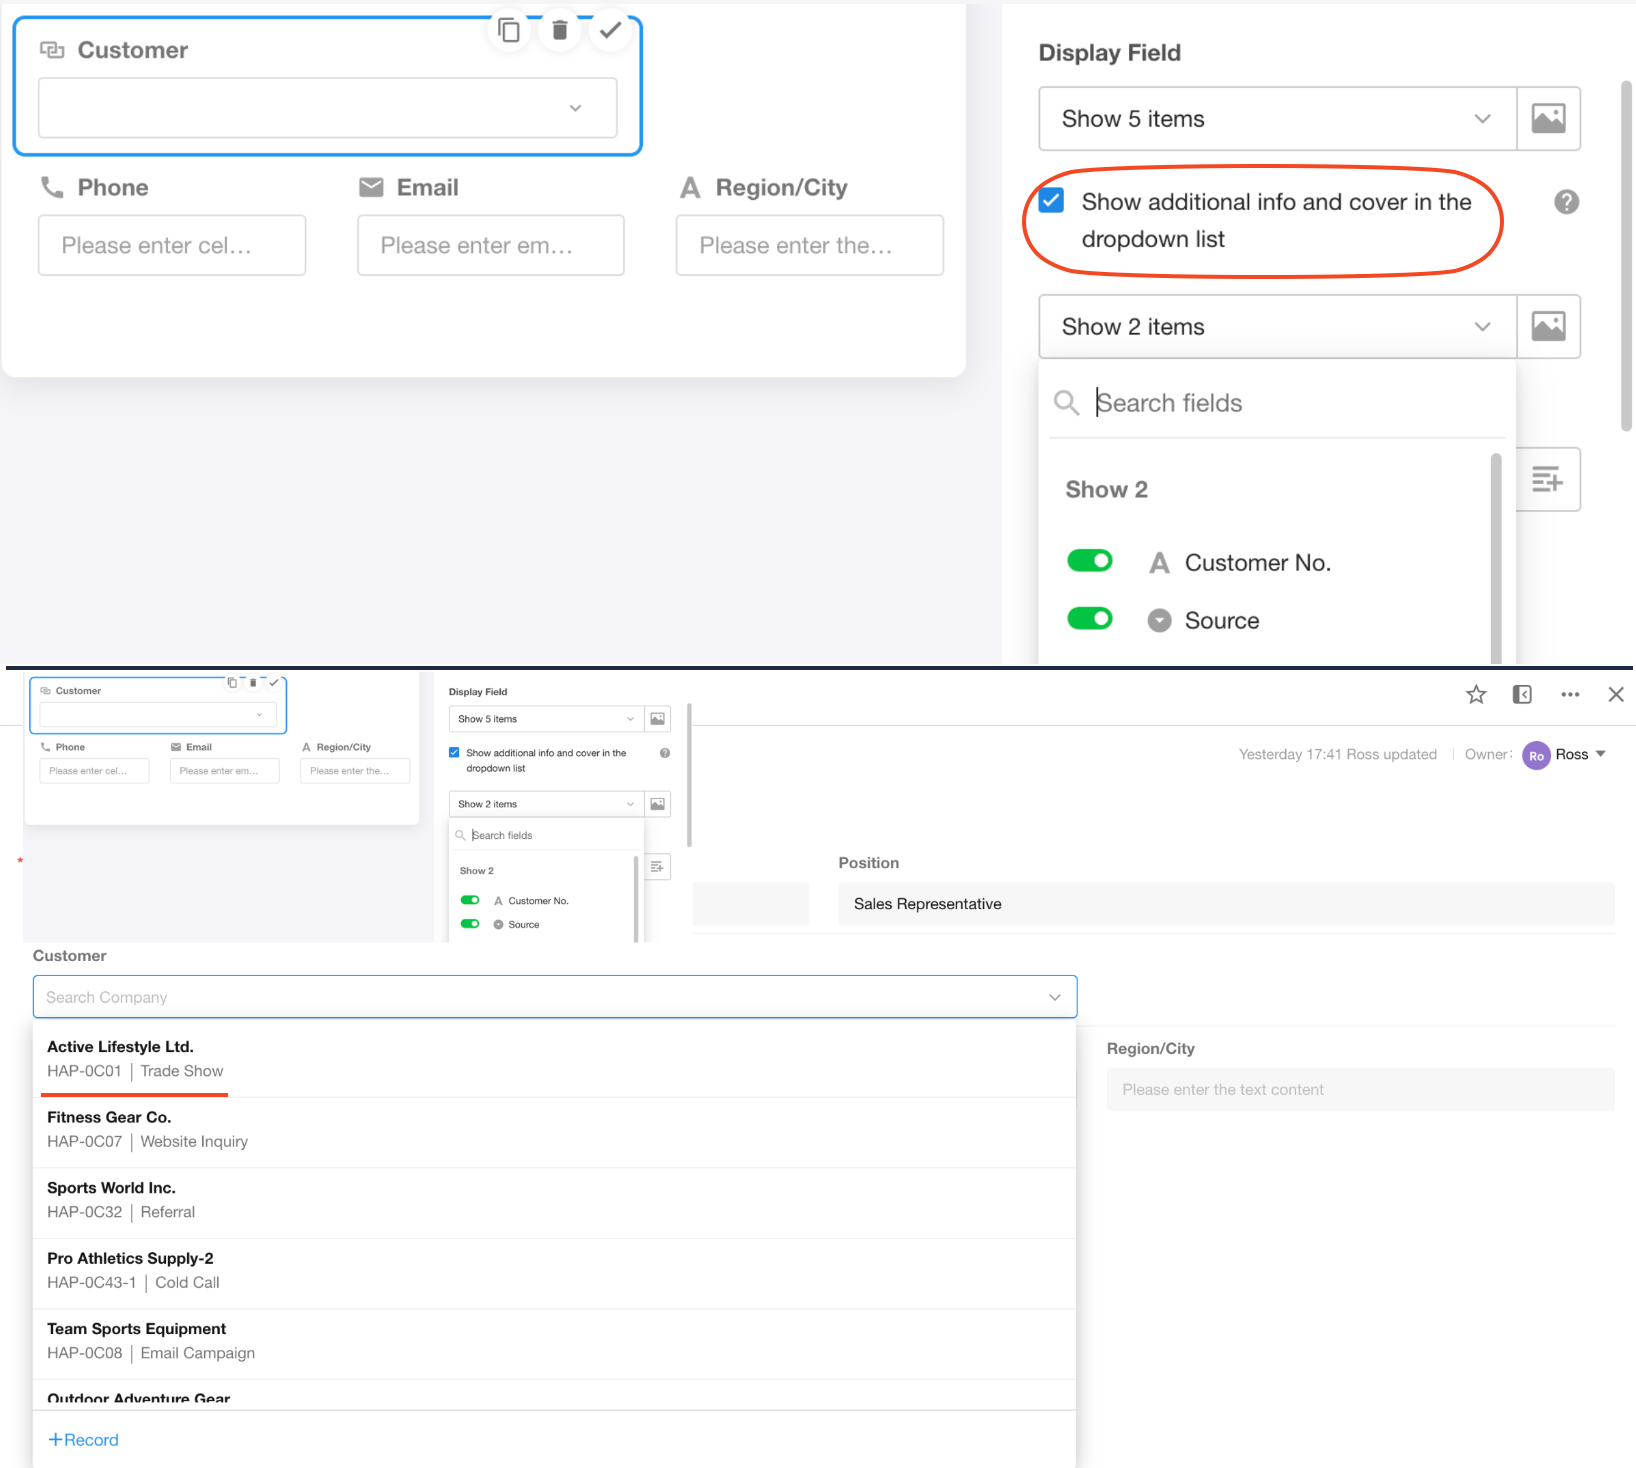
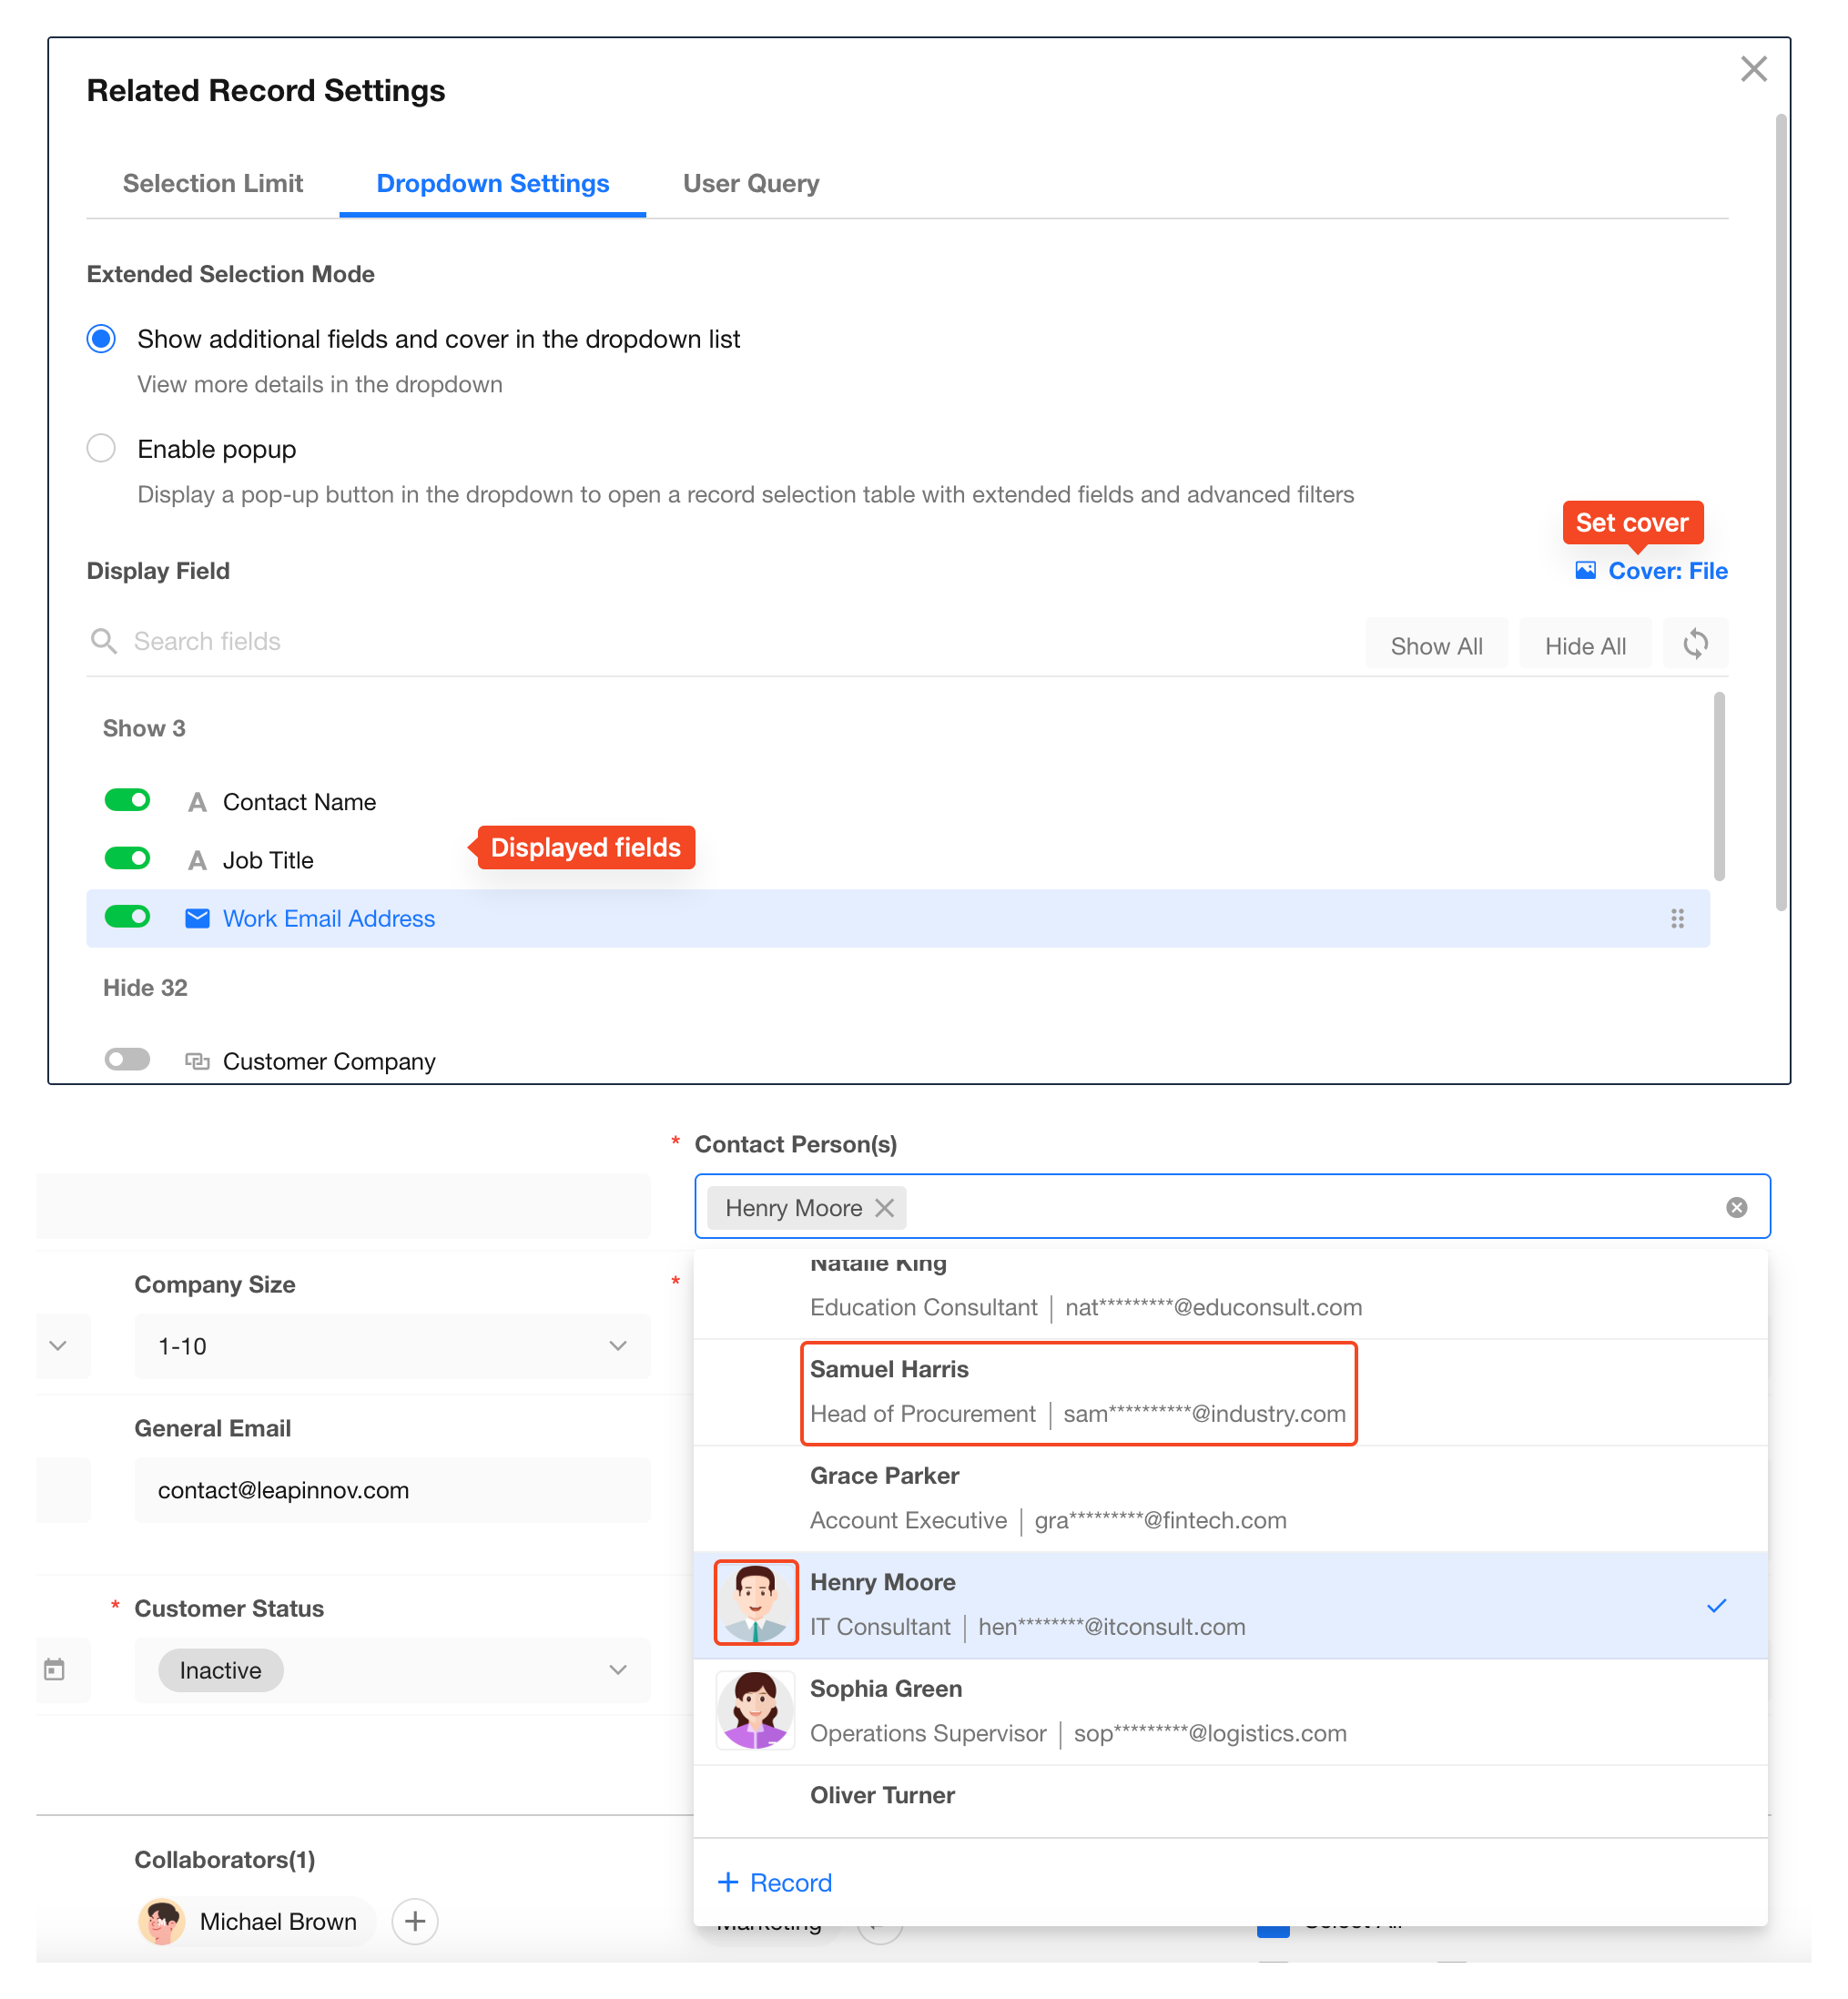
When displaying related records, other display fields are shown in a card below the dropdown menu.
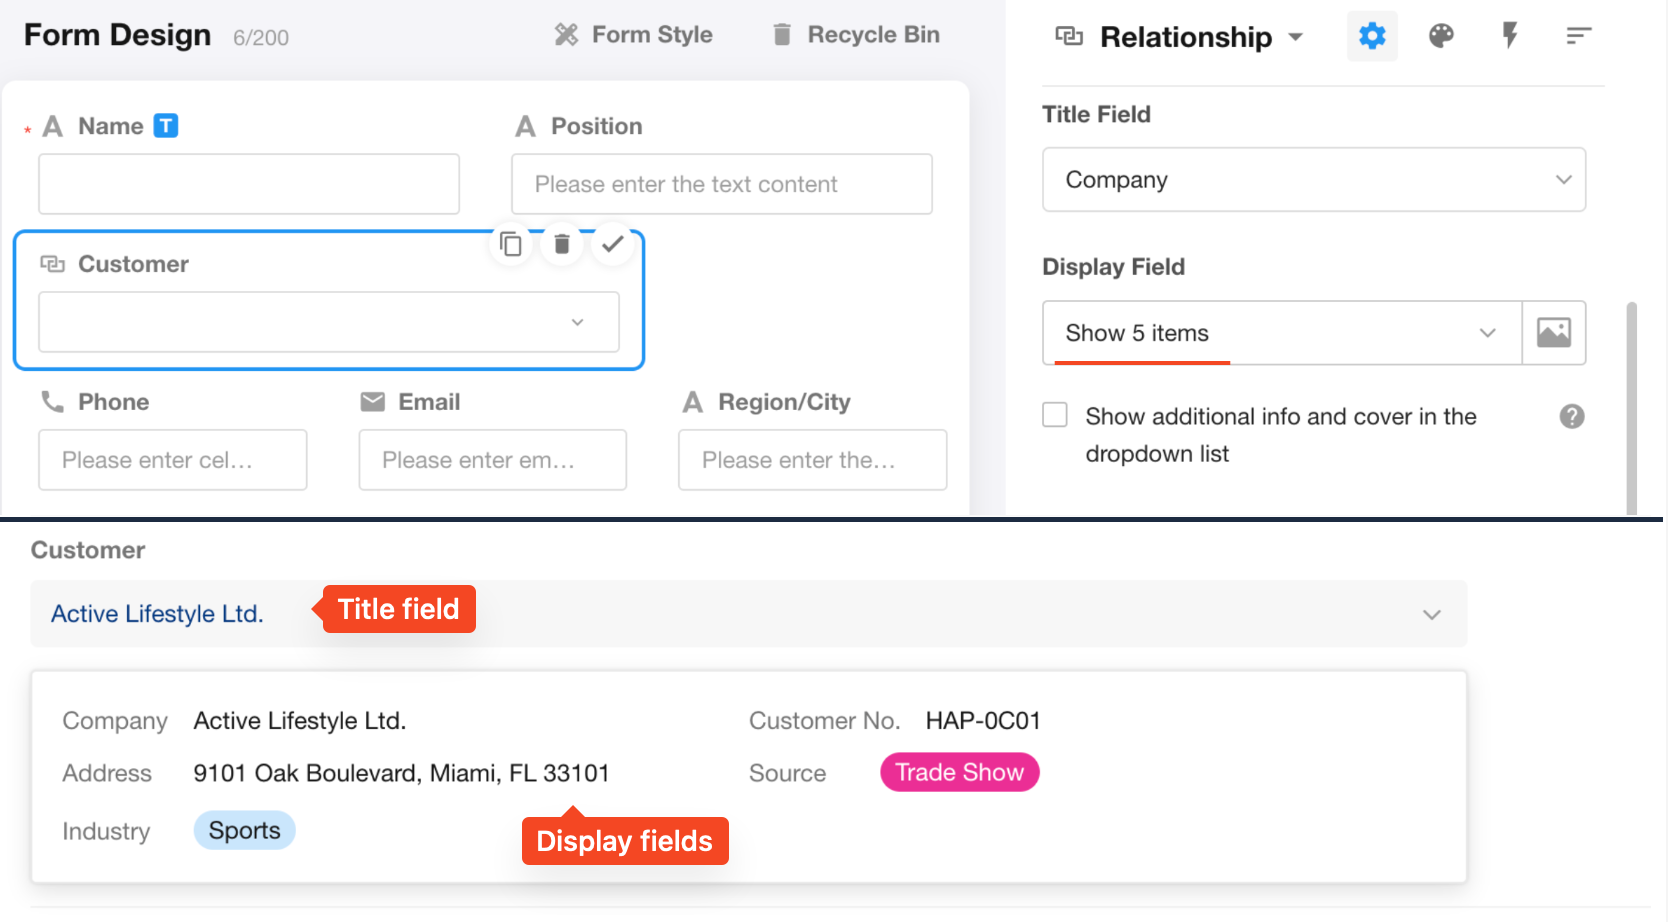
If more fields need to be displayed in the dropdown list when selecting related records, users can check "Show additional info and cover in the dropdown list" to set the display fields.
-
Table
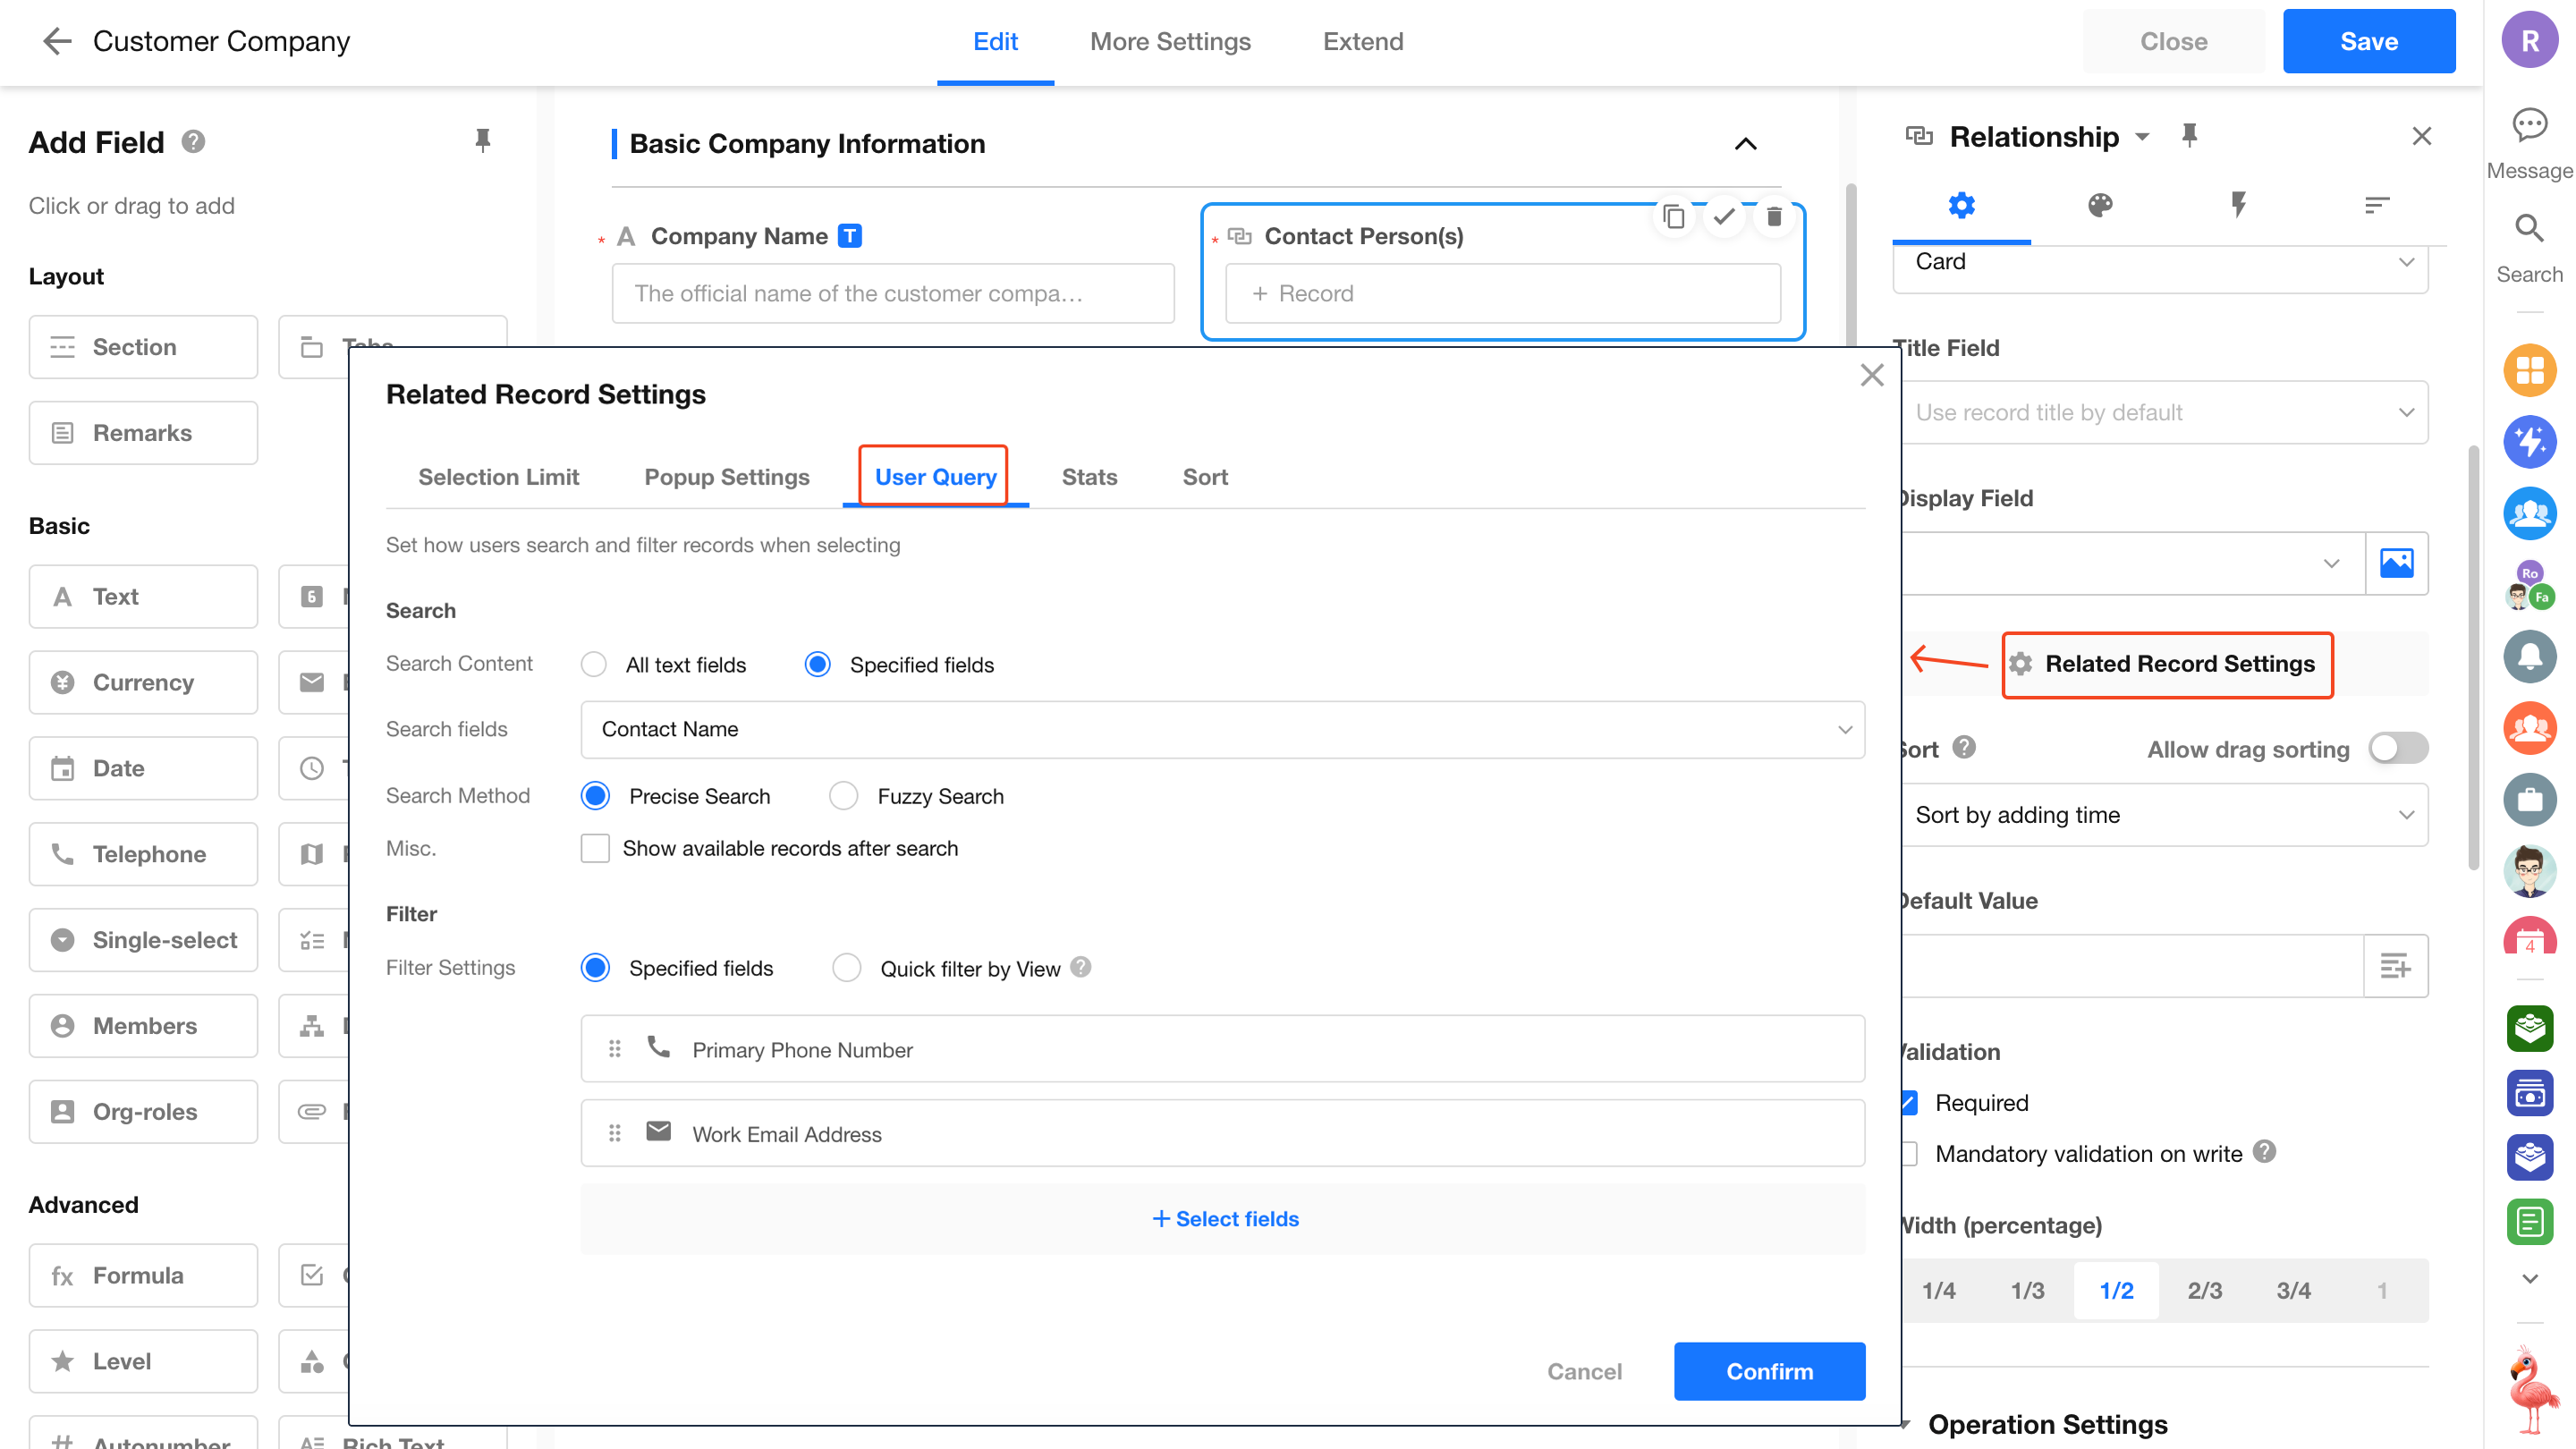
Related Records Selection Settings
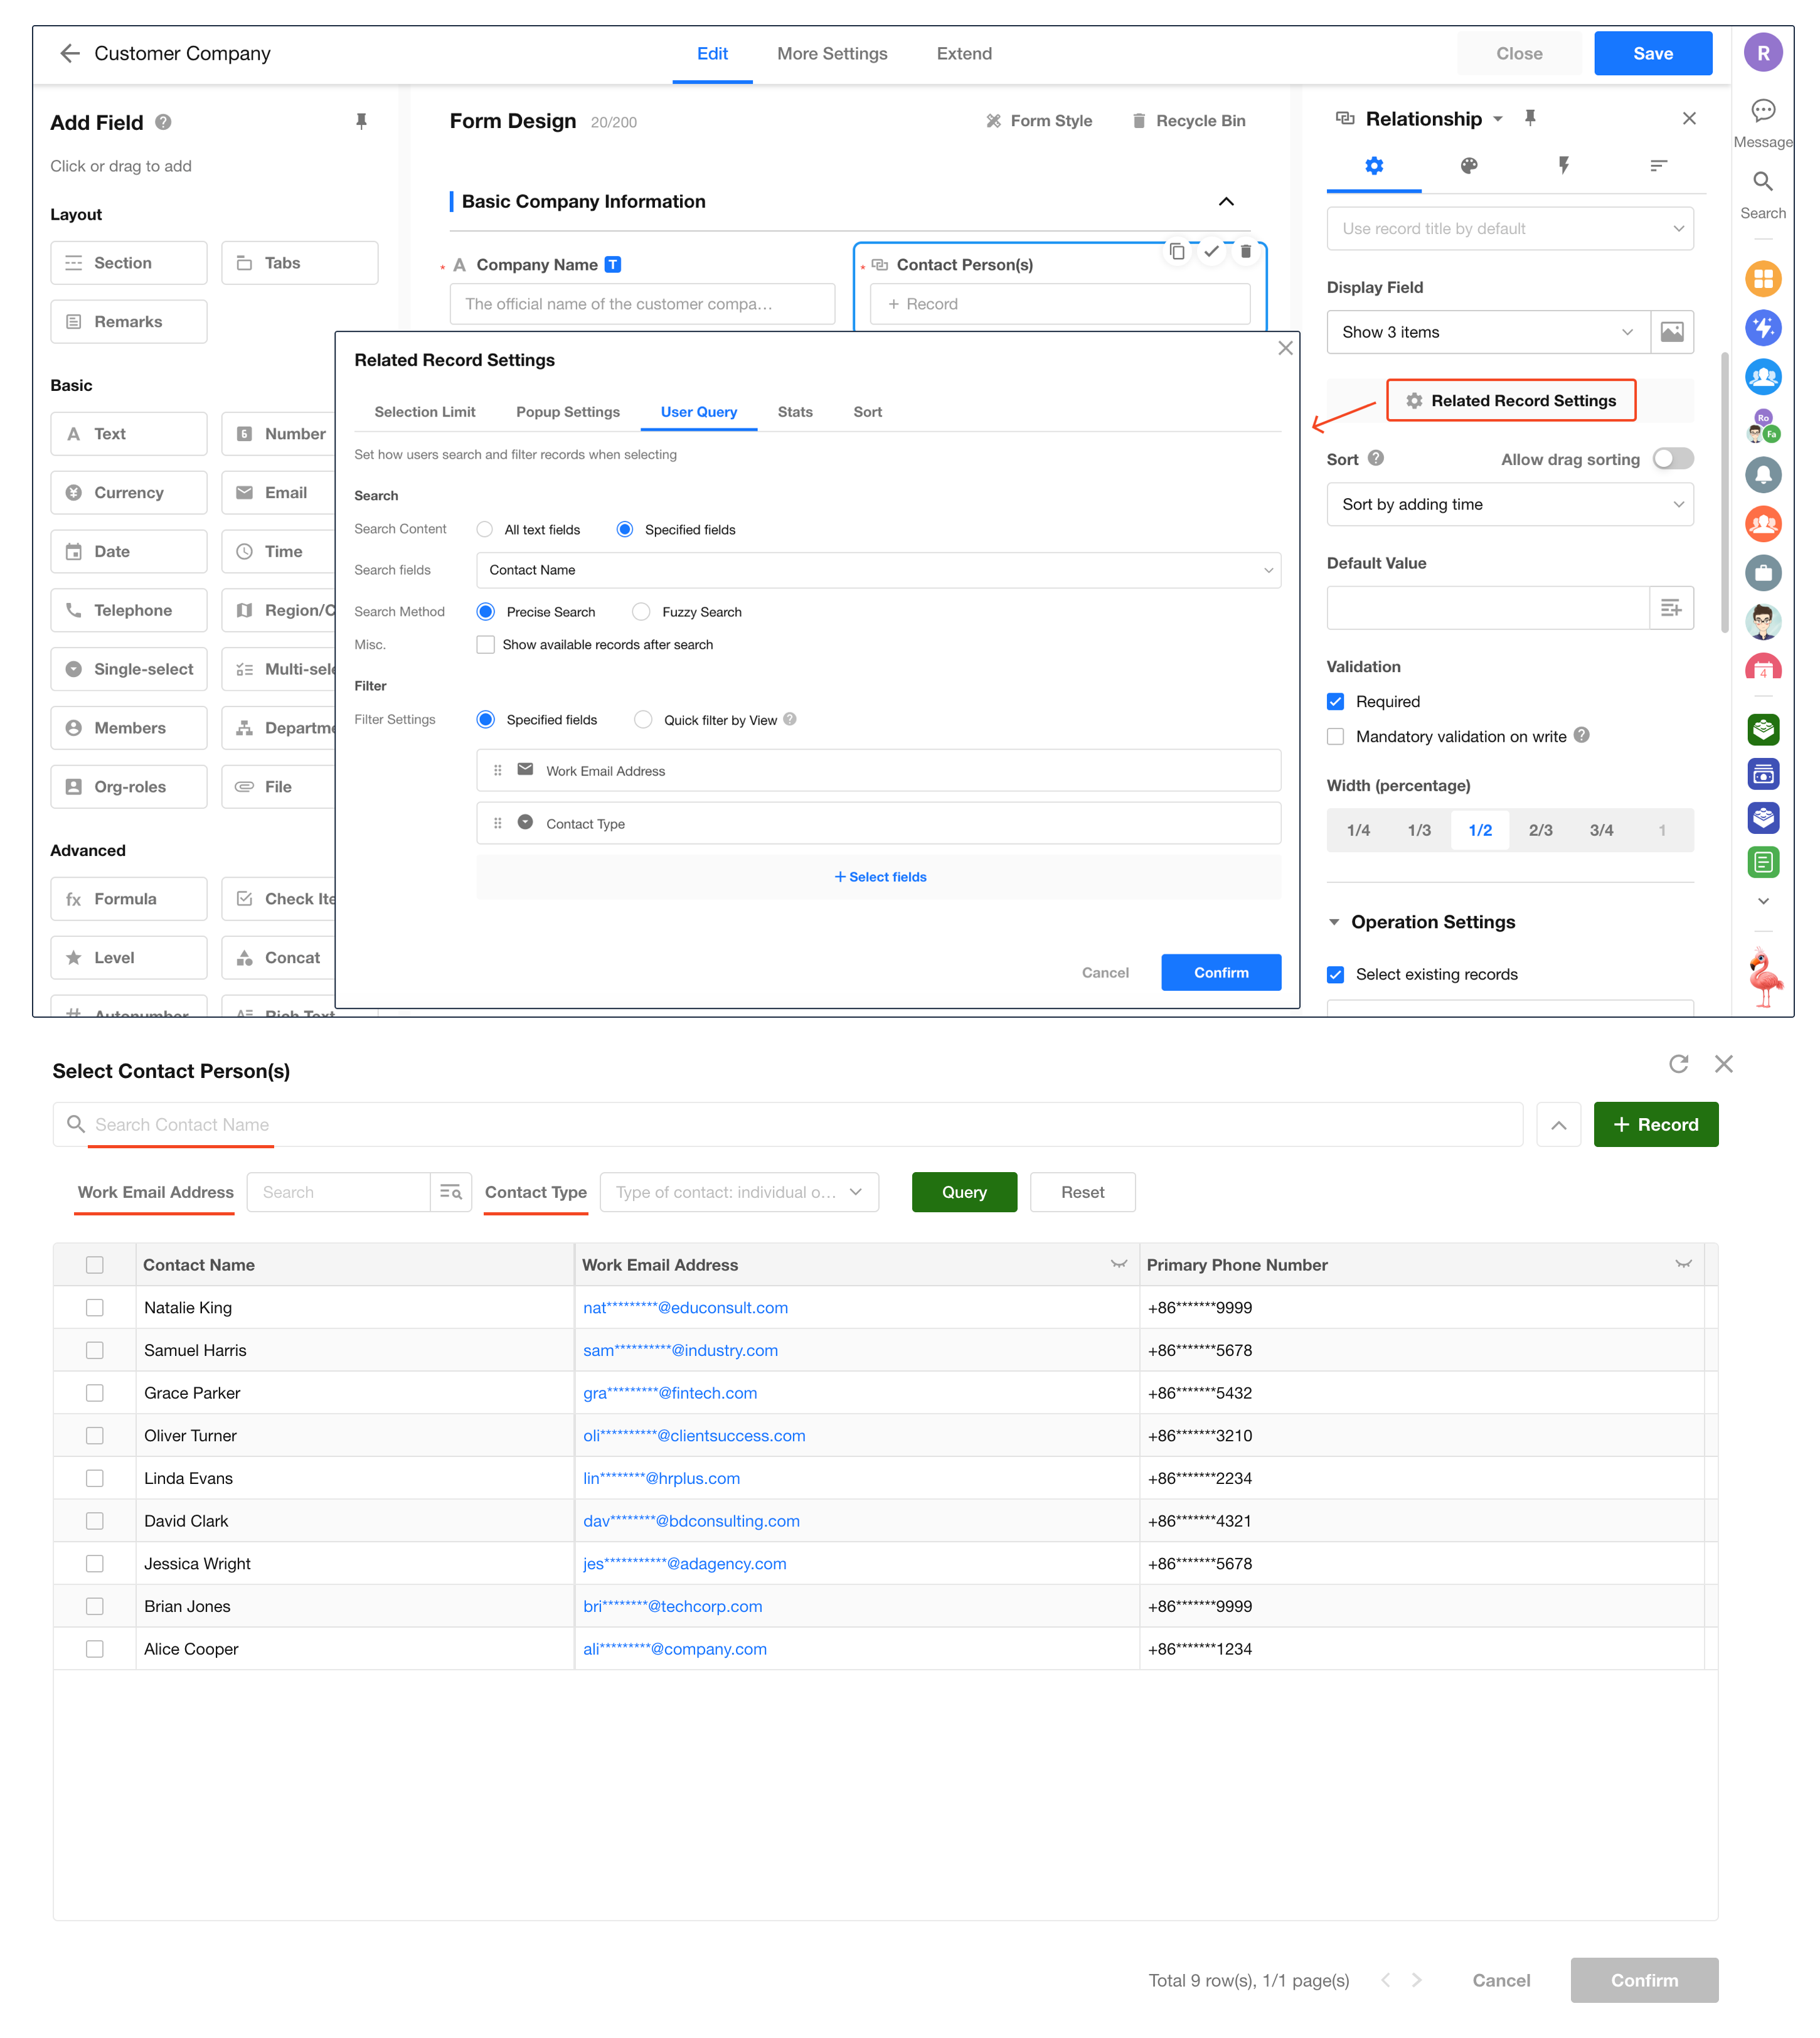
In Related Record Settings, configure the interface users see when selecting related records, including filters, pop-up settings (dropdown settings), query methods, displayed fields, statistics, and sorting.
If Select existing records is not enabled, the Related Record Settings button will be hidden.
Filter the Selection Scope
Use filters to narrow down the records that can be selected and linked.
Filter logic explained:
-
1. AND
Condition set:
{Condition 1: Field A = Field B}AND{Condition 2: Field C = Field D}Meaning: A record matches only when both Condition 1 and Condition 2 are satisfied.
-
2. OR
Condition set:
{Condition 1: Field A = Field B}OR{Condition 2: Field C = Field D}Meaning: A record matches when either Condition 1 or Condition 2 is satisfied.
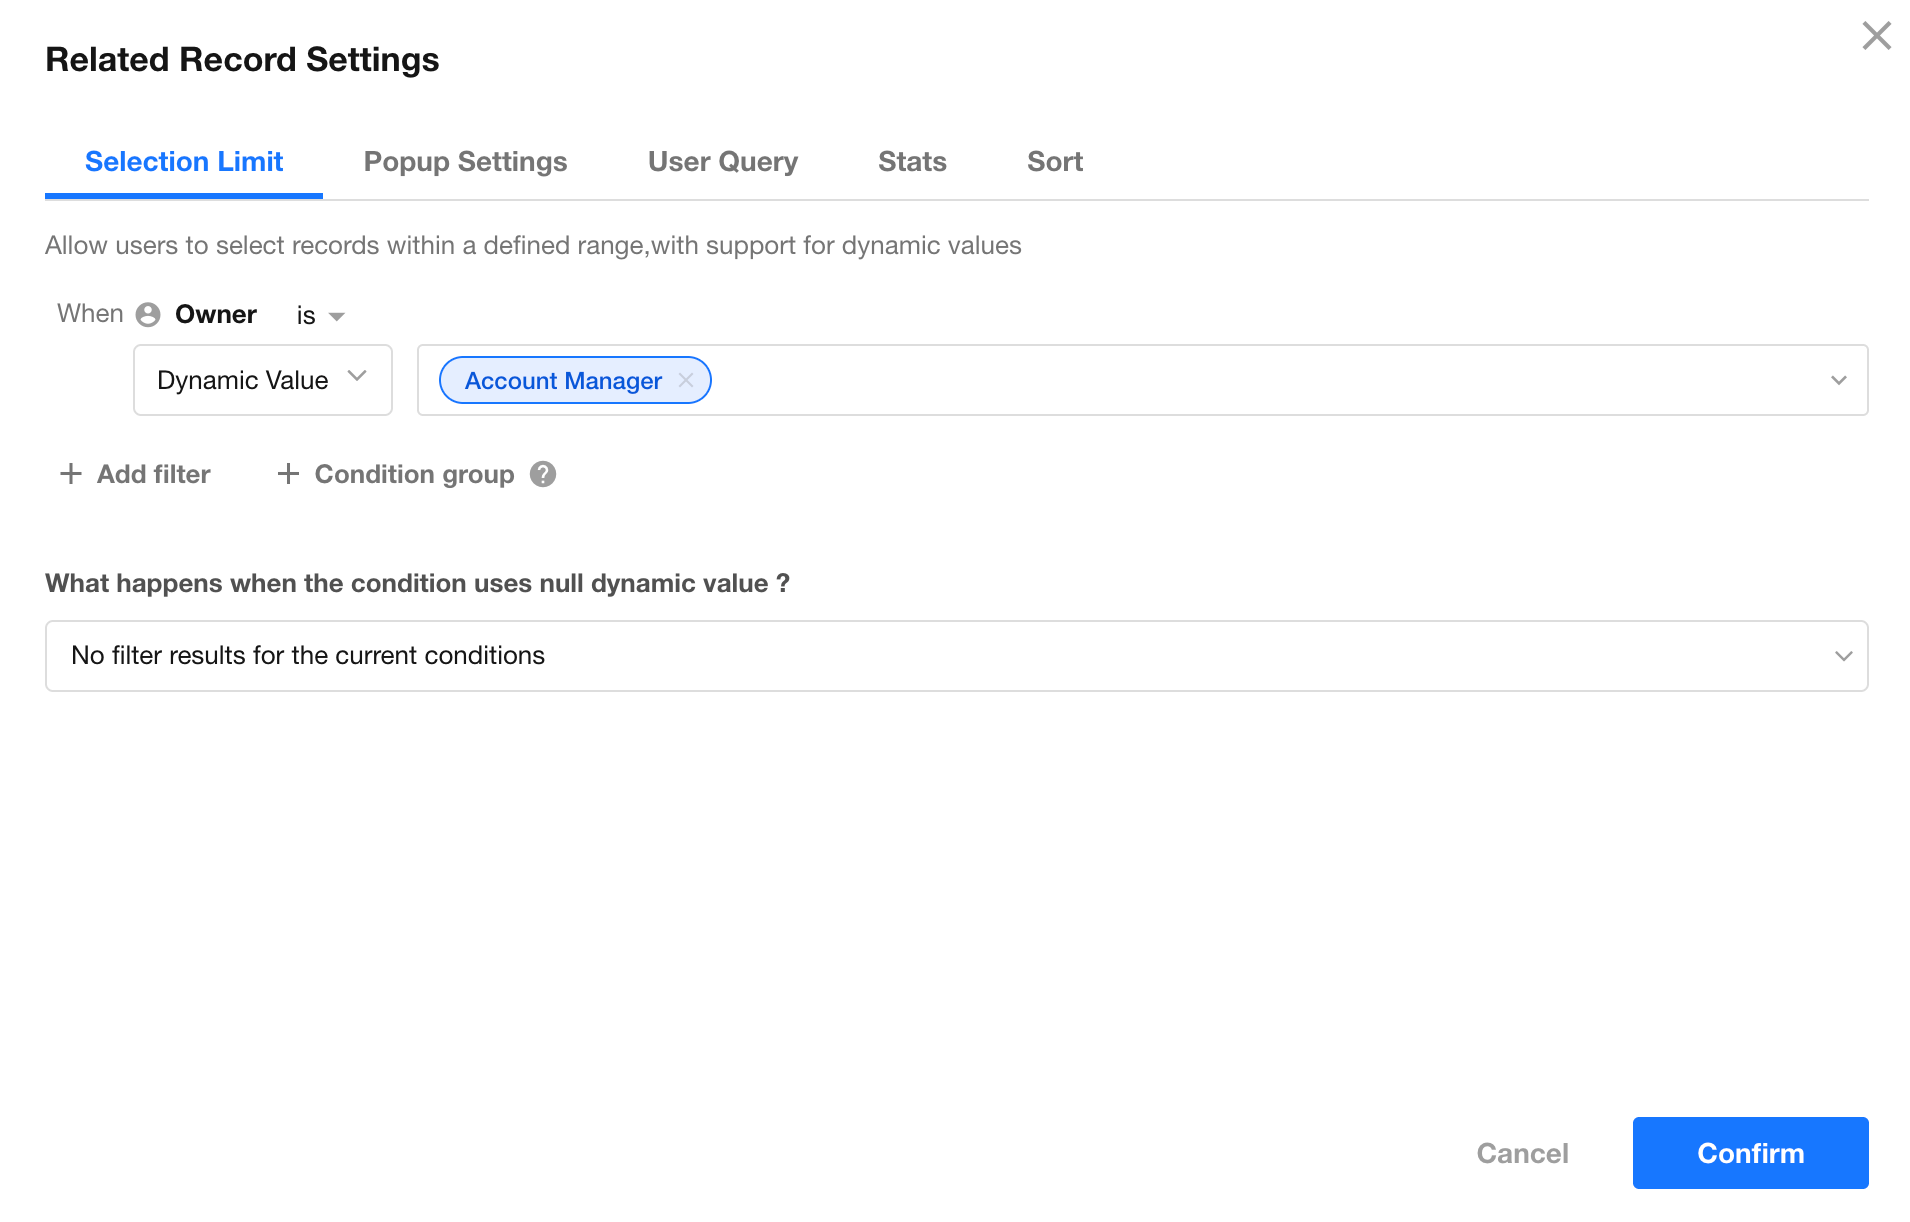
Handling dynamic values that are empty in filter conditions
When a filter uses dynamic values (for example, Condition 1 is Field A = Field B, Condition 2 is Field C = Field D, and Field D may be empty), you can choose one of the following strategies:
| Strategy | How Condition 2 is handled when Field D is empty | Result under AND / OR |
|---|---|---|
| No results for this condition | Treat Condition 2 as not met | AND: no results; OR: ignore Condition 2 and filter by other conditions |
| Ignore this condition (return all records if all are ignored) | Drop Condition 2 | If no valid conditions remain (e.g., all dynamic values are empty), return all records |
| Ignore this condition (return no results if all are ignored) | Drop Condition 2 | If no valid conditions remain, return no results |
| Query empty values | Treat the empty value of Field D as the condition value | Equivalent to Field C = empty |
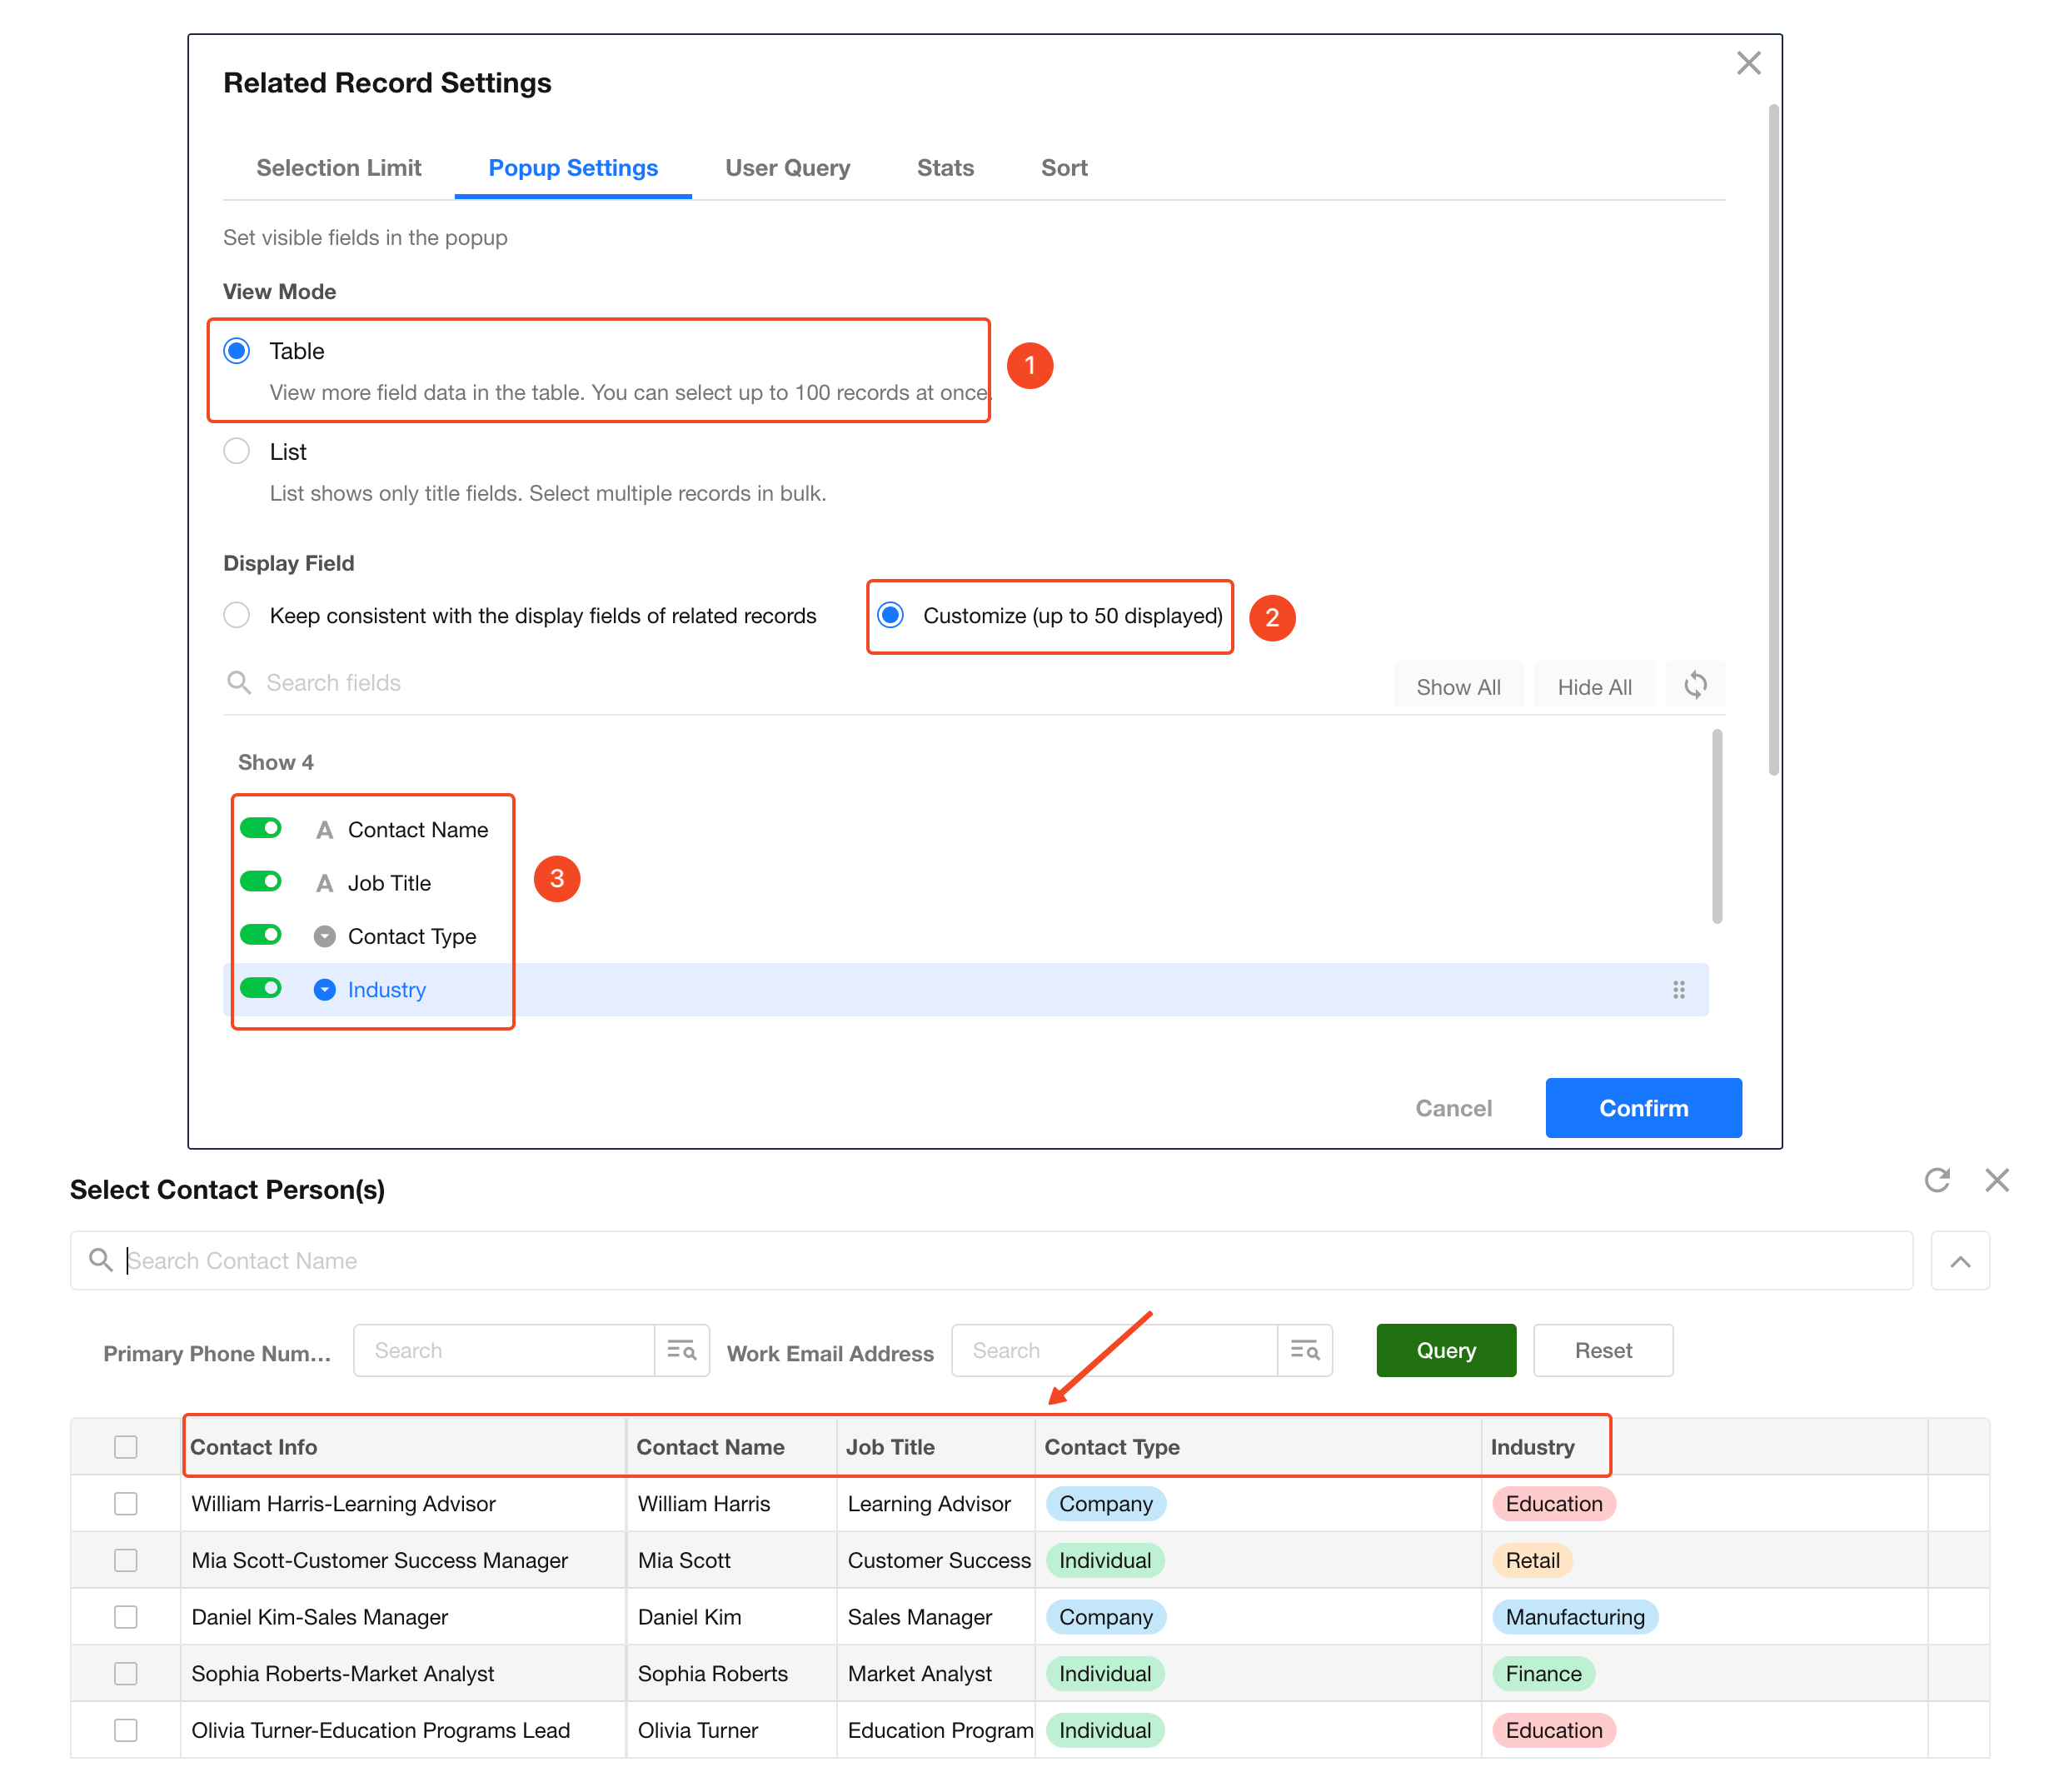
Popup Settings
-
When related records are displayed in card or table view, they can be selected via a popup.
-
If selectable records are displayed in a table view within the popup, you can configure which fields are shown.
-
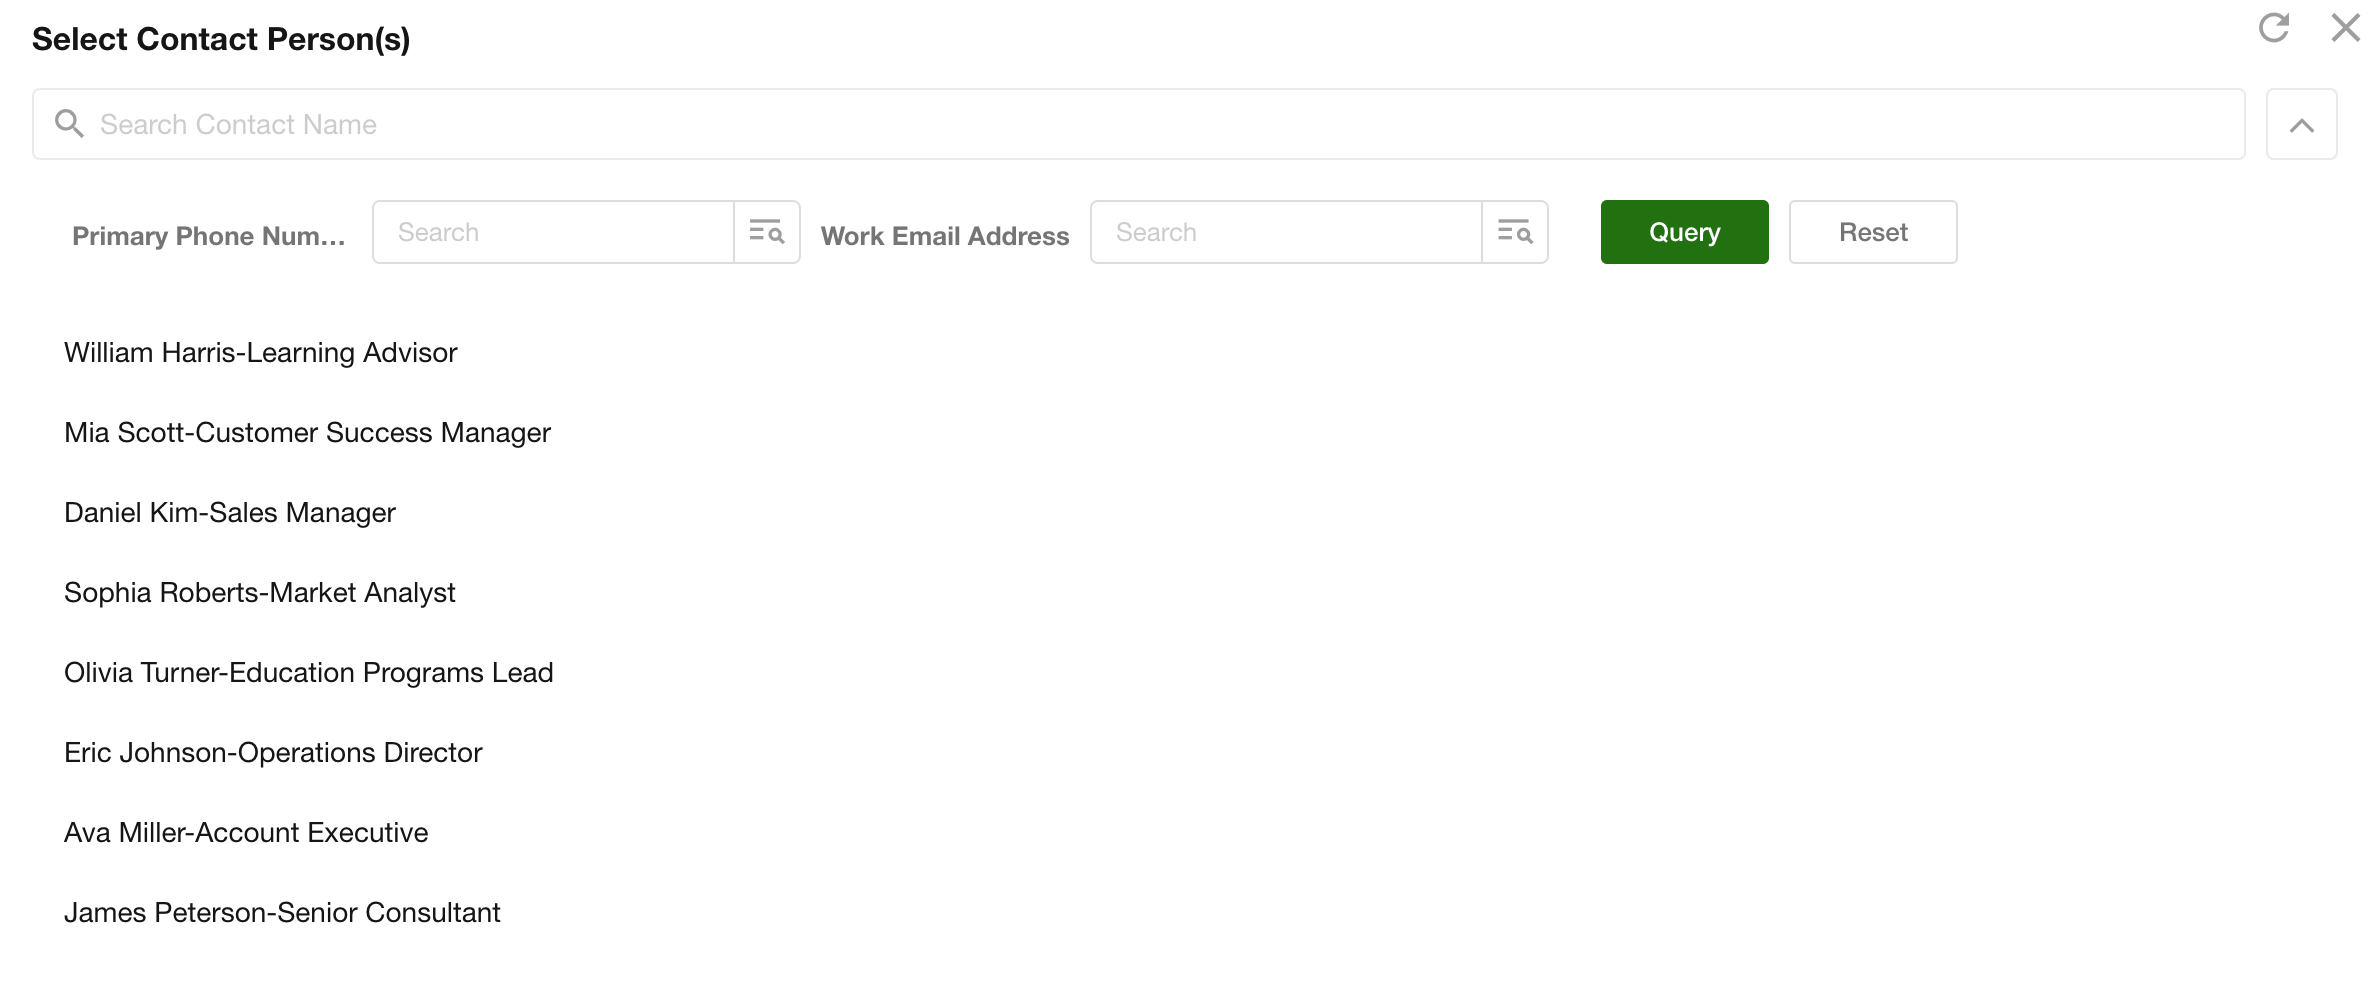
If selectable records are displayed in a list view within the popup, only the title field is shown.
In this list mode, up to 1000 records are loaded at a time.
-
-
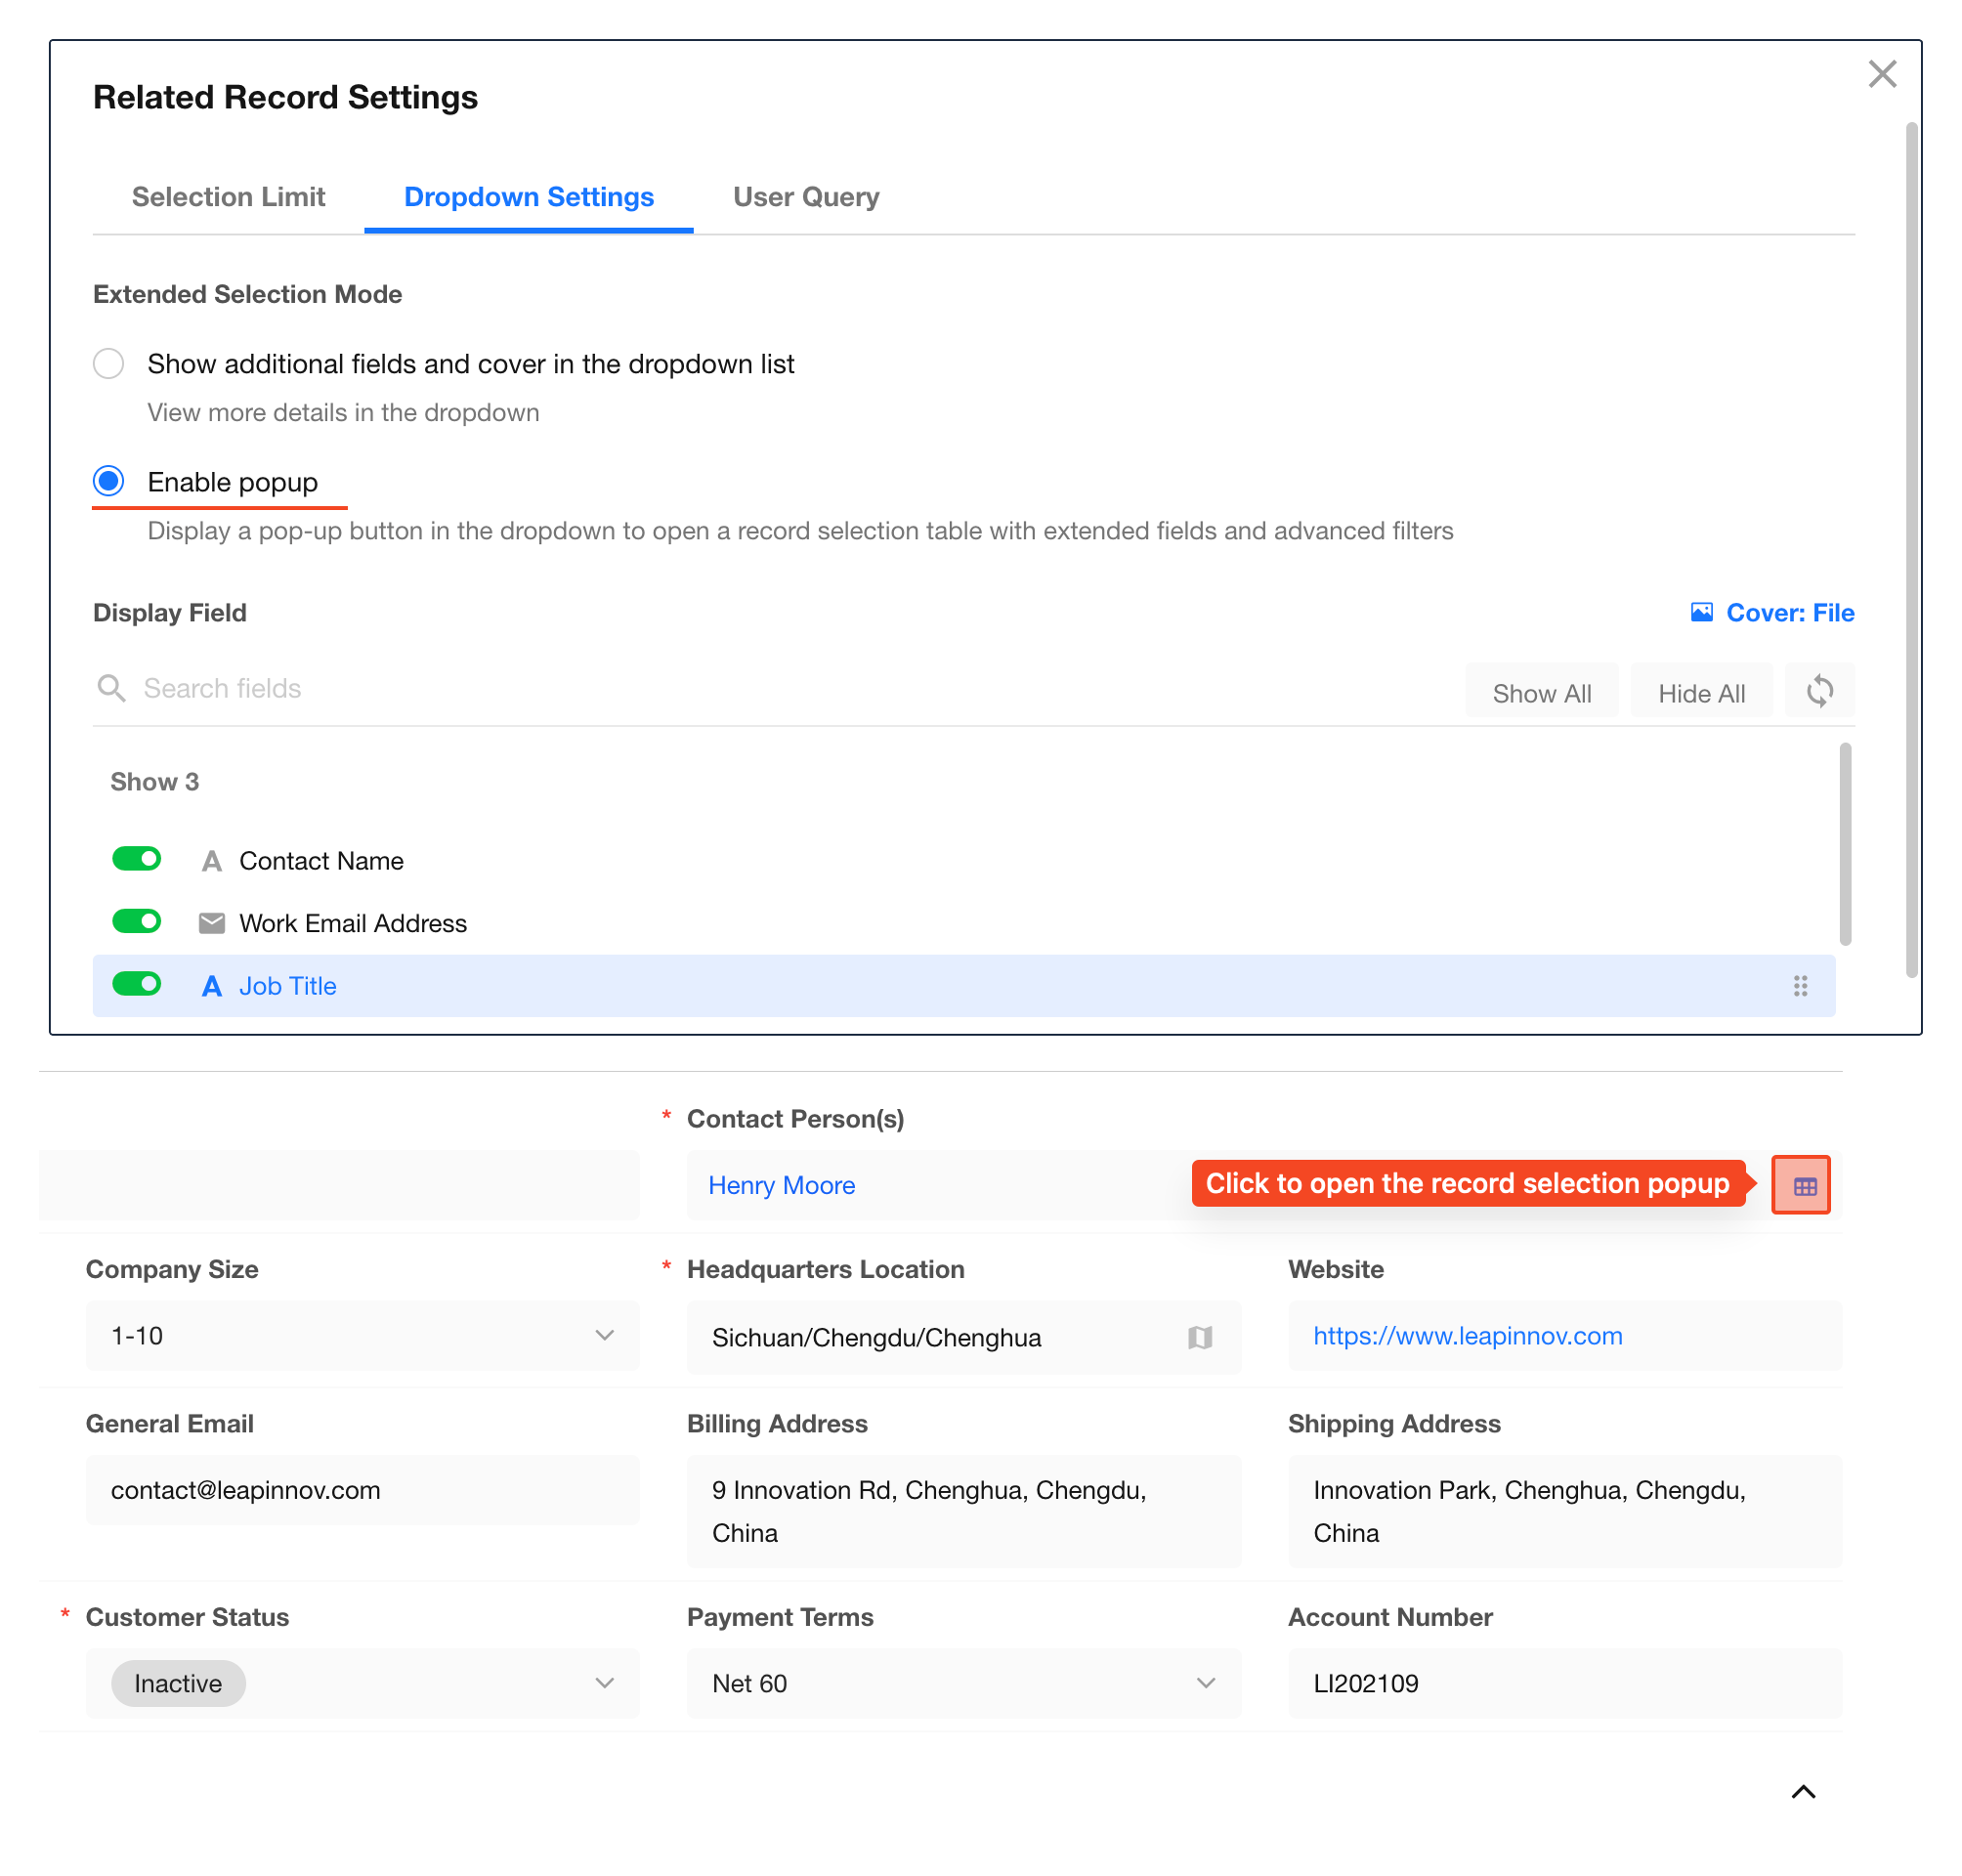
When related records are displayed in a dropdown, you can configure which fields and cover images are shown for each record in the dropdown list.
-
Enable popup: Once enabled, click the popup button in the dropdown to open a table-style popup for selecting records.
-
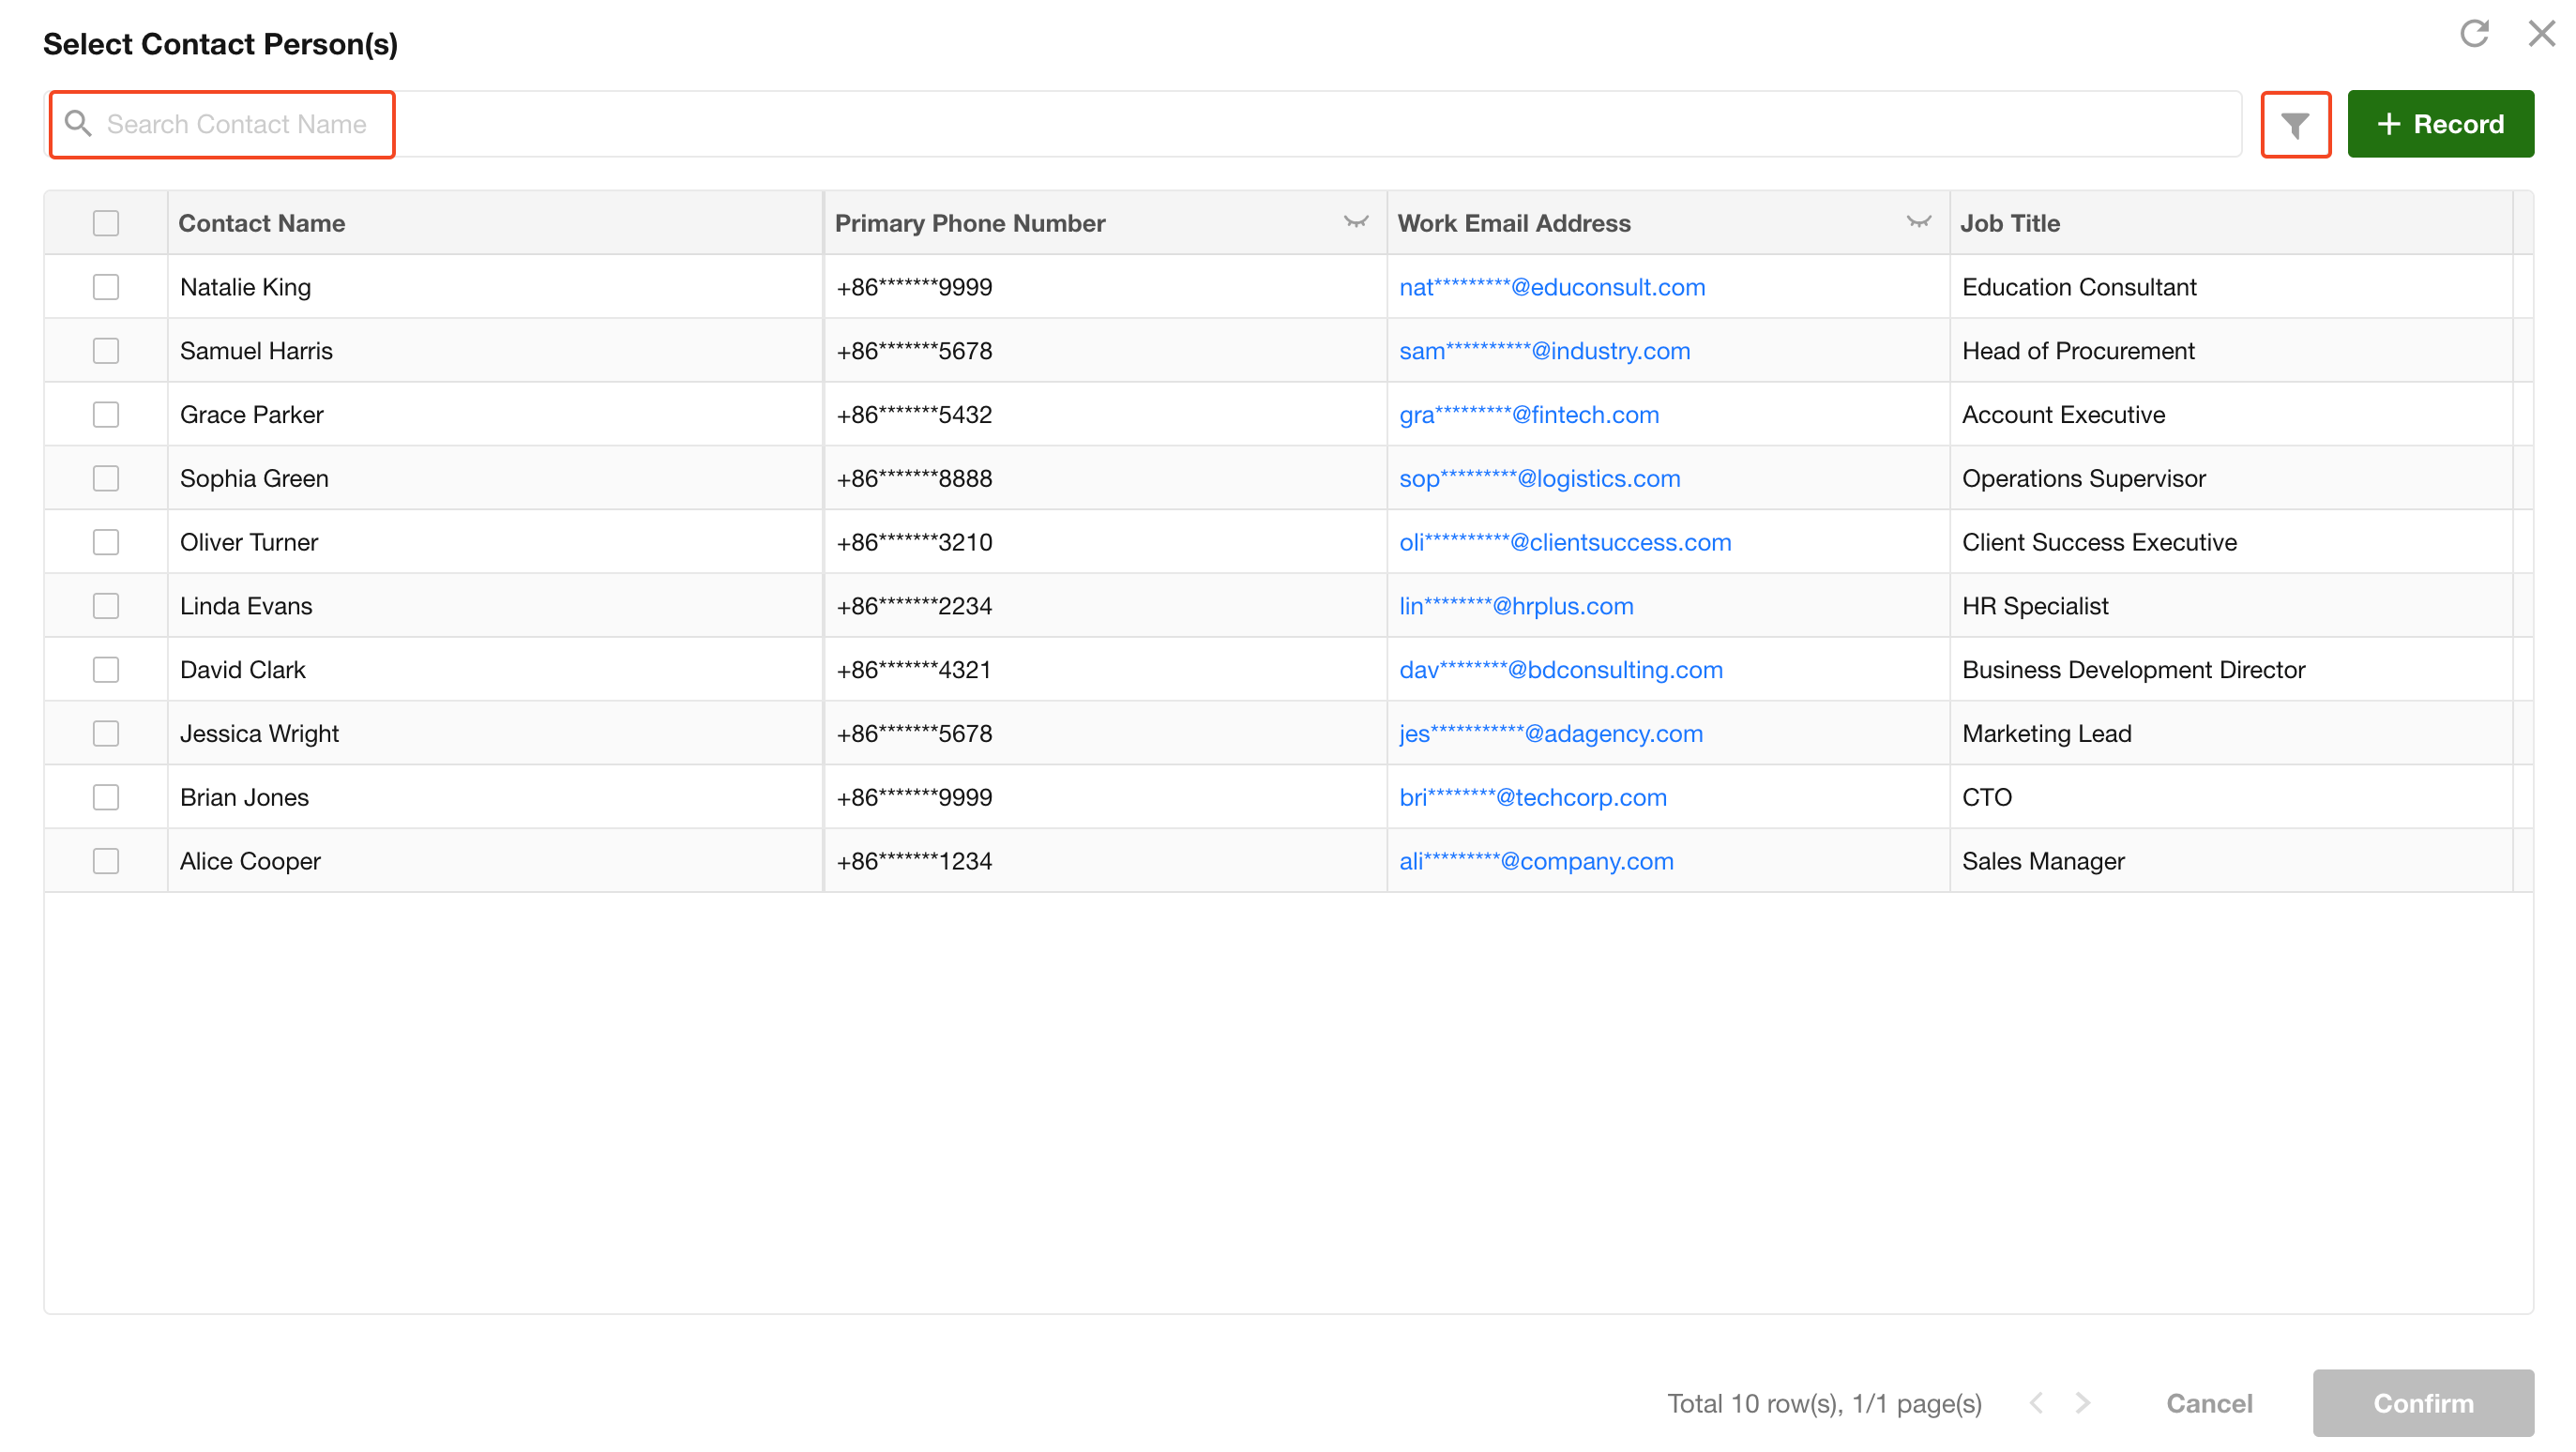
Query Settings
Query Settings help users quickly locate target records when selecting related records:
- Search fields: By default, all text fields are searchable. You can also specify search fields and choose exact or fuzzy matching.
- Show selectable records only after search: When enabled, the record list is hidden by default and displayed only after a search is performed.
- Filter fields: Configure multiple fields to further narrow down the selection.
User experience during selection:
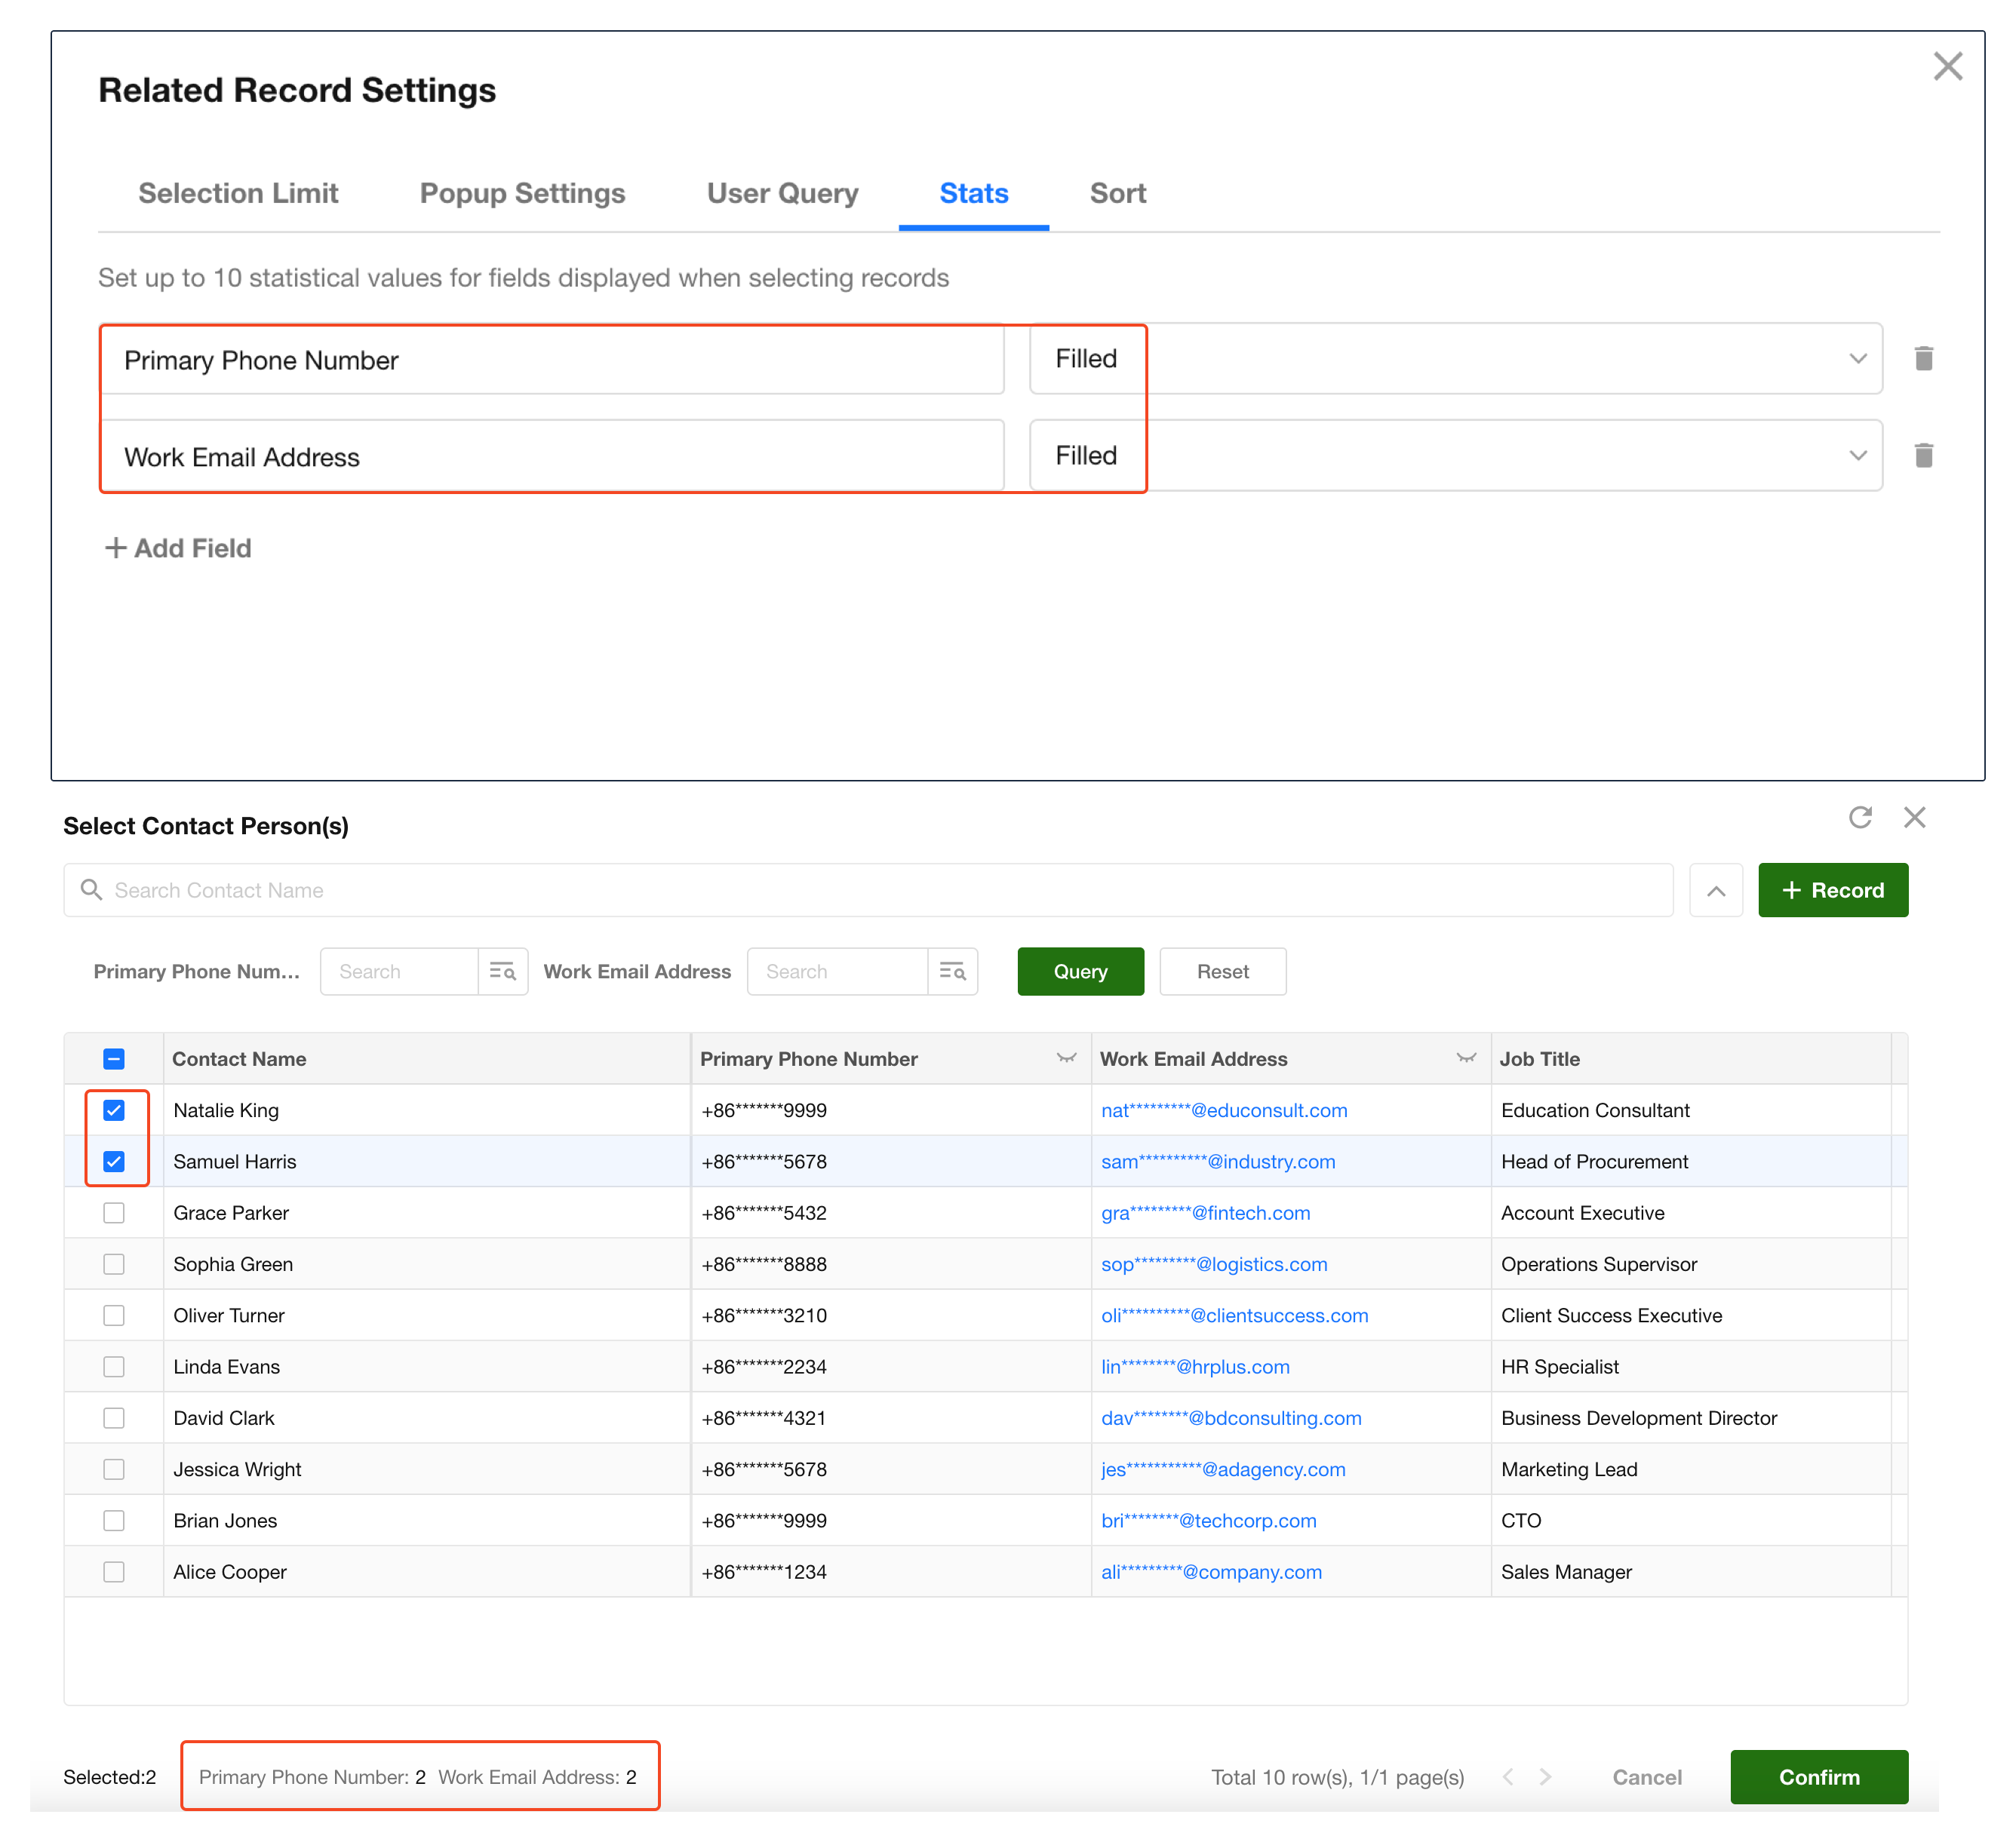
Statistics
Aggregate data for the selected records. Aggregation is supported only for fields that are displayed.
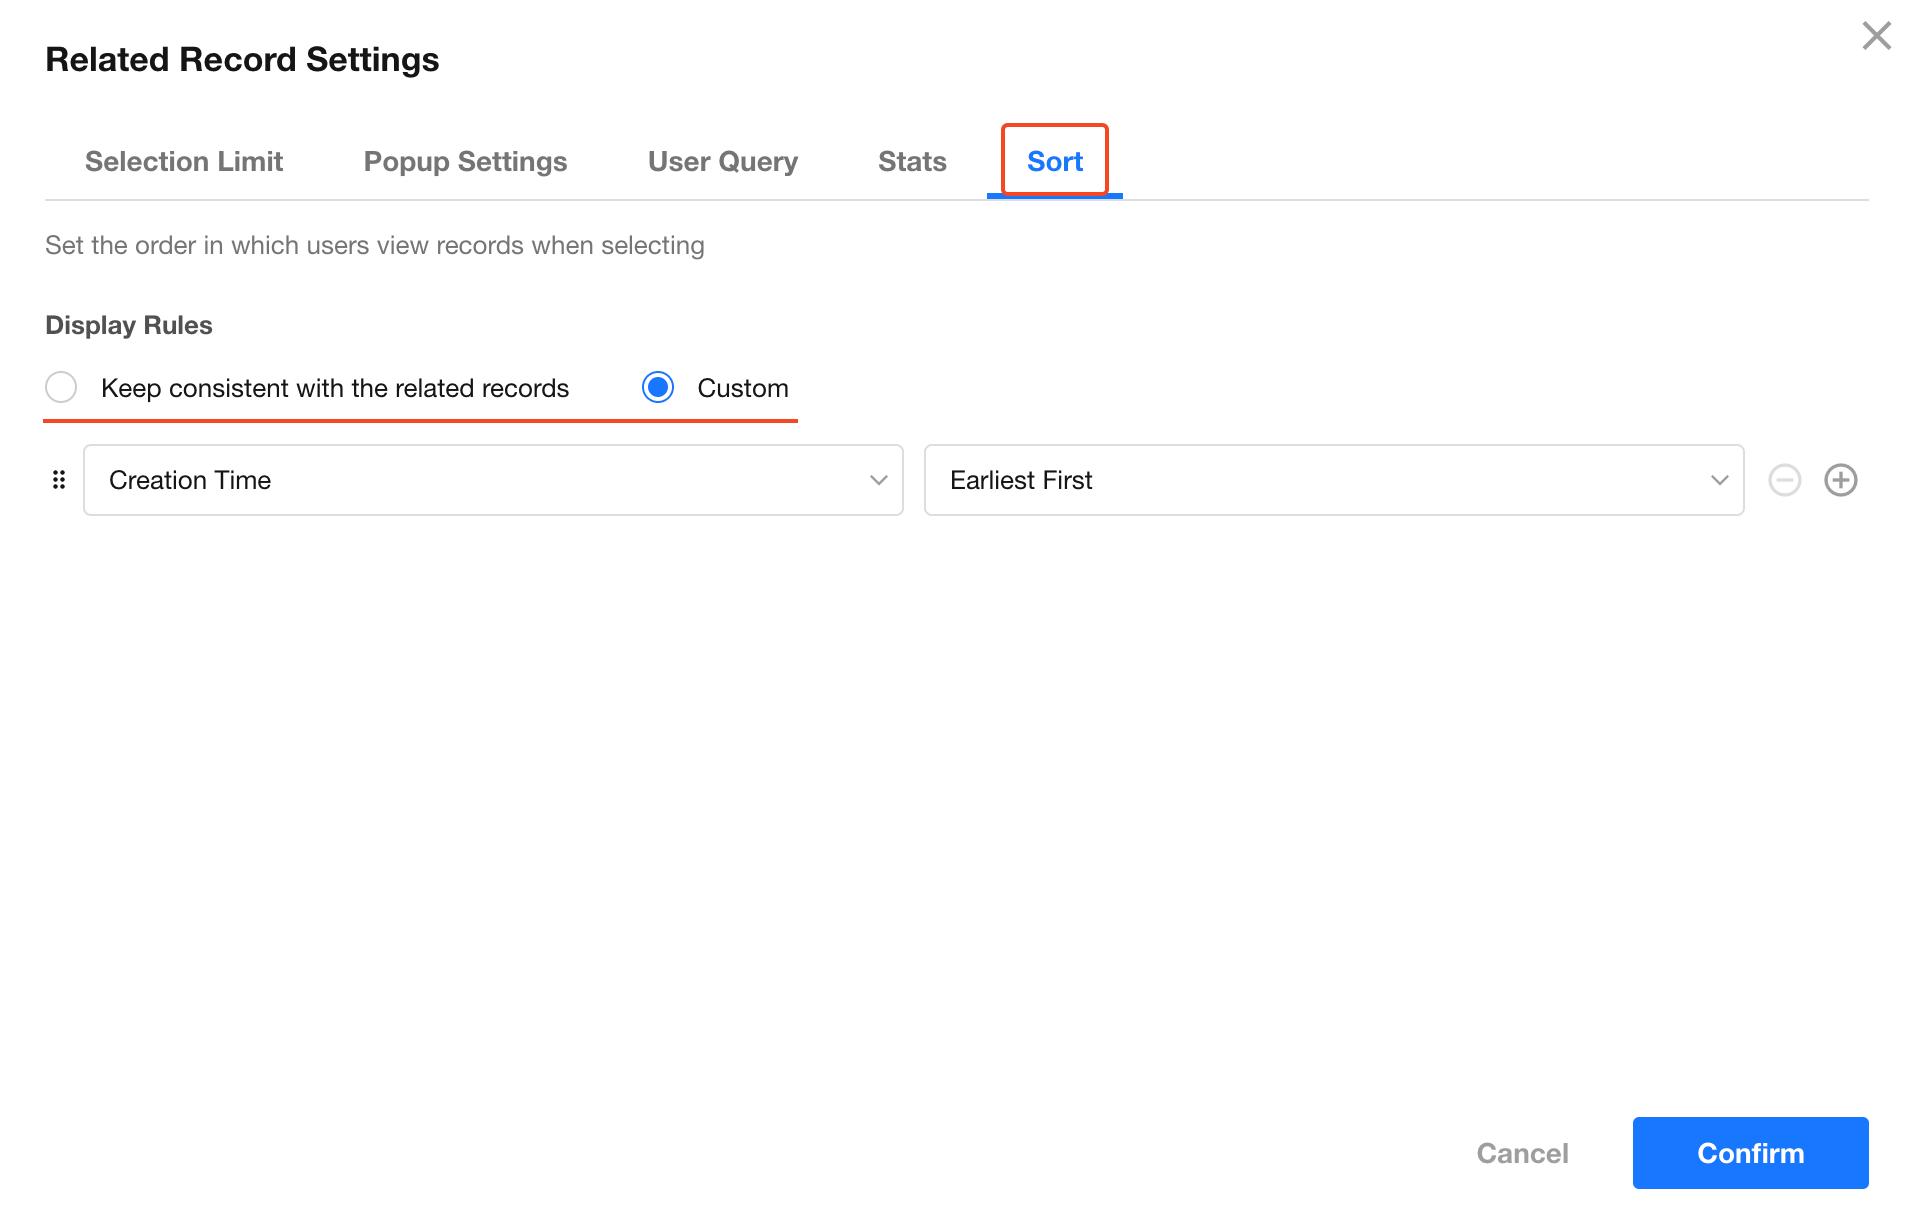
Records Sorting When Selecting
You can define the sorting order when selecting related records:
- Same as the related worksheet's sort order
- Custom sort order (Supports up to 5 sorting fields)
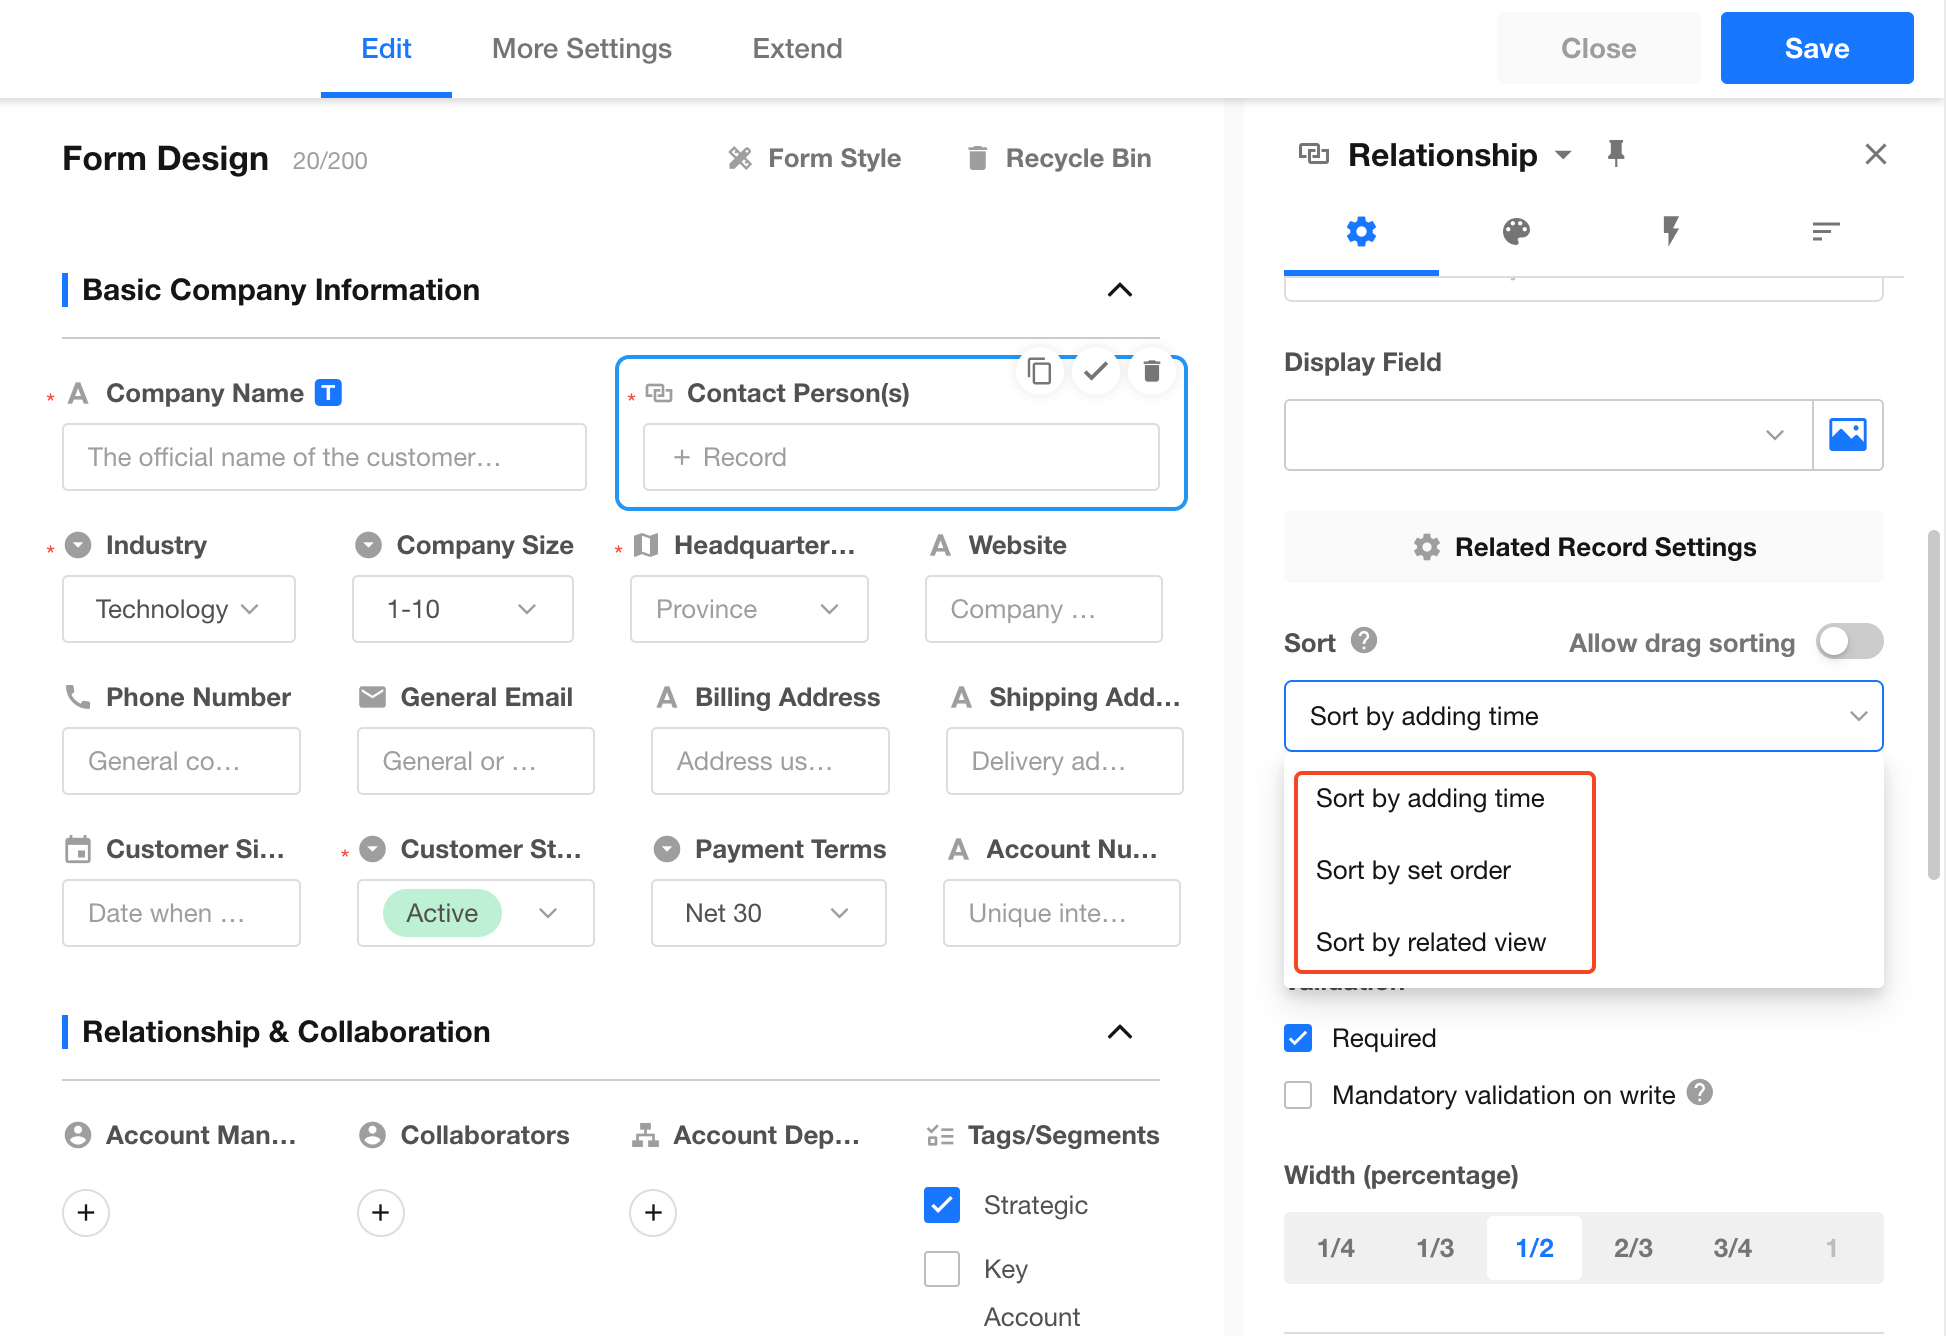
Sort Related Records
When multiple records are related, you can choose from the following sorting methods:
- Sort by added time (default)
- Card / Dropdown: Newly related records are added to the end of the list. You can drag and drop records to adjust their order.
- Table / Tab Table: Sorting by added time is not supported.
- Sort by set order: Sorts the related records in ascending or descending order based on selected fields in the related worksheet.
- Sort by the related view: Sort records according to the sorting rules configured in the selected view of the related worksheet.
Sorting Behavior in Cards / Dropdowns
| Sort Method | Condition for Effectiveness | Description |
|---|---|---|
| Sort by adding time | ≤ 50 related records | If exceeded, the order is retained but drag-and-drop is disabled. |
| Sort by set order | ≤ 5 related records | If exceeded, only the order of the first 5 is guaranteed. |
| Sort by related view | ≤ 5 related records | If exceeded, only the order of the first 5 is guaranteed. |
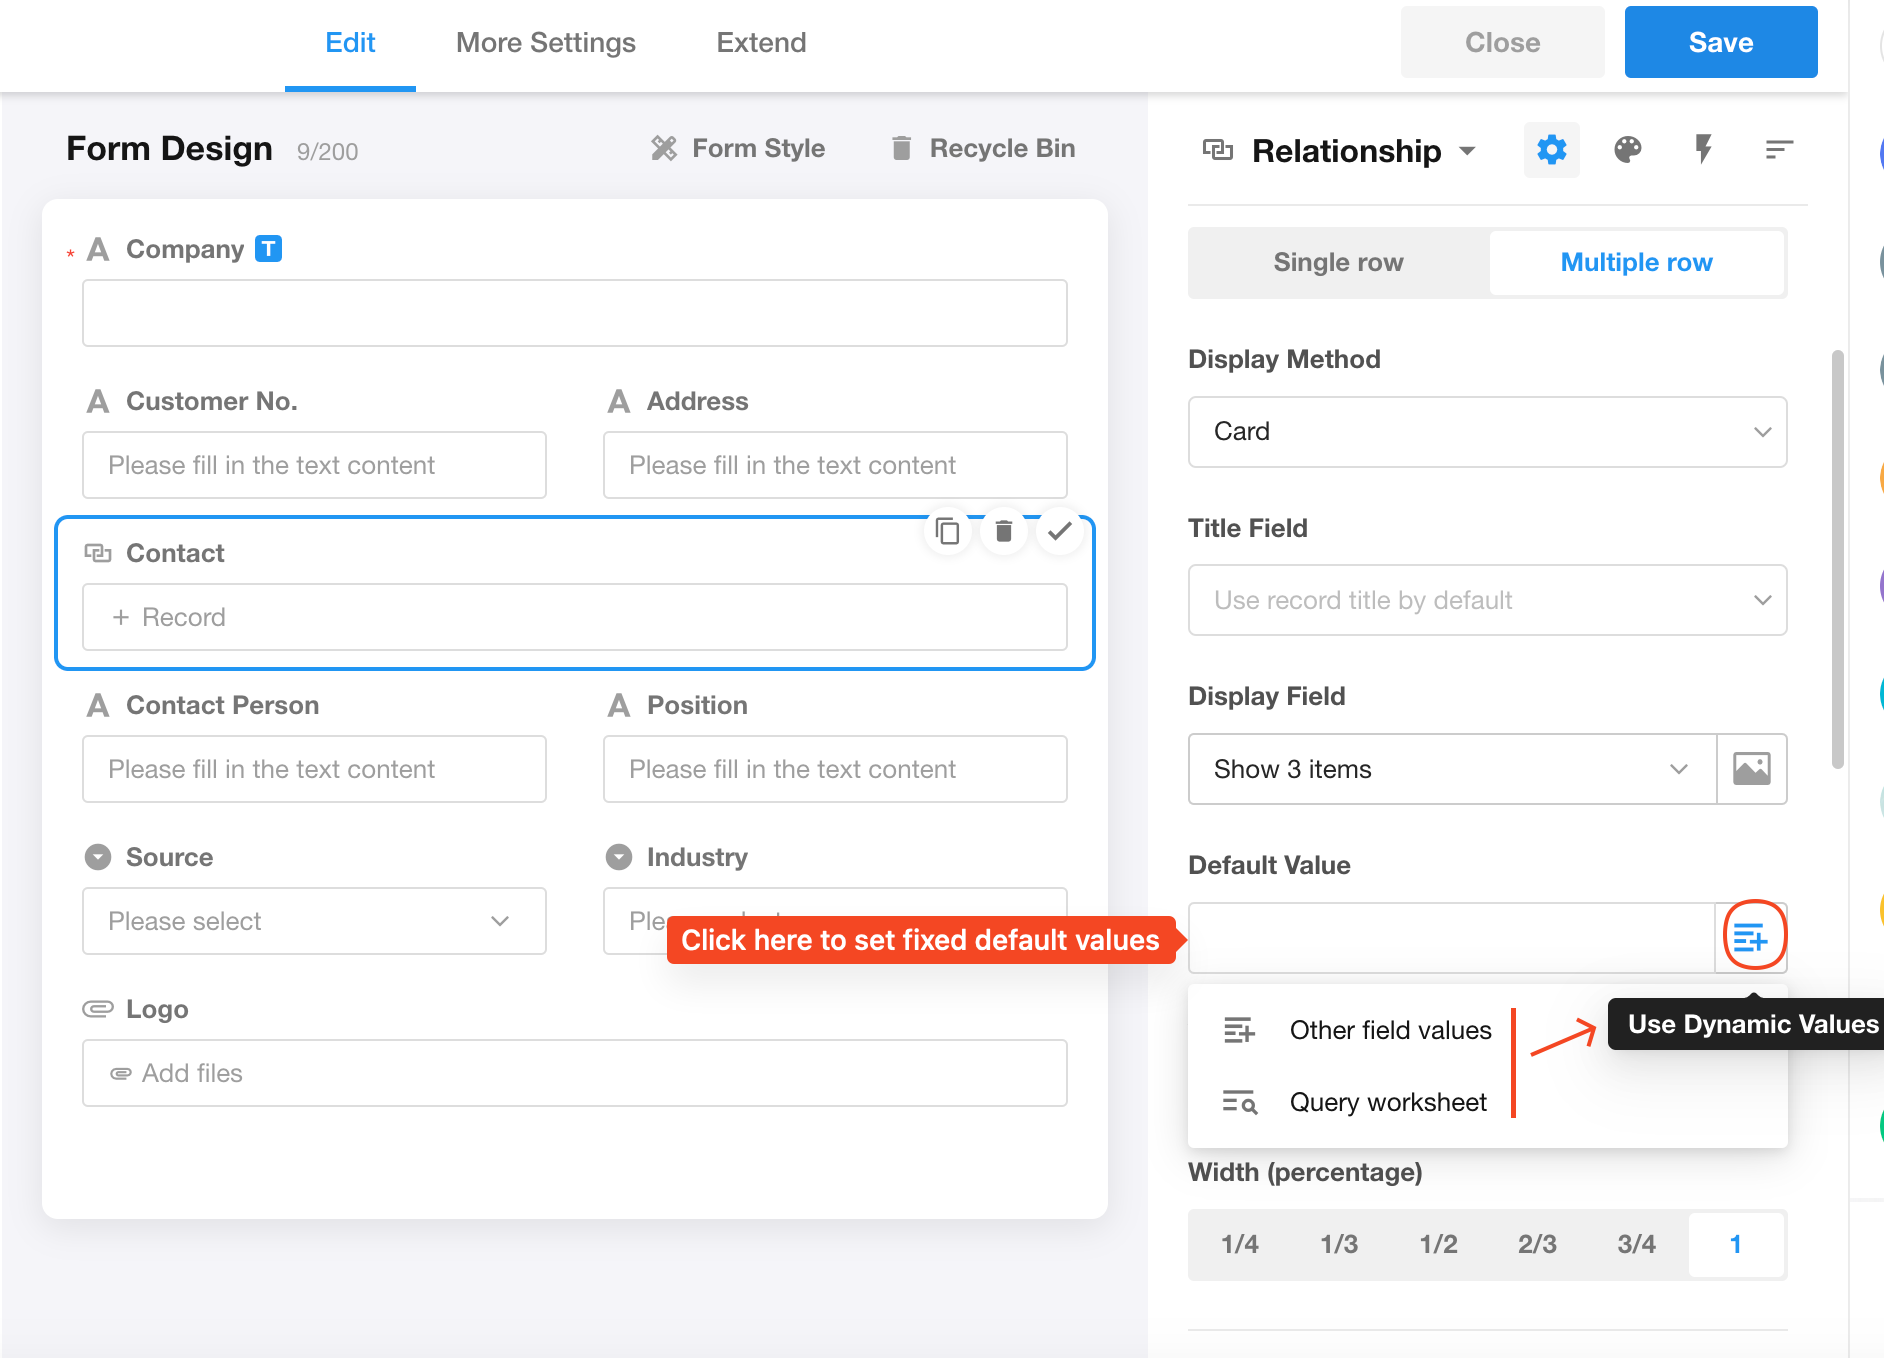
Default Values
When creating a new record, you can automatically relate one or more records by setting default values. The following options are supported:
- Fixed default value: Each new record is related with the same predefined record(s).
- Other field value: Automatically references the related records via another relationship field (not supported in table mode).
- Query worksheet: Populate defaults by querying a worksheet (up to 500 records).
Learn more about setting default values
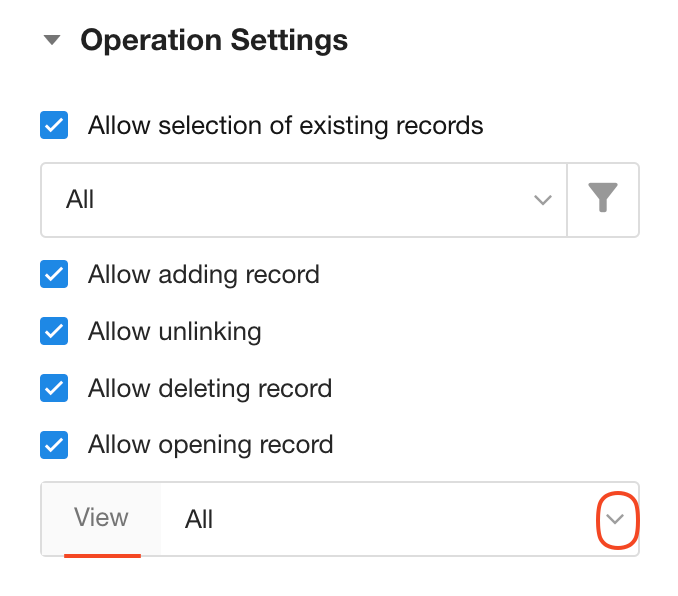
User Interaction Settings
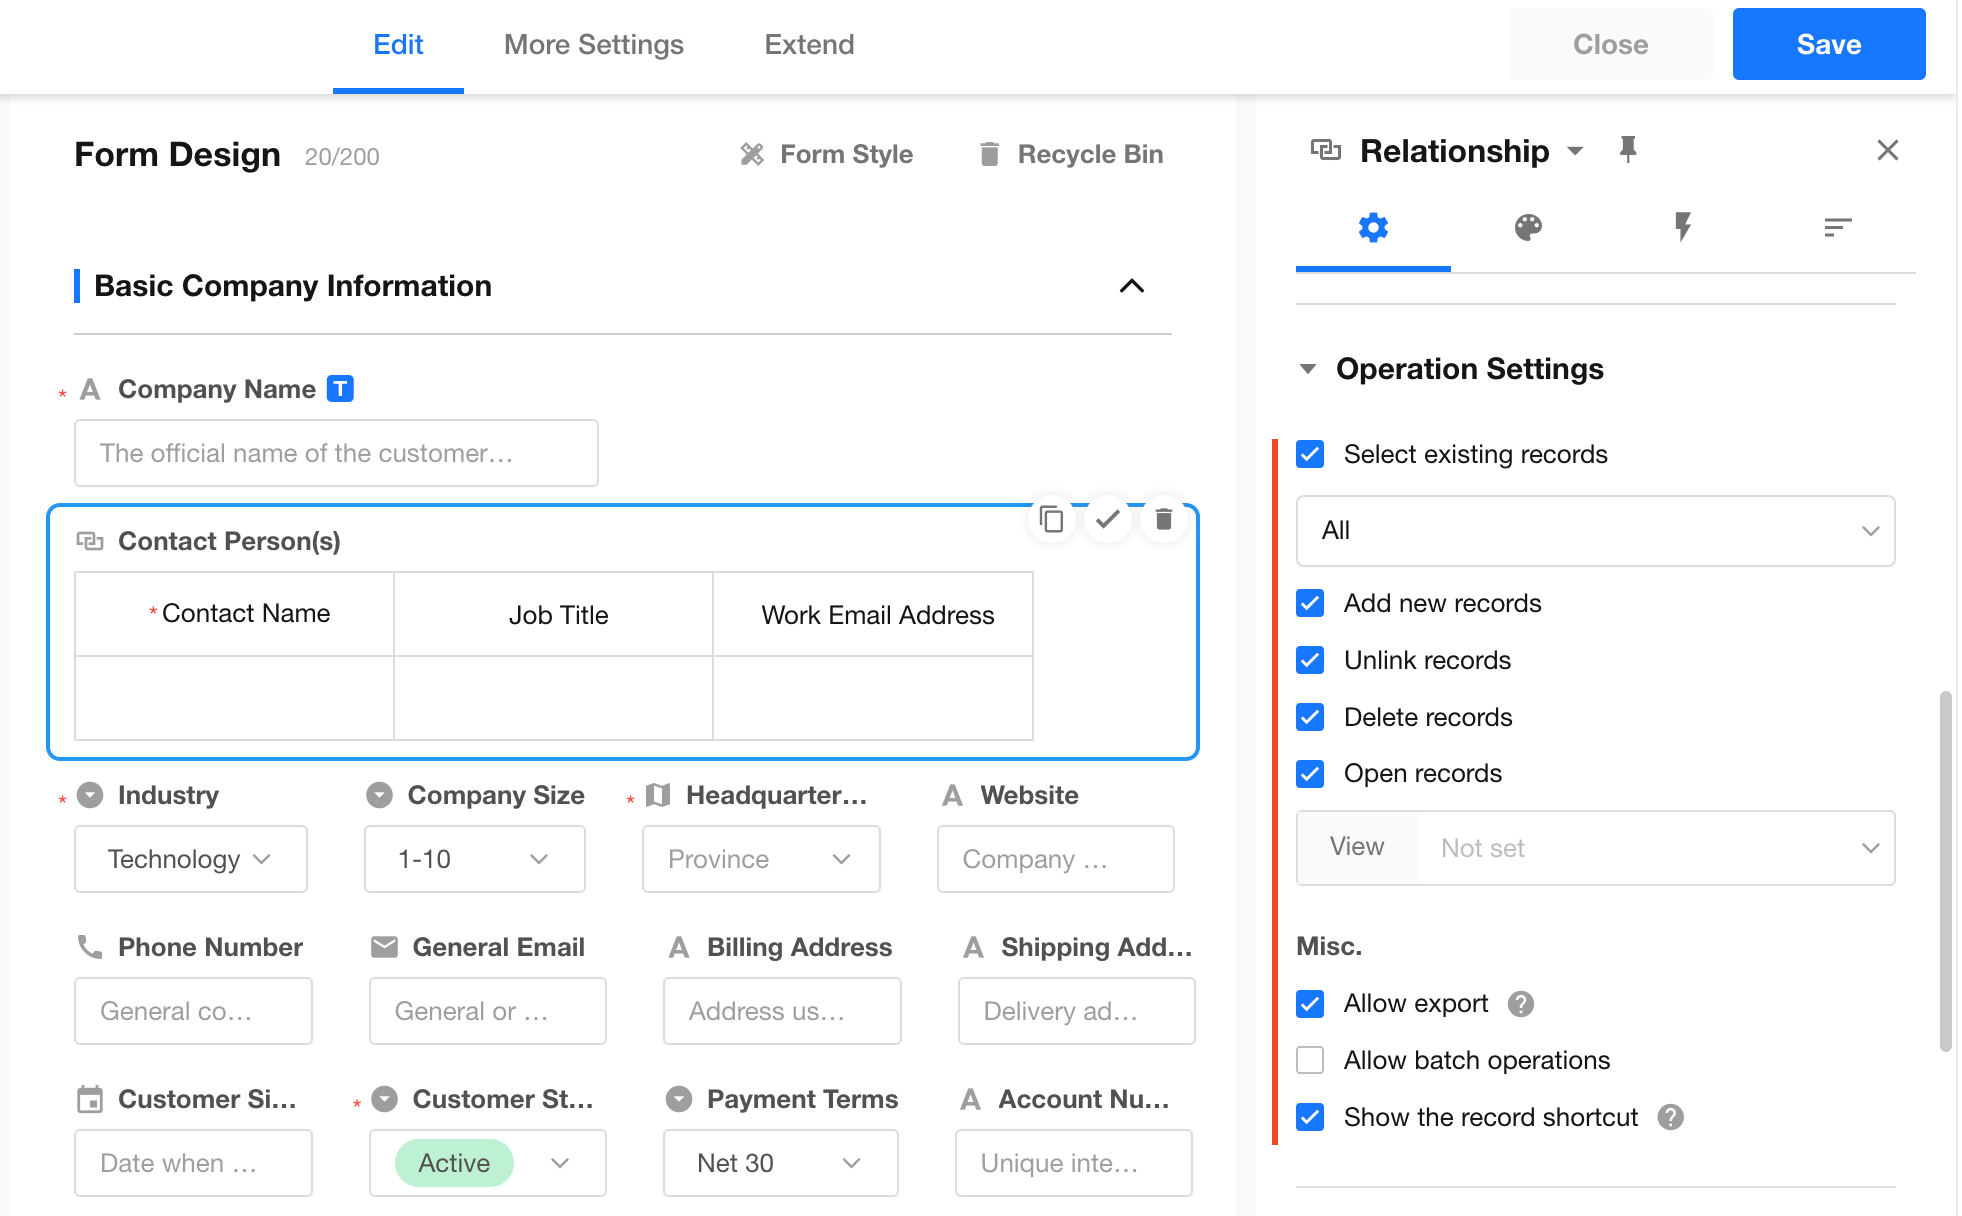
Select existing records
When enabled, users can select existing records to relate, and can click Related Record Settings to configure the display and behavior of selectable records.
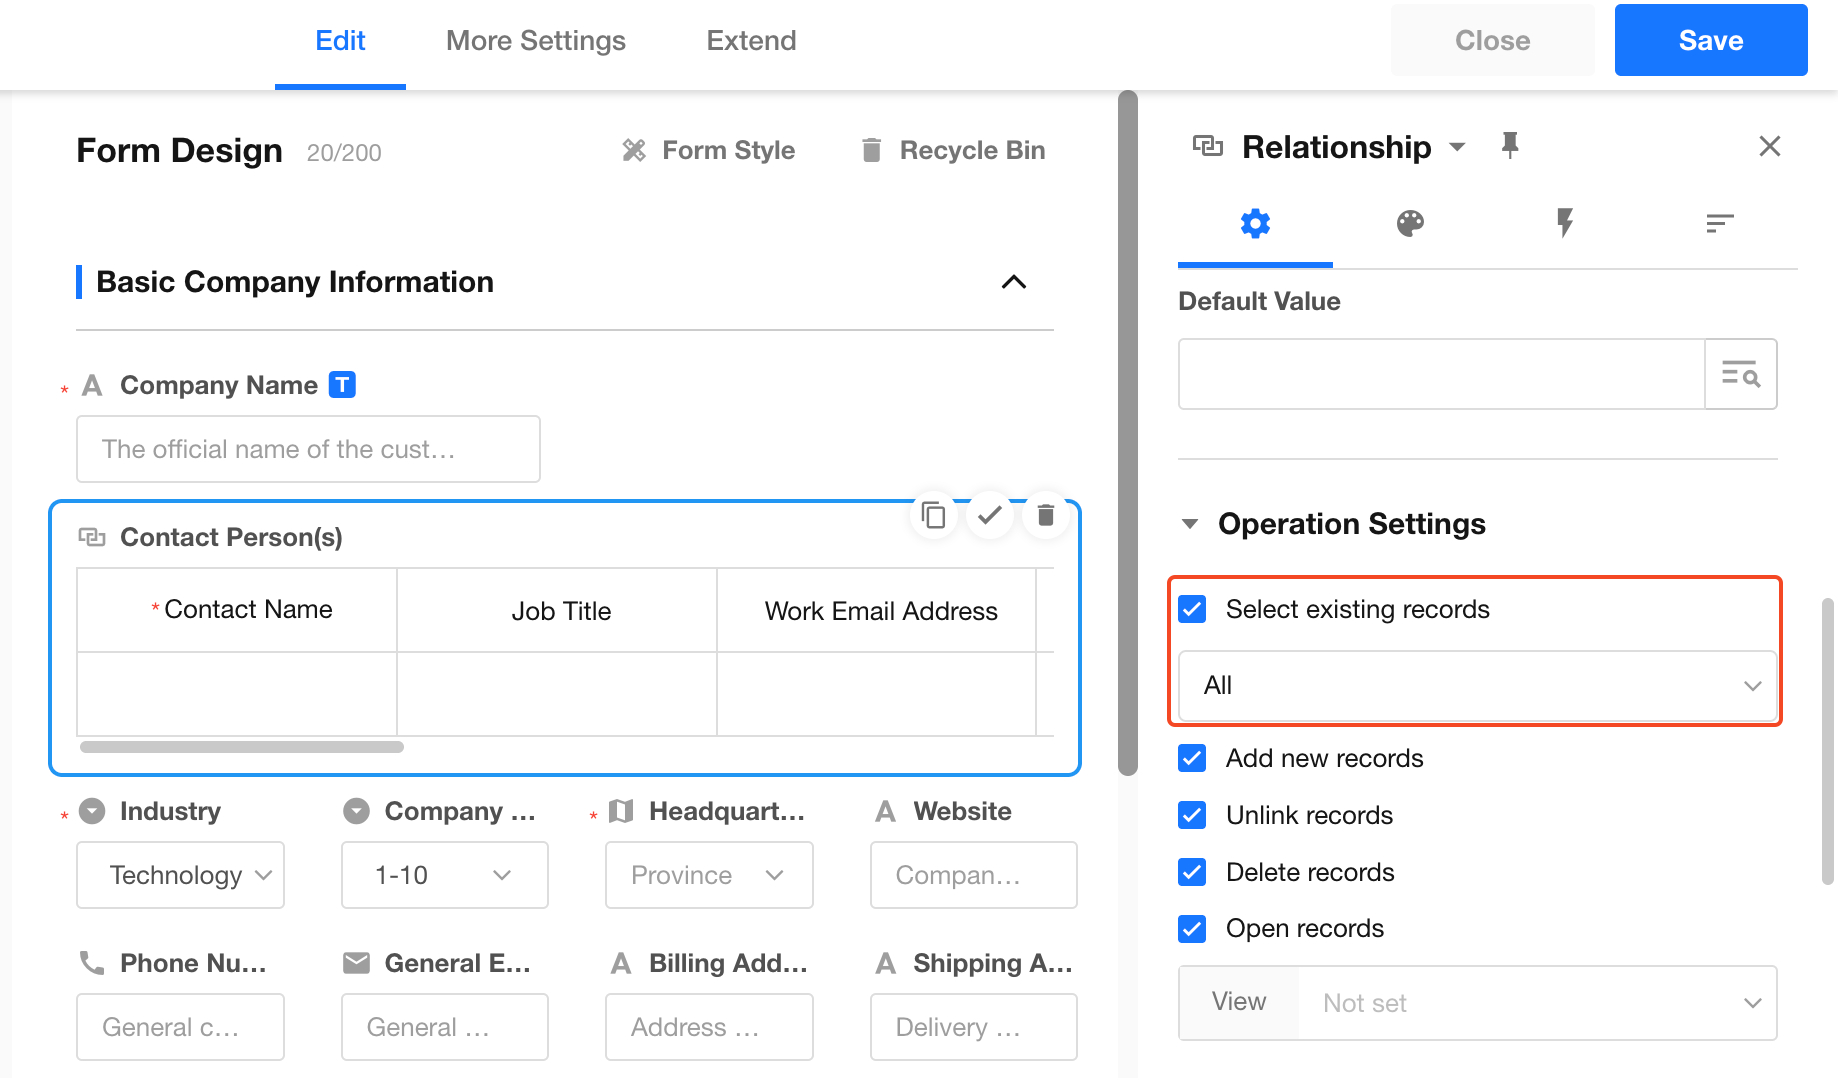
If Select existing records is not enabled, the Associate existing records button is hidden during association. The Related Record Settings option in the relationship field properties is also hidden.
Permission scope when associatingrecords
When selecting existing records, you can define the selectable scope:
- All records
- Only records with query permission
Additional filters can be applied to further narrow the scope.

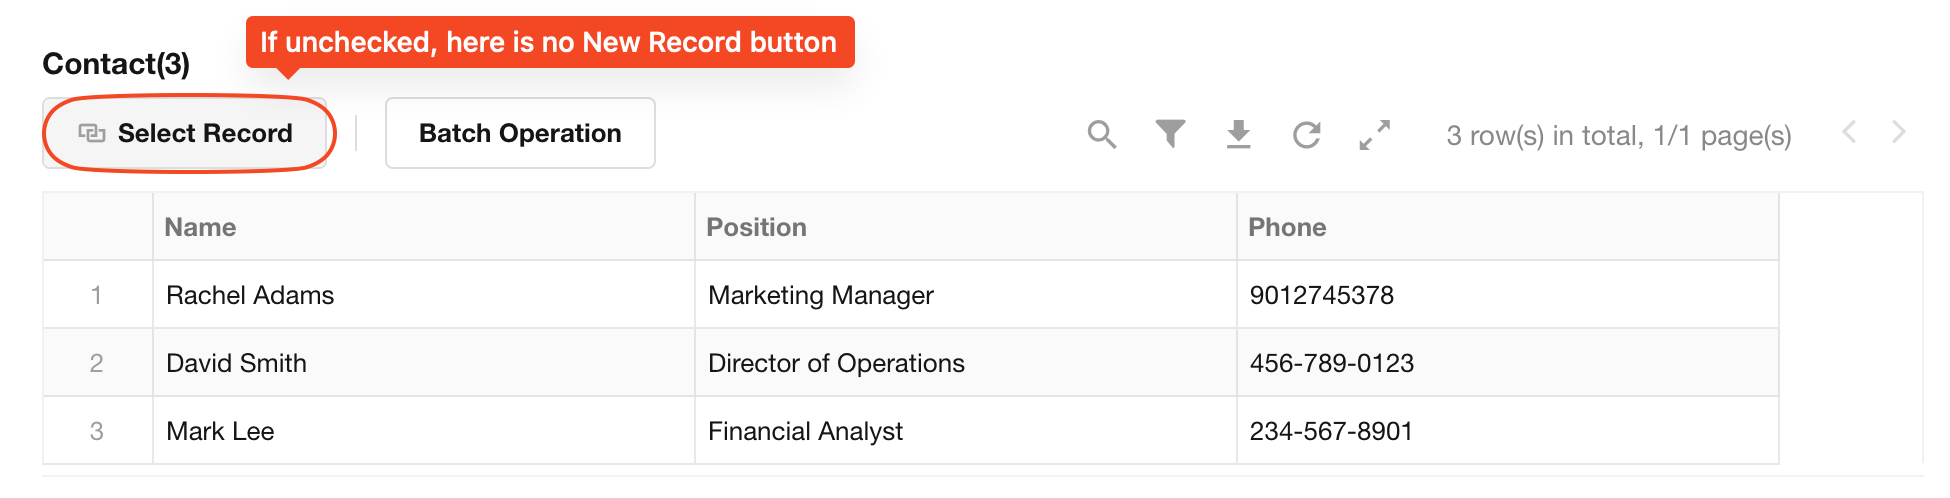
Add new records
If Add new records is disabled, the button for creating new records is hidden. Users can only associate existing records.
Unrelate records
For records that are already associated, you can configure whether users are allowed to remove the association. If disabled, the action button is hidden.
Open records
By default, this option is checked. Users can click on a record or record card to open the details page of the related record.
-
When setting "Allow opening records," users can select a view to display record details based on the operator's permissions.
When the operator viewing records in the worksheet (contact worksheet), the view ("My Contacts" view) is not visible to the operator, or this record is not visible in the view, the operator cannot open the details page of the record.
-
If a view is not selected here but a view is selected in the "Related view" section below, the settings below will apply.
If this view is not visible to the operator or this record is not visible in the view, the operator cannot open the details page of the record.
-
If no view is selected in either of the above settings, the record details page can be opened, displaying only the fields visible to the operator.
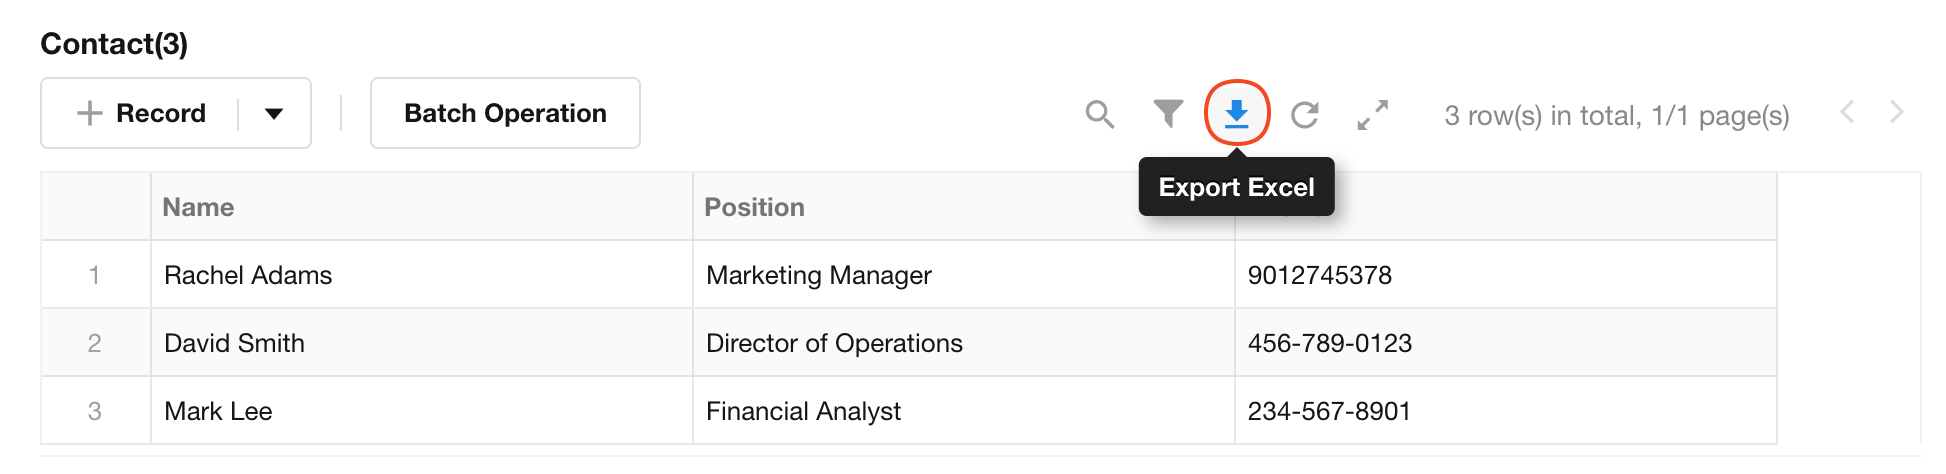
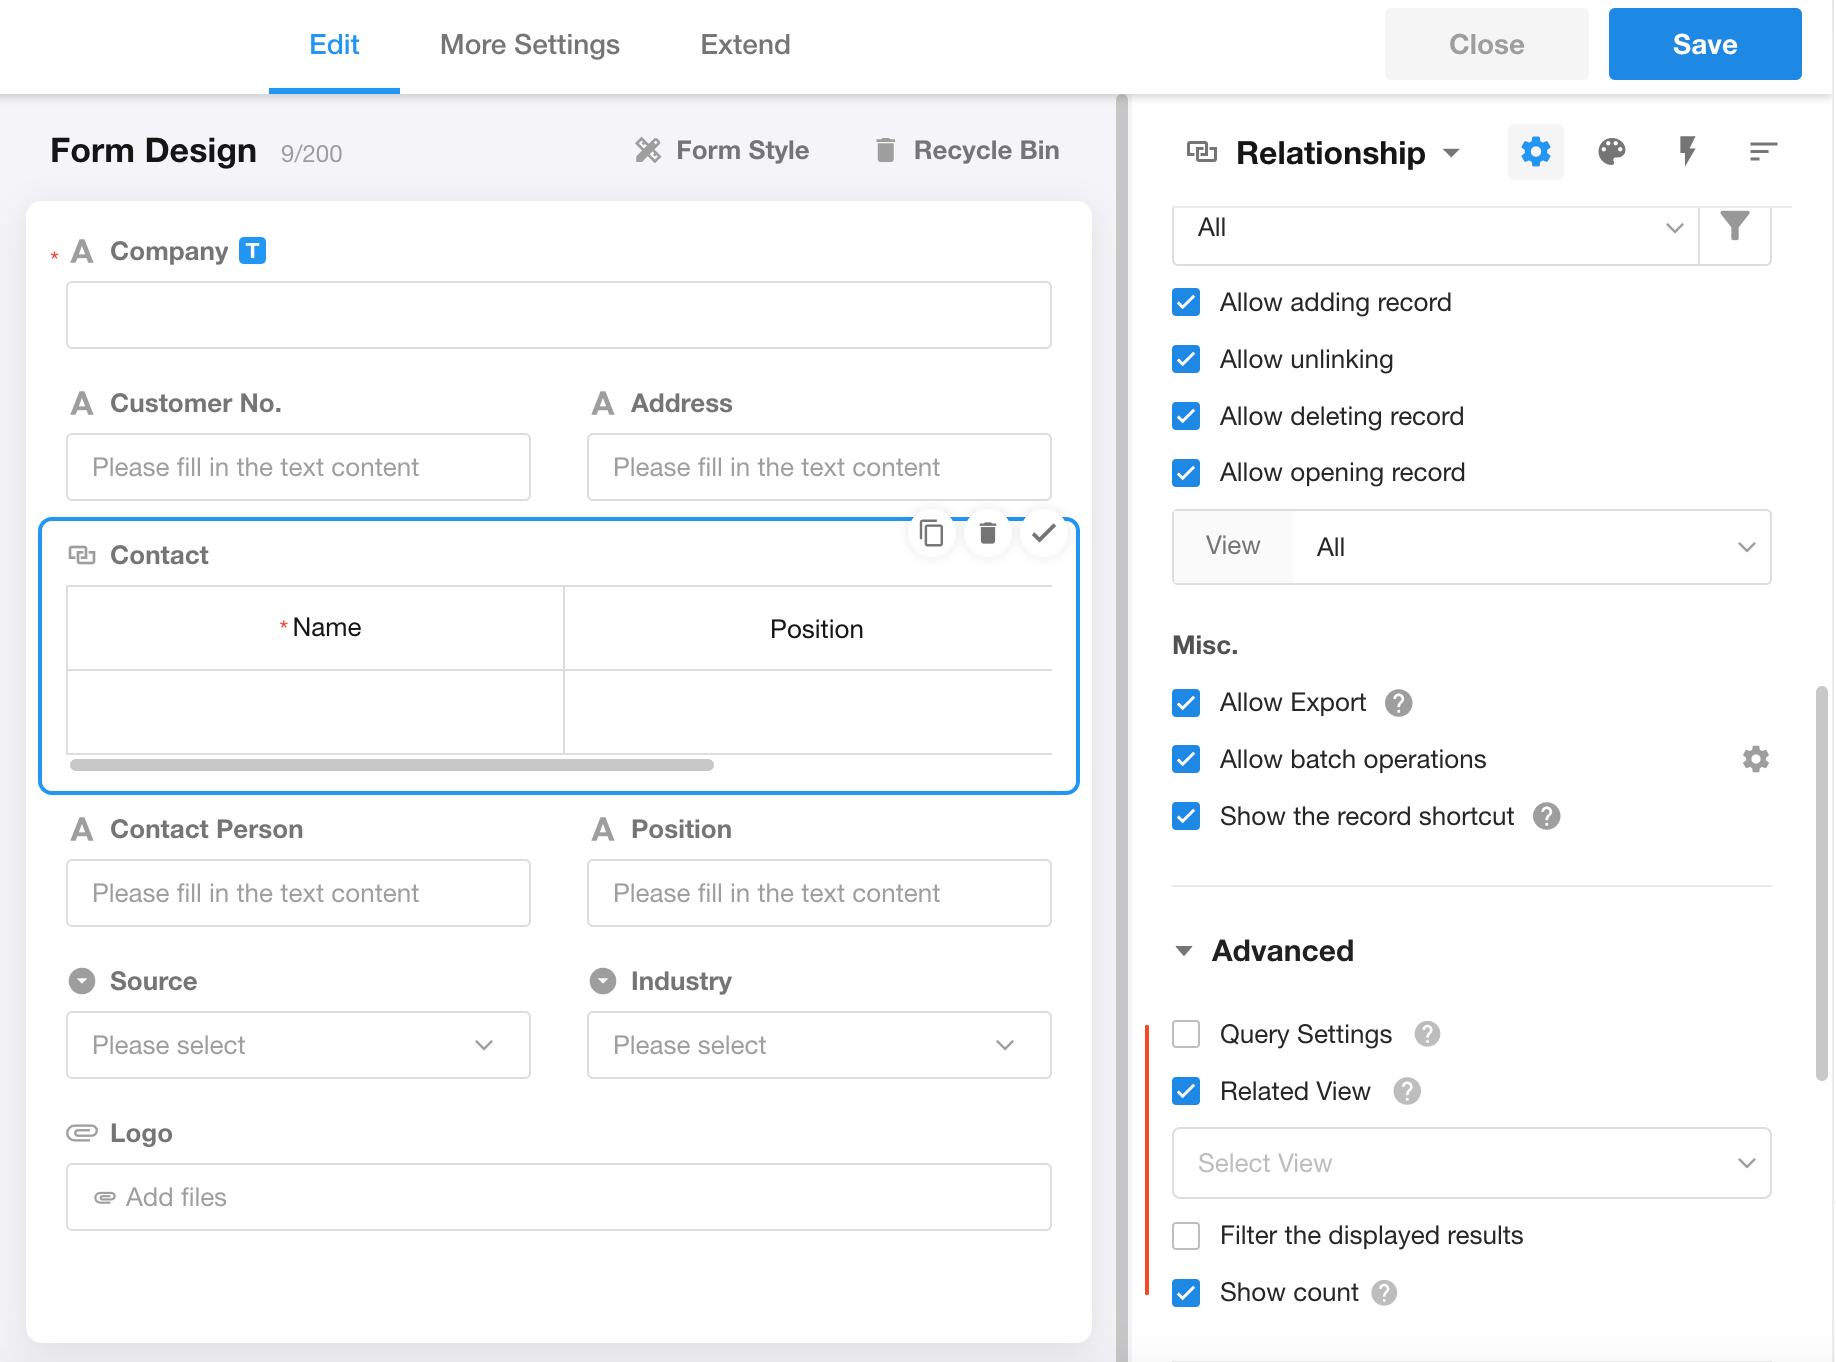
Allow export
If checked, users will see an "Export" button when viewing related records, allowing them to export the related records to Excel (exporting only the displayed fields).
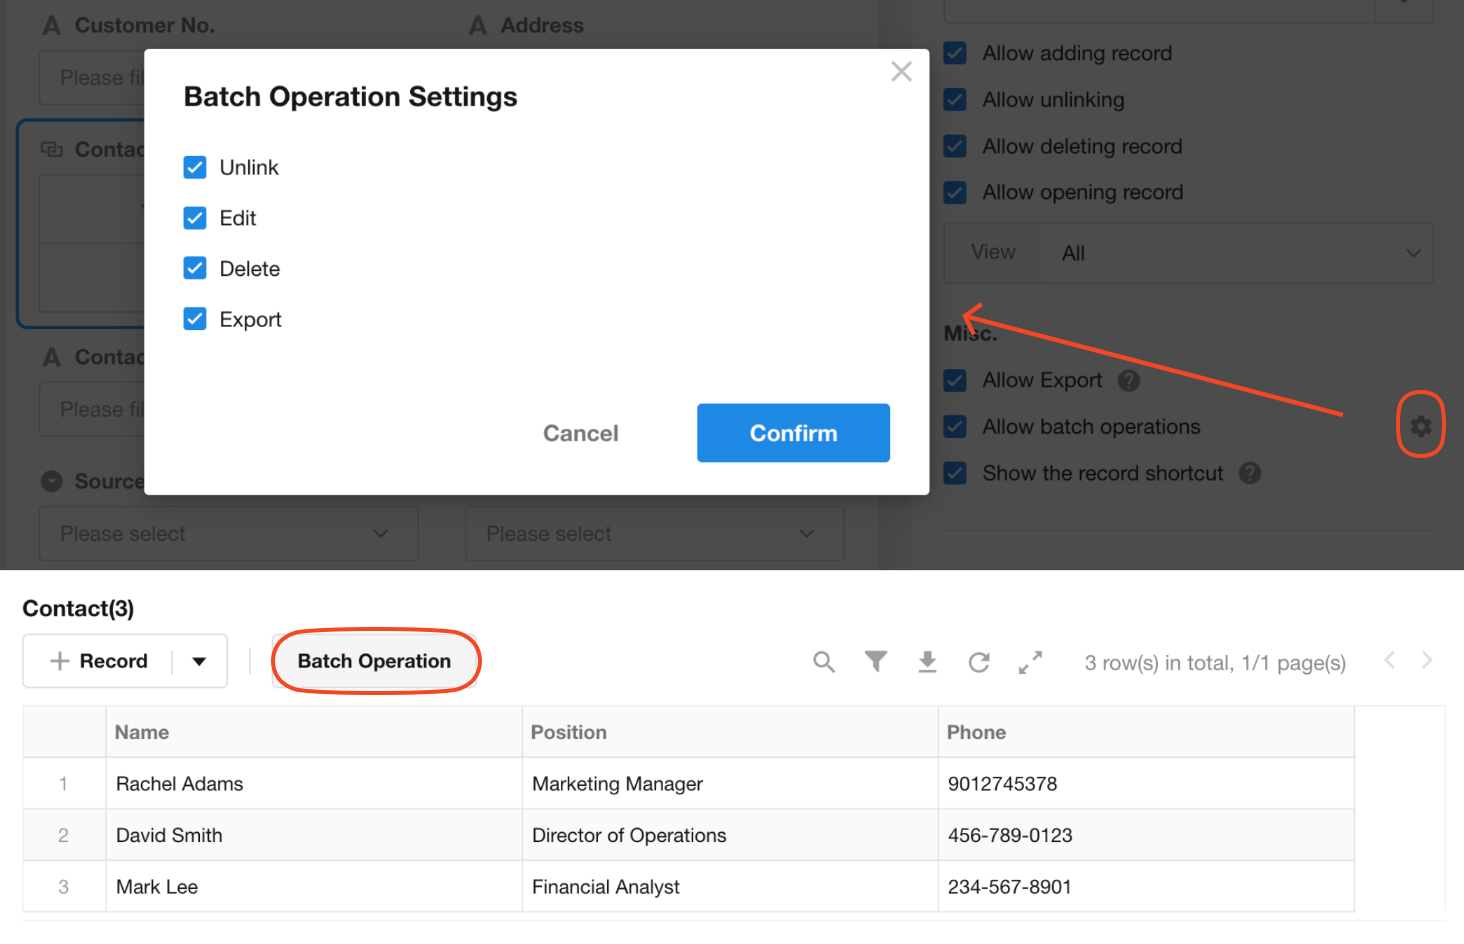
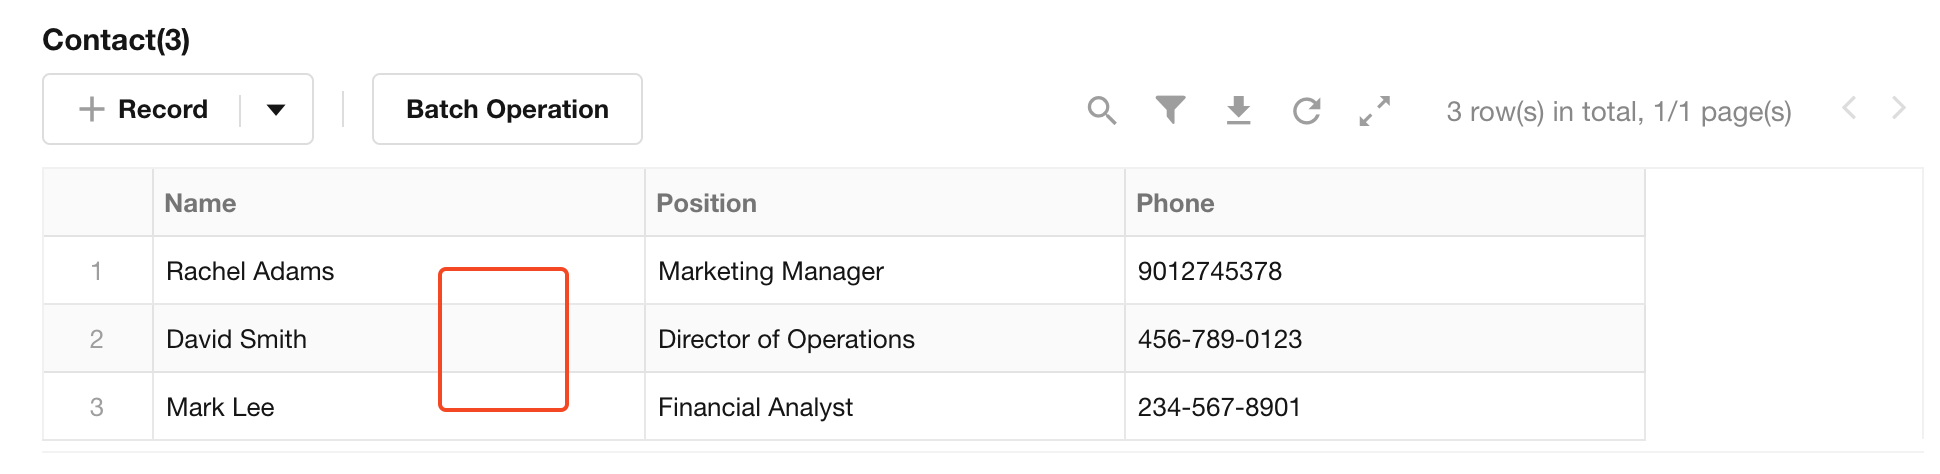
Allow batch operations
For records that have been related, users can set batch unrelating, batch editing, batch exporting, batch deleting, and other operations. Click the Settings button on the right to set which batch operations are allowed.
After checking "Allow batch operations", batch operations buttons will be displayed above the table of related records.
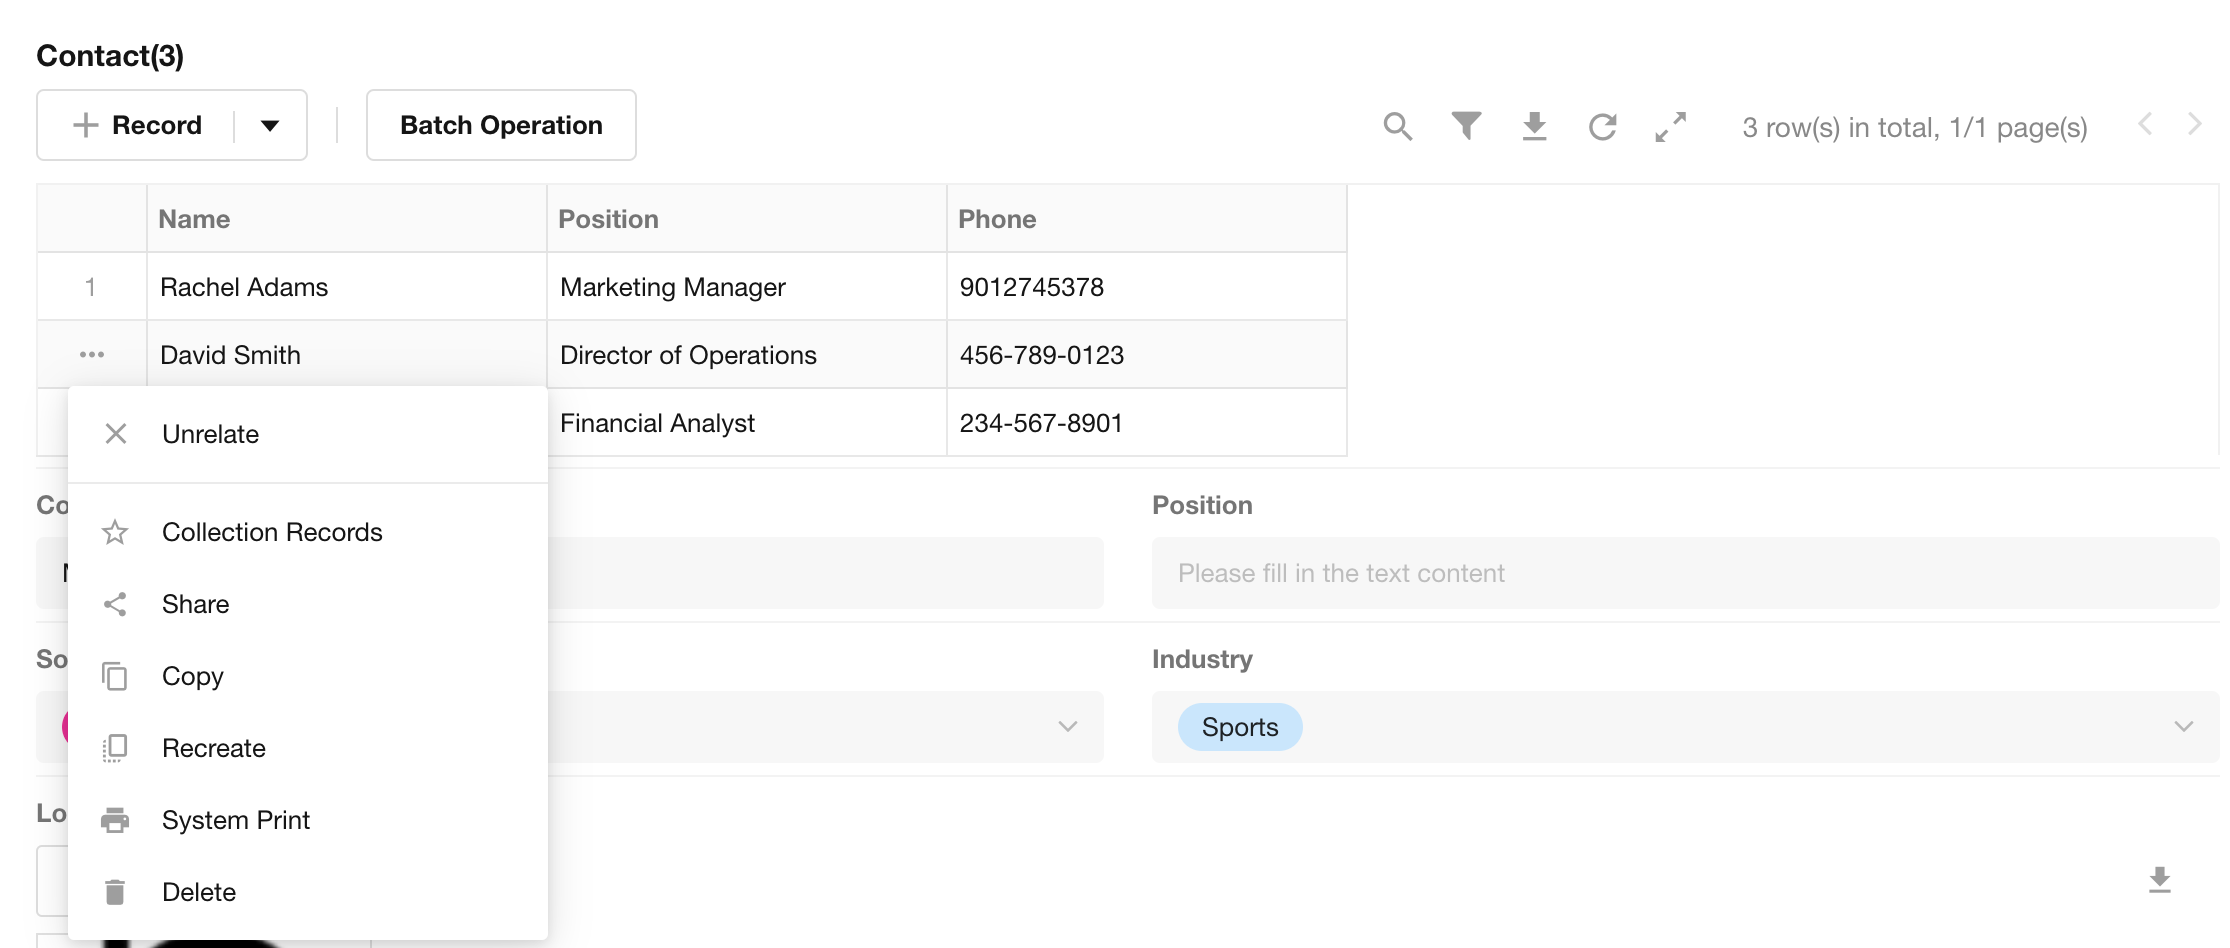
Show the record shortcut
If not checked, the shortcut buttons on the left side of the table of related records will be hidden, and users cannot quickly copy records, delete records, unrelate records, etc.
Style Settings
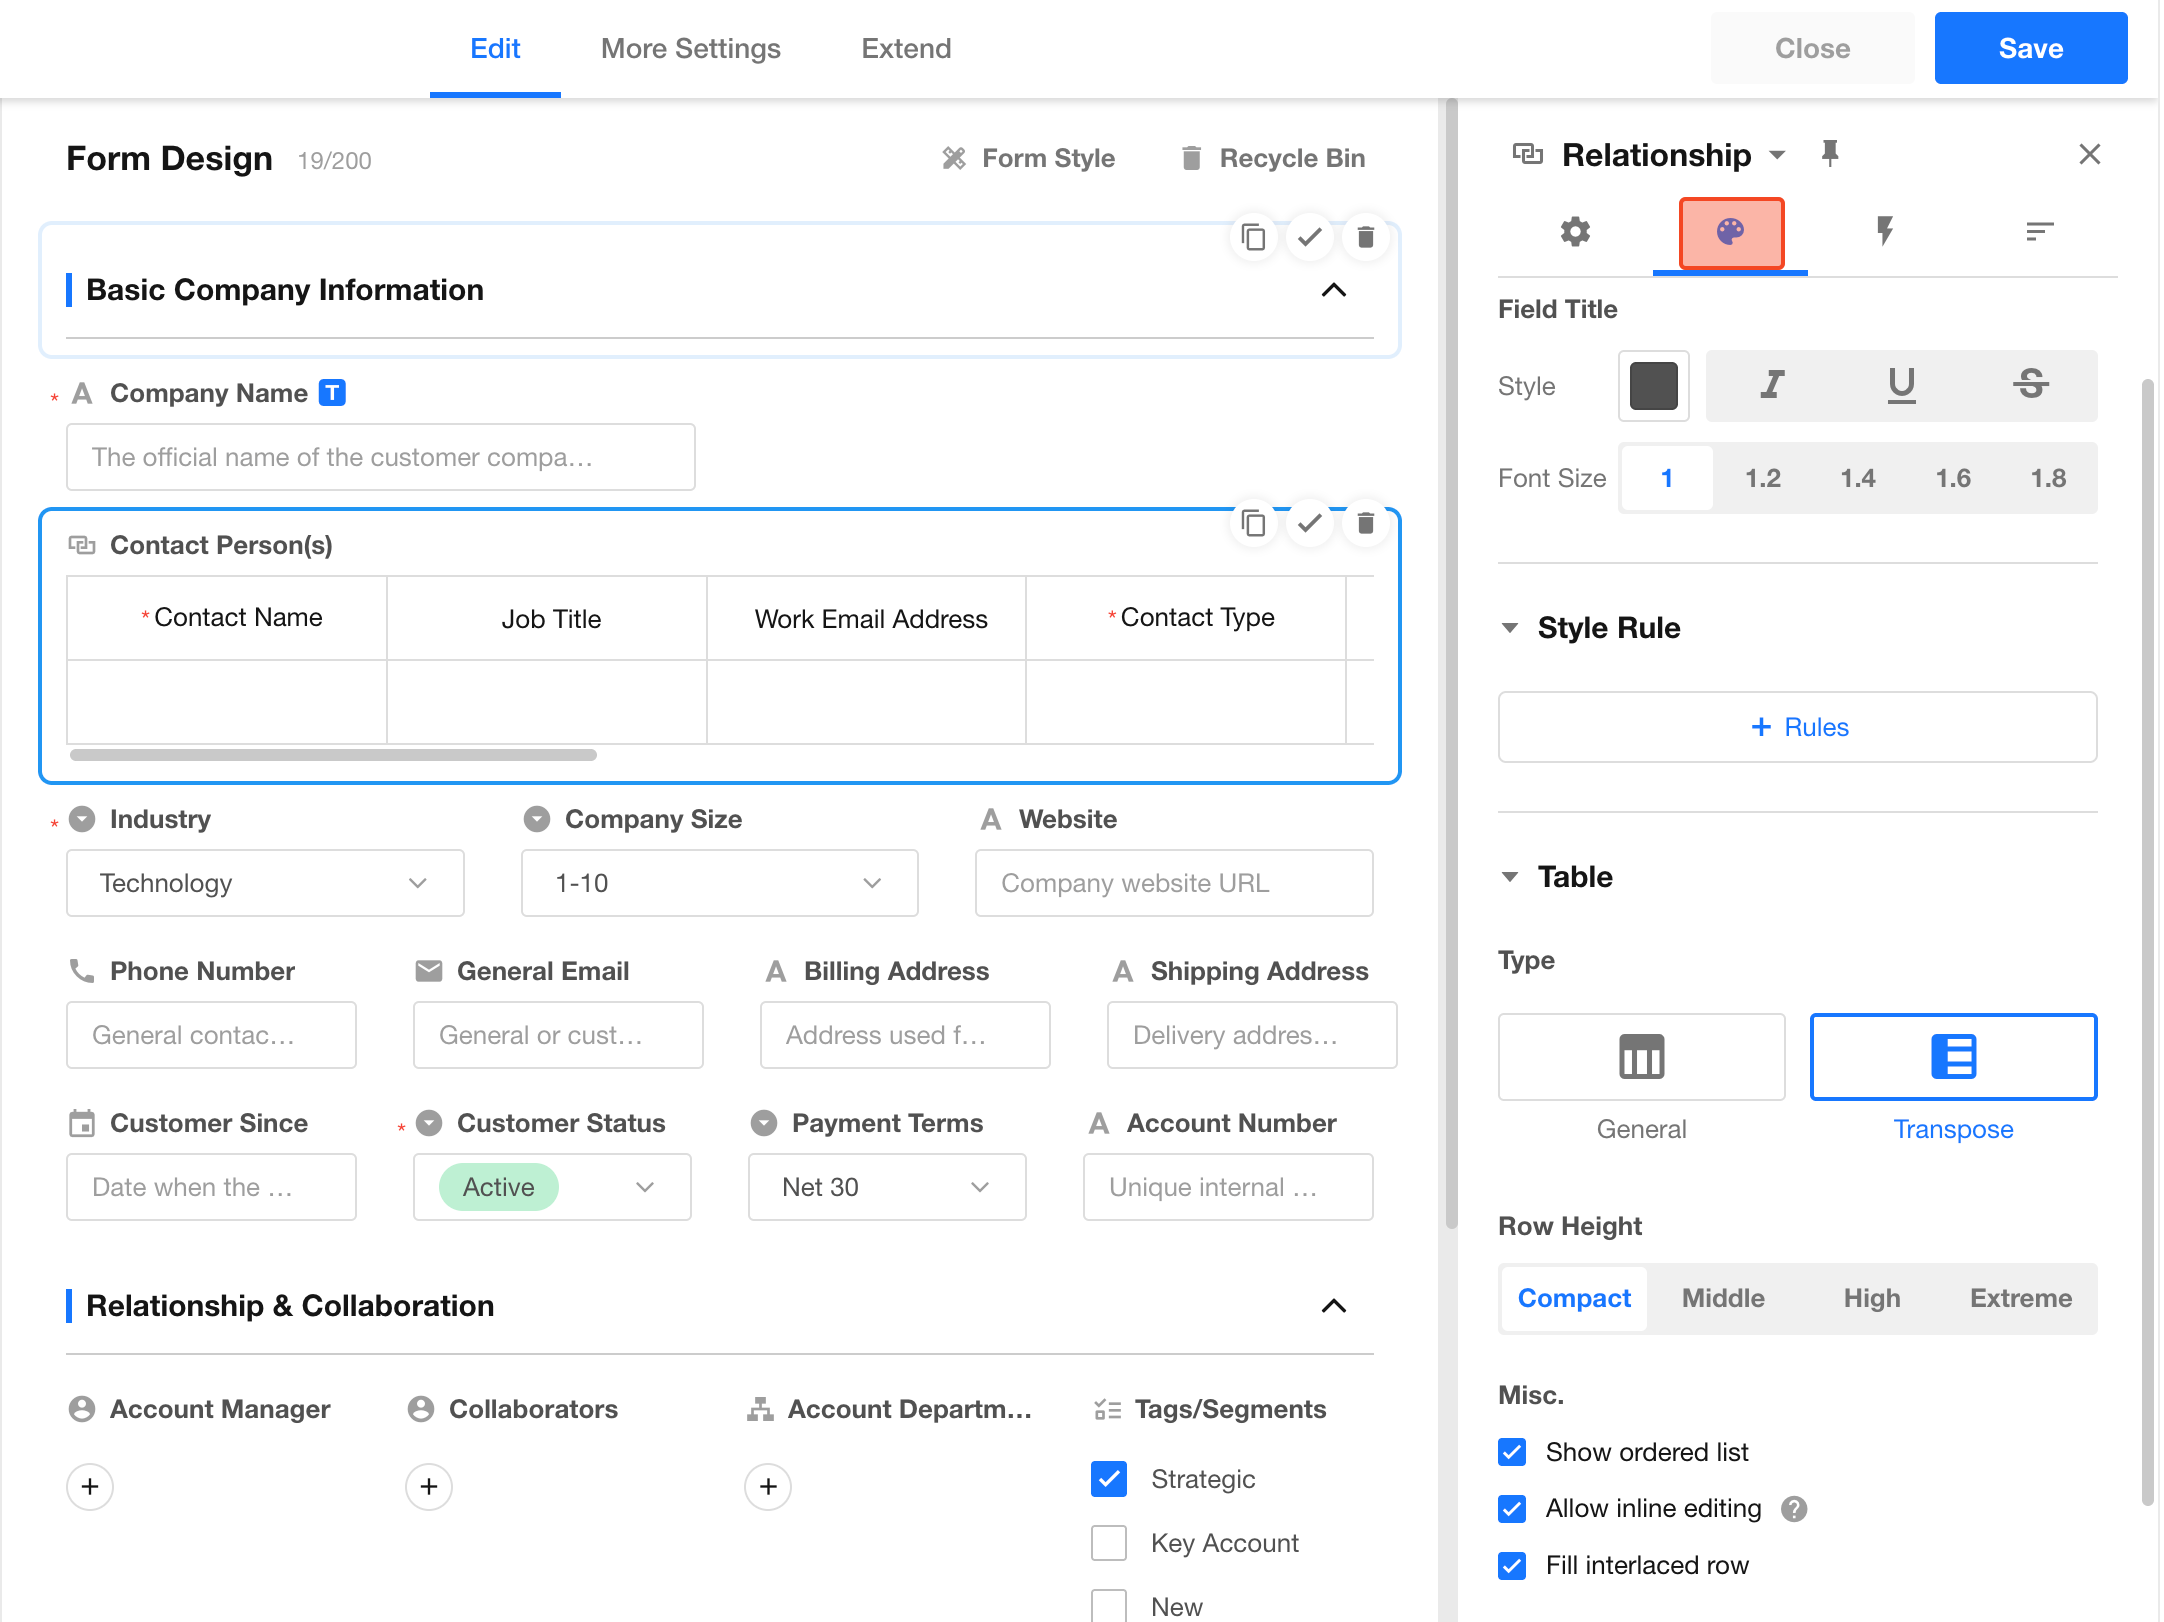
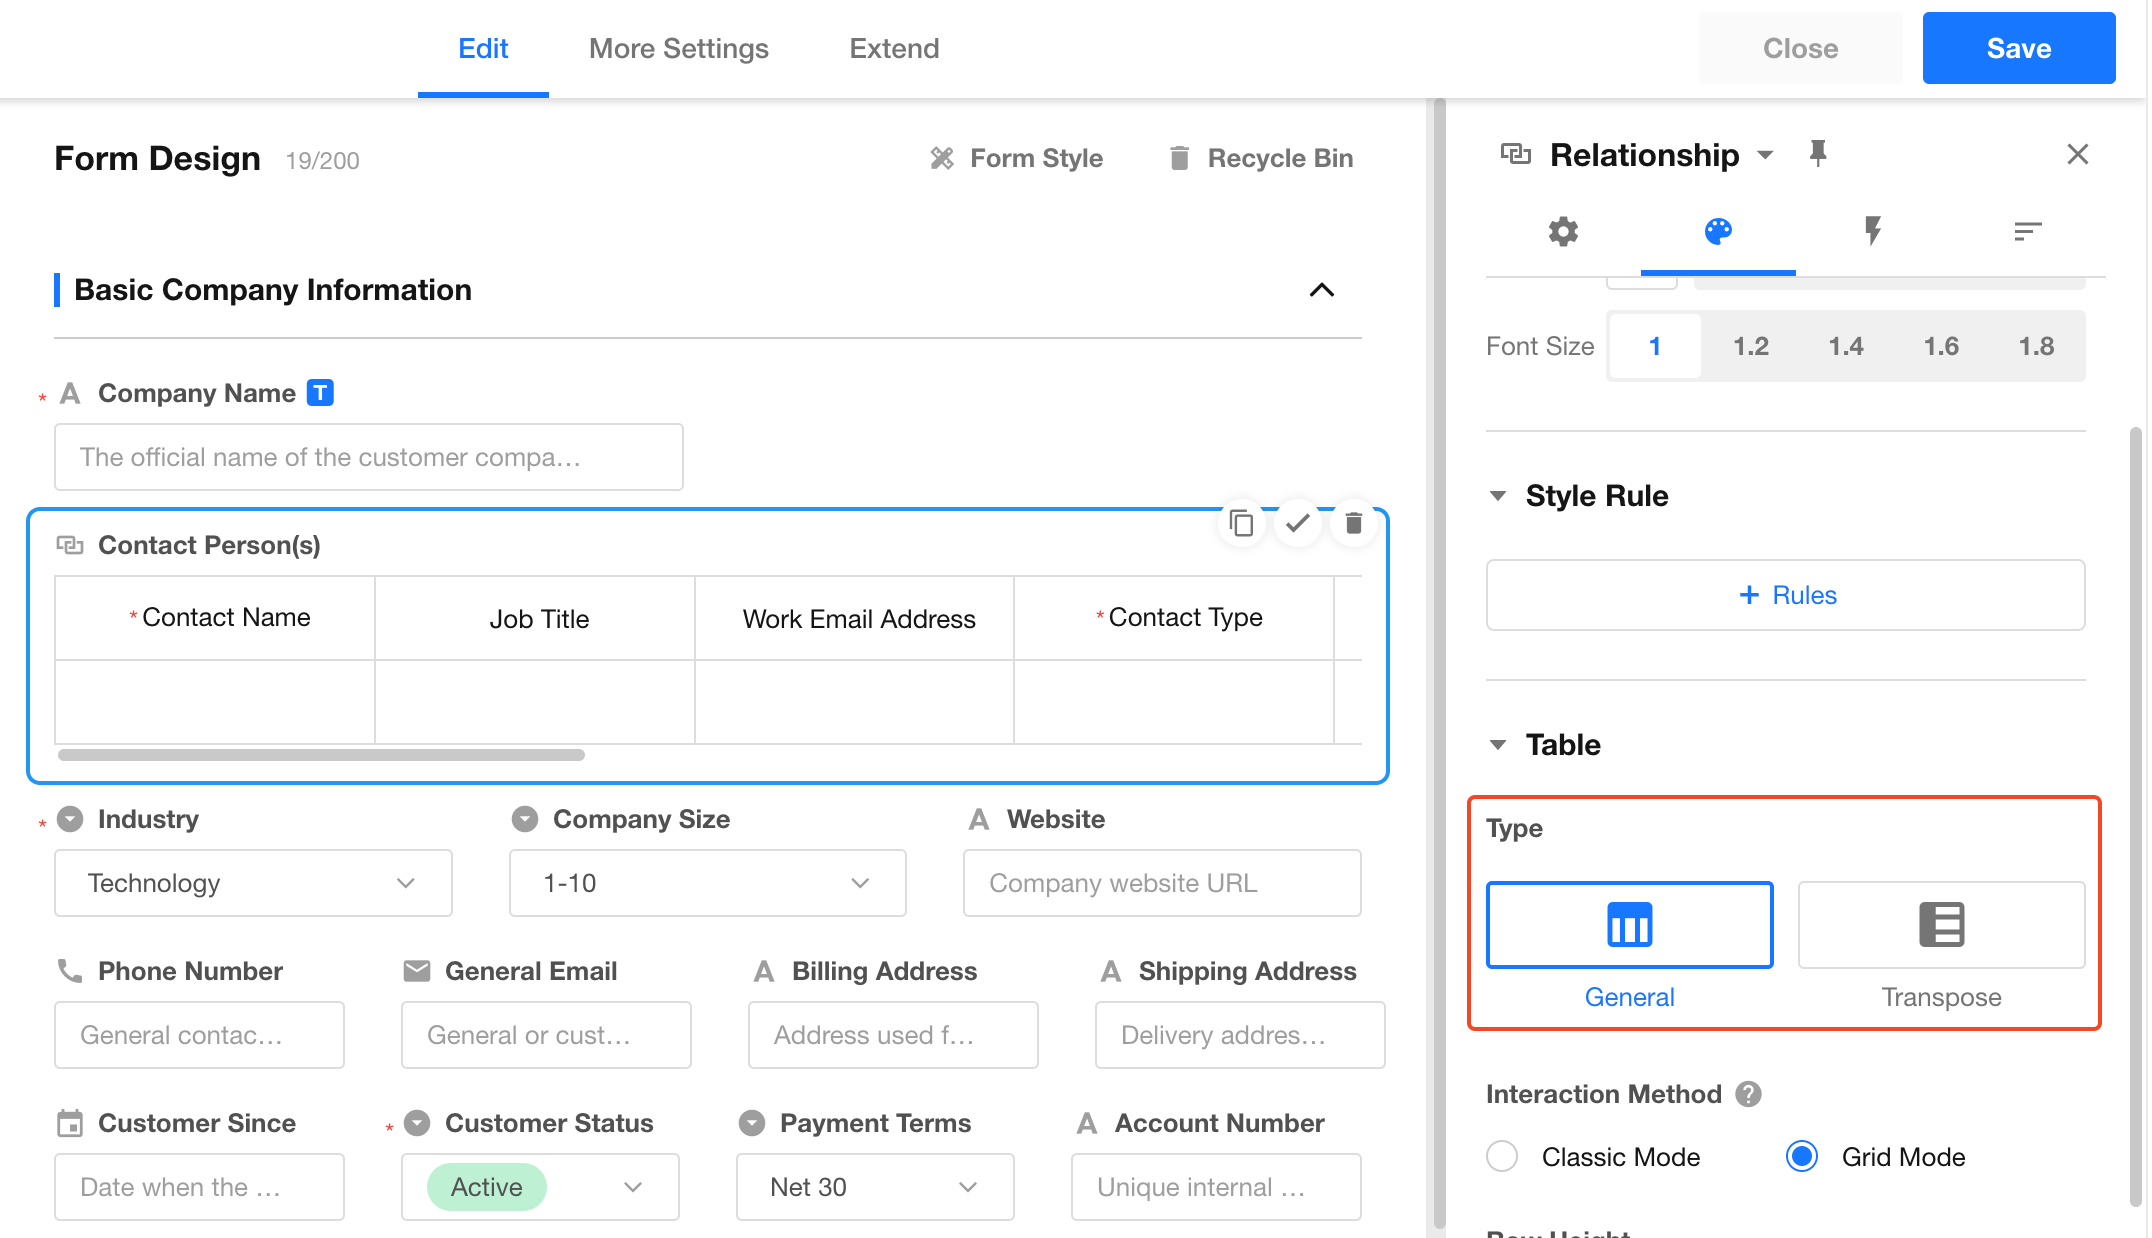
Table Style
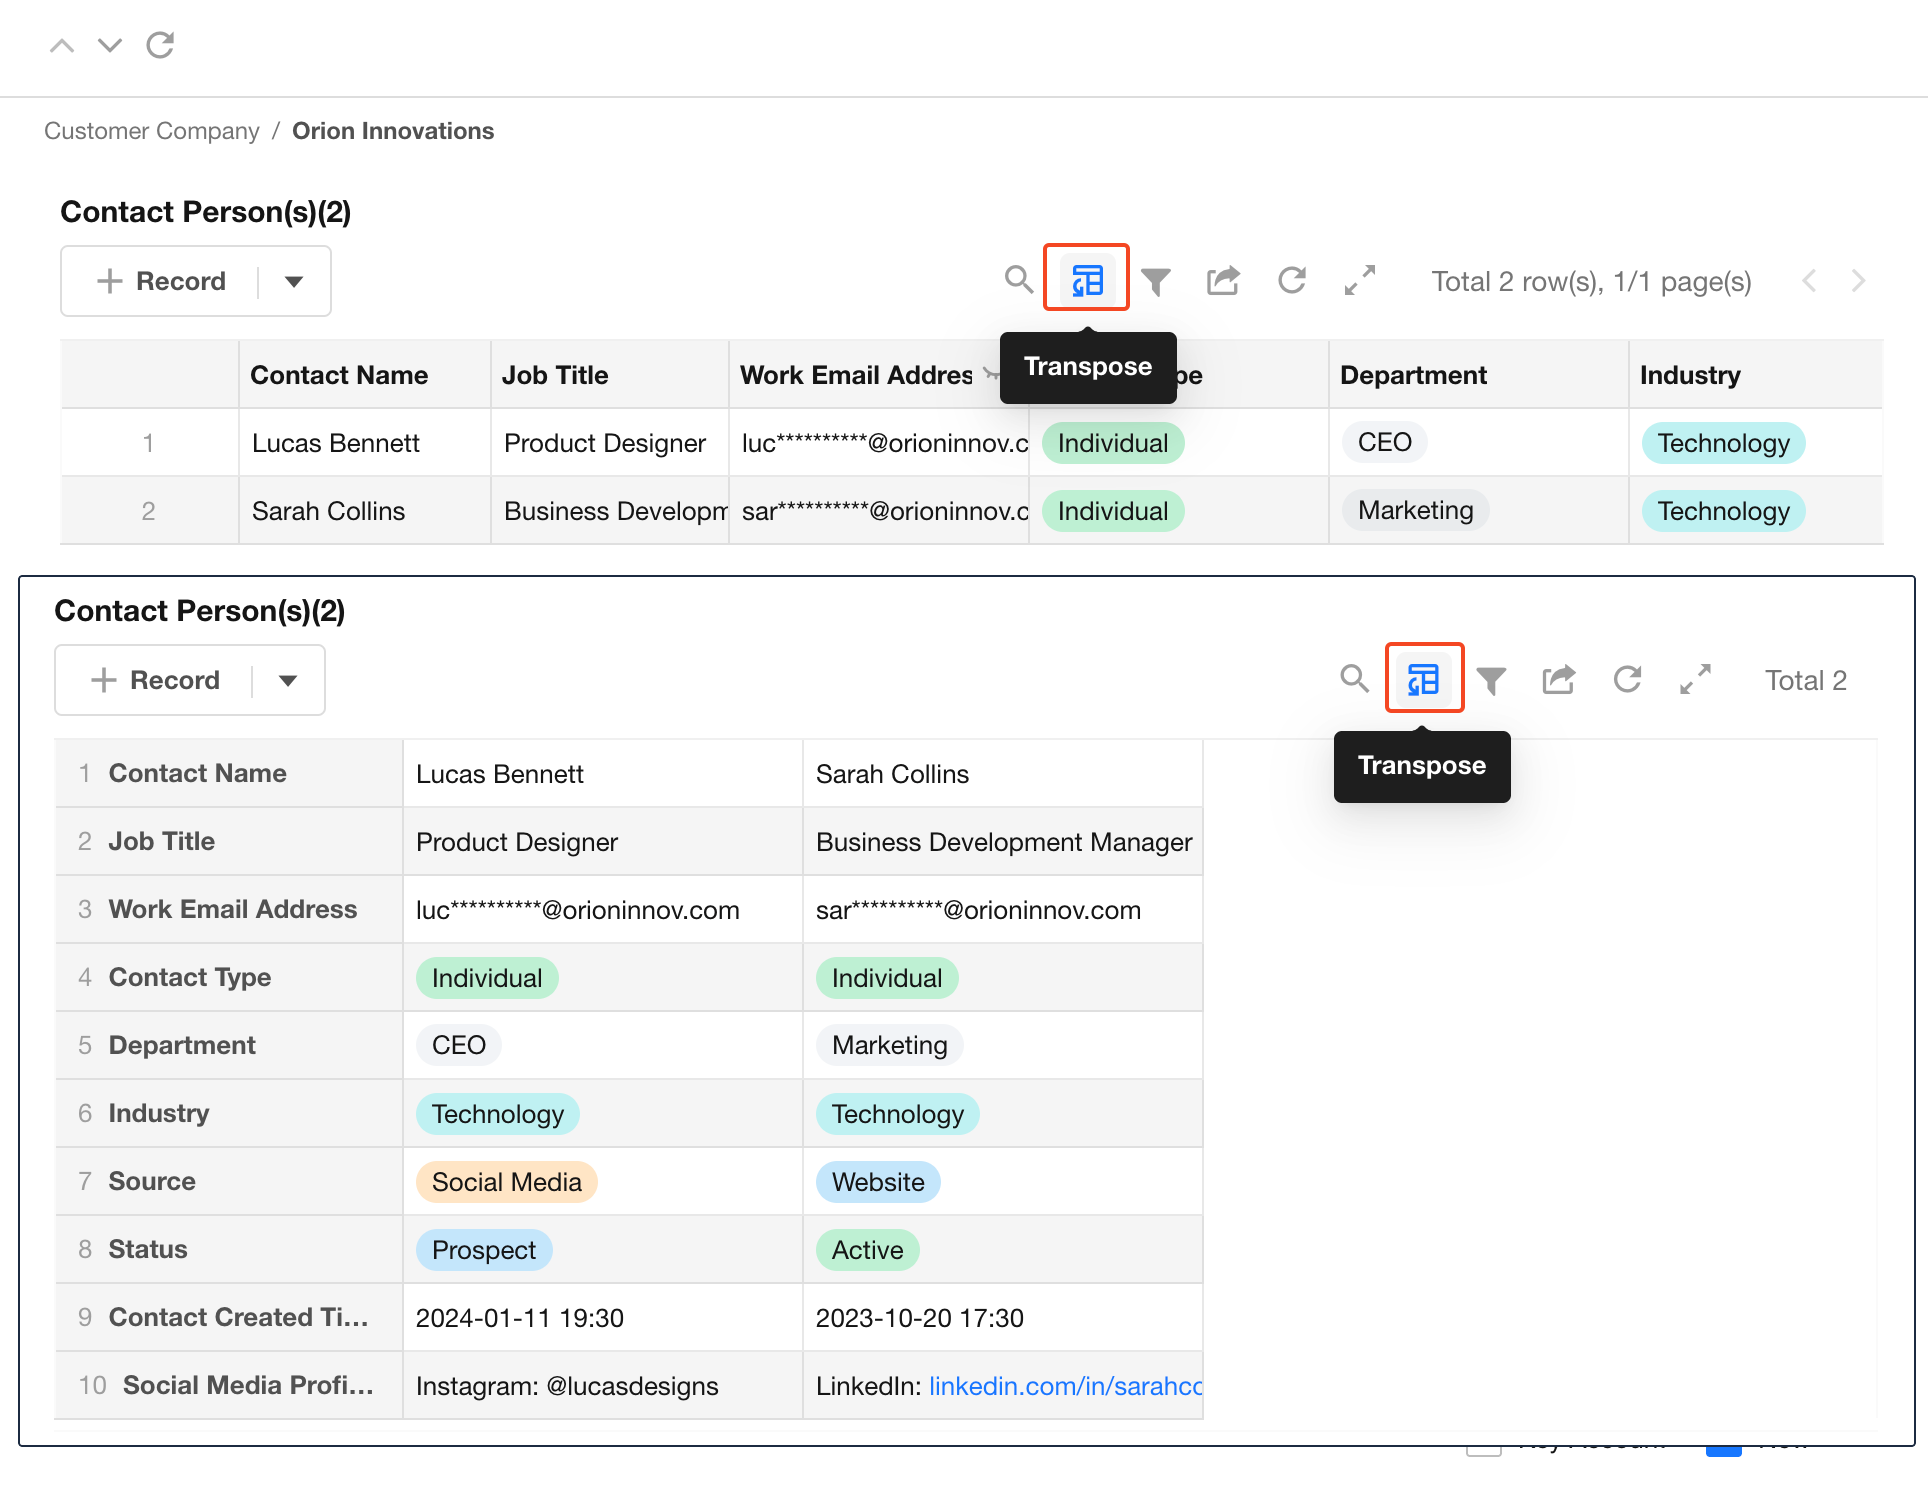
When displaying related records in a table format, you can choose between two styles: General and Transpose.
Comparison of General vs. Transpose styles:
If Transpose is selected, a Transpose icon will appear in the table. You can click the icon to toggle between the two styles.
Interaction mode
-
Classic Mode (default mode)
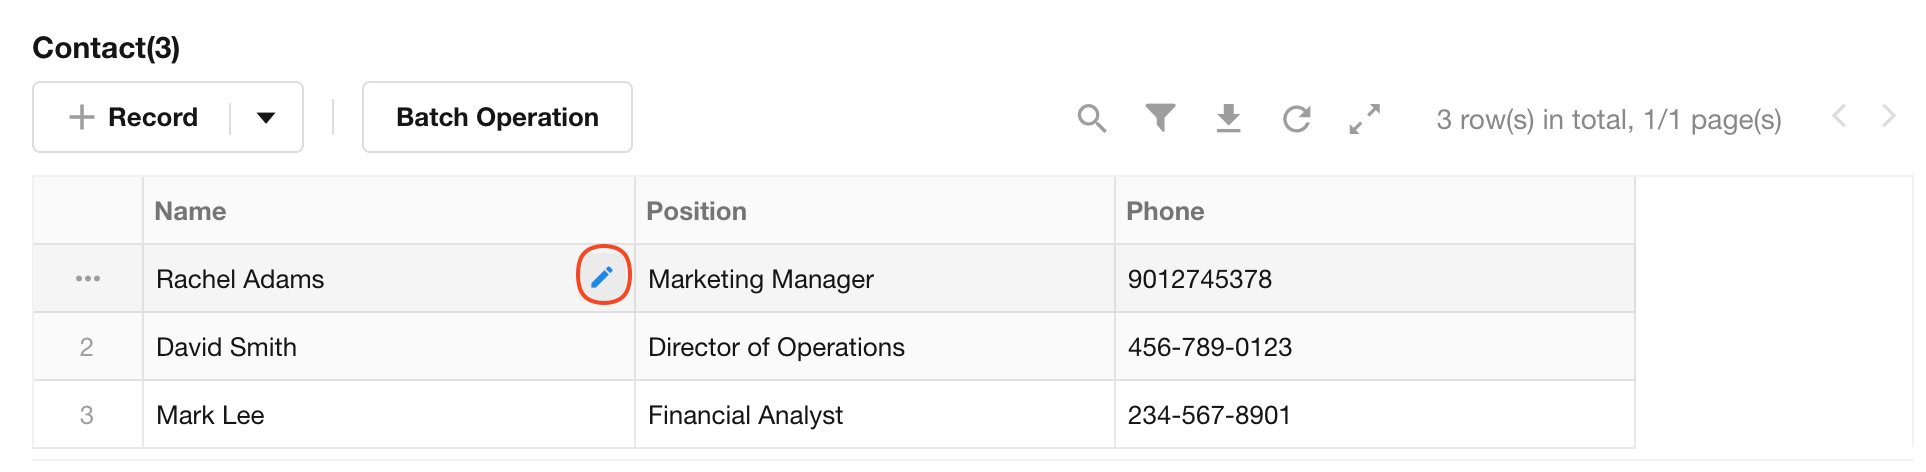
Open Record: Click on the blank space of each cell to open the details page of the record.
Quick Edit: Click on the edit button displayed when hovering over a cell to edit the record.
-
Grid Mode
Open Record: Click on a cell and then press Space to open the details page of the record.
Quick Edit: Click on a cell to select it, similar to operations in Excel, such as navigating cells using the arrow keys or copying content. Press Enter or click again to activate the cell for editing. When editing a field, you can input data using the keyboard. For fields like number fields or single-select fields, use the up and down keys on the keyboard to select options after the field is activated.
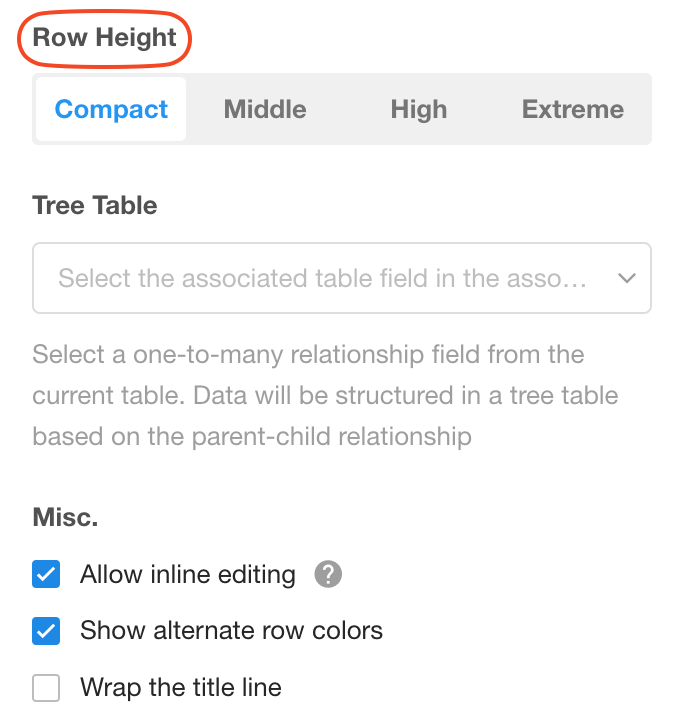
Row height and column width
The table of related records can have customized row heights and column widths.
-
Row Height
Choose the appropriate height in the field settings.
-
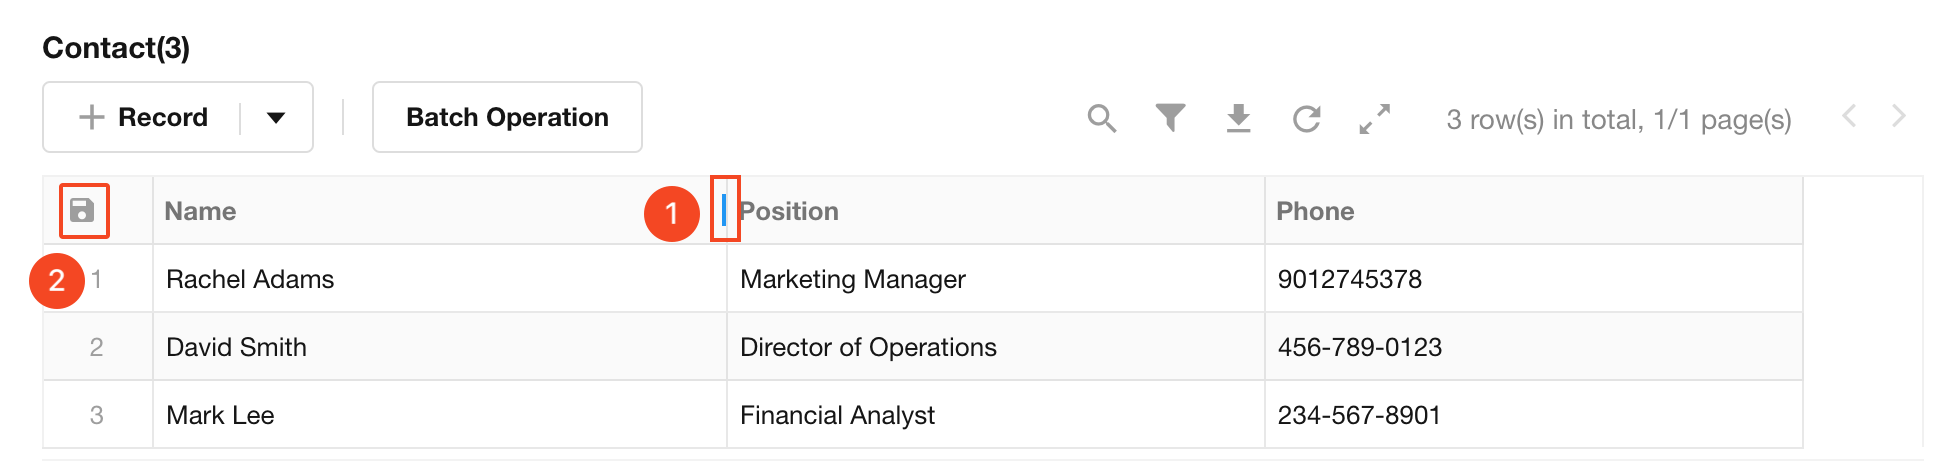
Column Width
Dragto adjust the column width, and then click the Save button on the left. The adjustments made to the table by the applicatiion administrator apply to all members.
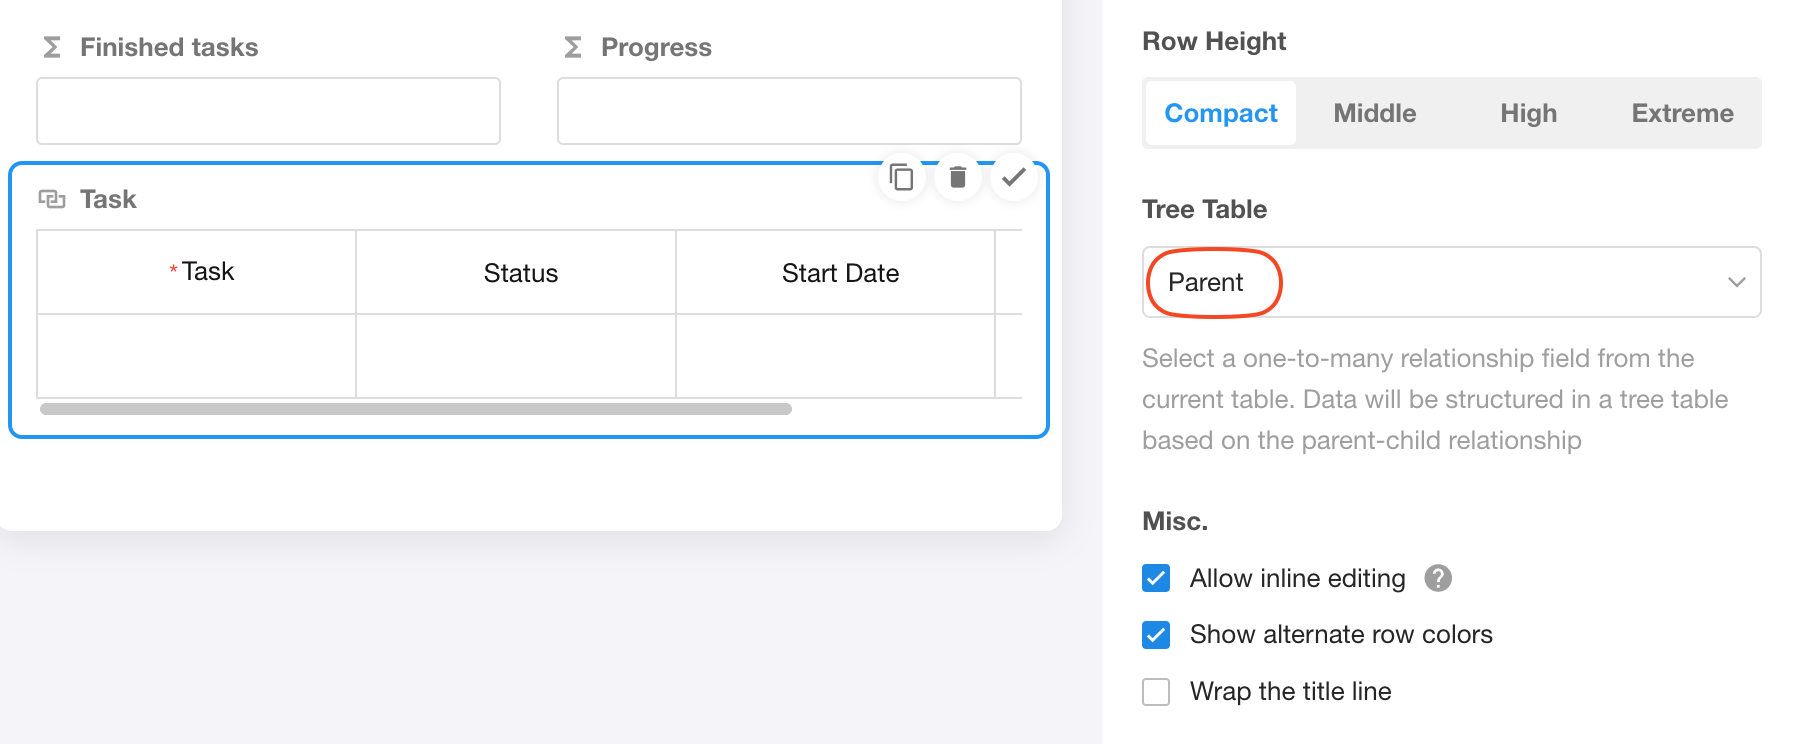
Tree table
For multiple related records, they can be displayed as a tree table, allowing users to visually show hierarchical relationships between data by collapsing or expanding.
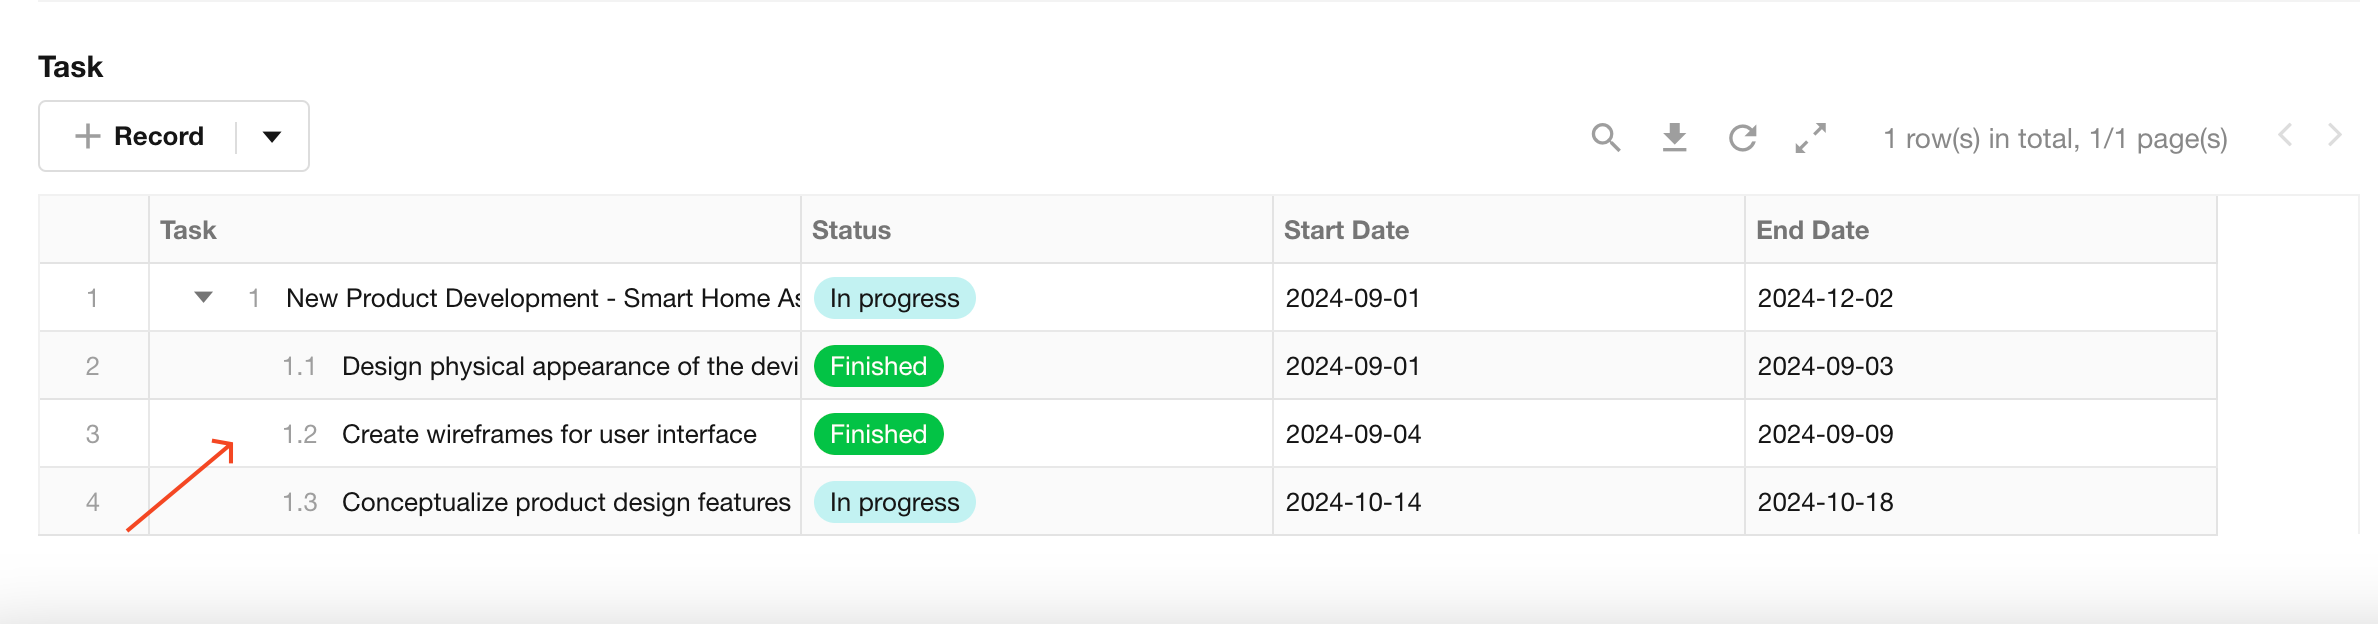
Example: In a project worksheet that is related to tasks, if the task worksheet has configured parent and child tasks, users can select the "Parent Task" field as the basis field in the tree table.
Effect:
Allow inline editing
If checked, users can directly edit cells in the table of related records. If unchecked, fields need to be edited on the record details page.
Show alternate row colors
Showing alternate row colors in the table of related records can improve readability.
Advanced settings
Query settings
When selecting records to be related, users can quickly locate the target record through searching and filtering.
Query: Search and Filter
-
Search fields
Only one field can be specified, and users can choose between exact search or fuzzy search.
-
Filter fields
It supports configuring multiple fields.
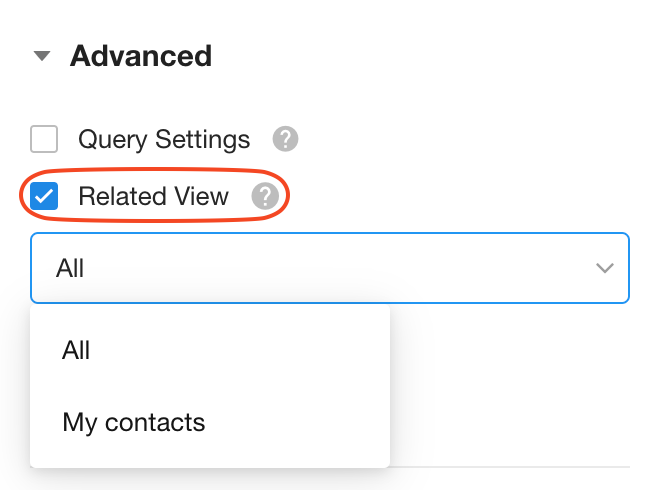
Related view
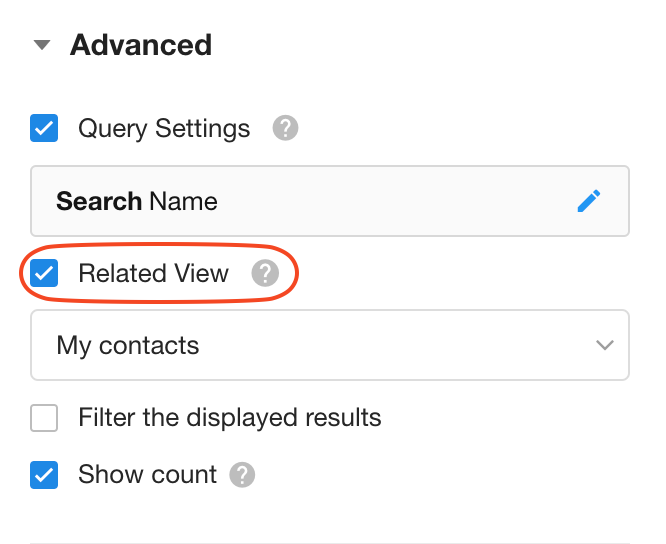
If a related view is set here, it will affect the sorting of related records, the selection range of records that can be related, and the view when opening records.
If the relationship field has already been set with sorting rules and a view in the "Allow opening record" section, those settings take precedence over the settings here.
It is important to note that even if a related record no longer appears in the selected view after being modified later, the relationship still exists.
Filter the displayed results
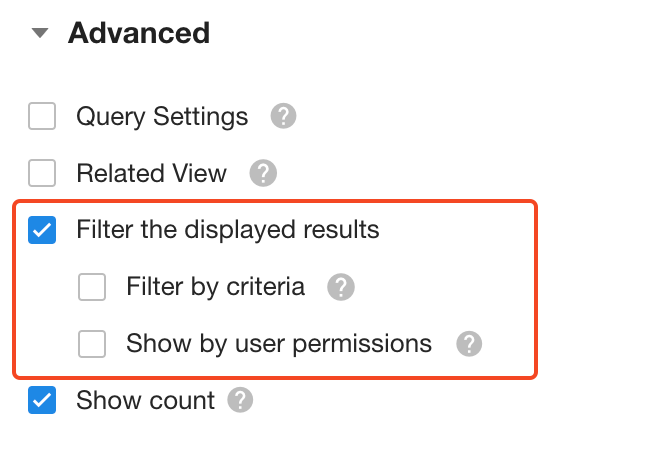
For already related records, users can also filter to display only certain records.
-
Filter by criteria
Set a specific condition to show only related records that meet that condition.
-
Show by user permissions
If checked, data will be displayed based on the operator's permissions on the related worksheet or view, hiding data or fields that are not visible to them.
For records that are hidden due to lack of permissions, it will display "X records are hidden".
Show count
When "Filter the displayed results" and "Filter by user permissions" are set, the number of records displayed may be less than the count. Therefore, it is recommended to uncheck this configuration option.
Mobile settings
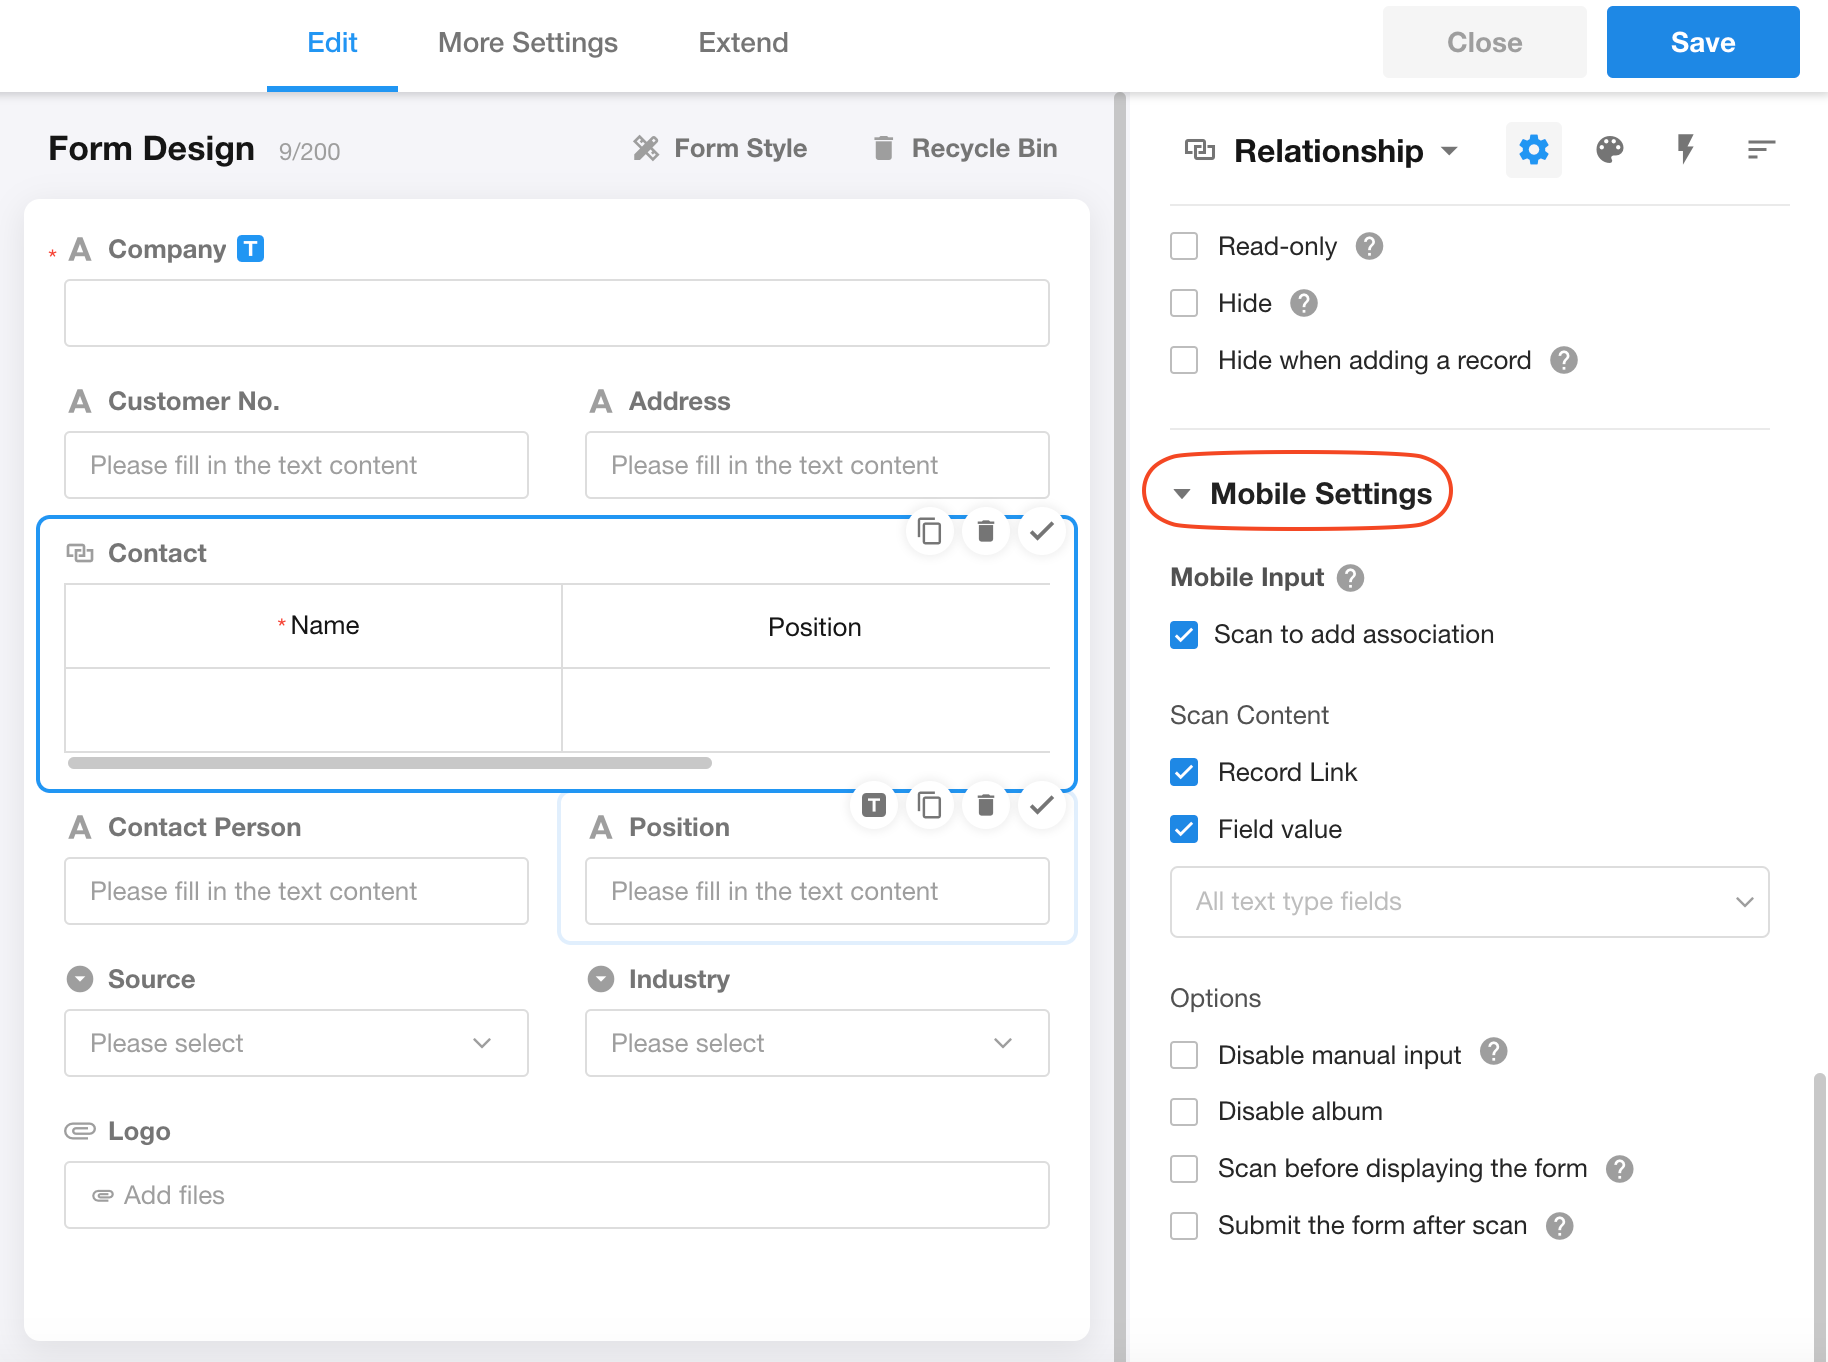
-
Scan content
Scan to add the related record, which means identifying a record based on the scanned content. In addition to using QR codes from record links to locate a specific record, users can also specify a field value to identify the target record for relationship. For example, if you select the Name field, the system will scan the content, recognize the name, and then search for the matching record to establish the relationship.
-
Disable manual input
If checked, users can only add related records by scanning codes on the mobile app. Manual addition of related records is disabled on both the PC and mobile.
-
Disable album
If checked, users can only take photos and cannot select existing images from the album.
-
Scan before displaying the form
If checked, when creating a record on the mobile app, it will first initiate a scan input. This feature also works when filling in through custom buttons.
-
Submit the form after scanning
Automatically submit the form after scanning on the mobile app. This feature also works when filling in through custom buttons.
4. Operations on related records
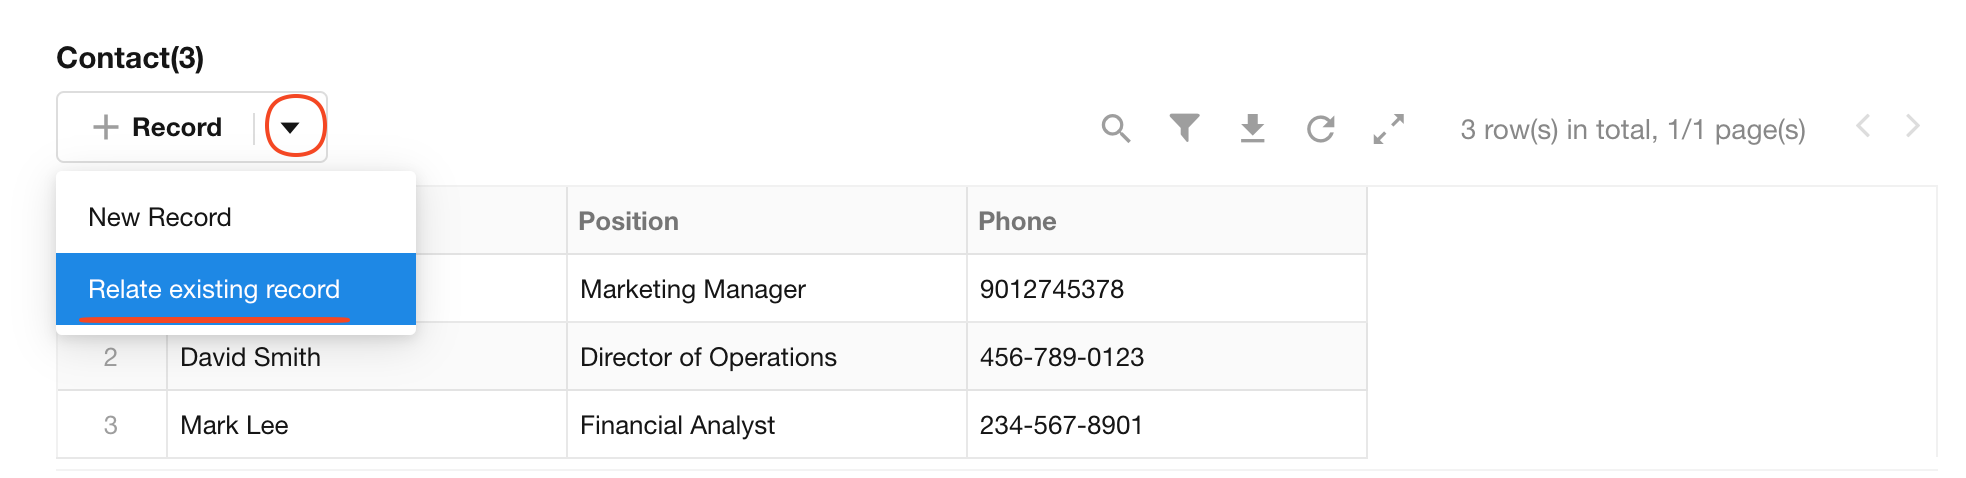
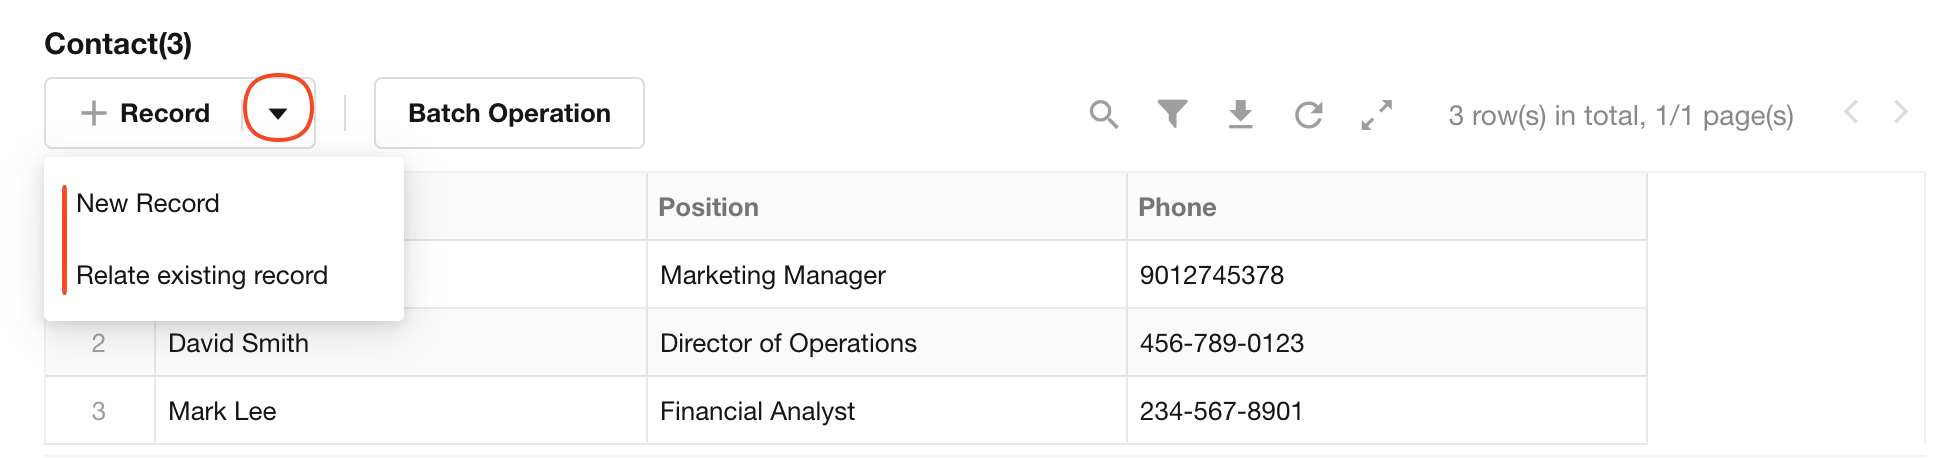
Add related records
New record: Create a record in the related worksheet and automatically relate it with the current record.
Relate existing record: Select an existing record from the related worksheet and relate it.
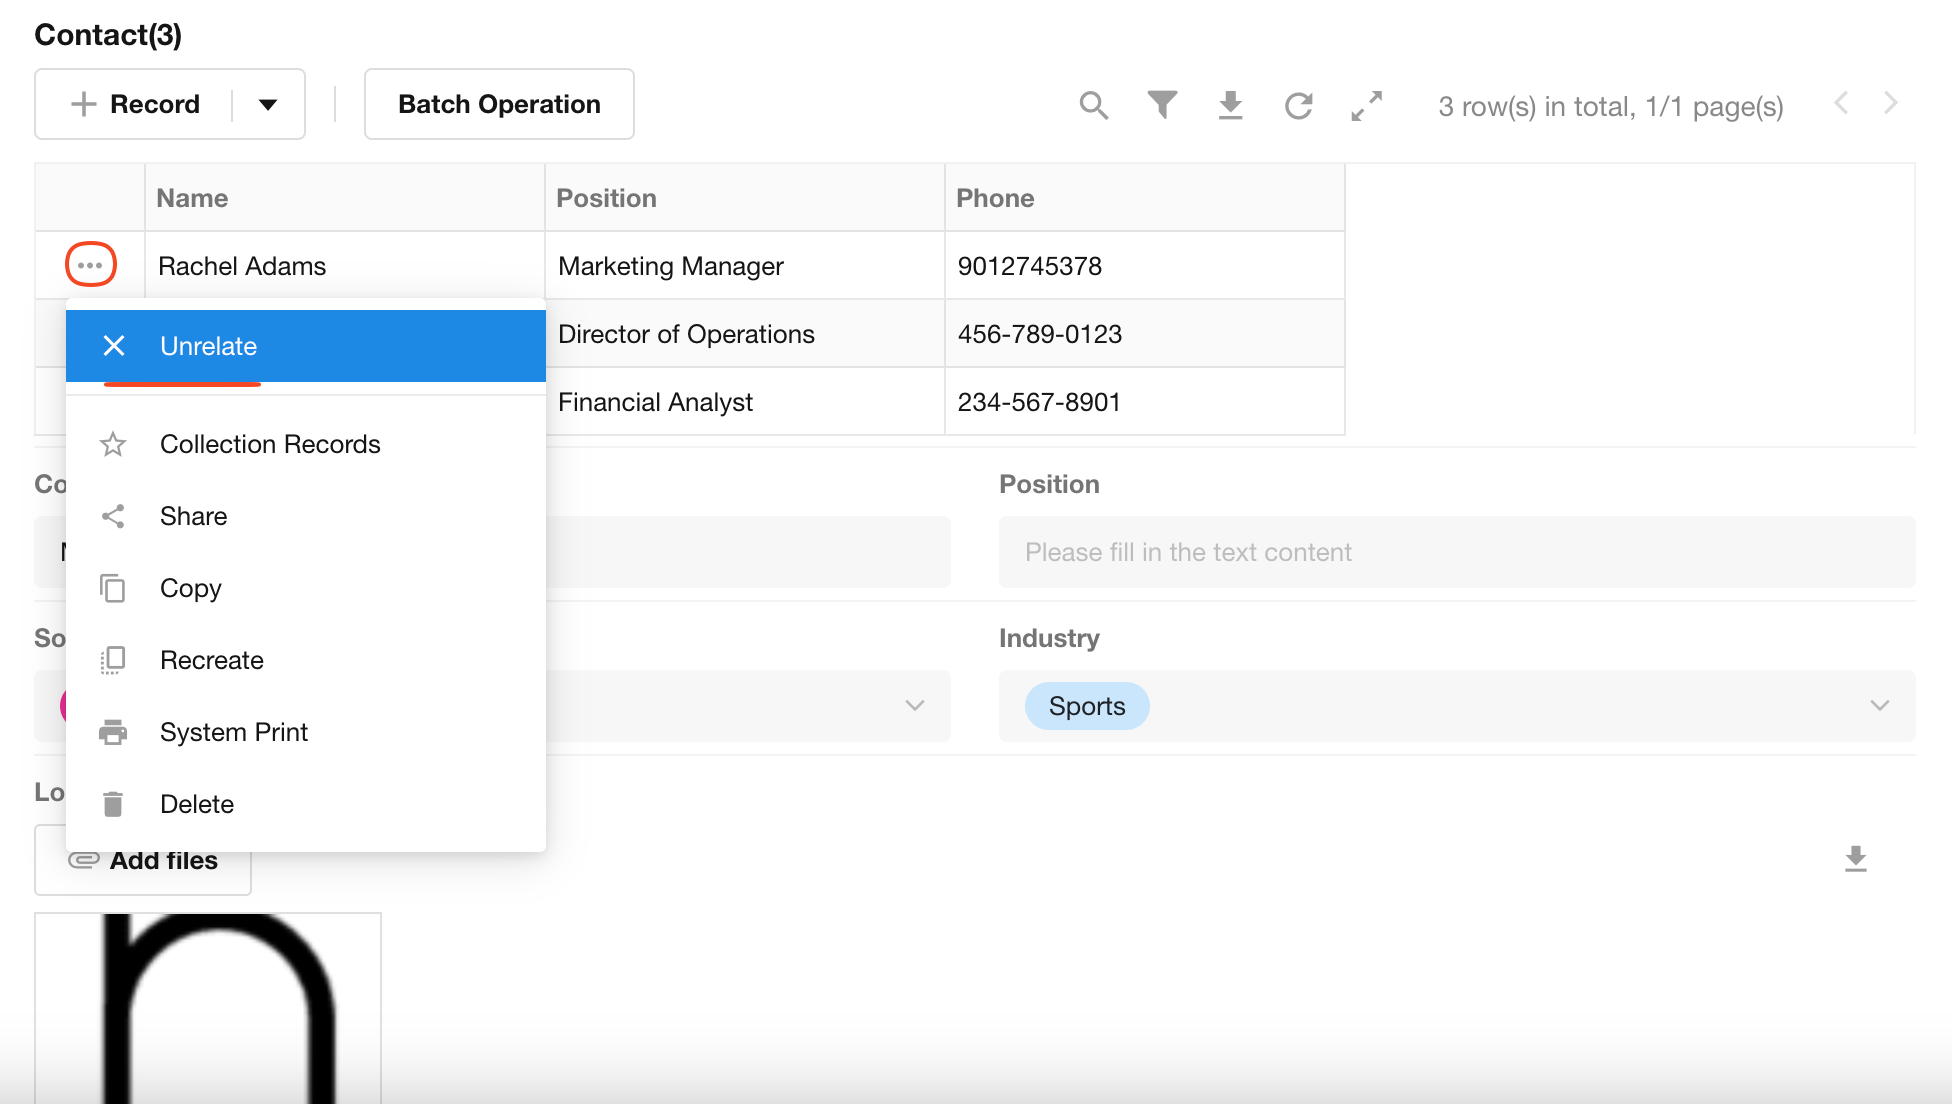
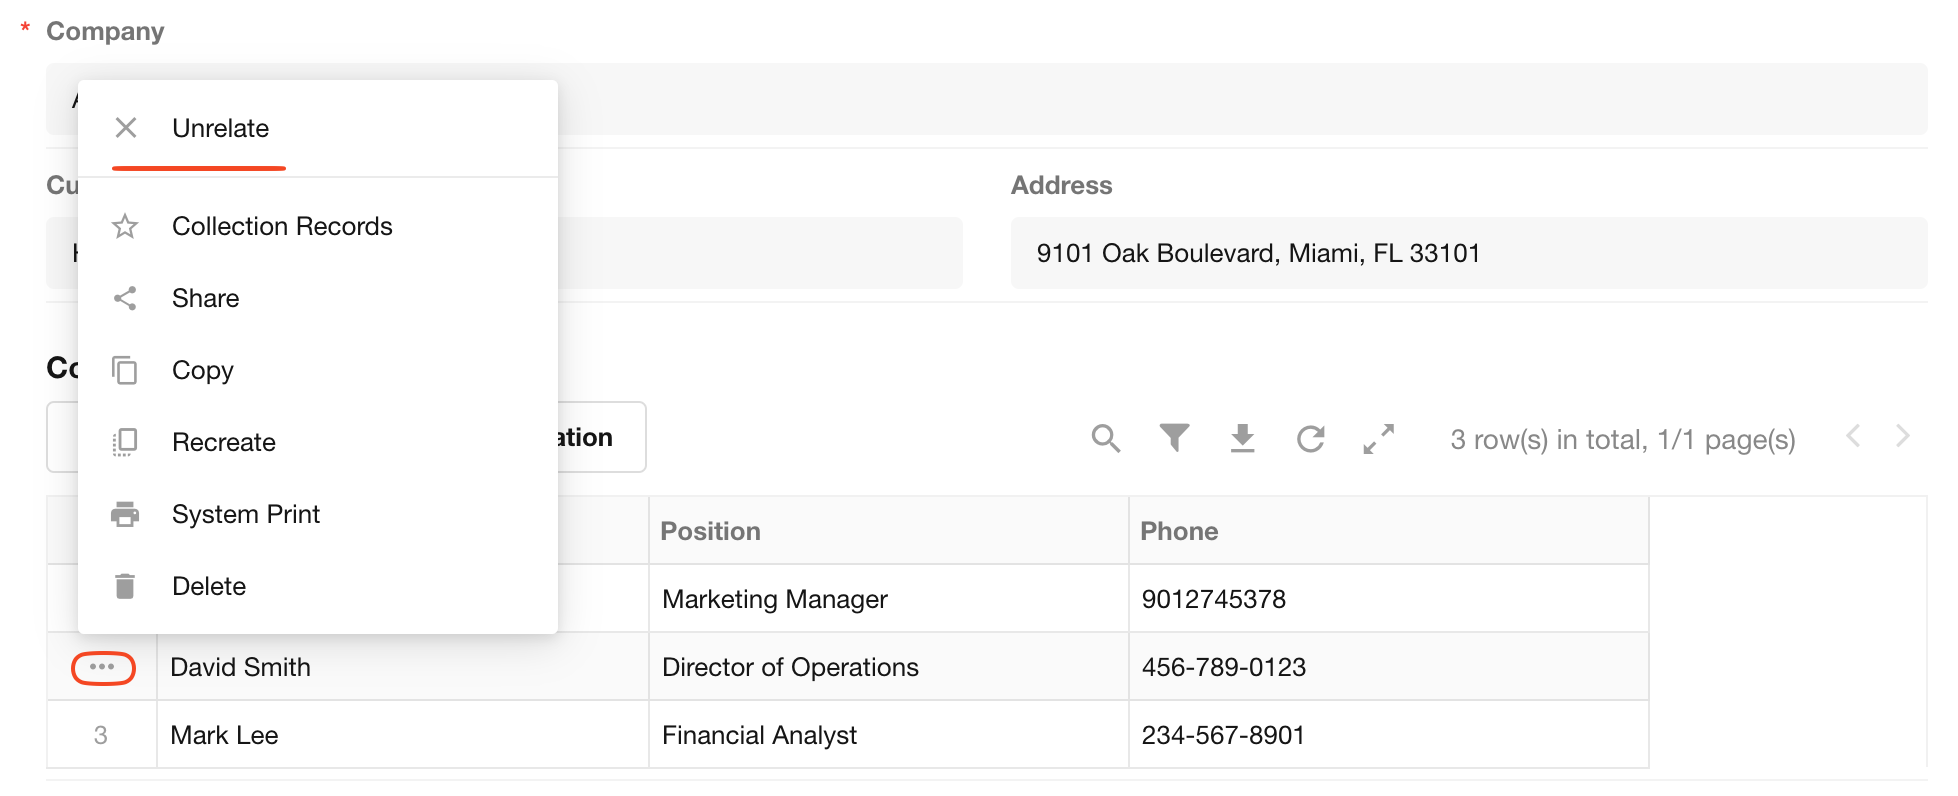
Unrelate records
Unrelating does not delete the record.
Display related records in columns
No additional configuration is needed; the related records just need to be displayed in the tab table.

Was this document helpful?